OZ Lifting Products OZ1500BW User manual

OPERATOR’S MANUAL
CARBON STEEL & STAINLESS STEEL
BRAKE WINCHES
Working Loads: 1000 lbs. 1500 lbs. 2000 lbs.
Please read the Owner’s Manual
carefully before operating
the equipment. Keep this
manual nearby the
equipment at
all times.
CARBON STEEL:
OZ1000BW
OZ1500BW
OZ2000BW
STAINLESS STEEL:
OZ1000BWSS
OZ1500BWSS
OZ2000BWSS
EN pg.1
EN
5455 W. 6th St.
P.O. Box 845
Winona, MN 55987
Distributed by
Tri-State Equipment Company Inc.
www.tsoverheadcrane.com
Tel: (314) 869-7200

EN pg.2
Table of Contents
Pg. 3 . . . . . . . . . . . . . . . . . . . . . . . . . Warranty
Pg. 4 . . . . . . . . . . . . . . . . . . . . . . . . . Important Information and Precautions
Pg. 5 . . . . . . . . . . . . . . . . . . . . . . . . . Warnings and Precautions
Pg. 6 . . . . . . . . . . . . . . . . . . . . . . . . . Installing the Winch
Pg. 7 . . . . . . . . . . . . . . . . . . . . . . . . . Installing the Rope
Pg. 8 . . . . . . . . . . . . . . . . . . . . . . . . . Concept of Operation / Pre-Operation
Pg. 9 . . . . . . . . . . . . . . . . . . . . . . . . . Inspection
Pg. 10 . . . . . . . . . . . . . . . . . . . . . . . . Inspection Chart
Pg. 11 . . . . . . . . . . . . . . . . . . . . . . . . Repair of Winch / Trouble Shooting Chart
Pg. 12 . . . . . . . . . . . . . . . . . . . . . . . . Specications / Performance Characteristics
Pg. 13 . . . . . . . . . . . . . . . . . . . . . . . . Mounting
Pg. 14 . . . . . . . . . . . . . . . . . . . . . . . . Parts
Pg. 15 . . . . . . . . . . . . . . . . . . . . . . . . Parts / Service Notes

EN pg.3
ONE YEAR WARRANTY
OZ Lifting Products LLC® guarantees this product to be free of defects in materials and workmanship for
one year from the date of shipment.
This warranty does not apply to products that show signs of misuse, overloading, alteration, improper
maintenance or negligence. The normal wear and tear of moving parts is excluded from the warranty.
Moving parts are dened as brake discs, wire rope and other wear components that are subject to use
conditions. This warranty does not cover any costs related to removal of this product, lost time, or any other
incidental or consequential damages/costs resulting from the claimed defects.
If this product fails during the rst year of operating due to defective materials or workmanship, it will be
repaired or replaced at the discretion of OZ Lifting Products LLC®. Any product subject to a warranty claim
must be returned, prepaid, to an authorized OZ Lifting Products LLC® warranty depot along with proof of
purchase. Upon repair, the product will be returned to the customer free of charge. If no defect is found,the
customer will be responsible for return shipping costs. The product’s warranty will be effective for the
remainder of the original warranty period (one year from shipment date).
OZ Lifting Products LLC® will not be held liable for the following arising from the use of this product:
injuries to persons or property, death, incidental, consequential, or contingent damages, whether negligent
or deliberate. It is the sole responsibility of the owner to install and operate the product properly and safely.
This is OZ Lifting Products LLC®‘s only written warranty. This warranty is in lieu of all other warranties
implied by law such as merchantability and tness. The sale of products from OZ Lifting Products LLC®
under any other warranty or guarantee, expressed or implied, is not authorized.
NOTE: OZ Lifting Products LLC® has the right to alter the design of or discontinue the production of any
product without prior notice.
For more information please contact:
P.O. Box 845, Winona, MN 55987
Distributed by Tri-State Equipment Company Inc.
www.tsoverheadcrane.com
Tel: (314) 869-7200

Important Information and Precautions
The information in this manual should be used only for the OZ Lifting Brake Winches. This manual contains
general instructions dealing with the normal installation, operation, and maintenance of the products
described herein. The information provided should not be expected to prepare the user for all possible
circumstances.
This product should not be installed, operated, or maintained by any person who has not read all the
contents of these instructions. Failure to read and comply with these instructions, warnings, or limitations
noted might result in bodily injury, death, or property damage. Contact the distributor for further explanation
if information is not fully understood.
It is the responsibility of the owner/user to install, test, maintain, and operate these products in accordance
with OSHA, regulations, other federal, state, and local regulations, and ANSI standards.
Only trained and qualied personnel shall operate and maintain this equipment.
Maintain Records
Schedule and maintain records of regular inspection and maintenance of the product in compliance with
ANSI/ASME standards. Record your Brake Winch serial number and purchase date on the front cover of
this manual to allow for easier referencing.
Precautions
Do not use OZ Lifting Products in conjunction with other equipment unless the system designer,
manufacturer, installer, or user has put the necessary safety devices in place. Modications to upgrade or
alter these products should only be authorized by the original manufacturer.
Brake Winches should be used for holding loads only within their load ratings.
These Brake Winches meet or exceed CE and ANSI/ASME standards
EN pg.4

EN pg.5
Warnings and Precautions
Failure to read and comply with the following warnings may result in a hazardous situation that
could lead to death, serious injury, or property damage. Keep this manual near the equipment at all
times. Do not remove, alter, or obscure the labels attached to the winch. Contact OZ Lifting Prod-
ucts LLC. for replacement manuals and labels.
Do Not operate until all personnel are warned or cleared from the area.
Do Not lift people or lift loads over people.
Do Not allow people anywhere near the potential path of wire rope that could snap.
Do Not allow people or situations to become distractions while operating the winch.
Do Not alter the equipment.
Do Not operate a damaged or malfunctioning product.
Do Not leave a suspended load unattended without taking proper precautions.
Do Not operate without verifying wire rope is installed securely to winch drum.
Do Not operate with any power other than manual.
Do Not operate without a minimum of 4 anchor wraps of wire rope on the drum.
Do Not get close to moving parts of the equipment including drum, gears, wire rope.
Do Not lift more than the designated load rating of the winch or other system parts.
Do Not use more than one winch to lift a load, unless the system is so designed.
Do Not lift or pull loads on an incline without a brake installed on the equipment.
Do Not use if the load is not suspended vertically.
Do Not use the equipment if guards are removed or improperly installed.
Do Not allow the load to swing or jerk and avoid shock loads by operating smoothly.
Do Not weld on the lifted load.
Do Not secure load by wrapping wire rope around it, instead use rigging connectors.

EN pg.6
Installing the Winch
Choosing a location
• Have a qualied professional conrm that the foundation complies with local codes, is rigid and level,
and will support the winch under all load conditions.
• Avoid areas with corrosives, ammables, combustibles, explosives, and other potentially
damaging materials.
• Avoid areas dened as hazardous by the National Electric Code, unless proper authorization is received.
• Situate the winch where the operator can avoid the load area and the potential path of snapping
wire rope.
• Situate the winch in a place where it can be seen throughout the whole operation.
• Avoid areas with potential interferences such as trafc and obstacles.
• Ensure the winch is easily accessible for operation and routine maintenance.
Installation
1. Use a eet angle between ½ and 1 ½ degrees.
• This angle permits the rope to spool more evenly onto the drum, reducing harm to the wire rope.
2. Do Not weld the winch frame to the foundation.
• Doing so would invalidate the warranty.
• Contact OZ Lifting Products LLC. for more information.
3. Fasten the winch rmly to the foundation.
• For standard products use 3/8 inch coarse thread fasteners of at least grade 5 with a torque of 30 ft. lb.
without lubrication. Use safe engineering practices to assure that the mounting holes are attached rmly to
a solid foundation that will support the winch and load in all situations.
4. Install the Sheave Roller or Roller Guide.
• It is recommended to use a sheave roller or roller guide to direct the wire rope onto the drum.
• Follow recommendations of the sheave manufacturer on installation and use.
• Install sheaves, tracks, and other equipment so that they stay rmly in place in all load situations.
• Select sheaves of a suitable diameter to lessen damage to the wire rope.
Maintain Fleet Angle
1. Wire rope moves over sheave or through the roller guide. Situate sheave or guide an acceptable
distance from the drum (distance “A”)
2. Wire rope moves directly to the load. Use tracks or guide rails to prevent sideway movements that can
stress and harm the drum ange.
Load
Tracks or�
guide rails Center line
Smooth drum
1/2 to 1-1/2 Degrees

EN pg.7
Installing the Wire Rope
• Ensure the wire rope spools correctly and is attached rmly to the winch drum to prevent release of the load.
• Wear protective clothing when working with the wire rope.
• Prevent damage to the rope by keeping it clean and not allowing it to pass through dirt or debris.
Consider the following information when choosing
the proper wire rope.
• Lay of the rope should match the winding direction of the drum.
• Breaking strength should be at least 3 times greater than the largest load when pulling on a horizontal
surface. 5 times that if loads are lifted or pulled at inclines.
• OZ Lifting advises a 7 x 19 galvanized aircraft cable be used for diameters up to 5/16 inch.
• Contact a wire rope supplier for further assistance.
Installation
1. Use a ange clip or quick disconnect anchor to anchor the rope to the drum.
a. Flange Clip Anchor
i. Thread the end of the wire rope through the ange hole.
ii. Connect the carriage bolt and wrap the wire rope around it.
iii. Fit the clip on so that it holds the wire rope with its curves.
iv. Tighten the jam nut on until it attens the wire rope against the drum ange.
b. Quick Disconnect Anchor
i. Insert the End Stop through the center hole in the drum ange.
ii. Pull the wire rope and the end stop into the slot.
2. Spool the rope onto the drum by turning the handle clockwise.
a. If the rope unwinds it needs to be re-installed correctly before continuing.
3. Keep the rope under tension, and using the winch, spool four full wraps of rope onto the drum.
Drum End View
Drum End View

Concept of Operation
1. Assure that the total force needed to lift the load does not surpass the load rating of the winch.
2. Follow all recommended maintenance and inspections to monitor for any damage that could contribute
additional weight to the equipment.
3. A disc brake should be used if loads will be lifted or pulled on an incline.
4. Be aware of variables affecting performance ratings of the equipment.
a. Loose spooling and overlapping of the wire rope affects drum capacity. Actual drum capacities are
25-30% less than those listed in performance tables.
b. As rope spools around the drum, the force needed to lift the load increases and the load rating of the
winch decreases.
i. Performance table values are based on a drum without rope and with a maximum handle length.
ii. The load rating is the greatest pull that can be applied on new equipment without damage or other
factors affecting its operation.
5. Maintain the correct eet angle and keep sufcient tension on the rope so it winds evenly.
6. Take in consideration the factors that can affect the duty rating.
a. Equipment Maintenance
i. Perform preventative maintenance and inspections to check for damage or defects on a regular basis.
ii. Keep the winch clean and free of debris.
b. Environmental Conditions
i. Avoid exposure to extreme temperatures, excessive dirt, wet conditions, ammables, combustibles,
explosives, and other potentially damaging materials.
c. Loading Conditions
i. Do not exceed maximum load ratings or shock load.
d. Frequency of Use
i. Monitor the equipment’s parts often as frequency of use increases. More use will increase wear and
shorten the life span of the parts.
Pre-Operation
• Be certain that no hazards will interfere with any part of operation and the load will have adequate clear
space to be moved.
• Complete all recommended inspections and any maintenance that are due.
• Assure that the operator is well rested, has up to date training on the equipment, and has proper personal
protective equipment including hardhat, safety shoes and eyewear, work gloves, and no loose tting
clothing or jewelry.
• Know the total force of the load so that the load rating of the equipment is not surpassed.
EN pg.8

Inspections
In order to maintain quality operation of the product, a regular inspection schedule should be set up by
each operator. All inspections should be reported and maintained in a dated record log. These records
should be available to all personnel involved with the product, and should be made available to OZ Lifting
Products LLC. when a warranty issue is in question.
Denitions
The following denitions are from the ANSI/ASME B30.21 and will be used in the inspections procedure
that follows.
Designated Person- a person who is selected or assigned as being competent to perform specic duties
to which they are assigned.
Qualied Person- a person that by possession of a recognized degree or certicate of professional
standing, or through extensive knowledge, training, and experience, has successfully demonstrated they
are able to resolve problems relating to the subject matter and work.
Normal Service- service that involves operation with randomly distributed loads within the rated load limit,
or uniform loads less than 65% of rated load for not more than 15% of the time.
Heavy Service- service that involves operation within the rated load limit and exceeds normal service.
Severe Service- service that involves normal or heavy service with abnormal operating conditions.
Inspection Classications
Frequent Inspections- The operator or designated person performs frequent inspections by doing a visual
examination and by listening for unusual sounds during operation. These inspections are usually performed
before each operation, every few hours in operation, and if problems arise.
Periodic Inspections- A designated person performs periodic inspections, which are more detailed
inspection, by doing visual examinations of internal and external conditions. These inspections are done on
the following schedule:
*Normal Service- Semi-annually
*Heavy and Severe Service- Quarterly
*Also perform following storage and return to use, if a possible shock load has occurred, and if operation
issues arise.
Label Equipment as “Out of Service” if damaged or maintenance is required
• Discontinue use of wire rope and equipment if damage or overloading occurs.
EN pg.9

Take note of the following regarding inspections.
• Brakes require more than audible and visual inspection. Check daily by operating with and without a load,
stopping at various positions to ensure safe operation. If the load coasts or creeps contact the factory for
friction disc replacements.
• Proper inspection may require disassembly of some parts. Contact the factory before doing so or the
applicable warranty may be voided.
• For wire rope inspections please contact the specic manufacturer of the rope. The inspection provided in
the chart below is for a general inspection only and is in no way the complete inspection required.
• Before operation assure all deciencies on the inspection chart are resolved and inspections are up to
date. Refer to troubleshooting chart for further assistance.
Inspection Chart
Frequent Inspection (F) and Periodic Inspection (P)
Location Check For F P
General Paint chipping or excessive wear X
Damage, cracks, rust, dents excess wear, or corrosion. X
Unusual sounds X
Smooth load movements X
Winch lubricated X
Signs of overloading (cracks, dents, or damage) X
Proper function when operated with a load equal to the load rating X
Foundation Good condition/Supports the winch under all conditions X
Cracks, corrosion, damage X
Brake Assembly Ratchet pawl clicks rmly as handle is turned clockwise X
Proper operation X
Corrosion, cracks, damage, or wear X
Fasteners Firmly installed X
Properly tightened X
Stripped threads, bent, or damage (check by removing winch from the foundation) X
Gears, bearings, shafts Excess wear, cracks, corrosion, or damage X
Well lubricated X
Handle Rotates freely in both directions X
End Connections Corrosion, excess wear, rust, or damage X
Attached rmly X
Drum Excess wear or distortion of anchor hole X
Excess movement due to misaligned gears, bearings, shafts (check by moving the drum by hand) X
Load Hook Bent, twisted or damaged X
Hook latch doesn’t close when released X
Securely attached to wire rope with no fraying or damage to the rope X
Frame Bent, cracks, or damage (signs of overloading) X
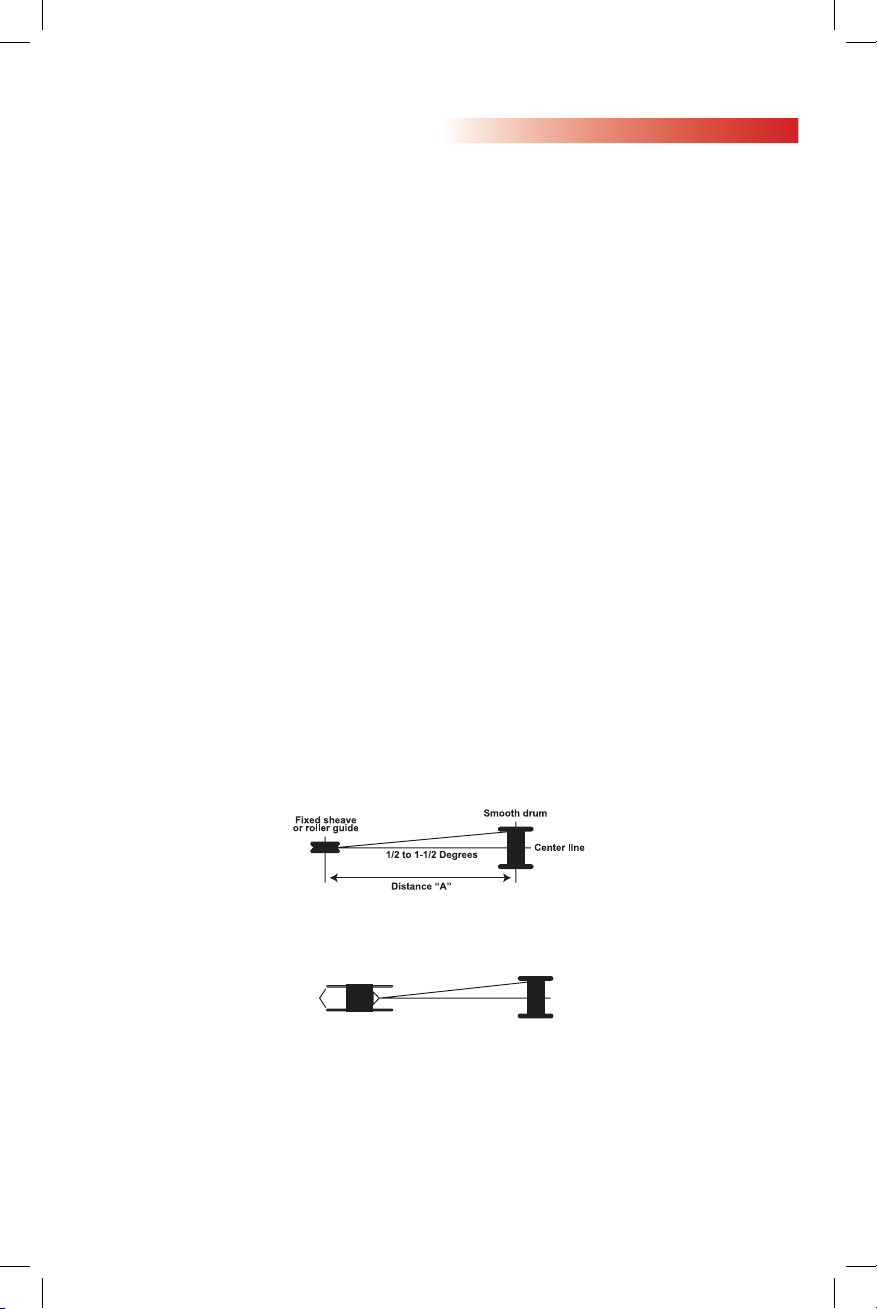
Wire rope Installed correctly X
Wound tightly and evenly on drum X
No visible damage to entire rope X
Labels Not been removed, altered, or obscured (Contact factory for replacements) X
EN pg.10

Repair of the Winch
All repairs must have factory authorization. Contact OZ Lifting LLC. to prevent voiding of the warranty and
potential damage to the winch.
Perform recommended inspections to identify which parts should be replaced.
• Only use OZ Lifting Products LLC. replacement parts.
• Contact the local OZ Lifting Products LLC. dealer for replacement parts. Please have the serial number
and part number and description available when calling.
Protect the winch from damage and corrosion by monitoring for paint chipping or excess wear.
• Renish any problem areas by removing paint to the bare metal, cleaning the area well and repainting
with a high quality primer and nish coat.
Troubleshooting Chart
Contact OZ Lifting Products LLC. if disassembly of the winch or brake is required. The warranty will be
voided if this is not done.
Problem Possible Cause Correction
Brake distance too long Discs are worn, damaged, or over lubricated Replace
Disc brake ratchet pawl damaged or worn Replace
Excess wear on gears or bearings Overloaded Reduce load
Improper lubrication Relubricate
Drum not turning (handle functioning okay) Damaged or loose spring pins Repair
Gears broke, stripped, or loose Repair/Replace
Difculty turning handle or not turning at all Heavy load Reduce load
Disc brake damaged or locked Repair
Gears or bearings damaged or locked Repair
Spring pins loose or damaged Repair
High pitched squeak Improper lubrication Relubricate
Grinding noise Dirty lubrication Clean and relubricate
Dirty brakes or gears Clean
Broken gears or bearings Replace
Rattling noise Loose bolts, screws, fasteners Tighten
No clicking noise in brake Ratchet not properly installed Install correctly
Ratchet pawl damaged or worn Replace
Uneven brake clicking Broken gear tooth Replace
Dull brake clicking Dirty or damaged spring or ratchet pawl Clean or repair
Excess wear of brake ratchet pawl, spring, or gear Replace
EN pg.11

EN pg.12
Specications
A
B L
C
M
K
F
E
D
H
I J
G
Performance Characteristics
Model/Wire rope diameter (in.) 1st layer Mid drum Full drum
OZ1000BW - OZ1000BWSS with 1/8” wire rope 7 ft. 74 ft. 140 ft.
OZ1000BW - OZ1000BWSS with 3/16” wire rope 5 ft. 34 ft. 75 ft.
OZ1500BW - OZ1500BWSS with 3/16” wire rope 7 ft. 66 ft. 140 ft.
OZ1500BW - OZ1500BWSS with 1/4” wire rope 5 ft. 27 ft. 89 ft.
OZ2000BW - OZ2000BWSS with 1/4” wire rope 8 ft. 36 ft. 85 ft.
OZ2000BW - OZ2000BWSS with 5/16” wire rope 7 ft. 22 ft. 52 ft.
Load rating
OZ1000BW - OZ1000BWSS 1000 lbs. 750 lbs. 500 lbs.
OZ1500BW - OZ1500BWSS 1500 lbs. 1250 lbs. 750 lbs.
OZ2000BW - OZ2000BWSS 2000 lbs. 1500 lbs. 1000 lbs.
*Actual drum capacities may be 25-30% less, due to nonuniform winding. Wire rope tension will also affect drum capacity.
Model OZ1000BW - OZ1000BWSS OZ1500BW - OZ1500BWSS OZ2000BW - OZ2000BWSS
Safe Working Load (lbs.) 1000 lbs. 1500 lbs. 2000 lbs.
Gear Ratio 4.2:1 5:1 10:1
Dimensions (in.) A 6.22” 7.73” 8.35”
B 7.20” 9.36” 11.10”
C 3.46” 4.21” 5.00”
D 8.26” 12.68” 12.99”
E 1.06” 1.06” 1.06”
F 10.43” 10.63” 11.81”
G 1.98” 2.30” 2.52”
H 4.29” 4.29” 4.29”
I 1.90” 2.38” 3.00”
J 5.33” 7.00” 7.09”
K 10.20” 15.31” 15.35”
L 5.98” 6.89” 7.87”
M 0.12” 0.14” 0.16”
Net Weight (lbs.) 8.15 lbs. 16.97 lbs. 22.06 lbs.

EN pg.13
Mounting
OZ1000BW
OZ1000BWSS
N= 1.73”
O= 3.46”
P= 1.30”
Q= 5.43”
R= 0.94”
S= 0.79”
T= 1.06”
U= 1.57”
V= 0.41”
W= 0.41” x 1.65”
X= 0.51”
Y= 0.63”
OZ2000BW
OZ2000BWSS
N= 2.50”
O= 5.00”
P= 6.36”
Q= 9.45”
R= 1.94”
S= 1.50”
T= 1.66”
U= 3.00”
V= 0.39”
W= 0.39” x 1.77”
X= 4.70”
Y= 0.39”x0.78”
Z= 1.15”
OZ1500BW
OZ1500BWSS
N= 2.10”
O= 4.20”
P= 5.28”
Q= 7.56”
R= 0.72”
S= 1.38”
T= 0.79”
U= 2.76”
V= 0.39”
W= 0.39” x 2.17”
X= 4.49”
Y= 1.14”
Z= 1.14”

EN pg.14
Parts
1. Nut (1)
2. Screw (1)
3. Drum (1)
4. Cover (1)
5. Mounting Base (1)
6. Snap Ring (2)
7. Ratchet Pawl (2)
8. Retaining Ring (2)
9. Shaft (1)
10. Rachet (1)
1. Nut (1)
2. Screw (1)
3. Drum (1)
4. Cover (1)
5. Mounting Base (1)
6. Snap Ring (2)
7. Ratchet Pawl (1)
8. Retaining Ring (1)
9. Bolt (1)
10. Friction Brake (2)
11. Friction Brake (2)
12. Clip (1)
13. Shaft (1)
14. Cover Part (1)
15. Washer 6 (5)
16. Bolt (5)
17. Nut (1)
18. Washer (1)
19. Support Rod (1)
20. Nut (1)
11. Rachet (1)
12. Clip (1)
13. Shaft (1)
14. Cover Part (1)
15. Washer (4)
16. Bolt (2)
17. Bolt (2)
18. Nut (1)
19. Washer (1)
20. Retaining Ring (2)
21. Retaining Ring (2)
22. Washer (2)
23. Gear (1)
24. Clip (1)
25. Bolt (1)
26. Washer (1)
27. Retaining Ring (1)
28. Handle (1)
29. Washer (1)
30. Nut (1)
40. Wire Rope Clip
21. Washer (2)
22. Nut (2)
23. Gear (1)
24. Clip (1)
25. Washer (1)
26. Retaining Ring (1)
27. Handle (1)
28. Washer (1)
29. Nut (1)
40. Wire Rope Cip (1)
OZ1500BW - OZ1500BWSS
OZ1000BW - OZ1000BWSS

Service Notes
EN pg.15
Parts
1. Nut (1)
2. Screw (1)
3. Drum (1)
4. Cover (1)
5. Nut (1)
6. Munting Base (1)
7. Snap Ring (2)
8. Ratchet Pawl (2)
9. Retaining Ring (2)
10. Bolt (2)
11. Shaft (1)
12. Rataining Ring (1)
13. Washer (1)
14. Gear (1)
15. Gear (1)
16. Shaft (1)
17. Shaft (1)
18. Cover Part (1)
19. Washer (6)
20. Bolt (3)
21. Washer (1)
22. Retaining Ring (1)
23. Handle (1)
24. Washer (1)
25. Nut (1)
26. Nut (1)
27. Washer (1)
28. Bolt (1)
29. Washer (1)
30. Support Pipe (1)
31. Retaining Ring (2)
32. Washer (2)
33. Support Rod (1)
34. Gear (1)
35. Clip (1)
36. Friction Brake (2)
37. Ratchet (1)
38. Clip (1)
39. Bolt (1)
40. Wire Rope Clip (1)
OZ2000BW - OZ2000BWSS


Rev. 01/17/23
5455 W. 6th St.
P.O. Box 845
Winona, MN 55987
Distributed by
Tri-State Equipment Company Inc.
www.tsoverheadcrane.com
Tel: (314) 869-7200

ELECTRIC WINCH RATING*
5% 10% 20% 30% 50% 70%
(3°) (6°) (11°) (17°) (26°) (35°)
SA5000AC, 8,000 lbs. 6,000 lbs. 4,000 lbs. 3,100 lbs. 2,200 lbs. 1,800 lbs. 1,200 lbs.
SA5015AC 3,629 kg 2,722 kg 1,814 kg 1,406 kg 998 kg ,816 kg ,545 kg
SA7000AC, 12,000 lbs. 9,000 lbs. 6,100 lbs. 4,600 lbs. 3,300 lbs. 2,700 lbs. 1,800 lbs.
SA7015AC 5,443 kg 4,082 kg 2,767 kg 2,087 kg 1,497 kg 1,225 kg ,817 kg
18,000 lbs.13,500 lbs. 9,100 lbs. 6,900 lbs. 5,000 lbs. 4,100 lbs. 2,700 lbs.
8,165 kg 6,124 kg 4,128 kg 3,130 kg 2,268 kg 1,860 kg 1,226 kg
SA12000AC, 26,700 lbs. 20,100 lbs.13,600 lbs.10,300 lbs. 7,400 lbs. 6,100 lbs. 4,000 lbs.
SA12015AC 12,111 kg 9,117 kg 6,169 kg 4,672 kg 3,357 kg 2,767 kg 1,816 kg
R
120 Volt AC
ELECTRIC WINCHES
DOUBLE LINE OPERATION
Models SA7000AC, SA7015AC, SA12000AC and
SA12015AC are factory equipped with a pulley
block and hook and 50’ of cable for double line
operation. This increases the pulling capacity of the
winch as shown, however, care must be taken to
allow adequate motor cooling. Note that with dou-
ble line, a pull of 25’ requires reeling in 50’ of cable.
For intermittent use only. Ratings at left are based
on 10’ pull. For longer pulls motor cooling periods
must be allowed.
CAUTION: CONTINUOUS RUNNING IN
EXCESS OF 3 MINUTES WILL DAMAGE WINCH
MOTOR.
GUIDE TO ROLLING LOAD CAPACITY**
Maximum weight in pounds and kilograms rolling load.
APPROXIMATE LOAD
SPEED (FT./MIN.)
MODEL PERCENT INCLINE
LOAD
CAPACITY*
(*) Load capacity (dead weight) is a measure of actual maximum force to which the
winch system may be subjected.
(**) All capacities shown are with 15’ of cable on the reel and 10% rolling friction factor.
For full reel of cable adjust capacities according to graph above. Note 5% incline is
one-half foot rise in ten feet.
WINCH RATINGS
OWNER’S
MANUAL
5000
4500
4000
3500
3000
2500
2000
1500
1000
500
DEAD WEIGHT CAPACITY (LBS.)*
LENGTH OF CABLE ON REEL (FT.)
10 20 30 40 50
SA9000AC, SA9010AC, SA9015AC single line
SA12000AC, SA12015AC double line
SA7000AC, SA7015AC double line
SA5000AC, SA5015AC single line
WARNING: NOT TO BE
USED AS A HOIST FOR
LIFTING, SUPPORTING OR
TRANSPORTING PEOPLE OR
LOADS OVER AREAS WHERE
PEOPLE COULD BE PRESENT!
NO LOAD FULL LOAD
Full Empty Full Empty
Reel Reel Reel Reel
35 16 16 9
17.5 8 9.5 6
18 6 7 3.5
9 3 4 2
WARNING: READ INSTRUCTIONS CAREFULLY BEFORE
ATTEMPTING TO INSTALL, OPERATE OR SERVICE THE STRONGARM
ELECTRIC WINCH. FAILURE TO COMPLY WITH INSTRUCTIONS COULD RESULT
IN SERIOUS OR FATAL INJURY. RETAIN INSTRUCTIONS FOR FUTURE REFERENCE.
MODELS SA5000AC, SA5015AC, SA7000AC, SA7015AC,
SA9000AC, SA9010AC, SA9015AC, SA12000AC & SA12015AC
SA9000AC,
SA9010AC,
SA9015AC
SA5000AC,
SA5015AC
SA7000AC,
SA7015AC
SA12000AC,
SA12015AC
SA9000AC, SA9010AC
SA9015AC

WARNING: FAILURE TO READ AND
FOLLOW INSTRUCTIONS BELOW COULD
RESULT IN SERIOUS OR FATAL INJURY.
WARNING: NOT TO BE USED AS A HOIST
FOR LIFTING, SUPPORTING, OR
TRANSPORTING PEOPLE OR LOADS OVER
AREAS WHERE PEOPLE COULD BE
PRESENT.
This winch is not designed for movement of
human beings. Do not use for scaffolding,
elevators, or any other application in which
persons could be positioned on or under the
load at any time. Do not use as an overhead
hoist.
This electric winch should be respected as
power equipment. High forces are created when
using a winch, creating potential safety hazards.
Never allow children or anyone who is not
familiar with the operation of the winch to use it.
Never exceed rated winch capacity.
Dangerously high forces can be created if the
load being moved is too large or is allowed to
get in a bind, etc. Note that installing longer
than normal cable results in increased load
on winch. If overloaded, this winch has power
enough to break the cable.
Inspect the winch cable often and replace at the
first sign of damage. Never exceed the winch
capacity. When cable breaks under tension, it
tends to whip toward the winch area. It is
recommended that a blanket or rug be placed
over the cable during winching operations to
minimize this whipping action in case of cable
breakage.
Never apply load to winch with cable fully
extended. Keep at least three turns of cable on
the reel.
IMPORTANT SAFETY INFORMATION
Keep the winching area free of all unnecessary
personnel. Never stand between load and
winch.
When winching operation has been completed,
do not depend on the winch to support the
load. Always secure the load properly. Use tie
down straps or chains.
The auxiliary handle is provided for emergency
use only. Never use the auxiliary handle as an
assist to the motor when the motor is running.
Always remove the auxiliary handle when it is
not in use. Do not operate the winch motor
with the handle installed.
Keep hands and fingers clear of the drum and
cable area of the winch when operating. Do
not attempt to guide the cable by hand as it
rewinds on the drum.
Special care should be taken with 120-volt AC
winch, as with any other 120-volt tools. Some
winch models are equipped with a ground fault
circuit interrupter in the power cord. Read and
follow instructions on the back of the GFCI.
The winch should be used only with a three
pronged grounded outlet. Do not remove the
grounding prong on the power cord for any
reason. Do not operate the unit in the rain or
when it is wet and never operate the winch
while standing in water.
The winch must be securely attached to a
structural member or frame that is capable of
sustaining loads in excess of the winch
capacity.
Periodically check the power cord for wear or
frays which could cause electrical shorts or
shocks.
MOUNTING INSTRUCTIONS
Be sure that the mounting surface is of sufficient strength
to support a load well in excess of the rated winch
capacity. Fasten the winch to the mounting surface with
three 1/2” bolts, nuts, washers, and lockwashers. (See
base hole pattern.) Be sure that the winch is positioned so
that the cable does not rub the front opening of the winch.
Your winch is equipped with key hole slots in the base for
use with quick-mounting shoulder studs if desirable. If you
wish to use quick-mount studs, they should be mounted
securely into the mounting surface. After positioning the
winch on the studs, a 3/8” bolt should be placed in one of
the other holes available to keep the winch securely in
position. For double line use, install an eye-hook on the
mounting surface close to the base of the winch for
fastening the stationary cable hook. Be sure the eye-hook
is of sufficient strength to withstand loads in excess of the
single line rating of the winch.
BASE HOLE PATTERN
SA5000AC, SA5015AC, SA7000AC and SA7015AC
Continued on next page
This manual suits for next models
5
Table of contents
Other OZ Lifting Products Winch manuals
Popular Winch manuals by other brands

DINAMIC OIL
DINAMIC OIL SE35 instruction manual

MSA
MSA SURE STRONG SCE1074021050 Instruction for operation and maintenance

Lewmar
Lewmar 5CT quick start guide

TrailFX
TrailFX Reflex WR08B owner's manual

Tractel
Tractel tirak X 300 P Series Original assembly and operating instructions manual

Britpart
Britpart PULLING POWER DB12000i Installation & operation manual