PAC Alcor JFTOT II User manual

JFTOT II JET FUEL THERMAL OXIDATION TESTER
October 2003
Version 2.1 or later
59297
300 BAMMEL WESTFIELD ROAD • HOUSTON, TEXAS 77090 USA
TELEPHONE: 281-580-0339 • FAX: 281-580-0719

JFTOT II User’s Manual Rev. C Page ii
Copyright ©2003, by PAC, Houston, Texas.
Printed in the United States of America
All rights reserved.
Contents of this publication may not be reproduced in any form
without permission of the copyright owner.
10.17.03
THIS MANUAL CONTAINS CONFIDENTIAL AND PROPRIETARY INFORMATION…
…which is the property of PAC. This manual and all information disclosed herein shall not be used to manufacture,
construct, or fabricate the goods disclosed herein; shall not be exploited or sold; shall not be copied or otherwise
reproduced in whole or in part and shall not be revealed or disclosed to others or in any manner made public
without the express written permission of PAC.
REVISION HISTORY
Rev Description Release Date
A F i r s t r e l e a s e January, 1997
B Update to include service manual September, 2000
C Update formatting and Section 6 October, 2003

JFTOT II User’s Manual Rev. C Page iii
ABOUT T HIS M ANUAL
This User’s Manual is suitable for JFTOT 230
and 240 models for S/N 477 and beyond, until
superseded. This manual may be used for S/N
200-476, but there have been some changes in
component part numbers. Two User’s Manuals
are provided with each JFTOT. One manual is
written in English, the other is written in one of
the following four languages as specified by the
customer; French, German, Spanish and Italian.
The Service Manual is available in English only and
is provided in back of the English User’s Manual.
SYMBOLS, SAFETY CONSIDERATIONS
AND WARNINGS
This equipment has been designed and tested in
accordance with EN 61010, “Safety Requirements
for Electrical Equipment for Measurement, Con-
trol, and Laboratory Use.” It is intended for indoor
use only. This instruction manual contains informa-
tion, warnings, and cautions that must be followed
to insure safe operation and to maintain the
equipment in safe operating condition. Use of this
product in a manner not specified may impair the
protection provided by the equipment.
Safety glasses should be worn by the operator and
anyone in the vicinity of the equipment for protec-
tion from splashed materials. Non-flammable heat
resistant gloves as well as non-flammable clothing
should be worn when using this equipment. Tests
performed with this equipment may involve
hazardous materials. This instruction manual does
not purport to address all safety concerns associ-
ated with these tests. It is the responsibility of the
user of this equipment to establish appropriate
safety and health practices and to determine
applicability limitations prior to use.
For safe operation, this equipment must be electri-
cally grounded by way of the protective grounding
connection in the power cord. Do not, under any
circumstances, defeat the protective grounding
connection.
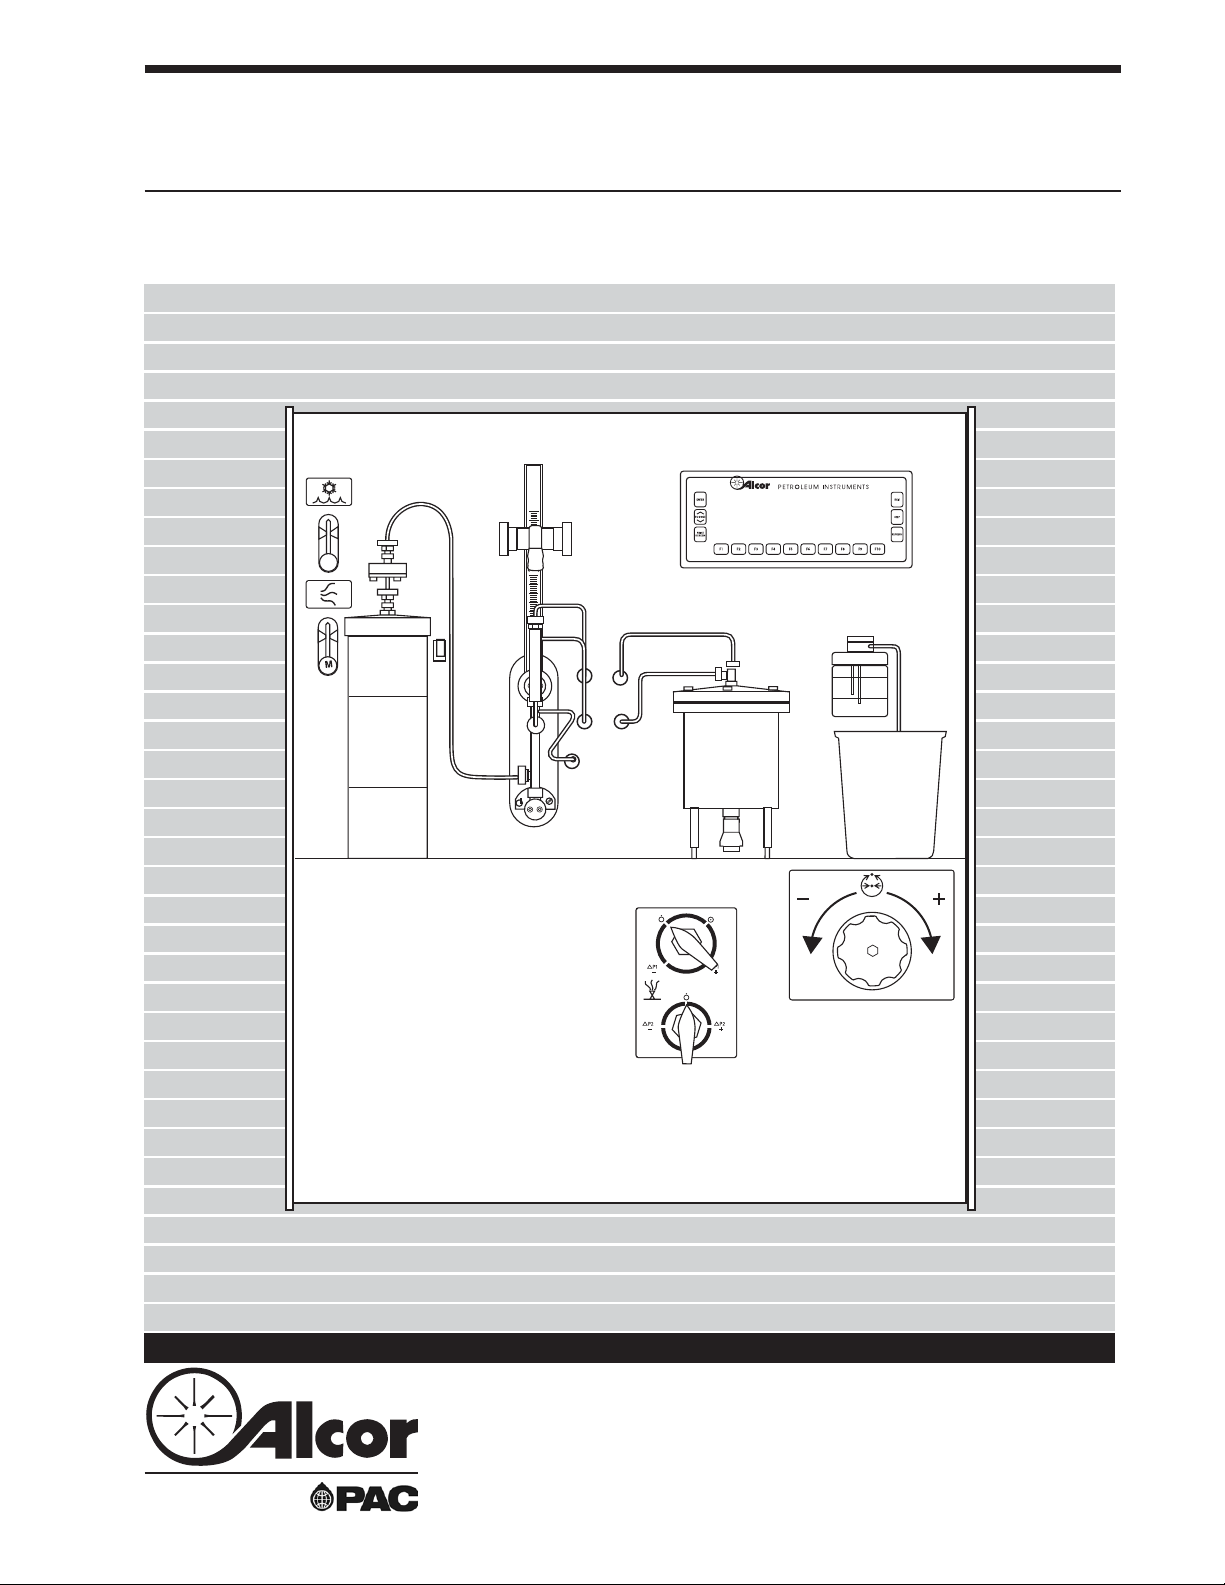
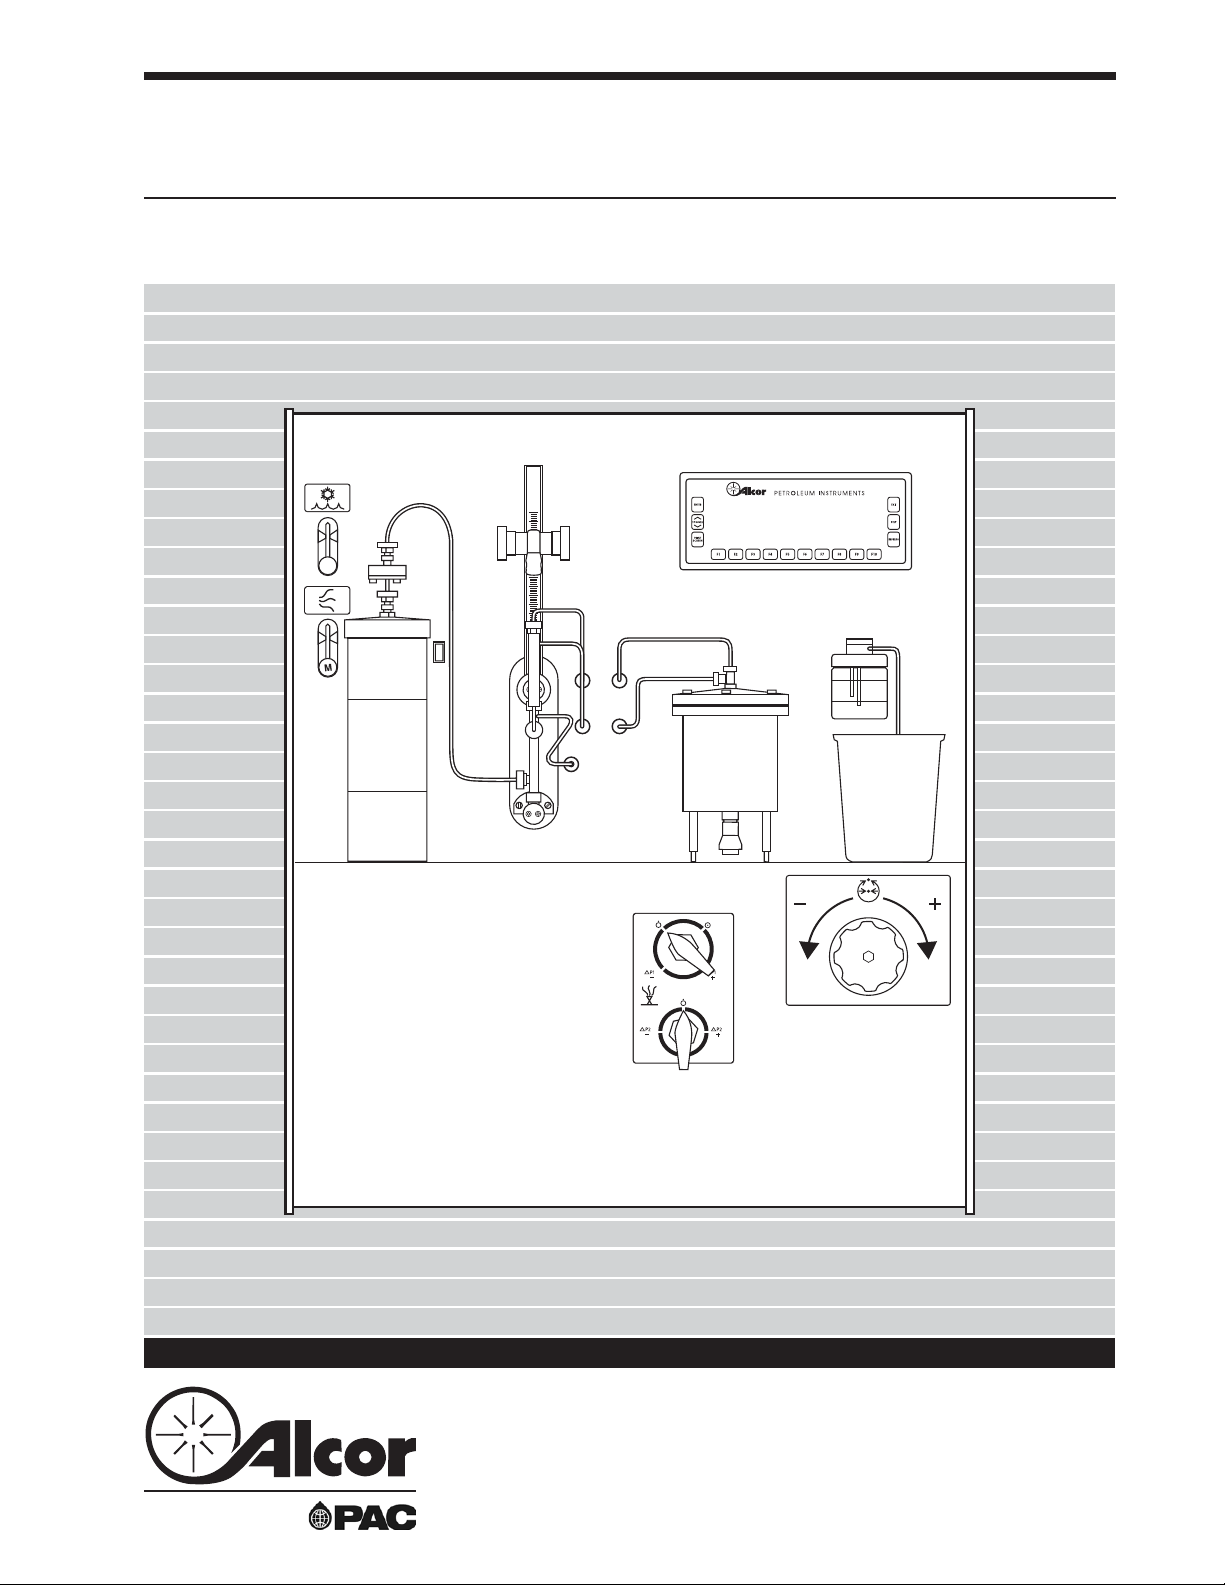
Two very powerful features of the JFTOT-II are
the REFRESH and PRINT SCREEN buttons on
the keypad. Whenever you are looking at a
menu and see something that looks inappropri-
ate, press the REFRESH key so the computer
will re-write the display. If the menu still
appears incorrect, press the PRINT SCREEN
key so the computer will print the complete
display to the printer. This print out can be
faxed to customer service to help troubleshoot
and resolve problems.
Servicing and repair should be performed only
by qualified personnel. Disconnect the equip-
ment from the power source when servicing or
replacing electrical components.
Service replacement parts and technical assis-
tance for this equipment may be obtained from:
PAC
300 Bammel Westfield Road
Houston, TX 77090
Tel: 281-580-0339 or 800-365-2143
Fax: 281-580-0719
This symbol (exclamation point in a
triangle) indicates a general Caution or
Warning. A Caution alerts you to information
that is important for protecting the equipment
and performance. A Warning alerts you to
information that is important for protecting
yourself, others and equipment from damage.
This symbol (a lightning bolt in a
triangle) indicates an electrical shock
hazard. Inside the MCRT are exposed live
voltage circuits. The MCRT should be opened
only by qualified service personnel. To prevent
electrical shock hazard DO NOT operate the
MCRT in rain or wet conditions.

JFTOT II User’s Manual Rev. C Page iv
This symbol (three wavy lines over a
straight line in a triangle) indicates a hot
surface. During operation, the MCRT surfaces
near the oven get hot. To prevent burns exer-
cise caution when operating the MCRT. Do
NOT open the lid while the oven is in use.
Opening the lid may cause hot samples to
ignite, creating a fire hazard.
NOTE: When shipping the MCRT, pack
upside down so that the legs are pointing up.
Failure to ship the MCRT with legs up will
damage the MCRT. Remove all samples and
accessories from the MCRT, remove and
clean the glass jar, remove any loose depos-
its from the oven, lid or exhaust tubes. Pack
any accessories on top of the MCRT between
the legs.
CAUTION: Do not use this equipment in a
hazardous atmosphere or near flammable
materials. Do not use this equipment with
hazardous materials for which the equipment
is not designed. Protection provided by this
equipment may be impaired if used with
accessories not provided or recommended by
the manufacturer or used in a manner not
specified by the manufacturer.

JFTOT II User’s Manual Rev. C Page v
PREFACE
The Jet Fuel Thermal Oxidation Tester (JFTOT)
has been designed to produce an accelerated
(higher temperature) version of conditions that
might be experienced by a flowing fuel in a
typical engine system. By maintaining these
conditions under close control, the JFTOT
promotes thermal degradation of the fuel so that
deposits may form just as they might in a real
fuel system over time. Normally the JFTOT is
used as a standard quality control tool in the
refinery laboratory. However, since fuel deposi-
tion products are of great interest in fuel re-
search, the JFTOT is also an important tool in
the search for improved fuel characteristics and
quality.
This manual has been written for the new
version of the JFTOT, called the JFTOT II.
The JFTOT II is available in two models, the
230 and 240. The models are basically the
same. The primary difference is that the
JFTOT 240 is able to measure the differential
pressure (∆P) across two collecting filters
while the JFTOT 230 is only capable of
measuring ∆P across one filter. The JFTOT
240 can be used to perform the standard
quality control tests (using only one ∆P) and
research (using either one or two ∆Ps). The
JFTOT 230 is used to perform the standard
quality control tests in the refinery laboratory.
The JFTOT II (JFTOT 230/240) has had
several names. Included are UFTOT, UFTOT
230, UFTOT 240, UFTOT D-3241, JFTOT-
230, and JFTOT-240. These are all the same
JFTOT.
ABOUT THIS MANUAL
This manual is applicable to both the JFTOT 230
and JFTOT 240. Therefore, references and
displays showing a second ∆P appear. If a test is
made using only a single ∆P, the operator should
ignore all references to the second ∆P as no
information on the second ∆P will appear on the
display.
This manual consists of five major sections.
Each section can be considered a separate
manual.
1. OPERATION MANUAL
This manual includes:
a. Installation
b. Basic Operating Instructions
c. Tube Rating Instructions
d. Appendix
2. D3241 MANUAL
This manual contains step by step procedures to
run an ASTM D3241 thermal oxidation test on
the JFTOT II.
3. CALIBRATION MANUAL
This manual contains step by step procedures to:
a. Calibrate the Thermocouple
b. Check the ∆P Indication
c. Check the Flowrate
d. Check Aeration Flow, Time and Coolant Flow
4. MAINTENANCE MANUAL
This manual includes:
a. Equipment overview
b. Routine maintenance
c. Troubleshooting information
d. System descriptions, repair and replacement
5. ISO-9000
This provides documentation to assist installa-
tion in an ISO-9000 certified lab.

JFTOT II User’s Manual Rev. C Page vi
Aamps
° degrees
g g r a m s
h h o u r s
Hz Hertz
K k i l o = x 1 0 3
L liters (mL = milliliters)
Mmega=x106
m meter (mm = millimeter, cm = centimeter)
min minutes
Pa Pascal = Newton/meter2
psi pounds force/inch2 (psig = psi gauge)
s seconds
Vvolts
VA volt-amperes
W watts
These manuals and the JFTOT use certain terminology
and graphic symbols listed:
CAUTION - risk of electrical shock
CAUTION - refer to accompanying
operating instructions
PROTECTIVE CONDUCTOR - (earth
ground) terminal
ALTERNATING CURRENT
∆P DIFFERENTIAL PRESSURE -
(∆P reported in mmHg consistent with
the original JFTOT’s kerosene/mercury
manometer) The JFTOT displays ∆P as
“dP”.
CAUTION STATIC SENSITIVE the
bus bars and thermocouple should not
be touched during operation. Static
discharge can cause the display
message to become scrambled. To
refresh the display and “unscramble”
messages, press the REFRESH key.
ABBREVIATIONS AND GLOSSARY
These manuals use certain units abbreviations shown:
WARNING HOT SURFACES - during
operation, the bus bars and lines are
heated surfaces. Do not touch.
PRESSURE REGULATOR -
indicates the adjusting control for the
system fuel pressure.
AERATION FLOW - indicates the
adjusting valve and flowmeter for fuel
aeration. Also identifies the aeration
outlet port fitting.
COOLANT FLOW - indicates the
adjusting valve and flowmeter for the
bus bar coolant.
COOLANT EXHAUST -
indicates the air flow exhaust for
cooling the bus bar coolant.
BLEED or VENT CONTROL - indicates
the flow control slector valves for
venting fuel pressure in the JFTOT.
OFF or CLOSED VENT CONTROL
indicates the RUN position, to allow
fuel pressure to increase to operating
pressure.
ON or OPEN VENT CONTROL -
indicates the SYSTEM VENT position.
PRINTER CONNECTOR - printer/
computer RS-232 serial interface
connection.

JFTOT II User’s Manual Rev. C Page vii
WARRANTY C ERTIFICATE
ALCOR Petroleum Instruments/PAC (API/PAC) warrants the listed Jet Fuel
Thermal Oxidation Tester (JFTOT II) manufactured by ALCOR Petroleum
Instruments to be free from defects in material and workmanship under use and
service for a period of one (1) year of operation.
The obligation of API/PAC under the warranty is limited to the repair or replace-
ment, at API/PAC's option, of any part, component or JFTOT II which, in the
opinion of API/PAC, is defective and which has been returned transportation
prepaid. This warranty shall not apply to any JFTOT II , its component parts or
accessories, which have been improperly installed, adjusted, stored, handled,
repaired, altered or operated contrary to current API/PAC recommendations.
Warranty will not be granted for removal and installation of parts, components
or accessories or for normally required maintenance functions such as minor
repair, gasket or seal replacement, inspection requirements, adjustments, etc.
Replacement or repair of a JFTOT II, component or accessory will not be
construed to extend the initial warranty period.
This warranty is expressly in lieu of all other warranties and representations,
expressed or implied and all other obligations and liabilities, either direct or
consequential on the part of API/PAC.
To expedite request for help or information concerning the JFTOT II, provide
the Model number and Serial number. These numbers are located on the name-
plate on the back of the JFTOT II.
Model Number: __________________ Serial Number: __________________
A COMPANY

JFTOT II User’s Manual Rev. C Page viii
THIS PAGE INTENTIONALLY BLANK.

JFTOT II JET FUEL THERMAL OXIDATION TESTER
Operation Manual / October 2003
Version 2.1 or later
300 BAMMEL WESTFIELD ROAD • HOUSTON, TEXAS 77090 USA
TELEPHONE: 281-580-0339 • FAX: 281-580-0719

JFTOT II Operation Manual Rev. CJFTOT II Operation Manual Rev. CPage 2
THIS PAGE INTENTIONALLY BLANK.

JFTOT II Operation Manual Rev. C Page i
TABLE OFCONTENTS
1. INTRODUCTION ........................................................................................................................... 1
1.1 Basic Design .................................................................................................................................. 1
1.2 Basic Principle ............................................................................................................................... 1
1.3 Model Types ................................................................................................................................... 1
1.4 Optional Operation of Time Reactor System ................................................................................. 1
1.5 Optional Time Reactor Insulation ................................................................................................... 2
1.6 Deposit Measurements .................................................................................................................. 2
2. INSTALLATION ............................................................................................................................. 3
2.1 Installation ...................................................................................................................................... 3
2.2 Components ................................................................................................................................... 3
2.3 Rear Panel Inspection .................................................................................................................... 6
2.4 Connect to power source ............................................................................................................... 6
2.5 Assemble sliding scale assembly and thermocouple ...................................................................... 7
2.6 Install aeration tube and dryer ........................................................................................................ 7
2.7 Pan Installation ............................................................................................................................... 7
2.8 First Time Power ON .................................................................................................................... 7
3. GENERAL OPERATIONAL INFORMATION ............................................................................ 9
3.1 Computer Display Screen and Keypad .......................................................................................... 9
3.2 Main Operations ............................................................................................................................10
4. PERFORMING A TEST ............................................................................................................... 17
4.1 Inspection of components .............................................................................................................17
4.2 Cleaning ........................................................................................................................................17
4.3 Assembly of Heater Tube Section ................................................................................................18
4.4 Assembly and Installation of Pre-Filter .........................................................................................20
4.5 Assembly of Water Reservoir .......................................................................................................20
4.6 Assembly of Air Trap ....................................................................................................................20
4.7 Preparation of Test Fuel ................................................................................................................20
4.8 Fuel Reservoir Section ..................................................................................................................22
4.9 Setting of Controls .........................................................................................................................22
4.10 Venting Fuel System ......................................................................................................................23
4.11 Start-Up ........................................................................................................................................23
4.12 Shutdown .......................................................................................................................................25
4.13 Print Report ...................................................................................................................................25
4.14 Disassembly ..................................................................................................................................26
4.15 Complete Test Report ...................................................................................................................27

JFTOT II Operation Manual Rev. CPage ii
5. HEATER TUBE DEPOSIT RATING .......................................................................................... 29
5.1 Visual Method ...............................................................................................................................29
6. APPENDICES ................................................................................................................................ 31
A1. Precautionary Statements For Hazardous Materials ....................................................................31
A2. JFTOT Equipment Description .....................................................................................................32
A3. Heater Tube Temperature Profile .................................................................................................41
A4. Routine Maintenance ....................................................................................................................41
A5. Materials, Supplies, and Spares .....................................................................................................41
Alcor JFTOT-230/240 Parts List ..........................................................................................................44
Supplies, Spares And Accessories.........................................................................................................44

JFTOT II Operation Manual Rev. C Page 1
1. INTRODUCTION
1.1 BASIC DESIGN
The JFTOT is a fully integrated bench top instrument
that provides everything needed to safety study the
thermal oxidation of any petroleum based liquid fuel.
The instrument is normally used in a batch mode
where a fuel sample is held in a reservoir and
pumped across a heated metal surface to a second
reservoir. In addition, it incorporates a special filter to
continuously trap deposits while simultaneously
monitoring the buildup by measuring differential
pressure across the test filter.
Pumping of the sample can be likened to that of a
large syringe; the sample is moved through the
system by the action of a piston which pushes the
sample from the reservoir. The movement of the
piston is controlled by a drive screw which is turned
very slowly by a gear reduced, controlled speed
motor. Flow of the liquid is restricted by a mechanical
pressure regulator which, once set, maintains the
relatively high pressure necessary to keep the heated
sample in liquid state, typically 3.45 MPa (500 psig).
Upstream of the pressure regulator is a special
sample trap called the water reservoir. This device,
initially filled with water, gives certain advantages.
First, it is a repository for the spent sample often
containing particulate matter or condensables that
may have passed through the filter. Second, it allows
the regulator valve to only have contact with water
which means the regulator will work predictably
regardless of the fuel properties. Finally, since water
is the only effluent of the system, the water reservoir
makes the system inherently safe regardless of the
fuel being tested.
1.2 BASIC PRINCIPLE
Since the JFTOT II is computer controlled, most of
the operations are automatic. There are a few
manual steps needed in preparing for a test, such as,
assembling the hardware, aerating the sample and
bleeding air from the system. With these exceptions,
the JFTOT is operated by entering parameters and
other test setup data into the computer. The JFTOT
stores this information and uses it whenever that
particular test is called for. This setup simplifies
operation when performing the same test.
1.3 MODEL TYPES
There are two models of JFTOT using the positive
syringe pump: Model 230 with one ∆P measuring
transducer and Model 240 with two ∆P transducers.
The Model 230 has been designed to perform ASTM
D3241 where differential pressure across a small
filter is one of the test criteria. This filter is placed in
the flow stream in such a way that reaction products
formed by the heating process and not deposited on
the heater tube will be caught downstream by this
test filter.
The Model 240 is designed with an additional differ-
ential pressure measure for deposits that may form
late in the process. In other words, temperature
induced reactions may cause certain precursors to
form that in themselves do not form a filter blocking
particle. However, these precursors may react with
other materials present to form significant insoluble
products or particles. Given sufficient time these
particles can cause ∆P across a test filter. They are
of interest because they could do this in a real fuel
system. The time reactor after-chamber and differ-
ential pressure measure offered in the Model 240
permits this additional mode of determining presence
of thermally induced insoluble components in fuels.
The Model 230 JFTOTs can be upgraded to Model
240 specifications. Contact ALCOR Petroleum
Instruments for details.
1.4 OPTIONAL OPERATION OF TIME
REACTOR SYSTEM
In this manual, operation of the Model 240 with the
time reactor system is described. When this optional
operating mode is not being used, a plug can be
installed into the fitting on the wall of the cabinet
where the ∆P output of the time reactor system is
normally attached.

JFTOT II Operation Manual Rev. CPage 2
By eliminating the time reactor and substituting a
supplied outlet line from the heater section, the
system can be run as a Model 230. A diagram in the
Appendix shows the two alternative systems.
1.5 OPTIONAL TIME REACTOR
INSULATION
A split block of insulation is provided that fits quickly
on the time reactor using a supplied clip. This cover-
ing is designed to help the time reactor maintain its
temperature so that post reactions expected in the
time reactor can occur. Currently this is an optional
feature as is the time reactor. Future work with this
device can be expected to yield details for require-
ments and specifications on operation. Currently it is
an option for use in research investigations.
1.6 DEPOSIT MEASUREMENTS
The purpose of the JFTOT system is to measure
formation of deposits from jet fuel upon heating in
presence of dissolved oxygen and a metal surface.
The deposits can be measured in four places in the
Model 240 JFTOT as shown below. The deposits can
be only measured in three places in the Model 230
JFTOT as shown below in locations A, B and D.
Regardless of the model, only deposits affecting A
and B are significant to ASTM D 3241.
FIG. 1 EVIDENCE OF DEPOSITS FROM JFTOT TEST, MODEL 240

JFTOT II Operation Manual Rev. C Page 3
2.1 INSTALLATION
Place the tester on a level laboratory bench. Allow
ready access to the rear of the tester for normal
maintenance and service requirements. Ensure that
the vent on the right side of the cabinet in not ob-
structed. Provide adequate ventilation and use proper
procedures for handling solvents and hydrocarbons.
2.1.1 Space Requirements
• Minimum bench space: 130 cm wide (front)
by 90 cm high by 65 cm deep
• Cabinet Size: 77 cm wide by 88 cm high by
52 cm deep, plus clearances: 6 cm in front
for knobs, and 15 cm on right side for fan.
• Mounting feet: 72 cm wide by 35 cm deep
• Printer size: 38 cm wide
2.1.2 Weight
115 Kg including accessory items
2.2 COMPONENTS
2.2.1 JFTOT cabinet
See Figure 2.1 for front view of cabinet; see
Figure 2.2 for rear view of cabinet.
2.2.2 Accessory Components
Accessory components provided that are not
attached to the JFTOT cabinet are packaged in
boxes, (see Figure 2.3).
1. Fuel reservoir with top, piston and seal
2. Water reservoir with top and seal
3. Heater tube test section
4. Sliding scale assembly
5. Thermocouple
6. Time Reactor Section (240 only)
2. INSTALLATION

JFTOT II Operation Manual Rev. CPage 4
FIG 2.1 - FRONT VIEW OF THE JFTOT
FIG 2.2 - LOWER RIGHT HAND SIDE VIEW OF THE JFTOT

JFTOT II Operation Manual Rev. C Page 5
FIG 2.3 - ACCESSORY COMPONENTS PACKAGED WITH JFTOT II

JFTOT II Operation Manual Rev. CPage 6
Accessories:
1. Power Cord
2. Filter/aeration funnel
3. Tin AutoCal Calibrator
4. Lead AutoCal Calibrator
5. Aeration dryer assembly
6. Thumb-nut Cap
7. Standardization Kit
8. Reservoir Stand
9. Pan
Lines:
1. Heater section outlet line
2. Reservoir outlet line
3. Water reservoir lines (two)
4. Pre-filter assembly
5. Time reactor line (240 only)
2.2.3 Printer Kit
A printer kit contains a printer and cable. This
printer operates on 120 VAC only. A printer
power receptacle is provided on the side of the
JFTOT to power the printer only.
2.2.4 Materials, Supplies, and Spares
Some spares and supplies are provided with the
JFTOT. Other accessories are not provided but
are required for normal operation. See MATERI-
ALS, SUPPLIES, AND SPARES in the Appen-
dix.
2.3 REAR PANEL INSPECTION
• The fluid level in the coolant reservoir should be
about 50%.
• Check for coolant leakage, clean any spills.
• Check for loose parts and connectors. (The JFTOT
model 230 has two unused electrical connectors
located inside which are for options used on the
JFTOT model 240.)
• Install rear panel.
2.4 CONNECT TO POWER SOURCE
• Check the voltage selector switch located on the
right side. Ensure that it is toggled to the proper line
voltage, 115 or 230.
• Attach the power cord to the power connector inlet
on the side. The inlet is an IEC 320 connector
which allows using international power cords.
Connect to single-phase power, 115/120VAC at
6.25A or 220/240VAC at 6.25A, 50/60 Hz.
• Attach printer power cord to 120 VAC receptacle
on side of JFTOT.

JFTOT II Operation Manual Rev. C Page 7
2.5 ASSEMBLE SLIDING SCALE
ASSEMBLY AND THERMOCOUPLE
• Place the sliding scale assembly on the top bus bar,
and push back against stop. Tighten the set screw
to secure scale assembly to the bus bar using Allen
(hex) driver tool.
• Plug the thermocouple into the socket of the
sliding scale assembly, and plug the lead into the
thermocouple receptacle on the cabinet.
2.6 INSTALL AERATION TUBE AND
DRYER
Connect the fitting of the aeration dryer assembly to
the cabinet.
2.7 PAN INSTALLATION
Slide the pan underneath the left side of the
JFTOT. (See Figure 2.1)
2.8 FIRST TIME POWER ON
Before switching power ON, read all of Section 3 to
become acquainted with the operation of the JFTOT
II.

JFTOT II Operation Manual Rev. CPage 8
THIS PAGE INTENTIONALLY BLANK.
Table of contents
Popular Test Equipment manuals by other brands

System Sensor
System Sensor RTS151 Installation and maintenance instructions

Keysight Technologies
Keysight Technologies N7700 user guide

HIPOTRONICS
HIPOTRONICS 800PL Series operating instructions

Fluke
Fluke 5320A manual

Hakko Electronics
Hakko Electronics FG101B-03 instruction manual

DataShark
DataShark Data/Link Cable-Check 70025 operating instructions