Paccar Peterbilt SmartAir User manual

OPERATOR’S MANUAL
SmartAir


Peterbilt SmartAir Operator’s Manual
This manual describes the Peterbilt idle free air conditioning system, how to operate it and how to maintain it. Please
keep this manual, along with the other manuals, with the vehicle at all times for future reference.

© 2014 PACCAR INC - All Rights Reserved
This manual illustrates and describes the operation of features or equipment which may be either standard or optional on this vehicle.
This manual may also include a description of features and equipment which are no longer available or were not ordered on this vehi-
cle. Please disregard any illustrations or descriptions relating to the features or equipment which are not on this vehicle.
Peterbilt reserves the right to discontinue, change specifications, or change the design of its vehicles at any time without notice and
without incurring any obligation.
The information contained in this manual is proprietary to Peterbilt. Reproduction, in whole or in part, by any means is strictly prohibited
without prior written authorization from PACCAR Inc.

(R05/2014) –1–
Safety
WARNING!
Excessive heat may cause your air conditioning system
to explode, which may result in death or personal injury.
Never weld, solder, steam clean, or use a blow torch
near any part of the air conditioning system. Failure to
comply may result in death, personal injury, equipment
or property damage.
WARNING!
Air conditioning refrigerant can be hazardous to your
health. Do not expose yourself to leaking refrigerant for
prolonged periods, near excessive heat, open flames, or
without proper ventilation. Failure to comply may result
in death or personal injury.
WARNING!
The air conditioning system is under pressure. If not
handled properly, it could explode, causing injury to you
and your vehicle. Any servicing that requires depressur-
izing and recharging the air conditioning system must
be conducted by a qualified technician with the right
facilities to do the job.
CAUTION
Do not modify the electrical system. Modifications to the
system may affect vehicle performance, which may lead
to equipment or property damage.
CAUTION
The system uses PVE refrigerant oil to lubricate the
compressor. Use of other refrigerant oils, such as PAG,
will damage the compressor.

–2– Y53-6051-1C1
Environmental Protection and Material
Hazards
Some components of the air conditioning system (refriger-
ant, PVE oil, batteries, etc.), contain hazardous sub-
stances and may contaminate the environment if spilled or
not disposed of properly. Failure to comply with environ-
mental regulations can result in civil or criminal penalties.
Contact your local government agency for information
concerning proper disposal.

CerƟĮcate of Idle ReducƟon System Weight
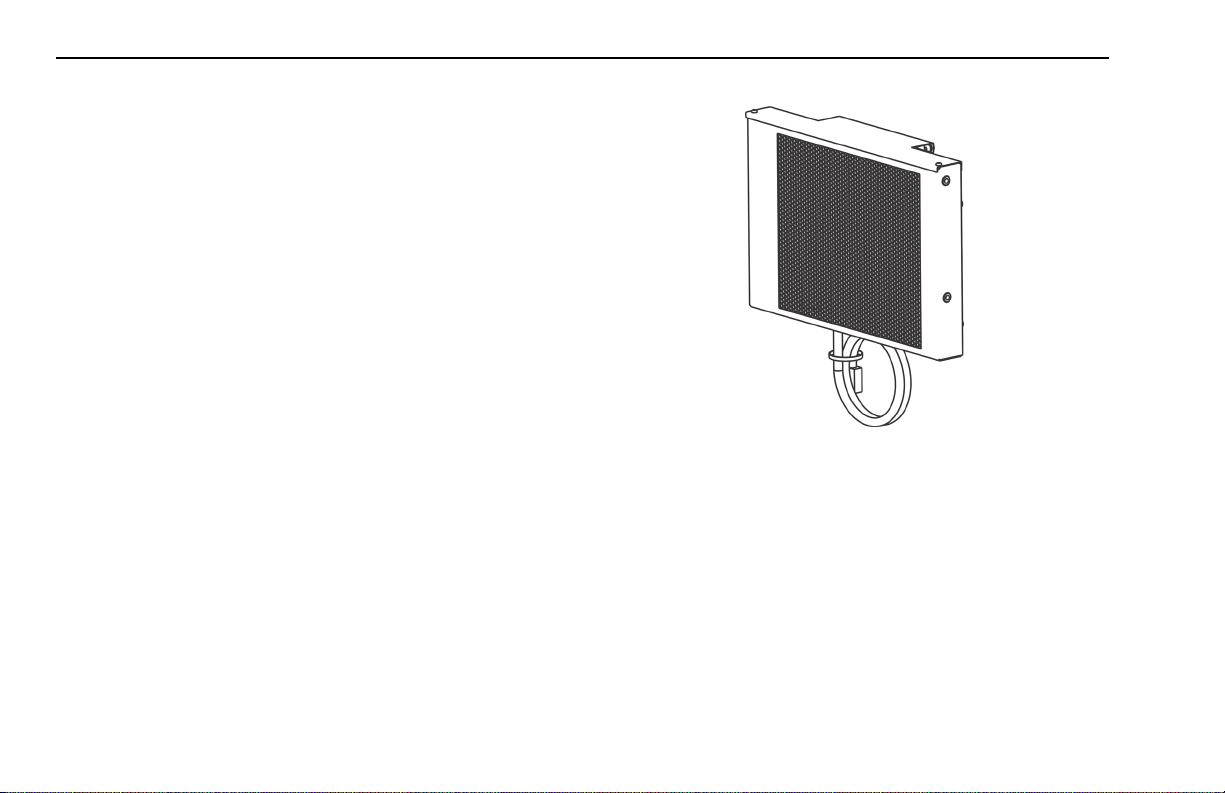
Peterbilt SmartAir eHVAC System
Peterbilt cerƟĮes that the idle reducƟon system, known as SmartAir, has a published weight of 547 lbs. (248 kg.), and
that components installed solely for the purpose of idle reducƟon exceed 550 lbs. (249 kg.).
On August 8, 2005 the Domenici-
Barton Energy Policy was signed
into law. SecƟon 756 of the Energy
Bill made changes to Title 23,
SecƟon 127(a) that regulates the
weight of vehicles to be used on
interstate highways. This secƟon
provides a 400-pound (181 kg.)
Vehicle Weight ExempƟon for idle
reducƟon technology.
On October 1, 2012 Moving Ahead
for Progress in the 21
st
Century
became law, increasing this weight
exempƟon from 400 lbs. (181 kg.)
to 550 lbs. (249 kg.)
23 USC §127(a)(12)
(12) Heavy Duty Vehicles
(A) In general – Subject to subparagraphs (B) and (C), in order to promote reduction of fuel
use and emissions because of engine idling, the maximum gross vehicle weight limit
and the axle weight limit for any heavy-duty vehicle equipped with an idle reduction
technology shall be increased by a quantity necessary to compensate for the additional
weight of the idle reduction system.
(B) Maximum weight increase – The weight increase under subparagraph (A) shall be not
greater than 550 pounds (249 kg.).
(C) Proof – On request by a regulatory agency or law enforcement agency, the vehicle
operator shall provide proof (through demonstration or certification) that:
(i) the idle reduction technology is fully functional at all times; and
(ii) the 550-pound (249 kg.) gross weight increase is not used for any purpose other
than the use of idle reduction technology described in subparagraph (A).
Each state can adopt this weight exempƟon, at its own discretion. It is the responsibility of the vehicle operator to understand whether a
parƟcular state has adopted this exemption, and if so whether the exempƟon is 400 lbs. (181 kg.) or 550 lbs. (249 kg.). There are a number
of websites which maintain a status summary for this weight exempƟon. The NaƟonal Idling ReducƟon Network News on the U.S.
Department of Energy website (hƩp://www1.eere.energy.gov/vehiclesandfuels/resources/fcvt_naƟonal_idling.html) is one example.
(R05/2014) –3–

–4– Y53-6051-1C1
Introduction
This vehicle is equipped with supplemental air conditioner
in addition to the standard sleeper air conditioner. This
system will help maintain sleeper temperature without
idling the engine. The system consists of a battery oper-
ated air conditioner mounted underneath the sleeper
bunk, a control panel above the bunk and a condenser
that is mounted to the outside back wall of the sleeper. If
the vehicle is also equipped with a fuel fired heater, the
system will provide heat when necessary.
The system has three primary modes. In AUTO mode, the
system will adjust output air temperature to maintain the
temperature set by the operator. In the manual COOL or
HEAT mode, the system will maintain a constant air tem-
perature based on the operator input. Additionally, the
control panel provides a reminder indicator for air filter
maintenance and a operational timer that can be used to
monitor usage (in hours) of the system.
Components
Control Panel
The control panel has a display screen on the top and 4
buttons on the bottom. The power button turns the unit on
and off. The button on the right is the enter button and is
used to select the setting to be changed. The up and
down arrows allow the user to change system settings.

(R05/2014) –5–
The available settings that may be changed are:
• Mode — Auto/Cool/Heat
• Blower speed — 1/2/3
• Temperature — 60º F to 85º F
• System runtime timer
• Temperature units — º F/º C
The control panel may display any combinations of these
icons:
Icon Description
Indicates the system mode for auto-
matic temperature control.
Provides battery charge status of the
auxiliary batteries (not the vehicle’s
starting batteries).
System air filter needs to be cleaned
and inspected when this icon is on.
Indicates the manual system mode
for cool air.
Indicates the fan speed setting.
Indicates the manual system mode
for heated air.
Indicates the system’s cumulative
operational time since the last reset.
Indicates a system error.
Icon Description

–6– Y53-6051-1C1
Fuel Fired Heater (Optional)
This vehicle may also be equipped with a fuel fired heater.
Control of the fuel fired heater will be through the system
control panel.
Batteries
Four auxiliary batteries are mounted on the exterior of the
vehicle, in addition to the starting batteries, to power the
system.
Condenser
The condenser is mounted to the exterior of the rear
sleeper wall.
Air Conditioning Unit
The main unit resides under the first sleeper bunk and
contains the system’s evaporator, blower, compressor and
the air filter.

(R05/2014) –7–
Fuse Panel
Fuses for the system are located on the inside main unit.
Access these fuses by removing the panel on the top of
the inside main unit.

–8– Y53-6051-1C1
What to do if...
Operating Tips
Make sure the sleeper air temperature is at or below the
desired air temperature before turning the unit on. The
main sleeper air conditioner unit may need to be operated
to obtain the desired temperature in the sleeper before
using the unit. In addition, close the sleeper curtain when
using the unit. These tips along with proper service will
maximize the effectiveness of the unit.
Turning on the system requires one of the three conditions
to be true:
Key Switch in the OFF position
OR
Key Switch in the ACC (Accessory) position
OR
Key is removed from ignition switch
The system will not turn on if the key switch is in the “IGN
(ON)’ position or if the engine is running.
Battery Management
The system contains a Battery Monitoring System (BMS).
The system monitors battery voltage and will separate
auxiliary battery from the vehicle’s starting batteries when
necessary. The system will use the following rules to
determine when to use auxiliary or starting batteries:
When the engine is NOT running, the start batteries
and auxiliary batteries remain connected in parallel
until the starting battery voltage drops below 12.5
volts for at least 10 seconds.
OR
When the engine is running and if the starting battery
voltage rises above 13.2 volts for at least 10 seconds,
the start batteries and auxiliary batteries will be auto-
matically connected to allow the alternator to charge
the auxiliary batteries.
The BMS also uses charge and discharge cycles to deter-
mine the state of health of the auxiliary batteries and
reports the state of health of the batteries to the control
panel (% of initial full life remaining).
The system will automatically shut off if the voltage of the
auxiliary batteries drops below 11.3 volts.

(R05/2014) –9–
Service Icons
Some of the icons on the control panel will require the
operator to perform some task.
Check Filter
The check filter indicator will illuminate when the
washable filter needs to be cleaned and
inspected.
CAUTION
Pay attention to the check filter indicator. A clean air fil-
ter will protect the evaporator from dust and debris. A
dirty air filter may cause equipment damage and will
reduce the system’s effectiveness.
Service
The Service indicator will illuminate when the
system has detected a problem. Please have
an authorized dealership service the unit.
The following table is a list of tasks that can be done when
necessary. If the table does not help your specific situa-
tion, please have an authorized dealership service the
system:

Symptom Action
Does not make sleeper
colder
OR
Does not maintain sleeper
air temperature
Turn off the unit.
Turn the vehicle ON and use the vehi-
cle’s main air conditioner to cool the
cab and sleeper.
Close the sleeper air curtain.
Turn the vehicle off once the air tem-
perature is colder than what is
desired.
Turn the unit back on.
Does not operate
OR
Does not turn on
Make sure the vehicle is OFF and the
ignition is NOT in the ON position.
If the SERVICE icon turns illuminates
briefly, have an authorized dealership
service the system.
Verify condition of the fuses. Have an
authorized dealership service the
system if blown fuses are found.
Verify the condition of the starting
and auxiliary batteries.
Does not blow cold air.
OR
Airflow is less than normal
Check the air filter for dirt and debris.
Check the unit for any items blocking
the air intake/supply.
–10– Y53-6051-1C1
Symptom Action

(R05/2014) –11–
How to Turn the System On and Off
The following steps will turn the system on and off:
1. Turn the vehicle’s ignition key to the ACC position,
OFF position, or remove the key from ignition switch.
2. Press the POWER button. The screen will display
the current mode, temperature setting and the battery
level. The initial default setting is blower speed: 1;
mode: Auto and temperature: 60º F (or last known
setting).
3. Press the POWER button again to turn the sys-
tem off.

–12– Y53-6051-1C1
How to Change a Setting
Change the temperature, blower speed or temperature
units using these steps:
1. Press the ENTER button until the desired mode is
displayed.
NOTE
If nothing is changed the control will return to the
default screen in a few seconds.
2. While the desired mode is displayed, use the UP
and DOWN arrow to adjust the setting to the
desired value. The system will wait for 5 seconds
before changing the system.
3. Wait 5 seconds for the changes to be accepted and
the system to respond.
The system will begin adjusting to the new settings.

(R05/2014) –13–
How to Reset the System Timer
The system has a timer to track the amount of usage
since the last reset. Resetting this timer does not affect
the CHECK FILTER indicator. To reset the timer:
1. Press ENTER until the HRS are displayed.
2. Press and hold the ENTER button for 7 seconds
to reset the timer.
3. Wait 5 seconds for the changes to be accepted and
the system to respond.
• The display will reset to 00:00.

–14– Y53-6051-1C1
Maintenance
The display has an indicator to alert when the air filter
needs to be cleaned or replaced. The air filter may need to
be cleaned before the indicator illuminates.
To access the filter:
1. Raise the bottom bunk to gain access to the main
unit.
2. The filter is accessible from the top of the air unit.
To clean and inspect the filter:
1. Wash the filter with water. No detergent or soap is
required to clean the filter.
2. Inspect the filter for any holes or tears. replace the fil-
ter if any holes or tears are found.
Allow the filter to dry completely before re-using.
To reset the “CHECK FILTER” reminder:
1. Press the ENTER button for 3 seconds to reset
the filter indicator
The words “CHECK FILTER” will disappear from the con-
trol unit display and will re-appear after 500 hours of sys-
tem operation.

(R05/2014) –15–

–16– Y53-6051-1C1
Table of contents
Languages: