Pacific Bay CASCADIA User manual

!
!
!
!
!
!
!
!
!
!
!
!
!
!
!
!
INSTALLATION GUIDE
CASCADIA SMART TOILET SEAT
Soft Close Lid, Cold/Warm Water Wash
With Side Control Panel
PB-TS04

BEFORE USE
• Before use, please read this installation guide to ensure you use the product
correctly. Pay special attention to the “Safety Precautions” section, making sure you
have read it thoroughly before you use the product so that you can safely operate
everything.
• After reading, please keep this installation guide for use in the event that an error
with the product occurs.
• This installation guide is for reference only, and extraneous circumstances may void
some parts of the manual.

TABLE OF CONTENTS
Before Installation . . . . . . . . . . . . . . . . . . . . . . . . . . . . . . . . . . . . . . . . . . . . . . . . . . . . . .1
Parts in Packaging . . . . . . . . . . . . . . . . . . . . . . . . . . . . . . . . . . . . . . . . . . . . . . . . . . . . . 1
Product Specifications . . . . . . . . . . . . . . . . . . . . . . . . . . . . . . . . . . . . . . . . . . . . . . . . . . 2
Installing Your Smart Toilet Seat. . . . . . . . . . . . . . . . . . . . . . . . . . . . . . . . . . . . . . . . . . . 2
Testing Your Smart Toilet Seat . . . . . . . . . . . . . . . . . . . . . . . . . . . . . . . . . . . . . . . . . . . .6
Cleaning the Water Filter . . . . . . . . . . . . . . . . . . . . . . . . . . . . . . . . . . . . . . . . . . . . . . . . 7
Getting Power to Your Smart Toilet Seat . . . . . . . . . . . . . . . . . . . . . . . . . . . . . . . . . . . . 9
Product Model and Parameters . . . . . . . . . . . . . . . . . . . . . . . . . . . . . . . . . . . . . . . . . . 10
Safety Precautions . . . . . . . . . . . . . . . . . . . . . . . . . . . . . . . . . . . . . . . . . . . . . . . . . . . . 12
Cautions Before Installation . . . . . . . . . . . . . . . . . . . . . . . . . . . . . . . . . . . . . . . . . . . . . 15
Necessary Tools . . . . . . . . . . . . . . . . . . . . . . . . . . . . . . . . . . . . . . . . . . . . . . . . . . . . . 15
Parts and Features . . . . . . . . . . . . . . . . . . . . . . . . . . . . . . . . . . . . . . . . . . . . . . . . . . . . 16
Function of Side Switches . . . . . . . . . . . . . . . . . . . . . . . . . . . . . . . . . . . . . . . . . . . . . . 17
Preparation Before Use . . . . . . . . . . . . . . . . . . . . . . . . . . . . . . . . . . . . . . . . . . . . . . . . 18
Using Your Smart Toilet Seat . . . . . . . . . . . . . . . . . . . . . . . . . . . . . . . . . . . . . . . . . . . . 18
Cleaning and Maintenance . . . . . . . . . . . . . . . . . . . . . . . . . . . . . . . . . . . . . . . . . . . . . . 19
Routine Maintenance . . . . . . . . . . . . . . . . . . . . . . . . . . . . . . . . . . . . . . . . . . . . . . . . . . 21
Deciphering your Smart Toilet Seats Various Beeps . . . . . . . . . . . . . . . . . . . . . . . . . . 23
Troubleshooting . . . . . . . . . . . . . . . . . . . . . . . . . . . . . . . . . . . . . . . . . . . . . . . . . . . . . . 24
Warranty . . . . . . . . . . . . . . . . . . . . . . . . . . . . . . . . . . . . . . . . . . . . . . . . . . . . . . . . . . . . 27

!
!
-!1!-!
BEFORE INSTALLATION
• Do not connect the toilet with electricity and water before finishing the installation
completely.
• Do not install the mounting plate on the main unit and connect the product to
electricity before installing the main unit on the ceramic body. The warm water
groove is still empty at that time, and if connected to the heater, it might cause
malfunction.
• The standard power supply is AC 110V (60HZ). Please refer to the specific model
for the power rating.
• The length of the power line is about 4 feet. Please confirm that the socket is set
in appropriate range to reach.
• Use the toilet in the water pressure range: 7.25 PSI (flowing pressure) – 108.75
PSI (static pressure).
• Use the toilet in the water temperature range of 32-95°F.
• Install a waterproof box on the power socket. (optional)
PARTS IN PACKAGING
Mounting Plate Metal Plates Rubber Anchors and Bolts
Metal Braided Hoses (Lengths: 23.62in)T-Cock PP Water Filter
9.84in

!
!
-!2!-!
PRODUCT SPECIFICATIONS
INSTALLING YOUR SMART TOILET SEAT
!
1 Remove Current Toilet Seat and Prepare Toilet for Installation
Remove the previously installed toilet seat by loosening the bolts and dismantling. Once done, clean
the toilet in preparation for the new Smart Toilet Seat.

!
!
-!3!-!
2 Install Rubber Anchors
The mounting plate for your Smart Toilet Seat comes disassembled. To start, take the rubber
anchors and insert them into the mounting holes on your toilet by forcing the knob on the anchor
down through the holes making sure the flared end is flush against the top of the toilet base. Note:
You may use a screw driver to push on and wet the surface of the rubber anchor to make installation
easier.
3 Position and Attach Mounting Plate
With the rubber anchors securely in place you are ready to attach the mounting plate. Place the
mounting plate on the toilet being sure to position it the correct way with the hooks towards the front
of the toilet. Once positioned, place the metal fasteners on the mounting plate and secure with
screws using a washer under each screw. Tighten down screws until secure, making sure the
mounting plate stays in its desired position, and being careful not to over tighten.

!
!
-!4!-!
4 Attach Smart Toilet Seat
Once you’ve installed the mounting plate you are ready to attach the Smart Toilet Seat. To do so,
simply slide the Smart Toilet Seat onto the mounting plate until you hear a click. Note: If the toilet
Seat is positioned improperly you can easily remove it by pressing and holding the uninstallation
button of the toilet found on the right side and sliding it off of the toilet. Once removed, reposition
the mounting plate and reattach.
5 Connect Water Supplies to Toilet Tank
Your Smart Toilet Seat comes with a T-Cock and extra hoses allowing you to divert water for the
spray functions. Completely shut off the water supply to your toilet and disconnect the hose from
the toilet body. Once disconnected, attach the T-Cock directly to the toilet body, and then
subsequently your supply line to the bottom of the T-Cock.

!
!
-!5!-!
Once the T-Cock is installed, and before you turn the water back on, you must install the water line
going from the T-Cock to the Smart Toilet Seat. Take the two hoses that came in the packaging and
connect them to either side of the filter making sure the rubber washer is properly in place in the
water filter intake. Once the water filter is securely attached to either hose, attach the hoses to the T-
Cock and Smart Toilet Seat. Note: Plumbers tape may be used to help prevent leaks.
6 Turn on Water and Test Smart Toilet Seat
Now that you’ve finished installing your Smart Toilet Seat you are ready to test everything. Turn on
the water supply and check around every connection point making sure there are no leaks. Once
you’ve confirmed that no water is leaking, plug in the Smart Toilet Seat into the outlet. The indicator
light on the plug should illuminate and if it does not you can test and reset the plug and it should
begin working.
TESTING YOUR SMART TOILET SEAT

!
!
-!6!-!
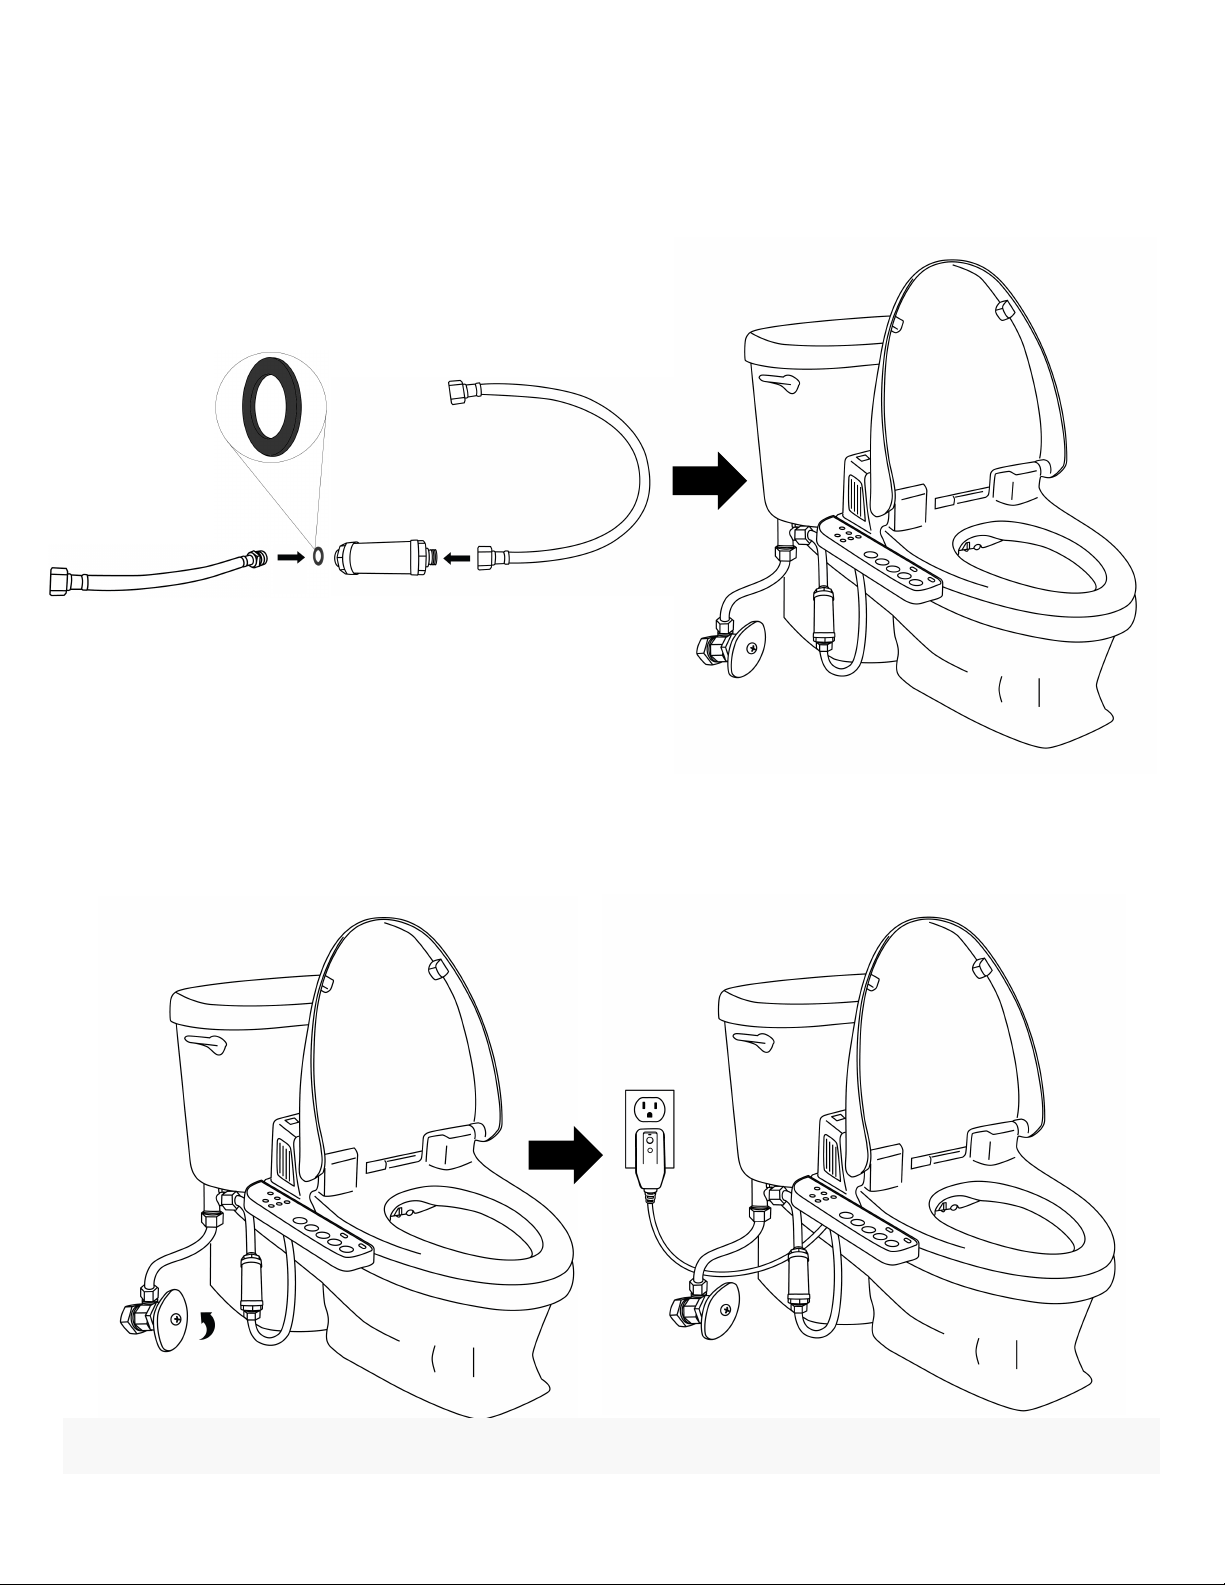
When first using your Smart Toilet Seat:
• Insert the power plug into the socket. Your Smart Toilet Seat’s spray nozzle
should extend and retract initially as part of the system testing phase.
• Make sure that the power indicator light is on before testing the product. The
power light will indicate when the power is on, and the toilet won’t respond even
if it’s connected to electricity when the power indicator light is off.
1 Search for any water leaks before using the product
a. Make sure that all water connections are secure
b. Turn on the water valve to confirm that there’s no water leaking
c. Check the main unit of the toilet seat to make sure no water is leaking from
the product
2 Confirm all product features are functional (Note: sitting sensor will only work
when the toilet seat is down)
a. Cover the sensor with a wet cloth or sit on the toilet
b. Confirm that deodorizer activates
i. Check that the air blows is blowing out correctly
c. Verify cleaning functions
i. Press the [SPRAY] button checking to make sure the nozzle sprays
water
1. The Smart Toilet Seat needs to wait 1 minute for water spray
function to work upon turning the water on and 4 minutes for
warm water after when the tank is empty
ii. Press the water pressure adjustment button and confirm the water
pressure changes
iii. Press the [STOP] button – sprayer should stop
d. Verify Drying Functions
i. Press the [DRYER] button to make sure warm air blows out
ii. Press the [STOP] button – air should stop
e. Verify that the toilet seat is heating properly
i. It may take about 30 seconds for the toilet seat to heat up fully
f. Make sure the deodorizer stops upon removing wet cloth or standing – it
takes 6 seconds for the deodorizer to deactivate
g. The seat cover then can be closed softly by hand before leaving
CLEANING THE WATER FILTER

!
!
-!7!-!
It is important that you clean your filter regularly. Failure to do so may result in
lowered water pressure due to blockages of dirt in the filter.
To clean the water filter:
1 Turn off the water valve supplying the toilet and seat
2 Press the [NOZZLE CLEANING] button. When the nozzle extends out, press the
button again
3 Remove the water filter and wipe off any visible dirt
a. You may use a cotton swab to clean any visible dirt on the water filter
4 Reinstall the water filter without connecting it to the toilet seat
5 Back-flush the water filter by turning on the water supply and running it through
the filter the opposite way
a. Note: the water filter is easily damaged so use caution when cleaning
Disconnecting the Water Filter While Water Valve is on will Result in
Water Spraying Out.

!
!
-!8!-!
CAUTIONS:
• Back-flush or change the filter if you find that the water pressure has fallen significantly.
• Filter can be easily damaged, and so it is therefore not guaranteed as part of the warranty.
GETTING POWER TO YOUR SMART TOILET SEAT

!
!
-!9!-!
The typical bathroom doesn’t have an outlet in close proximity to the toilet. To solve
this issue, you can have an electrician come and install an outlet near your toilet in the
bathroom. This will enable you to power your Smart Toilet Seat without using an
extension cord or other method.
If you have a GFCI outlet already in your bathroom you may connect your new outlet to
the load side of the existing GFCI assuming the loads on the GFCI aren’t full. By doing
so the new outlet will be protected.
PRODUCT MODEL AND PARAMETERS

!
!
-!10!-!
Input Water Type
Pipe Directly
Rated Power Supply
Alternating Current (AC) 110V 60Hz
Rated Power
430W
Standard Daily Power
Consumption
0.5kWh
Heated Seat
Surface
Temperature
Temperature Adjustment Range 86-104°F (Automatic Power
Saving at About 79°F)
Heater Power
40W
Safety Device
Thermal Fuse
Deodorizing
Device
Mode
Catalyst and Absorption Dually
Airflow Rate
6.36ft3/min
Washing
Device
Water Rate for
Spray
About 13.5-22oz/min (when the water pressure is 29 PSI)
Water Rate for Soft
About 13.5-18.5oz/min (when the water pressure is 29 PSI)
Water Rate for
Front
About 13.5-18.5oz/min (when the water pressure is 29 PSI)

!
!
-!11!-!
Water Temperature
Temperature Adjustment Range 86-104°F
Heater Power
Maximum: 650W
Tank Capacity
0.32 Gallons
Safety Device
Power leakage protection, thermal fuse, over-heating
protection, dry heating prevention
Backflow
Prevention Device
Reflux Valve
Drying Device
Drying Airflow
18.36 ft3/min
Temperature
Regulation
Adjustment Range Around 95-138°F
Power
350W
Safety Device
Thermal fuse, over temperature protection
Water
Requirements
Temperature
32-95°F
Water Pressure
7.25 PSI (Flow Pressure) – 108.75 PSI (Static Pressure)
Operating Temperature Range
32-104°F
Standard Dimensions
Width 20in / Length 21in / Height 7.1in
Standard Weight
About 13.25lbs
SAFETY PRECAUTIONS

!
!
-!12!-!
Please carefully read the following safety precautions to ensure you use the product
correctly. The precautions listed here are important security-related concerns that must
be followed.
Annotation and meanings are described below:
Mandatory
CAUTION
MUST COMPLY WITH
WARNING
If Ignored, May Cause Personal Injury or
Property Damage
Mandatory Steps
Forbidden or Prohibited

!
!
-!13!-!
1. Must comply with installation and use instructions.
Caution
1. If you do not operate this product in accordance to the following, it may cause a
fire or electric shock:
o This product requires electricity to function properly, so do not install it in a
place that it may get wet easily. Make sure the power plug and socket
connection is reliable and that the area around the connection is
waterproofed.
o Make sure the socket mounting is positioned over 1.2m above the ground,
and as far away from the bath as possible to avoid splashing water.
o Product wire must be grounded, so be sure to pick the ground line. (Note:
grounded means the ground resistance is lower than 100Ω. The ground wire
of the switchboard should use bronze wire with a diameter more than
1.6mm).
o When the bathroom is used, ventilating fans or ventilation opening needs to
be installed to maintain good air circulation in the bathroom. Do not spill
water or detergent on the body of the product or the power plug.
o When cleaning the product, be sure the power is disconnected.
o Children should not play with the appliance.
o Lit cigarettes or other combustible substances cannot be put into the toilet.
o If the power cord is broken, it must be repaired or replaced by the
manufacturer or another qualified service personnel to avoid danger.
2. In order to prevent low temperature burns the following requirements must be
complied with to operate:
o When sitting on the seat for a long time, the seat temperature should be
placed in the [OFF] position.
o When the following people are using the warm seat and warm air drying
functions, the seat should be placed in the [OFF] position, and the air
temperature should be set to the [LOW] position.
§ Children and elderly people who are unable to adjust the temperature
to comfortable levels on their own.
§ The sick or disabled, and any other person with reduced mobility.
§ Anyone using medicine that may cause sleepiness (e.g., sleeping pills,
cold medicine, etc.), impaired by alcohol, or extremely fatigued.

!
!
-!14!-!
3. If you do not use the tank containing products for an extended period of time,
close the inlet valve and release the water stored in the product. Once done,
remove power to the product. The next time you use the product, run water
through the product thoroughly before use.
4. If the product is in a place where it may encounter freezing temperatures,
measures should be taken to avoid damage.
Warning
1. Failure to operate this product according to the following statements may cause
fire or electric shock:
o Do not use with an electrical socket with power stronger than AC110V or
use a loose electrical socket.
o Never disassemble, repair or modify the product.
o Never use wet hands when inserting the plug into the socket.
o Never insert a needle or other metal object into the socket.
o Do not pull, heat, or forcibly bend the power cord or place heavy objects on
the power cord.
2. Do not use any source other than tap water with this product, as it may cause
skin irritation and/or other issues.
3. Do not carry the product by the seat or top cover only; carry the toilet’s body
during transport.
4. Do not place heavy objects on the seat or stand on the cover or face of the body,
or it may cause the body to be fractured, leaking, and/or damaged.
5. Do not put your fingers or other objects into or block the exit of heated air.
6. If you do not operate according to the following, it may cause the body or cover
to be damaged, scratched, or the toilet to malfunction and trigger to fail:
o Do not modify the main body or the nozzle with using a child seat. Children’s
seats should be placed on the toilet’s seat when in use, and removed after
use.
o Avoid direct sunlight as this may cause discoloration and uneven
temperature dispersion on the seat.
o Disconnect product from the outlet during lightning storms.
o Do not wipe the product body, seat, or cover with a dry cloth or paper towel.
o Don’t cover the sitting sensors or lean backwards on the opened cover.
o Stay away from the toilet when using radios and other electronics
equipment, or noise may be heard in the radio or electronic equipment.

!
!
-!15!-!
7. Unplug the power cord and close the inlet valve when you encounter the following
situations:
o Leaks from piping and/or inside the product
o Abnormal heat
o Abnormal sounds or smells
o Cracks in the product
o Smoke is coming from the toilet
8. Do not continue to use the product in the case of a defect, or it may cause fire,
electric shock, or indoor water damage problems.
CAUTIONS BEFORE INSTALLATION
Do not plug your Smart Toilet Seat into an electrical outlet before completing
installation. Otherwise, it may cause the toilet seat to malfunction.
• Pressure range: 7.25 PSI (flowing pressure) – 108.75 PSI (resting pressure).
• Do use the accessories included with the toilet.
• Use the new hose assemblies included in the packaging and do not reuse old
hoses or assemblies.
NECESSARY TOOLS AND EQUIPMENT
Monkey Wrench Phillips Screw Driver
You may also need any or all of the following: square, electric drill, hammer, marker
pen, glass glue, or glass glue gun.
PARTS AND FEATURES

!
!
-!16!-!
FUNCTIONS OF SIDE SWITCHES

!
!
-!17!-!
PREPARATIONS BEFORE USE
Table of contents
Other Pacific Bay Toilet manuals