Packard Bell EHR 2080 User manual

-
1
English. . . . . . . . . . . . . 3
Norsk . . . . . . . . . . . . 35
Svenska . . . . . . . . . . . 69
Polski. . . . . . . . . . . . 102
Česky . . . . . . . . . . . 136
Magyar . . . . . . . . . . 168

2 -
Packard Bell Easy HDD Recorder User's Guide

English -
3
ENGLISH
PACKARD BELL EASY HDD RECORDER USER'SGUIDE
Copyright © 2005 Packard Bell B.V. All Rights Reserved. No part of this manual may be reproduced or transmitted,
in any form or by any means, whether electronic, chemical, manual or otherwise, including but not limited to photo-
copying, recording, or information storage and retrieval systems, for any purpose without prior written permission of
Packard Bell B.V.
DISCLAIMER
Packard Bell B.V. specifically disclaims all warranties, either express or implied, including, but not limited to, implied
warranties of merchantability and fitness for a particular purpose with respect to this product and documentation.
Updates to hardware components are made regularly. Therefore some of the instructions, specifications and pictures
in this documentation may differ slightly from your particular situation. All items described in this guide are for illus-
tration purposes only and may not apply to your particular situation. No legal rights or entitlements may be obtained
from descriptions made in this manual.
Packard Bell B.V. reserves the right to revise or make changes or improvements to this product or documentation at
any time without obligation to notify any person of such revisions or improvements. In no event shall Packard Bell
B.V. be liable for any consequential or incidental damages, including but not limited to loss of business profits or any
other commercial damages, arising out of the use of this product.
TRADEMARKS
Packard Bell is a registered trademark of Packard Bell B.V.. All other company or product names are trademarks, regis-
tered trademarks or service marks of their respective owners.
WARNING
To prevent fire or shock hazard, do not use the plug with an extension cord, receptacle or other outlet unless the plug
can be fully inserted. Do not expose this appliance to rain or moisture.
IMPORTANT SAFETY PRECAUTIONS
• Read these instructions.
• Keep these instructions.
• Heed all warnings.
• Follow all instructions.
• Do not use this apparatus near water.
• Clean only with a dry cloth.
• Do not block any ventilation openings. Install in accordance with the manufacturer's instructions.
The lightning flash with
arrowhead symbol within a
triangle is intended to alert the
user to the presence of unin-
sulated dangerous voltage within
the product's enclosure that may
be of sufficient magnitude to
constitute a risk of electric shock
to persons.
WARNING: TO REDUCE THE
RISK OF ELECTRIC SHOCK, DO
NOT REMOVE THE COVER (OR
BACK). NO USER SERVICEABLE
PARTS INSIDE, REFER SERV-
ICING TO QUALIFIED SERVICE
PERSONNEL
The exclamation point within a
triangle is intended to alert the
user to the presence of important
operating and maintenance
(servicing) instructions in the
literature accompanying the
appliance.
WARNING
RISK OF ELECTRIC SHOCK.
DO NOT OPEN

4 -
Packard Bell Easy HDD Recorder User's Guide
• Do not install near any heat sources such as radiators, heat registers, stoves or other apparatus (including ampli-
fiers) that produce heat.
• Do not defeat the safety purpose of the polarised or grounding-type plug. A polarised plug has two blades with
one wider than the other. A grounding type plug has two blades and a third grounding prong. The wide blade
or the third prong is provided for your safety. If the provided plug does not fit into your outlet, consult an elec-
trician for replacement of the obsolete outlet.
• Protect the power cord from being walked on and from pinching.
• Only use attachments/accessories specified by the manufacturer.
• Unplug this apparatus during lightning storms or when unused for long periods of time. Please note that the
product warranty does not apply if damage to the product is the result of a lightning strike.
• Refer all servicing to qualified service personnel. Servicing is required when the apparatus has been damaged in
any way, has been exposed to rain or moisture, does not operate normally or has been dropped.
• You must unplug the power supply cord to disconnect the apparatus from the power supply. With this in mind,
the socket-outlet should be located close to the apparatus and should also be readily accessible.
PRODUCT DISPOSAL
The Waste Electrical and Electronic Equipment (WEEE) Directive requires that the used electrical
and electronic products must be disposed of separately from normal households waste in order to
promote reuse, recycling and other forms of recovery and to reduce the quantity of waste to be
eliminated with a view to reducing landfill. This includes accessories such as a remote control,
power cords, etc. When you dispose of such products, please follow the guidance of your munic-
ipal authority and/or ask your retailer when purchasing a new product.

English -
5
CONTENTS
Easy HDD Recorder Features.............................................................................................................................. 5
Main Features .............................................................................................................................................. 5
Additional features ....................................................................................................................................... 6
Getting Started - Controls................................................................................................................................... 7
Preparing the Remote Control ...................................................................................................................... 7
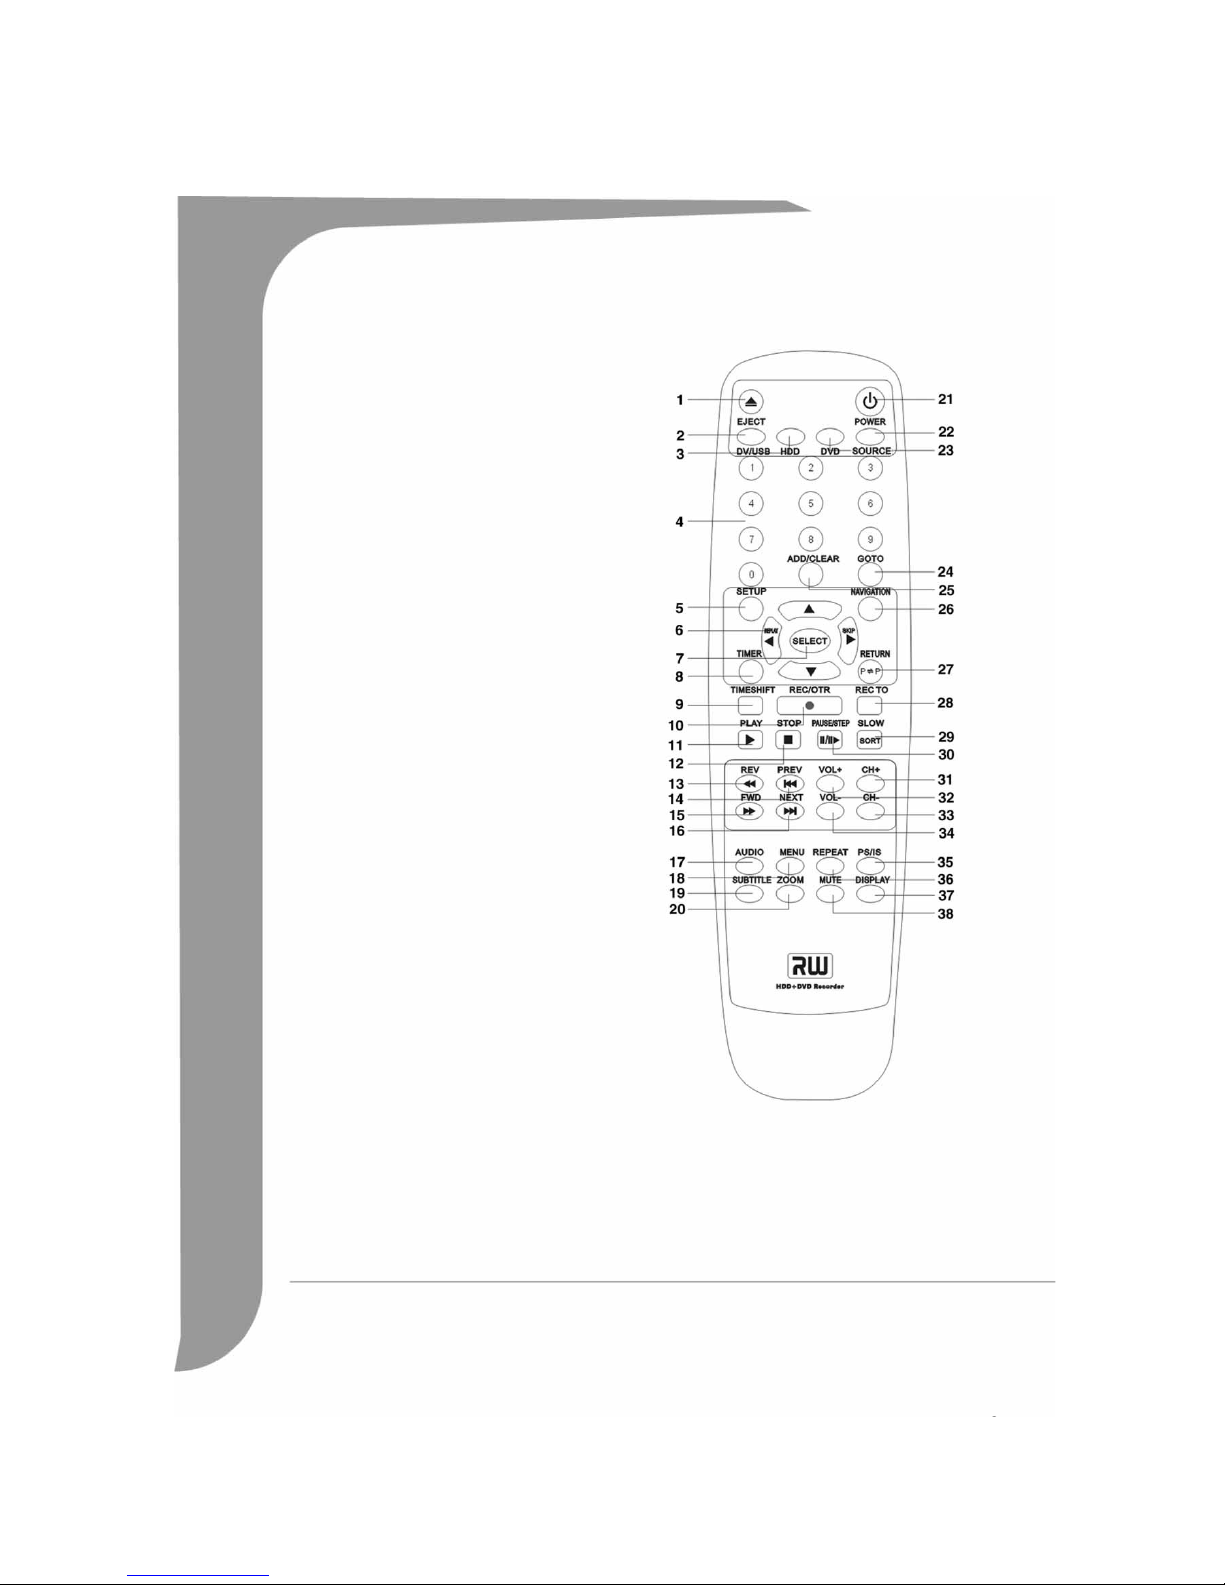
Remote Control Buttons ............................................................................................................................... 8
Front panel controls and features .................................................................................................................. 9
Rear panel diagram....................................................................................................................................... 9
Getting Started - Connecting ............................................................................................................................ 10
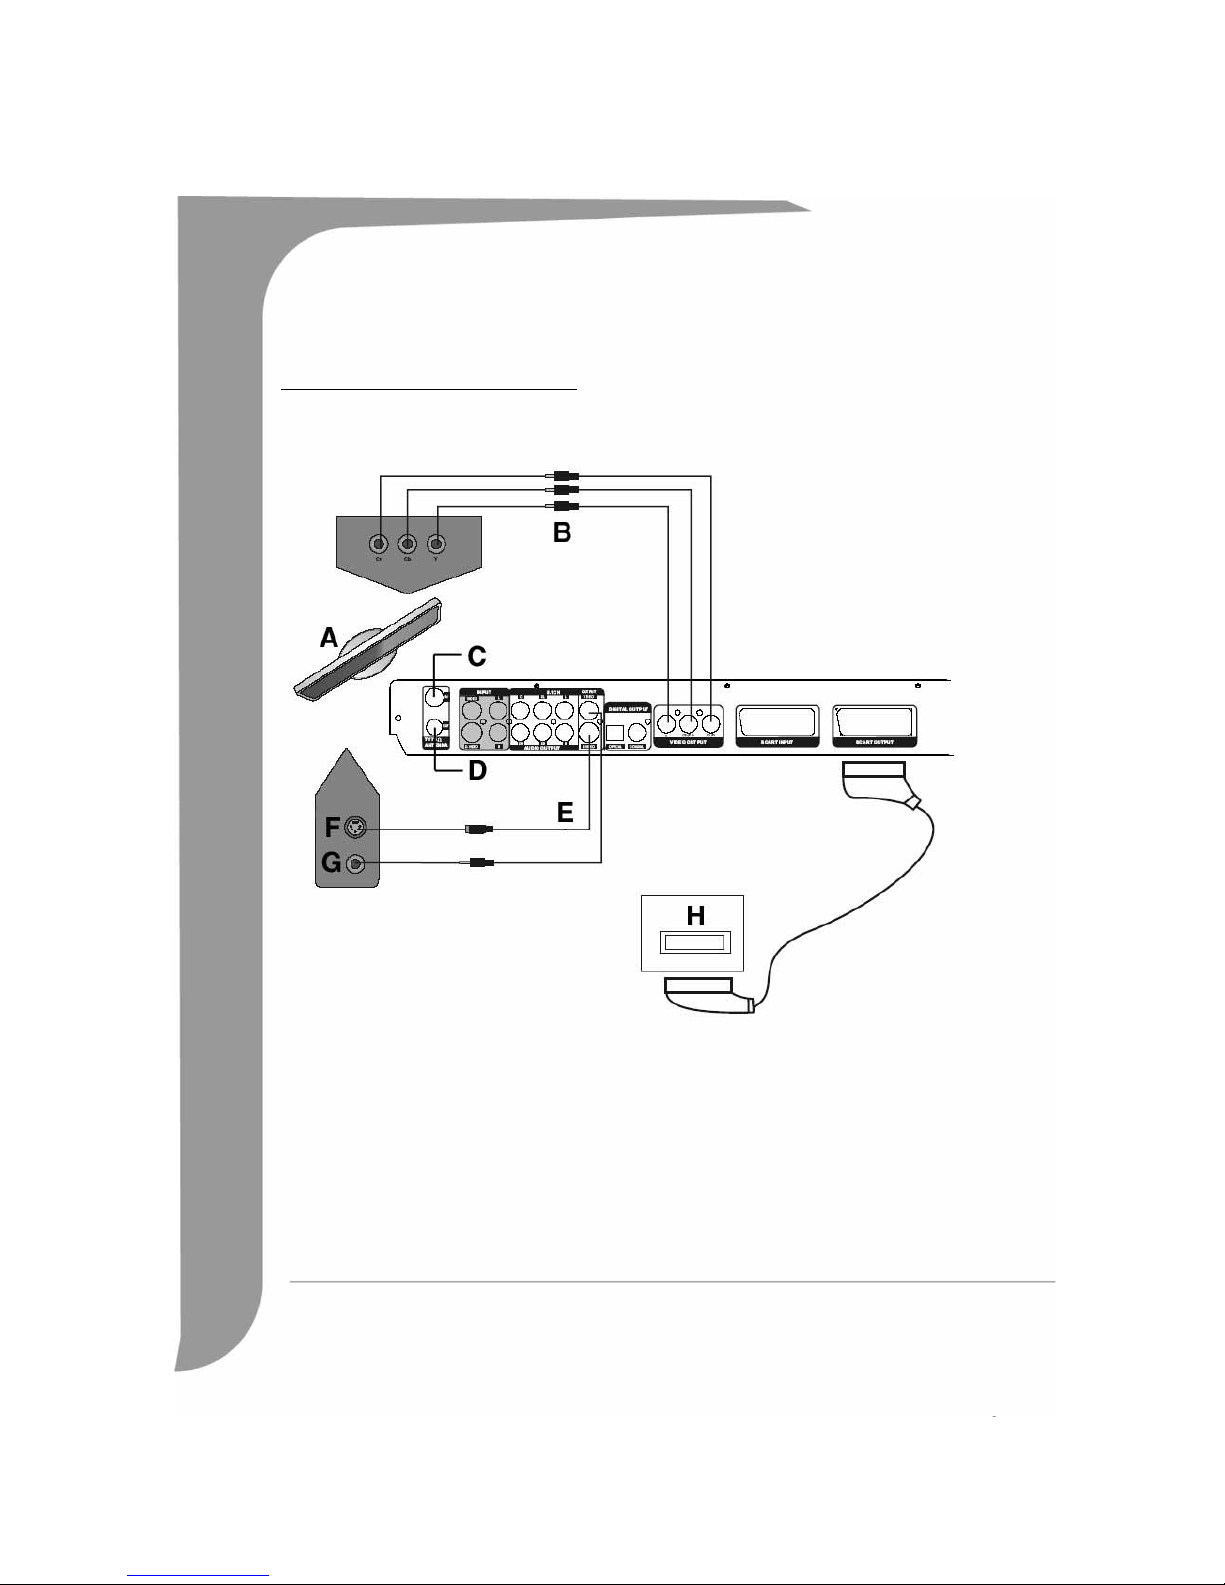
Connecting to a Television ......................................................................................................................... 10
Connecting To A 5.1 Channel Dolby Digital Audio Amplifier ...................................................................... 11
Connecting to a Dolby Digital Decoder or DTS Decoder Amplifier............................................................... 11
Connecting USB devices............................................................................................................................. 13
Navigation Mode........................................................................................................................................ 13
Scan for TV channels.................................................................................................................................. 14
Disc Types ....................................................................................................................................................... 15
DVDs......................................................................................................................................................... 15
SVCD/VCD/AUDIO CDs .......................................................................................................................... 15
MP3 /JPEG/DivX (Audio/Image/Video files) ............................................................................................. 15
Playable And Writable Discs ....................................................................................................................... 16
Playable Discs ............................................................................................................................................ 16
Unplayable Disc Types................................................................................................................................ 16
Playback Mode................................................................................................................................................. 16
DVD Playback ............................................................................................................................................ 16
VCD Playback ............................................................................................................................................ 17
General Playback Options........................................................................................................................... 18
JPEG/MP3 PLAYBACK .............................................................................................................................. 19
DivX PLAYBACK........................................................................................................................................ 20
Parental lock .............................................................................................................................................. 20
Recording/Time Shifting .................................................................................................................................. 20
To Record using Time Shifting .................................................................................................................... 21
Recording to DVD ...................................................................................................................................... 23
Recording quality ....................................................................................................................................... 23
Chapter markers......................................................................................................................................... 24
Timer Recording .............................................................................................................................................. 24
Setting the clock......................................................................................................................................... 24
Scheduled recording................................................................................................................................... 25
System time adjustment.............................................................................................................................. 25
HDD title list.............................................................................................................................................. 26
Dubbing..................................................................................................................................................... 26
Editing HDD Titles........................................................................................................................................... 27
Editing DVD+RW titles .............................................................................................................................. 28
Editing a DVD+RW disc ............................................................................................................................. 29
Editing a DVD+R disc................................................................................................................................. 29
Troubleshooting ............................................................................................................................................... 31
Specifications ................................................................................................................................................... 32
EASY HDD RECORDER FEATURES
The Packard Bell Easy HDD Recorder can encode TV signals, AV signals from external devices or digital
signals from IEEE 1394 devices, and can record on DVD+RW or DVD+R discs for the facility of storage. The
Easy HDD Recorder is also compatible with all functions of ordinary DVD players.
Main Features
• Embedded HDD (Hard Disk Drive), supports functions such as Time Shifting and Direct Digital Dub.
• Plays pre-recorded Movie DVDs and Audio CDs.
• MP3 support.
• DivX codec support (short for DivX compression/decompression).

6 -
Packard Bell Easy HDD Recorder User's Guide
• Dolby Digital sound for a total of 6 (‘5.1’) discrete channels (front-left, front-middle, front-right, rear-left,
rear-right and subwoofer).
Time Shifting
Simultaneous video recording and playback.
• Pause and resume live TV broadcasts. Fast forward, fast rewind and jump to any point in the recording.
• Instant replay.
• Play a previously recorded program while another program is being simultaneously recorded.
DVD/CD Player
• 16:9 and 4:3 TV screen aspect ratio support.
• Playback functions including Program, Repeat, Fast Forward/Reverse, Zoom, etc.
• Supports various audio languages, subtitle languages and disc menu languages. Supports viewing angles,
as well as other normal DVD playback features.
• Compatible with DVD, Super VCD, VCD, CD, CD-R discs, can play MP3, JPEG and Picture CD.
• Copy protection technology from Macrovision.
Program Recording
• Record from TV tuner or analogue AV input in MPEG-2 format.
• Play a previously recorded program from the HDD while recording another program.
• Programmable timer for recording a single or recurring TV program.
• Set up to 8 time-recording events with three options: "Once", "Daily" and "Weekly".
• OTR quick-record; record TV at the press of a button.
DVD Archiving (‘dubbing’)
• Archive recordings on the HDD (Hard Disk Drive) to DVD+RW or DVD+R discs.
• DVDs recorded using the Easy HDD Recorder can be played on most current and future DVD players.
Personal Video Archiving
• Transfer videos from a VCR, analog camcorder or digital (DV) camcorder to DVD with Direct Digital
Dub™.
Connectors
• Digital input (DV) connector for digital video cameras; audio and video signals are transmitted via the
same cable.
• Standard video out (CVBS), S-video out, SCART IN/OUT jacks, and component video out (Y, Cb/Pb,
Cr/Pr) out jacks.
• Coaxial digital audio out jack.
• Interfaces with USB flash drives, USB memory card readers and USB cameras (The mass storage device
must be FAT32 formatted).
• Signal pass-through with SCART and TV aerial connectors.
Additional features
• Parental Lock Level control system.
• Screensaver program for screen protection.
• Progressive Scan creates a picture with twice the scan lines of traditional Component Video. This results
in reduced picture flickering and motion artifacts as well as a sharper image on large screens.
This product contains copy protection technology, which is protected by US
Patent and other intellectual property rights. Use of this copy protection tech-

English -
7
nology from Macrovision Corporation requires the approval of Macrovision. It is intended exclusively for
home use and other limited pay-per-view applications, unless Macrovision approves some other use in
writing. Modifications to the equipment, removal of components and reverse engineering are prohibited.
GETTING STARTED - CONTROLS
Preparing the Remote Control
The remote control and batteries are individually packed. Before you use the remote control you must put
the batteries into the remote control:
1. Take the remote control and two AAA batteries.
2. Remove the battery cover on the remote control, insert the batteries (with the correct orientation) and
then put the cover back.
Note: When operating the Easy HDD Recorder, remember to point the remote control directly at the Recorder,
not the TV set!

8 -
Packard Bell Easy HDD Recorder User's Guide
Remote Control Buttons
Please refer to the relevant chapters for detailed
descriptions of these buttons:
1. EJECT button
2. DV/USB button
3. HDD button
4. NUMBERS (0-9) button
5. SETUP button
6. LEFT/REPLAY, UP, DOWN, RIGHT/SKIP buttons
7. SELECT button
8. TIMER button
9. TIME SHIFT button
10. REC/OTR button (RECORD/ONE-TOUCH RECORD)
11. PLAY button
12. STOP button
13. REV (Reverse) button
14. PREV (Previous) button
15. FWD (Forward) button
16. NEXT button
17. AUDIO button
18. MENU button
19. SUBTITLE button
20. ZOOM button
21. POWER button
22. SOURCE button
23. DVD button
24. GOTO button
25. ADD/CLEAR button
26. NAVIGATION button
27. RETURN button
28. REC TO button
29. SLOW/SORT button
30. PAUSE/STEP button
31. CHANNEL+ button
32. VOLUME+ button
33. CHANNEL- button
34. VOLUME- button
35. PS/IS (PROGRESSIVE/ INTERLACE SCAN)*
36. REPEAT button
37. DISPLAY button
38. MUTE button
WARNING: If the PS/IS button is pressed while the unit is connected to a non Progressive Scan compatible
TV the screen will turn black and access to all menus will be lost. If this happens, press the PS/IS button once
more to return to normal.

English -
9
Front panel controls and features
1. STANDBY/ON BUTTON
2. STANDBY LED
3. IR (REMOTE SENSOR)
4. DVD DOOR
5. VFD DISPLAY
6. OPEN/CLOSE BUTTON
7. SOURCE BUTTON
8. PLAY BUTTON
9. STOP BUTTON
10. RECORD BUTTON
11. COMPOSITE VIDEO INPUT(FRONT)
12. AUDIO INPUT (FRONT RIGHT)
13. AUDIO INPUT (FRONT LEFT)
14. USB INPUT
15. DIGITAL VIDICON INPUT
Rear panel diagram
1. RF SIGNAL INPUT
2. RF SIGNAL OUTPUT
3. COMPOSITE VIDEO INPUT(REAR)
4. S-VIDEO INPUT
5. AUDIO INPUT (REAR LEFT/RIGHT)
6. 5.1CH AUDIO OUTPUT (L, R, SL, SR, C, SW)
7. COMPOSITE VIDEO OUTPUT
8. S-VIDEO OUTPUT(REAR)
9. DIGITAL AUDIO- OPTICAL OUTPUT
10. DIGITAL AUDIO-COAXIAL OUTPUT
11. COMPONENT VIDEOS OUTPUT (Y, Cr/Pr, Cb/Pb)

10 -
Packard Bell Easy HDD Recorder User's Guide
12. SCART INPUT
13. SCART OUTPUT
GETTING STARTED - CONNECTING
Connecting to a Television
A. TV
B Component video output
CRFantennainput
D RF antenna output
E S-Video output
F S-video input
G Video input
HSCARTinput
There are three kinds of video outputs available, namely Component Video, S-Video and Composite Video.
In terms of picture quality, Component Video is the best; S-Video comes next, while the Composite Video is
less satisfying. There is a scart output available also. A Composite Video (CVBS), a Component Video (RGB)

English -
11
and audio (L & R) outputs are built into the scart output. When the scart output is used, none of the above-
mentioned cables is needed for connection.
Note: For Digital Cable and Satellite TV users please connect your decoder’s output to this unit’s input.
Connecting To A 5.1 Channel Dolby Digital Audio Amplifier
You can enjoy 5.1-channel Dolby Digital audio by connecting the recorder to an amplifier-and-speakers
system with 5.1 Channel Dolby Digital Audio. Dolby Digital programs can deliver surround sound with up to
five discrete full-range channels, Left, Centre, Right, Left Surround, Right Surround—plus a sixth channel for
powerful low-frequency effects (LFE). As it needs only about one-tenth the bandwidth of the others, the LFE
channel is referred to as a ".1" channel (and sometimes erroneously as the "subwoofer" channel).
A Ordinary Cable (Analog Output)
B 5.1 Channel Amplifier
Connecting to a Dolby Digital Decoder or DTS Decoder Amplifier
You can enjoy the completely-reproduced 5.1-channel Dolby Digital audio or Digital Theatre Systems audio
effect by connecting the recorder to an amplifier-and-speakers system with Dolby Digital decoder or DTS
decoder via a coaxial or optical cable.

12 -
Packard Bell Easy HDD Recorder User's Guide
A Coaxial or Optical audio cable. See your amplifier’s user guide for which type to use.
B Amplifier
• In Audio Setup, set the Digital Output Mode to RAW Output.
Connecting an external device for recording via the FRONT panel

English -
13
A. Digital Vidicon
B USB storage device
NOTE - Refer to the manual of the connected system. Turn off the power and unplug both units before
setting up any connections.
Connecting an external device for recording via the REAR panel
A. RF Input
B Video lnput (Video or S-Video)
CAudioInput
DSCARTInput
EDVDPlayer
Connecting USB devices
The Easy HDD Recorder may interface with USB flash drives, USB memory card readers and USB cameras
that are compatible with the Mass Storage Class.
You can view one or many JPEG pictures in sequence.
Once the USB device is connected to the USB port, press the DV/USB button twice to switch to USB mode.
This will bring up the file selection menu. You can browse the content of the USB device using the Up,
Down or Select buttons.
Note: It may take a few seconds for a USB device to be recognised.
Note: The mass storage device must be FAT32 formatted.
Navigation Mode
The Navigation Mode can realise all functions of the unit.

14 -
Packard Bell Easy HDD Recorder User's Guide
Press the Navigation button of the remote control to display the screen on the right.
1. Switch to DVD Playback Mode.
2. Switch to TV/VIDEO Mode.
3. Switch to System Setup Mode.
4. Switch to Timer Record Mode.
5. Switch to USB Playback Mode.
6. Switch to HDD Playback Mode.
Scan for TV channels
If you want to watch or record TV programs, you must first
perform a TV channel scan:
• Press the Setup button to access the system menu when the
playback is stopped.
• In the Recording section use the arrow buttons (Up/Down) to highlight the
Country Selection
icon, and
then press the Select button to view the country list.
• Choose your country from the list and press the Select button.
• Use the arrow buttons (Up/Down) to highlight
APS
and press the Select button to start scanning.
• Use the arrow buttons (Up/Down) to highlight
Modify channel
, and press the Select button to access
the
Channel Edit
menu.
Note: If you are using the Time Shifting features, turn Time Shifting off before continuing.
Modify Channel Information Menu
Program Number: The number of the current channel, this item can not be modified.
Name: Use the arrow buttons (Up/Down/Left/Right) to select and edit channel name.
Standard: The transmission standard of the current channel. You should choose the correct standard
according to the local TV signal.
Search type: Use the arrow buttons (Up/Down/Left/Right) to select scan mode. There are two modes:
Frequency
and
Channel
. In Frequency mode, the Band item will not be displayed.
Band: The band of this channel. You can select
Standard
or
Cable
.
Channel: Use the arrow buttons (Up/Down/Left/Right) to select and edit channel name.
Fine tune: Fine tune current channel.
Delete: To delete the current channel from the channel list.
OK: Confirm the settings for the current channel and save.
Cancel: Discard current settings and exit the menu.
• Use the arrow buttons (Up/Down) to select
Program Table
, and press the Select button to sort the TV
channels.
• Use the arrow buttons (Up/Down) to select the channel you want to sort, press the Right button to con-
firm your selection. The selected channel will be temporarily moved to the panel on the right. Use the
Up/Down buttons to move the selected channel to the desired position and press the Left button to
insert it into the channel list.

English -
15
• Change the system date and time with the arrow buttons.
DISC TYPES
DVDs
The whole disc is divided up into smaller, more manageable sections so that you can find specific content
more easily. DVD discs are divided into one or more titles. Each title may be further divided into several
chapters. Occasionally, a chapter may contain index points, effectively dividing the chapter up into several
parts, too.
Multi-Angle
You can view scenes from different camera angles when watching movies or other media with multiple angle
playback available.
Multiple Audio Languages
You can select the expected language on when watching movies or discs that have multiple languages and/
or audio soundtracks recorded on them.
Multi-Language Subtitles
You can select the expected subtitle language or turn subtitles off when watching movies or discs that have
multi-language subtitles recorded on them.
SVCD/VCD/AUDIO CDs
SVCD/VCD/AUDIO CD are divided into a number of tracks. A track may contain a number of index points
occasionally, which effectively divides the track up into several parts.
MP3 /JPEG/DivX (Audio/Image/Video files)
MP3 is a compressed audio file format that uses the file extension “mp3” or “.MP3”. JPEG is a compressed
image file format that uses the file extension “.jpg” or “.JPG”. DivX is a compressed video file format that
uses the file extension “.avi” or “.AVI”.
NOTE: The Easy HDD Recorder may take a long time to display the list of disc contents if the disc contains
many songs/pictures or very long songs or large pictures.

16 -
Packard Bell Easy HDD Recorder User's Guide
Playable And Writable Discs
DVD+RW (rewritable DVD discs)
DVD+RW is an erasable format. DVD+RW discs can be rewritten more than 1,000 times.
*DVD+R (write-once DVD discs)
DVD+R (write-once DVD discs) DVD+R discs can only be written once. Several recordings can be made on
the same disc as long as the disc is not finalised or full.
Note: If the disc is finalised, you can not edit or record on the disc, even though unused capacity may still be
available.
Should you wish to play a DVD+R created with your Easy HDD Recorder on another player, please make sure
it has been finalised. Likewise, you must use the "make compatible" option if you want to play a DVD+RW or
disc on another player.
Playable Discs
DVD Video (Digital Versatile Disc)
DVD-R and DVD+R (write-once DVD)
DVD-RW and DVD+RW (rewritable DVD)
DVD-RW discs must be recorded in video mode to be played by the Easy HDD Recorder.
Audio CD (digital audio disc)
Super Audio CD (only plays the CD layer of a hybrid SACD disc)
VCD (format 1.0, 1.1 and 2.0)
Super VCD
Audio CD-R (write-once CD) / MP3 Compressed Music
Audio CD-RW (rewritable CD) / MP3 Compressed Music
Unplayable Disc Types
• Unfinalised discs from other DVD/CD recorders.
• Not all CD-R, CD-RW, DVD-R, DVD-RW, DVD+R, DVD+RW discs are supported due to the type of disc
or the condition of the recording.
PLAYBACK MODE
DVD Playback
Playing ‘Ordinary’ DVD Discs (e.g. a DVD Movie)
1. Make sure all connections are correct, then plug the power cord into a wall outlet. Press the Standby/On
button on the front panel or the POWER button on the remote control to power on the Easy DVD
Recorder.
2. Insert a DVD disc. If the DVD picture does not appear on the screen, press the DVD button on the
remote control to switch to the DVD mode.
3. Use the arrow buttons to select the desired title.
4. Press the Select button. The selected title will start playing.
5. Press the Select button during the process of playback to display playback information.

English -
17
6. Press the Select button again to view the playback control menu below. Press the LEFT arrow button to
shut down the menu.
7. To remove the disc, press the OPEN/CLOSE button on the front panel.
Playing Recordable DVD Discs (DVD+RW, DVD-RW, DVD+R or DVD-R)
1. Power on the Easy HDD Recorder.
2. Insert a recordable DVD disc.
3. If the DVD Index screen does not appear, press the DVD button on the remote control to switch to the
DVD mode.
4. Use the Arrow buttons (Up/Down) to highlight the desired title. Press the Select buttons to start playing.
5. Press the Stop button to stop playback, press the Play button to resume playback from the stop point.
Screen display
Press the Select button during playback to display the following information:
Playing Title - Playing Chapter - Audio Language - Elapsed Time
Disc menu
Press the DVD button to show the disc menu. The contents of this menu depends on the disc being viewed.
Use the arrow buttons to select your desired title, and press the Select button to play it.
Press a number button to play the desired title.
VCD Playback
VCD Disc Menu
Press the DVD button to show the disc menu (PBC ON).
Press a number button to play the desired title.
NOTE: Only for VCD 2.0 and above versions. When the disc is being played, number buttons will trigger no
action.
Playing in sequence
Press the MENU button to switch between VCD DISC MENU (PBC ON) mode and PLAY IN SEQUENCE
(PBC OFF) mode.
For VCD 1.0, 1.1 discs, the player will enter PLAY IN SEQUENCE mode after the disc is loaded. (These
types of discs can only be played in this mode.) In this mode, you can press the number buttons to select a
title to play. And the number buttons will also respond when the disc is being played. Some discs will start to
play automatically.
NOTE: Only for VCD and SVCD discs.

18 -
Packard Bell Easy HDD Recorder User's Guide
General Playback Options
System menu
• Press the Setup button to show the system menu.
• Use arrow buttons to select your desired item, press the Select button to confirm your selection.
• Press the Setup button again to exit the menu.
Fast forward and fast reverse
Press the >> (Fast Forward) button to activate fast forward, press the << (Fast Reverse) button to activate
fast reverse. Press repeatedly to toggle through 4 different playback speeds.
NOTE: Press Play to resume normal playback.
Play
Press the Select button on the remote control or the Play button on the front panel to start playback.
Pause
Press the Pause button on the remote control to pause.
Skip
Press the >>| (Skip Forward) button to skip to the next title/chapter, press the |<< (Skip Reverse) button to
skip to the previous title/chapter.
Repeat
1. A-B Repeat
• Press the Select button twice to access the setup menu during playback.
•UsetheUp/Down arrow buttons to highlight the Mode submenu, and press the Select button.
•UsetheUp/Down arrow buttons to highlight the A-B REPEAT item, press the Select button to mark the
start point (A); press the Select button again to display the A-B REPEAT item and then press the Select
button for the third time to mark the end point (B). Then the section between the start point and end
point will be repeatedly played.
• Press the left arrow button to exit the setup menu.
2. Title/chapter repeat - Repeatedly press the Repeat button during playback to repeat title/chapter.
3. Repeatedly press the Repeat button until normal playback resumes.
Controlling Playback with the Playback Menu
1. Press the Select button to show the control menu and select a submenu:
MODE: Set the playback mode, e.g.: Repeat, Program, etc.
TRICK: Set the playback status, e.g.: Stop, F.F., F.R., etc.

English -
19
TITLE: Press the Select button and then enter the desired title number to jump to a title.
CHAPTER: Enter the desired chapter number to jump to the chapter.
AUDIO: Select the audio language you want to use, e.g.: FRE (French), ENG (English), etc.
SUBTITLE: Select the subtitle language.
ANGLE: Select the camera angle (must be supported by the disc).
T-TIME: Display the elapsed time and remain time.
2. Press the Left arrow button to exit the control menu.
Programmed playing order
Access the playback control menu (as above).
Select the Mode menu, then select
Program
.
• Use the arrow buttons to highlight the title or chapter you want to program. Press the ADD/CLEAR but-
ton to add the title or chapter name to the right panel. Add as many of your favourite titles or chapters as
you wish.
• Press the Right arrow button to move the cursor into the right panel, press the ADD/CLEAR button to
remove title or chapter from the list.
• Press the Select button to start program playback.
• To exit program playback, press the Stop button or press the Select button to access the playback con-
trol menu and select
Normal
.
Audio language
Press the AUDIO button repeatedly to toggle between up to 8 audio languages or sound when the disc is
recorded with multi-languages.
For Karaoke discs, press the AUDIO button to switch between the accompanying music and vocal.
NOTE: Only for DVD/SVCD discs.
Subtitle language
Press the SUBTITLE button repeatedly to toggle between up to 32 subtitle languages when the disc is
recorded with multi-subtitles.
NOTE: Only for DVD/SVCD discs.
JPEG/MP3 Playback
1. Insert the disc. The file folder menu appears on the screen.
2. Use the arrow and Select buttons to select folders and Mp3/JPEG files for playback.

20 -
Packard Bell Easy HDD Recorder User's Guide
3. If a disc contains JPEG and MP3 contents, the user can enjoy the pictures and music at the same time:
For JPEG/MP3 Simultaneous Slideshow, select the MP3 file then select the JPEG file. The MP3 and
JPEG files will playback in the order selected.
4. Press the Stop button to stop playback. For JPEG/MP3 Simultaneous Slideshow, press the Stop button
twice.
DivX Playback
If a disc contains DivX files, a playlist window will be displayed when the disc is loaded.
1. Use the Up/Down arrow buttons to select your desired file and press the Select button to play it.
2. Use the ADD/CLEAR button and the Up/Down buttons to make a favourite playlist in the right panel
and play files in your desired sequence (refer to Programmed Playing order).
Parental lock
Parental lock is a password protecting system. It enables the user to prohibit the Easy HDD Recorder from
playing some discs according to the information the disc carries.
To set parental lock:
1. Press the Stop button twice during playback.
2. Press the Setup button to access the system setup menu.
3. Press the Up/Down arrow buttons to highlight the
Preferences
item. Press the Select button to confirm
the selection.
4. Press the Up/Down arrow buttons to highlight the
Parental Level
item and press the Select button.
5. Press the Select button on the remote control to display the level list.
6. Use the Up/Down arrow buttons to highlight the desired control level and press the Select button.
7. Press the number buttons to enter the password (the master password is 0000 or 3308) and press the
Select button.
8. Press the Setup button to exit.
Changing the password
1. Repeat steps 1 to 3 as described above.
2. Use the Up/Down buttons to highlight
Change Password
and press the Select button on the remote con-
trol.
3. Enter the old password in the first block (the master password is 0000 or 3308); and then enter the new
password in the second block and again in the confirming block. Press the Select button to save the new
password.
4. Press the Setup button to exit the setup menu.
RECORDING/TIME SHIFTING
When the Easy HDD Recorder is on or you press the SOURCE button to switch to TV mode, the last viewed
TV channel will be displayed and Time Shifting starts automatically. Time Shifting allows a live TV broadcast
to be paused for up to 180 minutes. Press the Pause button to pause the broadcast, and press the Play button
to play the recording. If the system is paused until reaching the time limit, it will automatically resume TV
viewing.
Other manuals for EHR 2080
2
Table of contents
Languages:
Other Packard Bell DVR manuals