paco SCG 0606 User manual

Instruction Manual
Please read user manual carefully before use.
SOLAR CHARGE CONTROLLERS
SCG 0606 / SCG 0808 / SCG 1010 / SCG 1515

1
2. Gassing Regulation
1. Overcharge Protection
When the battery exceeds the final charge voltage, it starts to gas. As this
process is temperature dependent, the final charge voltage is adapted
automatically to the ambient temperature by built-in sensor. Strong gassing
leads an electrolyte loss and finally the destruction of the battery. The battery
is however not charged completely when the final charge voltage is reached, so
that the current flow should not be interrupted. The charge controller therefore
reduces the current flow into the battery just as much as that the final charge
voltage is not exceeded. This procedure is called “IU-charging” which is
considered to be especially fast and gentle. The reduction of the current flow is
effected by very quick, temporary short-circuiting (pulse width modulation) of
the solar generator.
3. Over discharge protection
Instructions and description of controllers with overcharge and over
discharge protection, gasing regulation and temperature compensation.
In photovoltaic solar systems lead batteries are often used for storing solar
current. These batteries have to be protected against overcharging and over
discharging. The Solar charge controller SCG0606 / SCG0808 / SCG1010
/ SCG1515 fulfill both tasks in one device. They can be used for 12 and 24 V
systems.
The final charge voltage is changed in dependence with the discharge level.
When a lead battery is operated without gas development for a longer time,
there is the danger of a harmful acid layering. This acid layering can be avoided
by limited, controlled gassing; this function is fulfilled by the gassing regulation.
The gassing regulation switches off the overcharge protection until the so-called
final gassing voltage is reached. Further more the gassing regulation increases
the final charge voltage during high cyclization. By this temperature dependent
function, the battery capacity is better used.
The batteries have to be protected from over discharge, as it would be
destroyed otherwise. Therefore the charge controller protects the battery from
over discharge by disconnecting the loads when the voltage falls below the final
charge voltage. After the battery has been recharged by the solar generator and
the reconnection voltage is reached, the users are again reconnected.

2
4. Description
4.1 Functions
The solar charge controller
● monitors the state of charge of the battery bank.
● controls the charging process.
● controls the connection/disconnection of loads.
This optimizes battery use and significantly extends its service life.
4.2 Construction
The solar charge controller consists of the following components:
1. Solar LED.
2. Battery capacity LED.
3. Load LED.
4. Load switch (on/off)
5. Terminal block for connecting the solar module.
6. Terminal block for connecting the battery.
7. Terminal block for connecting the loads.
8. USB socket
9. 4.3mm mounting hole.
1 2 3
5 6 7 8
4
9

3
4.3 LED displays
Note:
: ILLUMINATE. : FLASH. : EXTINGUISH .
: The LEDs illuminate in different colors according to battery capacity.
Normal mode
Charging mode
Load mode
Solar reverse / short mode
Load short / overload mode
Solar over circuits mode
Battery reverse mode
Wrong battery type
High mode temperature
Load LED
Battery LED
Solar LED
(RED)
(RED)

4
4.4 LED displays
Solar LED
Battery LED
Load LED
LED Status Meaning
High
Temperature
mode
Do not forget that the connected users do not use more current than
admissible for your regulator.
illuminates green
flashes green
extinguishes green
illuminates red
illuminates yellow
illuminates green
illuminates red
flashes red
extinguishes red
illuminates red
flashes red
battery and load
led flashes red
battery charging by solar
solar module polarity reverse or short circuit
over current protection
deep-discharge deactivation, state of
charge<30%
battery weak, state of charge>40% to 70%
battery full, state of charge>80% to100%
load discharge, battery capacity <30%
wrong battery type connection
battery polarity reverse
load discharge state
load short or overload
over temperature

5
5. Advice for Installation
The controller has to be installed possibly near the battery and must not be
exposed to direct weather conditions. The controller is to be operated in well-
ventilated rooms. The connection terminals have to point downwards when it is
installed. In order to activate the protective functions the controller has to be
connected with solar generator, battery and user.
All system components i.e. solar generator, battery users and controller have to
be coordinated concerning voltage. This is to be checked before installation.
Pay attention to the correct nominal voltage. Ask your dealer when you are in
doubt.
Connection sequence
1. battery
2. solar module
3. loads
Danger of explosion from sparking! Danger of electric shock!
present even when the incident light levels are low.
Protect the solar modules from incident light during installation, e. g.
cover them.
Never touch un-insulated cable ends.
Use only insulated tools.
Ensure that all loads to be connected are switched off. If necessary,
remove the fuse.
Connections must always be made in the sequence described below.
Solar modules generate electricity under incident light. The full voltage is
WARNING
6. Connection
SOLAR CHARGE CONTROLLER
SOLAR SCG 1010
12/24V 10A
Solar Load
12 3
yel low
gre en
ful l
red
emp ty

Label the battery connection cables as a plus cable (A+) and a
minus cable (A-).
Lay the battery cables in parallel between the solar charge controller and the
battery.
Connect the battery connection cable with the correct polarity to the middle
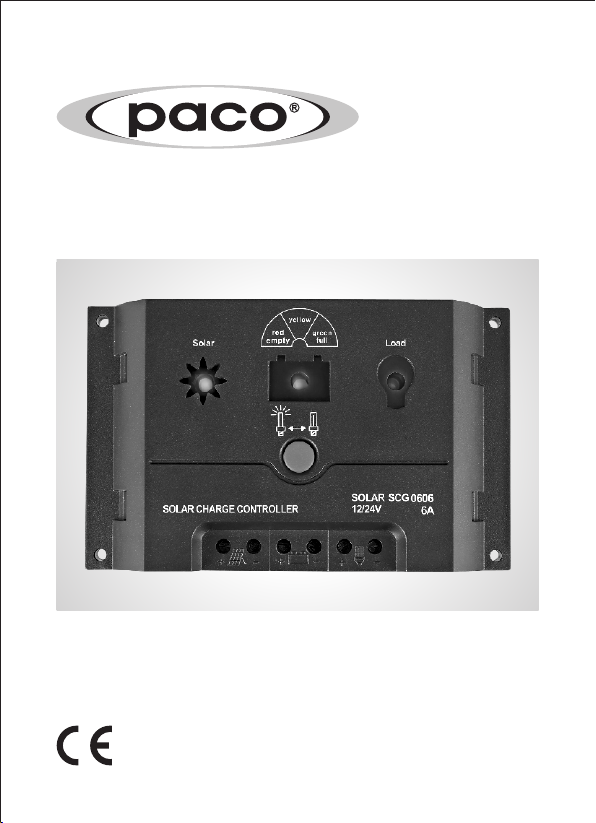
pair of terminals on the solar charge controller (with the battery symbol).
If necessary, remove any external fuse.
Connect battery connection cable A+ to the positive pole of the battery.
Connect battery connection cable A- to the negative pole of the battery.
Replace the external fuse in the battery connection cable.
If the polarity connection is correct, the battery LED illuminates.
1st step: Connect the battery
2nd step: Connect the solar module
Ensure that the solar module is protected from incident light.
Ensure that the solar module does not exceed the maximum
permissible input current.
Label the solar module connection cables as a plus cable (M+) and a minus
cable (M-).
Lay both solar module connection cables in parallel between the solar module
and the solar charge controller.
First connect the M+ solar module connection cable to the correct pole of the
left pair of terminals on the solar charge controller (with the solar modules
symbol),then connect the M- cable.
Remove the covering from the solar module.
3rd step: Connect loads
Notes
● Connect loads that must not be deactivated by the solar charge
controller deep discharge protection, e.g. emergency lights or
radio connection, directly to the battery.
● Loads with a higher current consumption than the device output can be
directly connected to the battery. However, the solar charge controller deep
discharge protection will no longer intervene. Loads connected in this manner
must also be separately fused.
Label the load connection cables as a plus cable (L+) and a minus cable (L-).
Lay the load connection cables in parallel between the solar charge controller
and the load.
First connect the L+ load cable to the correct pole of the right pair of terminals
on the solar charge controller (with the lamp symbol), then connect the L- cable.
Replace the load fuse or switch on the load.
4th step: Final work
Fasten all cables with strain relief in the direct vicinity of the solar charge
controller (clearance of approx .10cm).
6

7
7. Grounding
The components in stand-alone systems do not have to be grounded - this is not
standard practice or may be prohibited by national regulations.
Consult the technical manual for more information.
8. Lightning protection
In systems subjected to an increased risk of overvoltage damage, we
recommend installing additional lightning protection / overvoltage protection to
reduce dropouts.
Consult the technical manual for more detailed information.
9. Operation
The solar charge controller immediately begins operation once the battery is
connected or the external fuse is inserted.
The displays of the solar charge controller show the current operating mode.
User intervention or user settings are not required.
10. Protection functions
The following integrated protection functions of the solar charge controller
ensure that the battery is handled as gently as possible.
The following protection functions are part of the basic function of the controller
● Overcharge protection.
● Deep discharge protection.
● Battery low voltage protection.
● Solar module polarity reverse protection
The following installation faults do not destroy the controller. After correcting the
fault, the device will continue to operate correctly:
● Protection from solar module short circuits / incorrect solar module polarity.
● Protection from short circuits at the load output or excessive load current.
● Protection from battery connection with incorrect polarity.
● Protection from solar module over current.
● Protection from device over temperature.
● Protection from overvoltage at the load output.
● Protection from the wrong connection sequence.

11. Attention
1.Avoid short circuits: danger of fire!
2.Users which may not switched off must be installed near the battery and
protected by a fuse( e. g. position lights)
3.Sparking can develop especially in direct current systems during installation
and operation. Do not install PV-components in rooms where easy flammable
gases mixtures can develop (e. g. by gas bottles, lacquers, solvents). Consult
your dealer when in doubt.
12. Adjustment of nominal voltage
Automatic adjustment takes effect to the system voltage when the regulator is
installed.
When you pay attention to this instructions, your solar system will give you many
years of pleasure. The battery reaches a life of ten years or longer. As the solar
module and the charge controller have a considerably higher life age, only the
battery has to be exchanged. A defective battery can be recognized, although
the above-mentioned charging has already taken place, the over discharge
protection would switch off even the user has already started using it.
8

13. Technical data
6A
6A
8A
8A
15A
15A
12 V / 24 V
47 V DC
5.0V DC, 800mA
2
2.5mm / 4 2
mm
-4 mV / K / Zelle
O
85 C
O O
-25 C +50 C
195g
145 x 90 x 39 mm
Solar charge controller / P/No. SCG 0606 SCG 0808
10A
10A
SCG 1010 SCG 1515
Specifications are subjected to change without prior notice.
O
Max module input short circuit current at 25 C
O
Max load output current at 25 C
System voltage
Max. voltage of solar collector
USB output voltage (continuous)
Enclosure protection class
Terminal size(fine/single wire)
Temperature compensation
Thermal Protection
Ambient temperature allowed
Weight
Dimensions I x w x h
IP 32
9
Charging voltage
State of charge SOC
SOC<40%
SOC<30%
SOC>50%
SOC<40%
SOC<70%
SOC>70%
12V system
11.7V
11.1V
12.5V
11.7V
12.4V
13.9V
24V system
23.4V
22.2V
25.0V
23.4V
24.8V
27.8V
Specifications are subjected to change without prior notice.
Deep discharge warning
Load switch-off
Shift-in
Boost charging (14.4V / 28.8V)
Equalization charging (14.7V / 29.4V)
End-of-charge voltage(float)

CAUTION
ALWAYS PLACE THE SOLAR CHARGE CONTROLLER IN
AN ENVIRONMENT WHICH IS:
A. WELL VENTILATED.
B. NOT EXPOSED TO DIRECT SUNLIGHT OR HEAT
SOURCE.
C. OUT OF REACH FROM CHILDREN.
D. AWAY FROM WATER / MOISTURE, OIL OR GREASE.
E. AWAY FROM ANY FLAMMABLE SUBSTANCE.
F. SECURE NO RISK OF FALLING.
This manual suits for next models
3
Table of contents
Popular Inverter manuals by other brands

AIMS Power
AIMS Power PWRI300012S instruction manual

Briggs & Stratton
Briggs & Stratton FORTRESS Series Installation and operation manual

Generac Power Systems
Generac Power Systems SG010 Specifications

LIFAN Power USA
LIFAN Power USA LF7250IPL-CA Operating instructions and owner's manual

Solectria Renewables
Solectria Renewables PVI 3000S Installation and operation manual

Watt Drive
Watt Drive V3000-015LF manual