Pacojet PACOJET 2 User manual

1
Instruction Manual
Original Instruction Manual in German
Read this Instruction Manual prior to use

3
1 Warning 5
2 Introduction 9
2.1 What is PACOJET 2? 9
2.2 Important notes 9
3 Package contents 10
4 Setting up and connecting power 13
4.1 Installation location 13
4.2 Connecting the machine to an electrical power supply 14
5 PACOJET 2 control components 15
5.1 Review of machine controls 15
5.2 ON/OFF switch 15
5.3 Control panel 16
5.4 START button 16
5.5 STOP/RESET/HOME button 17
5.6 Display screen functions and navigation 17
5.7 Processing modes 17
5.7.1 Pacotizing mode 18
5.7.2 Chopping/Cutting mode 19
5.7.3 Mixing/Whipping mode 20
5.8 Cleaning cycles and machine settings 21
5.8.1 Rinsing cycle 22
5.8.2 Full cleaning cycle 22
5.8.3 Machine settings 22
5.8.4 Adjusting the presettings 23
5.9 UP/DOWN display 24
5.10 Depressurizing during a processing cycle 25
5.11 Pacotizing according to portions 25
5.12 Beakercontentlllevelandportionquantitydisplayduring
pacotizing 26
5.13 Machine control and assistance function when pacotizing
overlledbeakers 26
PACOJET 2 Instruction Manual

4
5
6 Handling the PACOJET 2 28
6.1 PACOJET 2 applications 28
6.2 Handling of fresh, frozen foods for pacotizing 28
6.2.1 Preparatory activities before pacotizing 28
6.2.2 Brief description of the pacotizing process 29
6.2.3 Detailed description of the pacotizing process 33
6.2.4 After a pacotizing cycle 36
6.3 Utilizing the machine to cut/chop fresh, non-frozen foods 37
6.3.1 Cutting/Chopping procedure 38
6.3.2 After the cutting/chopping procedure 39
6.4 Utilizingthemachineformixing/whippingfresh,liquidfoods 40
6.4.1 Mixing/Whipping procedure 40
6.4.2 After the mixing/whipping procedure 42
7 Cleaning PACOJET 2 43
7.1 General 43
7.2 Initial cleaning 43
7.3 Cleaning of the direct food contact zone 44
7.4 Detergent 45
7.5 Rinsing cycle procedure 45
7.6 Cleaning cycle procedure 47
7.7 Cleaning the depressurization hose 49
7.8 Cleaning the exterior of the machine 49
7.9 Cleaning accessories 50
8 What to do when 51
9 Information 53
9.1 Technical Data PACOJET 2 53
9.2 Accessories 54
9.3 Maintenance and technical service 54
9.4 Disposal and recycling 55
9.5 Warranty notes 55
9.6 PACOJET 2 declaration of conformity 55
Warning1
PACOJET 2 is a machine for commercial use. Thea)
machine may only be operated by persons capable of
using it safely. Persons with reduced physical, sensory
or mental capacities, including those with physical or
mental disabilities, or persons lacking knowledge or
experience, such as children, may not operate the
machine.
PACOJET 2 may only be used in accordance with thisb)
instruction manual. Failure to comply with the instruc-
tions can result in damage to the machine, risk of injury
to the operator or in the potential contamination of the
food preparations being processed.
Pacojet Coupe Set (available as an optional add-on,c)
see Sections 5.7.2, 5.7.3, 6.3 and 6.4): Refer to and
comply with the separate instruction manual, particu-
larly the safety warnings.
Use caution when unpacking PACOJET 2, as the ma-d)
chine is heavy in weight. Please note: two persons
should unpack the machine if possible to avoid bruis-
es or injury during the unpacking and set up process.
Some product parts have sharp edges.
Before operating the machine for the rst time, thee)
machine must receive an initial cleansing according to
section 7.2.
By virtue of its function, the pacotizing blade is veryf)
sharp, thus it must be handled with special caution.
Refer to enclosure
Refer to enclosure
WARNING1

6
7
The machine emits sound during processing. Emissionn)
data can be found in chapter 9.
Only the use of original Pacojet spare parts is permit-o)
ted. The use of other accessories not authorised by
Pacojet is not permitted.
Read the instruction manual for PACOJET 2 and famil-p)
iarise yourself with the machine and its handling, op-
eration, use and cleaning.
The cleaning of PACOJET 2 and its accessories mustq)
be done in accordance with the instruction manual
(Chapter 7).
Handlingfoodrequiresstricthygienicproceduresthatr)
comply with legal food standards.
Only the processing of foods is permitted. Processings)
anything other than foods is forbidden (Chapter 6).
Never use PACOJET 2 to process ingredients that pro-t)
duce gases during processing that could increase pres-
sure levels uncontrollably inside a pacotizing beaker,
i.e. pure liquid nitrogen (N) or carbon dioxide (CO2)
bound in an ingredient high in carbonation (Chapter
6). Accordingly, do not add any such products during
processing.
Never start the machine without a pacotizing beakeru)
being inserted in the protective outer beaker (see
Chapter 6).
The Pacojet Coupe Set (available optionally) includesg)
two extremely sharp cutting blade attachments. Due
to the risk of injury, all handling of them must be done
solely using the cutter tongs. Do not touch the cutting
edge of the blades! (Section 6.3)
Install the PACOJET 2 on a level surface away fromh)
water splash, sinks and any equipment producing
steam.Ensurethatthereisadequatespace.Themain
power switch is located on the right side of the machine
and must be accessible without obstruction at all times.
(Section 4.1)
In order to operate the machine safely, make sure thati)
thereisadequatemovingspacearoundthemachine.
Before connecting the machine into a power socket,j)
ensure that the voltage and power frequency of the
electrical source conform to that indicated on the
machine data plate. These must correspond exactly.
(Section 4.2)
For additional protection, it is recommended that ak)
20 mA ground fault circuit protector be installed. Con-
sult with your electrician about installation.
Do not operate the machine if the power cord is dam-l)
aged. Contact your Pacojet service provider. (Section
9.3)
The power cord can only be replaced by a service pro-m)
vider explicitly authorised by Pacojet.

8
9
Introduction2
What is PACOJET 2?2.1
PACOJET 2 is an innovative professional kitchen machine designed to puree
fresh, frozen foods without thawing into ultrasmooth mousses, naturally-fresh
ice creams and sorbets, as well as intensely avourful soups, sauces and
creams/llings.Thisprocessiscarriedoutwithorwithouttheapplicationof
pressure. Processing foods with PACOJET 2 is known as “pacotizing”.
The Pacojet Coupe Set expands the processing capabilities of the PACOJET 2
to non-frozen, fresh food products and is available separately.
Important notes2.2
Thisinstructionmanualcontainsallsignicantinformationthatyouneeda)
to use the PACOJET 2 kitchen machine, hereafter referred to as the
PACOJET 2. To ensure user security, PACOJET 2 should be used accord-
ing to the instructions presented in this manual. Please comply with the
caution notes in Chapter 1. Failure to comply with the recommendations
of this instruction manual will result in the refusal to assume any liability or
guarantee for damages.
ThePacojet Coupe Set is notpart ofthe standard equipment deliveredb)
with PACOJET 2; it is available as an option. The Pacojet Coupe Set is
designed exclusively for chopping, mixing and beating fresh, non-frozen
foods with a Pacojet machine. Please comply strictly to the instructions
given in the separate instruction manual delivered with the Pacojet Cou-
pe Set when using this product, as well as to these instructions for the
PACOJET 2.
Thecontentofthismanualmaybemodiedwithoutpreviousnotice.c)
Do not attempt to override safety sensors installed onv)
the PACOJET 2 that ensure the proper mounting of the
protective outer beaker with inserted pacotizing beaker
(see Chapter 6).
If the screen displays an “Error” message, consultw)
Chapter 8. If you are still unable to resolve the issue,
power off the machine and unplug it from the electrical
power supply. Contact your Pacojet service provider.
It is not permitted to operate PACOJET 2 with a defect.x)
If a defect is noticed, stop use of the machine immedi-
ately, power it off using the ON/OFF switch and discon-
nect the power cord from the electrical outlet.
The machine is sealed and may only be opened by any)
authorised service provider (Section 9.3).

10
11
one spray guard of black nitrile rubber incl. inner
sealing ring
one rinsing insert of green nitrile rubber
one cleaning insert of blue plastic, with brushes
one blue sealing ring
two beaker lids of white polypropylene
Package contents3
Using this instruction manual as a reference, please take a complete inven-
tory of the package to ensure the components are complete. Contents should
include:
one PACOJET 2 kitchen machine
one protective outer beaker (polyamide)
two chrome steel pacotizing beakers
one steel-cast pacotizing blade

12
13
Setting up and connecting power4
Installation location4.1
The PACOJET 2 machine should only be installed in a dry location with ade-
quateventilationonastable,atsurfacemeasuringatleast50cm×50cm.
ThePACOJET2machinemustsitrmlyandlevel,withitsplacementposition
ensuringthefree-owofcoolingairfortherearintakevent.Likewise,ensure
thereisampleclearanceunderneaththemachineforthefree-owofexhaust
air without any obstructions.
IMPORTANT!Î
Never use the machine:
in direct proximity of a heat source (i.e. grill)•
in direct proximity of a source from which steam or greasy vapours are•
emitted (i.e. fryer)
in direct proximity of an exhaust from which warm or hot air is emitted (i.e.•
combi steaming oven)
indirectproximityofawaterconnectionorintheareaofequipmentthatis•
cleaned using a water hose or high-pressure sprayer/steamer
on surfaces prone to heavy vibration•
Non-compliance with the above instructions may result in a malfunction or
damage to the machine.
one stainless steel spatula
Inspect to determine whether any items are missing or defective. Should
this be the case, please contact the place of business where the unit was
purchased and report your claim immediately. Claims for missing/defective
goods must be submitted within the legally designated time limit to be con-
sidered valid.
Keep all original packaging materials following PACOJET 2 installation to pro-
tect the machine from damage should it need be transported at a later date.

14
15
PACOJET 2 control components5
Review of machine controls5.1
ON/OFF switch5.2
The ON/OFF switch is located toward the back of
the lower, right side of the machine base. It is used
to turn the machine on or off:
“O” = OFF position = PACOJET 2 is off, the switch
is not illuminated.
“I” = ON position = PACOJET 2 is on, the switch is
illuminated.
PACOJET 2 must be switched on using the ON/
OFF switch to activate the colour display screen
and control panel.
Connecting the machine to an electrical power supply4.2
The electrical power cord is located on the lower, right side, toward the back
of the machine. It has a length of 1.5 m.
IMPORTANT!Î
The PACOJET 2 machine should only be used when the voltage and power
frequencyoftheelectricalsourceconformtothoseonthedataplate.Thevolt-
age of the electrical source must conform to that indicated on the data plate.
The data plate is located on the bottom side of the machine.
The PACOJET 2 machine should only be connected to an electrical source
that has been adequately grounded/earthed. Wall sockets and extension
cords must have functional ground fault circuit protectors.
Control panel
(5.3)
ON/OFF switch
(5.2)

16
17
Control panel5.3
The PACOJET 2 control panel has two function buttons: START and STOP/
RESET/HOME. It also features a high resolution colour screen, four selector
buttons for display functions and two buttons with arrows for increasing and
decreasing settings. The following sections describe these in greater detail.
START button5.4
The START button is used to begin a processing
cycle. Before a processing cycle can begin, a paco-
tizing beaker must be inserted within the protective
outer beaker and mounted in place and the ma-
chine must be in ready mode.
When the START button has been pressed, the
processing cycle begins, meaning the blade at-
tached to the shaft will rotate while descending to
the bottom of the beaker. The processing cycle can
take place with normal or overpressure according to
the chosen settings. When the designated portions
or the entire contents of the beaker have been proc-
essed, the shaft with the attached blade, ascend to
their starting position, the beaker is automatically
depressurized and the processing cycle ends. The
PACOJET 2 machine remains in ready mode.
STOP/RESET/HOME button5.5
The STOP/RESET/HOME button can be used to:
interrupt a processing cycle that is in progress•
(press during a cycle to stop the process)
reset previously selected pacotizing options•
(press during ready mode to reset)
return to the home screen (press within settings•
mode to return to the home screen)
Pressing the STOP/RESET/HOME button during
a pactotizing cycle will immediately command the
shaft and pacotizing blades to retract to the starting
position (UP/DOWN graphic, section 5.9), and au-
tomatically end the cycle. This method of operation
permitsprocessingrandomquantitiesofthebeaker
content, i.e. without preselected portions.
Display screen functions and navigation5.6
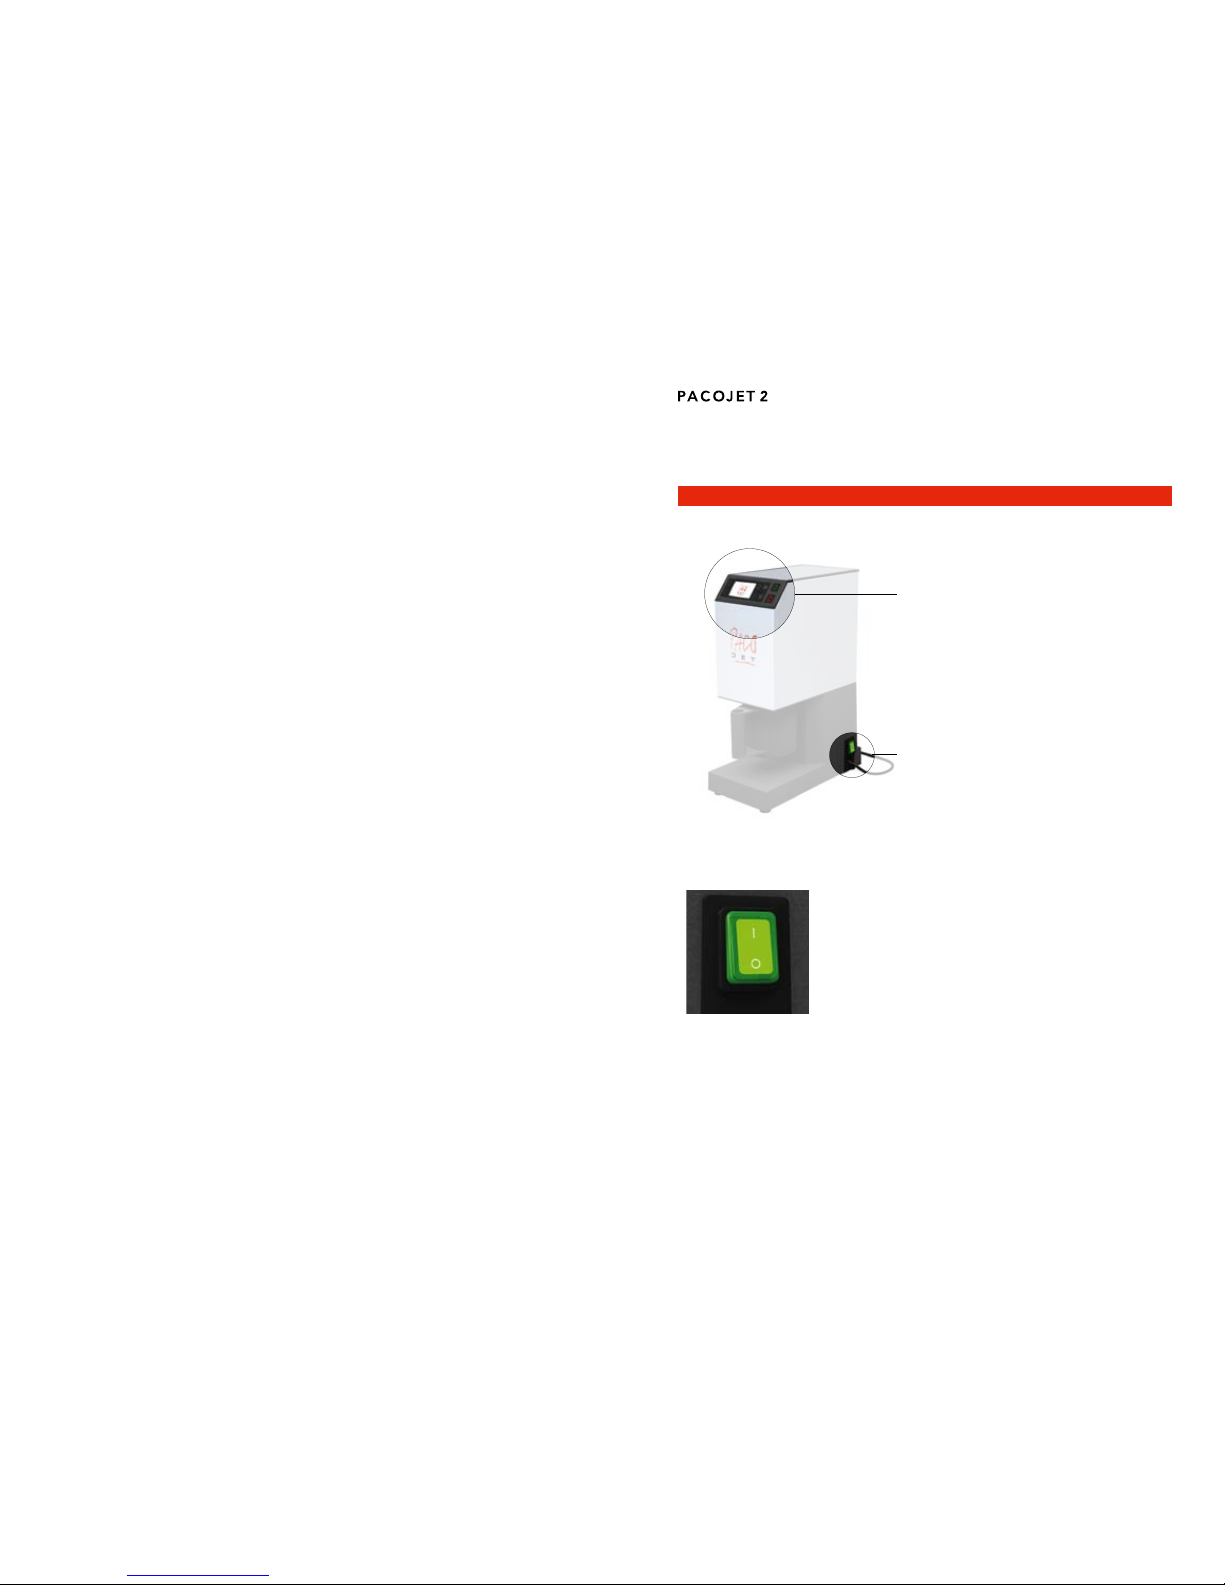
Utilizing the ON/OFF switch to power on the
PACOJET 2, the display will show the PACOJET
logo for several seconds. Immediately following, the
home screen will load, which features 3 process-
ing mode icons and an icon to access cleaning and
machine settings functions. From this home screen,
the PACOJET 2 can now be set/programmed for
theprocessesrequired.
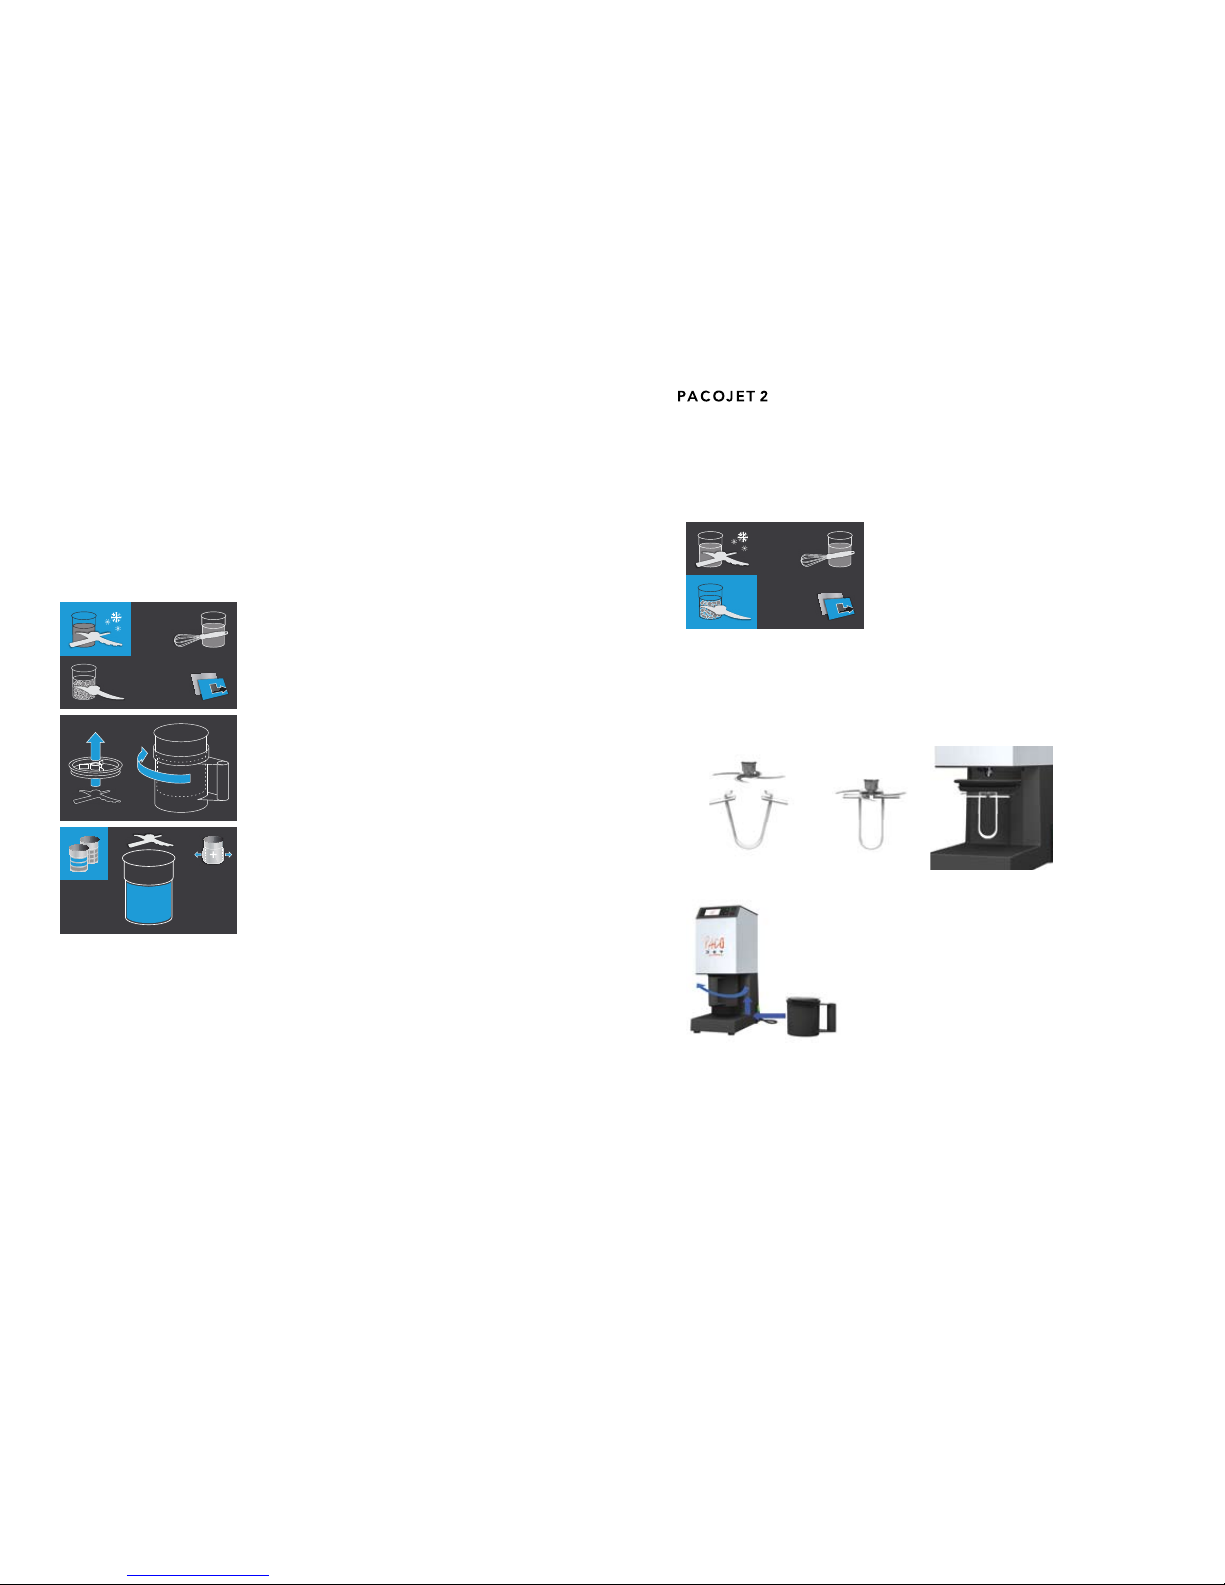
Processing modes5.7
The 3 processing mode icons represent the 3
processing modes available : Pacotizing, Chopping/
Cutting and Mixing/Whipping. When powering on
the PACOJET 2 utilizing the ON/OFF switch, the
home screen will appear after the PACOJET logo,
on which the pacotizing mode is selected as the
default.
Function buttons
START
Colour screen
Selector buttons Selector buttons
Arrows
STOP/RESET/HOME

18
19
Chopping/Cutting mode5.7.2
Chopping or cutting fresh, non-frozen foods with ei-
ther the 2- or 4-blade-cutter that are included in the
optional Pacojet Coupe Set (see page 21).
Please refer to the separate instruction manual for
the Pacojet Coupe Set (see page 21), giving par-
ticular attention to the safety guidelines.
For further programming the processing options within the chopping/cutting
mode, either the 2- or 4-blade-cutter must be positioned within the spray
guard with the help of the cutter tongs (as supplied within the Pacojet Coupe
Set package) and correctly secured onto the magnetic, splined shaft of the
PACOJET 2 machine.
Then the pacotizing beaker and the protective outer
beaker must be correctly mounted in the machine.
Each processing mode can be selected by press-
ing the appropriate selector button adjacent to each
processing mode icon, as shown on the display.
Pacotizing mode5.7.1
Usetopureefresh,frozenfoods(−18°Cto−23°C)
intoanultranetexturewithoutthawing.
All of the necessary accessories for this process-
ing mode are included in the original PACOJET 2
system package.
To access further settings in the pacotizing mode,
the pacotizing blade, the spray guard, the pacotiz-
ing beaker and the protective outer beaker must be
correctly mounted in the machine.
As soon as the protective outer beaker is mounted
and rotated into the correct position, the next dis-
play screen will appear with the default process-
ing settings selected for “Process entire contents
of beaker” and “overpressure”; together, with the
options of selecting the processing options “whole
portions and decimal portions” and/or “deactivate
overpressure before pacotizing”.
Each of the processing options can be selected by pressing the appropri-
ate selector button adjacent to each processing mode icon, as shown on the
display and be further dened using the arrow buttons to increase and/or
decrease the settings.

20
21
Should the same-cycle repetitions option be se-
lected and programmed, the shaft and blade/disk
will retreat to its starting position between beaker
changes, or to the upper level of the selected ap-
proximate ll volume until the selected number of
same-cycle repetitions is complete.
*The Pacojet Coupe Set, designed to process
fresh, non-frozen foods, is not included in the
original PACOJET 2 system package. The Pacojet
Coupe Set is available as a optional add-on and
can be purchased from a Pacojet sales point.
Please refer to the separate instruction manual for
the Pacojet Coupe Set, giving particular attention
to the safety guidelines.
Cleaning cycles and machine settings5.8
The lower right selector button next to the lower
right icon can be pressed to switch to another dis-
play screen containing further options for cleaning
and general machine settings (or when pressed
again, to return back to the home screen).
There are two cleaning cycle options on the left side
of the display screen. Select the upper icon for a rins-
ing cycle or the lower icon for a full cleaning cycle.
The settings functions can be accessed by pressing
the selector button on the upper right of the control
panel, adjacent to the “cog-wheels” icon shown on
the display screen.
1/2
3
As soon as the protective outer beaker is mounted
and rotated into the correct position, the next dis-
play screen will appear with the default processing
settings selected for “Chop/Cut entire contents of
beaker” and “overpressure”; however, with the pos-
sibility of selecting the processing option “deacti-
vate overpressure before chopping”.
This processing option can be selected by pressing the appropriate selector
button adjacent to the processing mode icon, as shown on the display and be
furtherdenedusingthearrowbuttons.
Mixing/Whipping mode5.7.3
Mixing/Whippingfresh,liquidfoodsutilizingthepa-
cotizing blade or the whipping disk included in the
optional Pacojet Coupe Set (see page 21).
For further programming processing options within
the mixing/whipping mode, either the pacotizing
blade or the whipping disk (as supplied within the
Pacojet Coupe Set package) must be positioned
within the spray guard and correctly secured onto the
magnetic, splined shaft of the PACOJET 2 machine.
Then the pacotizing beaker and the protective outer
beaker must be correctly mounted in the machine.
As soon as the protective outer beaker is mounted
and rotated into the correct position, the next dis-
play screen will appear with the default processing
settings selected for “Mixing/Whipping entire con-
tents of beaker” and “overpressure”; however, with
the options of selecting the processing options “de-
activate overpressure before mixing/whipping”, “set
theapproximatellvolumeinthepacotizingbeaker
in terms of portions” and “set the number of same-
cycle repetitions”.
10

22
23
Adjusting the presettings5.8.4
Select the Presettings options on the menu to cus-
tomize the PACOJET 2 presettings according to
your needs.
The default factory settings are as follows:
The default processing mode is “pacotizing” as programmed at the factory.•
The “overpressure” function is set by default at the factory for each process-•
ing mode.
Processing options chosen for a previous cycle are reset to default/factory•
settings after each processing task, i.e. each beaker change.
Consequently, each time the ON/OFF switch is used to power on the ma-
chine, the “pacotizing” and “overpressure” processing modes are already set.
The other processing modes, chopping/cutting and mixing/whipping are also
displayed on the home screen and may be selected by pressing the corre-
sponding selector button prior to each processing task.
Users can deactivate the default setting for overpressure by using the over-
pressure selector or the arrows buttons before beginning a particular process-
ing cycle.
After a processing task has been completed, the PACOJET 2 automatically
returns from the previous mode selected and programmed processing option
back to the default factory settings for “pacotizing” and “overpressure”.
However, it is possible to adjust and/or override the default factory- and other
presettings, according to a user’s particular needs.
Presettings
Mode
Pressure
Reset
Factory setting
Rinsing cycle5.8.1
To rinse the PACOJET 2 food contact components,
please see section 7.
Full cleaning cycle5.8.2
The procedure for implementing a full cleaning cy-
cle of the PACOJET 2 food contact components
can be found in section 7.
Machine settings5.8.3
Pressing the button to access the machine settings
on the selector panel will display the settings se-
lectionsfor“Presettings”,“Brightness”,“Language”,
as well as the usage information selections “Portion
counter” and “Version”.
Using the up- and down-arrow buttons, select the desired setting option and
conrmtheselection by pressingthebutton adjacent tothevalidation icon
(check mark) on the display screen.
In the above mentioned manner, one can modify the settings for “Presettings”,
“Brightness”and“Language”,programmingthemindividuallybypressingthe
validation button.
Using the arrow buttons and the validation button, one can also select and
view the “Portion counter”, which tracks the total number of pacotized whole
portionsthemachinehascompleted,orconrmtheversionofyourmachine
by selecting “Version”.
Settings
Presettings
Brightness
Language
Portion counter
Version

24
25
Depressurizing during a processing cycle5.10
During a processing cycle with an activated “over-
pressure” setting, it is possible to depressurize
the pacotizing beaker by pressing the appropriate
selector button for “depressurize” on the control
panel.
Pacotizing according to portions5.11
Simply by pressing the START button, the entire
contents of a pacotizing beaker will be fully proc-
essed–regardlessofllquantityandwithoutneed
foranindicationofaspecicportionamount.
To pacotize food preparations into portions, a beak-
er’s contents lled to the maximum ll-line are di-
vided into ten portions, each of which are further
subdivided into ten decimal portions. In this re-
spect, the total number of portions for a processing
task may be programmed in full or decimal portions.
This portioning feature has been calibrated accord-
ingtothemaximumll-linevolumeofabeaker,not
the actual content volume of a beaker.
0
4.5
4
a) Presetting the processing mode: Using the ar-
row buttons to scroll through the menu and by
pressingthevalidationbuttontoconrmthese-
lection, it is possible to program the presetting
for each processing mode, as well as the preset-
ting “Neutral”. Should the “Neutral” presetting be
selected, the appropriate processing mode must
be chosen prior to each processing task, as with
this selection, no default processing mode is de-
ned.
b) Presetting the overpressure function: Overpres-
sure can also be deactivated by default using
the arrows and the validation button.
c) Resetting chosen processing options: There
are two selection possibilities. PACOJET 2 can
be set so that any chosen processing options
will be reset to default settings either after each
processing task (changing a beaker) or after
powering off the machine using the ON/OFF
switch.
The default factory settings can be reactivated by selecting “Factory setting”
usingthearrowbuttonsandconrmingtheselectionbypressingthevalida-
tion button.
UP/DOWN display5.9
This display indicates the position and vertical
movement direction of the pacotizing blade during
a pacotizing cycle.
Mode
Pacotizing
Cutting
Mixing
Neutral
Pressure
Overpressure
Overpressure
Normal pressure
Reset
Beaker change
Beaker change
Switch on
0

26
27
When a pacotizing cycle has been initiated,
PACOJET2 can detect overll immediately when
the pacotizing blade meets the frozen surface. In
thecaseofoverll,onlytheamountforwhichthere
remains ample volume in the beaker is pacotized,
regardless of selected quantities. The pacotiz-
ing task will stop automatically after each needed
interval to allow the operator to remove excess
beaker content until the maximum ll-line level is
achieved.
Despitethisfeature,takecautiontostrictlyadheretonotoverllingpacotizing
beakersabovethemaximumll-line.
Beaker content ll level and portion quantity display during pacotizing5.12
The display screen indicates the programmed por-
tioning details prior to pacotizing and additionally,
duringpacotizing,thellquantityofthebeakerand
the progress of the task. At the end of the task, the
pacotizedquantityand the non-pacotized quantity
remaining in the beaker are also indicated. This dis-
play will clear when the protective outer beaker is
dismounted from the machine.
Should the number of programmed portions not be fully pacotized due to
insufcientllcontent,theremainingnumberofoutstandingportionswillbe
indicatedonthedisplayscreen.Inthiscase,thedisplay,andconsequently,
the programming of the task are retained, even after the protective beaker has
been dismounted and can thus be used as a presetting for processing a sec-
ond beaker to complete the outstanding amount of portions programmed.
Onecanresetthedisplayindicatinganyremainingquantitiesbypressingthe
STOP/RESET/HOME button.
Machine control and assistance function when pacotizing overlled 5.13
beakers
A pacotizing cycle can increase the volume of a beaker’s initial content up
to 30%, depending on the preparation of the food and the pressure setting.
Therefore,thepacotizingbeakermustneverbelledoverthemaximumll-
line as indicated on the pacotizing beaker.
In order to prevent damage caused by improper use through neglecting the
lllimitationdirections,thePACOJET2isequippedwithacontrolandassist-
ance function.
2.2
4.5

28
29
IMPORTANT!Î
Beakercontentshouldnotcontainemptycavitiesorairpockets.Likewise,the
surfaceofthebeakercontentmustbeat.Disregardingthesedirectionscan
damage the pacotizing blade during pacotizing.
a) seal the pacotizing beaker with a beaker lid.
b) Freeze the pacotizing beaker between −18°C
and−23°Cforatleast24hours.
Brief description of the pacotizing process6.2.2
a) ON/OFF switch (right-side, lower back). Power
on.
Handling the PACOJET 26
PACOJET 2 applications6.1
PACOJET 2 is designed for pacotizing i.e. pureeing fresh, frozen food prepa-
rations(−18°Cto−23°C)withoutthawing.Usethepacotizingbladeforthese
tasks. In most cases, a pacotizing cycle will raise the temperature of products
frozenat−18°Cto−23°Cbyaround10°C.Thus,topreservefoodhygiene,
it is critical to further process pacotized food products immediately and/or
rapidly return any contents remaining in beakers to the freezer.
In addition to pacotizing with the PACOJET 2, the optional Pacojet Coupe Set
is available to process fresh, non-frozen food items (sections 5.7.2, 5.7.3, 6.3
and 6.4). Please refer to the separate Pacojet Coupe Set instruction manual.
Handling of fresh, frozen foods for pacotizing6.2
Preparatory activities before pacotizing6.2.1
Fill the pacotizing beaker with prepared foods, in-
cludingliquids,uptothemaximumll-line.
IMPORTANT!Î
Neverllthepacotizingbeakerabovethemaximumll-line.Overllingbeak-
ers can result in extensive contaminant ingress that can lead to defects and
damage.

30
31
f) Select the pacotizing mode on the control panel
if it has not yet been selected.
g) Next, select the number of desired complete
portions and/or decimal portions.
h) The overpressure function is set by default for
pacotizing and may be deactivated as neces-
sary using the selector or arrow buttons to vali-
date the option “normal pressure”.
i) Press the start button.
j) The PACOJET 2 will automatically process
through the cycle as selected.
4.5
2.2
4.5
b) Snap the pacotizing blade into the spray guard.
c) Afxthepacotizingblade,insertedintothespray
guard onto the splined, magnetic shaft of the
PACOJET 2 until secure.
d) Select a pacotizing beaker with the frozen food
preparation from the freezer, remove the beak-
er lid and place it inside of the protective outer
beaker.
e) Mount the protective outer beaker containing
the pacotizing beaker onto the machine, rotating
it securely into working position clockwise, i.e.
turning it from right to left-forward.

32
33
Detailed description of the pacotizing process6.2.3
Insertion of the pacotizing blade with the spray guard into thea)
machine
Graspthepacotizingbladewithtwongersonthe
corners between the blades. Place the pacotizing
blade into the center hole of the spray guard, so
that the hollow end tting of the pacotizing blade
snaps beyond the retaining tabs of the spray guard.
Ensurethattheatsideofthesprayguardisfacing
downward against the blades.
Now afx the pacotizing blade, together with the
spray guard in place above the blade and its hollow,
magnetic connector piece, onto the splined, mag-
netic shaft, pressing up. The magnet must rmly
hold the pacotizing blade and the spray guard in
position.
Mounting the protective outer beaker onto the machineb)
Nowchooseacorrectlylledandfrozenpacotizing
beaker from the freezer, remove the lid and place it
inside the protective outer beaker.
IMPORTANT!Î
The pacotizing temperature of food preparations to be processed in the pa-
cotizingbeakermustbebetween−18°Cand−23°C.Thefrozenpreparation
must be completely frozen for a period of at least 24 hours at the same tem-
perature. If this does not occur, the blades or the machine may be damaged.
k) Upon completion of the processing cycle, the
shaft and pacotizing blade return to the start po-
sition, the beaker is depressurized automatically
and the pacotizing cycle ends.
l) Demount the protective beaker by exerting
counter clockwise pressure, i.e. from left- to
right-back, to withdraw it from the work position.
The pacotizing blade and the spray guard will
rest on the pacotizing beaker.
m) Remove the spray guard with the pacotizing
blade and retrieve the pacotizing beaker from of
the protective beaker.
n) Remove the desired amount of food that has
been pacotized.
o) Level-off any remaining product in the beaker
with the spatula. Seal the pacotizing beaker
with a beaker lid and immediately return it to the
freezer at a temperature between −18°C and
−23°C.
4.5
4.5

34
35
Programming pacotizing tasksc)
Select the pacotizing mode on the control panel if this has not yet been
selected.
When the protective beaker is mounted correctly,
the pacotizing settings are displayed immediately.
The overpressure function is set by default for pa-
cotizing prior to start and can be deactivated as
requiredbyusingtheselectororarrowbuttonsfor
“normal pressure” before start.
As a further processing option, one may now continue with the default preset-
ting “pacotize the entire beaker” or one can select the amount of total and
decimal portions.
Pacotizingd)
When the START button has been pressed, the
PACOJET 2 will proceed through the chosen
processing cycle fully automatically. Upon comple-
tion of the processing cycle, the shaft and pacotiz-
ing blade return to the start position, the beaker
is depressurized automatically and the pacotizing
cycle ends.
IMPORTANT!Î
Never start the machine without having inserted a pacotizing beaker into the
protective outer beaker!
2.2
4.5
IMPORTANT!Î
Thefrozenfoodproductmustadherermlytothepacotizingbeakerduring
the pacotizing process. Furthermore, the beaker contents may not thaw prior
to pacotizing. In either case, the frozen product may dislodge itself from the
beaker inner surface during pacotizing and result in machine overload.
Take the protective outer beaker with an inserted
pacotizing beaker by its handle and place it on the
base plate of the machine. Push the protective
outer beaker back against the rounded back wall
of the base to centre it. The beaker handle should
be facing toward the right side of the machine and
perpendicular to it. Now raise the protective outer
beaker upward into position.
The top of the protective beaker must have ush
contact with the machine, so that the tabs of the
protectiveouter beakert snuglyinto the twist-t-
ting of the PACOJET 2. Now turn the beaker handle
clockwise, i.e. from right to left-front, 90° until the
handle is perpendicular to the front. Done correctly,
the protective outer beaker will now be tightly and
evenly mounted in the PACOJET 2.
To avoid damage to the PACOJET 2 or injury to operators, the machine will
only function when the protective outer beaker is properly mounted in the
machine.
IMPORTANT!Î
Never mount the protective outer beaker into the PACOJET 2 with a paco-
tizingbladeand spray guardsimply resting onit, as inthiscase, sufcient
contact of the pacotizing blade to the magnetic end of the shaft cannot be se-
cured and the pacotizing blade may fall into the beaker. Starting the machine
under this condition can damage the pacotizing blade and the shaft.

36
37
If the entire contents of the pacotizing beaker has
not been pacotized, the remaining contents must
be returned immediately to the freezer! If any paco-
tized food content remain in the beaker, the surface
mustbeattenedusingthespatulabeforereplac-
ing into the freezer.
Holdingtemperaturesbetween−18°Cand−23°C
e) Should no further beakers be immediately proc-
essed, a rinsing cycle of the PACOJET 2 food
processingsystemmustbeconsequentlyimple-
mented using the cleaning kit provided. Please
clean the machine in accordance with the in-
structions found in Chapter 7.
6.3 Utilizing the machine to cut/chop fresh, non-frozen foods
One requires the 2-blade or 4-blade cutter attachments contained in the
Pacojet Coupe Set, which is available as an add-on option.
Exercise extreme caution handling the 2-blade and
4-blade cutter attachments contained in the Pacojet
Coupe Set as they are very sharp! Touch only the
upper/connector shaft part of the blade cutter at-
tachment. Use the blade cutter afxing tongs in-
cluded in the Pacojet Coupe Set. Do not ever come
into contact with the blades of any Pacojet Coupe
Set attachment.
Please adhere to the instruction manual provided
separately with the Pacojet Coupe Set.
After a pacotizing cycle6.2.4
Proceed as follows after the machine has automatically depressurized,
stopped and completed a pacotizing cycle:
a) Rotate the protective outer beaker by the handle
counterclockwise,i.e.fromleft-fronttoright,90°
until it is perpendicular to the right side of the
machine.
Demount the protective outer beaker by lower-b)
ing it down from the machine. The spray guard
with the pacotizing blade will rest on the paco-
tizing beaker.
c) Remove the spray guard with the pacotizing
blade using one of the three tabs on the spray
guard.
d) Remove the pacotizing beaker from the protec-
tive outer beaker. The pacotized food is now
ready for further preparation.

38
39
d) Select the cutting/chopping mode on the control
panel if this has not yet been preselected. The
overpressure function is preset as the standard
default for cutting/chopping prior to each start
butcanbedeactivatedasrequiredbypressing
the “Normal pressure” button before starting the
processing cycle.
When the START button has been pressed, the PACOJET 2 will proceed
through the chosen processing cycle fully automatically. Upon completion of
the processing cycle, the shaft and the 2- or 4-blade cutter attachment re-
turn to the start position, the beaker is depressurized automatically and the
processing cycle ends.
IMPORTANT!Î
Never start the machine without having inserted a pacotizing beaker intoe)
the protective outer beaker!
After the cutting/chopping procedure6.3.2
Demount the protective outer beaker containing the pacotizing beaker ac-a)
cording to the PACOJET 2 instruction manual, section 6.2.4 with the spray
guard resting in place.
Remove the spray guard with the blade cutter attachment off the pactotiz-b)
ing beaker using the three tabs.
Using the blade tongs, grasp the blade cutter attachment and remove itc)
from the spray guard. The blade cutter attachment may now be cleaned
immediately under running water. Further cleaning directions can be found
in the separate instruction manual supplied with the Pacojet Coupe Set,
which is available as an optional add-on.
d) Should no further beakers be immediately proc-
essed, a rinsing cycle of the PACOJET 2 food
processingsystemmustbeconsequentlyinitiat-
ed using the cleaning kit provided. Please clean
the machine in accordance with the instructions
found in Chapter 7.
Cutting/Chopping procedure6.3.1
a) Fill the pacotizing beaker with small pieces of
fresh, non-frozen food, then add other desired
ingredients and seasonings.
IMPORTANT!Î
Neverllthepacotizingbeakerabovethemaximumll-line.Overllingbeak-
ers can result in extensive contaminant ingress that can lead to defects and
damage.
b) Remove the 2-blade or 4-blade cutter attachment from the packaging of
the Pacojet Coupe Set by holding only the upper/connector shaft part of
thebladecutterattachment.Next,usethebladecutterafxingtongsin-
cluded to clasp the centre of the blade. The connector shaft part of the
blade cutter will face upward.
Install the spray guard on the cutter blade so that the cutter blade upper/
connector shaft goes through the hole in the spray guard. Using the cutter
tongs, bring the cutter blade and the spray guard up to the splined end of
the machine shaft. Check that the cutter blade and the spray guard are
afxedproperlybyexertinglightupwardpressure.
Now the pacotizing beaker and the protective beaker can be mounted ontoc)
the machine as described in section 6.2.3b of the PACOJET 2 instruction
manual.
Table of contents