7
SELECTING YOUR GRIND SIZE
For each coffee style, Espresso, Percolator, Filter, French Press and Steep, the grind size will
differ. Within each coffee style there is a range of settings. Experiment with different grind
settings to achieve the brew that best suits your taste. As a start we recommend you to use
the grind size setting listed in the chart below. This chart is also a guide to find right ratio of
coffee to water.
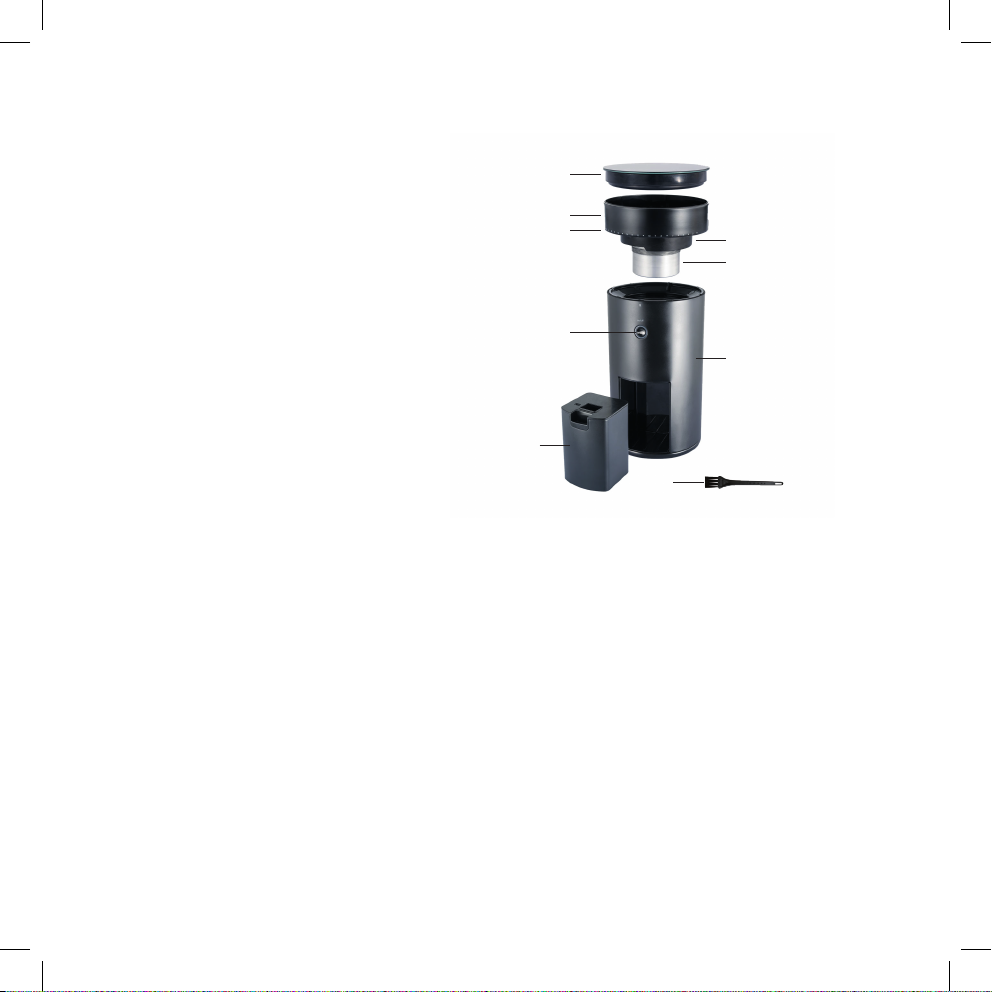
Before use rotate the bean hopper B to desired grind size position. Weigh the coffee beans
based on your desired brew volume.
Note: There are 45 grind size setting for different coffee styles – Espresso, Aeropress, Filter,
French Press and Steep.
Grind size (fine-coarse) (1-4) (26-28) (28-31) (39-45)
Brew volume Espresso Filter French Press Steep
Single shot 12-15 g
Double shot 18-20 g
0,25 l 15 g 15 g 15 g
0,5 l 30 g 30 g 30 g
0,75 l 45 g 45 g 45 g
1 l 60 g 60 g 60 g
1,25 l 75 g 75 g 75 g
Note: Brewing time for each type of brew will differ. It will also vary based on grind size.
Please experiment to find what is suitable for you. As a guideline please look at the below.
Normal brewing time for:
Espresso: 20seconds.
Filter: 4-6min.
French press: 6min.
Steep: 8min.
COFFEE GRINDING OPERATION
• Press and release the start button E.
• The button light glow white.
• The grinder will automatically stop after end of grinding, white light pulsing (3 times, 2
sec on, 2 sec off).
• Complete the grinding job, then the light will turn off.
Cancel
• Press and release the start button E.
• The light will turn off and stop grinding.
MAINTENANCE AND CLEANING
• This product should be used and stored by adults.
• This product should be kept away from damp environments.
• Do not immerse the unit into liquid/water or put it in a dishwasher.
• Clean the scale with a slightly damp cloth. Do not use chemical/abrasive cleaning
agents.
• Do not clean or perform maintenance on the unit while the plug is connected to the
mains supply.
• Clean the casing
I, the lid of the coffee bean cup /scale, the coffee bean cup and
coffee with a dry cloth. Never use a wet or heavily chemical cleaning agent.
• Store the unit in a dry place out of the reach of children, and avoid direct sunlight.
• If the appliance breaks down or is dropped or damaged, stop using it immediately.
• Do not open the product, as this will invalidate the purchase warranty.
• When using espresso at the finest setting, the device may stop at some occasions. If this
happen, grind coffee with a coarser setting such as #25 and let the burrs grind out the
8
COFFEE GRINDING OPERATION
• Press and release the start button E.
• The button light glow white.
• The grinder will automatically stop after end of grinding, white light pulsing (3 times, 2
sec on, 2 sec off).
• Complete the grinding job, then the light will turn off.
Cancel
• Press and release the start button E.
• The light will turn off and stop grinding.
MAINTENANCE AND CLEANING
• This product should be used and stored by adults.
• This product should be kept away from damp environments.
• Do not immerse the unit into liquid/water or put it in a dishwasher.
• Clean the scale with a slightly damp cloth. Do not use chemical/abrasive cleaning
agents.
• Do not clean or perform maintenance on the unit while the plug is connected to the
mains supply.
• Clean the casing
I, the lid of the coffee bean cup /scale, the coffee bean cup and
coffee with a dry cloth. Never use a wet or heavily chemical cleaning agent.
• Store the unit in a dry place out of the reach of children, and avoid direct sunlight.
• If the appliance breaks down or is dropped or damaged, stop using it immediately.
• Do not open the product, as this will invalidate the purchase warranty.
• When using espresso at the finest setting, the device may stop at some occasions. If this
happen, grind coffee with a coarser setting such as #25 and let the burrs grind out the
, the coffee bean cup and