Palme Fenix User manual

F002.1 - 1
Fenix
Pendeltür an Fixteil/
Eckeinstieg 4-tlg./
Runddusche 4-tlg.
Fenix
swing door on fi xed part/
4-part corner entry/
4-part curved shower
Montageanleitung F002.1
F002.1Assembly Instruction

F002.1 - 2
1
1 x 107673 +
1 x 107672
3
1 x 107686
2 x 107687
2 x M5x16
102900
2 x 101497
4 x M4x10
107706
1 x 107694
2
4 x ø6x50
106537
4 x ø4,2x50
106538
4 x 101385
Option
1 x kpl.
3
1 x 107688/
107689
3 x 106318 +
3 x 106319
1 x 106317
3 x 106734
1 x
1 x 106671
1 x 106672
1 x 107674
4 x 102408
1 x 107679 +
1 x 107696
2 x 106527
4
1 x
1 x 107676 +
1 x 107675
1 x 107678 +
1 x 107677
2 x M5x20
106368
2 x 106527
2 x 102408
1 x 107684 +
1 x 107685
4
1 x
1 x Griff kpl.
5
1 x M5x16
102900
1 x 107674
1 x 106527
1 x 106351
1 x 105836
1 x 102117
1 x 105837/
105838
nur bei
Eckeinstieg 4-tlg.
only for
4-part corner entry
1 x 101861
nur bei
Pendeltür an Fixteil /
Runddusche 4-tlg.
only for
swing door on fixed part /
4-part curved shower
33
oder
or
zusätzlich bei Aus-
führung mit Seitenteil
additionally for version
with side panel
1 x M5x16
102900
1 x 106527
ø 6 mm TX20
SW3
Achtung:
Montagepaket kann mehr Teile enthalten, als zum Aufbau benötigt werden.
Possibly more assembly components are included than necessary.
L=2000mm
L=600mm
Bei Eckeinstieg 4-tlg. und Runddusche 4-tlg.
werden alle Teile zweimal benötigt.
All parts are required twice for 4-part corner entry
and 4-part curved shower.
Silikonfett
Silicon grease

F002.1 - 3
1 x 100636
Option
8
nur bei
Eckeinstieg 4-tlg.
only for
4-part corner entry
1 x 106384
1 x 104242
1 x 104949
nur bei
Nischeneinbau
only for
alcove installation
1 x 104947
3 x 101385
3 x 103637
3 x ø6x50
106537
3 x ø4,2x50
106538
3 x M6x6
105946
1 x 104362
1 x 101556
2 x 106231
2 x 106232
1 x ø6x50
106537
1 x ø4,2x50
106538
2 x 103637
2 x M6x6
105946
4 x M5x10
102224
4 x 106527
1 x M5x22
106605
Enfällt bei
Ausführung
mit Seitenteil
Not applicable for
version with side panel
6 7
ø 6 mm TX20
SW3
Achtung:
Montagepaket kann mehr Teile enthalten, als zum Aufbau benötigt werden.
Possibly more assembly components are included than necessary.
L=2000mm
L=600mm
Bei Eckeinstieg 4-tlg. und Runddusche 4-tlg.
werden alle Teile zweimal benötigt.
All parts are required twice for 4-part corner entry
and 4-part curved shower.

F002.1 - 4
Anleitung für linke Beschlagseite dargestellt.
Für rechte Beschlagseite, spiegelgleicher Aufbau.
Instructions shown for the left side fi tting.
For right side fi tting, mirror structure.
Bei allen Arbeitsschritten mit dem Silikon-Symbol: Für den entsprechenden Untergrund
geeignetes Silikon verwenden. Oberfl äche vor dem Silikonieren gründlich reinigen (fettfrei).
For all work steps with the silicone symbol: Use suitable silicone for the respective base
material. Thoroughly clean the surface prior to using silicone (free of grease).
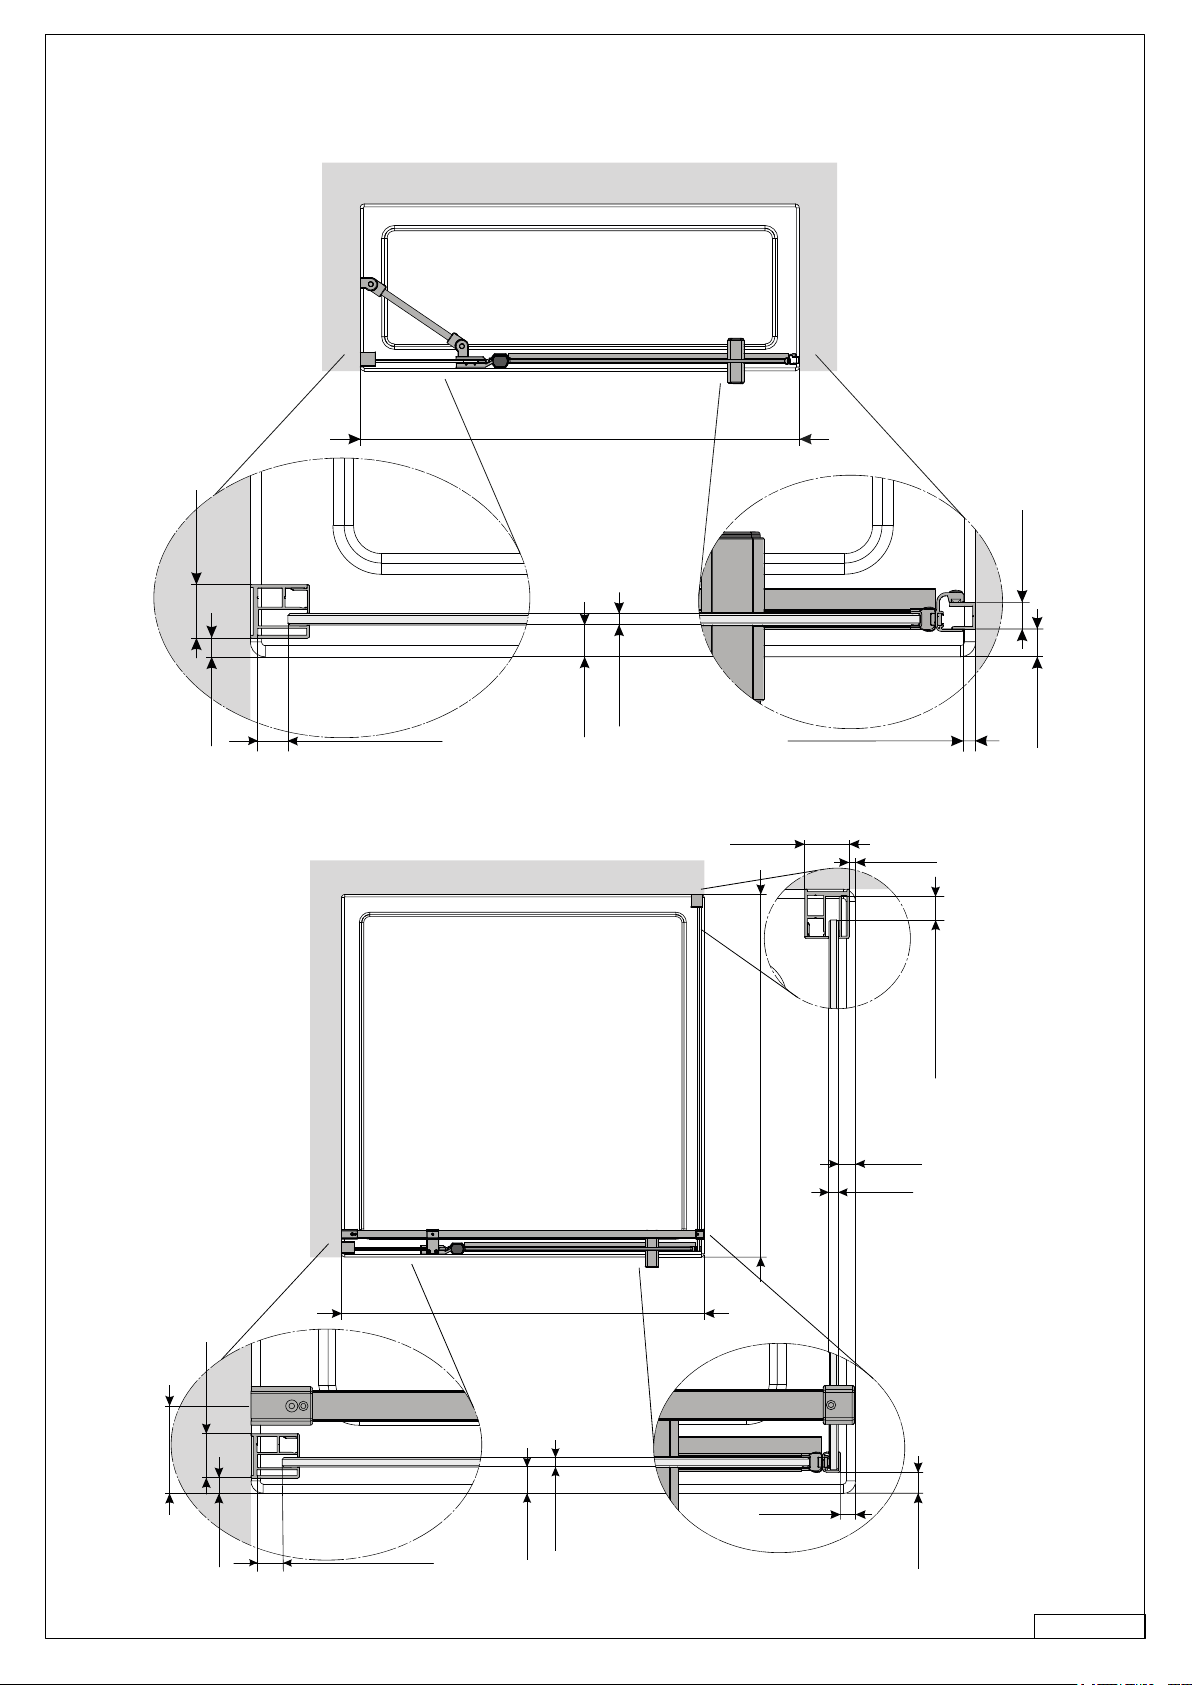
F002.1 - 5
Wanneneinbaumaß
Tray fitting size
15 mm 14 mm
Nischeneinbaumaß
Alcove fitting size
17 mm
6 mm
10 mm 28 mm
Ausgleichsbereich:
Compensation range:
0 - 15 mm
Ausgleichsbereich:
Compensation range:
0 - 5 mm
14 mm
Wanneneinbaumaß
Tray fitting size
17 mm
6 mm
10 mm 28 mm
11 mm
6 mm
10 mm
4 mm
28 mm
Ausgleichsbereich:
Compensation range:
0 - 15 mm
Ausgleichsbereich:
Compensation range:
0 - 15 mm
57 mm
Einbauinformation
Installation information
Nischeneinbau
alcove installation
Pendeltür an Fixteil
mit Seitenteil
swing door on fi xed
part with side panel
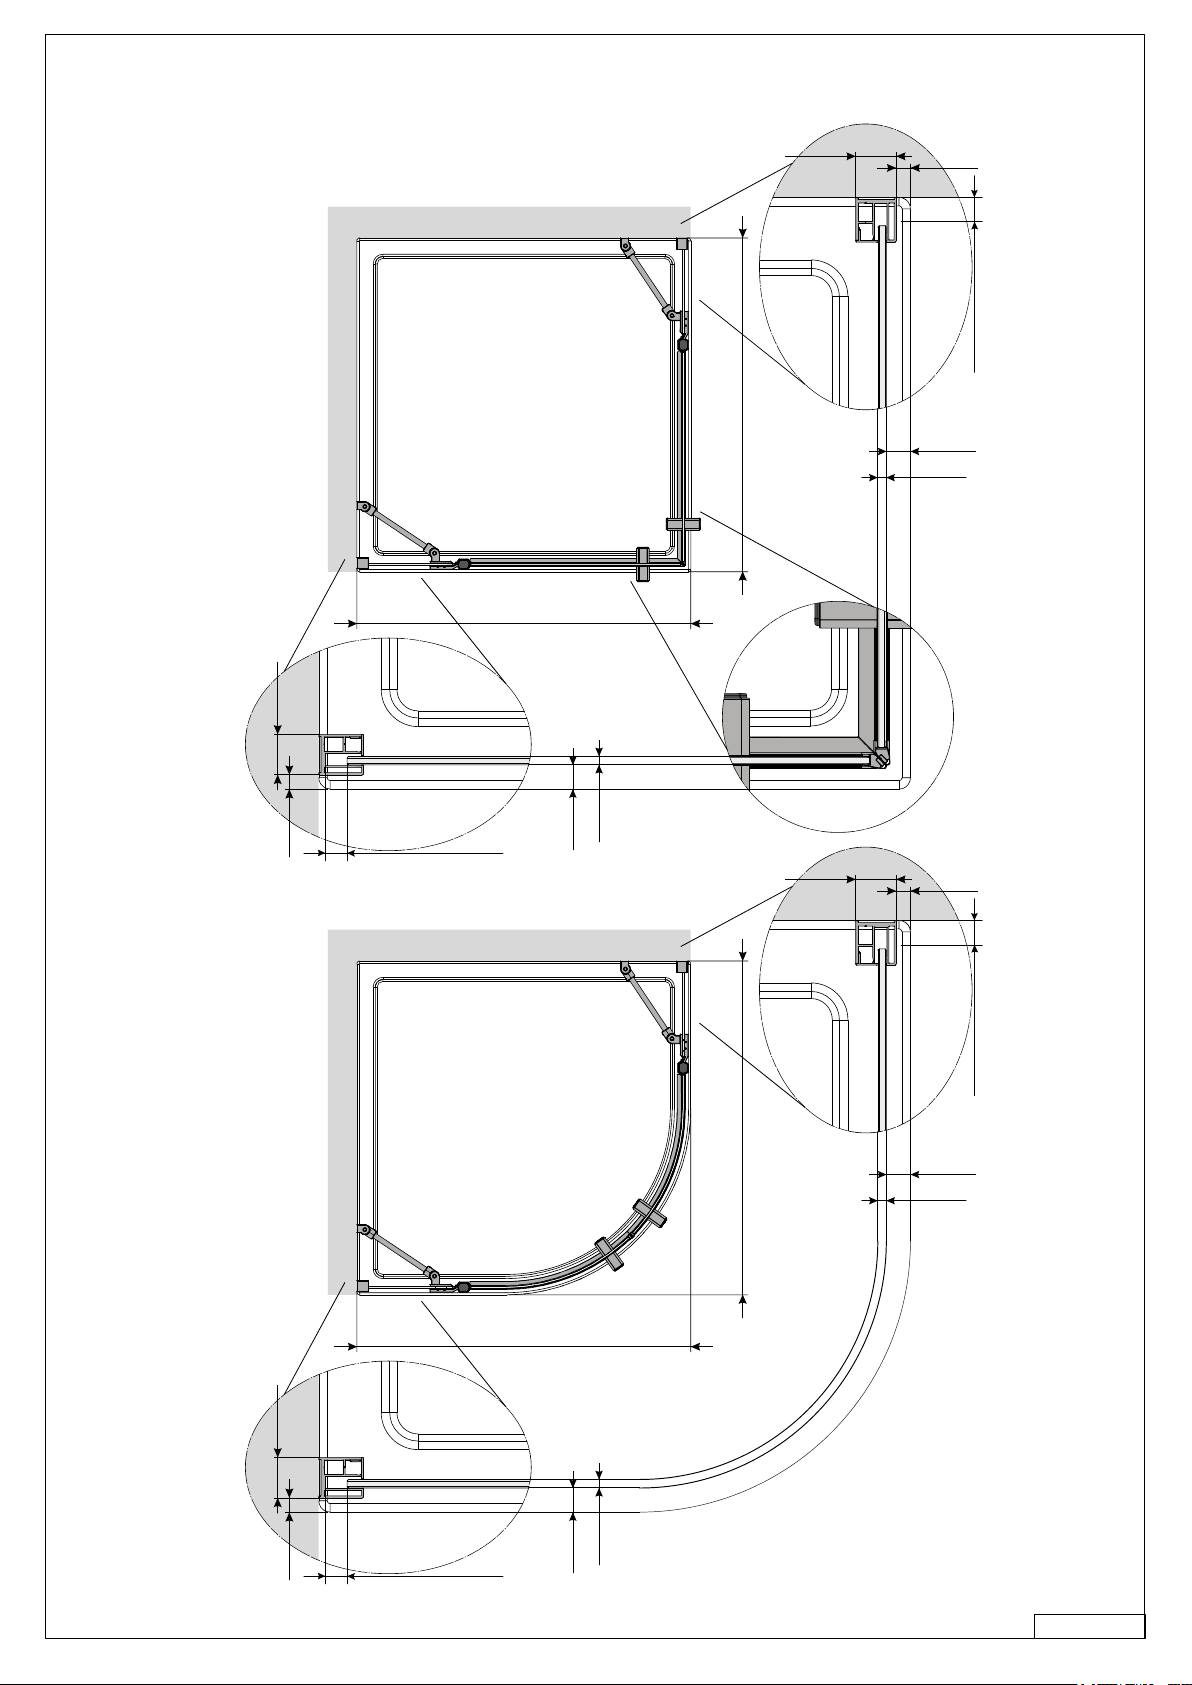
F002.1 - 6
Wanneneinbaumaß
Tray fitting size
Wanneneinbaumaß
Tray fitting size
17 mm
6 mm
10 mm 28 mm
Ausgleichsbereich:
Compensation range:
0 - 15 mm
17 mm
6 mm
10 mm
28 mm
Ausgleichsbereich:
Compensation range:
0 - 15 mm
Wanneneinbaumaß
Tray fitting size
Wanneneinbaumaß
Tray fitting size
17 mm
6 mm
10 mm 28 mm
Ausgleichsbereich:
Compensation range:
0 - 15 mm
17 mm
6 mm
10 mm
28 mm
Ausgleichsbereich:
Compensation range:
0 - 15 mm
Einbauinformation
Installation information
Eckeinstieg 4-tlg.
4-part corner entry
Runddusche 4-tlg.
4-part curved shower
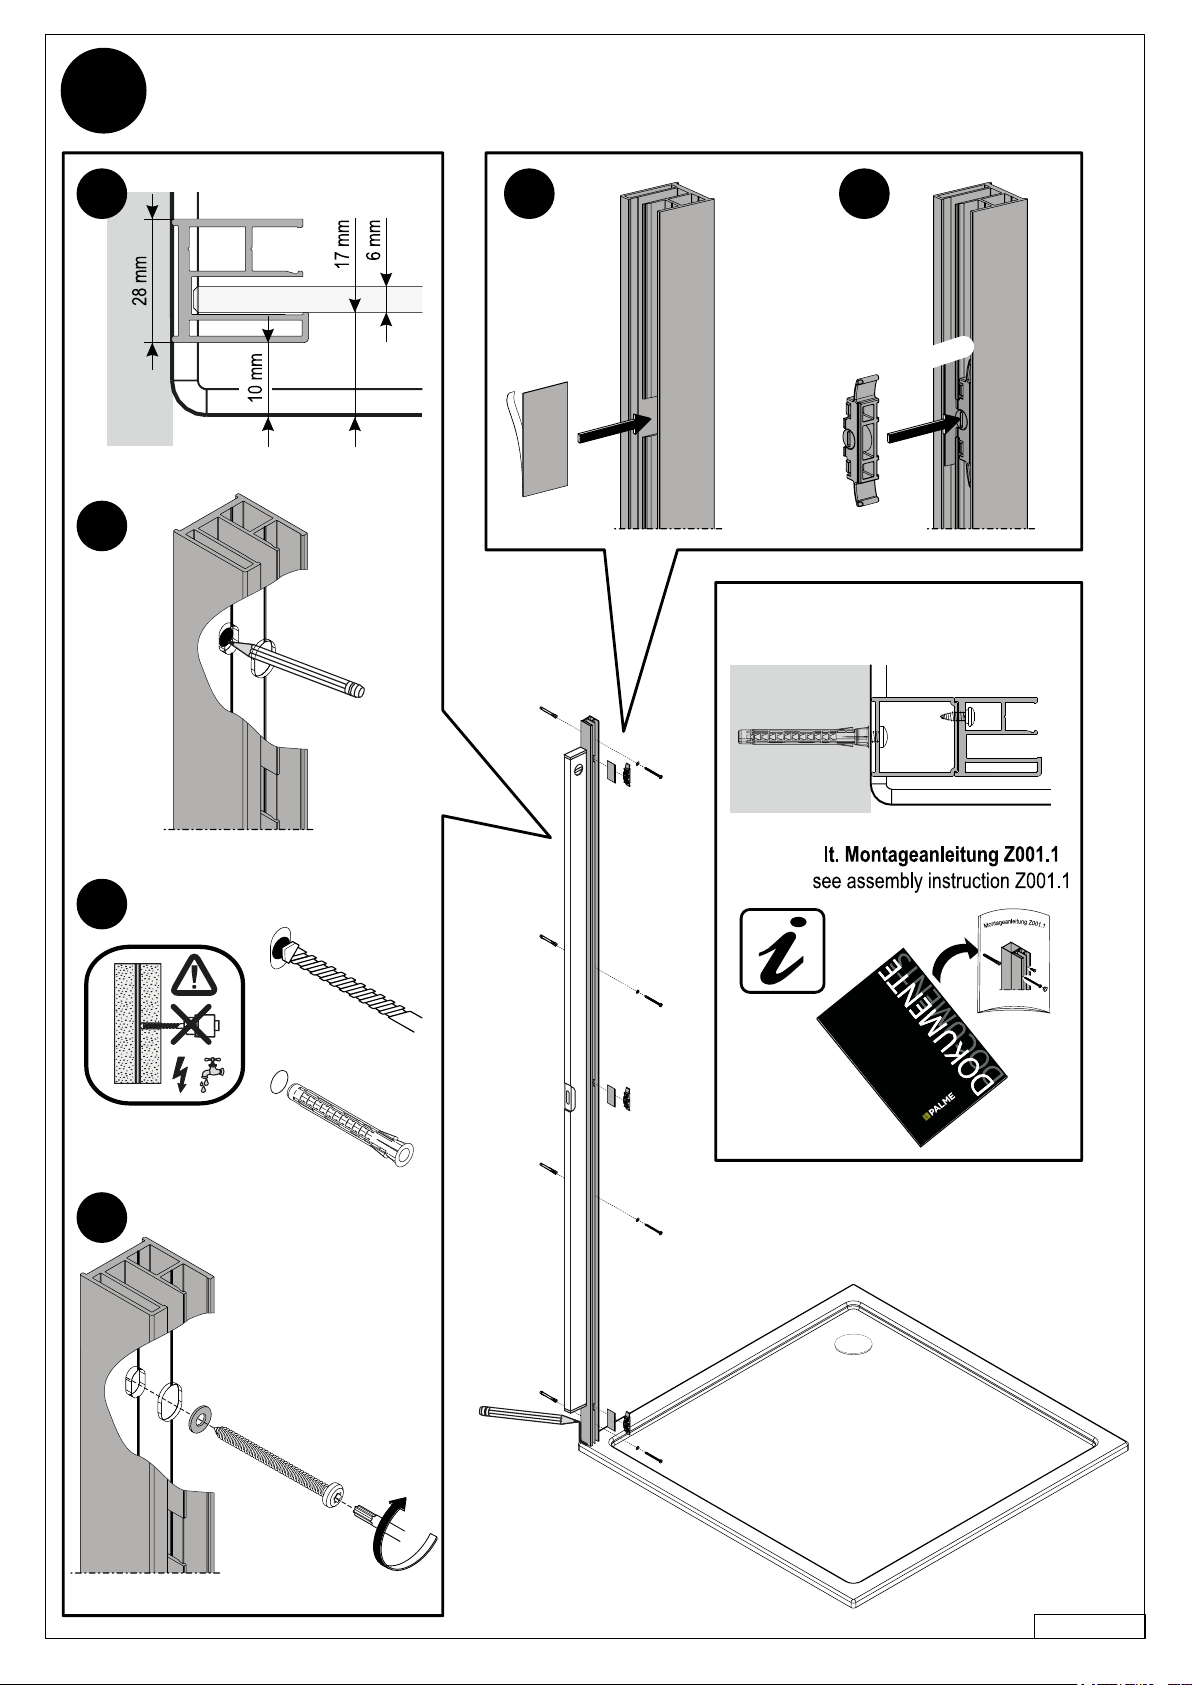
F002.1 - 7
1
A
B
C
D
Ø 4,2x50mm
Ø 6mm
Ø 6x50mm
TX20
4 x
4 x
4 x
Anleitung für linke Beschlagseite dargestellt.
Für rechte Beschlagseite, spiegelgleicher Aufbau.
Instructions shown for the left side fi tting.
For right side fi tting, mirror structure.
Optional mit Verbreiterungsprofi l
Optionally with extension profi le
E F
3 x 3 x
*klick*
Vor Montage trocken und fettfrei reinigen.
Clean dry and free of grease before mounting.

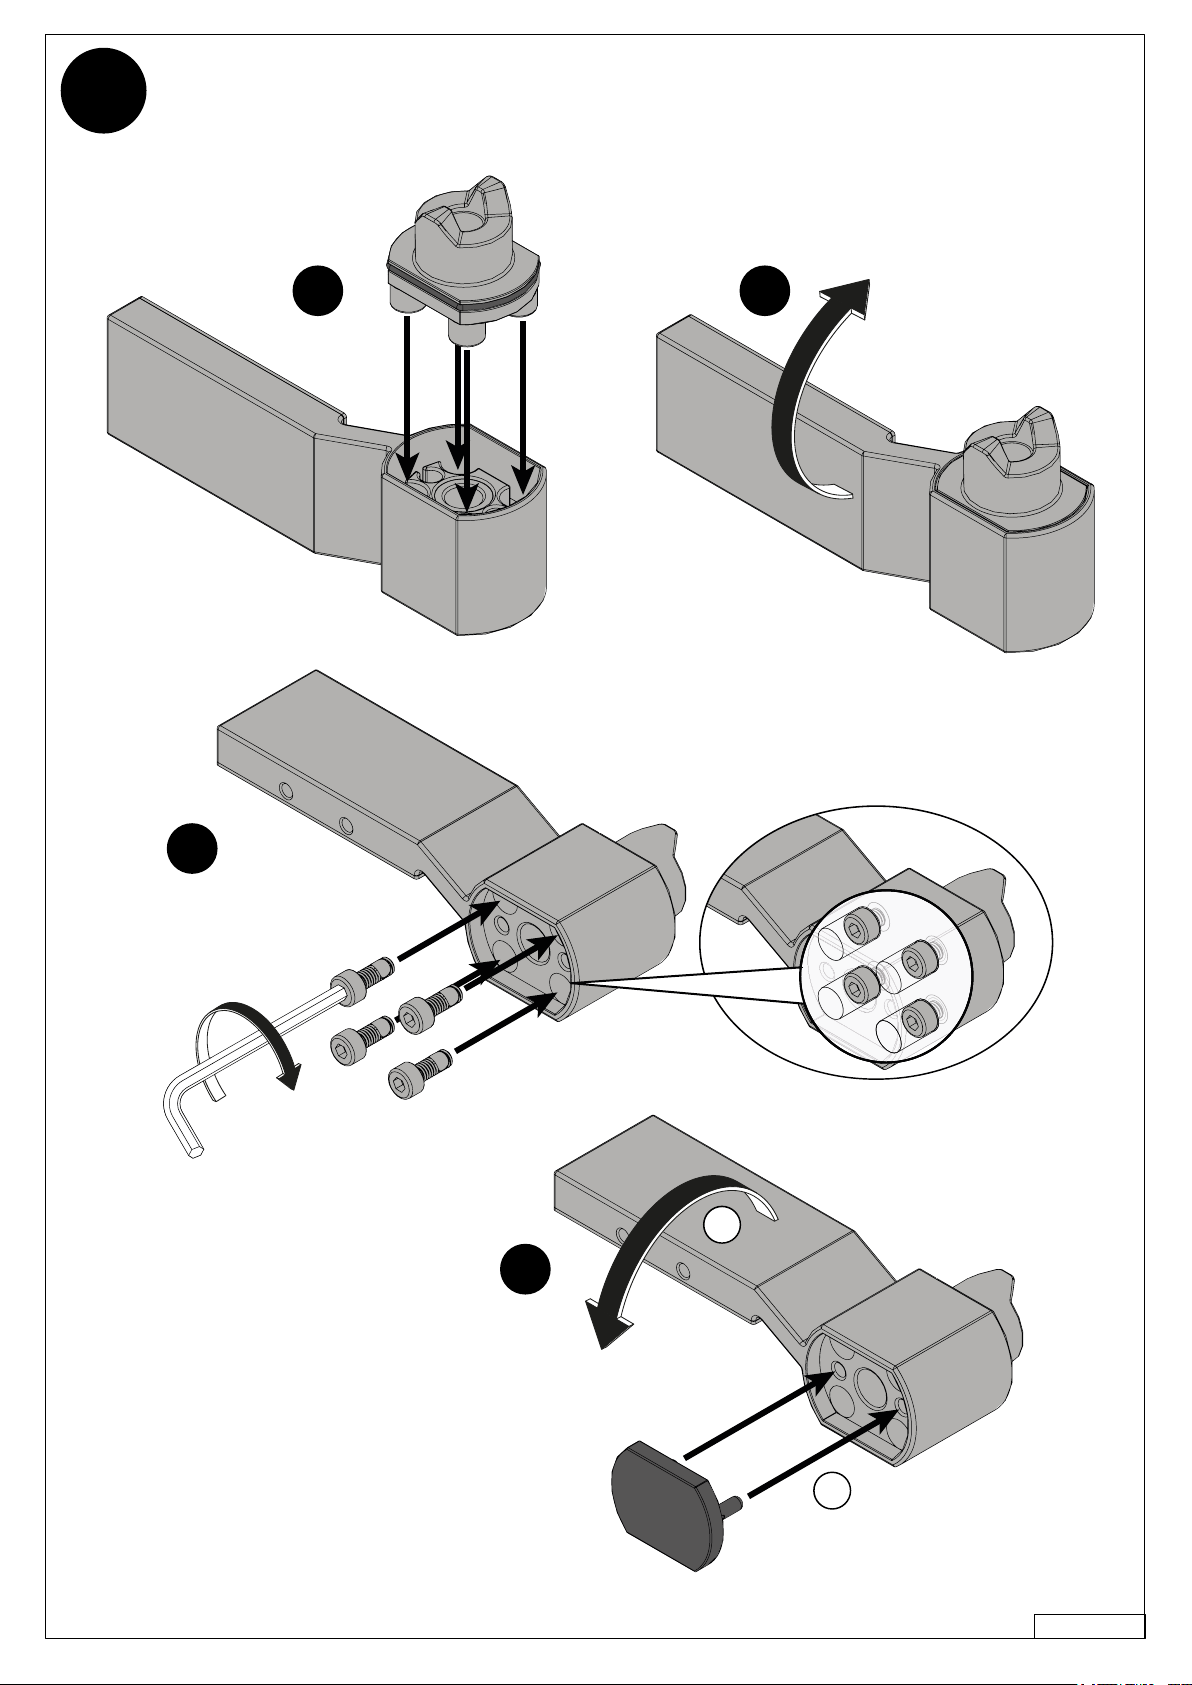
F002.1 - 8
A
B
C
D
Anleitung für linke Beschlagseite dargestellt.
Für rechte Beschlagseite, spiegelgleicher Aufbau.
Instructions shown for the left side fi tting.
For right side fi tting, mirror structure.
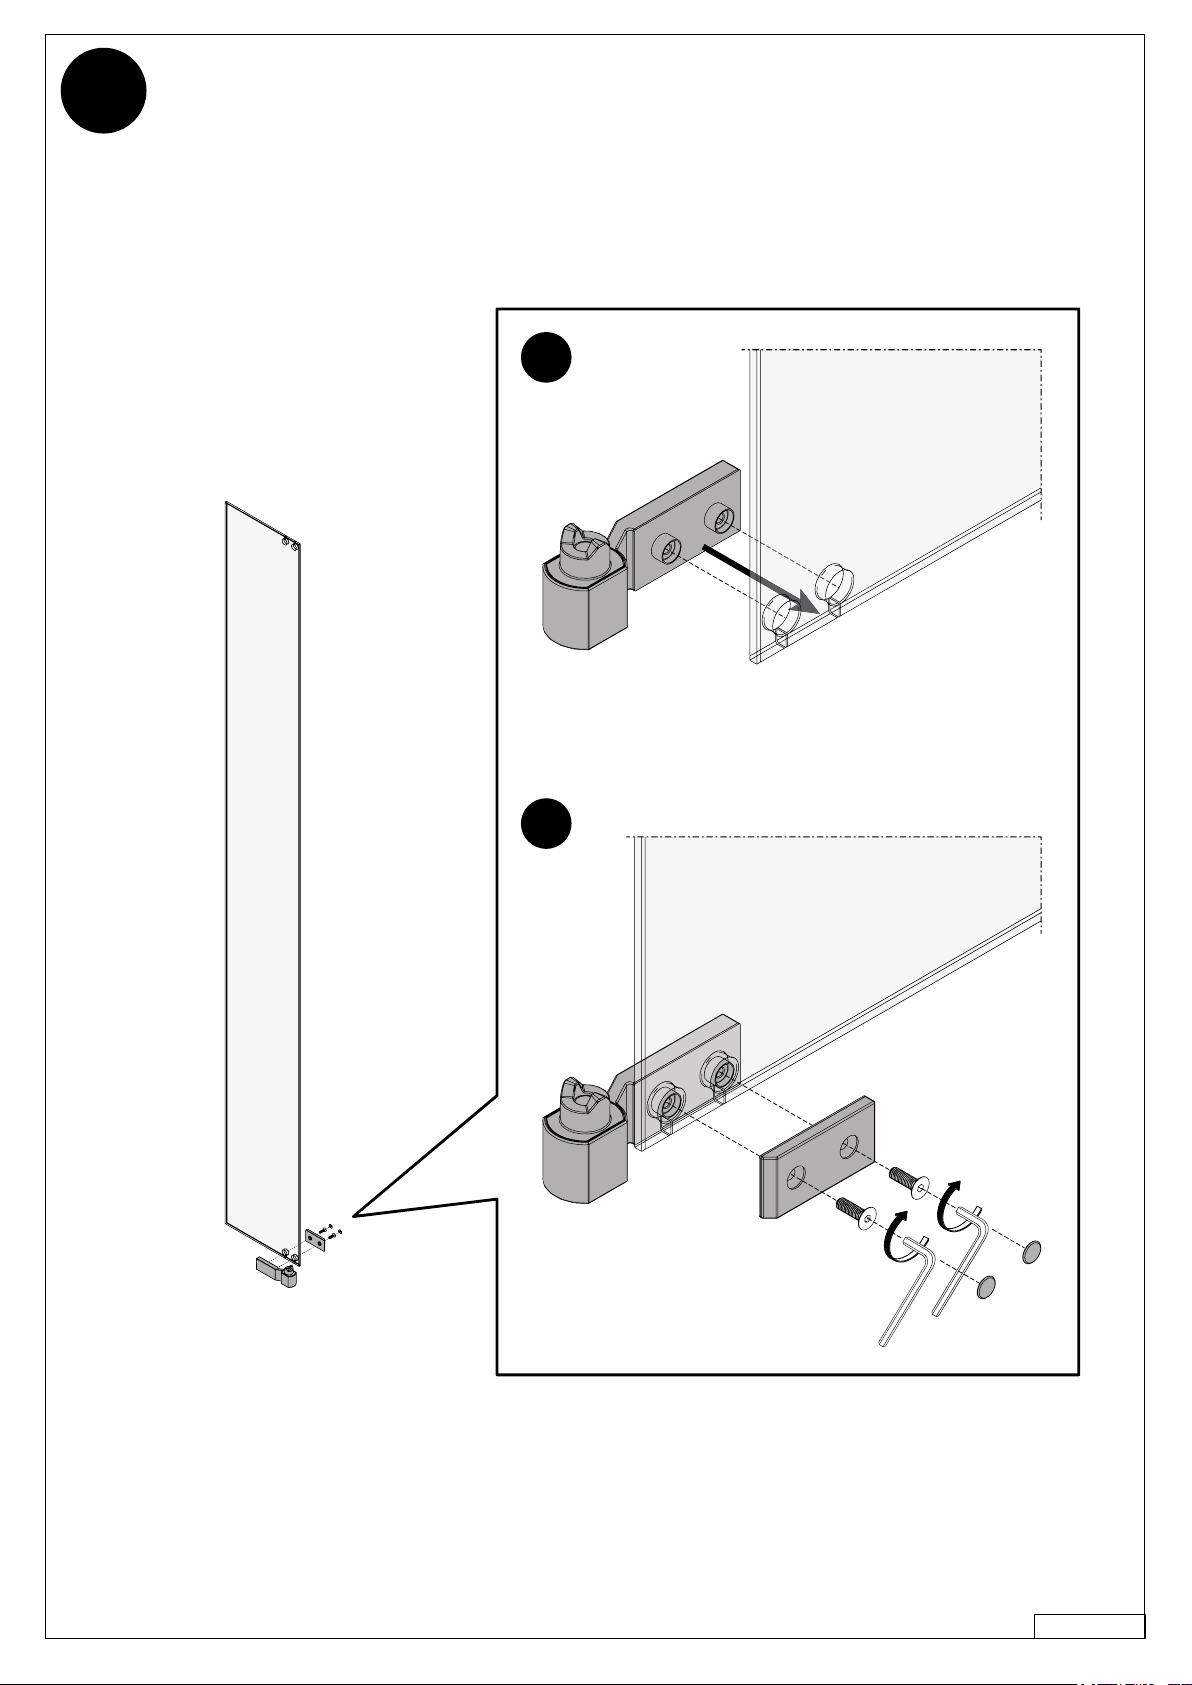
Vormontage oberes Scharnier
upper hinge pre-assembly
2
F002.1 - 9
A B
C
D
Anleitung für linke Beschlagseite dargestellt.
Für rechte Beschlagseite, spiegelgleicher Aufbau.
Instructions shown for the left side fi tting.
For right side fi tting, mirror structure.
Vormontage unteres Scharnier
lower hinge pre-assembly
M4x10mm
SW3
4 x
1
2
2
F002.1 - 10
Anleitung für linke Beschlagseite dargestellt.
Für rechte Beschlagseite, spiegelgleicher Aufbau.
Instructions shown for the left side fi tting.
For right side fi tting, mirror structure.
3
A
B
M5x16mm
SW3
Other Palme Shower Cabin manuals


Popular Shower Cabin manuals by other brands


US HORIZON
US HORIZON SORRENTO Series Assembly instructions

Arblu
Arblu PERSEO ANGOLO Q-R 2SL+1LF Assembling instructions

ELEGANT
ELEGANT SPR870 quick start guide

RIHO
RIHO SCANDIC NXT X101 installation manual

Aquadart
Aquadart Rolla 8 installation instructions

Arblu
Arblu DEDALO PLUS NICCHIA 1AB+1LF Assembly instructions