manuals.online logo
Brands
  1. Home
  2. •
  3. Brands
  4. •
  5. Panasonic
  6. •
  7. Enclosure
  8. •
  9. Panasonic WV-CR1S User manual

Panasonic WV-CR1S User manual

Other Panasonic Enclosure manuals

Panasonic AJPCD20 - P2 DRIVE -ADDENDUM Owner's manual

Panasonic

Panasonic AJPCD20 - P2 DRIVE -ADDENDUM Owner's manual

Panasonic WJHDE300 - DIGITAL DISK RECORDER User manual

Panasonic

Panasonic WJHDE300 - DIGITAL DISK RECORDER User manual

Panasonic WV-NF5C User manual

Panasonic

Panasonic WV-NF5C User manual

Popular Enclosure manuals by other brands

Antec Veris Fusion Remote Max Specification sheet

Antec

Antec Veris Fusion Remote Max Specification sheet

ENERMAX iVektor.Q ECA 3371 Series user manual

ENERMAX

ENERMAX iVektor.Q ECA 3371 Series user manual

Lindy 43095 user manual

Lindy

Lindy 43095 user manual

SICK C4000 Select operating instructions

SICK

SICK C4000 Select operating instructions

Geeek A60 PLUS installation guide

Geeek

Geeek A60 PLUS installation guide

OVE SYDNEY 48 installation manual

OVE

OVE SYDNEY 48 installation manual

SilentiumPC Armis AR5 Hardware installation

SilentiumPC

SilentiumPC Armis AR5 Hardware installation

Pulsar 17/TRP80/DSPR Assembly instructions

Pulsar

Pulsar 17/TRP80/DSPR Assembly instructions

MSI MPG SEKIRA 500X quick start guide

MSI

MSI MPG SEKIRA 500X quick start guide

Antec Dark fleet DF-10 user manual

Antec

Antec Dark fleet DF-10 user manual

Peavey DS 1502 Specifications

Peavey

Peavey DS 1502 Specifications

D-Link ShareCenter Pro DNS-1550-04 user manual

D-Link

D-Link ShareCenter Pro DNS-1550-04 user manual

Rosewill RX82-U(JBOD) user manual

Rosewill

Rosewill RX82-U(JBOD) user manual

QNAP SAS JBOD CLI 1.0 user guide

QNAP

QNAP SAS JBOD CLI 1.0 user guide

GAMDIAS Talos P1 Quick installation guide

GAMDIAS

GAMDIAS Talos P1 Quick installation guide

Auvs KR615 user manual

Auvs

Auvs KR615 user manual

Antec AR300 user manual

Antec

Antec AR300 user manual

CommScope FDH 3000 user manual

CommScope

CommScope FDH 3000 user manual

manuals.online logo
manuals.online logoBrands
  • About & Mission
  • Contact us
  • Privacy Policy
  • Terms and Conditions

Copyright 2025 Manuals.Online. All Rights Reserved.

Before attempting to connect or install this product,
please read these instructions carefully and save this manual for future use.
The model number is abbreviated in some descriptions in this manual.
Operating Instructions
Included Installation Instructions
Dome Cover
Model No.
WV-CR1S
Precautions
Mounting procedures
Refer installation work to the dealer.
Installation work requires technique and experience. Failure to observe this may cause fire, electric
shock, injury, or damage to the product.
Be sure to consult the dealer.
Read the following descriptions together with the Installation Guide of the camera. The WV-SFR631L
is used as an example in these descriptions.
Note:
● When a smoke type dome cover is used, the IR LED irradiation distance and the illuminance level
for switching between color and monochrome are lower than for a standard clear type dome
cover. Check the settings after attaching the enclosure.
Step1
Remove the enclosure
from camera
Use the bit included with the camera to loosen
the 2 screws that secure the enclosure, and then
remove the enclosure from the camera body.
Note:
● The enclosure is still connected to the cam-
era with the auxiliary wire at this stage.
Enclosure
Camera body
Enclosure
fixing screws
(x2)
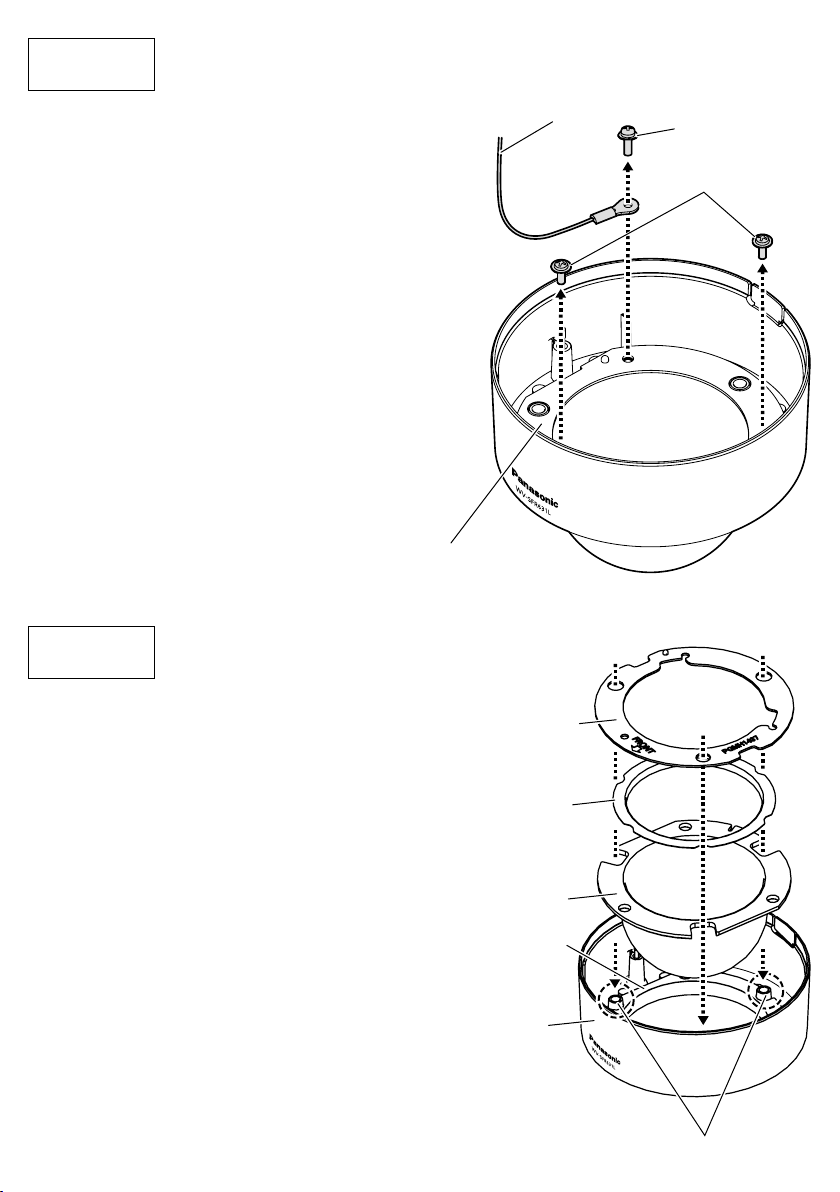
Step2 Remove the auxiliary wire and dome cover
1 Remove the fixing screw* (1 pc., with washer)
that secures the auxiliary wire to the enclosure.
2 Remove the 2 fixing screws* (2 pcs., without
washers) that secure the dome cover anchor
bracket to the enclosure.
3 Remove the dome cover anchor bracket, light-
blocking sheet, and the dome cover. (Do not
remove the dome sheet.)
These 3 fixing screws, the dome cover anchor
bracket, and light-blocking sheet will be used
again in step 3.
* Depending on the camera used, all 3 fixing
screws may be of the same type (without wash-
ers). In this case, please use the removed
screws.
Step3
Replace the dome cover
1 Remove the cover film from the outside of the
dome cover (WV-CR1S). Keep the removed cover
film for future use. (Take care not to damage the
outside or inside of the dome cover.)
2 Attach the dome cover (WV-CR1S) to the enclo-
sure. When attaching, align the 3 holes of the
dome cover anchor bracket and 3 notches on the
lightblocking sheet and dome cover with the 3
protrusions on the enclosure.
3 Using the 2 fixing screws (without washers) that
were removed in step 2, secure the dome cover
to the enclosure.
(Recommended tightening torque: 0.78 N·m
{0.58 lbf·ft})
4 Attach the cover film removed in 1 to the sur-
face of the dome cover.
Auxiliary wire Fixing screw
(with washer)
Dome cover anchor bracket
Dome cover
anchor bracket
Dome cover
Light-blocking
sheet
Enclosure
Protrusions on the enclosure
Dome sheet
Fixing screws
(without washers)
Step4
Attach the enclosure to the camera
1 Use the last fixing screw (1 pc., with washer) to secure
the auxiliary wire from the camera body to the enclo-
sure. (Recommended tightening torque: 0.78N·m
{0.58lbf·ft})
Position and secure the flat side of the end of the auxil-
iary wire to the dome cover anchor bracket with the
screw. (Make sure not to position the end of the auxil-
iary wire above the protrusion.)
2 Secure the camera to the enclosure with the 2 enclo-
sure fixing screws.
(The recommended tightening torque of the enclosure
fixing screws is 0.59 N·m {0.44 lbf·ft})
⇒ Refer to the Installation Guide for more information
about installing the camera.
IMPORTANT:
● When the enclosure is attached, the camera's focus
may go out of focus. Use the "Auto focus" function in
the setup menu to adjust the focus.
● Remove the cover film after installation is complete.
● If there are fingerprints or dirt on the dome cover, wipe it clean with a soft cloth.
End of the
auxiliary wire
Protrusion
Fixing screw
(1 pc., with washer)
Specifications
Standard Accessories
Ambient operating temperature: –10 °C to +50 °C {14 °F to 122 °F}
Mass: Approx. 61.0 g {0.13 lbs}
Dimensions: Diameter: 108 mm {4-1/4 inches}
Height : 59.5 mm {2-11/32 inches}
Diameter of the dome: 41.5 mm {1-5/8 inches}
Operating Instructions .................................... 1 set
For U.S. and Canada:
Panasonic System Communications
Company of North America,
Unit of Panasonic Corporation
of North America
www.panasonic.com/business/
For customer support, call 1.800.528.6747
Two Riverfront Plaza, Newark, NJ 07102-5490
Panasonic Canada Inc.
5770 Ambler Drive, Mississauga,
Ontario, L4W 2T3 Canada
(905)624-5010
www.panasonic.ca
© Panasonic System Networks Co., Ltd. 2014
For Europe and other countries:
Panasonic Corporation
http://panasonic.net
Importer's name and address to follow EU rules:
Panasonic Testing Centre
Panasonic Marketing Europe GmbH
Winsbergring 15, 22525 Hamburg, Germany
PGQX1552ZA Cs0214-0
Printed in China