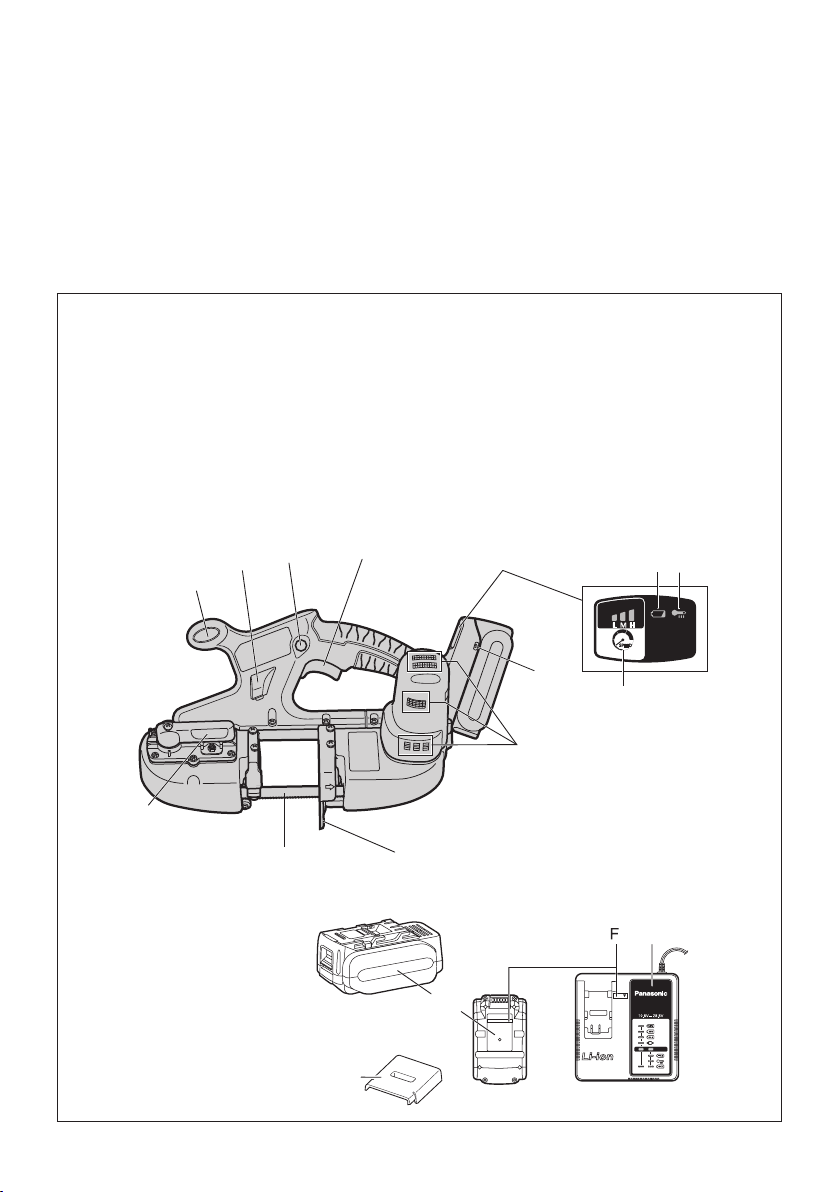
Panasonic EY45A5 User manual

Model No: EY45A5
Operating Instructions
Bedienungsanleitung
Instructions d’utilisation
Istruzioni per l’uso
Gebruiksaanwijzing
Manual de instrucciones
Brugsvejledning
Driftsföreskrifter
Bruksanvisning
Käyttöohjeet
Çalıştırma Talimatları
Instrukcja obsługi
Provozní pokyny
Használati utasítás
Návod na obsluhu
Navodila za uporabo
Instrucţiuni de utilizare
Instruções de Uso
Cordless Band Saw
Kabellose Bandsäge
Scie à Ruban sans Fil
Sega a Nastro Senza Fili
Accubandzaag
Sierra de Banda Inalámbrica
Trådløs Båndsav
Trådlös Bandsåg
Trådløs Bandsåg
Johdoton Vannesaha
Akumulátorová Pásová Píla
Bezkáblová Pásová Píla
Serra de Fita Sem Fio
Before operating this unit, please read these instructions completely and save this manual for future use.
Vor Inbetriebnahme des Gerätes die Betriebsanleitung bitte gründlich durchlesen und diese Broschüre zum späteren Nachschlagen
sorgfältig aufbewahren.
Prima di usare questa unità, leggere completamente queste istruzioni e conservare il manuale per usi futuri.
Lees deze gebruiksaanwijzing aandachtig door voor u het apparaat in gebruik neemt en bewaar de gebruiksaanwijzing voor eventuele naslag.
Antes de usar este aparato por primera vez, lea todas las instrucciones de este manual y guarde el manual para poderlo consultar en el futuro.
Gennemlæs denne betjeningsvejledning før brugen og gem den til fremtidig brug.
Läs igenom hela bruksanvisningen innan verktyget tas i bruk. Spara bruksanvisningen för senare användning.
Før enheten tas i bruk, vennligst les disse alle anvisningene og oppbevar deretter bruksanvisningen for senere bruk.
Lue ohjeet huolella ennen laitteen käyttöönottoa ja säilytä tämä käyttöohje tallessa tulevaa tarvetta varten.
Prosimo vas, da pred uporabo polnilca v celoti preberete ta navodila in jih shranite za prihodnjo uporabo.

- 2 -
Index/Index/Index/Indice/Index/Indice/Indeks/Index/Indeks/Hakemisto/Dizin/Indeks/
Rejstřík/Tárgymutató/Obsah/Kazalo/Index/Índice
English: Page 11
Deutsch: Seite 24
Italiano: Pagina 48
Español: Página 72
Dansk: Side 84
Polski: Strona 144
FUNCTIONAL DESCRIPTION
FUNKTIONSBESCHREIBUNG
DESCRIPTION DES FONCTIONS
DESCRIZIONE DELLE FUNZIONI
FUNCTIEBESCHRIJVING
DESCRIPCIÓN FUNCIONAL
FUNKTIONSBESKRIVELSE
FUNKTIONSBESKRIVNING
FUNKSJONSBESKRIVELSE
TOIMINTAKUVAUS
İŞLEVSEL AÇIKLAMA
OPIS DZIAŁANIA
FUNKČNÍ POPIS
MŰKÖDÉSI LEÍRÁS
POPIS FUNKCIÍ
OPIS FUNKCIONALNOSTI
DESCRIERE FUNCŢIONALĂ
DESCRIÇÃO FUNCIONAL
(A)
(B)(C)(D)
(F)
(E)
(K)
(L)(M)
(J)
(I)(H)
(N)
(O)
( ) (P)
(G)

(A)
Auxiliary handle
Zusatzhaltegriff
Poignée auxiliaire
Impugnatura ausiliaria
Hulphandgreep
Mango auxiliar
Hjælpehåndtag
Extrahandtag
Hjelpehåndtak
Lisäkädensija
Uchwyt dodatkowy
Segédmarkolat
Mâner auxiliar
Alavanca auxiliar
(B)
LED light
LED-Leuchte
Lumière DEL
Luce LED
LED-lampje
Luz indicadora
LED-lys
LED-ljus
LED-lys
LED-valo
Lampka LED
LED-lámpa
LED svetlo
Luz LED
(C)
Off-lock switch
Aus/Sperrschalter
Bouton de déverrouillage
Interruttore di sblocco
Uit-blokkeerschakelaar
Interruptor de desbloqueo
Brytare av-lås
Lås av-bryter
Lukituskytkin
Kioldógomb
Stikalo za izklop-zaklep
Interruptor de bloqueio
(D)
Switch
Schalter
Interrupteur
Interruttore
Schakelaar
Interruptor
Kontakt
Strömbrytare
Bryter
Kytkin
Kapcsoló
Stikalo
Interruptor
(E)
Control panel
Bedienfeld
Panneau de commande
Pannello di controllo
Bedieningspaneel
Panel de controle
Kontrolpanel
Kontrollpanel
Kontrollpanel
Säätöpaneeli
Kumanda paneli
Ovládací panel
Ovládací panel
Panou de control
Painel de controle
(F)
Alignment marks
Ausrichtmarkierungen
Marques d’alignement
Marcature allineamento
Uitlijntekens
Marcas de alineación
Flugtemærker
Anpassningsmärken
Opprettingsmerke
Sovitusmerkit
Znaczniki
Pozíciójelölések
Oznake za poravnavo
Marcaje de aliniere
Marcas de alinhamento

- 4 -
(G)
Vent
Entlüftung
Apertura
Ventilatiegat
Ventilación
Ventilation
Ventil
Ventilasjonshull
Aukko
Otwory wentylacyjne
Prieduch
Saída de ar
(H)
Guide plate
Führungsschiene
Plaque de guidage
Piastra guida
Geleiderplaat
Placa guía
Guideplade
Styrplåt
Føreplate
Ohjainlevy
Vodicí deska
Vodiaca doska
Placa guia
(I)
Saw blade
Sägeblatt
Lame de scie
Lama della sega
Zaagblad
Hoja de sierra
Savklinge
Sågblad
Sågblad
Sahanterä
Lâmina de serra
(J)
Saw blade tension lever
Spannhebel des Sägeblatts
Levier de tension de lame de scie
Leva della tensione della lama della sega
Hendel zaagbladspanning
Palanca tensora de la cuchilla de la sierra
Spændingshåndtag til savblad
Spännarm för klinga
Spenningsspak for sagblad
Sahanterän jännitysvipu
Alavanca de tensão da lâmina de serra
(K)
Blade speed button
Blattgeschwindigkeitsknopf
Bouton de vitesse de rotation de lame
Tasto velocità della lama
Bladsnelheidsknop
Botón de velocidad de la cuchilla
Bladhastighedsknap
Knapp klinghastighet
Bladhastighetsknapp
Teränopeuspainike
Botão de velocidade da lâmina
(L)
Battery low warning lamp
Akkuladungs-Warnlampe
Témoin d’avertissement de batterie basse
Spia avvertenza batteria scarica
Waarschuwingslampje voor lage accuspanning
Luz de aviso de baja carga de batería
Advarselslampes batterieffekt lav
Varningslampa för svagt batteri
Varsellampe for at batteriet er for lavt
Alhaisen akkujännitteen varoituslamppu
Lampka ostrzegawcza niskiego poziomu
Kontrolka nízkého nabití baterie
Akkumulátor alacsony töltésszintjére
akumulátora
Indicator luminos de avertizare cu privire la
Lâmpada de aviso de bateria fraca

(M)
Overheat warning lamp (motor/battery)
Überhitzungs-Warnlampe (Motor/Akku)
Témoin d’avertissement de surchauffe
(moteur/batterie)
Spia avvertenza surriscaldamento
(motore/batteria)
Oververhitting-waarschuwingslampje
(motor/accu)
Luz de advertencia de sobrecalentamiento
(motor/batería)
Advarselslamp til overophedning (motor/
batteri)
Varningslampa för överhettning (motor/
batteri)
Varsellampe for overoppheting (motor/
batteri)
Ylikuumenemisen varoituslamppu
(moottori/akku)
Lampka ostrzegawcza przegrzania (silnik/
akumulator)
(motor/akkumulátor)
akumulátora)
baterija)
Indicator luminos de avertizare cu privire la
Lâmpada de aviso de superaquecimento
(motor/bateria)
(N)
Battery pack
Akku
Batterie autonome
Pacco batteria
Accu
Batería
Batteripakning
Batteri
Batteripakke
Akku
Akumulator
Blok baterie
Akkumulátoregység
Akumulátorová jednotka
Baterijski sklop
Acumulator
Conjunto de baterias
(O)
Battery pack cover
Akkuabdeckung
Couvercle de la batterie autonome
Coperchio pacco
Accudeksel
Cubierta de batería
Pakningsdæksel
Batteriskydd
Pakkedeksel
Akkukotelon kansi
Kryt bloku
Az akkumulátoregység fedele
Kryt akumulátorovej jednotky
Pokrov sklopa
Capac acumulator
Capa do conjunto de baterias
(P)
Battery charger
Ladegerät
Chargeur de batterie
Caricabatterie
Acculader
Cargador de batería
Batterioplader
Batteriladdare
Batterilader
Akkulaturi
Baterijski polnilnik
Carregador da bateria

[Fig.1]
Befestigungsschraube des Sägeblattschutzes
Bevestigingsschroef beschermkap zaagblad
de la sierra
Fastgørelsesskrue til savbladsdæksel
Fixeringsskruv skydd för klinga
Sagblad og festeskrue
Sahanterän suojan kiinnitysruuvi
Saw blade cover
Sägeblattschutz
Protecteur de lame de scie
Coperchio della lama della sega
Beschermkap zaagblad
Cubierta de la cuchilla de la sierra
Savbladsdæksel
Skydd för klinga
Deksel til sagblad
Sahanterän suoja
Kryt pilového pásu
Tampa da lâmina de serra
[Fig.2]
Saw blade tension lever
Spannhebel des Sägeblatts
Levier de tension de lame de scie
Leva della tensione della lama della sega
Hendel zaagbladspanning
Palanca tensora de la cuchilla de la sierra
Spændingshåndtag til savblad
Spännarm för klinga
Spenningsspak for sagblad
Sahanterän jännitysvipu
Alavanca de tensão da lâmina de serra
Rotate
Drehen
Tourner
Ruotare
Draaien
Girar
Roter
Rotera
Roter
Käännä
Döndür
Forgás
Zavrtite
Rotire
Girar

- 7 -
Saw blade
Sägeblatt
Lame de scie
Lama della sega
Zaagblad
Cuchilla de la sierra
Savblad
Klinga
Sagblad
Sahanterä
Brzeszczot
Pilový pás
Lâmina de serra
Push in
Eindrücken
Enfoncer
Spingere
Induwen
Presionar
Skub ind
Tryck in
Trykk inn
Työnnä sisään
Potisnite noter
Pressionar
Push in
Eindrücken
Enfoncer
Spingere
Induwen
Presionar
Skub ind
Tryck in
Trykk inn
Työnnä sisään
Potisnite noter
Pressionar
Saw blade bearing
Sägeblattlager
Roulement de lame
de scie
Cuscinetto della
lama della sega
Zaagbladlager
Cojinete de la
cuchilla de la sierra
Savbladsleje
Lager för klinga
Sagbladlager
Sahanterän laakeri
pilového pásu
Rolamento da lâmina
de serra
[Fig.4]
Rear bearings
Hintere Lager
Roulements arrière
Cuscinetti posteriori
Lagers achter
Cojinetes traseros
Baglejer
Bakre lager
Bakre lagre
Takalaakerit
Arka yataklar
Hátsó csapágyak
Rolamentos traseiros
OK
OK
OUI
OK
OK
BIEN
OK
Bra
OK
OK
Tamam
DOBRZE
Správně
OK
ÁNO
PRAV
OK
SIM
NG
Nicht OK
NON
NG
NG
MAL
IG
Dåligt
NG
EI
Yanlış
ŹLE
Nesprávně
NG
NIE
NI PRAV
NG
NÃO

- 8 -
Guide plate
Führungsschiene
Plaque de guidage
Piastra guida
Geleiderplaat
Placa guía
Guideplade
Styrplåt
Føreplate
Ohjainlevy
Vodicí deska
Vodiaca doska
Placa guia
OK
OK
OUI
OK
OK
BIEN
OK
Bra
OK
OK
Tamam
DOBRZE
Správně
OK
ÁNO
PRAV
OK
SIM
NG
Nicht OK
NON
NG
NG
MAL
IG
Dåligt
NG
EI
Yanlış
ŹLE
Nesprávně
NG
NIE
NI PRAV
NG
NÃO
Saw blade
Sägeblatt
Lame de scie
Lama della sega
Zaagblad
Cuchilla de la sierra
Savblad
Klinga
Sagblad
Sahanterä
Brzeszczot
Pilový pás
Lâmina de serra
Saw blade rotation roller
Drehrolle des Sägeblatts
Rouleau de rotation de lame
de scie
Rullo di rotazione della lama
della sega
Draairol zaagblad
Rodillo giratorio de la
cuchilla de la sierra
Rotationsrulle til savblad
Rotationsrulle för klinga
Rotasjonskontroll for sagblad
Sahanterän kääntörulla
Rolka obrotu brzeszczotu
Kladka pilového pásu
de serra
[Fig.7]
Saw blade tension lever
Spannhebel des Sägeblatts
Levier de tension de lame de scie
Leva della tensione della lama della sega
Hendel zaagbladspanning
Palanca tensora de la cuchilla de la sierra
Spændingshåndtag til savblad
Spännarm för klinga
Spenningsspak for sagblad
Sahanterän jännitysvipu
Alavanca de tensão da lâmina de serra
[Fig.8]
Alignment marks
Ausrichtmarkierungen
Marques d’alignement
Marcature allineamento
Uitlijntekens
Marcas de alineación
Flugtemærker
Anpassningsmärken
Opprettingsmerke
Sovitusmerkit
Znaczniki
Pozíciójelölések
Oznake za poravnavo
Marcaje de aliniere
Marcas de alinhamento

- 9 -
[Fig.9]
Button
Knopf
Bouton
Tasto
Knop
Botón
Knap
Frigöringsknapp
Knapp
Painike
Przycisk
Gomb
Gumb
Buton
Botão
Workpiece
Werkstück
Pièce ouvragée
Pezzo da lavorare
Werkstuk
Pieza de trabajo
Arbejdsemne
Arbetsstycke
Arbeidsstykke
Työstökappale
Element roboczy
Obrobek
Munkadarab
Obrobok
Obdelovanec
Guide plate
Führungsschiene
Plaque de guidage
Piastra guida
Geleiderplaat
Placa guía
Guideplade
Styrplåt
Føreplate
Ohjainlevy
Vodicí deska
Vodiaca doska
Placa guia
Saw blade
Sägeblatt
Lame de scie
Lama della sega
Zaagblad
Cuchilla de la sierra
Savblad
Klinga
Sagblad
Sahanterä
Brzeszczot
Pilový pás
Lâmina de serra
[Fig.11]
Switch
Schalter
Interrupteur
Interruttore
Schakelaar
Interruptor
Kontakt
Strömbrytare
Bryter
Kytkin
Kapcsoló
Stikalo
Interruptor
Off-lock switch
Aus/Sperrschalter
Bouton de déverrouillage
Interruttore di sblocco
Uit-blokkeerschakelaar
Interruptor de desbloqueo
Brytare av-lås
Lås av-bryter
Lukituskytkin
Kioldógomb
Stikalo za izklop-
zaklep
Interruptor de bloqueio
[Fig.12]
Rubber belt
Gummiring
Courroie élastique
Cintura di gomma
Rubberen band
Correa de goma
Gummibælte
Gummibälte
Gummibelte
Kumihihna
Gumowy pasek
Gumiszíj
Gumový pás
Gumijast trak
Curea de cauciuc
Correia de borracha
Saw blade rotation roller
Drehrolle des Sägeblatts
Rouleau de rotation de lame
de scie
Rullo di rotazione della lama della
sega
Draairol zaagblad
Rodillo giratorio de la cuchilla de la
sierra
Rotationsrulle til savblad
Rotationsrulle för klinga
Rotasjonskontroll for sagblad
Sahanterän kääntörulla
Rolka obrotu brzeszczotu
Kladka pilového pásu

Pack cover
Akkuabdeckung
Couvercle de la
batterie autonome
Coperchio pacco
Accudeksel
Cubierta de batería
Pakningsdæksel
Batteriskydd
Pakkedeksel
Akkukotelon kansi
Kryt bloku
Az akkumulátoregy-
ség fedele
Kryt akumulátorovej
jednotky
Pokrov sklopa
Capac acumulator
Capa do conjunto
Terminals
Anschlüsse
Bornes
Terminali
Aansluitpunten
Terminales
Terminaler
Poler
Ender
Liittimet
Terminaller
Styki
Konektory
Svorky
Terminale
Terminais
Label
Etikett
Etiquette
Etichetta
Label
Etiqueta
Label
Etikett
Etikett
Tarra
Etiket
Etykieta
Etiketa
Címke
Štítok
Oznaka
Etiqueta
[Fig.14]
Attaching
Anbringen
Connexion
Collegamento
Bevestigen
Acoplamiento
Påsætning
Montering
Montering
Kiinnittäminen
Takma
Mocowanie
Nasazení
Csatlakoztatás
Pripojenie
Pritrjevanje
Removing
Entfernen
Retrait
Rimozione
Verwijderen
Desacoplamiento
Aftagning
Lossdragning
Demontering
Irrottaminen
Sejmutí
Eltávolítás
Odpojenie
Odstranjevanje
Alignment marks
Ausrichtmarkierungen
Marques d’alignement
Marcature allineamento
Uitlijntekens
Marcas de alineación
Flugtemærker
Anpassningsmärken
Opprettingsmerke
Sovitusmerkit
Znaczniki
Pozíciójelölések
Oznake za poravnavo
Marcaje de aliniere
Marcas de alinhamento
Battery pack release button
Akku-Entriegelungsknopf
Bouton de libération de batterie autonome
Tasto di rilascio pacco batteria
Accu-ontgrendeltoets
Botón de liberación de batería
Udløserknap til batteripakning
Frigöringsknapp för batteri
Utløserknapp for batteripakke
Akkupaketin irrotuspainike
Przycisk zwolnienia blokady akumulatora
Akkumulátoregység kioldógombja
Gumb za sprostitev baterijskega sklopa
Buton pentru eliberarea acumulatorului

- 11 -
EN
Original instructions: English
Translation of the original instructions:
Other languages
Read “the Safety Instructions” booklet
and the following before using.
I. INTRODUCTION
DANGER
This product is a cutting tool, designed to
cut through metal and wood. It has a
rotating blade which is capable of cutting
you deeply, causing serious injury or
death. As a result, please read this
manual and the cautionary markings on
the tool carefully, and obey all of the
Safety Instructions to avoid such injury.
WARNING
To avoid injury, never insert your nger
or any other object into any opening of
the tool.
WARNING
Read all safety warnings and all
instructions.
Failure to follow the warnings and
instructions may result in electric shock,
re and/or serious injury.
How to Use This Manual
• Please read this manual completely
before starting to cut with your tool. If
you let someone else use the tool, make
sure they either read this manual or are
fully instructed in the proper use and all
safety precautions concerning the tool.
• Please keep this manual for future
reference. It contains important safety
information that you must follow to use
the tool safely.
• This manual and product use the
following signal words:
NOTE:
Notes provide additional information that
you should know about the tool.
CAUTION:
Caution indicates a potentially hazardous
situation, which could result in minor or
moderate injury if not avoided. Cautions
also alert you to unsafe practices to be
avoided.
WARNING
Warning indicates a potentially
hazardous situation, which could result
in serious injury or death if not avoided.
DANGER
Danger indicates an imminent hazard
which will result in serious injury or death
if not avoided.
II. ADDITIONAL
SAFETY RULES
Safety instructions for all
saws
DANGER
1) Keep hands away from cutting area
and the blade. Keep your second
hand on auxiliary handle, or motor
housing. If both hands are holding
the saw, they cannot be cut by the
blade.
2) Never hold piece being cut in your
hands or across your leg. Secure
the workpiece to a stable platform. It
is important to support the work
properly to minimize body exposure,
blade binding, or loss of control.
3) Use saw blades recommended by
Manufacture.
4) Wear a dust mask, if the work
causes dust.
5) Wear ear protectors when using the
tool for extended periods.
6) Never wear knitted gloves.
7) Be sure to inspect material. Avoid
cutting other different material.
8) Be careful not to drop the tool.
9) Never swing the tool.

- 12 -
EN DANGER
10) Never cover the ventilation slots,
and keep them free from dust or
other material.
11) Do not clamp the tool in a vise.
Never cut with the tool held upside
down in a vise. This is extremely
dangerous and can lead to serious
accidents.
12) Be sure no one is below when using
the tool in high locations.
13) Do not touch the blade immediately
after operation. It may be hot and
could burn your skin.
14) Do not touch material after it has
been cut. Cut material may be very
hot.
15) Do not use cutting oil. This use of
cutting oil may cause a re.
16) Do not start the blade when in
contact with workpiece. Wait for
blade to reach full speed before
beginning cut.
17) Ensure sparks don’t strike your
body. This can cause burning.
18) When attaching or removing a saw
blade or preparing, inspecting or
storing the device, be sure to
remove the battery pack rst.
Failure to do this could lead to
unintended operation and injury.
19) Keep your hands and face away
from the saw blade and moving
parts.
Failure to do so can lead to injury.
20) Do not touch the saw blade,
discharge or frame after operation
as they may be hot.
This can lead to injury.
21) Fix the workpiece rmly.
Failure to x the workpiece properly
can lead to movement, damage to
the saw blade, or injury.
22) To prevent accidents, be sure to
switch off and remove the battery
pack from the device when operation
is interrupted or complete.
DANGER
23) Be sure to attach the saw blade
cover to the saw blade rotation
roller.
Failure to do so can lead to injury if
the saw blade slips off or is
damaged.
24) The saw blade, workpiece and
debris can be hot immediately after
cutting, so do not touch with bare
hands.
25) Do not put pressure on the grip
during cutting in an attempt to speed
up the process.
26) Do not cut heat-mouldable plastics.
The heat of cutting can cause the
workpiece to melt, making the saw
blade embed into the workpiece and
leading to the motor locking.
27) Do not cut hard workpieces such as
toughened steel.
This can cause damage to the saw
blade.
28) If the saw blade locks during cutting,
immediately switch off and suspend
operation.
29) Be sure to hold the grip and auxiliary
handle during use, holding with both
hands.
30) Periodically open the saw blade
rotation cover to remove debris.
Debris may build up within the frame
during continuous use.
31) If the device will not be used for a
long time, remove the saw blade
from the device before storage.

- 13 -
EN
Symbol
Symbol Meaning
Volts
Direct current
No load speed
Revolutions or
reciprocations
Amperes
To reduce the risk of
injury, user must read
and understand
instruction manual.
For indoor use only.
WARNING
• Do not use other than the Panasonic
battery packs that are designed for use
with this rechargeable tool.
• Panasonic is not responsible for any
damage or accident caused by the use
of the recycled battery pack and the
counterfeit battery pack.
• Do not dispose of the battery pack in a
re, or expose it to excessive heat.
• Do not drive the likes of nails into the
battery pack, subject it to shocks,
dismantle it, or attempt to modify it.
• Do not allow metal objects to touch the
battery pack terminals.
• Do not carry or store the battery pack in
the same container as nails or similar
metal objects.
• Do not charge the battery pack in a
high-temperature location, such as next
to a re or in direct sunlight. Otherwise,
the battery may overheat, catch re, or
explode.
Never use other than the dedicated
charger to charge the battery pack.
Otherwise, the battery may leak,
overheat, or explode.
• After removing the battery pack from
the tool or the charger, always reattach
the pack cover. Otherwise, the battery
contacts could be shorted, leading to a
risk of re.
WARNING
• When the Battery Pack Has
Deteriorated, Replace It with a New
One.
Continued use of a damaged battery
pack may result in heat generation,
ignition or battery rupture.
III. ASSEMBLY
Fitting a saw blade
CAUTION:
• Wear gloves when exchanging the saw
blade.
• Immediately after operation the saw
blade will be hot. Remove only after it
has cooled down.
• When attaching or removing a saw blade
or preparing, inspecting or storing the
device, be sure to remove the battery
pack rst. Failure to do this could lead to
unintended operation and injury.
1. Loosen the saw blade cover xing
screw and remove the saw blade cover.
[Fig.1]
• The saw blade cover separates into
two.
2. Rotate the saw blade tension lever 180
degrees clockwise (direction of the
arrow), to release tension. [Fig.2]
• Firmly set the saw blade tension lever
to maintain the saw blade tension.
3. Insert the saw blade into the saw blade
restraining bearings from the rear.
[Fig.3]
• Be sure to push it home until the back
of the blade contacts with the inside of
the saw blade restraining bearings.

- 14 -
EN WARNING
Inserting a saw blade
If the saw blade is not mounted correctly
the blade may sit at an angle and will not
cut straight, causing motor burnout or
blade damage.
• Be sure to push until the back of the
saw blade contacts with the rear
bearings of the saw blade restraining
bearings (both). [Fig.4]
• Be sure that the saw blade is parallel to
the guide plate. [Fig.5]
4. Hand the saw blade on the saw blade
rotation roller, while holding the saw
blade so it does not fall off. [Fig.6]
5. Rotate the saw blade tension lever 180
degrees anticlockwise (direction of the
arrow), to tighten the saw blade. [Fig.7]
WARNING
Be careful not to trap your ngers in the
saw blade tension lever when selecting
the tension.
6. Move the saw blade in the direction of
rotation manually, and check whether it
hangs correctly on the saw blade
rotation roller (the saw blade should not
move outside the thickness of the saw
blade rotation roller).
NOTE:
If it is not hanging correctly, rotate the
saw blade tension lever 180 degrees
clockwise to loosen the saw blade and
rehang the saw blade.
7. Attach the saw blade cover and tighten
the saw blade cover xing screw.
NOTE:
Tighten the saw blade cover xing
screw while holding the saw blade
cover in position so it does not rise up.
Attaching or Removing
Battery Pack
CAUTION:
Before inserting battery pack, check that
the power switch in the tool actuates
properly and returns to the “OFF” position
when released.
1. To connect the battery pack [Fig.8]
Align the highlighted marker points and
attach battery pack.
• Slide the battery pack until it locks into
position.
2. To remove the battery pack [Fig.9]
Push down the button and slide the
battery pack forward.

- 15 -
EN
IV. OPERATION
[Main Body]
Before Using the Tool
• Do not touch the saw blade, workpiece,
or cutting chips with bare hands
immediately after cutting; they may be
hot and could burn skin.
Each time you use the tool, you must
make sure it is in good operating
condition.
1. Test operation
Cycle the device through on and off
several times and check that the saw
blade is mounted correctly. If the saw
blade is not running smoothly, remove
the saw blade and reinstall from the
beginning.
2. Select the blade speed
Set to suit the properties of the
workpiece being cut.
• 3 blade speed settings are available.
• Blade speed setting “L” is effective for
cutting stainless steel which requires
slow rotation.
<Setting blade speed>
Press the blade speed button to set the
rotation speed.
• Keep pressing to switch from H to M
to L.
<Blade speed table>
Blade speed
button setting
L M H
Type of
operation
Stainless
steel Steel pipe
18 V 120
m/min
140
m/min
162
m/min
14.4 V 110
m/min
120
m/min
130
m/min
3. Bring guide plate to workpiece
Press the workpiece against the guide
plate such that the saw blade does not
make contact. [Fig.10]
WARNING
If a gap is left between the guide plate
and the workpiece, the workpiece may
wobble and damage the saw blade.
4. Make the cut
(1) Check the saw blade is not
touching the workpiece.
(2) Switch on while holding the off-lock
switch.
(3) If rotation is smooth, bring the saw
blade slowly towards the workpiece
without shocking the saw blade,
and make the cut. [Fig.11]
(4) Do not apply unreasonable force to
the saw blade.
(5) Be sure to hold the device with
both hands. While holding the
device, be sure to keep the saw
blade perpendicular to the
workpiece. There is no need to
force the device more than
required. Be aware that application
of excessive lateral or pushing
force to the device may cause
device malfunction.
(6) Blade rotation spin-up can be
controlled using the pressure on
the switch, to control kickback
when starting a cut (only for blade
speeds 2 and 3 when using the
18V battery model).

- 16 -
EN WARNING
• Fix the workpiece rmly.
• Be sure to attach the saw blade cover.
CAUTION:
• Attach only after checking for
abnormalities such as splinters and
ssures on the saw blade.
• Wipe away any debris or dirt attached to
the saw blade rotation roller. Fitting an
oiled or greased saw blade to the saw
blade restraining bearing can cause the
saw blade to slip or come loose.
• When attaching a saw blade, avoid
twisting or folding at the join on the saw
blade.
• Keep your face away when exchanging a
saw blade as the saw blade can jump
out suddenly.
<Identifying an expired saw blade>
• A ruptured saw blade will not rotate
easily.
(Rotation may be accompanied by a
noise)
• A worm blade edge may lead to slower
cutting times.
These phenomena are indications that
the saw blade requires exchange.
Using the hook
The hook is intended for hanging on
stepladders, etc. and should not be used
to hang at your side on a belt. If the hook
is not required, the screw can be loosened
to remove it.
WARNING
• Do not hang the hook at your side such
as on a belt.
• Check that the hook is not unstable and
the screw is not loose.
Example of Use
Rubber belt inspection
A rubber belt is attached to the outer rim of
the saw blade rotation roller (inlay type).
Be sure to check the rubber belt for
tightness and damage whenever
exchanging the saw blade.
A loose or damaged rubber belt may
cause the saw blade to run unevenly or
jump out, so be sure to contact your
retailer in this event. [Fig.12]
WARNING
Periodically remove any debris from the
rubber belt.
Failure to do so may cause the saw
blade to slip or be unable to cut.

- 17 -
EN
Control Panel
(L)(M)
(L) Battery low warning lamp
Off
(normal
operation)
Flashing
(No charge)
Battery protection
feature active
Excessive (complete) discharging of
lithium ion batteries shortens their service
life dramatically.
The tool includes a battery protection
feature designed to prevent excessive
discharging of the battery pack.
• The battery protection feature activates
immediately before the battery loses its
charge, causing the battery low warning
lamp to ash.
• If you notice the battery low warning
lamp ashing, charge the battery pack
immediately.
• If it is started with too little battery power
remaining, the tool may stop operating
without the battery low warning lamp
ashing rst. This indicates that there is
too little battery power remaining to use
the tool, and the battery pack should be
charged before further use.
• If the tool is subject to a sudden load
during use that causes the motor to lock
up, the over-discharge prevention sensor
may be triggered, and the battery low
warning lamp may ash.
The lamp will stop ashing once you
address the cause of the motor’s locking
up and cycle the trigger.
CAUTION:
The over-discharge protection function
works even when both the battery low
warning lamp and LED light are ashing.
• Charge the battery pack immediately as
the battery power is getting low.
• When charging a cool battery pack
(below 0 °C (32 °F)) in a warm place,
leave the battery pack at the place and
wait for more than one hour to warm up
the battery to the level of the ambient
temperature.
• Weaken and cut off the power applied as
the voltage of the battery is plummeting
due to the high load acting on the motor.
Do not carry out operations that will
repeatedly cause the over-discharge
prevention function to be activated.

- 18 -
EN (M) Overheat warning lamp (motor /
battery)
Off
(normal
operation)
Flashing: Overheat
Indicates operation has
been halted due to
battery overheating.
The overheating protection feature halts
tool operation to protect the battery pack
in the event of overheating. The overheat
warning lamp on the control panel ashes
when this feature is active.
• If the overheating protection feature
activates, allow the tool to cool
thoroughly (at least 30 minutes). The tool
is ready for use when the overheat
warning lamp goes out.
• Avoid using the tool in a way that causes
the overheating protection feature to
activate repeatedly.
• If the tool is used in cold-temperature
conditions (such as during winter) or if it
is frequently stopped during use, the
overheating protection feature may not
activate.
The performance of the EY9L42
deteriorates signicantly at and below
10 °C due to work conditions and other
factors.
• The ambient temperature range is
between 0 °C (32 °F) and 40 °C (104 °F).
If the battery pack is used when the
battery temperature is below 0 °C
(32 °F), the tool may fail to function
properly.
• When charging a cool battery pack
(below 0 °C (32 °F)) in a warm place,
leave the battery pack at the place and
wait for more than one hour to warm up
the battery to the level of the ambient
temperature.
[Battery Pack]
For Appropriate Use of
Battery Pack [Fig.13]
• The rechargeable batteries have a
limited life.
• For optimum battery life, store the Li-ion
battery pack following use without
charging it.
• When operating the battery pack, make
sure the work place is well ventilated.
For safe use
• The battery pack is designed to be
installed by proceeding two steps for
safety. Make sure the battery pack is
installed properly to the main unit before
use.
• If the battery pack is not connected rmly
when the switch is switched on, the
overheat warning lamp and the battery
low warning lamp will ash to indicate
that safe operation is not possible, and
the main unit will not rotate normally.
Connect the battery pack into the unit of
the tool until the red or yellow label
disappears.
[Battery Charger]
Charging
CAUTION:
1) If the temperature of the battery pack
falls approximately below −10 °C
(14 °F), charging will automatically
stop to prevent degradation of the
battery.
2) The ambient temperature range is
between 0 °C (32 °F) and 40 °C
(104 °F).
If the battery pack is used when the
battery temperature is below 0 °C
(32 °F), the tool may fail to function
properly.

- 19 -
EN
3) Use the charger at temperatures
between 0 °C and 40 °C, and charge
the battery at a temperature similar to
that of the battery itself. (There should
be no more than a 15 °C difference
between the temperatures of the
battery and the charging location.)
4) When charging a cool battery pack
(below 0 °C (32 °F)) in a warm place,
leave the battery pack at the place
and wait for more than one hour to
warm up the battery to the level of the
ambient temperature.
5) Cool down the charger when charging
more than two battery packs
consecutively.
6) Do not insert your ngers into contact
hole, when holding charger or any
other occasions.
7) To prevent the risk of re or damage
to the battery charger.
• Do not cover vent holes on the
charger and the battery pack.
• Unplug the charger when not in use.
NOTE:
Your battery pack is not fully charged at
the time of purchase. Be sure to charge
the battery before use.
How to charge
1. Plug the charger into the AC outlet.
NOTE:
Sparks may be produced when the plug
is inserted into the AC power supply,
but this is not a problem in terms of
safety.
2. Connect the battery pack rmly into the
charger.
1 Line up the alignment marks and
place the battery onto the dock on
the charger.
NOTE:
Not all battery packs display the
alignment mark (F) (on page 3).
2 Slide forward in the direction of the
arrow. [Fig.14 ]
3. During charging, the charging lamp will
be lit. When charging is completed, an
internal electronic switch will
automatically be triggered to prevent
overcharging.
• Charging will not start if the battery
pack is hot (for example, immediately
after heavy-duty operation).
The orange standby lamp will be
ashing until the battery cools down.
Charging will then begin automatically.
4. The charge lamp (green) will ash
slowly once the battery is approximately
80% charged.
5. When charging is completed, the
charging lamp in green colour will turn
off.
6. If the temperature of the battery pack is
0 °C or less, charging takes longer to
fully charge the battery pack than the
standard charging time.
Even when the battery is fully charged,
it will have approximately 50% of the
power of a fully charged battery at
normal operating temperature.
7. Consult an authorized dealer if the
charging lamp (green) does not turn off.
8. If a fully charged battery pack is
inserted into the charger again, the
charging lamp lights up. After several
minutes, the charging lamp in green
colour will turn off.
9. Remove the battery pack while the
battery pack release button is held up.
[Fig.14 ]

- 20 -
EN LAMP INDICATIONS
Charging is completed. (Full charge.)
Battery is approximately 80% charged.
Now charging.
Turn off Illuminated Flashing
Charger is plugged into the AC outlet. Ready to charge.
Charging Status Lamp.
Left: green Right: orange will be displayed.
Battery pack is cool.
The battery pack is being charged slowly to reduce the load on
the battery.
Battery pack is warm.
Charging will begin when temperature of battery pack drops. If
the temperature of the battery pack is -10° or less, the charging
status lamp (orange) will also start ashing. Charging will begin
when the temperature of the battery pack goes up.
Charging is not possible. Clogged with dust or malfunction of
the battery pack.
(Green) (Orange)
Battery Recycling
ATTENTION:
For environmental protection and recycling of materials, be sure that it is disposed of at
an ofcially assigned location, if there is one in your country.
Other manuals for EY45A5
1
Table of contents
Other Panasonic Saw manuals

Panasonic
Panasonic EY3531 - 15.6V WOOD SAW User manual

Panasonic
Panasonic EY3551 - 18V WOOD SAW User manual

Panasonic
Panasonic EY45A5 User manual

Panasonic
Panasonic EY45A1 User manual

Panasonic
Panasonic EY3551 User manual

Panasonic
Panasonic EY3503 User manual

Panasonic
Panasonic EY47A1 User manual

Panasonic
Panasonic EY3544-U1 User manual

Panasonic
Panasonic EY4541 User manual
Popular Saw manuals by other brands

Grizzly
Grizzly G0640X owner's manual

Gude
Gude TK 2100 Translation of the original instructions

Bosch
Bosch GCO 2 Professional Original instructions

Makita
Makita LS1016 instruction manual

Jet
Jet JWBS-15 Operating instructions and parts manual

MK Diamond Products
MK Diamond Products MK-1590 Operations & parts manual