Panta Pocket Cam M18205 User manual

1
Pocket Cam
Gebrauchsanleitung.....................................................................05
Instructions for Use......................................................................10
Mode d’emploi................................................................................14
Manuale di utilizzazione.............................................................19
Gebruiksaanwijzing......................................................................25
Használati utasítás........................................................................30
Návod k použití ..............................................................................35
Návod na použitie .........................................................................39
Instrucţiuni de utilizare ...............................................................44
Instrukcja obsługi..........................................................................49
M18205_PantaPocketCam_Manual_A5_20181031_KS.indd 1 29.11.18 11:00

2
3
A
B
F
H
K
I
C
G
D
E
J
DE
A. Ein-/Aus-Schalter
B. Anzeigeleuchte
C. Kameralinse
D. Infrarot-Lichter
E. Mikrofon
F. MicroSD-Karteneinlass
G. Ladeanschluss
H. Wandhalterung/
Tischständer
I. Klebeband
J. Kameraclip
K. Micro USB-Ladekabel
Unterstützt Memory SD-
Karten bis 32 GB (nicht im
Lieferumfang enthalten)
EN
A. Power on/off button
B. Indicator light
C. Camera lens
D. Infra-red lights
E. Microphone
F. microSD card port
G. Charging port
H. Wall Mount/Table Stand
I. Adhesive Tape
J. Camera Clip
K. USB charging cable
Supports SD memory
cards up to 32GB (not
included in delivery
contents)
FR
A. Interrupteur marche/
arrêt
B. Témoin lumineux
C. Objectif de l‘appareil
photo
D. Lumières infrarouges
E. Microphone
F. Insertion de carte
MicroSD
G. Port de charge
H. Fixation murale/support
sur pied
I. Ruban adhésif
J. Clip pivotant
K. Câble de charge USB
Compatible carte mémoire SD
jusqu‘à 32 Go (non incluse)
IT
A. Interruttore ON/OFF
B. Spia luminosa
C. Lente
D. Luci a raggi infrarossi
E. Microfono
F. Slot micro scheda SD
G. Collegamento
caricatore
H. Fissaggio a parete/
supporto da tavolo
I. Nastro adesivo
J. Clip rotatorio
M18205_PantaPocketCam_Manual_A5_20181031_KS.indd 2 29.11.18 11:00

2
3
K. Cavetto USB
Scheda memory SD
supportata con memoria
fino a 32 GB (non inclusa
nella fornitura)
NL
A. AAN-/UIT-schakelaar
B. Weergavelampje
C. Cameralens
D. Infraroodlicht
E. Microfoon
F. Kaartsleuf MicroSD
G. Oplaadpunt
H. Muurbevestiging /
tafelstatief
I. Kleefstrook
J. Cameraclip
K. USB-laadsnoer
Ondersteunt SD-
geheugenkaarten tot 32 GB
(niet meegeleverd)
HU
A. BE- / KI-KAPCSOLÓ
B. Jelzőlámpa
C. Kameralencse
D. Infravörös lámpa
E. Mikrofon
F. MicroSD-Kártyanyílás
G. Töltőcsatlakozás
H. Fali rögzítés/Asztali
állvány
I. Ragasztószalag
J. Kamera-klipsz
K. USB töltőkábel
SD-kártyákat támogat 32
GB-ig (nincs a szállítási
terjedelemben)
SK
A. Vypínač
B. Kontrolka
C. Objektív kamery
D. Infračervené svetlá
E. Mikrofón
F. Zásuvka na kartu
MicroSD
G. Prípojka na nabíjanie
H. Upevnenie na stenu /
stolný stojan
I. Lepiaca páska
J. Klip kamery
K. Nabíjací kábel USB
Podporuje pamäťové karty
SD s kapacitou do 32 GB
(nie je súčasťou balenia)
CZ
A. Spínač Zap/Vyp
B. Indikační kontrolka
C. Čočka kamery
D. Infračervené světlo
E. Mikrofon
F. Vstup karty MicroSD
G. Připojení nabíjení
H. Připevnění na stěnu/
stolní stativ
I. Lepicí páska
J. Kamerový klip
K. USB nabíjecí kabel
Podporuje paměťové SD
karty do 32 GB (nejsou
obsahem dodávky)
RO
A. Întrerupător pornit/
oprit (ein/aus)
B. Lampă indicatoare
C. Lentilă cameră
D. Lampă generatoare de
lumină în infraroşu
E. Microfon
F. Fanta slot card
MicroSD
G. Racord de încărcare
H. Fixare la perete/Stativ
de masă
I. Bandă adezivă
J. Clemă rabatabile
K. Cablu de încărcare
USB
Suportă carduri de
memorie Memory SD
până la 32 GB (nu sunt
incluse în coletul livrat)
PL
A. Włącznik/wyłącznik
B. Lampka wskazująca
C. Soczewka kamery
D. Światła podczerwieni
E. Mikrofon
F. Gniazdo karty MicroSD
G. Przyłącze ładowania
H. Mocowane ścienne /
stojak stołowy
I. Taśma klejąca
J. Zaczep kamery
K. Kabel ładowania USB
Obsługuje karty pamięci
SD maks. 32 GB (poza
zakresem dostawy)
M18205_PantaPocketCam_Manual_A5_20181031_KS.indd 3 29.11.18 11:00

4
5
FIGURE D
FIGURE E
FIGURE F
FIGURE G
FIGURE H
FIGURE K FIGURE L
FIGURE M-1
FIGURE M-2
FIGURE N
FIGURE O
A B CD
E
F G H
JK L M-1
M-2
NO
FIGURE Q
Q
FIGURE P
P
FIGURE R
R
FIGURE I
I
M18205_PantaPocketCam_Manual_A5_20181031_KS.indd 4 29.11.18 11:00

4
5
DE
WICHTIGE SICHERHEITSHINWEISE: VOR GEBRAUCH DIESES PRODUKTS
ALLE WARNHINWEISE UND ANLEITUNGEN LESEN UND BEFOLGEN. EIN
UNSACHGEMÄSSER GEBRAUCH KANN ZU VERLETZUNGEN FÜHREN.
BEWAHREN SIE DIE GEBRAUCHSANLEITUNG AUF.
WARNHINWEISE:
• AUSSER REICHWEITE VON KINDERN LAGERN. DIESES PRODUKT IST KEIN
SPIELZEUG.
• Bitte sehen Sie die staatlichen und örtlichen Gesetzgebungen Ihres
Gerichtsstandes bezüglich des Gebrauchs von Videoaufzeichnungsgeräten ein.
• MediaShop weist darauf hin, dass bei der Nutzung außerhalb der rein privaten
Räumlichkeiten besondere Datenschutzbestimmungen zu beachten sind,
insbesondere die Regeln der DSGVO.
• In einigen Ländern könnte es als Eingriff in die Privatsphäre gelten, mit einer
Kamera Fotos oder Videos von Personen oder deren Fahrzeugen aufzunehmen
oder öffentlich zu zeigen. Es unterliegt Ihrer Verantwortung, sich in Ihrem Land
mit den geltenden Gesetzen und Rechten auf Privatsphäre vertraut zu machen
und diese einzuhalten. Dasselbe gilt für die Anerkennung der gemachten
Videoaufnahmen als offizielles Beweismittel.
Zum Schutz der Panta®Pocket Cam und der Aufzeichnungen vor Beschädigungen:
• Von starken Magneten und hoher Spannung fernhalten.
• Die Kameralinse nur mit einem weichen Tuch reinigen.
• Die Panta®Pocket Cam ist nicht wasserdicht, keinen nassen oder feuchten
Umgebungen aussetzen. Nicht ungeschützt im Freien verwenden. Nicht in Wasser oder
andere Flüssigkeiten tauchen.
• Keinen Temperaturen unter 0˚ C oder über 40˚ C aussetzen.
AUFLADEN
Batterieladestandanzeige
1. Zum Prüfen der Batterie den Ein-/Aus-Schalter für 4 Sekunden gedrückt halten und
somit die Panta®Pocket Cam einschalten (Abbildung A). Die Anzeigeleuchte leuchtet
dauerhaft rot, wenn die Kamera vollständig geladen ist. Wenn die Anzeigeleuchte
beginnt, ein Mal pro Sekunde zu blinken, ist der Ladestand der Batterie niedrig.
HINWEIS: Es verbleiben danach noch 10 % Batterieladung, bis die Kamera an eine
Stromquelle angeschlossen werden muss.
M18205_PantaPocketCam_Manual_A5_20181031_KS.indd 5 29.11.18 11:00

6
7
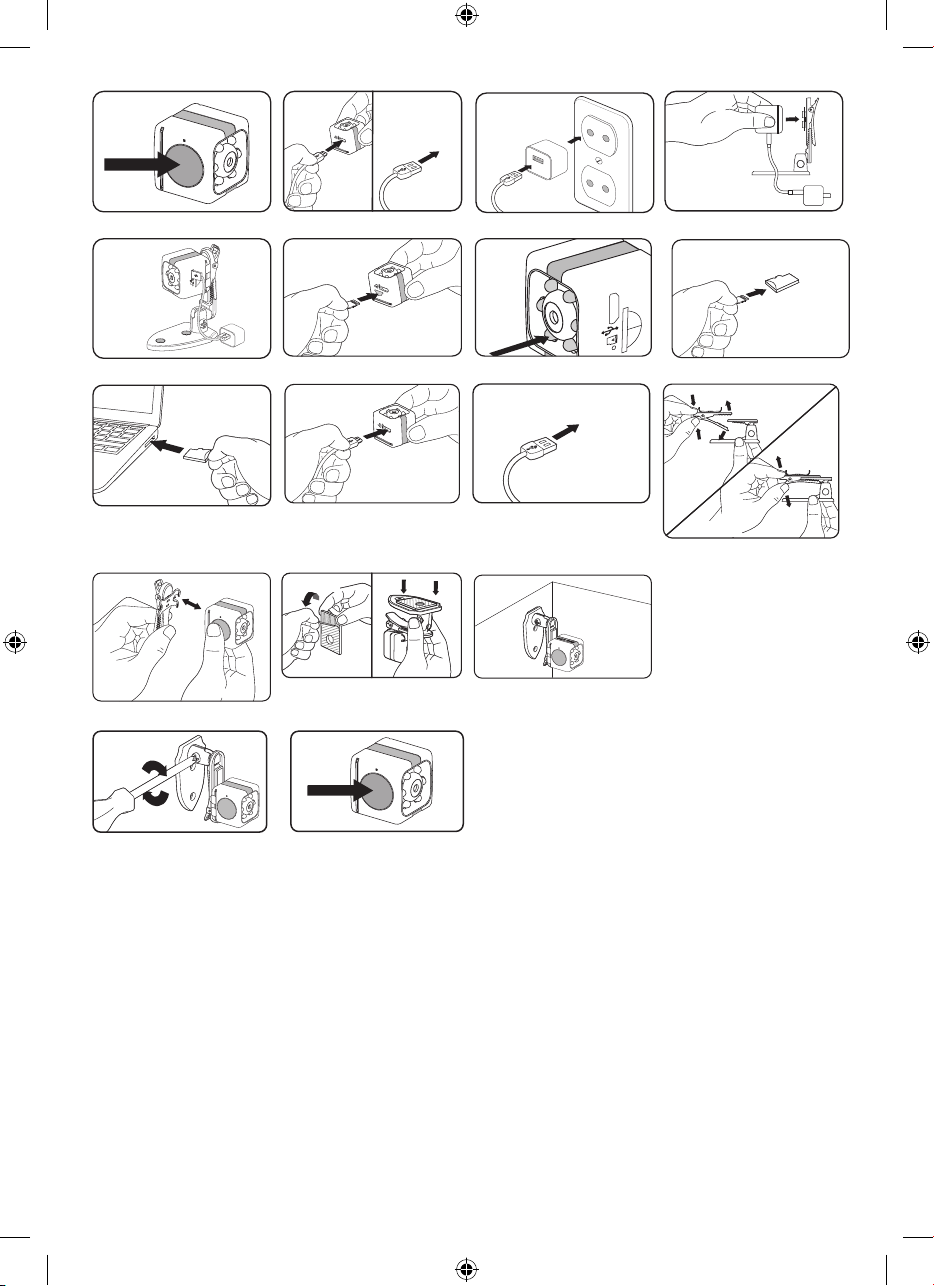
Aufladen über den Computer/Laptop
1. Zum Laden der Panta®Pocket Cam über den Computer/Laptop das Micro USB-
Anschlussende des mitgelieferten Micro USB-Ladekabels in den Ladeanschluss der
Kamera stecken (Abbildung B). Nachdem das Micro USB-Ladekabel in die Panta®
Pocket Cam gesteckt wurde, das andere Ende des Kabels in den USB-Anschluss am
Computer/Laptop stecken (Abbildung C).
HINWEIS: Der USB-Anschluss kann sich entweder auf der linken oder der rechten
Seite des Computers/Laptops befinden.
2. Während die Kamera am Computer/Laptop lädt, blinkt die Anzeigeleuchte
abwechselnd rot und grün.
HINWEIS: Wenn die Panta®Pocket Cam am Computer/Laptop lädt, zeichnet sie
NICHT auf.
3. Sobald das Laden abgeschlossen ist, schaltet sich die Anzeigeleuchte AUS.
Aufladen über eine Wandsteckdose
1. Das Micro-USB-Anschlussende des mitgelieferten Micro USB-Ladekabels in den
Ladeanschluss der Kamera stecken (Abbildung B).
2. Nachdem die Kamera erfolgreich am Kameraclip befestigt wurde (Abbildung E+F),
das USB-Kabelende in den Steckdosenadapter (nicht mitgeliefert) und danach den
Adapter in die Steckdose stecken (Abbildung D).
3. Während die Kamera an der Wandsteckdose lädt, leuchtet die Anzeigeleuchte alle 3
Sekunden auf, um anzuzeigen, dass die Kamera richtig lädt.
HINWEIS: Wenn die Panta®Pocket Cam an der Wandsteckdose lädt, ZEICHNET sie
gleichzeitig AUF und LÄDT.
4. Sobald das Laden abgeschlossen ist, leuchtet die Anzeigeleuchte dauerhaft rot.
AUFZEICHNEN EINES VIDEOS
1. Die Memory Micro SD-Karte in den Micro SD-Karteneinlass der Panta
®
Pocket Cam
einsetzen (Abbildung G).
HINWEIS: Die Memory MicroSD-Karte ist bereits im Gerät installiert. Falls die
Memory MicroSD-Karte NICHT im Gerät installiert ist, während es eingeschaltet ist,
leuchtet die Anzeigeleuchte 8 mal grün auf, danach schaltet sich das Gerät ab.
2. Zum Einschalten der Panta®Pocket Cam den Ein-/Aus-Schalter 4 Sekunden lang
gedrückt halten. Die Kamera beginnt automatisch mit der Aufzeichnung, sobald sie
eingeschalten ist und eine Bewegung erkennt.
HINWEIS: Die LED-Leuchte leuchtet dauerhaft rot, wenn die Kamera an ist
und aufzeichnet. Die Panta®Pocket Cam geht automatisch in eine Schleife und
M18205_PantaPocketCam_Manual_A5_20181031_KS.indd 6 29.11.18 11:00

6
7
überspeichert frühere Aufnahmen. Nach 1 Minute ohne erkannte Bewegung bleibt
die Panta®Pocket Cam eingeschaltet, stoppt jedoch die Aufzeichnung.
3. Zum Ausschalten der Panta®Pocket Cam den Ein-/Aus-Schalter einfach 4 Sekunden
lang gedrückt halten bzw. bis sich die LED-Leuchte abschaltet.
Nachtmodus – sobald die Panta®Pocket Cam eingeschaltet ist und eine Bewegung
erkannt wird, zeichnet sie auch bei Dunkelheit auf. Es werden Infrarotlichter rund um
die Kameralinse (Abbildung H) aktiviert, aber diese sind nicht sichtbar erleuchtet.
FOTOGRAFIEREN
1. Zum Wechseln vom Video-Modus zum Foto-Modus den Ein-/Aus-Schalter einfach
2 Sekunden lang gedrückt halten. Wenn der Foto-Modus aktiviert wurde, leuchtet
die LED-Leuchte dauerhaft grün. Zur Aufnahme eines Fotos, den Ein-/Aus-
Schalter einmal kurz drücken. Die LED-Leuchte blinkt zur Anzeige, dass ein Foto
aufgenommen wurde, nach jedem Klick einmal auf.
2. Zum Wechseln in den Video-Modus, den Ein-/Aus-Schalter 2 Sekunden lang
gedrückt halten. Die LED-Leuchte leuchtet dauerhaft rot zur Anzeige, dass der Foto-
Modus deaktiviert wurde und die Kamera zurück im Modus Video ist.
Videoformat AVI Bildgröße 1,3 M
Videocodierung MJPG Batteriekapazität 200 mAh
Auflösungsverhältnis Video 720p Betriebszeit Bis zu
45 Minuten
Bildfrequenz Video 720 bei 30 fps
(Standard) Ladespannung 5 V
Player Pot Player/
Windows Player Schnittstellentyp Micro-USB
Betriebssystem Microsoft
Windows XP/7/8 Speicher-Support Ja
Bildformat JPG Batterietyp Lithiumbatterie
ABRUFEN VON AUFNAHMEN
1. Die Memory MicroSD-Karte aus der Panta®Pocket Cam entnehmen, indem man
die Memory MicroSD-Karte zum Freigeben leicht nach innen drückt, dann die Karte
vorsichtig aus dem Schlitz ziehen. Die Memory MicroSD-Karte in einen MicroSD-
Kartenadapter (nicht mitgeliefert) einsetzen (Abbildung I). Nachdem die Memory
MicroSD-Karte in den Adapter eingesetzt ist, den Adapter in den SD-Karteneinlass
am Computer/Laptop anstecken.
M18205_PantaPocketCam_Manual_A5_20181031_KS.indd 7 29.11.18 11:00

8
9
HINWEIS: Der SD-Karteneinlass kann sich entweder auf der linken, oder der
rechten Seite des Computers/Laptops befinden.
2. Falls Sie KEINEN MicroSD-Kartenadapter haben, oder der Computer/Laptop KEINEN
SD-Karteneinlass aufweist, benutzen Sie einfach das mitgelieferte USB-Kabel
zum Anschließen der Panta®Pocket Cam an den Computer/Laptop. Das Micro
USB-Anschlussende des USB-Ladekabels in die Kamera stecken (Abbildung K).
Nachdem das Micro USB-Ladekabel in die Kamera gesteckt wurde, das andere
Ende des Kabels in den USB-Anschluss am Computer/Laptop stecken (Abbildung
L).
3. Auf die Aufzeichnungen über das Laufwerk, das mit der Panta®Pocket Cam
verbunden ist, zugreifen. Auf den Ordner PHOTO & VIDEO gehen, um die Dateien
anzuzeigen. Aufgezeichnete Videos und Fotos können von dort abgespielt,
gespeichert oder gelöscht werden.
GEBRAUCH VON KAMERAWANDHALTERUNG, TISCHSTÄNDER UND
KAMERACLIP
Zusammenbau des Tischständers
1. Halten Sie die Wandhalterung in der einen und den Kameraclip in
der anderen Hand.
2. Die Klammern des Kameraclips zum Öffnen zusammendrücken (Abbildung M1).
3. Das gerillte Unterteil der Wandhalterung in den offenen Kameraclip einsetzen und
die Rillen ineinander greifen lassen (Abbildung M2).
4. Die Wandhalterung ist nun vollständig zusammengebaut und bereit, um als
Tischständer benutzt zu werden.
Gebrauch des Kameraclips
1. Den Kameraclip an der Rückseite des Geräts platzieren (Abbildung N). Den
Kameraclip der Kamera vorsichtig nach unten drücken, bis der Clip in die
Montagerillen der Panta®Pocket Cam an der rechten und linken Seite der Kamera
einrastet.
HINWEIS: Es ist ein leises Klick-Geräusch zu hören, um die korrekte Montage
anzuzeigen. Stellen Sie sicher, dass sich der Ein-/Aus-Schalter auf der Seite befindet,
wenn das Gerät in Gebrauch ist. Zum Entfernen des Kameraclips diesen vorsichtig
nach unten oder oben aus den Montagerillen der Kamera schieben.
Gebrauch der Wandhalterung
1. Zum Montieren der Panta®Pocket Cam mit dem mitgelieferten Montageband zuerst
M18205_PantaPocketCam_Manual_A5_20181031_KS.indd 8 29.11.18 11:00

8
9
die Folie von einer Seite des Montagebands lösen und dieses an die Rückseite der
Wandhalterung kleben (Abbildung O).
2. Nachdem das Montageband an der Wandhalterung befestigt ist, einfach die
Schutzfolie von der anderen Seite des Montagebands abziehen und das Gerät fest
an die Befestigungsoberfläche andrücken (Abbildung P).
HINWEIS: Die Wandhalterung kann senkrecht oder waagrecht montiert werden.
3. Nachdem die Wandhalterung montiert wurde, den Kamerawinkel durch Lockern des
Sockels der Wandhalterung mit einem Schraubenzieher (nicht mitgeliefert) einstellen
(Abbildung Q). Sobald der gewünschte Winkel erreicht wurde, sicherstellen, dass
der Sockel der Wandhalterung wieder festgezogen wird.
4. Stellen Sie sicher, dass sich das Logo der Panta®Pocket Cam auf der Oberseite des
Gerätes befindet, mit dem Ein-/Aus-Schalter auf der Seite (Abbildung R).
5. Zum Entfernen der Wandhalterung diese vorsichtig abziehen, sodass die
Wandoberfläche nicht beschädigt wird.
HINWEIS: Es werden auch Schrauben und Dübel für die Wandbefestigung
mitgeliefert.
Lichtfarbe Akku Modus
Dauerhaft Rot Vollgeladen Video-Modus
Einmal pro Sek. Rot 10% Akku noch verfügbar
Abwechselnd Rot und Grün Kamera lädt an einem
Laptop
Auflade-Modus ohne
Aufnahmemöglichkeit
Anzeigeleuchte aus Kamera vollständig geladen
an einem Laptop
Auflade-Modus ohne
Aufnahmemöglichkeit
Alle 3 Sekunden Kamera lädt an einer
Wandsteckdose
Auflade-Modus mit
Aufnahmemöglichkeit
Anzeige leuchtet dauerhaft
rot
Kamera vollständig
aufgeladen an
Wandsteckdose
Auflade-Modus mit
Aufnahmemöglichkeit
Grün Foto Modus
Batterien gehören nicht in den Hausmüll. Bringen Sie diese zu einer autorisierten Sammelstelle.
Entsorgen Sie das Produkt am Ende seiner Lebensdauer nicht mit dem normalen Hausmüll. Bringen
Sie es zu einer Sammelstelle zum Recycling von elektrischen und elektronischen Geräten. Dies wird
durch dieses Symbol auf dem Produkt, in der Bedienungsanleitung und auf der Verpackung
angegeben. Informieren Sie sich über Sammelstellen, die von Ihrem Händler oder der lokalen Behörde
betrieben werden. Die Wiederverwertung und das Recycling von Altgeräten ist ein wichtiger Beitrag
M18205_PantaPocketCam_Manual_A5_20181031_KS.indd 9 29.11.18 11:00

10
11
zum Schutz unserer Umwelt.
Nur zur Verwendung in Innenräumen.
EN
IMPORTANT SAFETY NOTE: READ AND FOLLOW ALL WARNINGS AND
INSTRUCTIONS BEFORE USING THIS PRODUCT. INJURY CAN RESULT
FROM IMPROPER USE. RETAIN THESE INSTRUCTIONS.
WARNING NOTES:
• STORE OUT OF REACH OF CHILDREN. THIS PRODUCT IS NOT A TOY.
• Please familiarize yourself with the national and local laws of your jurisdiction
regarding using video recording devices.
• MediaShop would like to highlight the fact that when using outside of wholly
private premises special data protection regulations are to be observed, in
particular the GDPR regulations.
• In some countries, it might be considered a privacy invasion to use a camera to
take or publicly present photos or videos of people or their vehicles. It is your
responsibility to familiarize yourself and comply with all applicable laws and
privacy rights in your country. The same applies to the recognition of the video
recordings as official evidence.
To protect the Panta® Pocket Cam and its recordings from damage:
• Keep away from strong magnets and high voltages.
• Clean the camera lens only with a soft cloth.
• The Panta® Pocket Cam is not waterproof; do not expose to wet or damp
environments. Do not use outdoors if unprotected. Do not immerse in water or other
liquids.
• Do not expose to temperatures below 0˚C or above 40˚C.
CHARGING
Battery life indicator
1. To test the battery, hold down the on/off button for 4 seconds to turn on the Panta®
Pocket Cam (Figure A). Indicator light is solid red when fully charged. When the
indicator light starts flashing once per second, the battery is low.
NOTE: There is a 10% battery charge remaining until the camera is connected to a
power source.
M18205_PantaPocketCam_Manual_A5_20181031_KS.indd 10 29.11.18 11:00

10
11
Charging via the computer/laptop
1. To charge the Panta® Pocket Cam using your computer/laptop, plug the Micro-
USB connector end of the supplied USB cable into the charging port of the camera.
(Figure B) Once the Micro-USB cable is plugged into the Panta® Pocket Cam , plug
the other end of the cable into the USB port of your computer/laptop. (Figure C)
NOTE: The USB port can be located on either the left or right side of your computer/
laptop.
2. While the camera is charging via your computer/laptop, the indicator light will
alternately flash red and green.
NOTE: If Panta® Pocket Cam is charging via your computer/laptop, it will NOT
record.
3. When charging is complete, the indicator light will turn OFF. Charging using a wall
outlet
Charging using a wall outlet
1. Plug the Micro-USB connector end of the supplied USB cable into the charging port
of the camera (Figure B).
2. Once the camera is successfully attached to the camera clip (Figure E+F), plug the
other end of the cable into a wall adapter (not provided), then plug the adapter into
the wall outlet (Figure D).
3. While the camera is charging in a wall outlet, the indicator light will flash red every
3 seconds, indicating that the camera is charging properly.
NOTE: If the Panta® Pocket Cam is charging via a wall outlet, the camera will
CHARGE and RECORD at the same time.
4. When charging is complete, the indicator light will turn solid red.
RECORDING A VIDEO
1. Insert the microSD card into the Panta® Pocket Cam SD card port (Figure G).
NOTE: The microSD card is already installed in the unit. If the microSD card is NOT
installed in the unit while power is on, the indicator light will flash green 8 times and
then the unit will turn off.
2. To turn on the Panta® Pocket Cam, press and hold down the power button for 4
seconds. The camera will automatically start recording as soon as it is turned on and
detects a movement.
NOTE: The LED light will light up solid red when switched on and recording. The
Panta® Pocket Cam automatically records on loop and overwrites earlier shots.
After 1 minute of no movement being detected, the Panta® Pocket Cam will remain
M18205_PantaPocketCam_Manual_A5_20181031_KS.indd 11 29.11.18 11:00

12
13
switched on, but will stop recording.
3. To turn the Panta® Pocket Cam off, simply press and hold the on/off button for 4
seconds, or until the LED light turns off. Night Mode – When the Panta® Pocket
Cam is turned on and motion is detected, it will continue to record - even in
darkness. Infra-red lights around the camera‘s lens (Figure H) will be activated, but
they are not visibly lit.
TAKING PHOTOS
1. To switch from Video to Photo mode, simply press and hold the on/off button down
for 2 seconds. LED light will illuminate solid green, indicating photo mode has been
activated. To take a photo, briefly press the on/off button once. The LED light will
flash once after each click, indicating that a photo has been taken.
2. To switch back to video mode, press and hold the on/off button for 2 seconds. LED
light will turn solid red, indicating photo mode has been deactivated and camera is
back in video mode.
Video Format AVI Image Proportion 1.3 M
Video Coding MJPG Battery Capacity 200mAh
Video Resolution Ratio 720p Operation Time Up to 45
Minutes
Video Frame Rate 720 at 30 fps
(default) Charging Voltage 5 V
Player Pot Player /
Windows Player Interface Type Micro-USB
Support System Microsoft
Windows XP/7/8 Storage Support Yes
Image Format JPG Battery Type Lithium Battery
RETRIEVING RECORDINGS
1. Remove the microSD card from the Panta® Pocket Cam by gently pushing the
microSD card inward to release, then gently pulling the card out of the slot. Insert
the microSD card into an SD card adapter (not provided) (Figure I). Once the
microSD card is inserted into the adapter, plug the adapter into the SD card port of
your computer/laptop.
NOTE: The SD card port can be located on either the left or right side of your
computer/laptop.
2. If you do NOT have a microSD card adapter, or your computer/laptop does NOT have
M18205_PantaPocketCam_Manual_A5_20181031_KS.indd 12 29.11.18 11:00

12
13
an SD card port, simply use the provided USB cable to connect the Panta® Pocket
Cam to your computer/laptop. Plug the Micro-USB connector end of the USB cable
into the camera (Figure K). Once the Micro-USB cable is plugged into the camera,
plug the other end of the USB cable into the USB port of your computer/laptop
(Figure L).
3. Access the footage by going to the drive associated with the Panta® Pocket Cam. Go
to the PHOTO & VIDEO folder to view the files. You can view, save, or delete recorded
videos & photos there.
USING CAMERA WALL MOUNT, TABLE STAND & CAMERA CLIP
Assembling the table stand
1. Hold the wall mount in one hand and the camera clip in the other.
2. Gently press the camera camera clip clamp together to open (Figure M1).
3. Insert the grooved base of the wall mount into the opening of the camera clip, and
allow the grooves to align (Figure M2).
4. Now the wall mount is fully assembled and is ready to be used as a table stand.
Using the camera clip
1. Place the camera clip on the back of the unit (Figure N). Gently press the camera
camera clip down until the clips enter the Panta® Pocket Cam mounting grooves,
located on the left and right sides of the camera.
NOTE: A faint click will indicate correct mounting. Make sure that the on/off switch
is positioned to the side when the unit is in use. To remove the camera clip, gently
slide the clips either up or down out of the camera mounting grooves.
Using the wall mount
1. To mount the Panta® Pocket Cam using the mounting tape provided, first peel off a
single side of the mounting tape and place on the back of the wall mount (Figure O).
2. Once the mounting tape is attached to the wall mount, simply peel the protective film
off of the other side of the mounting pad and press the unit firmly onto the mounting
surface (Figure P).
NOTE: The wall mount can be installed either vertically or horizontally.
3. After the wall mount is installed, adjust the angle of the camera by loosening the
wall mount base with a screwdriver (not provided) (Figure Q). When the desired
angle is achieved, tighten the wall mount base.
4. Make sure that the Panta® Pocket Cam logo is visible on the device, and that the
on/off switch is positioned to the side (Figure R).
M18205_PantaPocketCam_Manual_A5_20181031_KS.indd 13 29.11.18 11:00

14
15
5. To remove the wall mount, carefully peel off so as not to damage the wall surface.
NOTE: Screws and wall plugs are also supplied for wall mounting.
Light colour Battery Mode
Continuous red Fully charged Video mode
Once per second Red 10% battery power available
Alternating red and green Camera is charging via a
laptop
Charging mode without
possibility of recording
Indicator light off Camera fully charged via a
laptop
Charging mode without
possibility of recording
Every 3 seconds Camera is charging via a
wall outlet
Charging mode with
possibility of recording
Indicator light is continuously
red
Camera fully charged via a
wall outlet
Charging mode with
possibility of recording
Green Photo mode
Batteries are not part of your household waste and must be taken to an authorized collection point.
Do not dispose this product at the end of its service life through normal domestic waste. It has to be
disposed through a collection agency that recycles electric and electronic devices. This is pointed out
by the symbol on the product, in the instruction manual, and on the packaging. Please inquire about
local collection agencies that may be operated by your distributor or your municipal administration. By
recycling, making use of the materials, or other forms of recycling old units you are making an
important contribution to protecting our environment.
For indoor use only.
FR
CONSIGNES DE SÉCURITÉ IMPORTANTES : LIRE ET SUIVRE TOUS LES
AVERTISSEMENTS ET INSTRUCTIONS AVANT D‘UTILISER CE PRODUIT.
UNE UTILISATION INCORRECTE PEUT ENGENDRER DES BLESSURES.
CONSERVER LE MODE D‘EMPLOI.
AVERTISSEMENTS :
• CONSERVER HORS DE PORTÉE DES ENFANTS. CE PRODUIT N‘EST PAS UN
JOUET.
• Consulter les législations nationales et régionales de la juridiction concernant
l‘utilisation d‘appareils d‘enregistrement vidéo.
• MediaShop rappelle qu‘en cas d‘utilisation en dehors de locaux purement privés,
des dispositions relatives à la protection des données doivent être respectées, en
M18205_PantaPocketCam_Manual_A5_20181031_KS.indd 14 29.11.18 11:00

14
15
particulier les règles du RGPD.
• Dans certains pays, prendre des photos ou des vidéos de personnes ou de
leurs véhicules avec un appareil photo ou les diffuser publiquement peut être
considéré comme une atteinte à la vie privée. Il est de votre responsabilité
de vous familiariser avec les lois et droits sur la vie privée en vigueur dans
votre pays et de les respecter. Il en va de même pour la reconnaissance des
enregistrements vidéos en tant qu‘élément de preuve officiel.
Pour protéger le Panta® Pocket Cam et les enregistrements des dommages :
• Tenir à distance des aimants puissants et de toute haute tension.
• Nettoyer l‘objectif de l‘appareil photo uniquement avec un chiffon doux.
• Le Panta® Pocket Cam n‘est pas étanche, ne pas l‘exposer à des environnements
humides. Ne pas utiliser en plein air sans protection. Ne pas immerger dans de l‘eau
ou d‘autres liquides.
• Ne pas exposer à des températures inférieures à 0˚ C ou supérieures à 40˚ C.
RECHARGE
Affichage de niveau de charge de la batterie
1. Pour contrôler la batterie, maintenir l‘interrupteur marche/arrêt enfoncé pendant 4
secondes et mettre ainsi le Panta® Pocket Cam en marche (illustration A). Le témoin
lumineux s‘allume en continu en rouge lorsque l‘appareil photo est complètement
rechargé. Lorsque le témoin lumineux commence à clignoter une fois par seconde,
le niveau de charge de la batterie est faible.
REMARQUE : il reste ensuite encore 10 % de charge de batterie avant que l‘appareil
photo ne doive être branché à une source d‘électricité.
Charge via l‘ordinateur/l‘ordinateur portable
1. Pour charger le Panta® Pocket Cam via l‘ordinateur/l‘ordinateur portable, insérer
l‘extrémité de branchement micro-USB du câble USB fourni dans le port de charge
de l‘appareil photo. (Illustration B) Une fois que le câble micro-USB a été inséré dans
le Panta® Pocket, insérer l‘autre extrémité du câble dans le port USB sur l‘ordinateur
/ l‘ordinateur portable. (Illustration C)
REMARQUE : le port USB peut se trouver soit du côté gauche, soit du côté droit de
l‘ordinateur/ordinateur portable.
2. Pendant le chargement de l‘appareil photo sur l‘ordinateur/l‘ordinateur portable, le
témoin lumineux clignote alternativement en rouge et en vert.
REMARQUE : lorsque le Panta® Pocket Cam charge sur l‘ordinateur/l‘ordinateur
M18205_PantaPocketCam_Manual_A5_20181031_KS.indd 15 29.11.18 11:00

16
17
portable, il n‘enregistre PAS.
3. Dès que la charge est terminée, le témoin lumineux S‘ÉTEINT. Charge via une prise murale
Charge via une prise murale
1. Insérer l‘extrémité de branchement micro-USB du câble USB fourni dans le port de
charge de l‘appareil photo (illustration B).
2. Une fois que la caméra a été fixée avec succès sur le clip pivotant (illustration E+F),
insérer l‘autre extrémité de câble dans l‘adaptateur de prise (non fourni), puis insérer
l‘adaptateur dans la prise (illustration D).
3. Pendant que l‘appareil photo charge sur la prise murale, le témoin lumineux s‘allume
toutes les 3 secondes pour indiquer que l‘appareil photo charge correctement.
REMARQUE : lorsque le Panta® Pocket Cam charge sur la prise murale, il
ENREGISTRE et CHARGE simultanément.
4. Dès que la charge est terminée, le témoin lumineux s‘allume en continu en rouge.
ENREGISTREMENT D‘UNE VIDÉO
1. Insérer la carte MicroSD dans le port de carte SD du Panta® Pocket Cam
(illustration G).
REMARQUE : la carte MicroSD est déjà installée dans l‘appareil. Si la carte MicroSD
n‘est PAS installée dans l‘appareil pendant qu‘il est en marche, le témoin lumineux
s‘allume 8 fois en vert, puis l‘appareil s‘éteint.
2. Pour mettre le Panta® Pocket Cam en marche, maintenir l‘interrupteur marche/
arrêt enfoncé pendant 4 secondes. L‘appareil photo commence automatiquement
l‘enregistrement dès qu‘il est en marche et qu‘il détecte un mouvement.
REMARQUE : le témoin LED est allumé en rouge en continu lorsque l‘appareil
photo est en marche et qu‘il enregistre. Le Panta® Pocket Cam effectue
automatiquement une boucle et écrase les enregistrements précédents. Après 1
minute sans mouvement détecté, le Panta® Pocket Cam reste allumé mais arrête
toutefois l‘enregistrement.
3. Pour éteindre le Panta® Pocket, maintenir l‘interrupteur marche/arrêt enfoncé
simplement pendant 4 secondes ou jusqu‘à ce que le témoin LED s‘éteigne. Mode
nuit –Dès que le Panta® Pocket Cam est en marche et qu‘un mouvement est
détecté, il enregistre même dans l‘obscurité. Des lumières infrarouges tout autour de
l‘objectif de l‘appareil photo (illustration H) sont activées, mais celles-ci ne sont pas
éclairées de manière visible.
PRENDRE DES PHOTOS
M18205_PantaPocketCam_Manual_A5_20181031_KS.indd 16 29.11.18 11:00

16
17
1. Pour passer du mode vidéo au mode photo, maintenir simplement l‘interrupteur
marche/arrêt enfoncé pendant 2 secondes. Le témoin LED s‘allume en continu en
vert pour indiquer que le mode photo a été activé. Pour prendre une photo, appuyer
brièvement une fois sur l‘interrupteur marche/arrêt. Le témoin LED clignote une fois
après chaque clic pour indiquer qu‘une photo a été prise.
2. Pour passer en mode vidéo, maintenir l‘interrupteur marche/arrêt enfoncé pendant
2 secondes. Le témoin LED s‘allume en continu en rouge pour indiquer que le mode
photo a été désactivé et que l‘appareil photo est de nouveau en mode vidéo.
Format vidéo AVI Taille des images 1,3 M
Codage vidéo MJPG Capacité de la
batterie 200 mAh
Résolution vidéo 720p Durée de
fonctionnement
Jusqu'à 45
minutes
Images vidéo par seconde 720 à 30 fps
(Standard) Tension de charge 5 V
Lecteur Pot Player/
Windows Player Type d'interface Micro-USB
Système d'exploitation Microsoft
Windows XP/7/8
Prise en charge
de supports de
stockage
Oui
Format des images JPG Type de batterie Batterie au
lithium
RÉCUPÉRATION DES ENREGISTREMENTS
1. Retirer la carte MicroSD du Panta® Pocket Cam en poussant légèrement la carte
MicroSD vers l‘intérieur pour la dégager puis extraire avec précaution la carte de
la fente. Insérer la carte MicroSD dans un adaptateur de carte SD (non fourni)
(illustration I). Une fois que la carte MicroSD est insérée dans l‘adaptateur, brancher
l‘adaptateur dans le port de carte SD sur l‘ordinateur/l‘ordinateur portable.
REMARQUE : le port de carte SD peut se trouver soit du côté gauche ou soit du
côté droit de l‘ordinateur/ordinateur portable.
2. Si vous n‘avez PAS d‘adaptateur de carte MicroSD ou si l‘ordinateur/l‘ordinateur
portable ne présente PAS de port pour carte SD, utiliser simplement le câble USB
fourni pour brancher le Panta® Pocket Cam sur l‘ordinateur/l‘ordinateur portable.
Insérer l‘extrémité de branchement micro-USB du câble USB dans l‘appareil photo
(illustration K). Une fois que le câble micro-USB a été inséré dans l‘appareil photo,
M18205_PantaPocketCam_Manual_A5_20181031_KS.indd 17 29.11.18 11:00

18
19
insérer l‘autre extrémité du câble dans le port USB sur l‘ordinateur / l‘ordinateur
portable (illustration L).
3. Accéder aux enregistrements via le disque dur connecté au Panta® Pocket Cam.
Aller dans le dossier PHOTO & VIDEO pour afficher les fichiers. À partir de là, les
vidéos et photos enregistrées peuvent être lues, sauvegardées ou supprimées.
UTILISATION DE SUPPORT MURAL POUR APPAREIL PHOTO, SUPPORT SUR
PIED ET CLIP PIVOTANT
Montage du support sur pied
1. Tenir le support mural dans une main et le clip pivotant dans l‘autre.
2. Serrer les pinces du clip pivotant pour l‘ouvrir (illustration M1).
3. Insérer la partie inférieure rainurée du support mural dans le clip ouvert de l‘appareil
photo et laisser les rainures s‘adapter (illustration M2).
4. Le support mural est alors complètement monté et prêt à être utilisé en tant que
support sur pied.
Utilisation du clip pivotant
1. Placer le clip pivotant sur l‘arrière de l‘appareil (illustration N). Pousser le clip
pivotant de l‘appareil photo avec précaution vers le bas jusqu‘à ce que le clip
s‘encliquète dans les rainures de montage du Panta® Pocket Cam du côté gauche
et du côté droit.
REMARQUE : un léger clic indiquant le montage correct se fait entendre. S‘assurer
que l‘interrupteur marche/arrêt se trouve sur le côté lorsque l‘appareil est utilisé.
Pour retirer le clip pivotant, le glisser avec précaution vers le bas ou le haut hors des
rainures de montage de l‘appareil photo.
Utilisation du support mural
1. Pour monter le Panta® Pocket Cam avec le ruban de montage fourni, retirer d‘abord
le film d‘un côté du ruban de montage et le coller sur la face arrière du support mural
(illustration O).
2. Une fois que le ruban de montage est fixé sur le support mural, décoller simplement
le film de protection de l‘autre côté du ruban de montage et presser fermement
l‘appareil sur la surface de fixation (illustration P).
REMARQUE : le support mural peut être monté à la verticale ou à l‘horizontale.
3. Une fois que le support mural a été monté, régler l‘angle de l‘appareil photo en
desserrant le socle du support mural avec un tournevis (non fourni) (illustration Q).
Dès que l‘angle souhaité a été atteint, s‘assurer que le socle du support mural est
resserré à fond.
M18205_PantaPocketCam_Manual_A5_20181031_KS.indd 18 29.11.18 11:00

18
19
4. S‘assurer que le logo du Panta® Pocket Cam se trouve sur l‘appareil. Avec
l‘interrupteur marche/arrêt sur le côté (illustration R).
5. Pour enlever le support mural, le retirer avec précaution de sorte que la surface
murale ne soit pas endommagée.
REMARQUE : des vis et des chevilles sont également fournies pour la fixation murale.
Couleur du témoin Batterie Mode
Rouge continu Complètement chargé Mode vidéo
Une fois par sec. Rouge 10% de batterie encore
disponible
Alternativement rouge et vert L'appareil photo charge sur
un ordinateur portable
Mode recharge
sans possibilité
d'enregistrement
Témoin lumineux éteint Appareil photo
complètement chargé sur un
ordinateur portable
Mode recharge
sans possibilité
d'enregistrement
Toutes les 3 secondes L'appareil photo charge sur
une prise murale
Mode recharge
avec possibilité
d'enregistrement
Le témoin est allumé en
rouge en continu
Appareil photo
complètement chargé sur
une prise murale
Mode recharge
avec possibilité
d'enregistrement
Vert Mode photo
Ne pas jeter les piles aux déchets ménagers. Les apporter à un point de collecte agréé.
Ne jetez pas le produit aux déchets ménagers à la fin de sa durée de vie. Apportez-le à un point de
collecte pour le recyclage des appareils électriques et électroniques. Cela est indiqué par le symbole
présent sur le produit, le mode d’emploi et l’emballage. Informez-vous des points de collecte mis à
disposition par votre commerçant ou l’autorité locale. La réutilisation et le recyclage des appareils
usagés sont une contribution importante à la protection de notre environnement.
Uniquement pour utilisation dans des pièces intérieures.
IT
IMPORTANTI ISTRUZIONI DI SICUREZZA: LEGGERE E SEGUIRE TUTTE LE
AVVERTENZE E LE ISTRUZIONI PRIMA DI UTILIZZARE IL PRODOTTO. UN
USO IMPROPRIO PUÒ CAUSARE LESIONI. CONSERVARE LE ISTRUZIONI
PER L‘USO.
M18205_PantaPocketCam_Manual_A5_20181031_KS.indd 19 29.11.18 11:00

20
21
AVVERTENZE:
• CONSERVARE AL DI FUORI DELLA PORTATA DEI BAMBINI. IL PRODOTTO NON
E UN GIOCATTOLO!
• Si prega di esaminare le vigenti normative statali e regionali di riferimento in
merito all‘utilizzo di apparecchi per le riprese video.
• MediaShop ricorda che, in caso di uso all‘esterno degli spazi chiusi privati,
bisogna prestare attenzione alle disposizioni in materia di protezione dei dati, in
particolare le norme del GDPR.
• In alcuni paesi fotografare e riprendere con una macchina fotografica le persone
o i loro veicoli o mostrare tali foto/video in pubblico sono considerati violazione
della privacy. È di responsabilità dell‘utilizzatore informarsi su e rispettare
normative e diritti in vigore nel proprio paese in merito di privacy. Ciò vale altresì
per il riconoscimento delle riprese video come mezzi probatori ufficiali.
Per la protezione Panta® Pocket Cam e la registrazione dei danni:
• Tenere lontano da magneti e da alta tensione.
• Pulire la lente della macchina fotografica solo con un panno morbido.
• La Panta® Pocket Cam non è imperbeabile e non deve essere utilizzata in ambienti
bagnati o umidi. Non utilizzare all‘aperto senza le adeguate protezioni. Non immergere
in acqua o in altri liquidi.
• Non esporre a temperature inferiori a 0˚ C o superiori a 40˚ C.
CARICAMENTO
Indicatore stato batteria
1. Per controllare la batteria, tenere premuto per 4 secondi l‘interruttore ON/OFF in
modo da accendere la Panta® Pocket Cam (figura A). La spia luminosa rimane rossa
quando la macchina fotografica è completamente carica. Quando la batteria è bassa,
la spia luminosa comincia a lampeggiare una volta al secondo.
AVVISO: La macchina fotografica deve essere messa sotto carica quando la carica della
batteria è al 10%.
Caricamento tramite computer/laptop
1. Per caricare la Panta® Pocket Cam tramite computer/laptop inserire l‘estremità
dell‘attacco della micro USB del cavo USB in dotazione nell‘apposito attacco del
caricatore della macchina fotografica. (Figura B) Dopo aver inserito il cavo della
M18205_PantaPocketCam_Manual_A5_20181031_KS.indd 20 29.11.18 11:00
This manual suits for next models
1
Table of contents
Languages: