Panther TLSL-II Assembly instructions

Panther TLSL-II
Fitting Guide
20190218
Fitting the Panther TLSL
The Panther Spinal Brace is an orthopedic back
brace that provides abdominal compression
while restricting motion and supporting spinal
alignment.
Its design is simple yet sophisticated; simple
because of the patented method of setting the
size and sophisticated because of the space
age materials, like the mesh fabric that provides
cool comfort, or the light yet strong polymer
that provides support.
Fitting the Panther is a snap. Just add or remove
belt segments and adjust the string length.
Throughout this guide, the term “Build” refers to
the conguration of belts and belt segments.
When reviewing the Panther Build Chart (Page
4) the Brace Illustration Column shows how each
assembled Build will look.
Note: The Panther is shipped assembled as Build
B because it ts over 50% of patients, so half the
time you wont need to alter the Build.

2
Panther TLSL Components
Part Key Description Comments
1Right Main Belt In any Build, the Main Belts are always the end components.
The right Main Belt attaches to the top of the left Main Belt.
2Left Main Belt
3Right Short Belt Segment Each short belt segment adds 5” circumference to the Panther
brace. Each pair adds 10”.
4Left Short Belt Segment
5Right Long Belt Segment Each long belt segment adds 10” circumference to the Panther
brace. Each pair adds 20”.
6Left Long Belt Segment
7Back Pouch The Panther Back Pouch ts any Panther Build.
8Power Unit The MA=5 Power Unit includes pulleys, strings, & pull handles.
9Gator Clip Each belt segment has one; the Power Unit has two.
10 Pull Handles Pull to tighten the Power Unit strings; wind to adjust string length.
11 Lateral Pouches Attach to the belts by Velcro and contains plates.
12 Mickey This posterior plate can be set to the desired height.
13 S.T.E.P Adjustable-height Sternal Thoracic Extension Plate with quick-
connect adjustable straps.
Panther TLSL Assembled View
Panther TLSL in Build B

3
Panther TLSL in Build B
2
13
1
4
3
7
24
9
6
9
11
11
1
5
9
9
3
9
9
10 10
8
8
Panther TLSL Detailed Component View
12

4
Panther TLSL Build Chart
Build Range Components Brace Illustraon
A 25” - 36”
(8) Power Unit
(1&2) Main Belts
(13) STEP
B 35” - 46”
(8) Power Unit
(1&2) Main Belts
(3&4) Short Belt Segments
(13) STEP
C 45” - 56”
(8) Power Unit
(1&2) Main Belts
(5&6) Long Belt Segments
(13) STEP
D 55” - 66”
(8) Power Unit
(1&2) Main Belts
(3&4) Short Belt Segments
(5&6) Long Belt Segments
(13) STEP
5. Install the Lateral Pouches (11) after sizing the brace.
6. Replace the Pull Handles (10) on the belt near the edges of the Power Unit (8), and extend the belt fully.
To nd the correct build above, use the pants hip size for women and waist size for men.
Note: If the size range is between two Builds, choose the larger.
1. Open the Back
Pouch ap
2. Tack the Pull Handles (10) on
the edges of the Power Unit (8)
and open the Gator Clips (9).
3. Insert the Main Belts (1) (2) or Belt Segments (3) (4)
(5) (6) into the Gator Clips (9). Close the Gator Clips (9),
pressing rmly.
4. Adjust the Mickey height.
Note: See page 5 for instructions.
To create Panther Build, remove/attach belt segments
Note: The Panther is pre-assembled in Build B.

5
Adjusting the Panther tLSL Posterior height
Slide the Mickey with the
Height Adjustment Card up to
the desired height.
Pinch an edge to hold the
Mickey and the pouch in
place, remove the card.
Press rmly on the center of
the pouch to bond the hook
& loop inside.
Note: To change the Mickey’s height later, slide the
card (or your hand) down to release the hook &
loop bond, reset the height, and press rmly.
1
2
3

6
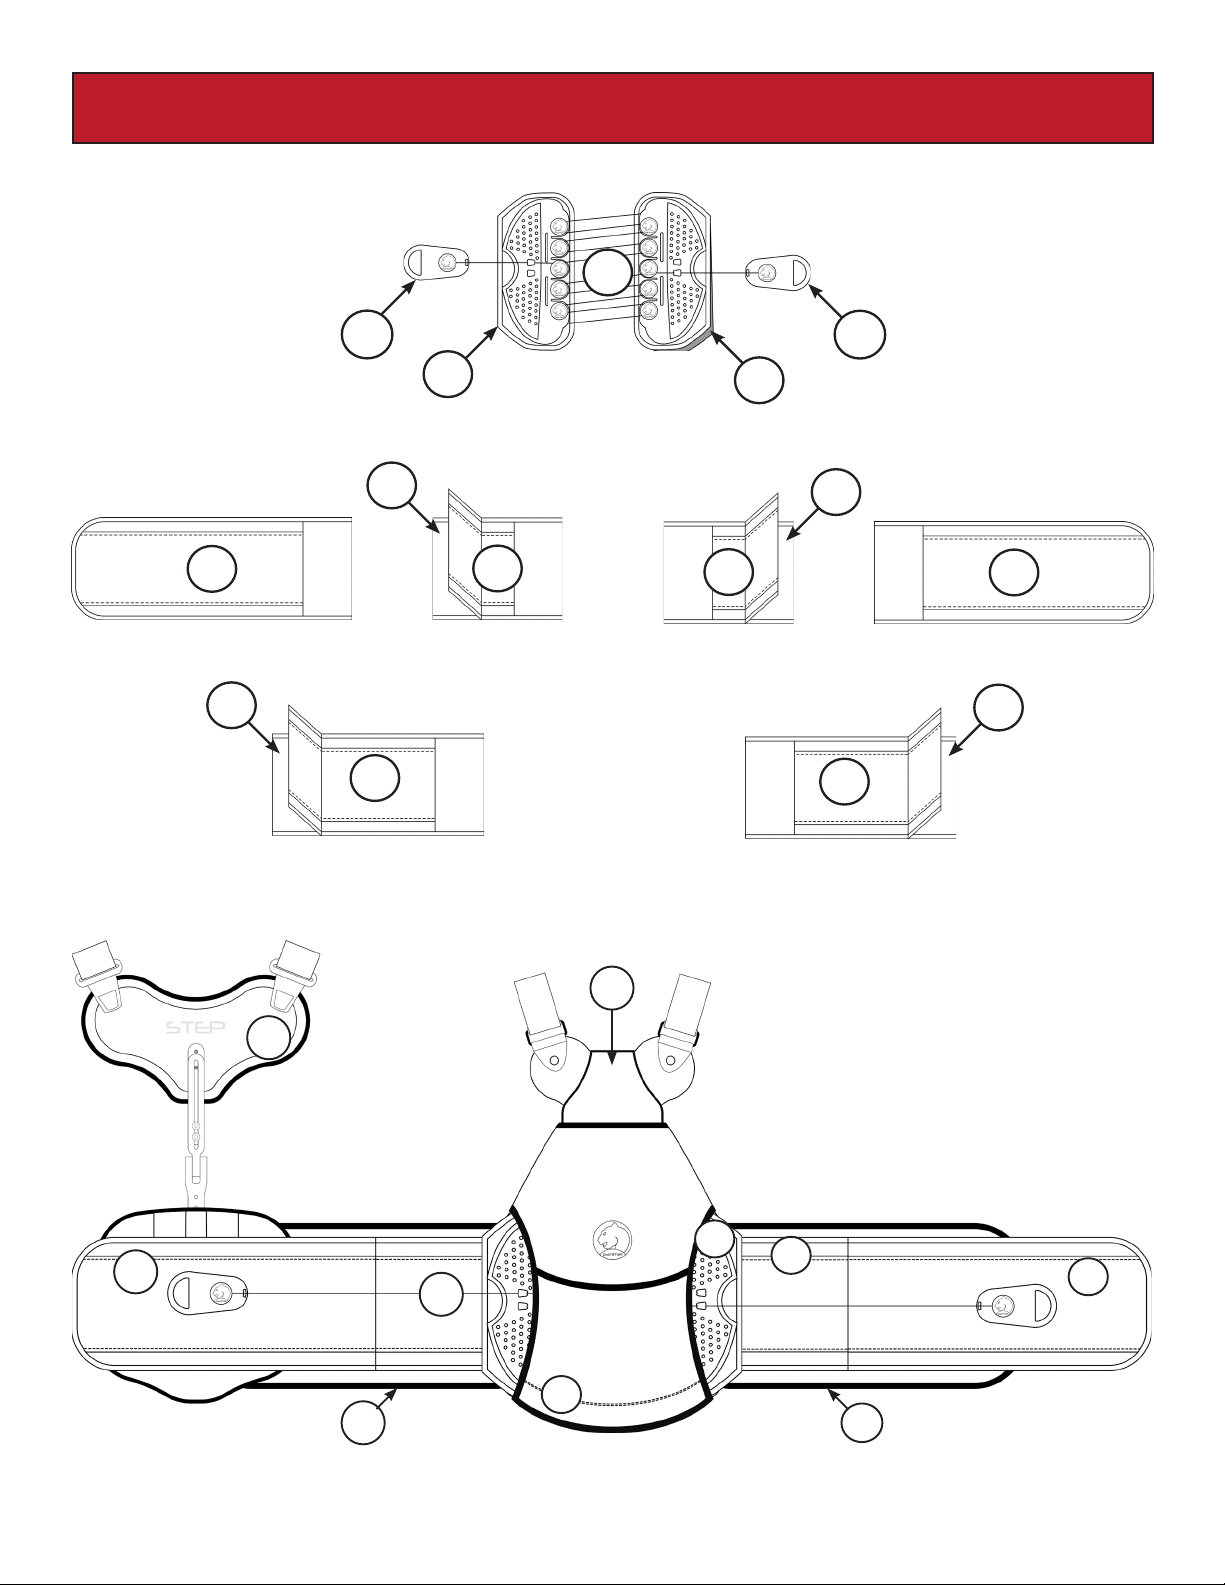
With the STEP attached, lay
the Left Main Belt (2) over
the Right Main Belt (1).
Pull the right and left pull
handles (10) tight and tack
them down in the front.
Verify that the STEP
assembly is centered on the
torso.
Wrap the Panther around the
patient’s waist and
connect the shoulder
straps to the STEP (13).
Attach the Lateral
Pouches (11) so they do
not interfere with the
belt end placement or
the STEP position when
donning the brace.
Center the brace on the
back and match the
lumbar curve with the lordosis.
Using the Velcro oval on
the STEP’s Front Pouch
as a guide, center the
pouch vertically on the
belt.
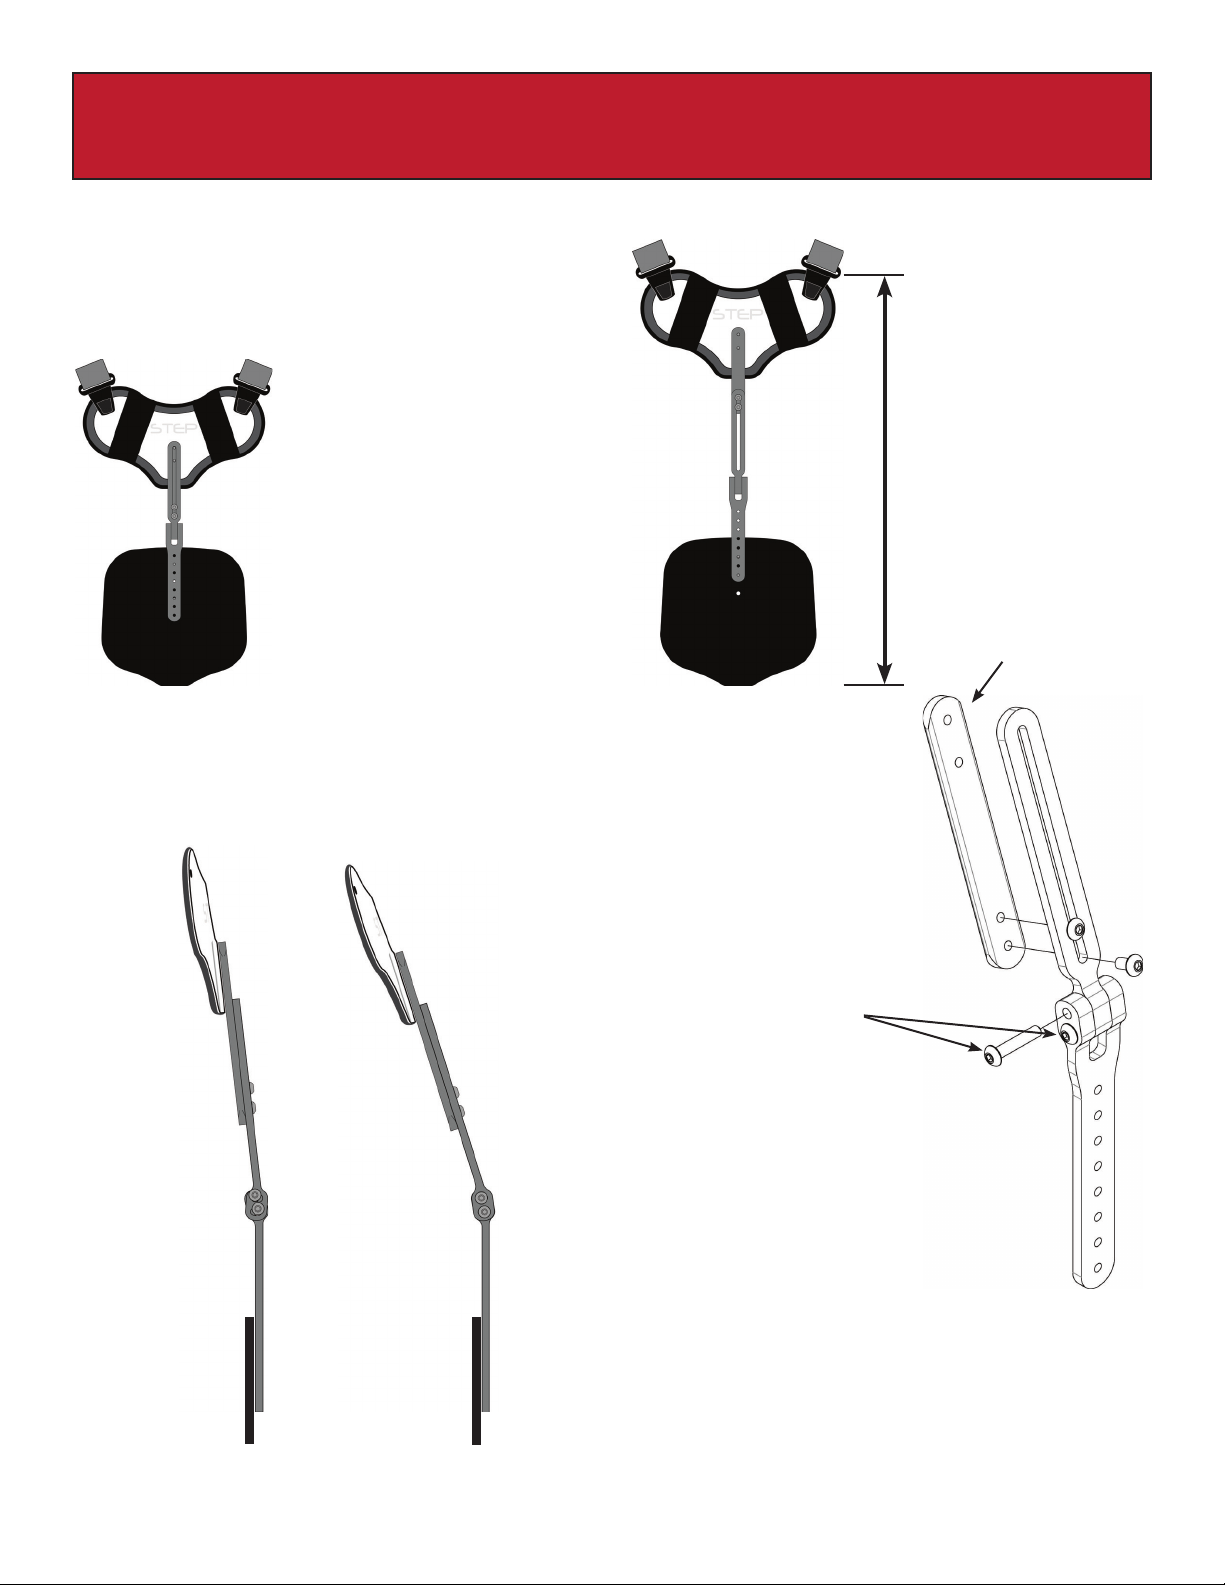
To adjust the STEP height
and angle, see the
included STEP Fitting
Guide.
Adjust the String Lengths
21
34
Tighten all STEP screws before completing patient tting.
Fitting the Panther
Panther Fitting Tips
To adjust the string length, create slack, snag the string
with your ngernail, and wind or unwind to adjust the
length.
Wind to shorten Unwind to lengthen
Pull tight
• For circumferences larger than 66”, add belt segments left over from previous Panther ttings.
• Right and Left Belt Segments are normally used symmetrically, but this is not required.
• Right and left string lengths are normally the same, but they can be different if needed.
The patient should contact the prescribing physician or brace provider if experiencing pain or swelling while
wearing this brace or if any part of this brace fails. Refer to the Instructions for Use for information on wearing
and caring for the Panther brace.
BLUE DIAMOND
ORTHOPEDIC
EMERGO EUROPE
Prinsessgracht 20
2514 AP, The Hauge
The Netherlands
Blue Diamond Orthopedic
6439 Milner Blvd, Ste. 4
Orlando, Fl 32809
USA

7
height Adjustment
Angle Adjustment
Adjusting the steP ii height And Angle
Hinge Screws
Slide Bar
Using the Allen wrench
included with your STEP,
loosen the two hinge screws.
Adjust the angle until
the sternal extensive
force is correct.
Hold the joint angle
and re-tighten the
screws.
Note: Loosen but don’t remove the screws.
The STEP II‘s height can be adjusted in two places:
The slide bar on top allows
you to adjust the height by
loosening the two screws with
the included Allen wrench
and sliding the bar.
The bottom bar placement can
be adjusted on the anterior plate
by removing the screws, adjusting
the bar position, and replacing the
screws in different holes.
Note: Make sure to tighten all screws prior to releasing the brace to the patient.
1
2
Height Range
16 1/8” - 22 3/8”
Shortest 16 1/8” High Tallest 22 3/8” High

8
Adjusting the SteP shoulder strAPs
Note: The STEP’s straps come set at 9.5” long. They can be shortened to 5” or lengthened to 11.5”.
TabBuckle
Retainer
Ring Chafe
Strap
Unwrap the Ring
from around the
strap.
Slide the Chafe away from the
buckle.
Reposition the Ring so it will cover the end
of the bottom strap. Then, wrap it around
the top of the strap, securing it to itself.
Pry the Tab up and pull it towards the Chafe, then secure it to the strap.
shortening the steP shoulder strAPs
lengthening the steP shoulder strAPs
steP shoulder strAP ComPonents
1
2
3
Other Panther Medical Equipment manuals