Papenmeier Braillex EL 80s User manual

Papenmeier part n°: 0090.403.00
Rev. 2.0
/
Februar
y
2008
B
BR
RA
AI
IL
LL
LE
EX
X
®
®
E
EL
L
8
80
0s
s
U
Us
se
er
r’
’s
s
M
Ma
an
nu
ua
al
l


Table of Contents
Introduction ............................................................................................I
The Easy Access Bar ........................................................................I
CE Medical Devices Directive .............................................................I
Symbols and Conventions ................................................................II
Getting Started....................................................................................... 3
Physical Description ........................................................................3
Installation ....................................................................................3
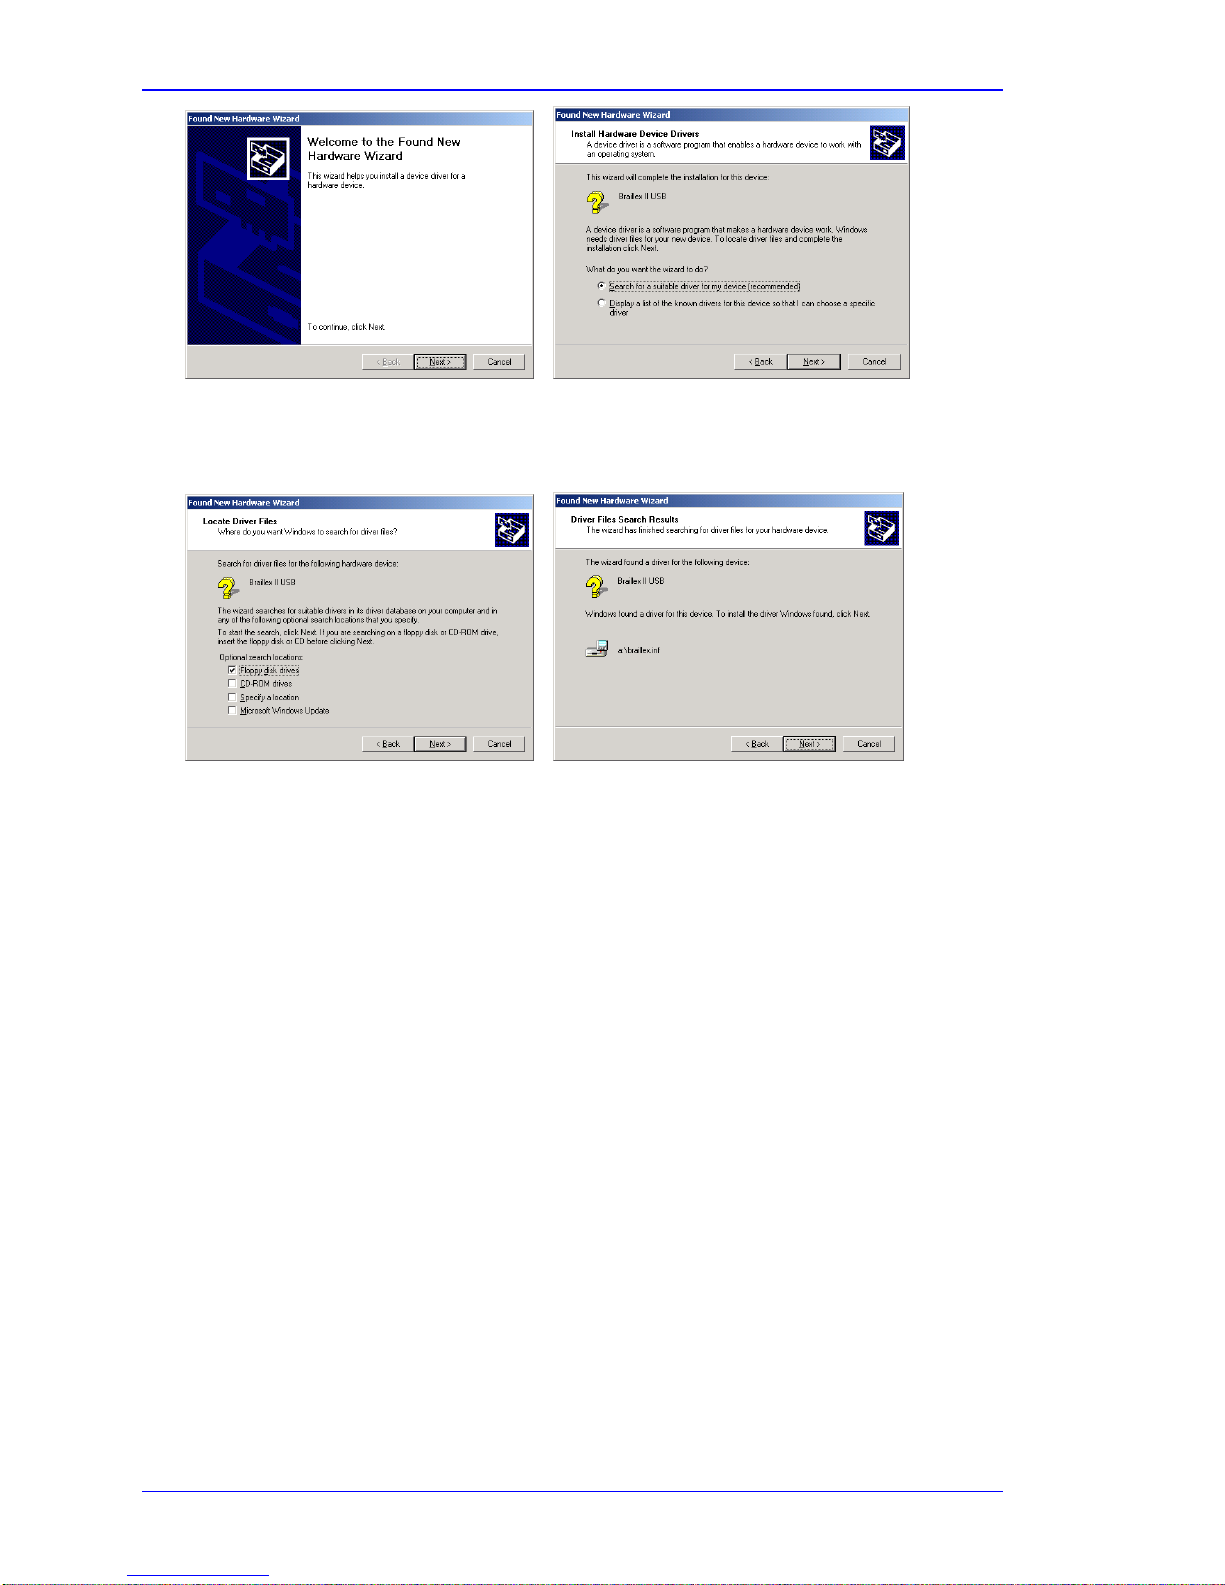
USB Connection...................................................................... 3
Serial Connection....................................................................4
Start Message ........................................................................4
Installing the Screen reader .....................................................4
Service..........................................................................................5
Safety Advice.................................................................................5
Service and Maintenance .................................................................5
Using the Braille display with Jaws for Windows.................................... 7
Function Keys.................................................................................7
Braille Functions............................................................................. 7
Moving the Braille display (Reading Window) ..............................7
Working Modes............................................................................... 7
Selecting the Working Modes.................................................... 8
Easy Access Bar Assignment in the Different Working Modes......... 8
Cursor Tracking...................................................................... 9
Braille presentation............................................................... 10
Reveal Text Attributes ........................................................... 11
Mouse Functions................................................................... 12
Using the Braille display with Dolphin Hal/Supernova.......................... 13
Function Keys............................................................................... 13
Braille Functions........................................................................... 13
Moving the Braille display (Reading Window) ............................ 13
Working Modes............................................................................. 13
Selecting the Working Modes.................................................. 14
Easy Access Bar Assignment in the Three Working Modes........... 14
Cursor Tracking.................................................................... 16
Braille presentation............................................................... 16
Reveal Text Attributes ........................................................... 17
Mouse Functions................................................................... 18
Important Advice.................................................................................. 19
Purpose of the Device.................................................................... 19
Safety Advice............................................................................... 19
General Precautions ...................................................................... 19
CE-Marking.................................................................................. 20
Copyright .................................................................................... 20
Declarations of Conformity............................................................. 20
Index.................................................................................................... 23


I
Introduction
BRAILLEX EL 80s is the best selling of Papenmeier's world-renowned Efficiency
Line Braille desktop displays. It combines state-of-the-art access technology with
a particularly comfortable user interface. The highlight of the unit is the patented
Easy Access Bar.
This document will describe the installation and use of the device.
The Easy Access Bar
The Easy Access Bar integrated in the font of BRAILLEX EL 80s allows fast and
easy navigation across the screen.
You can push the Easy Access Bar in all four directions, in two steps each. When
you sit in front of the device and read the Braille display, your thumbs are
naturally located in front of the Easy Access Bar.
You push the bar with your thumb. When you release it after a movement, it will
jump back to the initial position. The profiled front of the bar gives your thumb
enough grip to activate these keys. You feel a light resistance and hear a click
when you have activated a key. Its function is generally executed only after you
have released the Easy Access Bar. Only the keys with repeat function make
exception.
In every direction you can access two functions. After you release it, the Easy
Access Bar returns to its home position. In its home position it has no function.
Jaws for Windows obviously allows more functions than the 8 described above.
Therefore, Papenmeier added two keys to the left and to the right of the Braille
display. You will learn below that using the keys, you can also alter the
assignment of the Easy Access Bar. You then get a selection dialog that modifies
the meaning of the Easy Access Bar until you change it again.
CE Medical Devices Directive
BRAILLEX EL 80s complies with the requirements of the European Union Medical
Devices Directive, as an active class I medical product intended to be used
for the purpose of compensation for a handicap.
This product may only be used in home or office environments. In medical
facilities, this product may only be used in office rooms.
Please read this manual and the information on medical devices carefully.

Symbols and Conventions
II
Symbols and Conventions
The following conventions and symbols shall help you to identify all the text
elements being used in this manual:
Comment and / or additional information.
Warnings of possible dangers and safety information re-
ferring to the medical devices regulation
All trademarks and proper names mentioned in this manual are properties of
their respective holders.
F.H. Papenmeier reserves the right to modify the devices described in this
manual without notice.
April 2004
F. H. Papenmeier GmbH & Co KG
Reha Division
P.O. Box 16 20
D-58211 Schwerte, Germany
Phone: +49-2304-946 0
Fax: +49-2304-946 246

3
Getting Started
Physical Description
The housing
Measuring 569 x 277 x 22 mm (22.4" x 10.9" x 0.87") and weighing only 2.440
kg (5.4 lbs.), BRAILLEX EL 80s is one of the smallest, flattest and lightest 80 cell
Braille desktop units on the world market.
Front panel
In the rounded front you will find the integrated Easy Access Bar. The bar has a
rubber profile.
Back panel
If you face it, on the left side you have the communication ports and the power
supply jack. From left to right, there is a USB connector, a 9-pin female serial
connector and a power supply jack. If connected to a USB port, BRAILLEX EL 80s
does not need an external power supply; this one is only required if you connect
the device through the serial port.
Top
The Braille display is placed along the front line. It almost occupies the whole
width of the device.
On either side of the Braille display, you will find a key. The keys have two
positions each: you can press them towards the front side (for one function),
and towards the rear side, for another one.
Installation
USB Connection
You connect the BRAILLEX EL device with the PC with the supplied USB cable.
After a short while, a box will pop up: "Found new hardware, Braillex II USB".
After a couple of seconds, the Found New Hardware Wizard dialog starts. Hit
Enter to activate the Next button.
In the next box, check "Search for a suitable driver for my device
(recommended)" and hit Enter to activate the Next button.

Installation
4
In the next box, you can specify the search locations to reduce the searching
time. Check " Floppy disk drives" if you have the driver on a floppy disk, or "CD
ROM drives" if you have it on s CD-ROM. Hit Enter to activate the Next button.
Finally, confirm that you want to install the "BRAILLEX.INF" driver that Windows
found on the media you specified and hit Enter to activate the Next button.
The next box confirms that you have installed a "Papenmeier Braillex II USB
device". Hit Enter to activate the Finish button.
Serial Connection
In case you want to connect BRAILLEX EL 80s via serial port, you have to use
the supplied power supply. No further installation is required (besides the screen
reader software, see below).
Start Message
As soon as the display unit is powered on (see above), you will see a start
message:
"BRAILLEX EL 80s" and the revision number of the actual firmware of the device.
Installing the Screen reader
If you want to read the computer screen on the Braille display, you need to
install and run a screen reader package. Depending on the package you might
need to install driver software for the BRAILLEX EL 80s.

Getting Started
5
Service
In case of any defect of the Braille display unit, please contact an authorized
Papenmeier service center. If you are in doubt about the service center
responsible for your area, please contact Papenmeier:
F. H. Papenmeier GmbH & Co. KG
Phone:+49-2304-9460
Fax: +49-2304-946 246
If possible give a short description of the kind of disturbance.
Safety Advice
Please read the information in this manual carefully, so you
will be able to avoid problems.
Use BRAILLEX EL 80s in a dry environment only. Even if the
device is not powered up, it must not get wet.
Never place any heavy objects on the Braille display.
Service and Maintenance
Avoid touching the device with dirty hands. You may clean the surface of the
device (NOT the Braille cells) with a soft, damp cloth. Do not use any aggressive
detergent or soap.


7
Using the Braille display with Jaws for Windows
Function Keys
BRAILLEX EL 80s offers 80 Braille cells for reading the screen. You can move this
reading window across the screen with the Easy Access Bar. With the
routing keys integrated into the Braille cells you move the mouse pointer to
any desired place on the screen.
You control the Braille display either with the Easy Access Bar alone, or with the
keys.
Braille Functions
Moving the Braille display (Reading Window)
For navigating across the screen, you just use the Easy Access Bar.
Push the Easy Access Bar one step up to move the display up one line. Push the
Easy Access Bar one step down to move the display down one line. You
maintain the column position of your Braille display when you push the Easy
Access Bar up or down.
The Easy Access Bar positions one step left and one step right have the meaning
"Read backward" and "Read forward".
• Push the Easy Access Bar one step left to move the reading window 80
columns to the left.
• Push the Easy Access Bar one step right to move the reading window 80
columns to the right.
Using the "Read forward" function, you continuously read the screen, i.e. once
the display has finished reading the the screen line, it will go to the next line if
you continue pushing the Easy Access Bar.
Working Modes
When navigating in the active window, you can choose between three different
working modes, which influence the assignment of the Easy Access Bar:
Navigation Mode
In the Navigation Mode, you just read across the screen when using the
navigation keys as described above; the cursor is NOT moved. This also
means that you can explore parts of the screen where the cursor can't go.
PC Mode
The PC mode is the opposite: Instead of moving the display across the
screen when pushing the Easy Access Bar, you move the cursor. Please note
that as long as the active cursor moves the Braille display, this obviously also
influences the Braille display position.
Combined Mode
The so-called Combined Mode is a mix of the two modes described above. It
is useful especially when it comes to reading long text documents. Whenever
you press a reading key and a line border is crossed, the PC cursor is moved
to the new line as well. This means that you can read a text without having
to bother about screen pages.

Working Modes
8
Selecting the Working Modes
In order to select the working modes, press the right key towards the rear. You
will get a dialog box that looks like follows:
The mode displayed is the one currently selected. Move the Easy Access Bar one
step left or right to change the values. Once you have reached the end of the
list, you will see the first value again. The options are the following:
Navigation mode
PC Mode
Combined Mode
For setting the value temporarily, push the Easy Access Bar 2 steps up. This will
set the value displayed and return to the application you came from.
If you want to save the setting as a new default for the current application, push
the Easy Access Bar 2 steps down. You will hear the message "settings saved",
the value displayed will be activated, and you will return to the application you
came from.
Easy Access Bar Assignment in the Different Working Modes
In the following you will see the assignment of the Easy Access Bar in the three
different working modes:
Navigation Mode
Used for normal screen navigation. The cursor position is not changed. Two
marker positions can be reached directly: the title bar (with 2 steps up) and the
last window line, which typically corresponds to a status line (with 2 steps
down). The main reading functions (read forwards and backwards) have a
double assignment: they can be reached with both the first step and the second
step right or left.
Navigation Mode Functions
Easy Access Bar Function
One step up Moves the display one line up.
One step down Moves the display one line down.
One step left Read backwards.
Two steps left Same as one step left.
One step right Read forwards.
Two steps right Same as one step right.
Two steps up Moves the display to the title bar
Two steps down Moves the display to the last line of the window.

Using the Braille display with Jaws for Windows
9
PC Mode
In PC mode, the Easy Access Bar allows to navigate through an application. Easy
Access Bar keys will emulate PC keyboard functions:
PC Mode Functions
Easy Access Bar Function
One step left PC Left arrow key
One step up PC Up arrow key
One step right PC Right arrow key
One step down PC Down arrow key
Two steps left (Shift)+(Tab)
Two steps up (Alt); within a dialog box or menu: (Esc)
Two steps right (Tab)
Two steps down (Enter)
Combined Mode
The combined mode includes both screen navigation and cursor movement
features. When you move the Easy Access Bar up or down, the cursor is moved
one line up or down as well (cf. PC mode). When you move the Easy Access Bar
to the right, the function is the same as in navigation mode if the text line is
longer than the display is. The cursor remains at the original position. Once all
the text of that line has been displayed, another “read forwards” command will
move both the cursor and the display to the next line. Pushing the Easy Access
Bar one step left corresponds to “read backwards” if you are within a long line of
text. Otherwise, both cursor and display are moved one line up.
In analogy to the navigation mode, two marker positions can be reached
directly: the title bar (with 2 steps up) and the last window line, which typically
corresponds to a status line (with 2 steps down). This will NOT move the cursor.
The main reading functions (read forwards and backwards) have a double
assignment: they can be reached with both the first step and the second step
right or left.
Combined Mode Functions
Easy Access Bar Function
One step left Read backwards (within a long line), or: move cursor
and display to previous line
Two steps left Same as one step left
One step up Move cursor and display to previous line
One step right Read forwards (within a long line), or: move cursor
and display to next line
Two steps right Same as one step right.
One step down Move cursor and display to next line
Two steps up Moves the display to the title bar
Two steps down Moves the display to the last line of the window.
Cursor Tracking
When navigating across the screen with the Braille display, you do not always
take the cursor with you. You can return to the cursor position at any time. If the
cursor is not present within the Braille display and you want to move the display
back to the cursor position, press the right key towards the front. This will move
the display to the cursor location and make sure that when the cursor is moved,
the display will follow.

Working Modes
10
You can also decide not to have the Braille display follow the cursor movements.
For this purpose, press the right key towards the front while the cursor is visible
on the display. You will hear the message "the active cursor will not move the
Braille display", and the automatic tracking is disabled. In order to enable the
cursor tracking again, move the display away from the cursor and press right
key towards the front again.
Cursor Tracking
Key Function
Right key in front position while
cursor is NOT within Braille window Enable cursor tracking and move
display to the cursor position
Right key in front position while
cursor is visible within Braille
window
Disable cursor tracking
Braille presentation
When pressing the left key in front position, you access a number of Braille
presentation options. A dialog box with six different parameters will pop up:
In this dialog, you can adjust the most frequently used Braille presentation
options. The choices you have refer to the Braille verbosity settings within Jaws.
The settings displayed are the ones that are currently selected.
Move the Easy Access Bar one step down or up to move between the different
parameters. Move the Easy Access Bar one step left or right to change the
values. The options are the following:
Braille presentation options
Parameters Options
Braille mode Line
Structured
Grade two translation On
Off
Translate word under cursor Translating whole line
Expanding current word
Mark with dots 7 and 8 On
Off
Text display in Braille As on screen
Line up text
Display in Eight dot Braille
Six dot Braille

Using the Braille display with Jaws for Windows
11
For setting the values temporarily, push the Easy Access Bar 2 steps up. This will
set the value displayed and return to the application you came from.
If you want to save the setting as a new default for the current application, push
the Easy Access Bar 2 steps down. You will hear the message "settings saved",
the value displayed will be activated, and you will return to the application you
came from.
Reveal Text Attributes
You can have the Braille display reveal different text attributes. The Braille
display then underlines the corresponding portion of text with dots 7+8. You can
select any of the different attributes directly, or you can choose to get all
available attributes revealed. You can, of course, also disable this function.
Press the left key in rear position to activate the selection. You will see a dialog
that looks like follows:
The first line in the dialog box shows the current attribute value at the cursor
position of the application you are in. You can obviously also use this function to
just look up the exact attribute at the cursor position.
The next line contains the global attribute display choices:
Attribute display: Braille marking all
Attribute display: Braille marking off
Attribute display: Braille marking see below for current settings
If you select "Braille marking all", all text with screen attributes other than
normal will be marked with dots 7 and 8. This only works if in the Braille
presentation options, the "mark with dots 7 and 8" option is enabled.
The "Braille marking off" option disables the Braille marking function for all
attributes.
If you have chosen one or several attributes you want to get revealed with dots
7 and 8, you get the message "Braille marking see below for current settings".
Push the Easy Access Bar one step to the left or to the right to select the
settings.
In the next lines, you see the list of attributes that can be revealed with dots 7
and 8. You enable or disable the marking by pushing the Easy Access Bar one
step to the left or to the right. If you modify any of the settings in this part of
the dialog, line 2 will change to " Attribute display: modified". If you go back to
line 2 you can then also restore the initial selection of attributes to be displayed,
by chosing "Braille marking see below for current settings".

Working Modes
12
For setting the values temporarily, push the Easy Access Bar 2 steps up. This will
set the value displayed and return to the application you came from.
If you want to save the setting as a new default for the current application, push
the Easy Access Bar 2 steps down. You will hear the message "settings saved",
the value displayed will be activated, and you will return to the application you
came from.
Mouse Functions
You can activate mouse functions with all BRAILLEX EL devices, using the routing
keys.
In order to execute a mouse click, you first move the Braille display to the
relevant position. Then you press a routing key at the desired position. This
corresponds to a left mouse click.
You can also use the routing keys to select text, for example in a word
processing program. Move the display to the starting point of the marker. Hold
the left key in front position while you press the routing key at the start position.
Then move the display to the end point and repeat the key combination.
Mouse functions
Key Function
Routing key Route mouse to the key position and
execute a left mouse click
Left key in front position + routing key Text selection

13
Using the Braille display with Dolphin
Hal/Supernova
Function Keys
BRAILLEX EL 80s offers 80 Braille cells for reading the screen. You can move this
reading window across the screen with the Easy Access Bar. With the
routing keys integrated into the Braille cells you move the mouse pointer to
any desired place on the screen.
You control the Braille display either with the Easy Access Bar alone, or with the
keys.
Braille Functions
Moving the Braille display (Reading Window)
For navigating across the screen, you just use the Easy Access Bar.
Push the Easy Access Bar one step up to move the display up one line. Push the
Easy Access Bar one step down to move the display down one line. You
maintain the column position of your Braille display when you push the Easy
Access Bar up or down.
The Easy Access Bar positions one step left and one step right have the meaning
"Read backward" and "Read forward".
• Push the Easy Access Bar one step left to move the reading window 80
columns to the left.
• Push the Easy Access Bar one step right to move the reading window 80
columns to the right.
Using the "Read forward" function, you continuously read the screen, i.e. once
the display has finished reading the the screen line, it will go to the next line if
you continue pushing the Easy Access Bar.
Working Modes
When navigating in the active window, you can choose between three different
working modes, which influence the assignment of the Easy Access Bar:
Navigation Mode
In the Navigation Mode, you just read across the screen when using the
navigation keys as described above; the cursor is NOT moved. This also
means that you can explore parts of the screen where the cursor can't go.
PC Mode
The PC mode is the opposite: Instead of moving the display across the
screen when pushing the Easy Access Bar, you move the cursor. Please note
that as long as the active cursor moves the Braille display, this obviously also
influences the Braille display position.
Combined Mode
The so-called Combined Mode is a mix of the two modes described above. It
is useful especially when it comes to reading long text documents. Whenever
you press a reading key and a line border is crossed, the PC cursor is moved

Working Modes
14
to the new line as well. This means that you can read a text without having
to bother about screen pages.
Selecting the Working Modes
In order to select the working modes, press the right key towards the rear. You
will get a dialog box that looks like follows:
The mode displayed is the one currently selected. Move the Easy Access Bar one
step left or right to change the values. Once you have reached the end of the
list, you will see the first value again. The options are the following:
Navigation mode
PC Mode
Combined Mode
If you want to save the setting, push the Easy Access Bar 2 steps down. The
value displayed will be activated, and you will return to the application you came
from.
If you want to exit without saving the changes, push the Easy Access Bar 2 steps
up. You will then return to the application you came from.
Easy Access Bar Assignment in the Three Working Modes
In the following you will see the assignment of the Easy Access Bar in the three
different working modes:
Navigation Mode
Used for normal screen navigation. The cursor position is not changed. Two
marker positions can be reached directly: the title bar (with 2 steps up) and the
last window line, which typically corresponds to a status line (with 2 steps
down). The main reading functions (read forwards and backwards) have a
double assignment: they can be reached with both the first step and the second
step right or left.
Navigation Mode Functions
Easy Access Bar Function
One step up Moves the display one line up.
One step down Moves the display one line down.
One step left Read backwards.
Two steps left Same as one step left.
One step right Read forwards.
Two steps right Same as one step right.
Two steps up Moves the display to the title bar
Two steps down Moves the display to the last line of the window.

Using the Braille display with Dolphin Hal/Supernova
15
PC Mode
In PC mode, the Easy Access Bar allows to navigate through an application. Easy
Access Bar keys will emulate PC keyboard functions:
PC Mode Functions
Easy Access Bar Function
One step left PC Left arrow key
One step up PC Up arrow key
One step right PC Right arrow key
One step down PC Down arrow key
Two steps left (Shift)+(Tab)
Two steps up (Esc)
Two steps right (Tab)
Two steps down (Enter)
Combined Mode
The combined mode includes both screen navigation and cursor movement
features. When you move the Easy Access Bar up or down, the cursor is moved
one line up or down as well (cf. PC mode). When you move the Easy Access Bar
to the right, the function is the same as in navigation mode if the text line is
longer than the display is. The cursor remains at the original position. Once all
the text of that line has been displayed, another “read forwards” command will
move both the cursor and the display to the next line. Pushing the Easy Access
Bar one step left corresponds to “read backwards” if you are within a long line of
text. Otherwise, both cursor and display are moved one line up.
In analogy to the navigation mode, two marker positions can be reached
directly: the title bar (with 2 steps up) and the last window line, which typically
corresponds to a status line (with 2 steps down). This will NOT move the cursor.
The main reading functions (read forwards and backwards) have a double
assignment: they can be reached with both the first step and the second step
right or left.
Combined Mode Functions
Easy Access Bar Function
One step left Read backwards (within a long line), or: move cursor
and display to previous line
Two steps left Same as one step left
One step up Move cursor and display to previous line
One step right Read forwards (within a long line), or: move cursor and
display to next line
Two steps right Same as one step right.
One step down Move cursor and display to next line
Two steps up Moves the display to the title bar
Two steps down Moves the display to the last line of the window.

Working Modes
16
Cursor Tracking
When navigating across the screen with the Braille display, you do not always
take the cursor with you. You can return to the cursor position at any time. If
you want to move the display back to the cursor position, press the right key
towards the front. This will move the display to the cursor location.
Cursor Tracking
Key Function
Right key in front position Move display to the cursor position
Braille presentation
When pressing the left key in front position, you access a number of Braille
presentation options. A dialog box with six different parameters will pop up:
In this dialog, you can adjust the most frequently used Braille presentation
options. The choices you have refer to the Braille verbosity settings within Jaws.
The settings displayed are the ones that are currently selected.
Move the Easy Access Bar one step down or up to move between the different
parameters. Move the Easy Access Bar one step left or right to change the
values. The options are the following:
Braille presentation options
Parameters Options
Braille mode Logical
Physical
Literary Braille On
Off
Cursor at word uncontracted On
Off
Enhanced characters On
Off
Expand gaps On
Off
Display in eight dot On
Off
If you want to save the setting, push the Easy Access Bar 2 steps down. The
value displayed will be activated, and you will return to the application you came
from.
Table of contents
Other Papenmeier Monitor manuals