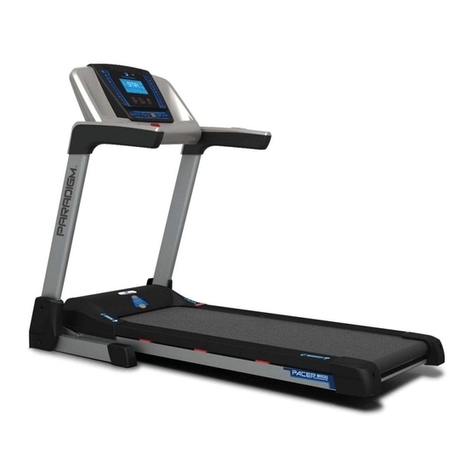
Paradigm Platinum T1 User manual

OWNER’S MANUAL
Call for service 07 3272 7010 PDG0038

Table of Contents
Features __________________________
Exploded View _______________________
Part List ________________ _____________
Safety Information_____________________
Electrical Information ___________________
Included Hardware_______________________
Assembly Instruction___________________
Maintenance ___________________________
Fold & Transport _______ ____________
Operations__________________________
Monitor Your Heart Rate _______________
Warranty / Service ___________________
Page
3
4 -5
6 - 7
8
9
10
11 - 14
15
16
17 - 23
Warm Up___________________________26
Fitness Guide _______________________ 27
Trouble Shooting _____________________ 28 - 29
30- 32
Call for service 07 3272 7010
2
24 - 25

Features
Console
Pulse sensors
Console Mast
Running Belt
The treadmill has been designed and constructed to provide trouble free usage and enjoyable
exercise. You can greatly improve your understanding and benefits of exercising by carefully
reading the instructions given in this manual .Please familiarize yourself with the maintenance
advice provided for you.
SPECIFICATION
MAX.USER WEIGHT 130 KGS
Call for service 07 3272 7010
Motor
Speed range
Incline
Monitor
Striding surface
Roller diameter
DC motor 2.5 hp
0.8 – 18 km/h
0 - 12%, power
7” LCD, blue backlight
48 x 132
cm, 1.4 mm thick
50 mm
USB charging
Polar chest strap
Speakers
Fan
3
3

Exploded View
2
Call for service 07 3272 7010
4

Exploded View
2
Call for service 07 3272 7010
5

Part List
2
Bubble Description Qty Bubble Description Qty
1teltuonaF31B1emarfesabelosnoC10A
1teltuonaF41B1lenaplortnoc,emarF20A
A03 Left upright tubing 1 B15 Console upper wire 70cm 1
A04 Right upright tubing 1 B16 Lower wire 180cm 1
1rabegaknilthgir,revoC71B2rabegakniL50A
6leehwesaB81B1tekcarbhctiwsrewoP60A
1revocrotoM91B1emarfniaM70A
1tlebevirD02B1tekcarbenilcnI80A
1rotoM12B1tekcarbyrailixuA90A
1rotomenilcnI22B1rellortnorF01A
1)A01(hctiwsytefaS32B1rellorraeR11A
1hctiwsniaM42B6liaredisfodnatsxiF21A
1tekcosrewoP52B1elosnoc,revocpoT10B
1drocrewoP62B1elosnoc,revocmottoB20B
2pacdneemarF72B1lenaplortnoC30B
1)citengaM(rosnesdeepS82B1redlohpuctfeL40B
3mm3pmalcelbaC92B1redlohpucthgiR50B
B06 Handgrip HR receiver (top) 2 B30 Rubber bumper 2
B07 Handgrip HR receiver (bottom) 2 B31 Shock absorber 4
2liarediS23B2pirgmaoF80B
1tlebgninnuR33B1yekytefaS90B
1kcedgninnuR43B2revocrekaepS01B
2tooF53B2eriwhtiwrekaepsW311B
1pacdneliartfeL63B1eriwraE21B
Call for service 07 3272 7010
6

Part List
2
Bubble Description Qty Bubble Description Qty
B37 Right rail end cap 1 C09 Stuff screw∮8x25L 2
252*01rehsaW01C2gnirE83B
B39 End cap, incline bracket 2 C11 Philip head self tapping screw
M4*16
6
202*4MwercsdaehpilihP21C1gnirpssaG04B
853*4MwercsdaehpilihP31C1rellortnoC14B
452*6MtlobdaehtekcosxeH41C2gniretirreF24B
201*3MwercsdaehpilihP51C7eitelbaC34B
1011*8MtlobdaehxeH61C1enohprae,eriW44B
115.1*61*8rehsaW71C3mc81eriW54B
901MtunnoluN81C1mc7eriW64B
124*01MtlobdaehxeH91C1mc5.4eriW74B
B48 Grounding wire 12cm 1 C20 Hex socket head bolt M8*55 3
256*01MtlobdaehtekcosxeH12C2pmalcelbaC94B
4gnihsubepahsT22C1rotcudnI05B
802*6MwercsdaehpilihP32C1retliF15B
B52 Cover, left linkage bar 1 C24 Bearing, upright tubing 2
221*01MtlobdaehxeH52C1tropBSU,esaB35B
C01 Philip head screw M3*8 43 C26 Hex socket head bolt M8*20 2
C02 Philip head screw M4*12 31 C27 Hex socket core screw M6 2
C03 Philip head screw M4*16 18 C28Hex socket head screw M6 2
C04Philip head self-tapping screw
M4*16
4C29Philip head screw M4*8 2
C05 Hex socket head bolt M8*35 2 C30Philip head screw M4*6 7
118MtunnolyN60C C312emarfgniraeB
281*8rehsaW23C2001*01MtlobdaehtekcosxeH70C
C08 Hex socket head bolt M8*50 6
Call for service 07 3272 7010
7

Important Safety Information
IMPORTANT: THIS UNIT IS INTENDED FOR HOUSEHOLD USE ONLY
Your treadmill was designed and built for optimum safety. However, certain precautions apply
whenever you use your treadmill. Be sure to read the manual before assembly and operation.
Also, please note the following safety precautions:
DANGER: To reduce the risk of electric shock, always unplug the treadmill from the electrical outlet
immediately after using and before cleaning.
1. Read OWNER’S MANUAL and all accompanying literature and follow it carefully
before using your treadmill.
2. If dizziness, nausea, chest pains, or any other abnormal symptoms are experienced while using this
equipment, STOP the workout and CONSULT A PHYSICIAN IMMEDIATELY.
3. Never leave the treadmill unattended when plugged in. Unplug from the outlet when not in use and
before removing or replacing parts.
4. Never operate the treadmill if it has a damaged cord or plug, if it is not working properly, if it has
been dropped, damaged, or exposed to water.
5. Do not pull the treadmill by the power supply cord or use cord as a handle. Keep cord away from
heated surfaces and open flames.
6. Fitness equipment must always be installed and used on a flat surface. Do not use outdoors or near
water.
7. Do not insert any objects into any openings.
8. Keep children and pets away from this equipment at all times while exercising.
9. Handicapped individuals should have medical approval and close supervision when using this
treadmill.
10.Do not place hands or feet under the treadmill. Always keep hands and legs off the treadmill
when others are using it.
11.Never turn on treadmill while standing on treadbelt. Always return the treadmill to slow speed to
provide for safe dismount and low speed restart.
12.To disconnect, turn all controls to the off position, then remove plug from outlet.
13. Use the treadmill only for it is intended use as described in this manual.
14. Warm up 5 to 10 minutes before each workout and cool down 5 to 10 minutes afterward. This allows
your heart rate to gradually increase and decrease and will help prevent straining muscles.
15. Never hold your breath while exercising. Breathing should remain at a normal rate in conjunction
with the level of exercise being performed.
16. Start your program slowly and very gradually increase your speed and distance.
17. Always wear suitable clothing and footwear while exercising. Do not wear loose fitting clothing
that could become entangled with the moving parts of your treadmill.
18. Do not walk or jog barefoot, in stockings or loose fitting shoes or slippers.
19. Care must be taken when lifting or moving the equipment, so as not to injure your back. Always use
proper lifting techniques.
WARNING: Before beginning any exercise program consult your physician. This is especially
important for individuals over the age of 35 or persons with pre-existing health problems.
Read all instructions before using any fitness equipment. We assume no responsibility
from personal injury or property damage sustained by or through the use of this product.
CAUTION!! Please be careful when opening this unit.
Call for service 07 3272 7010
8

4
Grounded Outlet
Grounding Pin Grounded Outlet Box
Metal Screw
Adapter
Tab of
Grounding
Screw
Electrical Information
WARNING!
NEVER use a ground fault circuit interrupt (GFCI) wall outlet with this treadmill. Large switching currents of
the drive motor will trip GFCI type outlets, as any appliance with a large motor. Route the power cord away
from any moving part of the treadmill including the elevation mechanism and transport wheels.
NEVER remove any cover without rst disconnecting AC power.
If voltage varies by ten percent (10%) or more, the performance of your treadmill may
be aected. Such conditions are not covered under your warranty. If you suspect
the voltage is low, contact your local power company or a licensed electrician for proper
testing.
NEVER expose this treadmill to rain or moisture.This product is NOT designed for use outdoors, near a pool
or spa, or in any other high humidity environment.The temperature specication is 4 to 48 degrees Celsius,
and humidity limit is 95%, non-condensing (no water drops forming on surfaces).
Grounding Instructions
This product must be grounded. If the treadmill should malfunction or breakdown, grounding provides a
path of least resistance for electric current, reducing the risk of electric shock.This product is equipped
with a cord having an equipment-grounding plug.The plug must be plugged into an appropriate outlet
that is properly installed and grounded in accordance with all local codes and ordinances.
DANGER - Improper connection of the equipment-grounding conductor can result in a risk of elec-
tric shock. Check with a qualied electrician or serviceman if you are in doubt as to whether the
product is properly grounded. Do not modify the plug provided with the product if it will not t the
outlet. Have a proper outlet installed by a qualied electrician.
This product is for use on a nominal 240-volt circuit, and has a grounding plug that looks like the plug
illustrated below. A temporary adapter that looks like the adapter illustrated below may be used to
connect this plug to a 2-pole receptacle as shown below if a properly grounded outlet is not available.The
temporary adapter should be used only until a properly grounded outlet, (below) can be installed by a
qualied electrician.The green colored rigid ear-lug, or the like, extending from the adapter, must be
connected to a permanent ground such as a properly grounded outlet box cover. Whenever the adapter is
used, it must be held in place by a metal screw.
Call for service 07 3272 7010
9

Included Hardware
Collapse box bottom and lay sides down before assembly and do not attempt to move
the treadmill out of its box until the unit is fully assembled. Locate the hardware bag
and parts that are listed in the chart below.
Call for service 07 3272 7010
10

Assembly Instruction
1Lift up the upright handlebar, align linkage bar with shaft, then fasten screw (I) tightly at
the bottom linkage bar with Allen key (J).
Call for service 07 3272 7010
11

Assembly Instruction
2Fold down the handlebars platform to the upright tubing. Place washers (D) and screws
(C) on the handlebar. Fasten the screws with Allen key (J) tightly.
Call for service 07 3272 7010
12

Assembly Instruction
3Connect 2 wires with the same color respectively. Attach console (A) to the supporter.
Make sure 3 bolts align with holes. Put nuts (F) and washer (H) on the center bolt. Put nuts
(F) and washer (H) on the side bolts. Tighten with Carriage wrench (E).
Call for service 07 3272 7010
13

Assembly Instruction
4Attach and press down the upright side cap (L) at the bottom linkage bar.
When finish assembly, please make sure all bolts are tightened properly!
Call for service 07 3272 7010
14

Maintenance
CENTERING RUNNING BELT
TREADMILL LUBRICATION
Lubricating under the treadbelt will ensure superior performance and extend its life expectancy.
After the first 25 hours of use (2-3 months) apply one half bottle of lubricant.
Every 50 hours of use (5-8 months) apply one half bottle of lubricant.
HOW TO CHECK TREADBELT FOR PROPER LUBRICATION
Lift one side of the treadbelt and feel the top surface of the treadboard.
If the surface is slick to the touch, then no further lubrication is required.
If the surface is dry to the touch, apply one packet of lubricant or half of the bottle of lubricant.
HOW TO APPLY LUBRICANT
Lift one side of treadbelt.
Pour one half of the lubricant bottle
under the center of the treadbelt on the top
surface of the treadboard.
Walk on the treadmill at a slow speed for 3 to 5
minutes to evenly distribute lubricant.
NOTE: DO NOT over lubricate treadboard. Any
excess lubricant that comes out should be wiped
off.
IMPORTANT: ONLY USE HALF THE BOTTLE OF LUBRICANT PER APPLICATION
LUBRICATION SCHEDULE.
Start the treadmill without anyone on the running belt, press
speed up bottom until speed reached 16kph.
If toward the left side of the deck
Using an Allen wrench, turn the left adjustment bolt 1/8 turn in
a clockwise direction and the right adjustment bolt counter
clockwise 1/8.
If toward the right side of the deck
Using an Allen wrench, turn the right adjustment bolt 1/8 turn
in a clockwise direction and the left adjustment bolt counter
clockwise 1/8.
ADJUST THE BELT TENSION
If the running belt feels as though it is “slipping” or hesitating when you plant your foot during a run,
the tension on the running belt may have to be increased. To increase the tension of the running belt,
turn both left and right adjustment bolts clockwise evenly.
Call for service 07 3272 7010
15

FOLDING
After assembly is complete, you may fold the machine into the
upright position for storage. To fold the machine, raise the deck
until it locks into position.
Make sure the treadmill’s elevation is at its lowest position
(%) before folding the deck to avoid damage to your machine. To
fold the machine, raise the deck until it locks into position.
Make sure you hear a slight click sound of the deck locking
into position. This is to ensure the deck is locked in place and will
not drop back down.
UNFOLDING
Lightly kick the switch indicated in the middle of the shock absorb
rod and lightly pull down frame about 10 degree to activate the
deck auto soft drop function.
This vertical rod (shock) has a built-in safety unfolding
feature to help lower the deck slowly. Please make sure there are
no children or other things under the deck when you lower it.
MOVING THE TREADMILL
Before moving the treadmill, be sure the power cord is unplugged
from the wall and the treadmill. Fold up the deck until it is locked
and push the treadmill on the transportation wheels. Hold the
handlebars to move the treadmill.
To prevent malfunction of the treadmill, store it in a dry place with
as little temperature variation as possible, protected against dust.
Always unplug the treadmill from the electrical outlet when not in
use.
Folding & Transport
2
Call for service 07 3272 7010
16

Call for service 07 3272 7010
Operations
KEY FUCTION
Rotary knob key = Rotate to choose program or set number (clockwise to increase number,
counterclockwise to decrease number). Press knob to confirm.
Start = Press to start treadmill
Stop = Press to stop the treadmill.
Speed ( + / - ) =Increase (and decrease) the speed. Press once and the speed increases (decrease)
by 0.1 KPH / 0.1 MPH. Pressing and holding for two seconds will increase (decrease) the speed
faster. This button is also used to scroll the programs.
Incline ( + / - ) = Increase (and decrease) the incline level. Press once and the incline increase
(decrease) 1 level. Pressing and holding for two seconds will increase (decrease) the incline faster.
Speed / Incline Quick Keys = Pressing these keys will changes the speed and incline to that
respectively level.
Fan = Turn on/off fan.
Call for service 07 3272 7010
17

Operations
SAFETY TETHER KEY
The treadmill cannot run if the tether key is not installed on the console correctly. The treadmill will
immediately stop once the key is removed from its place. Insert the safety key onto the slot on the control
panel. Pinch the clip of the safety tether key to your clothing tightly. Make sure the clip does not detach
from clothing before the safety tether key disconnects from the console slot.
USB CHARGING
USB charging provides 5V electricity charging. Use your the connection cord to charge up battery via the
USB outlet on your treadmill, then when you are ready to recharge your iPhone, iPod or other device
simply plug them into the USB input.
SPEAKER FUNCTION
The user can connect a music device with the internal speakers using the included speaker wire.
CHEST STRAP (only for choosing this feature)
Before start workout, wet the electrode areas of the strap well under running water. Attach the
connector to the strap. Adjust the strap length to fit it tightly but comfortably. ie the strap around your
chest, just below the chest muscles, and attach the hook to the
other end of the strap. Check that the wet electrode areas are firmly against your skin and the connector
is in a central and upright position.Ready to workout.
Operation procedure for speed and incline calibration
Every time replace the console or controller or incline motor or drive motor, the treadmill needs to reset
its speed and incline. The procedure is to press 2 keys and hold them for 3 seconds. “STOP” with “+” of
INCLINE. Treadmill will activate the reset function.
Call for service 07 3272 7010
18

Operations
DISPLAY READOUT
Incline = Display the elevation of current treadmill level. Increment and decrement is 1 level.
Speed = Display the moving speed of the treadmill belt. Increment and decrement is 0.1 KPH.
Pulse = Display the pulse rate. Place both of your hands on the pulse grip bars.
Calories = Display calories consumed.
Pace = Display walked steps.
Distance = Display the Distance. Unit is kilometer.
Time = Show Workout Time and begins at 00:00 and counts up. In “Target time” mode, time counts
down.
Fan = Symbol will light up when turn on fan. Symbol will be gone when turn off fan.
Bluetooth = Symbol will light up when connected with paired devices. Symbol will be gone when
disconnected.
The current limit = This is a warning message. Symbol will light up when reaches the rated
current. Treadmill will automatically shuts off after 5 minutes continuous showing this message.
Treadmill can revert to work once cool down or after cleaning the deck and belt with lubricator.
Motor load level = Display the motor loading level. Classified into 3 levels. Low, middle
load level: All levels are good for use.
Maintenance = Symbol will light up when incur error code message.
Opening Display
As soon as turned on power 1 second, the display shows “W” on the left side 10x10 dot matrix, shows “T"
on the right hand side dot matrix. Weight number is display at the window.
Call for service 07 3272 7010
19

Operations
PROGRAM OPERATION
Definition
1. Gender: “1” for male. “0” for female
2. Age: 10 – 99. Preset is 20.
3. Height: 100 – 240cm with preset 160cm. 40 – 95 inches with preset 63 inches.
4. Weight: 10 – 250 kgs with preset 60 kgs. 10 – 550 lbs with preset 132 lbs.
To start attach the safety key to the monitor. The treadmill will not operate without the safety key.
Please clip the other end of the safety key to your clothing before exercising to ensure the machines will
stop in case the user accidentally walks off the treadmill. If the user falls off the treadmill, the safety key
will come off the monitor and the treadmill will stop at once to avoid further injury.
P1 MANUAL MODE
Input age and weight by turning <rotary knob>, press <rotary knob> to confirm. Press <START>.
Treadmill begins after 3 seconds count down. The initial speed is 0.8km (or 0.5 MPH).
You may adjust speed and incline during exercise. Press <STOP> to end program and exit.
P2 - P4 INCLINE PROGRAM
Input weight by turning <rotary knob>, press knob to confirm. Incline value is set each of program.
During program, when one incline is adjusted, the entire incline level will be automatic changed
accordingly. It will have 3 beeps before proceed to next segment.
1. Choose program by turning <rotary knob>, press it to confirm.
2. Press <START>. Treadmill begins after 3 seconds count down.
3. It will have 3 beeps at the end of program.
You may press <STOP> to end program and exit any time during exercise.
P5 – P7 SPEED PROGRAM
Input weight by turning <rotary knob>, press knob to confirm. Speed value is set each of program.
During program, when speed is adjusted, the entire speed level will be automatic changed accordingly. It
will have 3 beeps before proceed to next segment.
1. Choose program by turning <rotary knob>, press it to confirm. Set exercise time. Preset time is 10:00
minutes.
2. Press <START>. Treadmill begins after 3 seconds count down.
3. It will have 3 beeps at the end of program.
You may press <STOP> to end program and exit any time during exercise.
P8 – P10 SPEED+INCLINE PROGRAM
Input weight by turning <rotary knob>, press knob to confirm. Speed and incline value are set each of
program. During program, when speed or incline is adjusted, the entire intensity level will be automatic
changed accordingly. It will have 3 beeps before proceed to next segment.
Call for service 07 3272 7010
20
Table of contents
Other Paradigm Treadmill manuals