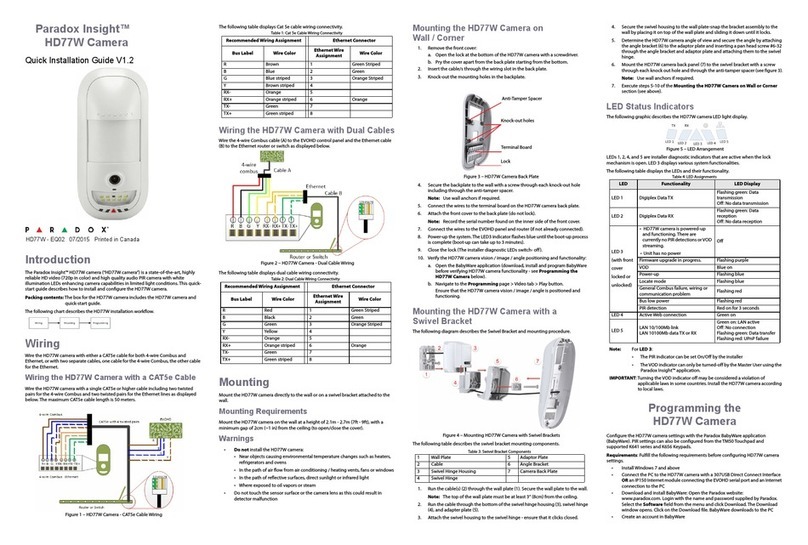
Figure 7 – Connections Options Settings
4. The Settings window opens. Click the Locate button . A list of all IP150 devices
appears.
5. Select your IP150 device and Click Configure. The IP Device Configuration window
opens.
6. Click OK.
7. Enter the IP 150 module password.
8. Click OK to confirm password.
9. Click OK to finish configuring the IP 150 device.
10. Click Connect to finalize the connection settings.
Device Location and Label
With BabyWare open, locate each device by its serial number and add its label (for example
front window) and its location (for example Living room).
Serial numbers are acquired through the module scan and automatically inserted by
Babyware.
Receive Programming
At the BabyWare homepage always start by going to the HD77 security module, right click
and select Receive programming. This assures that you will start with the latest device
configuration parameters. Do this for each HD77 Camera.
HD77 Programming
In BabyWare under the Security Modules heading, double click or right click the HD77
module and Click Properties. The HD77 Programming screen appears. Wait for the
properties to appear.
Before you start programming each camera do a Read of the existing camera parameters.
Whenever you make a change to the HD77 programming the Write button will be enabled
and highlighted.
Figure 8 – Write Button
Click Write to implement your changes to the device.
HD77 Server Parameters
Enter the Installer parameters.
Enter the Central Monitoring Station (CMS) parameters.
Receiver Parameters (Monitoring Station Reporting)
1. To configure your HD77 to report events to an IPRS7 software, check the Reporting
Enabled checkbox.
2. Enter the Receiver parameters. These parameters come from the Central
Monitoring Station.
a. Select Communication from the tool bar.
b. Select Register to IP Receiver.
c. Click OK.
Figure 9 – Communication Drop Down Menu
TCP/IP Parameters
When supported by your router, we recommend to enable DHCP, enable UPnP, and work
with the PMH (enable PollPMH, see below). This will allow for easy and fast network
installation.
When one of the key parameters needs to be fixed, such as working with a static WAN IP
(not using PMH) or when UPnP is not supported (or fails) in your router, we HIGHLY
recommend setting all parameters statically. Meaning, the IP address of the camera should
be static (either with static LAN IP or better with using MAC binding which will always assign
the same IP address to the camera). The port selection should also be static in order to be
able to do port forwarding that will not break in case of port or IP change.
Static IP or Dynamic IP for the WAN
If your ISP assigns a dynamic WAN IP (as in most cases) you must check the Poll
PMH(ParadoxMyHome) checkbox.
If you do not wish to use the PMH, you must acquire a static WAN IP from your ISP and
uncheck the Poll PMH (ParadoxMyHome) checkbox. Later, you will have to manually
key-in the static WAN IP address into the Paradox Insight™ Application and the BabyWare
application HD77 programming page.
Dynamic Configuration
1. From the HD77 programming page set the HD77 Server Parameters, check the
DHCP Enabled box.
• If your router supports UPnP check the UPnP (Universal Plug and Play) box.
UPnP takes care of the port forwarding automatically.
Note: If your router does not support UPnP, we HIGHLY recommend setting all
parameters statically.
2. From the HD77 programming page set the HD77 Settings:
a. Select Communication from the tool bar.
b. Select Settings from the drop down menu. The settings page opens.
Note: For your router settings please contact your Internet Service Provider (ISP).
Figure 10 – Communication Drop Down Menu
c. On the HD77 Settings window select Auto Detect.
Figure 11 – HD77 Settings Window
d. Click Refresh .
e. Click OK, and return to the HD77 programming page.
3. From the HD77 programming page register the HD77 to PMH:
a. Select Communication from the tool bar.
b. Select Register to PMH (ParadoxMyHome).
c. Enter your Installer credentials.
d. Enter a unique Site ID, to identify the system on ParadoxMyHome. This site ID is
needed for the Paradox Insight App.
e. Click OK to finish the successful registration.
f. Click OK and return to the BabyWare homepage.
Note: If your router supports UPnP you are now DONE configuring Server Parameters.
Skip to “Static IP or Dynamic IP for the WAN”
Reserved/Static IP Configuration
Note: If your router supports reserved IP addresses, in the router bind the MAC
address to a reserved IP address for the LAN.
Note: If you are using a reserved IP address the camera must be DHCP enabled. The
reserved IP address must be within the DHCP range.
Note: If you are using a static IP address the camera must be DHCP disabled. The
static IP address must be outside of the DHCP range.
Setting Up the Router for Port Forwarding
This step allows you to manually set up the router port forwarding should UPnP not be
supported by your router.
1. Ensure that the router is connected properly as indicated in the router’s instructions.
2. Access your router’s configuration page:
• Refer to your router’s manual for the exact procedure. In most cases, this is done
by entering the router’s IP address in the address bar of your web browser.
• For this instruction sheet, we will use 192.168.1.1 as an example, since it is a
commonly used default router IP address.
• Your router’s IP address may be indicated in the router’s instructions or on a
sticker on the router.
3. In the router’s configuration page, check the DHCP settings:
• If DHCP is enabled, verify that the IP address range leaves at least one IP address
available outside of the range.
• The range shown in following figure, would leave addresses two to four and 101
to 254 available (all the numbers in an IP address are between 1 and 254.).
Figure 12 – DHCP Settings
• Record one of the addresses outside the DHCP range as the one you will use for
the HD77.
•DHCPmustbeenabled.
4. In the router’s configuration page, go to the Port Forwarding section (also known as
“Port Mapping” or “Port Redirection”):
• Add a service/item, set the Port to >10000, for example 10001, and enter the IP
address selected in the previous step 3 or the HD77 module.
• If port 10001 is already used, you can use another one, such as 10002 or 10003.
• Update the camera port parameter in BabyWare.
• If you have trouble connecting to the camera, verify with the ISP that these ports
are available and working.
Note: Each camera needs a unique port number. DO NOT use the same port
number more than once.
Port Forwarding (screenshot may differ depending on type of router used).
Figure 13 – Port Numbering
Programming PIR Settings with BabyWare
Always perform a Receive Programming before configuring.
1. Select the PIR parameters.
PIR LED On/Off – Default is on.
2. Set PIR sensitivity Level.
3. Set Security Level
Table 6: PIR Parameters
Click Write to implement your changes to the device.
Figure 14 – Send the New Configuration to the Module
Programming PIR Settings with the TM50 Touchpad
Only PIR parameters of the HD77 can be configured through the TM50 touchpad.
Note: To program the HD77 from any installed keypad, BabyWare must be
disconnected from the system.
1. Select the [Menu] key.
2. Select the [Advanced] key.
3. Select the [Installer Programming] key.
4. Enter your [Installer Code].
5. Select the [System Programming] key.
6. Key in Section [4003].
7. Enter the module’s [Serial Number].
8. Click Next.
9. Enter Section [001].
Option 1 is for PIR LED On/Off;
On – LED#3 will light up red when PIR motion is detected.
Off – LED#3 stays off when the PIR motion is detected.
Default is On.
Options 2 through 8 are to remain off.
10. Enter Section [002].
11. Input the PIR Sensitivity level.
Select PIR sensitivity level, level 0 to level 4 – Default is #2.
12. Enter Section [003].
13. Select PIR security level, level 0 to level 2 – Default is #0.
Programming PIR Settings with Keypads
Only PIR parameters for the HD77 can be configured through any of the K641 series
keypads plus the K656 keypad.
Note: To program the HD77 from any installed keypad, BabyWare must be
disconnected from the system.
1. Press and hold the [0] key.
2. Enter your [Installer Code]. The default installer code is 000000.
3. Key in Section [4003].
4. Enter the module’s [Serial Number].
5. Enter Section [001].
6. Option 1 is for PIR LED On/Off;
On [1] – LED#3 is red when PIR motion is detected.
Off [*] – LED#3 stays off when the PIR motion is detected.
Default is On.
Options 2 through 8 are to remain off.
7. Enter Section [002].
8. Select PIR sensitivity level, level 0 to level 4. Default is level 2.
9. Enter Section [003].
10. Select PIR security level, level 0 to level 2.
Default is level 0.
HD77 Specifications
HD77 Compatibility
This device is compatible with the Paradox EVOHD control panel.
Certifications
WARRANTY: For complete warranty information on this product, please refer to the Limited Warranty
Statement found on the website www.paradox.com/terms. The terms and conditions are subject to change
without notice, from time to time, in Paradox’s sole discretion. We invite you to visit our website on a
regular basis for the latest Limited Warranty Statement. Your use of the Paradox product signifies your
acceptance of all warranty terms and conditions. Please ensure that your use of the Paradox product is in
compliance with local, national, and international laws.
© 2014 Paradox Security Systems Ltd. All rights reserved. Specifications may change without prior notice.
US, Canadian and international patents may apply. Paradox Insight™ and Paradox are a trademarks or
registered trademarks of Paradox Security Systems (Bahamas) Ltd. or its affiliates in Canada, the United
States and/or other countries.
Description Section Setting Setting Details Example
1. PIR LED
display
[001] [*] Off
[1] On
PIR LED Off
PIR LED On Default
(1*******)
2. PIR
Sensitivity
[002] [0] Low (Sensitivity level) (002) 000-002
as seen on the TM50
(002)
as seen on the
K641series keypads
[1]
[2] Default
[3]
[4] High (Sensitivity level)
3 Security
Level
[003] [0]
Normal
(Mild environment)
Default
(003) 000-000
as seen on the TM50
(000)
as seen on the
K641series keypads
[1] Medium
[2] High (Harsh
environment)
Voltage input Nominal: 12VDC, range 9-16VDC
Current consumption Max 200 mA without illumination LEDs
330 mA with illumination LEDs lit
PIR Type Quad PIR, Auto pulse
Weight 166g (5.86 OZ)
Dimensions
(H x W x D)
15 cm x 7.5 cm x 5 cm
(6 in x 3 in x 2 in)
Operating temperature -10° C to +40° C (14° F to 104° F)
Compliance EN 50131-2-2 Grade 2 Environmental Class II
Certification Body: Applica Test and Certification


