Parata InspectRx200 Manual

InspectRx200 Operator Guide

Chapter 1. InspectRx200 Operator Guide........................................................................................3
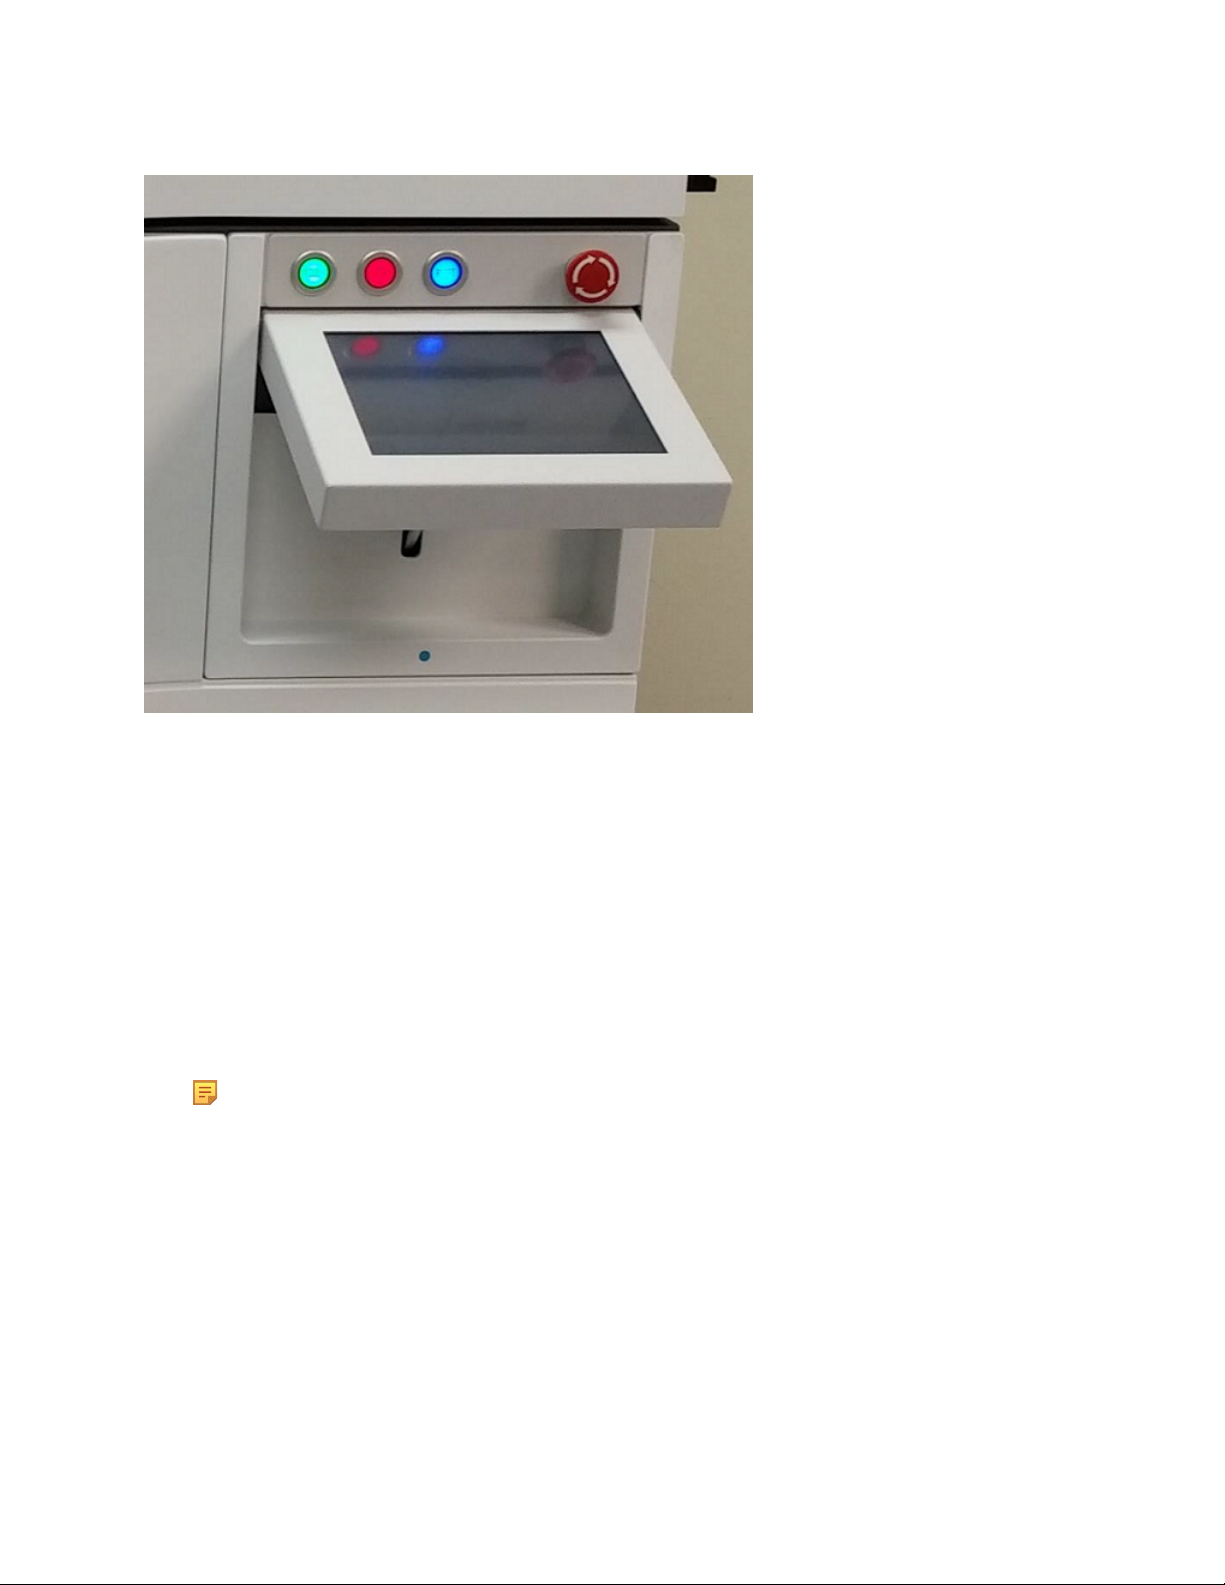
Starting, Stopping, Resetting, and Emergency Stopping the Machine..........................................3
Power Cycle and Restart Procedure...................................................................................... 5
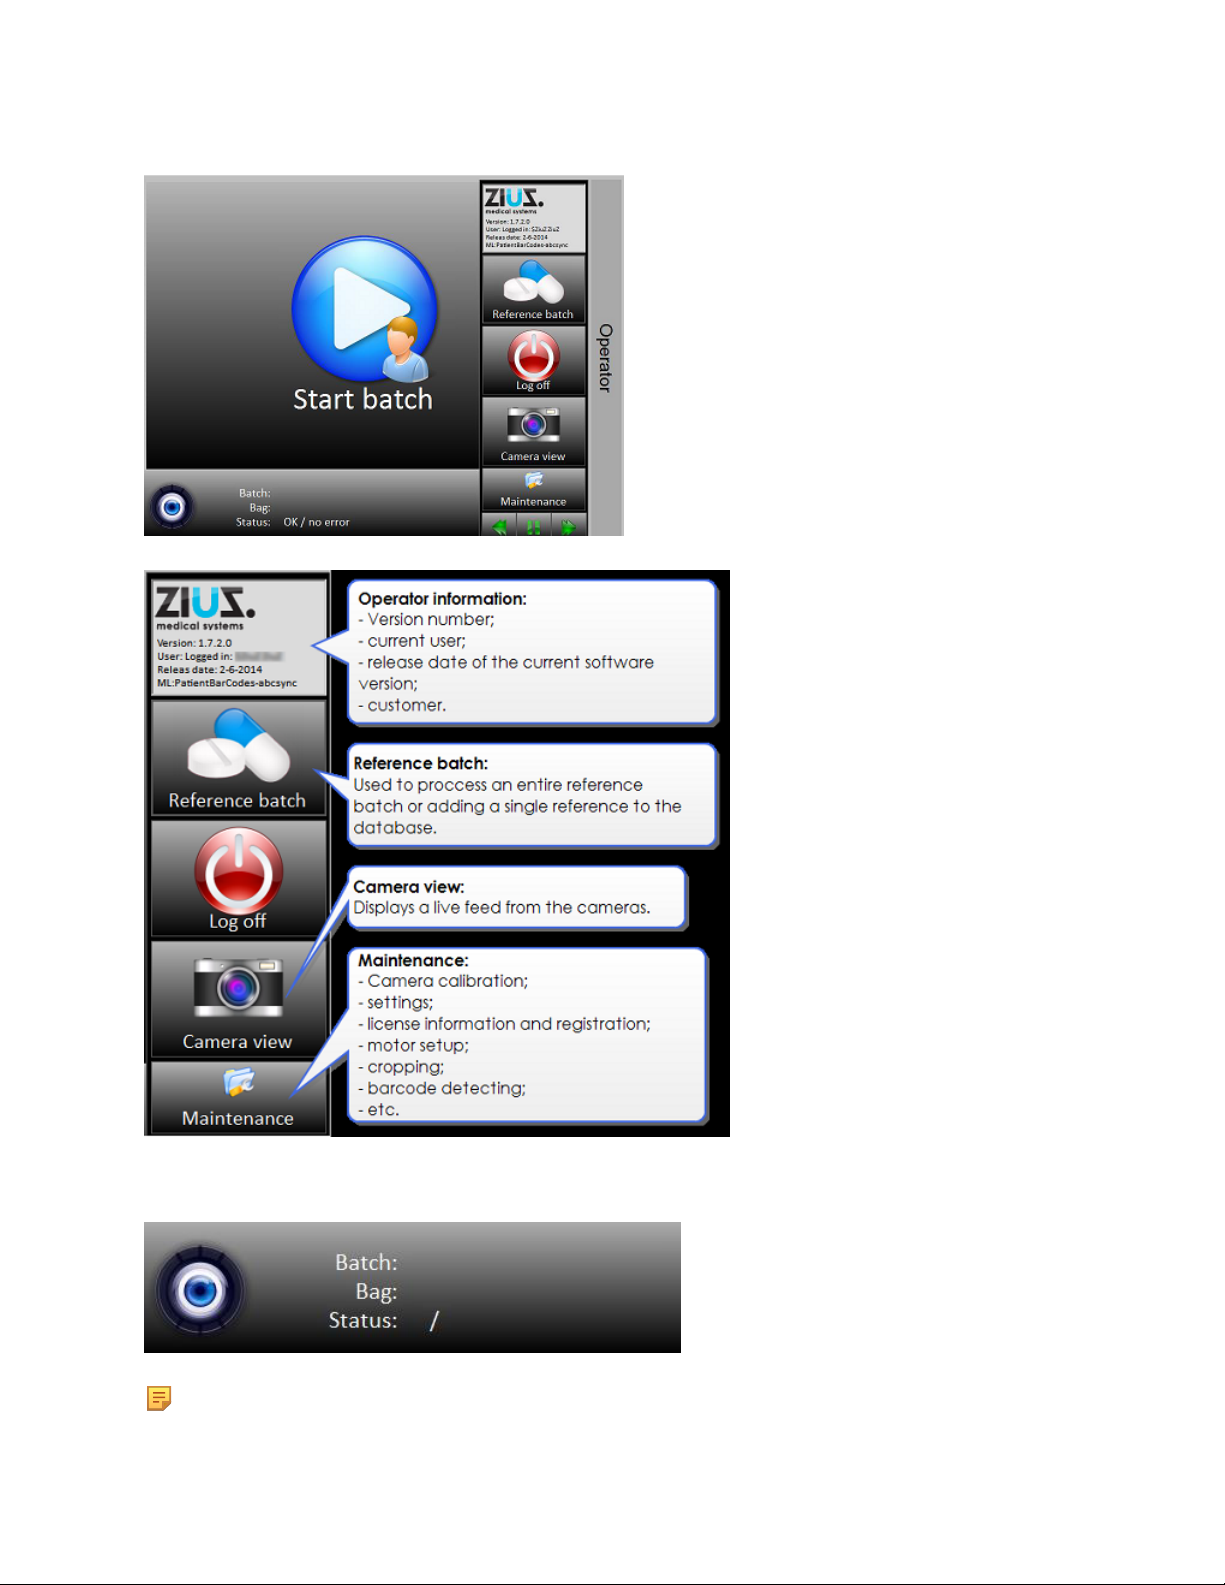
Starting Up, Logging In, and Logging Off................................................................................... 6
Starting, Scanning, and Viewing a Batch....................................................................................10
Adding a Reference Image or Batch...........................................................................................12
Reports..........................................................................................................................................16
Period Report........................................................................................................................18
Facility Report......................................................................................................................19
False Negative Report..........................................................................................................20
Medication Error Report......................................................................................................21
Reference Report..................................................................................................................23
Corrector Report...................................................................................................................24
Medications to Add Report..................................................................................................25
Medication Track Report.....................................................................................................26
User Report.......................................................................................................................... 27
Inspector Idle Time Report..................................................................................................28
Shutting Down the InspectRx......................................................................................................29
Troubleshooting............................................................................................................................29
Cleaning the InspectRx................................................................................................................30
Chapter 2. InspectRx Preventative Maintenance Guide................................................................40
Removing the Main Belt..............................................................................................................40
Installing the Main Belt...............................................................................................................45
Replacing the Infeed Belt............................................................................................................ 45
Service Bulletins & Maintenance................................................................................................46
Belt Alignment and Verification................................................................................................. 50
Camera Settings and Calibration................................................................................................. 50
InspectRx & InspectRx Pro Preventative Maintentance Kit....................................................... 56
Hardware Preventative Maintenance........................................................................................... 57
InspectRx PM Process CheckList................................................................................................58

Chapter 1. InspectRx200 Operator Guide
InspectRx Operator Guide PDF This document provides instructions on how to operate an InspectRx
unit. Click the link for a printable download.
Introduction
This document is intended to guide a user through the process of operating and troubleshooting an
InspectRx200 unit.
Starting, Stopping, Resetting, and Emergency Stopping the
Machine
Four buttons can be found above the touch screen.

InspectRx200 Operator Guide | 1 - InspectRx200 Operator Guide | 4
•Start (green) Button: This button activates the main transport belt of the machine. As with the
red button, do not use this button for normal production. Only use this button for installation,
configuration and error resolving situations.
•Stop (red) Button: This button stops the main transport belt of the machine, and all other
commonly handled operations. Only use this button for installation, configuration and error
resolving situations.
•Reset (blue) Button: this button resets the machine out of an error state. For example, when
the emergency stop button is pressed, because of a situation that required the machine to stop
instantly. Production can only be resumed by removing the error, twisting out the emergency
stop button and resetting the machine, using the blue reset button. A reset may be required in
other situations, and those will be displayed on the touch screen.
Note: While using remote access software for support purposes, it is also possible to reset
the machine using the “R” key on the keyboard.
•Emergency Stop Button: This button is used to stop all operations immediately. For example,
if a bags get jammed in the main transport belt. Use the button when you, a colleague or the
machine is in danger. Release the button by turning it clockwise. Always reset the button after
an emergency stop.
◦To reset the emergency state back to the normal operation mode, perform the following
steps:
1. Use the Blue Machine Reset button.
2. After performing this step, the machine will return to normal operating mode.

InspectRx200 Operator Guide | 1 - InspectRx200 Operator Guide | 5
Power Cycle and Restart Procedure
InspectRx Series Shutdown Procedure:
1. Turn the Corrector Station off
•Close out all open Corrector applications
•Go to Windows menu and select shutdown
2. Turn the Viewer Station off
•Close out all open Viewer applications
•Close out all open remote desktop connections
•Go to Windows menu and select shutdown
3. Turn the Operator off
•Press and release the OPE button on the lower right side of unit
•Press and release the ANA button on the lower right side of unit
**IMPORTANT**‐ Wait until both lighted buttons are no longer illuminated
4. Press the red power button upward to turn the unit off (the power button llumination should be
off)
InspectRx Restart Procedure:
1. Restart the Operator Computer
•Press and release the OPE button on the lower right side of unit
•Press and release the ANA button on the lower right side of unit ** IMPORTANT** -
Wait until both lighted button are no longer illuminated
•Press the red power button below buttons upward to turn off (the power button illumination
should be off)
2. Let InspectRx sit for a two minutes, then
3. Turn the Operator on
•Press the red power button downward on the lower right side of unit to turn on (the button
should illuminate)
•Press the ANA button (button should illuminate)
•Press the OPE button (button should illuminate)
•Wait for unit to boot up and sign in (software should automatically startup after sign in) **
IMPORTANT** ‐Wait for Operator boot‐up before continuing
4. Restart the Viewer
•Close out all open Viewer applications
•Close out of any open remote desktop connections
•Go to Windows menu and select restart
•Wait for unit to reboot
•Open the Viewer Application
5. Restart the Corrector
•Close out all open Corrector applications
•Close out all open Batch Validator applications (if applicable)
•Go to Windows menu and select restart

InspectRx200 Operator Guide | 1 - InspectRx200 Operator Guide | 6
•Wait for reboot and open the Corrector application
Starting Up, Logging In, and Logging Off
Start Up
The Operator screen is visible after a successful startup with the Control tab active.
Complete the steps below to start up the Operator:
1. Turn on the InspectRx by flipping the main power switch on.
2. Press the ANA button to power up the internal Analyzer PC.
3. Press the OPE button to power up the internal Operator PC.
4. Wait for the machine to boot up. The Operator Application, which is used to control the
InspectRx, will start automatically.
5. Upon successful powering-on of the computer, the Operator main screen will automatically
open with the Login window visible.
Log In Overview and Application Rights Levels
All InspectRx Applications are secured by a log-in functionality. When an application is started, a
log in window will appear. Closing this window will close the application. Users log in with a User
Name and Password. When an application is left unattended for a certain amount of time (default= 15
minutes), the application will automatically log the user out.
Three Log in levels are available for the InspectRx applications. The levels are named “Level One,
Level Two, and Level three” Level Three is the Admin level, with access to settings, managing
references and managing users permissions.
Note: New Users are created within the Manager Application. To Add, Modify or Delete Users,
see the INSPECTRX MANAGER (ADMIN) Training Guide. Reports about user activity can also
be generated in the Manager Application. Tracking data is collected for Checking, Validating, and
Correcting.
Application Rights Table
Table 1.
Application Level One Rights Level Two Rights Level Three Rights
Operator Tab “View” not present
No access to ZiuZ menu
“Reference Batch” not
present
“Single Reference” button
not present
No Restrictions

InspectRx200 Operator Guide | 1 - InspectRx200 Operator Guide | 7
Application Level One Rights Level Two Rights Level Three Rights
InspectRx (v1.8) “Maintenance” Menu
inaccessible
“Reference” Menu
inaccessible
“Reference” Menu
inaccessible No Restrictions
Viewer “Edit” Menu not present
(to delete batch and
settings)
“View” Menu: “Save-,
Load-, and Reset Layout-“
not present
“Action” Menu: “Reset
Batch, Reset Double
checked Batch, Reset
Patient, Reset Double
Checked Patient, and
Manage Dispensers” nor
present
“Analyzers” menu not
present
No Restrictions No Restrictions
Corrector “View” Menu: “Save-,
Load-, and Reset Layout”
not present
No Restrictions No Restrictions
Manager No Login to “Manager”
Generating Reports Only
(users can generate
reports without logging in)
No access to “Reference
Manager”
Can Manager Users up to
Level Two
No Restrictions
InspectRx (v1.8)
Reference Manager No Login to “Reference
Manager” No Login to “Reference
Manager” No Restrictions
Database Copy Tool No Login to Database
Copy Tool” No Restrictions No Restrictions
Backup/ Archiver No Login to “Backup/
Archiver” No Restrictions No Restrictions
Log in
All InspectRx Applications are secured by a log in functionality. Only authorized users can make
changes to the system.
Note: New Users are created within the Manager Application. To Add, Modify or Delete Users,
see the INSPECTRX MANAGER (ADMIN) Training Guide. Reports about user activity can also be
generated in the Manager Application. Tracking data is collected for Checking and Correcting.

InspectRx200 Operator Guide | 1 - InspectRx200 Operator Guide | 8
1. Enter your First Name and Last Name.
2. Enter your Password.
3. Select the Submit button.
Note: The Operator will log itself out after 15 minutes of inactivity. This default timeframe
can be changed under the menu “Settings”, by an Administrator with Level three Permissions. It
cannot be completely turned off.
Once logged in, the main interface screen will appear.
At the right, you will see an expandable sidebar containing information about the Operator (version
number, currently logged in user, release date, and customer), Reference batch menu, Log off button,
Camera view menu and the Maintenance menu. Each of these menus will be explained further into
this chapter.

InspectRx200 Operator Guide | 1 - InspectRx200 Operator Guide | 9
The lower status bar displays information related to the currently processed batch.
Note: Certain features may be disabled, depending on your log in permissions.

InspectRx200 Operator Guide | 1 - InspectRx200 Operator Guide | 10
Log Off
Press the Log off button to log the current user out and allow another user to log in.
Starting, Scanning, and Viewing a Batch
Starting a Batch
A production batch is scanned by selecting the Start Batch button.
Scan a New Batch
To scan a new production batch perform the following steps:
1. Feed the initial bag of the batch in between the sponge rollers, making sure that the printed label
side of the bags faces downward and the serrated edge is facing the front of the machine. The
barcode should be the first object on the bag. The batch needs to start with a Header or Footer
Bag.
2. Select Start Batch button on the screen.
3. The bags will “catch” and automatically start moving into the machine.
The barcode of the identification bag is scanned and compared with the output data that is received
from the ATP packaging machine. The following message appears if there is no match between
the barcode on the bag and stored data files, “Output file not found.” The most common reason for

InspectRx200 Operator Guide | 1 - InspectRx200 Operator Guide | 11
this error is the batch is not finished packaging. If this is the case, the order can be manually sent
to the InspectRx, using the ATP Export Tool. Other possibilities include network issues or poor
barcode print quality. Note: The order file will be automatically sent to the InspectRx after the order
is completely dispensed from the ATP. If you need to start processing the order before dispensing is
completed (for a large, multi-spool order, for example) you can manually send the order file to the
InspectRx using the ATP Export Tool.
Production Batch
Once the Batch ID (barcode) is successfully recognized, the bags will automatically move through
the machine. The operator touch-screen will display the first bag and its batch ID. The batch will now
be processed by the InspectRx. This may take up to several minutes, depending on the size of the
batch.
Three images of each bag are taken; a high quality color image and near-infared image of the
medication side and a black and white image of the label side. The total number of bags in the batch
displays and counts down as each bag moves through the machine.
1. When the machine has finished analysing the batch, the following widow will appear.
2. Selecting the Stop Batch button or wait for the window to disappear automatically.
3. The batch has now been processed and is ready to be checked for errors with the Viewer
application.
View a Batch
During processing, press the Camera view button to display a live feed of the top and bottom
cameras. This feature can be used to check if the cameras have been aligned correctly. This feature
works with Level Two or Three access.

InspectRx200 Operator Guide | 1 - InspectRx200 Operator Guide | 12
Adding a Reference Image or Batch
Reference Image Overview
When a production batch is being processed by the machine, The InspectRx takes images of each bag
and then compares the contents of the bag with the corresponding reference images.
The reference image database contains accurate images of each medication. With the use of an
advanced algorithm, the system will analyze on 13 characteristics such as surface area, shape, size,
contour and color. This information is needed to identify the medication.

InspectRx200 Operator Guide | 1 - InspectRx200 Operator Guide | 13
Occasionally, the InspectRx won’t have the reference image needed to check a medication. This
happens in cases when a medication’s size, shape, color is changed by the manufacturer, or when a
new medication is being dispensed.
New individual drug reference images or reference batches can easily be added to the reference
image database.
Note: It is possible to add new and existing medications to the database directly through
production. This process is explained in the Reference Manager section of the Manager (ADMIN)
course.
Scan a Manual Reference Image
A manual reference or new individual drug reference image allows the user the ability to add a single
reference to the database. This feature is helpful when new medication has been introduced.
To add an individual reference image to the database,
1. Select Reference Batch/ Manual Reference on the Operator Menu.

InspectRx200 Operator Guide | 1 - InspectRx200 Operator Guide | 14
Note: Each medication needs to be placed in an empty individual bag. This means each
reference image bag may only contain one piece of medication.
2. Place the bag containing the medication under the camera, with the white side facing down, (no
text on the bag) and the barcode on the left side.
3. Fill in the required information: Drug ID/ NDC/ DIN, Primary Medication Name, Secondary
Medication Name, Manufacturer and Fraction. Default fraction is “1”, which indicates a whole
pill. Choose the option for pill sizes <1.
4. Select Take Reference Picture.
5. A screen will display with the message: Picture Successfully Taken! Go to the Manager to
activate the reference.
6. Select OK.
7. Go to Manager (ADMIN) to activate the reference image and choose a Mugshot (best image to
display on Viewer screen)
Scan a Reference Batch
Note: During you initial installation, a reference batch will be created and scanned to start your
reference image database.

InspectRx200 Operator Guide | 1 - InspectRx200 Operator Guide | 15
Your reference batch should include both your canister and tray medications. Additional medications
can be added using production batch images and the Reference Manager feature, or can be
individually scanned in “on the fly”, as detailed above.
Note: Each medication needs to be placed in an individual bag. This means each bag can contain
one single piece of medication.
To scan a reference batch:
1. Select Reference Batch/ Reference Batch on the Operator Screen.
2. Feed the batch through the machine with the printed side down, the serrated side facing front,
and the barcode entering first.
3. The InspectRx will take images of the entire batch, and will save the images as a reference batch
within the Manager Application.
4. Go to Manager (ADMIN) to activate the reference image and choose a Mugshot (best image to
display on Viewer screen.
5. See the Manager (ADMIN) course for more information about the steps in this process.
Maintenance Menu
The Maintenance Menu is used for installation and configuration purposes. Please contact the Parata
Technical Assistance Center for help with Camera Calibration, Settings, Motor Setup, Cropping,
Barcode Detecting, and Troubleshooting.

InspectRx200 Operator Guide | 1 - InspectRx200 Operator Guide | 16
Reports
Reports are located on the Analyzer Computer within the Operator Unit. Users can access this at the
Viewer Station using remote access. There is an icon on the desktop that when selected will remote
into the selected computer.
By Selecting the Manager icon, the software will open and a user will have access to the available
reports.

InspectRx200 Operator Guide | 1 - InspectRx200 Operator Guide | 17
Report Summary
•Period Report
•Facility Report
•False Negative Report
•Medication Error Report
•Reference Report
•Corrector Report
•Medication To‐Add Report
•Medication Tracking Report
•User Report
•Inspect Idle Time Report

InspectRx200 Operator Guide | 1 - InspectRx200 Operator Guide | 18
Period Report
Features:
•Period report
•Report itemized by Batch
Overview:
This report provides mostly quality metrics respective of each batch.
Report information includes:
•Batch ID / Facility
•Total Bags and Bags / Batch
•AP/AF (Bags automatically Passed and Failed by Inspect)
•MP/MF (Bags Manually Passed and Failed by Viewer)
•% bags failed / passed
•% False Negatives
•% Bags checked
•Leadtime (Start of Inspect to Correction Complete)

InspectRx200 Operator Guide | 1 - InspectRx200 Operator Guide | 19
Use/Benefit:
•High level QA performance of ATP/Inspect
•Identify certain chronic Batch issues
•Lead Time Estimates of Inspect Batch Start and Stop Period Report F
Facility Report
Features:
•Period report
•Report itemized Batches by Facility
Overview:
Report is same as period report but filtering by Facility.
Use/Benefit:
•Same as Period Report
•See QA and Production Trends per Facility F

InspectRx200 Operator Guide | 1 - InspectRx200 Operator Guide | 20
False Negative Report
Features:
•Period report
•Report itemized by Medication Dispensed
Overview:
This report shows the overview of each medication and how many times the analyzer has matched or
unmatched the reference image
Information found in the report includes:
Table of contents
Other Parata Laboratory Equipment manuals
Popular Laboratory Equipment manuals by other brands

ThermoFisher Scientific
ThermoFisher Scientific QuantStudio Series user guide

new brunswick
new brunswick innova 2000 operating manual

Sorvall
Sorvall Legend T instruction manual

TPP
TPP Turbo-Fix operating instructions

Sheldon
Sheldon 2015 Installation and operation manual

NT-MDT
NT-MDT NTEGRA Spectra Probe NanoLaboratory instruction manual

Kendro
Kendro HERAsafe KS Series Service instructions

Lumen Dynamics Group
Lumen Dynamics Group OmniCure R2000 user guide

fine bubble
fine bubble MK1 NANO BUBBLER Operation and maintenance manual

Metrohm
Metrohm 761 Compact IC Instructions for use

Okolab
Okolab H201-UP user manual

TTI
TTI LISN 1600 instruction manual