Parrot MKi9000 User manual

Quick start guide
Guide d’utilisation rapide
Guía de instalación rápida
Bedienungsanleitung
Guida all’uso
Gebruikershandleiding
Manual do utilizador
PARROT
MKi9000

* TERMS & CONDITIONS: WWW.PARROT.COM
(GAGNEZ DES MUSIQUES AU FORMAT MP3
ET DES PRODUITS SANS FIL PARROT)
W
W
W
.
P
A
R
R
O
T
.
C
O
M
WIN
MP3
MUSIC FILES
AND PARROT
WIRELESS
PRODUCTS
*

www.parrot.com
Parrot MKi9000
Installation diagrams........................
English.............................................
Français...........................................
Español...........................................
Deutsch ..........................................
Italiano ............................................
Nederlands .....................................
Português........................................
General Information.........................
p.04
p.09
p.15
p.23
p.31
p.39
p.47
p.55
p.63

- Car stereo with an ISO connector
- Autoradio avec connecteur ISO
- Autorradio con conector ISO
- Autoradio mit ISO-Anschluss
- Autoradio con connettore ISO
- Autoradio met ISO-connector
- Auto-rádio com conector ISO
www.parrot.com
• A: 12V ignition (orange)
• B: 12V constant power supply (red)
• C: Ground
• D: Connection to the vehicle’s power supply
• E : Connection to the vehicle’s speakers
1. Rear right speaker (purple / purple-black)
2. Front right speaker (grey / grey-black)
3. Front left speaker (white / white-black)
4. Rear left speaker (green / green-black)
• F : This wiring is not used.
4

- Car stereo with Line In input
- Autoradio avec entrées Line In
- Autorradio con entradas Line In
- Autoradio mit Leitungseingang (Line In)
- Autoradio con ingresso Line In
- Autoradio met Line-In ingangen
- Auto-rádio com entradas Line In
- Autoradio con connettore ISO
- Autoradio met ISO-connector
- Auto-rádio com conector ISO
www.parrot.com
• A : 12V ignition (orange)
• B : 12V constant power supply (red)
• C : Ground
• D : Connection to the vehicle’s power supply
• E : Line-out 1
1 : Line 1 + : white
2 : Line 1 - : brown
• F : Line-out 2
1 : Line 2 + : red
2 : Line 2 -: black
• G : This wiring is not used
5

- Inserting the remote control battery
- Insertion de la pile de la télécommande
- Inserción de la pila del mando
- Einführen der Batterie in die Fernbedienung
- Inserimento della pila del telecomando
- De batterij van de afstandsbediening inzetten
- Introdução da pilha no controlo remoto
- Installing the remote control on the dashboard
- Installation de la télécommande sur le tableau de bord
- Instalación del mando sobre el salpicadero
- Anbringen der Fernbedienung am Armaturenbrett
- Installazione del telecomando sul cruscotto
- De afstandsbediening op het dashboard bevestigen
- Instalação do controlo remoto no painel de instrumentos
6

clic
- Do not install the remote
control on the outside of the
steering wheel
- N’installez pas la
télécommande sur le côté
extérieur du volant
- No instale el mando en el lado
exterior del volante
- Anbringen der Fernbedienung
am Armaturenbrett
- Non installare il telecomando
sul lato esterno del volante
- Installeer de afstandsbediening
niet op de buitenzijde van het
stuur
- Não instale o controlo remoto
na parte exterior do volante
7

8

This simplified guide of the Parrot MKi9000 gives you the
main instructions to easily use this product. For further
information, consult our website www.parrot.com.
Contents
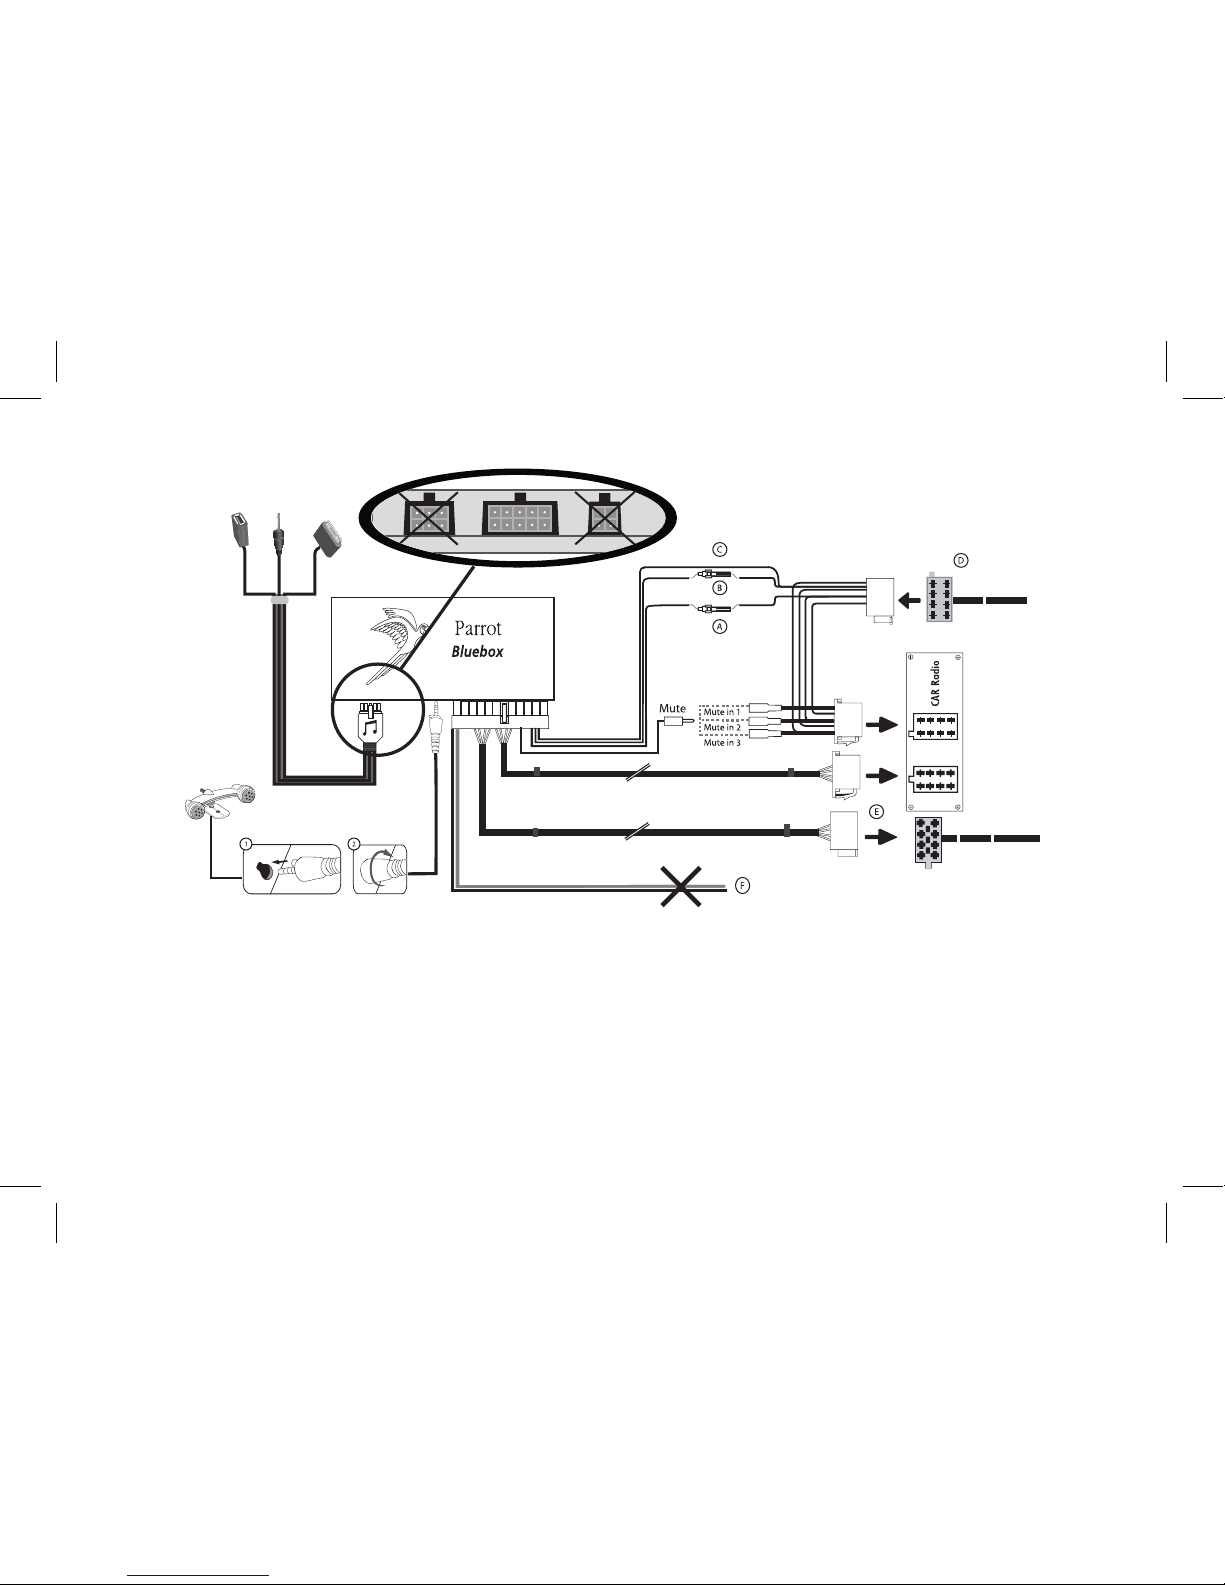
• Prior to xing the hands-free kit’s different components
inside the car, connect the installation cables, control
keypad and double microphone to the electronic
control unit.
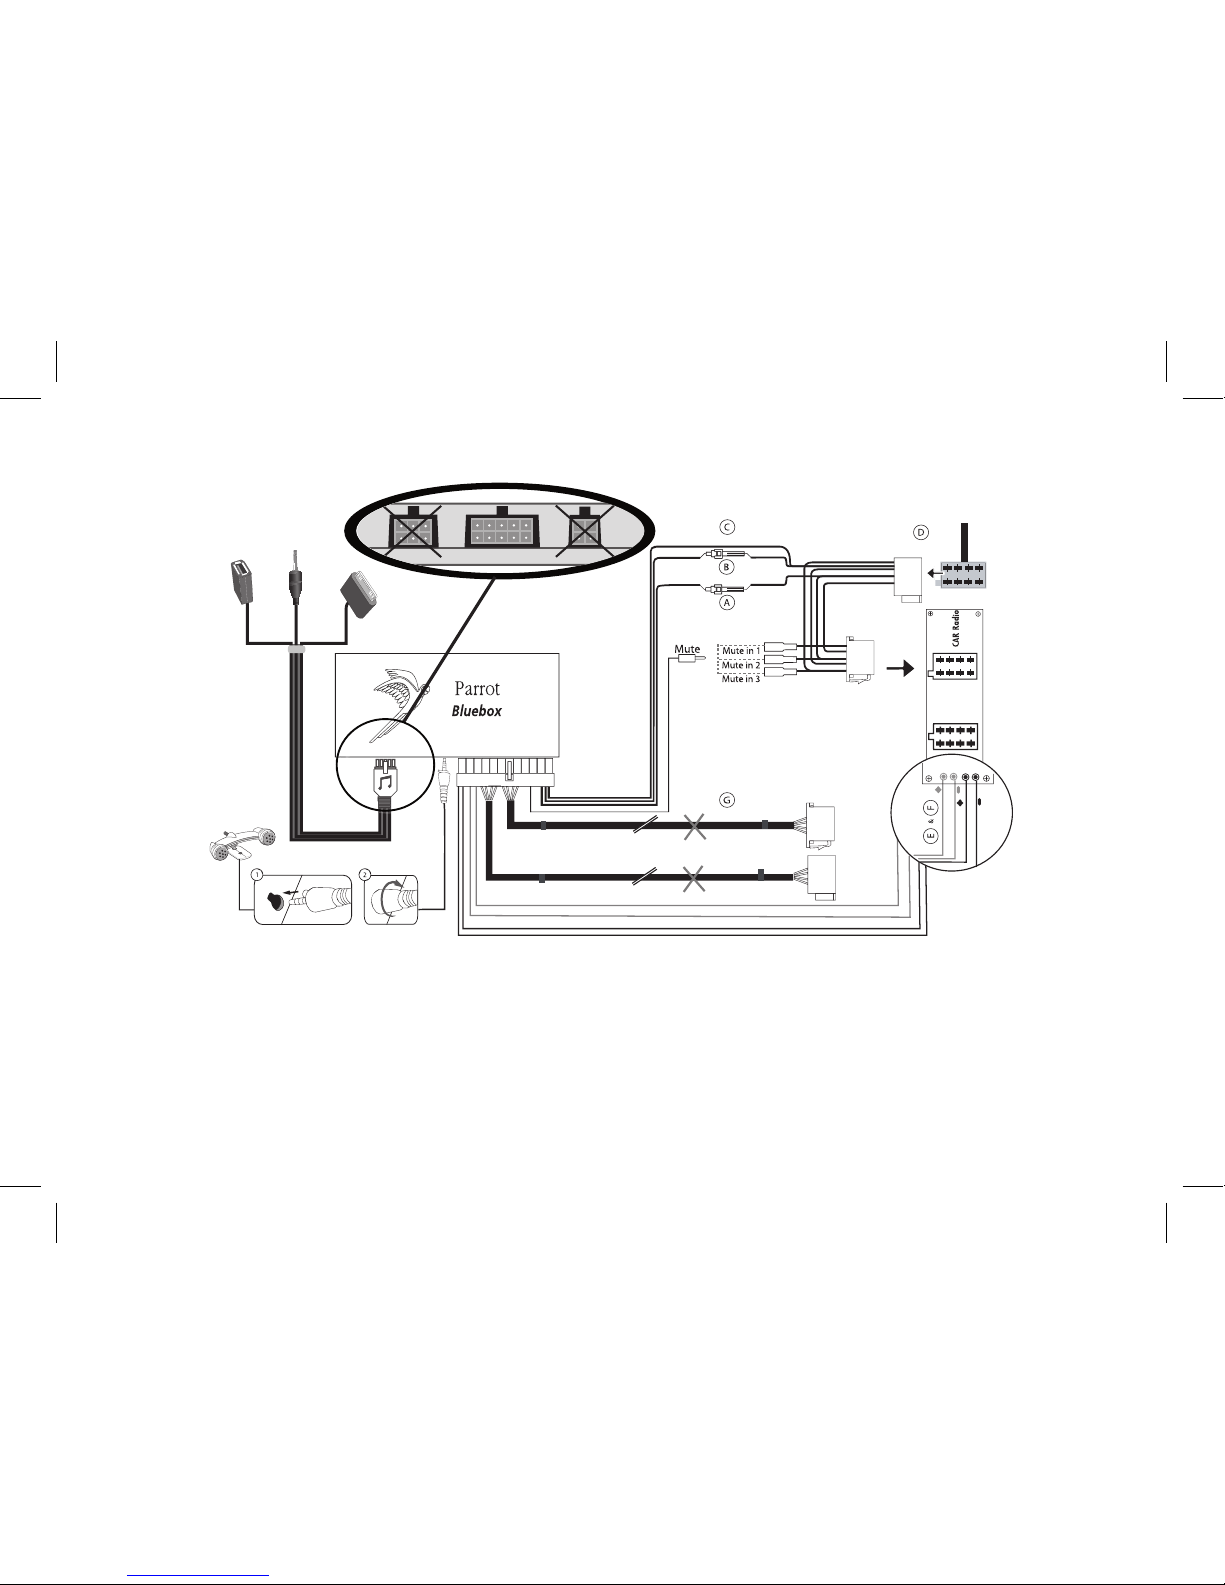
• The cables supplied with the kit feature ISO connectors
and two pairs of line-out jacks. The line-out jacks can be
used if your audio system features this option (use of an
amplier). Several set-ups are therefore possible
depending on the type of car stereo and your vehicle.
• The mute function is used to cut the sound of your car
stereo to enable a phone call. The choice of the mute-in
jack depends on your car stereo’s conguration.
English
English
The availability of some functionality only depends
on your mobile phone.
►Refer to our website www.parrot.com, in the
Compatibility section, for further information.
Installing the Parrot MKi9000
Installing the Parrot MKi9000..............................................
Car stereo with an ISO connector................................
Car stereo with Line-In jacks.......................................
Car stereo without ISO connectors..............................
Installing the kit’s power cable.....................................
Installing the audio connectors....................................
Installing the electronic box.........................................
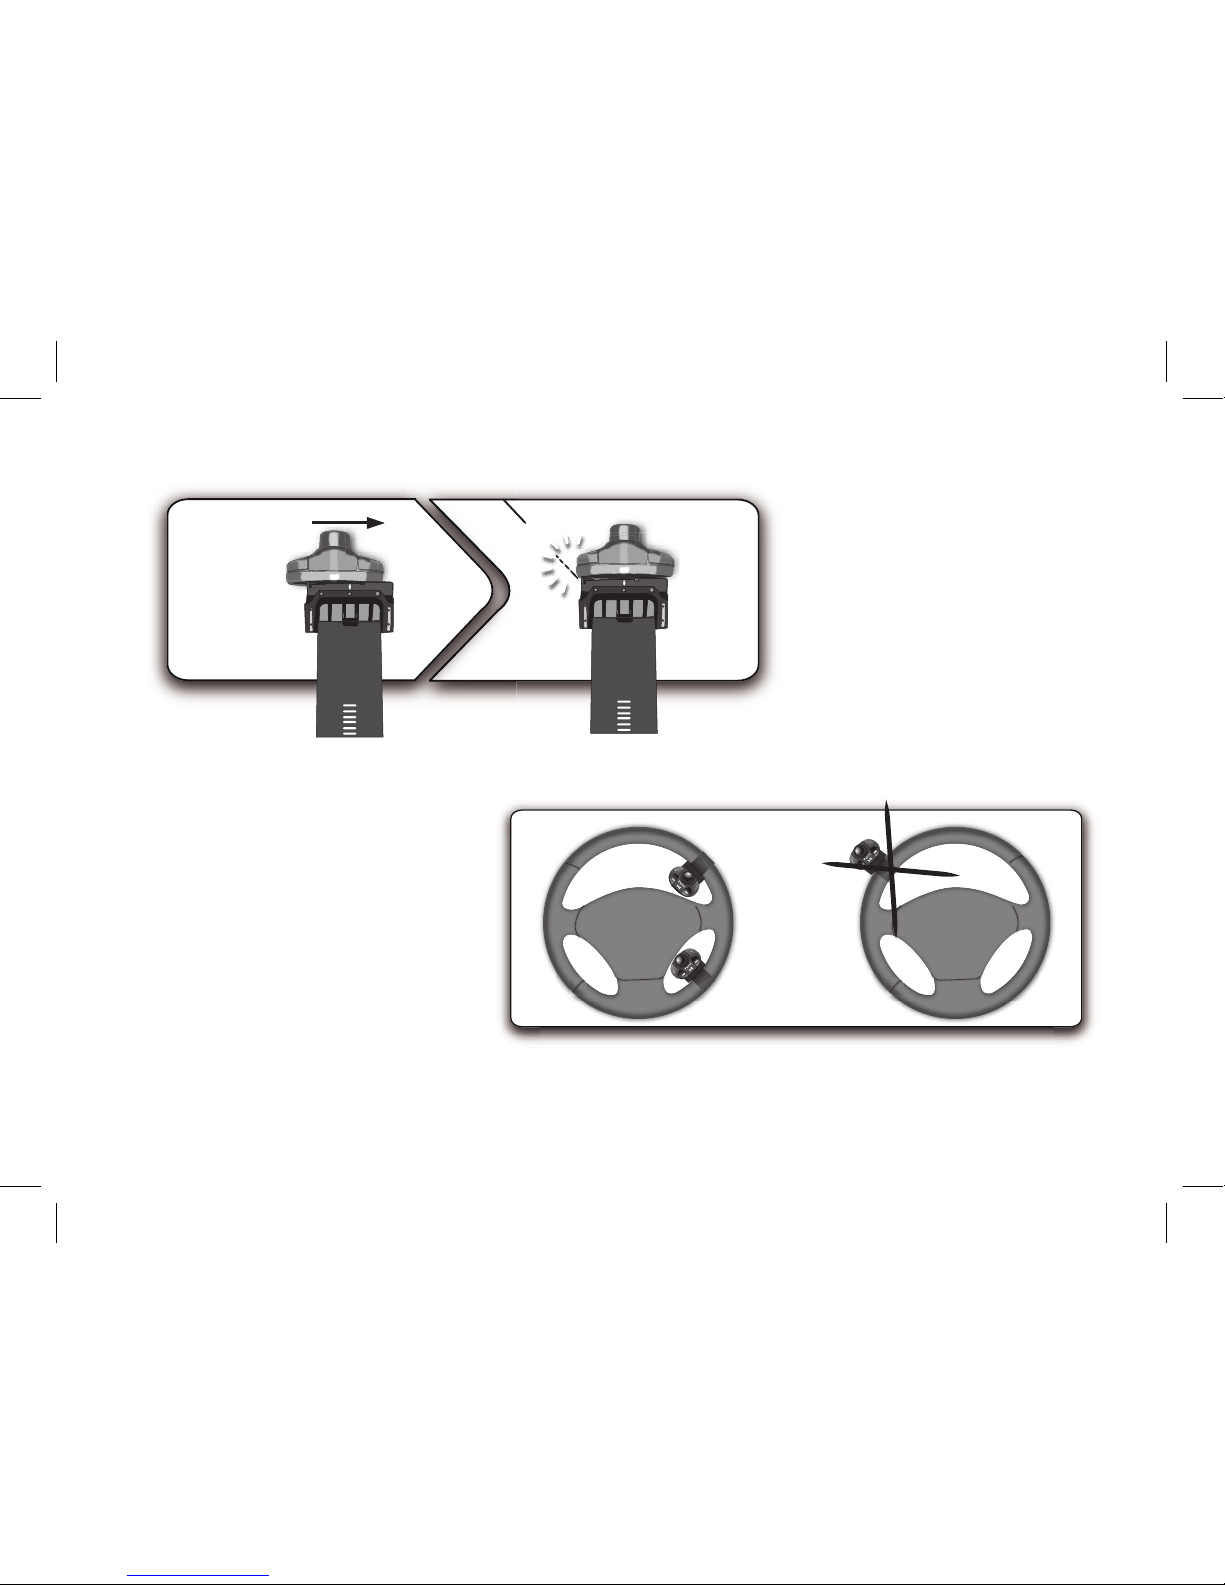
Installing the remote control........................................
Installing the microphone.............................................
Using the Parrot MKi9000 for the 1st time.........................
Navigating through the menus.....................................
Pairing a phone to the Parrot MKi9000........................
Using the telephony function..............................................
Synchronising the phonebook.....................................
Commands..................................................................
Receiving a calll...........................................................
Making a call................................................................
Making a call via voice recognition..............................
Using the magic words................................................
Using the Music function.....................................................
Selecting a music source............................................
Commands...................................................................
We would advise our customers to have the Parrot
MKi9000 fitted by a professional.
9
09
10
10
10
10
10
11
11
11
11
11
11
12
12
12
12
13
13
13
14
14
14

10
On some vehicles, there is no ignition +12V on the
vehicle’s connectors. You must therefore connect
the orange power supply wire to the fuse box or
another ignition power source.
Car stereo with an ISO connector
1. Connect the male connectors of the hands-free kit to the
car stereo.
2. Join the vehicle’s audio and power supply cables to the
female connectors of the Parrot MKi9000.
3. On the installation cable, connect the free yellow wire to
one of the audio system’s corresponding mute-in jacks if
available (mute in 1, mute in 2 or mute in 3).
Car stereo with line-in jacks
• Use this type of connection by wiring a line-out jack
(brown & white wire or red & black wire) to your car
stereo’s line-in jack.
• Using the two pairs of line-out jacks will enable you to
take advantage of the streaming audio function in stereo
over your vehicle’s speakers.
• On the installation cable, connect the free yellow wire to
one of the audio system’s corresponding mute-in jacks if
available (mute in 1, mute in 2 or mute in 3).
Car stereo without ISO connectors
To simplify the wiring procedure, you will need to purchase
an ISO adapter cable. Refer to the range of ISO adapters on
our website: www.parrot.com.
Installing the kit’s power cable
• Refer to your car stereo’s wiring diagram.
• The red wire of the kit’s cable must correspond to the
constant +12V supply, the orange wire to the ignition +12V
and the black wire to ground.
• Check that the orange wire is not connected to the
constant +12V supply, as you could run down the vehicle’s
battery.
• On some vehicles, the red and orange power supply
wires may need to be reversed. This can easily be done
by reversing the two fuse holders on the Parrot MKi9000
installation cable.
Installing the audio connectors
• Connect the music cable to the electronic box and
place the USB / iPod / Jack connectors into the glove
box, the central console or the parcel tray depending on
the configuration of your dashboard.
• To protect the connectors from dust, use the provided
protection cap.

Installing the electronic box
Avoid installing the electronic box:
- near heating or air-conditioning system;
- on a spot directly exposed to sunlight;
- behind metal walls.
Installing the remote control
• Choose the place for the remote control inside your
vehicle. We would advise you to fit it in the centre of the
dashboard.
• If you want to place the remote control on the steering
wheel, make sure it is securely attached, so it does
not move when you are driving. Do not install the
remote control on the outside of the steering wheel, so
that it does not get in the way when driving. Refer to the
diagrams p.7.
• If you want to place the remote control on the dashboard,
stick the double-sided tape located on the at side of the
bracket to x it against the dashboard. You can then insert
the remote onto the bracket. Refer to the diagrams p.6.
Installing the microphone
Parrots microphones are directional and need to be
pointed towards the user to pick up clear speech.
Where possible the microphone should be installed near the
front roof light cluster in the centre of the vehicle with a clear
path to the user.
Navigating through the menus
• Press the central jog wheel to access the menus.
> The kit says the name of the current menu.
• Browse through the menus by turning the wheel and
confirm with the green button or by pressing the scroll
wheel.
• To exit the menu, press the red button or wait a
few seconds.
Pairing a phone to the Parrot MKi9000
Prior to using your Parrot MKi9000 with your phone for the
very first time, you must initially pair both devices.
1. From your phone, search for Bluetooth®peripherals
(refer to your phone’s user guide for more information).
2. Select «MKi9000» in the list.
3. Enter «0000» on your phone when prompted.
4. Press the green button to accept the pairing
> The Parrot MKi9000 says «Pairing successful» .
Using the PARROT MKi9000 for the 1st time
Depending on the model of your phone, step 3 and
step 4 may be inverted.
11

Before using your Parrot MKi9000 telephony function, you
first have to connect both devices.
►Refer to the Pairing a phone to the Parrot MKi9000
section for more information.
Commands
Synchronising the phonebook
With some Bluetooth phones, the phonebook is automatically
synchronized in the kit’s memory. Only the contacts stored in
the phone memory are synchronized.
If your phone doesn’t support automatic synchronization,
you can also use the Object Push function of your phone to
send contacts from your mobile to the car kit via Bluetooth.
To do so:
1. Press the jog wheel and select Settings > Receive
contacts.
> The kit says « Waiting for contact ».
2. Refer to your phones’ user guide for more information
about sending contacts via Object Push.
Receiving a call
An incoming call is indicated by a ringtone.
• If you want to answer the call, press the green button.
Then press the red button to end the call.
• If you want to refuse this call, press the red button.
• If the magic words are activated, you can use the voice
recognition feature to pick up and reject a call.
► Refer to the Using the magic words section.
Using the telephony function
12
The name of the caller is announced if his details
are known by the kit.
ButtonFunctions
Short press :
- Answer an incoming call
- Launch voice recognition mode
- Transfer the call on the phone
(discreet mode)
- Exit discreet mode
- Answer a second incoming call /
toggle between two calls
Long press : Call the last dialled number
- Reject an incoming call (or a second
incoming call)
- Hang up
Adjust the communication volume
Short press : Use the DTMF function
(to manage interactive vocal servers)
Mute / unmute the microphone (secret mode)

Making a call
• If the contact you want to call is in the phonebook of the
phone connected to the Parrot MKi9000:
1. Press the jog wheel to enter the main menu and
select Phonebook.
> You access the phonebook of the connected phone.
2. Select a letter and push the jog wheel;
> Once the contact chosen:
- Press the green key to call this contact;
- or use the jog wheel to choose between different
numbers of the same contact.
• If the contact you want to call is not in the phonebook
of the phone connected to the Parrot MKi9000, stop your
vehicle in a safe location and use your phone to make
the call.
Making a call via voice recognition
1. Press the green button to launch the voice
recognition feature.
> A beep is emitted.
2. Say the « Call » keyword and the name of the contact
you want to call.
> The call is automatically launched if the voice tag is
correctly understood. If it is not the case, a confirmation
message is asked by the kit.
3. Conrm by saying « Yes » or « Call ».
> The call is initiated.
Using the magic words
To use the magic words, you must activate them.
To do so:
1. Press the jog wheel and select Settings > Magic words.
2. Press the jog wheel to activate/deactivate the
magic words.
• The magic word «Accept» allows you to accept an
incoming call.
Bob!
Call Bob!
Call Bob at home!
Call Bob office!
Bob mobile!
13
You can make a call via voice recognition using se-
veral combinations of keywords. For example, « call
‘Bob’» or simply « ‘Bob’ ». You can also associate
the type of number you want to call: «call ‘Bob’ at
home», «’Bob’ home », etc.

• The magic word «Refuse» allows you to reject an
incoming call.
Selecting a music source
• Use the USB, Jack or iPod connectors to connect the
Parrot MKi9000 to your audio player / iPod / USB stick.
• Press the Play button to launch the music function.
• To change the music source, press the jog wheel to access
the source menu and select it in the following order :
- iPod ;
- USB peripheral ;
- Audio player connected via Bluetooth ;
- Audio player connected via Line In.
Commands
Using the Music function
The Next/Previous tracks functions are not availa-
ble if the Parrot MKi9000 is connected to the audio
player via the jack/jack cable.
Press the Play button during 2 seconds to activate
/ deactivate the Virtual Bass effect.
14
Button Functions
Short press:
- Start music mode
- Pause / resume playback
Long press: Activate the Virtual Bass effect
Short press: Go back to the beginning
of the track / get to the previous track
Long press: Fast rewind
Short press: Go to the next track
Long press: Fast forward
Adjust the volume

L’utilisation de certaines fonctionnalités dépend
uniquement de votre téléphone.
► Consultez notre site web www.parrot.com,
section Compatibilité pour plus d’informations.
Installer le Parrot MKi9000..................................................
Autoradio avec connecteur ISO..................................
Autoradio avec entrées Line In....................................
Autoradio sans connecteurs ISO.................................
Installation du câble d’alimentation du kit...................
Installation des connecteurs audio..............................
Installation du boitier électronique...............................
Installation de la télécommande..................................
Installation du double microphone...............................
Utiliser le Parrot MKi9000 pour la 1ère fois........................
Naviguer dans les menus.............................................
Jumeler un téléphone au Parrot MKi9000....................
Utiliser la fonction téléphonie.............................................
Synchroniser le répertoire du téléphone......................
Commandes................................................................
Recevoir un appel.........................................................
Emettre un appel..........................................................
Emettre un appel par reconnaissance vocale..............
Utiliser les mots magiques...........................................
Utiliser la fonction Musique................................................
Sélectionner une source audio....................................
Commandes.................................................................
15
16
16
16
16
17
17
17
17
17
17
17
18
18
19
19
19
20
20
21
21
21
15
Ce guide simplifié du Parrot MKi9000 vous donne les
instructions principales qui vous permettront d’utiliser
facilement cet appareil. Pour plus d’informations, consultez
notre site web www.parrot.com.
Sommaire
• Avant de xer les différents éléments du kit mains-libres
dans l’habitacle, commencez par connecter les différents
câbles sur le boîtier électronique. Retirez auparavant les
connecteurs d’origine du système audio de votre véhicule.
• Les câbles fournis sont équipés de connecteurs ISO ainsi
que de deux sorties Line. Les sorties Line peuvent être
utilisées si votre système audio possède cette option.
Plusieurs montages sont donc possibles selon le type de
votre autoradio et de votre véhicule.
• La fonction Mute permet d’interrompre le son de votre
autoradio pour laisser place à la communication. Le choix
de l’entrée Mute dépend de la conguration de
votre autoradio.
Français
Installer le Parrot MKi9000
Nous vous recommandons de faire appel à un
professionnel pour l’installation du Parrot MKi9000.

Sur certains véhicules, il n’y a pas de +12V après
contact sur les connecteurs du véhicule. Il est alors
nécessaire de brancher le fil d’alimentation orange
sur la boite à fusible ou sur une autre source
d’alimentation après contact.
16
Autoradio avec connecteur ISO
1. Branchez les connecteurs mâles du kit mains-libres
à l’autoradio.
2. Reliez les faisceaux audio et alimentation du véhicule aux
connecteurs femelles du Parrot MKi9000.
3. Sur le câble d’installation, reliez le l jaune libre à l’une des
entrées mute correspondante du système audio s’il en est
équipé (mute in1, mute in2 ou mute in3).
Autoradio avec entrées Line In
• Utilisez ce type de connexion en reliant une sortie « Line »
(ls marron et blanc ou ls rouge et noir) sur l’entrée
« Line » de votre système audio.
• L’utilisation des deux paires de sorties « Line » permet de
bénécier de la fonction Streaming Audio en stéréo sur les
haut-parleurs de votre véhicule.
• Sur le câble d’installation, reliez le l jaune libre à l’une des
entrées mute correspondante du système audio s’il en est
équipé (mute in1, mute in2 ou mute in3).
Autoradio sans connecteurs « ISO »
Afin de faciliter le montage, vous devez vous procurer un
câble adaptateur ISO. Consultez la gamme d’adaptateur ISO
sur notre site internet : www.parrot.com.
Installation du câble d’alimentation du kit
• Consultez le schéma électrique de votre autoradio.
• Le l rouge du câble du kit doit correspondre au +12V
permanent, le l orange au 12V après-contact et le l noir
à la masse.
• Vériez que votre l orange n’est pas connecté au 12V
permanent, vous risqueriez de décharger la batterie du
véhicule.
• Sur certains véhicules, il est nécessaire d’inverser les ls
rouge et orange d’alimentation. Cette opération s’effectue
simplement en inversant les deux portes fusibles situés sur
le câble d’installation du Parrot MKi9000.

Installation des connecteurs audio
• Reliez les connecteurs audio au boitier électronique et
installez les connecteurs audio (USB / iPod/ Jack) dans
la boîte à gants, la console centrale ou le vide poche en
fonction de la configuration de votre tableau de bord.
• Utilisez le bouchon de protection fourni.
Installation du boitier électronique
Evitez d’installer le boîtier :
- près du chauffage ou de la climatisation
- à un endroit exposé au soleil
- derrière des parois métalliques.
Installation de la télécommande
• Choisissez l’emplacement de la télécommande dans
l’habitacle de votre véhicule. Nous vous conseillons de le
positionner au centre de votre tableau de bord ou proche
de vous. Consultez les schémas p.7.
• Si vous la placez sur le volant, veillez à ce qu’elle soit
fermement attachée an qu’elle ne bouge pas durant votre
conduite. Ne l’installez pas du côté extérieur du volant an
de ne pas vous gêner lors de la conduite. Consultez les
schémas p.6.
• Si vous utilisez le second support, utilisez l’adhésif double
face situé au dos de celui-ci an de le coller sur le tableau
de bord. Vous pouvez ensuite insérer la télécommande sur
ce support.
Installation du double microphone
Le double microphone doit être dirigé vers le conducteur
et installé de préférence entre le pare-soleil et le rétroviseur
central.
Naviguer dans les menus
• Appuyez sur la molette centrale pour accéder aux menus.
> Le kit énonce le nom du menu atteint.
• Naviguez dans les menus en tournant la molette, et validez
avec le bouton vert ou en appuyant sur la molette.
• Pour sortir du menu, appuyez sur le bouton rouge ou
attendez quelques secondes.
Jumeler un téléphone au Parrot MKi9000
Si vous utilisez votre téléphone avec le Parrot MKi9000 pour
la 1ère fois, vous devez effectuer un jumelage des deux
appareils : lorsque les deux appareils se seront détectés
mutuellement, il ne sera plus nécessaire de procéder à cette
Utiliser le PARROT MKi9000 pour la 1ère fois
17

opération. Pour cela :
1. Depuis votre téléphone, lancez une recherche de péri-
phériques Bluetooth®. Consultez la notice de votre télé-
phone pour plus d’informations.
> La liste des périphériques Bluetooth s’afche.
2. Une fois la recherche terminée, sélectionnez
« Parrot MKi9000 ».
3. Entrez « 0000 » lorsque le code PIN vous est demandé.
> Un prompt vocal vous demande de confirmer le
jumelage.
4. Appuyez sur la touche verte pour accepter le jumelage.
> Le Parrot MKi9000 annonce « Jumelage réussi ».
Avant d’utiliser la fonction téléphonie de votre Parrot
MKi9000, vous devez tout d’abord connecter votre
téléphone/PDA à ce dernier.
►Consultez la section Jumeler un téléphone au Parrot
MKi9000 pour plus d’informations.
Synchroniser le répertoire du téléphone
Avec certains téléphones Bluetooth, le répertoire du télé-
phone est automatiquement synchronisé dans la mémoire
du kit. Seuls les contacts enregistrés dans la mémoire du
téléphone se synchronisent.
Si votre téléphone ne supporte pas la synchronisation
automatique, vous pouvez aussi utiliser la fonctionnalité
Object Push de votre téléphone an d’envoyer des contacts
de votre téléphone vers le Parrot MKi9000 par Bluetooth.
Pour cela :
1. Appuyez sur la molette et sélectionnez Préférences >
Recevoir contacts.
2. Consultez la notice de votre téléphone pour connaître la
procédure d’envoi de contacts par Object Push.
Utiliser la fonction téléphonie
Selon le modèle de votre téléphone, les étapes 3 et
4 peuvent être inversées.
18

Commandes
Recevoir un appel
Un appel entrant est indiqué par une sonnerie.
• Si vous souhaitez accepter cet appel, appuyez sur la
touche verte. Appuyez ensuite sur la touche rouge pour
terminer l’appel.
• Si vous souhaitez refuser cet appel, appuyez sur la
touche rouge.
• Si vous avez activé les mots magiques, vous pouvez
utiliser les commandes vocales pour décrocher ou
rejeter un appel entrant.
► Consultez la section Utiliser les mots magiques pour
plus d’informations.
Emettre un appel
• Si le contact que vous souhaitez appeler se trouve dans le
répertoire du téléphone connecté au Parrot MKi9000:
1. Appuyez sur la molette et sélectionnez Répertoire.
2. Sélectionnez une lettre et appuyez sur la molette.
> Une fois le contact choisi :
- Appuyez sur le bouton vert pour lancer l’appel vers le
numéro par défaut.
- Utilisez éventuellement la molette pour choisir parmi
les différents numéros du contact.
• Si le contact que vous souhaitez appeler ne se trouve
pas dans le répertoire du téléphone connecté au Parrot
MKi9000, arrêtez votre véhicule à un emplacement appro-
prié, puis lancez l’appel à partir de votre téléphone.
19
Le nom du contact est annoncé si le numéro de
ce contact fait partie du répertoire du téléphone
connecté au Parrot MKi9000.
Bouton Fonctions
Appui court:
- Répondre à un appel entrant
- Lancer le mode de reconnaissance vocale
- Transférer l'appel sur le téléphone (mode
discret)
- Sortir du mode discret
- Répondre à un second appel entrant /
basculer entre plusieurs appels
Appui long : Initier un appel vers le dernier
numéro appelé
- Refuser un appel entrant (ou un second
appel entrant)
- Raccrocher
Régler le volume de la communication
Appui court : Activer la fonction DTMF
(afin de gérer les serveurs vocaux interactifs)
Désactiver / réactiver le micro (mode secret)

Cette fonction n’est disponible que si vos contacts
ont été préalablement synchronisés dans le kit
mains libres.
Paul !
Appelle Paul !
Appeler Paul !
Appelle Paul maison !
Appeler Paul maison !
20
Emettre un appel par reconnaissance vocale
1. Appuyez sur le bouton vert pour initier le processus de
reconnaissance vocale.
> Un signal sonore retentit pour vous informer du début
du processus de reconnaissance vocale.
2. Prononcez le mot-clé « Appeler » suivi du nom du
contact que vous souhaitez appeler.
> L’appel vers ce contact est automatiquement initié si
la commande vocale a été bien comprise. Dans le cas
contraire, le kit mains libres diffuse un message de
confirmation.
3. Conrmez en prononçant « Oui », « Appelle »
ou « Appeler ».
> L’appel vers ce contact est alors lancé.
Utiliser les mots magiques
Pour utiliser les mots magiques suivants, vous devez activer
les mots magiques. Pour cela :
1. Appuyez sur la molette et sélectionnez Préférences >
Mots magiques.
2. Appuyez sur la molette pour activer/désactiver les
mots magiques.
• Le mot magique « Accepter » vous permet d’accepter
un appel entrant.
• Le mot magique « Refuser » vous permet de refuser un
appel entrant.
Vous avez la possibilité d’émettre un appel par
plusieurs combinaisons de mots clés. Par exemple,
« appelle ‘Paul’ », « appeler ‘Paul’ », ou simplement
« Paul ». Vous pouvez également y associer le
type de numéros de ce contact : « appelle ‘Paul’
‘maison’ », « appeler ‘Paul’ ‘à la maison’ » ou «
‘Paul’ ‘maison’ ».
Other manuals for MKi9000
7
Table of contents
Languages:
Other Parrot Speakers manuals

Parrot
Parrot DS1120 User manual

Parrot
Parrot DS1120 User manual

Parrot
Parrot ZIKMU SOLO User manual

Parrot
Parrot PARTY User manual

Parrot
Parrot DS1120 User manual

Parrot
Parrot Zikmu User manual

Parrot
Parrot PARTY-BLACK User manual

Parrot
Parrot DS3120 User manual

Parrot
Parrot ZIKMU SOLO User manual

Parrot
Parrot ZIKMU SOLO User manual
Popular Speakers manuals by other brands

Accessory Power
Accessory Power GO groove SonaVERSE LBr user guide

Creative
Creative GIGAWORKS T20 - QUICKSTART FRONT quick start guide

Tema Telecomunicazioni
Tema Telecomunicazioni AD633C product manual

XD
XD XDCLUSIVE P329.87 Series manual

Linn
Linn MAJIK 126 owner's manual

HOMTSSAW
HOMTSSAW ES-T60 user manual