Pasport Smart Gate PS-2180 User manual

Instruction Sheet
012-14324B
Smart Gate
PS-2180
.
*See the PASCO catalog or the PASCO web site at www.pasco.com
for more information.
Introduction
The PS-2180 Smart Gate measures the time for the motion of
a moving object, such as a PASCO Cart. The PASCO data
collection software analyzes the data and calculates position,
velocity, and acceleration.
The sensor is designed to work with a PASPORT-compatible
interface (such as the PS-2100 USB Link) and data collec-
tion software (such as PASCO Capstone or SPARKvue) to
record, display, and analyze the motion.
The Smart Gate has three detector ports and one Auxiliary
port. Detector Ports 1 and 2 are located opposite the two
infrared emitter ports. The ports are 1.5 cm apart. (Please see
the diagram.)
Sensor
Extension
Cable
Smart Gate
Mounting
Rod 9 pin
mini-DIN
Connector
Swivel Rod
Clamp
Indicator
LED
Detector
Port 4
Detector Ports
1 and 2
Auxiliary
Port 3
Included Items
Smart Gate
Mounting Rod
Sensor Extension Cable (PS-2500)
Required Items*
PASCO Interface
PASCO Data Collection Software

Smart Gate Introduction
2012-14324B
The Auxiliary Port (number 3) accepts a 1/4” (6.35 mm)
tip-ring-sleeve “phono” plug similar to the illustration.
Detector Port 4 can detect a beam of laser light in the same
way as the PASCO Laser Switch (ME-9259A). The fourth
detector port allows the measurement of an object that is too
large to pass through the Smart Gate.
The sensor includes a 2 meter long Sensor Extension Cable
and a 14 centimeter long, 0.95 cm diameter Mounting Rod.
The Mounting Rod fits the threaded hole on the side of the
Smart Gate.
Related Products*
The Smart Gate is part of three PASCO systems:
• Smart Gate System (ME-3701)
• Smart Gate Pulley System (ME-3702)
• Projectile Launcher Smart Gate System (ME-6798)
(*See the PASCO web site at www.pasco.com for more information.)
Compatible Equipment
The Smart Gate can be used with a variety of PASCO equip-
ment:
(*See the PASCO web site at www.pasco.com for more information)
Setup the Smart Gate
Connecting the Smart Gate
• Connect the small end of the cable into the 9- pin
mini-DIN Port on the back of the Smart Gate.
Phono Plug
Infrared Emitter
Ports
Photogate Tape
Slot
Threaded hole (1/4”-20 threads per inch))
Auxiliary Port
(Number 3)
Product Name* Model
Super Pulley ME-9450A
Photogate Stand ME-9805
Picket Fence (Large) ME-9377A
Picket Fence (Smart Timer) ME-8933
Picket Fence (Cart) ME-9804
Photogate Bracket (Track) ME-9806
Photogate Mounting Bracket
(Projectile Launcher)
ME-6821A
Photogate Head ME-9498A
Accessory Photogate ME-9204B
Time-of-Flight Accessory ME-6810
Photogate Tape ME-6663
Photogate Tape, High Resolution ME-6666
Photogate Pendulum Set ME-8752
Smart Gate
9 pin
mini-DIN
Plug
Sensor
Extension
Cable
9 pin
mini-DIN
Port
Photogate
Tape Slot
Auxiliary
Port 3

Model No.PS-2180 Introduction
3
012-14324B
• Connect the other end of the cable to a PASPORT input
port of a PASCO interface.
• Test the operation of the Smart Gate by watching the
light-emitting diode (LED) on the front side of the
Smart Gate as the beams are blocked.
Mounting the Smart Gate
The Mounting Rod fits the threaded hole that is on the side
of the Smart Gate opposite to the swivel rod clamp.
The swivel rod clamp and thumbscrew allows the Smart
Gate to be mounted on a 0.63 cm (1/4 in.) diameter support
rod, such as the Photogate Stand (ME-9805).
The open space for the Smart Gate is 7.2 cm (width) by 4.0
cm (depth). Remember, the Smart Gate Detector Port 4
allows the measurement of larger objects when used with a
laser.
The tab on the Smart Gate housing provides a seat for attach-
ing a PASCO Super Pulley (ME-9450A) using the included
Mounting Rod. When using a Super Pulley with the Smart
Gate, only Detector Port 1 (“gate 1”) will record state
changes caused by the rotating pulley.
Mounting the Smart Gate on a PASCO Track
The Smart Gate can be attached to the side of a PASCO
Track with a Photogate Bracket (ME-9806). Slide the square
nut on the Photogate Bracket into the T-slot of the side of the
PASCO track. Remove the swivel rod clamp from the side of
the Smart Gate (but save the swivel rod clamp for later use).
Use the short thumbscrew from the Photogate Bracket
assembly to attach the Smart Gate to the Photogate Bracket.
Note that part of the Smart Gate housing fits between the
“rails” on each edge of one side of the Photogate Bracket,
Sensor Cable Plug
Interface
1/4-20
threaded hole
Mounting
Rod
Tab for
Super Pulley
Depth =
4.0 cm
Width =
7.2 cm
Swivel Rod
Clamp
Mounting
Rod
Super Pulley
(ME-9450A)
T-slot
Square
Nut
Photogate
Bracket
(ME-9806)
PASCO
Track
Smart
Gate

Smart Gate Introduction
4012-14324B
and the Smart Gate can be adjusted up or down. If you wish
to adjust the Smart Gate to an angle relative to the Photogate
Bracket, mount the bracket on the track with the smooth side
of the bracket against the edge of the track. The small
thumbscrew will hold the Smart Gate in place against the
smooth side of the bracket so the Smart Gate can be set an
any angle.
Mounting the Smart Gate on a PASCO Projectile
Launcher
Use a Photogate Mounting Bracket (ME-6821A) to attach
the Smart Gate to a PASCO Projectile Launcher (see the
PASCO web site for more information about launchers).
Clamp the PASCO Projectile Launcher in place. Mount the
Photogate Mounting Bracket to the T-slot of the Projectile
Launcher. Adjust the bracket so that the second position on
the bracket is aligned with the end of the launcher. Remove
the swivel rod clamp from the side of the Smart Gate (but
save the swivel rod clamp for later use). Use one of the
smaller thumbscrews from the Photogate Mounting Bracket
(ME-6821A) to attach the Smart Gate to the Photogate
Mounting Bracket as shown.
Using the Smart Gate with the Time-of-Flight
Accessory
The PASCO Time-of-Flight Accessory (ME-6810) is
designed for projectile motion experiments. The
Time-of-Flight Accessory can be used with a Smart Gate
mounted on a Projectile Launcher to measure the time of a
projectile’s motion from launch to landing. Connect the plug
from the Time-of-Flight Accessory into the Auxiliary Port
on the back of the Smart Gate. The Smart Gate measures the
initial speed of the projectile and the Time-of-Flight Acces-
sory measures total travel time.
Using the Smart Gate with Photogate Tape
Photogate Tape (ME-6663) or High Resolution Photogate
Tape (ME-6666) fits through the Photogate Tape Slot on the
detector side of the Smart Gate.
The Photogate Tape is made of a flexible Mylar material that
can be cut to any length, and is reusable. The tape is 30 m
long with 5 cm band spacing (edge-to-edge). When the tape
is threaded through the Photogate Tape Slot of the Smart
Gate, the student can measure position, velocity, and acceler-
ation with a high degree of accuracy. The high-resolution 1
cm version is ME-6666.
Using the Smart Gate with a Picket Fence on a Cart
Mount a Five Pattern Picket Fence (ME-9804) or a Smart
Timer Picket Fence (ME-8933) to the accessory tray of a
PASCO Cart (such as the ME-6950 PAScar). Use a Photo-
gate Bracket to mount the Smart Gate on the side of a
PASCO Track (such as the ME-6960 PAStrack).
Using the Smart Gate with a Photogate Pendulum
Use a clamp (such as the ME-9506 Pendulum Clamp), sup-
port rod, and string (such as the SE-8050 Braided Physics
String) to hang a Photogate Pendulum as shown (biflar sus-
pension).
Mount the Smart Gate so that the Photogate Pendulum inter-
rupts the infrared beam as it swings through the Smart Gate.
Smart Gate
Projectile
Launcher
Base
Photogate
Mounting
Bracket
(ME-6821A)
Indicator
LED
Thumbscrew
Projectile Launcher
(ME-6800)
Smart
Gate ME-6663
ME-6666
Photogate
Tape Slot
Photogate
Tape
Photogate Tape,
High Resolution
Photogate Bracket
(ME-9806)
PASCO Track
PASCO Cart
Picket Fence

Model No.PS-2180 Technical Support
5
012-14324B
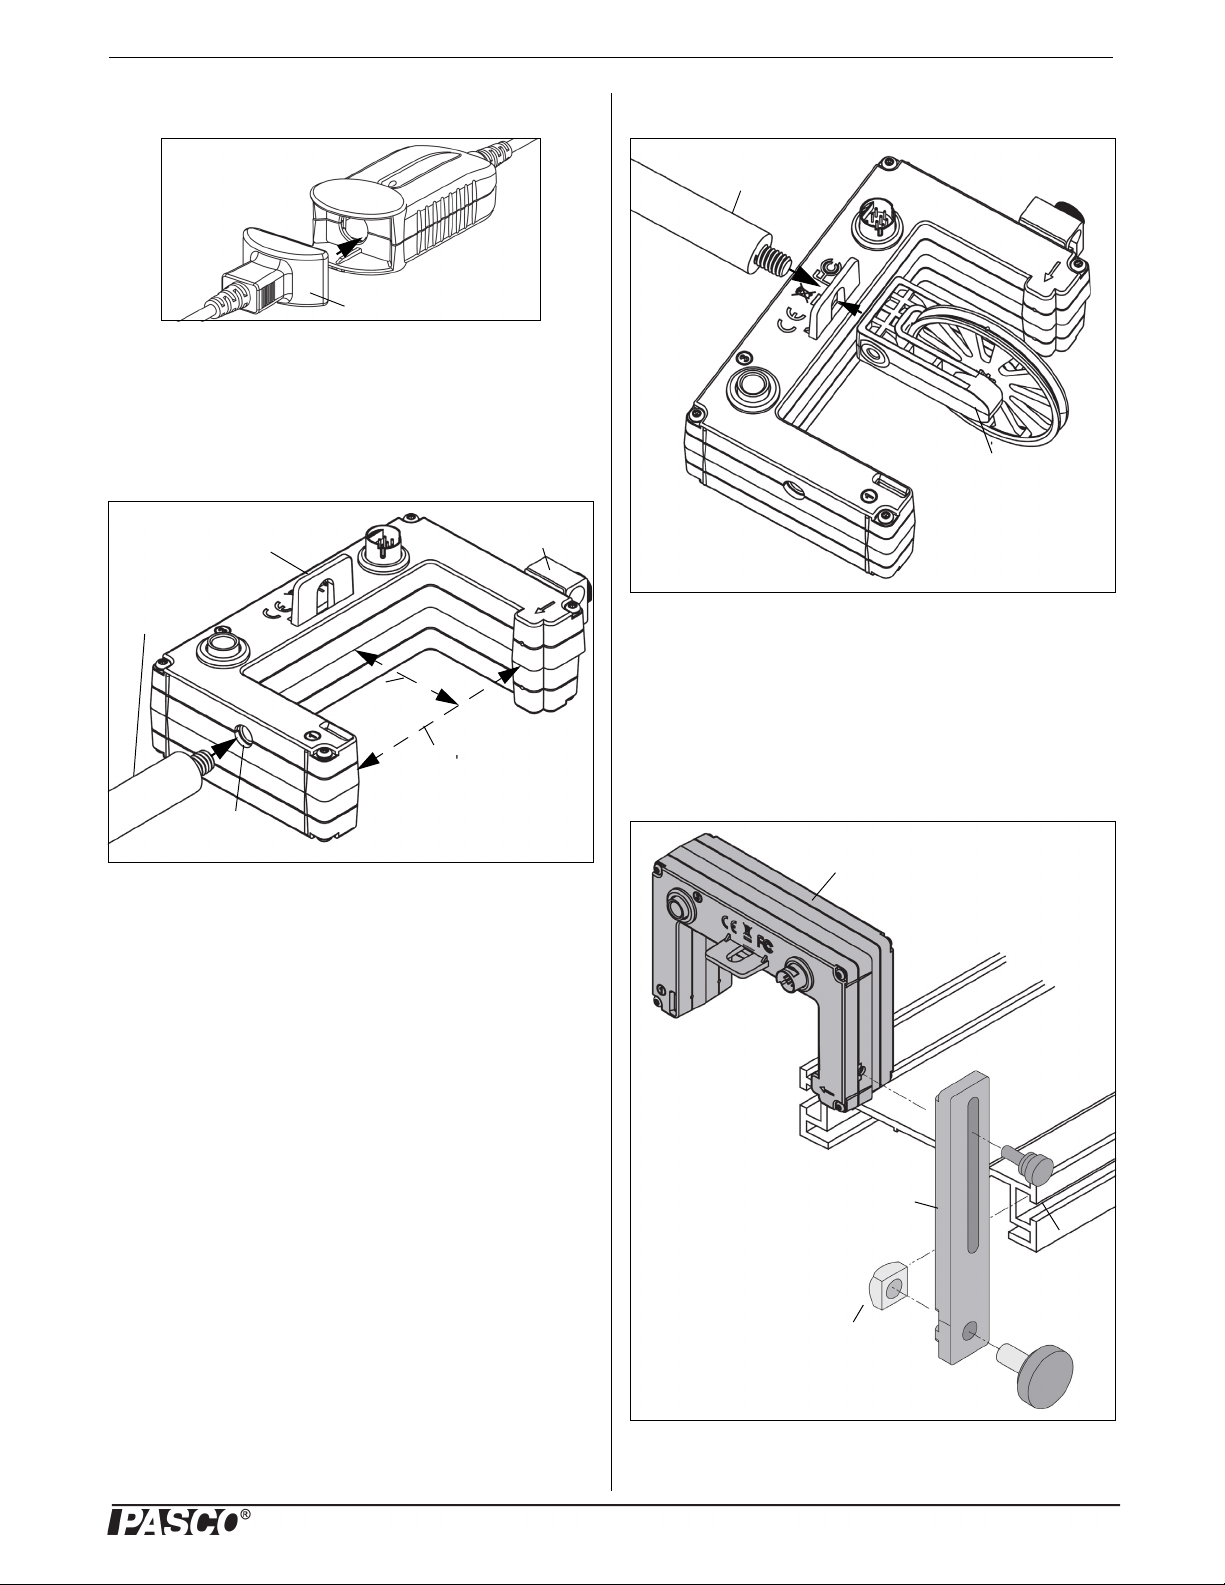
For more accurate results, arrange the pendulum so that it
swings close to the emitter side of the Smart Gate.
Recording Data
Setup the Data Collection Software
NOTE: Refer to the User’s Guide and On-Line Help for the
data collection software.
Suggested Activities
• Refer to the experiment guide that comes with your
PASCO equipment.
• Also, check the PASCO web site. Find the web page for
the PASCO equipment you are using and check the
“User Resources” tab. There may be a download able
(PDF) file of experiments.
More Information
For the latest information about the Smart Gate, visit the
PASCO web site at www.pasco.com and enter “PS-2180” in
the Search window.
Specifications
Technical Support
Before calling PASCO Technical Support, please have the
apparatus, this user's guide, and the following information
available:
• Product name, model number, and serial number;
• Approximate age of the product;
• Detailed description of how to duplicate the problem.
For assistance with any PASCO product, contact PASCO at:
Limited Warranty For a description of the product warranty, see the
PASCO catalog. Copyright This PASCO scientific Instruction Sheet
is copyrighted with all rights reserved. Permission is granted to
non-profit educational institutions for reproduction of any part of this
manual, providing the reproductions are used only in their laborato-
ries and classrooms, and are not sold for profit. Reproduction under
any other circumstances, without the written consent of PASCO sci-
entific, is prohibited. Trademarks PASCO, PASCO Capstone,
PASPORT, and SPARKvue are trademarks or registered trademarks
of PASCO scientific, in the United States and/or in other countries.
For more information visit www.pasco.com/legal.
Product End of Life Disposal Instructions:
This electronic product is subject to disposal and recycling
regulations that vary by country and region. It is your
responsibility to recycle your electronic equipment per your
local environmental laws and regulations to ensure that it
will be recycled in a manner that protects human health and
the environment. To find out where you can drop off your
waste equipment for recycling, please contact your local
waste recycle/disposal service, or the place where you pur-
chased the product.
The European Union WEEE (Waste Elec-
tronic and Electrical Equipment) symbol
(to the right) and on the product or its
packaging indicates that this product must
not be disposed of in a standard waste con-
tainer.
Smart Gate
Mounting
Rod
Clamp
Base
Support
Rod
Pendulum
Clamp
(ME-9506)
String
Photogate
Pendulum
(ME-8752 Emitter
side
Item Value
Rise and Fall Time: Symmetrical, all four ports
Infrared Source: 940 nm
Minimum Block Time,
Detector Ports 1 and 2:
1.5 ms
Address: PASCO scientific
10101 Foothills Blvd.
Roseville, CA 95747-7100
Phone: +1 916 462 8384 (worldwide)
877-373-0300 (U.S.)
E-mail: [email protected]
Web www.pasco.com
Table of contents
Other Pasport Accessories manuals

Pasport
Pasport PS-2169 User manual

Pasport
Pasport PS-2126A User manual

Pasport
Pasport PS-2190 User manual

Pasport
Pasport AirLink SI User manual

Pasport
Pasport PS-2104 User manual

Pasport
Pasport PS-2170 User manual

Pasport
Pasport PS-2194 User manual

Pasport
Pasport PS-2174 User manual

Pasport
Pasport PS-2187 User manual

Pasport
Pasport PS-2163 User manual
Popular Accessories manuals by other brands

SONBEST
SONBEST SM2170B user manual

ROSE DISPLAYS
ROSE DISPLAYS ECONOFRAME WITH TOP AND BOTTOM WALL MOUNTS instruction sheet

TeraBee
TeraBee TeraRanger One Installation and operation manual

Stulz
Stulz EC Series manual

Oregon Scientific
Oregon Scientific THR238N user manual

Clifford
Clifford Sense and Tell 4 owner's guide