PATONA Powerstation Autarc 600 User manual
................................
PLATINUM NO LIMIT
MANUAL / ANLEITUNG
Powerstation Autarc 600
DE 01
EN 08
FR 15
ES 22
IT 29
NL 36
SV 43
CS 50
PL 57
HR 64
SR 71
TR 78


1
Inhaltsverzeichnis
1. Lieferumfang
2. Warnhinweise
3. Produktübersicht
4. Bedienungsanleitung
5. Fehlerbehebung
6. Technische Spezikationen
7. Geschätzte Ladedauer
1. Lieferumfang
»Portable Powerstation
»AC Netzteil
»AC Kabel
»Anleitung
»Herstellerinformation für Elektro-/Elektronikgeräte
2. Warnhinweise
»Anweisungen, Warnhinweise und Bedienungsanleitung aufmerksam lesen.
»Unsachgemäße Nutzung kann zu Gefahr für Leib und Leben führen.
»Powerstation von Feuchtigkeit fernhalten.
»Von Hitzequellen wie direkter Sonneneinstrahlung, offenem Feuer, Heizkörper,
Öfen usw. fernhalten.
»Die Powerstation nicht zerlegen, modizieren und/oder reparieren.
»Nur ein trockenes Tuch zur Reinigung der Powerstation nutzen. Keine üssi-
gen Reinigungsmittel und/oder Chemikalien einsetzen.
»Während der Nutzung kann die Powerstation warm werden. Dies ist normal.
»Powerstation nicht abdecken, für ausreichende Lüftung sorgen.
»Sollte es zu einem Leck, Feuer oder Explosion kommen bitte Sand, eine
Löschdecke oder einen Gel-Feuerlöscher verwenden.
»Powerstation vor starken Erschütterungen und Stößen schützen.
»Gehäuse nicht Beschädigen und/oder durchstechen.
»Powerstation nur mit in der Anleitung beschriebenen Methoden laden.
»Die Powerstation und das Zubehör ist nicht für Kinder geeignet.
»Keine Fremdkörper und Metallgegenstände in die Öffnungen einführen.
»Entsorgung nach den örtlichen Vorschriften im jeweiligen Land.
»Nicht in der nähe brennbarer Stoffe, Gase und Materialien betreiben.
»Kompatibilität und Spannungswerte der angeschlossenen Geräte beachten.
DE
2
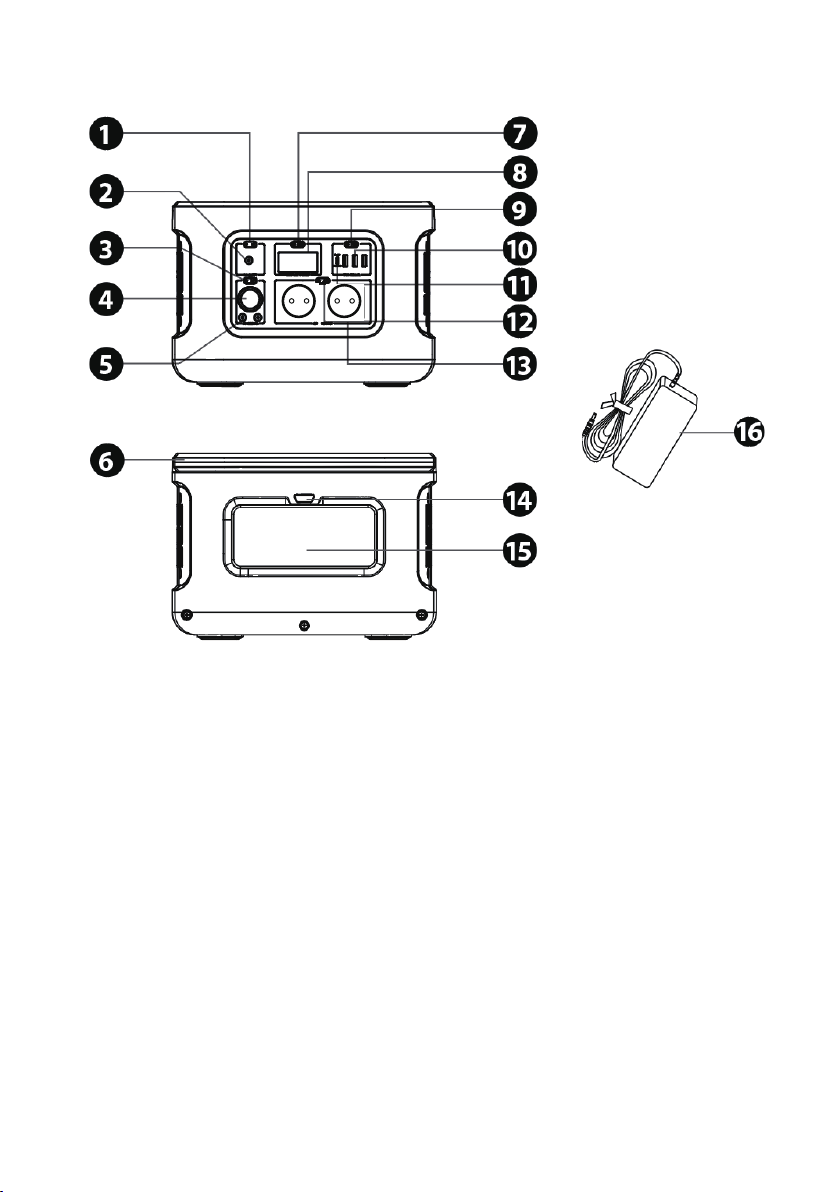
3. Produktübersicht
1. LED: Statusanzeige Eingang DC 10. Ausgänge: USB-A
2. Eingang: DC 11. Eingang/Ausgang: USB-C PD
3. Taste: DC AN/AUS 12. Taste: Ausgang AC AN/AUS
4. Steckdosen: DC 12V 13. Ausgang: AC 230V
5. Ausgänge: 12V DC 5525 14. Taste: Scheinwerfer AN/AUS
6. Klappbarer Griff 15. Scheinwerfer
7. Taste: LCD EIN/AUS 16. Netzteil
8. LCD
9. Taste: Ausgang USB AN/AUS
4. Bedienungsanleitung
Laden Sie die Powerstation vor dem ersten Gebrauch vollständig auf.

3
Auaden der Powerstation mit dem Netzteil:
1. Nutzen Sie das mitgelieferte Netzteil. Stecken Sie den DC Stecker in den DC
Eingang der Powerstation.
2. Stecken Sie nun den AC Netzstecker in eine geeignete Wandsteckdose.
3. Die Powerstation beginnt automatisch mit dem Auaden.
4. Wenn die Powerstation zu 100% vollständig aufgeladen ist, wird dies auf dem
LCD angezeigt.
5. Trennen Sie nach dem Ladevorgang das Netzteil von der Stromquelle und
der Powerstation.
Hinweise:
»Optional kann die Powerstation alternativ oder zusätzlich über den USB-C
(PD) Anschluss mit einem USB-C Adapter (nicht im Lieferumfang enthalten)
aufgeladen werden.
»Die Powerstation kann darüber hinaus auch mit einem Solarpanel aufgeladen
werden.
»Die Powerstation kann gleichzeitig geladen und genutzt/entladen werden
(charge through).
Tastenfunktionen
Hinweise:
»Um den Akku zu schonen, schalten Sie die DC-, USB- und AC-Ausgänge aus,
wenn das Produkt nicht verwendet wird.
Taste ON/OFF für LCD:
1. Um das LCD ein-/auszuschalten, drücken Sie die Taste ON/OFF für LCD.
Taste ON/OFF für Ausgang DC:
1. Um den DC Ausgang ein- oder auszuschalten, drücken Sie die Taste ON/OFF
für Ausgang DC.
2. Ist der DC Ausgang eingeschaltet, leuchtet die LED.
Taste ON/OFF für Ausgang AC:
1. Um den AC Ausgang ein-/auszuschalten, drücken Sie die Taste ON/OFF für
Ausgang AC.
2. Ist der AC Ausgang eingeschaltet, leuchtet die LED.

4
Versorgung elektronischer Geräte
»Die Powerstation ist mit Geräten kompatibel, welche Wechselstrom (AC) oder
Gleichstrom (DC) benötigen.
»Es gibt mehrere Möglichkeiten, elektronische Geräte mit Strom zu versorgen.
»AC/DC Ausgänge können gleichzeitig genutzt werden.
Verwendung der Ausgänge AC 230V:
Mit der Powerstation können Sie Geräte mit einer Nennleistung von bis zu 600W
versorgen.
1. Drücken Sie dann die Taste ON/OFF für Ausgang AC.
2. Verbinden Sie den AC Stecker Ihres Gerätes mit dem AC Ausgang der Power-
station.
Hinweise:
»Stellen Sie sicher, dass der AC Netzstecker ordnungsgemäß in den AC Aus-
gang der Powerstation eingesteckt ist.
Verwendung der Ausgänge USB-A:
1. Drücken Sie die Taste ON/OFF für Ausgänge USB-A.
2. Verbinden Sie das USB Kabel mit dem Endgerät und stecken Sie den USB-A
Stecker in einen der Ausgänge USB-A.
Hinweis:
»Die USB-A Anschlüsse liefern eine Leistung von 5V 2.4A.
Verwendung Ausgang USB-C PD:
»Verwenden Sie ein USB-C Kabel mit PD-Funktionalität, um Geräte mit voller
Leistung aufzuladen.
»Die Powerstation verfügt über die USB-Smart-Charge-Technologie, wodurch
die Powerstation mit angeschlossenen Geräten kommunizieren kann und so
die schnellste und sicherste Lademöglichkeit bereitstellt.
»Die Taste USB ON/OFF gilt nicht für USB-C.
1. Verbinden Sie das USB-C PD Kabel mit dem Endgerät und stecken Sie den
USB-C Stecker in den Ausgang USB-C PD.

5
Verwendung der Ausgänge DC 12V und DC 12V 5525:
»Die Powerstation ist mit Geräten kompatibel, welche eine 12V Gleichstromver-
sorgung (DC) benötigen.
1. Drücken Sie die Taste ON/OFF für Ausgang DC.
2. Schließen Sie ein kompatibles 12V Gerät an den Anschluss an.
Verwendung des Scheinwerfer/Flutlichts:
1. Drücken Sie die Taste ON/OFF für Scheinwerfer/Flutlicht, um die verschiede-
nen Modi zu wählen.
erster Druck einschalten
zweiter Druck Helligkeit 50%
dritter Druck Helligkeit 100%
vierter Druck ausschalten
doppelt drücken SOS Modus
5. Fehlerbehebung
Wenn die Powerstation Geräte nicht auädt und/oder mit Strom versorgen kann,
überprüfen Sei bitte die folgenden Punkte.
»Stellen Sie sicher, dass die korrekte EIN/AUS Taste eingeschaltet ist.
»Stellen Sie sicher, dass die AC/DC bzw. USB Netzschalter eingeschaltet sind
und prüfen Sie, ob die entsprechende LED grün leuchtet.
»Überprüfen Sie den Akkustand. Bei unter 3 %, laden Sie die Powerstation auf.
»Stellen Sie sicher, dass der Stromverbrauch des angeschlossenen Gerätes
die Nennleistung des jeweiligen Ports nicht überschreitet.
»Wird ein Fehlercode auf dem LED ausgegeben, prüfen Sie die Fehlercodes
(nächster Abschnitt).
»Betreiben Sie die Powerstation nicht außerhalb der zulässigen Temperaturen.

6
Fehlercodes
Überspannungsschutz (Eingang): Das Symbol blinkt 5 Sekunden
lang, wenn eine Überspannung erkannt wird.
Überlastung (Ausgang): Das Symbol blinkt 5 Sekunden lang, wenn
eine Überlastung des AC Ausgangs erkannt wird.
Low-Power-Alarm: Das Symbol blinkt, wenn der Akkustand der Po-
werstation weniger als 3 % beträgt.
Temperatur zu niedrig: Das Temperatursymbol wird angezeigt,
wenn die Temperaturen zu niedrig sind.
Temperatur zu hoch: Das Temperatursymbol wird angezeigt, wenn
die Temperaturen zu hoch sind.
6. Technische Spezikationen
Ausgang
AC Ausgang Nennspannung 230V
Nennleistung 600W
Spitzenleistung 1000W
Frequenz 50Hz
KFZ-Anschluß mit DC12V
Ausgang
Nennspannung 13.3V
Nennstrom 10A
DC12V Ausgang (5525) Nennspannung 13.3V
Nennstrom 10A
USB-A Ausgang Nennspannung 5V
Nennstrom 2.4A
USB-C Ausgang/Eingang siehe Produktlabel
Scheinwerfer/Flutlicht MIM 200 niedrig / 800 mittel /
1400 hoch

7
Eingang
DC Eingangsspannung 12-24V
DC Eingangsleistung Maximal 120W
Akku
Akkuleistung siehe Produktlabel
Allgemein
Arbeitsumgebung Relative Luftfeuchtigkeit: 20-90%
Temperatur: 14-104°F (-10-40°C)
Größe ca. 290 x 210 x 205mm
Nettogewicht 5.8kg

8
Table of contents
1. Scope of delivery
2. Warnings
3. Product overview
4. Operating instructions
5. Troubleshooting
6. Technical specications
7. Estimated charging time
1. Scope of delivery
»Portable Powerstation
»AC power supply unit
»AC cable
»Instructions
»Manufacturer‘s information for electrical/electronic equipment
2. Warnings
»Read instructions, warnings and user manual carefully.
»Improper use may result in danger to life and limb.
»Keep the Power Station away from moisture.
»Keep away from heat sources such as direct sunlight, open ames, radiators,
stoves, etc.
»Do not disassemble, modify and/or repair the Powerstation.
»Use only a dry cloth to clean the Powerstation. Do not use liquid detergents
and/or chemicals.
»The Power Station may become warm during use. This is normal.
»Do not cover the Power Station, ensure adequate ventilation.
»In the event of a leak, re or explosion, use sand, a re blanket or a gel re
extinguisher.
»Protect the Power Station from strong vibrations and shocks.
»Do not damage and/or puncture the housing.
»Only charge the Power Station using the methods described in the instructions.
»The Powerstation and accessories are not suitable for children.
»Do not insert foreign objects or metal objects into the openings.
»Dispose of in accordance with local regulations in your country.
»Do not operate near ammable substances, gases or materials.
»Observe the compatibility and voltage values of the connected devices.
EN
9
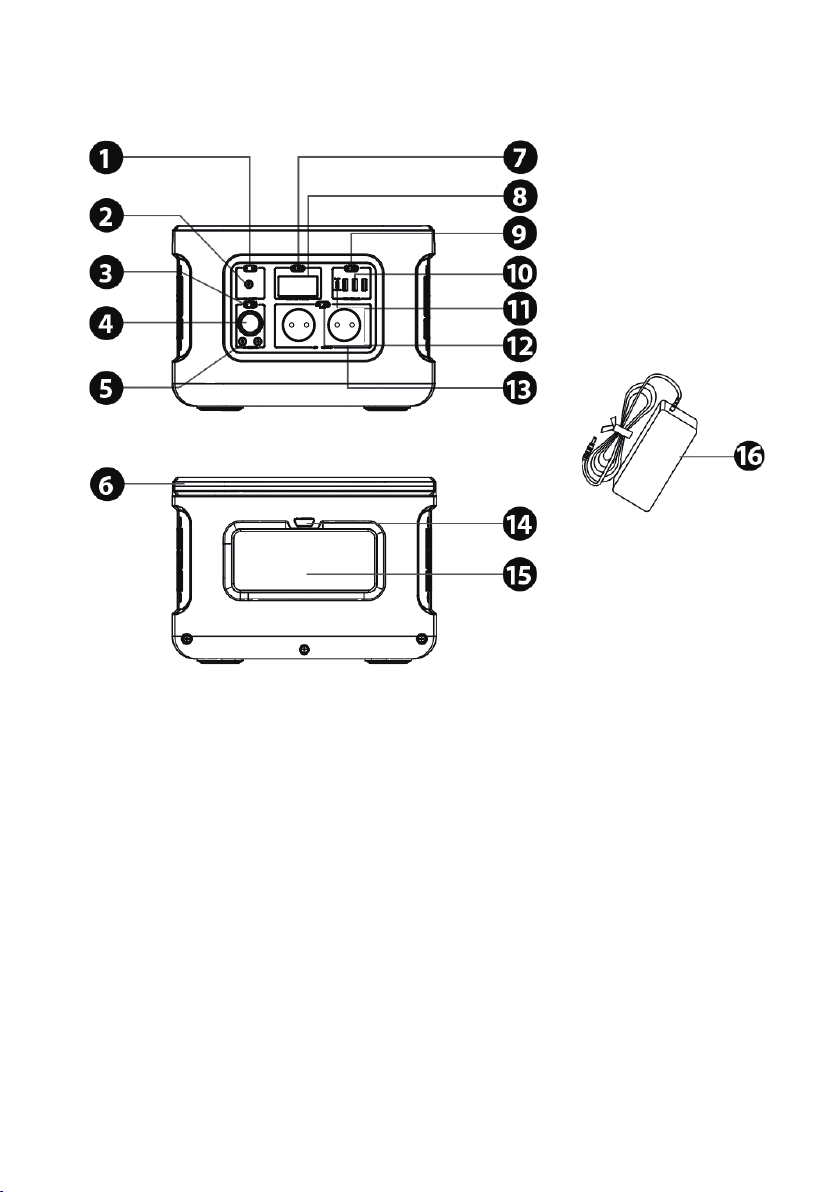
3. Product overview
1. LED: DC input status display 10. Outputs: USB-A
2. Input: DC 11. Input/output: USB-C PD
3. Button: DC ON/OFF 12. Button: Output AC ON/OFF
4. Sockets: DC 12V 13. Output: AC 230V
5. outputs: 12V DC 5525 14. Button: Headlamp ON/OFF
6. Folding handle 15. Spotlight
7. Button: LCD ON/OFF 16. Power supply unit
8. LCD
9. Button: Output USB ON/OFF
4. Operating instructions
Fully charge the power station before using it for the rst time.

10
Charge the power station with the mains adapter:
1. Use the mains adapter supplied. Insert the DC plug into the DC input of the
Power Station.
2. Now insert the AC mains plug into a suitable wall socket.
3. The Power Station will automatically start charging.
4. When the Power Station is 100% fully charged, this is indicated on the LCD.
5. After charging, disconnect the AC adapter from the power source and the
Powerstation.
Notes:
»Optionally, the power station can be charged alternatively or additionally via
the USB-C (PD) port with a USB-C adapter (not included in the scope of deli-
very).
»The power station can also be charged with a solar panel.
»The Powerstation can be charged and used/discharged simultaneously (char-
ge through).
Button functions
Notes:
»To conserve battery power, turn off the DC, USB and AC outputs when the
product is not in use.
Button ON/OFF for LCD::
1. To turn the LCD on/off, press the ON/OFF button for LCD.
Button ON/OFF for DC output:
1. To switch the DC output on or off, press the ON/OFF key for DC output.
2. If the DC output is switched on, the LED lights up.
Button ON/OFF for output AC:
1. To switch the AC output on/off, press the ON/OFF button for output AC.
2. If the AC output is switched on, the LED lights up.

11
Power supply for electronic devices
»The Powerstation is compatible with devices that require alternating current
(AC) or direct current (DC).
»There are several ways to supply power to electronic devices.
»AC/DC outputs can be used simultaneously.
Use of the AC 230V outputs:
You can use the power station to supply devices with a rated power of up to
600W.
1. Then press the ON/OFF button for output AC.
2. Connect the AC plug of your appliance to the AC output of the power station.
Notes:
»Make sure the AC power plug is properly plugged into the AC output of the
power station.
Using the USB-A outputs:
1. Press the ON/OFF button for outputs USB-A.
2. Connect the USB cable to the terminal device and insert the USB-A plug into
one of the USB-A outputs.
Notice:
»The USB-A outlets provide a power of 5V 2.4A.
Use output USB-C PD:
»Use a USB-C cable with PD functionality to charge devices at full power.
»The Powerstation features USB Smart Charge technology, which allows the
Powerstation to communicate with connected devices to provide the fastest
and safest charging option.
»The USB ON/OFF button does not apply to USB-C.
1. Connect the USB-C PD cable to the end device and insert the USB-C plug
into the USB-C PD output.

12
Use of the DC 12V and DC 12V 5525 outputs:
»The power station is compatible with devices that require a 12V direct current
(DC) supply.
1. Press the ON/OFF button for the DC output.
2. Connect a compatible 12V device to the port.
Using the headlamp/ oodlight:
1. Press the ON/OFF button for spotlight/oodlight to select the different modes.
rst press switch on
second press brightness 50%
third press brightness 100%
fourth press switch off
double press SOS mode
5. Troubleshooting
If the Powerstation fails to charge and/or power devices, please check the follo-
wing points.
»Make sure the correct ON/OFF button is turned on.
»Make sure the AC/DC or USB power switches are turned on and check that the
corresponding LED is green.
»Check the battery level. If it is below 3%, charge the power station.
»Make sure that the power consumption of the connected device does not ex-
ceed the rated power of the respective port.
»If an error code is displayed on the LED, check the error codes (next section).
»Do not operate the power station outside the permissible temperatures.

13
Error codes
Overvoltage protection (input): The symbol ashes for 5 seconds
when an overvoltage is detected.
Overload (output): The symbol ashes for 5 seconds when an AC
output overload is detected.
Low power alarm: The symbol ashes when the battery level of the
power station is less than 3 %.
Temperature too low: The temperature symbol is displayed when
the temperatures are too low.
Temperature too high: The temperature symbol is displayed when
the temperatures are too high.
6. Technical specications
Output
AC output Rated voltage 230V
Rated power 600W
Peak power 1000W
Frequency 50Hz
Car connection with
DC12V output
Rated voltage 13.3V
Rated current 10A
DC12V output (5525) Rated voltage 13.3V
Rated current 10A
USB-A output Rated voltage 5V
Rated current 2.4A
USB-C output/input see product label
Spotlight/Floodlight MIM 200 low / 800 medium /
1400 high
Input
DC input voltage 12-24V

14
DC input power max. 120W
Battery
Battery capacity see product label
General
Working environment Relative humidity: 20-90%.
Temperature: 14-104°F (-10-40°C)
Size ca. 290 x 210 x 205mm
Net weight 5.8kg

15
Table des matières
1. Portée de la livraison
2. Avertissements
3. Aperçu du produit
4. Instructions d‘utilisation
5. Dépannage
6. Spécications techniques
7. Temps de charge estimé
1. Étendue de la livraison
»Centrale d‘énergie portable
»Bloc d‘alimentation CA
»Câble CA
»Instructions
»Informations du fabricant pour l‘équipement électrique/électronique
2. Avertissements
»Lisez attentivement les instructions, les avertissements et le manuel d‘utilisa-
tion.
»Une utilisation incorrecte peut entraîner un danger pour la vie et l‘intégrité
physique.
»Conservez la Power Station à l‘abri de l‘humidité.
»Tenir à l‘écart des sources de chaleur telles que les rayons directs du soleil, les
ammes nues, les radiateurs, les poêles, etc.
»Ne pas démonter, modier et/ou réparer la Powerstation.
»Utilisez uniquement un chiffon sec pour nettoyer la Powerstation. N‘utilisez
pas de détergents liquides et/ou de produits chimiques.
»La Powerstation peut devenir chaude pendant son utilisation. Ceci est normal.
»Ne couvrez pas la Powerstation, assurez une ventilation adéquate.
»En cas de fuite, d‘incendie ou d‘explosion, utilisez du sable, une couverture
anti-feu ou un extincteur à gel.
»Protéger la Power Station des vibrations et des chocs importants.
»Ne pas endommager et/ou percer le boîtier.
»Ne chargez la Power Station qu‘en utilisant les méthodes décrites dans les
instructions.
»La Power Station et les accessoires ne conviennent pas aux enfants.
»N‘insérez pas de corps étrangers ou d‘objets métalliques dans les ouvertures.
»Mettez-les au rebut conformément aux réglementations locales en vigueur
dans votre pays.
»Ne pas utiliser l‘appareil à proximité de substances, de gaz ou de matériaux
inammables.
FR

16
»Respectez les valeurs de compatibilité et de tension des appareils connectés.
3. Aperçu du produit
1. LED : Afchage de l'état de l'entrée CC 10. Sorties : USB-A
2. Entrée : DC 11. Entrée/sortie : USB-C PD
3. Bouton : DC ON/OFF 12. Bouton : Sortie AC ON/OFF
4. Prises de courant : DC 12V 13. Sortie : AC 230V
5. sorties : 12V DC 5525 14. Bouton : Lampe frontale ON/OFF
6. Poignée pliable 15. Projecteur
7. Bouton : LCD ON/OFF 16. Bloc d'alimentation
8. LCD
9. Bouton : Sortie USB ON/OFF
4. Instructions d‘utilisation
Chargez complètement la station d‘alimentation avant de l‘utiliser pour la pre-
mière fois.

17
Chargez la centrale avec l‘adaptateur secteur :
1. Utilisez l‘adaptateur secteur fourni. Insérez la che CC dans l‘entrée CC de la
Power Station.
2. Insérez ensuite la che secteur CA dans une prise murale appropriée.
3. La Power Station commencera automatiquement à se charger.
4. Lorsque la Power Station est entièrement chargée, cela est indiqué sur l‘écran
LCD.
5. Après la charge, débranchez l‘adaptateur CA de la source d‘alimentation et
de la Power Station.
Remarques :
»En option, la power station peut être chargée alternativement ou en plus via
le port USB-C (PD) avec un adaptateur USB-C (non inclus dans la livraison).
»La power station peut également être chargée avec un panneau solaire.
»La station d‘alimentation peut être chargée et utilisée/déchargée simultané-
ment (charge à travers).
Fonctions des boutons
Remarques :
»Pour économiser la batterie, éteignez les sorties CC, USB et CA lorsque le
produit n‘est pas utilisé.
Bouton ON/OFF pour l‘écran LCD :
1. Pour allumer/éteindre l‘écran LCD, appuyez sur le bouton ON/OFF de l‘écran
LCD.
Bouton ON/OFF pour la sortie CC :
1. Pour activer ou désactiver la sortie CC, appuyez sur la touche ON/OFF pour
la sortie CC.
2. Si la sortie CC est activée, la LED s‘allume.
Touche ON/OFF pour la sortie AC :
1. Pour allumer ou éteindre la sortie CA, appuyez sur la touche ON/OFF pour la
sortie CA.
2. Si la sortie AC est activée, la LED s‘allume.

18
Alimentation électrique pour appareils électroniques
»La Powerstation est compatible avec les appareils qui nécessitent du courant
alternatif (CA) ou du courant continu (CC).
»Il existe plusieurs façons d‘alimenter les appareils électroniques.
»Les sorties AC/DC peuvent être utilisées simultanément.
Utilisation des sorties AC 230V :
Vous pouvez utiliser la station d‘alimentation pour alimenter des appareils d‘une
puissance nominale allant jusqu‘à 600W.
1. Appuyez ensuite sur le bouton ON/OFF de la sortie AC.
2. Connectez la che CA de votre appareil à la sortie CA de la station d‘alimen-
tation.
Remarques :
»Assurez-vous que la che d‘alimentation CA est correctement branchée sur la
sortie CA de la station d‘alimentation.
Utilisation des sorties USB-A :
1. Appuyez sur le bouton ON/OFF pour les sorties USB-A.
2. Connectez le câble USB à l‘appareil terminal et insérez la che USB-A dans
l‘une des sorties USB-A.
Remarque :
»Les sorties USB-A fournissent une puissance de 5V 2,4A.
Utilisez la sortie USB-C PD :
»Utilisez un câble USB-C avec la fonctionnalité PD pour charger les appareils
à pleine puissance.
»La Powerstation est dotée de la technologie USB Smart Charge, qui permet
à la Powerstation de communiquer avec les appareils connectés pour fournir
l‘option de charge la plus rapide et la plus sûre.
»Le bouton USB ON/OFF ne s‘applique pas à l‘USB-C.
1. Connectez le câble USB-C PD à l‘appareil nal et insérez la che USB-C dans
la sortie USB-C PD.
Table of contents
Other PATONA Power Supply manuals

Popular Power Supply manuals by other brands

Videx
Videx 520MR Installation instruction

Poppstar
Poppstar 1008821 Instructions for use

TDK-Lambda
TDK-Lambda LZS-A1000-3 Installation, operation and maintenance manual

TDK-Lambda
TDK-Lambda 500A instruction manual

Calira
Calira EVS 17/07-DS/IU operating instructions

Monacor
Monacor PS-12CCD instruction manual


