Patriot Lighting E9502-2 User manual

Questions, problems, missing parts?
Before returning to your retailer, call our customer service at 1-800-887-6326
Monday – Friday 9:00 a.m. – 5:00 p.m. CST
SKU Number: 343-2408
2-LIGHT LED SECURITY LIGHT
Model Number: E9502-2
PACKAGE CONTENTS
Page 1 of 6
201027
HARDWARE CONTENTS Note: Hardware not shown actual size.
AA BB
Anchor
X5
Drywall Screw
X5
AB
C
D

201027
Page 2 of 6
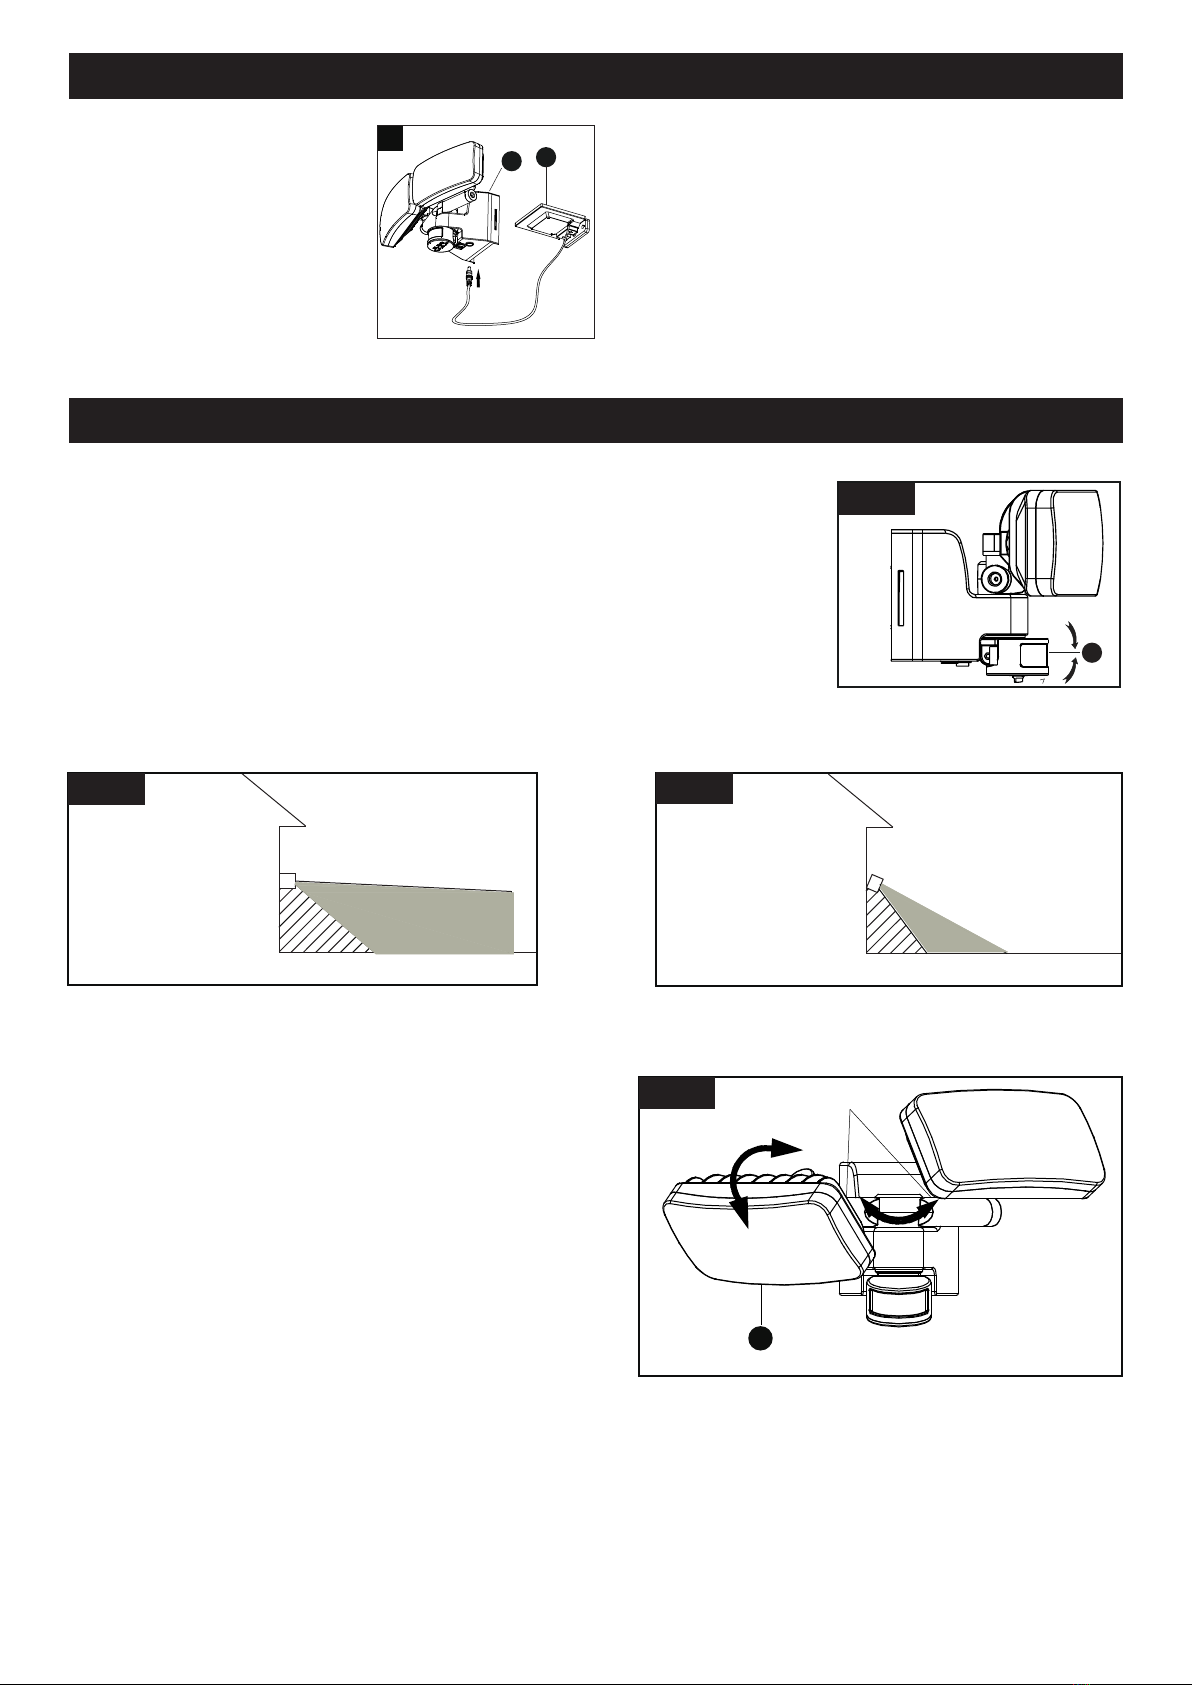
1. Slide off the mounting plate
from back of the light.
2. Install the mounting plate to the
wall or mounting surface using
anchors (AA) and drywall
screws (BB)
3. Slide the light fixture back on
to the mounting plate.
SAFETY INFORMATION
Please read and understand this entire manual before attempting to assemble, operate or install the product.
WARNING
● Do not expose the light fixture to fire or intense heat.
● Do not submerge in water.
● Your light fixture and solar panel are both weather-resistant.
● Never look directly into the solar motion light when illuminated.
● Do not dispose batteries in a fire, for they may leak and explode. Do not dispose batteries in any body of water.
Do not open, short circuit, or destroy batteries. Dispose of batteries in accordance with Local, State, and Federal
regulations. Do not mix old and new batteries. Do not mix alkaline, standard (Carbon-Zinc), or rechargeable
(Nickel Cadmium or Nickel Hydride) batteries with lithium batteries.
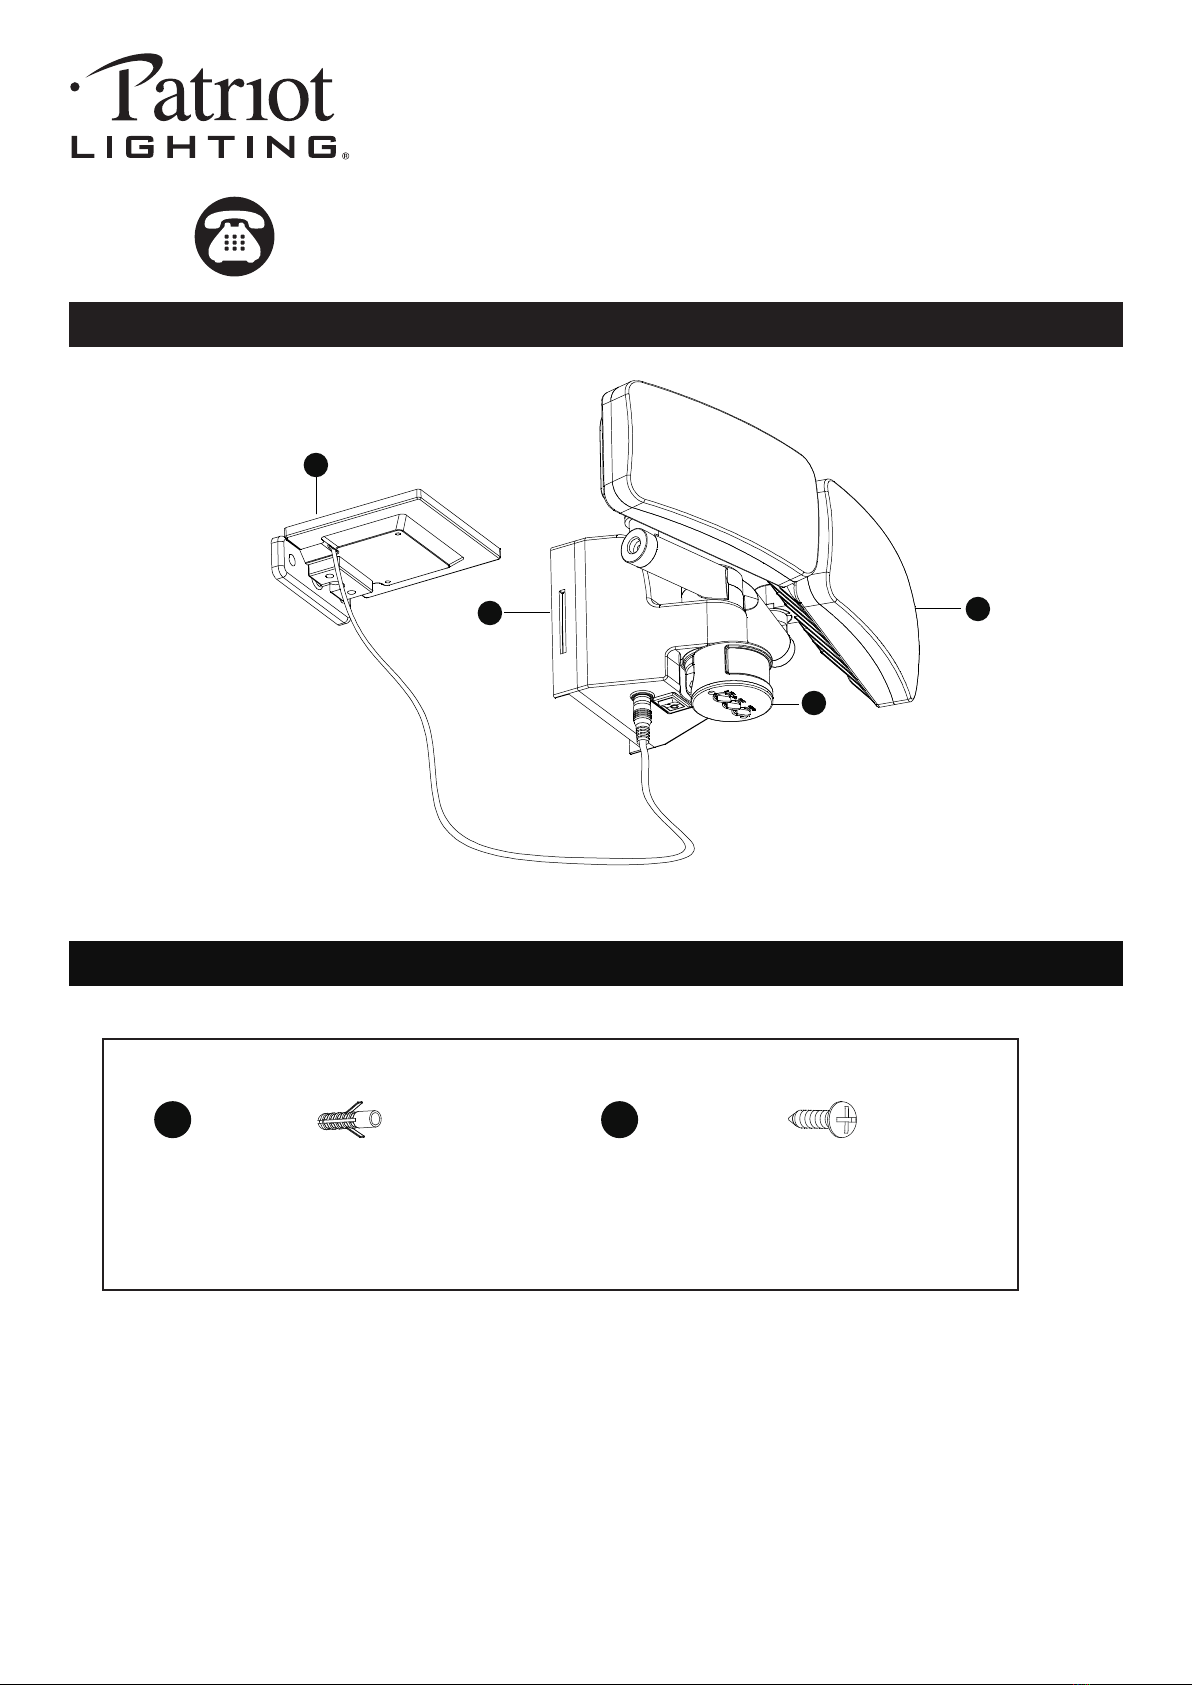
Before beginning assembly, installation or operation of product, make sure all parts are present. Compare parts with
package contents list and diagram on previous page. If any part is missing or damaged, do not attempt to assemble,
install or operate the product. Contact customer service for replacement parts.
Tools Required for Assembly (not included): Phillips Screwdriver, Pliers, Electrical Tape, Wire Cutters, Safety Glasses,
Ladder, Wire Stripper, Electrical Drill.
ASSEMBLY INSTRUCTIONS
PREPARATION
Important to Know
For best results, position the solar panel in a location where it will receive maximum sunlight.Ideally, the location
should be free from cover or shade. You should avoid positioning the light sources, as this may cause the lights
to flicker.
1
Mounting Plate
2
Mounting Surface
BB
AA
Mounting Plate
Slide Down
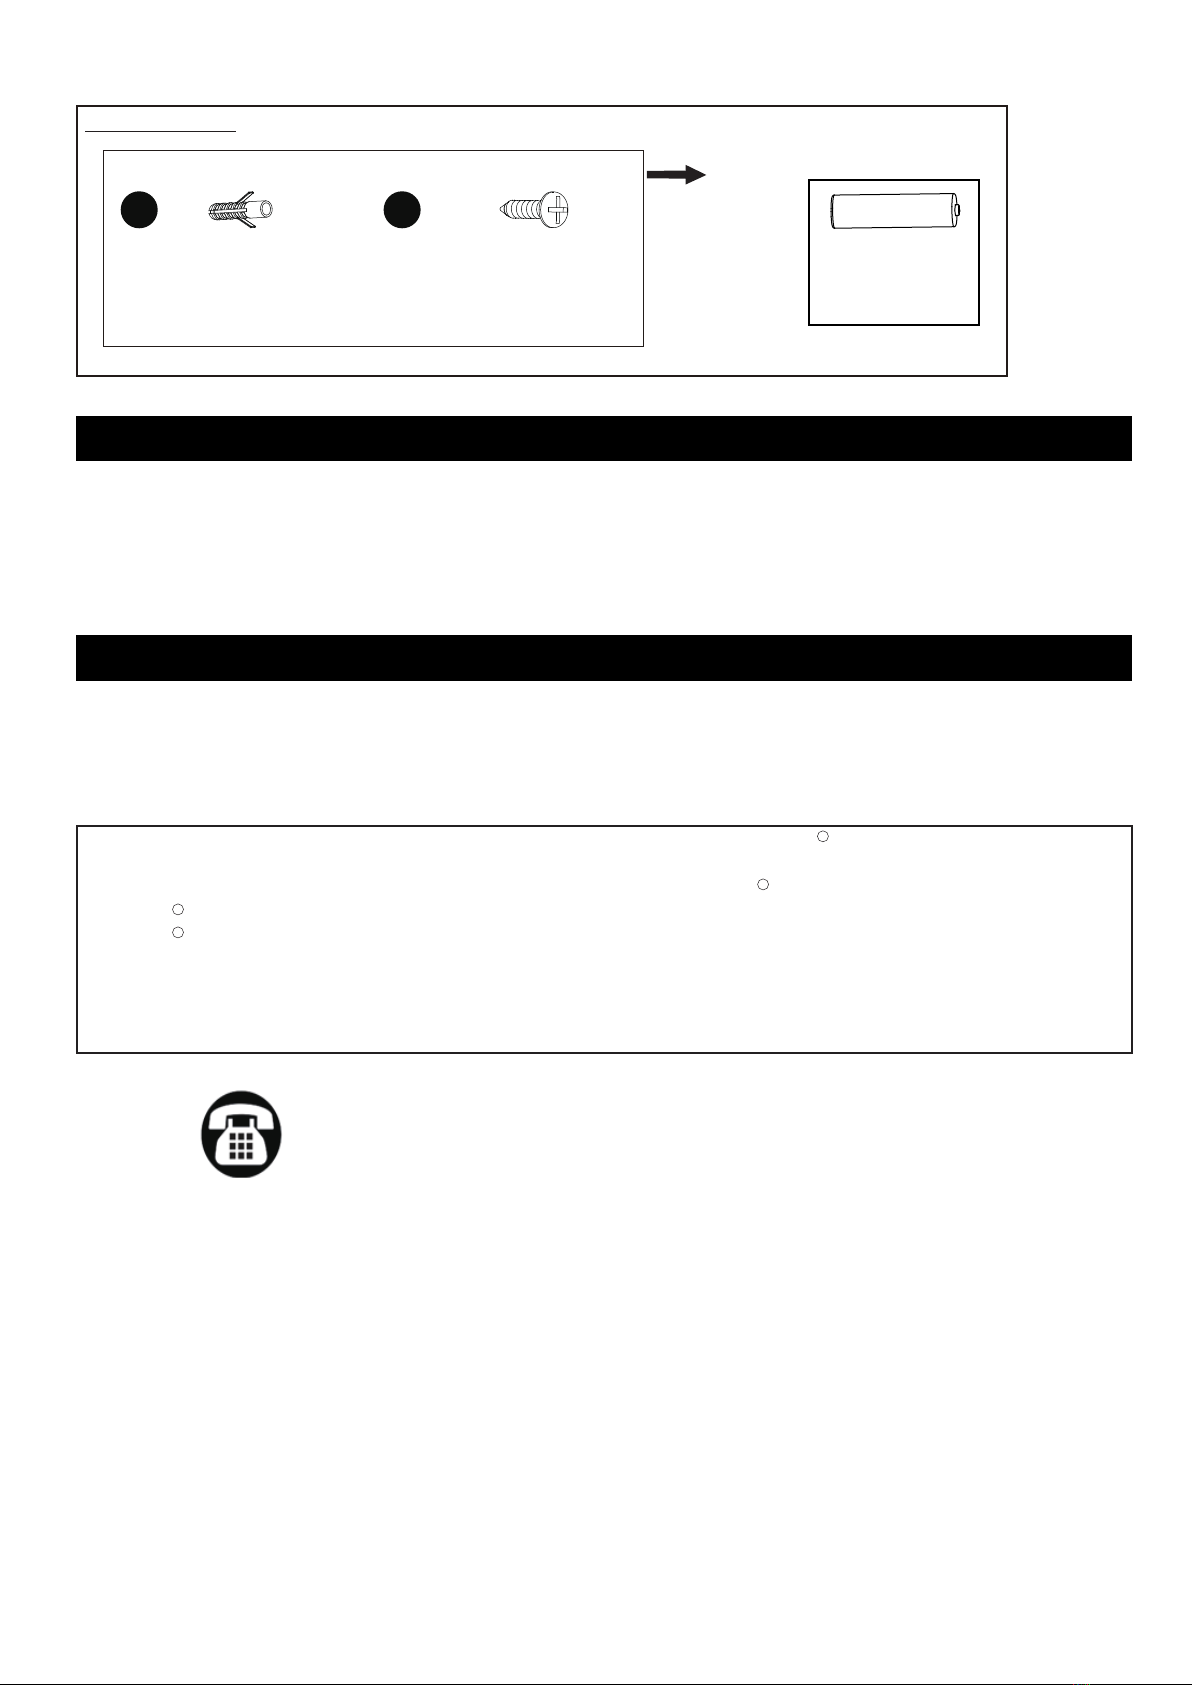
34. Place the solar panel (D) to the
wall and mark drilling location.
Then install the solar panel to
the wall using wall anchors (AA)
and the wall screws (BB)
Note: The solar panel is
equipped with a 16 ft.(5M)
connecting wire,so the light
fixture and solar panel can
be installed up to 16ft.(5M)
apart.
4
AA
BB
D

Page 3 of 6
201027
ASSEMBLY INSTRUCTIONS (continued)
OPERATION
5. Connect the cable from solar
panel (D) to the bottom of light
fixture (A). Only use solar panel
(D) to charge the light, other
external charger may damage
the light fixture.
Adjusting the Sensor Head (C):
1. Aim sensor head toward desired detection area, maintaining a 5° - 40° downward
angle to allow moisture to drain.
Note: Make sure sensor head is positioned with controls facing toward the ground.
2. You can rotate the sensor head up and down to change the coverage area.
(See Fig. 1)
Note: Range set too high may increase false triggering.
(See Fig. 2 and Fig. 3)
5
D
A
C
Fig.1
Sensor Adjustment Higher For Long Coverage
Fig. 2
Sensor Adjustment Lower For Short Coverage
Fig. 3
Adjusting the Light Head (B):
1. Adjust the light head up or down, left or right for desired area.
Keep the light heads at least 1˝ (25mm) away from the
sensor.(See Fig. 4)
2. Keep the light heads (B) face down around 30 degrees
angle to avoid water damage and electrical shock.
Axis
B
Fig. 4

Page 4 of 6
201027
Fig.5
3 Dials
ON OFF
Press the ON Switch “ ” in order to turn the light on (See Fig.5).
The light will activate at 800 lumens once motion is detected for the desired
duration-see “TIME” instructions below.
Press OFF Switch “ ” to turn off. The light will remain off and not detect any
movement (See Fig.5).
ADJUSTING THE LIGHT
On the bottom off the motion sensor unit there are 3 dials:
SENS (sensitivity to motion)- this determines the range of the motion detector.
Rotating the dial clockwise will increase the sensor range from 26ft to 50ft and
a 120˚ angle.
TIME - the duration the light stays on after motion has been detected.
This can be adjusted to the light will remain on from 10 seconds up to 60
seconds when the motion sensor is activated. Rotating the dial clockwise will
extend the time the light is illuminated.
LUX (sensitivity to light)- Turn the “ LUX ” knob clockwise to “ ” position,
the light turns on day and night. Turn the “ LUX ” knob counter clockwise
to “ ” position, the light turns on at dusk and turn off at dawn
automatically - this is the ideal setting for general evening and nighttime.
FUNCTION AND OPERATION
TO INSERT / CHANGE BATTERIES
Notes:
1. The sensitivity of the motion sensor will increase as the
environmental temperature gets cooler. For best performance,
gently clean the lens with a soft cloth every 1 or 2 months to
ensure maximum sensitivity.
2. For best performance, install fixture at least 8 feet above the
ground. At such a height, the fixture will provide a detection
distance of up to 50 feet at 77 degrees Fahrenheit. (See Fig.6)
3. The sensor detects movement across a detection range of
120 degrees. (See Fig.7)
4. The sensor will be more sensitive to motion across its detection
path than motion directly towards it. (See Fig.8)
5. To reduce possible nuisances, do not mount the fixture near a
heat source like an air conditioner, vent or furnace.
Fig.8
Motion
Least sensitive
Motion
Most sensitive
Sensor
10'
8.0'
12.0'
50'
Where you install your fixture is important:
Be sure the light is mounted straight on the wall;
otherwise, the detection distance may be limited.
Fig.6 Fig.7
˚
120

Page 5 of 6
201027
TO CHARGE
Fig.9
Solar Panel
Other charging methods:
- The Lithium lon batteries may be charged in a lithium ion battery charger
(must be purchased separately).
- Alternatively, you can purchase alkaline dry batteries ( type C 1.5V X 3)
and install via the alkaline battery compartment.
* For best results, leave the light on to charge in direct sunlight for three days.
This allows the solar panel's batteries to reach full capacity.
If the solar panel dirty, its charging capacity will be reduced. Clean as required with a damp cloth - avoid harsh
detergents or solvents as these can damage the panel.
If the rechargeable battery loses its charge, the fixture will rely on the alkaline dry battery for power
(if dry batteries are in place)
* WARNING: MAKE SURE A LITHIUM BATTERY CHARGER IS USED AS OTHER CHARGERS MAY NOT BE
COMPATIBLE AND COULD BE A SAFETY RISK.
Using the Alkaline Batteries
3
Replacing the Rechargeable Battery
2
1. Turn the two dials at the back
of the light fixture to unlock the
compartment and pull the cover
open.
3. Turn the two dials at the back
of the light fixture to secure the
compartment.
1. Remove the 4 screws at the
back of the light fixture.
2. Insert the batteries and close
the plate.
Note: Using alkaline dry
batteries (type C 1.5V x 3).
2. Carefully pull back cover of the
light fixture apart, and replace
the rechargeable batteries
inside.
Note: using 2pcs of 3.7V
1500mah Lithium ion
Batteries.
1
3
12
3. Attach the back cover of the
light fixture, and fasten the 4
screws at the back.
TO INSERT / CHANGE BATTERIES

Page 6 of 6
201027
The following parts are available for reorder if damaged or missing. Call our toll free at 1-800-887-6326.
Spare Parts List:
Assembly Kit
6273MM (1 SET)
AA BB
Anchor
X5
Dry Wall Screw
X5
● From time to time, ensure the plug between the solar panel and light is securely connected.
● The solar panel should be cleaned with a damp cotton cloth on a regular basis.
This will ensure optimal performance and battery charging.
● Never let any abrasive material come into contact with the solar panel.
If the light does not turn on: Ensure solar panel is positioned to receive direct sunlight and is not blocked by trees or
other objects. Remove the battery, wipe both ends with a clean, dry cloth and reinstall the battery. Check the battery
to ensure that it is making secure contact with the terminals. If this does not work, replace with a new battery.
If unable to fix any of the above issues, please consult a certified electrician.
Questions, problems, missing parts?
Before returning to your retailer, call our customer service at 1-800-887-6326
Monday – Friday 9:00 a.m. – 5:00 p.m. CST
CARE AND MAINTENANCE
TROUBLESHOOTING
ONE-YEAR LIMITED WARRANTY: If, during normal use, this PATRIOT LIGHTING lighting fixture breaks or fails
due to a defect in material workmanship within one (1) years from the date of original purchase, simply bring this
lighting fixture with the original sales receipt back to your nearest MENARDS retail store. At its discretion, PATRIOT
LIGHTING agrees to have the product or any defective part(s) repaired or replaced with the same or similar PATRIOT
LIGHTING product or part free of charge, within the stated warranty period, when returned by the original purchaser
with original sales receipt. This warranty; (1) excludes expendable parts including but not limited to light bulbs; (2) does
not cover damage that has resulted from abuse or misuse; and (3) does not cover any losses, labor, injuries to
persons/property or costs. This warranty does give you specific legal rights and you may have other rights, which vary
from state to state.
R
R
R
R
Li-ion Battery
X2
7192BB
This manual suits for next models
1
Table of contents
Other Patriot Lighting Floodlight manuals
Popular Floodlight manuals by other brands

Channel Safety Systems
Channel Safety Systems MotionPro Security Lighting Series instructions

GlacialTech
GlacialTech SP100 Installation instruction

LED Lighting
LED Lighting STAGE PRO SPOT 650 user manual

Rosco
Rosco MIRO Cube 4C user manual

Life
Life 39.9F4030F user manual

Milwaukee
Milwaukee M18 SLED user manual