Pawbo WagTag TK010 User manual
WagTag TK010
User Manual

CONTENTS
Getting to know your WagTag...................................................................................3
Before you begin….....................................................................................................4
Package contents.......................................................................................................5
A tour of your WagTag ...............................................................................................6
Charging your WagTag ..............................................................................................7
Attaching your WagTag to pet's collar .....................................................................7
Getting started............................................................................................................8
Download the app...................................................................................................8
Sign Up/In...............................................................................................................8
Edit user prole.......................................................................................................9
Add a pet ................................................................................................................9
Using the application ...............................................................................................12
MyPets screen and Side menu.............................................................................12
Pet page ...............................................................................................................13
Activity ..................................................................................................................14
Track.....................................................................................................................15
Notication............................................................................................................18
Service plan..........................................................................................................20
Group....................................................................................................................21
Firmware upgrade ................................................................................................22
Specication .............................................................................................................23
More Information ......................................................................................................25

3
Getting to know your WagTag
WagTag comes with built-in GPS/GSM functionalities. Through Android/iOS
application connected to your smartphone, you always know where your pets are.
By using your smartphone and WagTag application, you can:
• Activity Analysis
Wag Tag helps you easily realize your pet's activity status. System will
automatically set up the activity goal according to the breed.
• Track Your Pet
WagTag helps you track pet's location in real-time wherever they are on the
smartphone.
• Create Safe Zones
Geo-fencing technology allows you to create multiple safe zones and receive
warning messages when your pet enters or leaves the predened perimeter.
• Set Temperature Warning
Featuring the temperature sensor, WagTag is able to monitor surrounding
temperature. You will receive warning messages on your smartphone when your
pet is feeling overheating or too cold.
• Bark Detection & Voice Recording
With bark detection & voice recording, it could prevent your pets from danger. You
will receive warning messages and record any environmental voice when your pet
has unusual barking behavior.
• Add Group Members
You can create a group and add your family members or friends to follow your
pet's status for group care and sharing.

4
Before you begin…
• Please save this User Manual for future reference.
• Read this User Manual before using your product.
• Do not cover the microphone hole and temperature sensor.
• Do not cover this product with a blanket.
• Only use dry cloth for cleaning.
• Do not place on or drop into water or other liquids.
• Do not attempt to open or disassemble this product.
© 2017 Pawbo All Rights Reserved. Pawbo and the Pawbo logo are trademarks or
registered trademarks of Pawbo Corporation or its subsidiaries. All other thirdparty
marks mentioned herein may be trademarks of their respective owners.
This publication may not be reproduced, in whole or in part, without prior express
written permission from Pawbo Inc.
The information in this Usuer Manual is subject to change without notice.

5
Package contents
Make sure the following items are included within your package. Contact your
authorized dealer or distributor if any item is missing or damaged.
WagTag GPS Tracker Micro-USB Cable
Collar Holder
Quick Guide
Guide rapide
Guía rápida
快速使用指南
Safety Guide
Guide de sécurité
Guide de sécurité
Guida di sicurezza
Sicherheitshinweise
Veiligheidsgids
Guía de seguridad
Quick Guide Safety Guide
Warranty Card
Carte de garantieuide
Tarjeta de garantía
Cartão de garantia
Warranty Card
Note: Actual items might differ from illustrations.
6
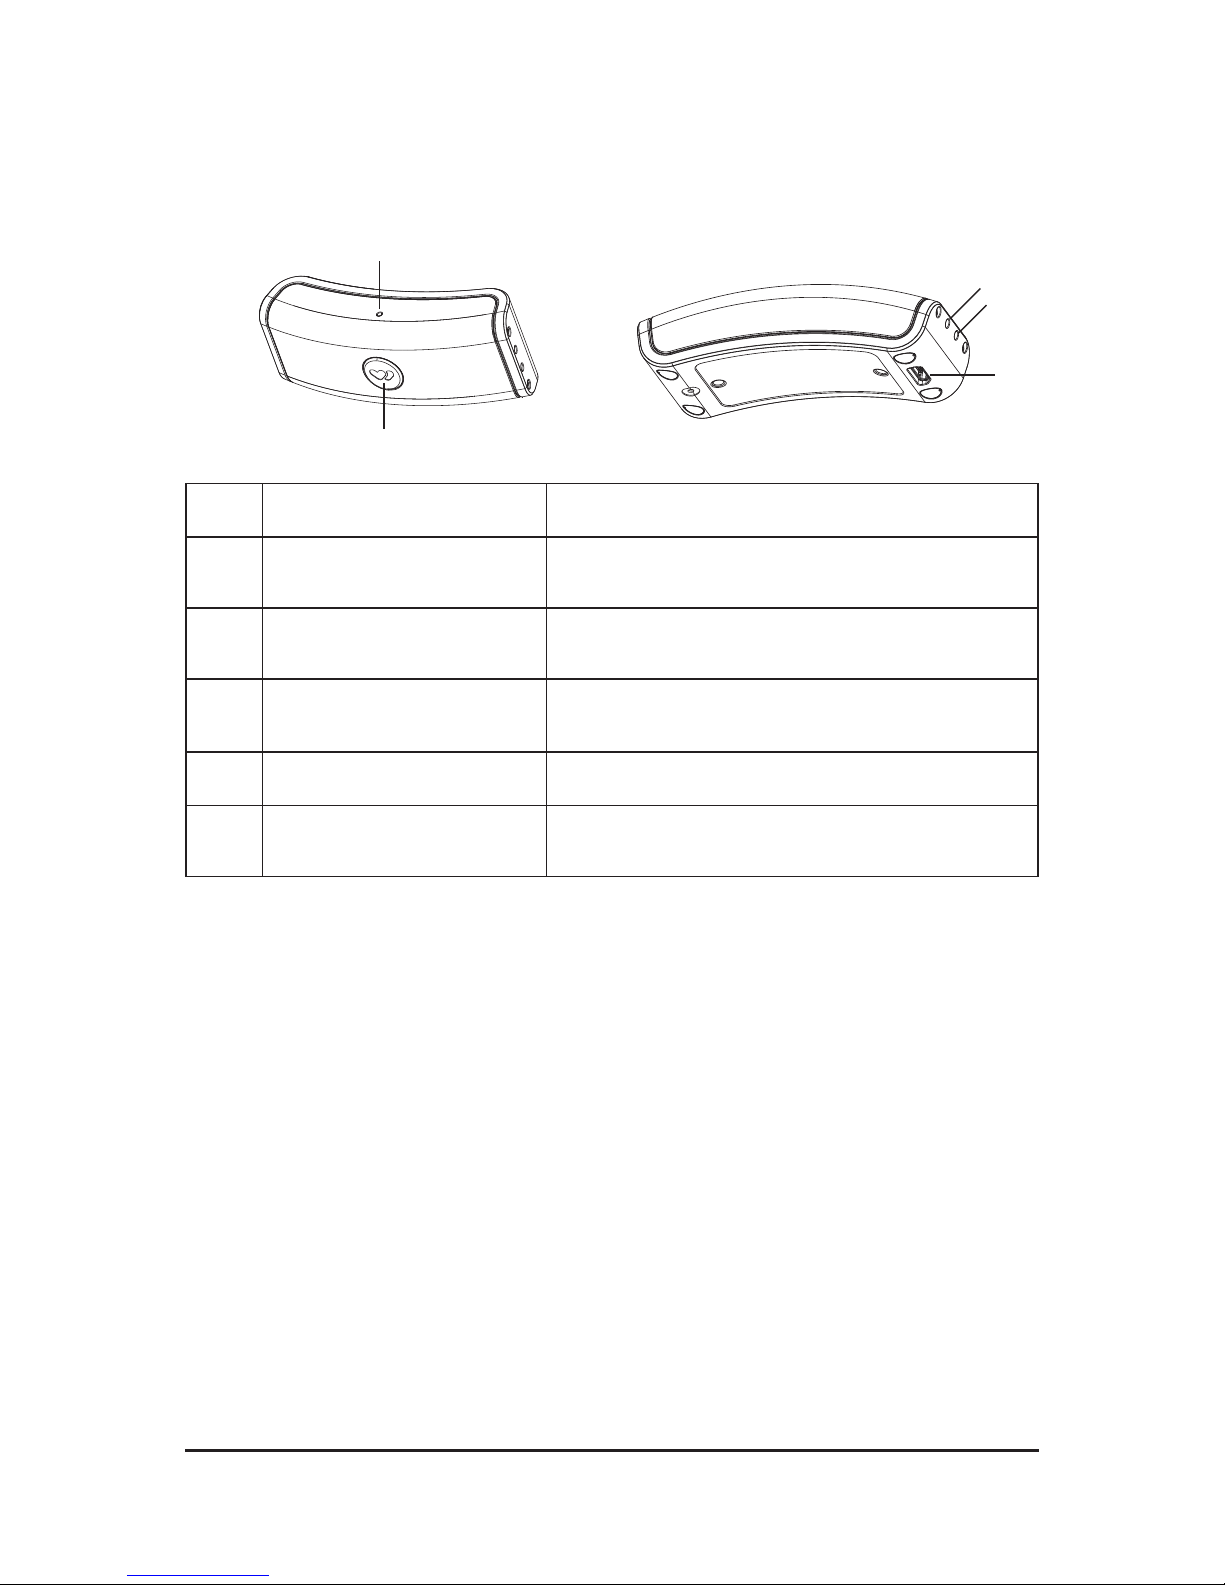
A tour of your WagTag
1
2
3
4
5
No. Item Description
1 LED Indicator light Indicates WagTag's power/battery/
communication status.
2 POWER button Press and hold the POWER button for 5
seconds to power on/off device.
3 Temperature sensor Monitor ambient temperature to keep pets from
danger.
4 Microphone Internal microphone for sound recording.
5 Micro-USB port Connects to the electrical outlet/PC for
charging.
LED indicator light status
• USB cable is disconnected
- Solid GREEN: WagTag is powering on
- Flashing RED: Battery is low
- Solid RED*: Power is powering off
You can short press POWER key to see whether your Wag Tag is still powered on. If the
power is still on, the LED light will ash once GREEN and then off.
• USB cable is connected
- Solid RED: Battery is charging
- Solid GREEN: Battery is fully charged

7
Charging your WagTag
For initial use, you need to charge WagTag (by the provided USB cable) for at least
90 minutes.
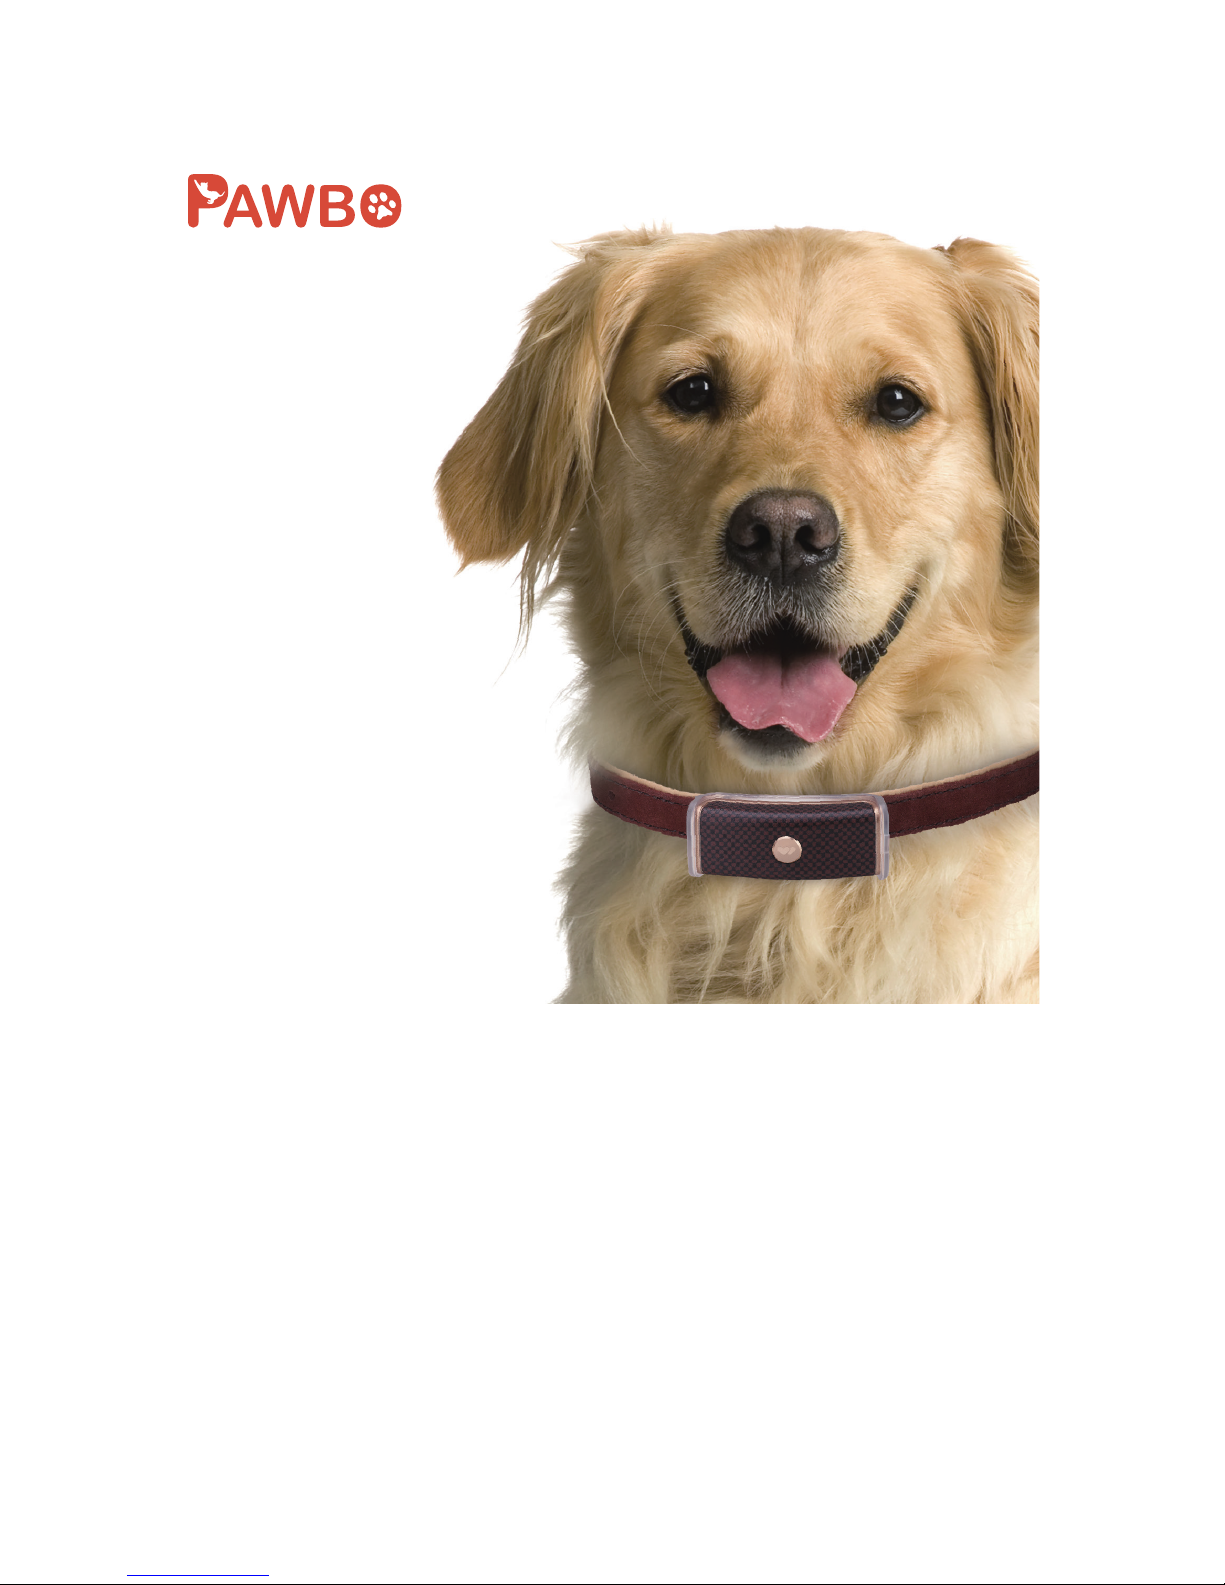
Attaching your WagTag to pet's collar
1. Slip the collar through the holder.
This side up
2. Slide your WagTag into the holder until they securely snap together.
Note:
• The collar’s length is suitable for all breeds of dog/cat. But it is not recommended
to use it with young puppies/kitties.
• If WagTag comes off the holder, you'll receive a warning message and nd its
location using GPS.
8
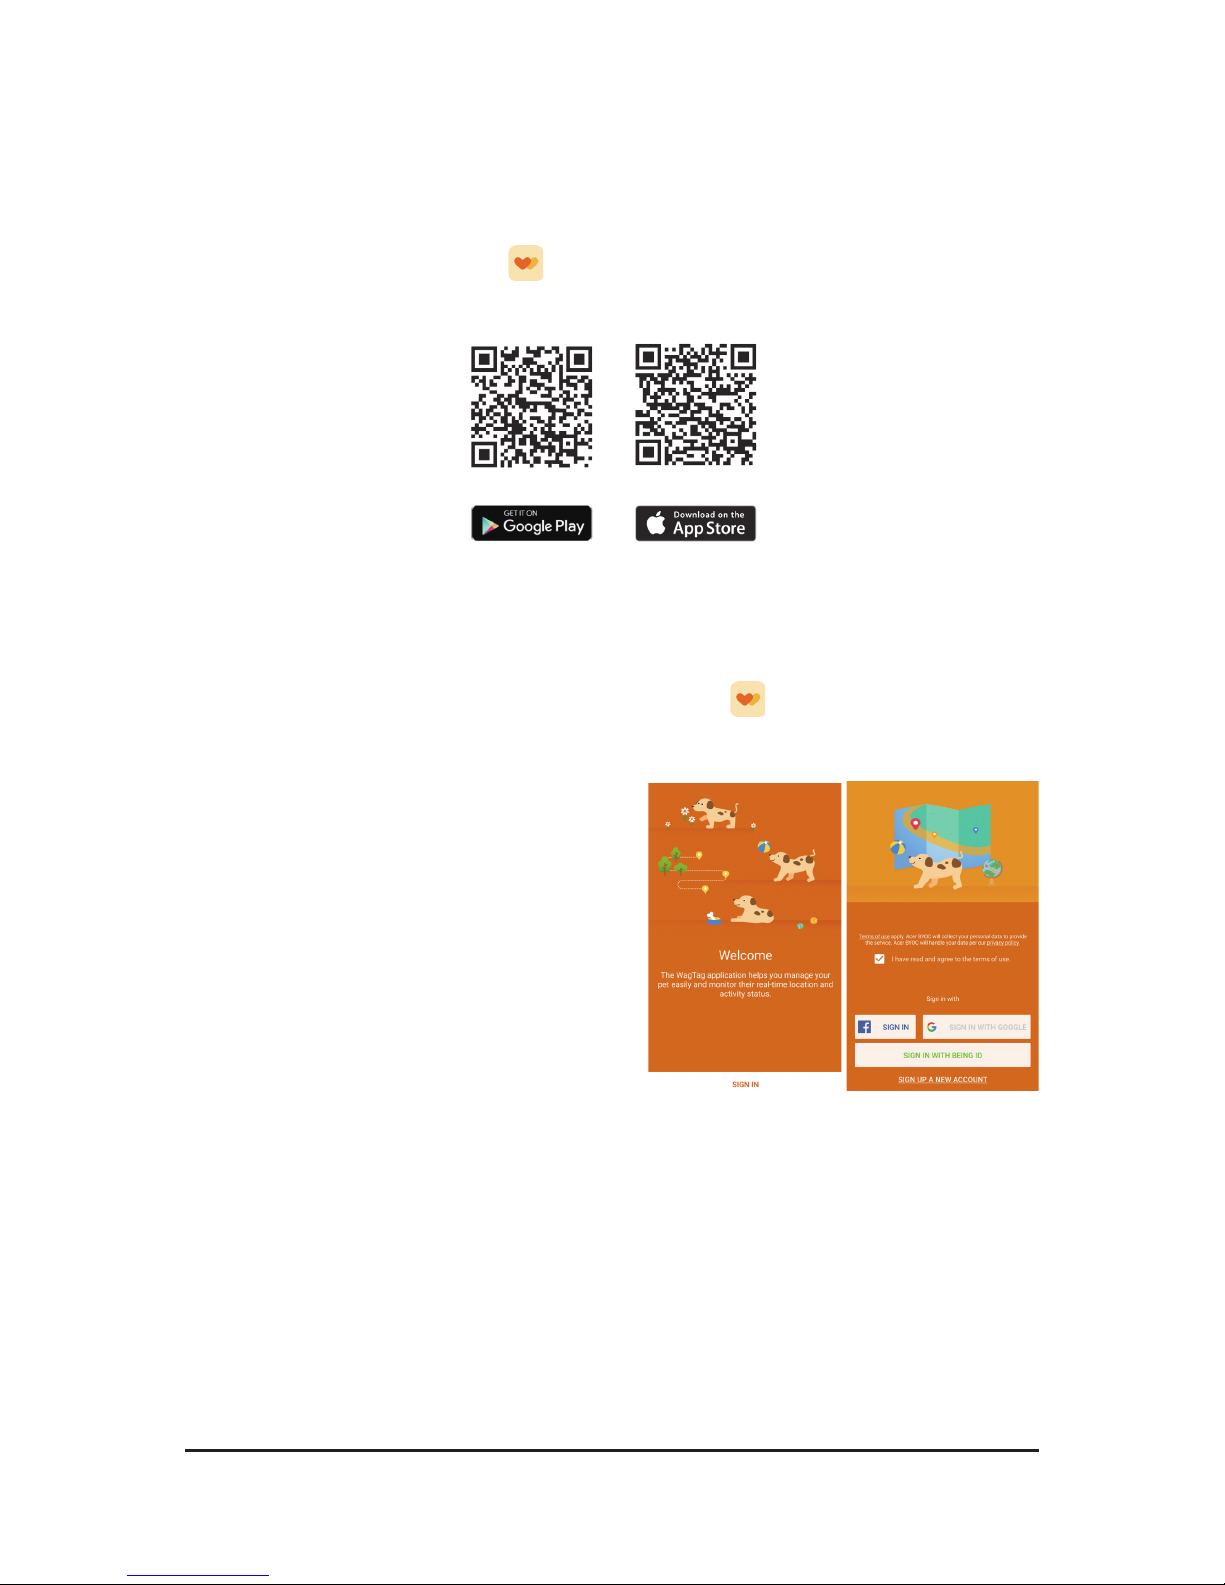
Getting started
Download the app
Download the free WagTag App from either the Google Play (Android) or the App
Store (iOS). Alternatively, scan the QR code below to begin downloading:
Sign Up/In
Once the download is completed, tap on WagTag icon to launch the application.
• Sign up a new account
1. Tap SIGN UP A NEW ACCUNT.
2. Enter your registered email address
and password in the required elds.
3. Tap SIGN UP.
• Sign in with existing account
It allows you to sign in with your existing
Facebook, Google+ or Being ID account.
Note: You’re required to check the "I have
read and agree to the terms of use."
checkbox before tapping any SIGN UP/IN
button.
9
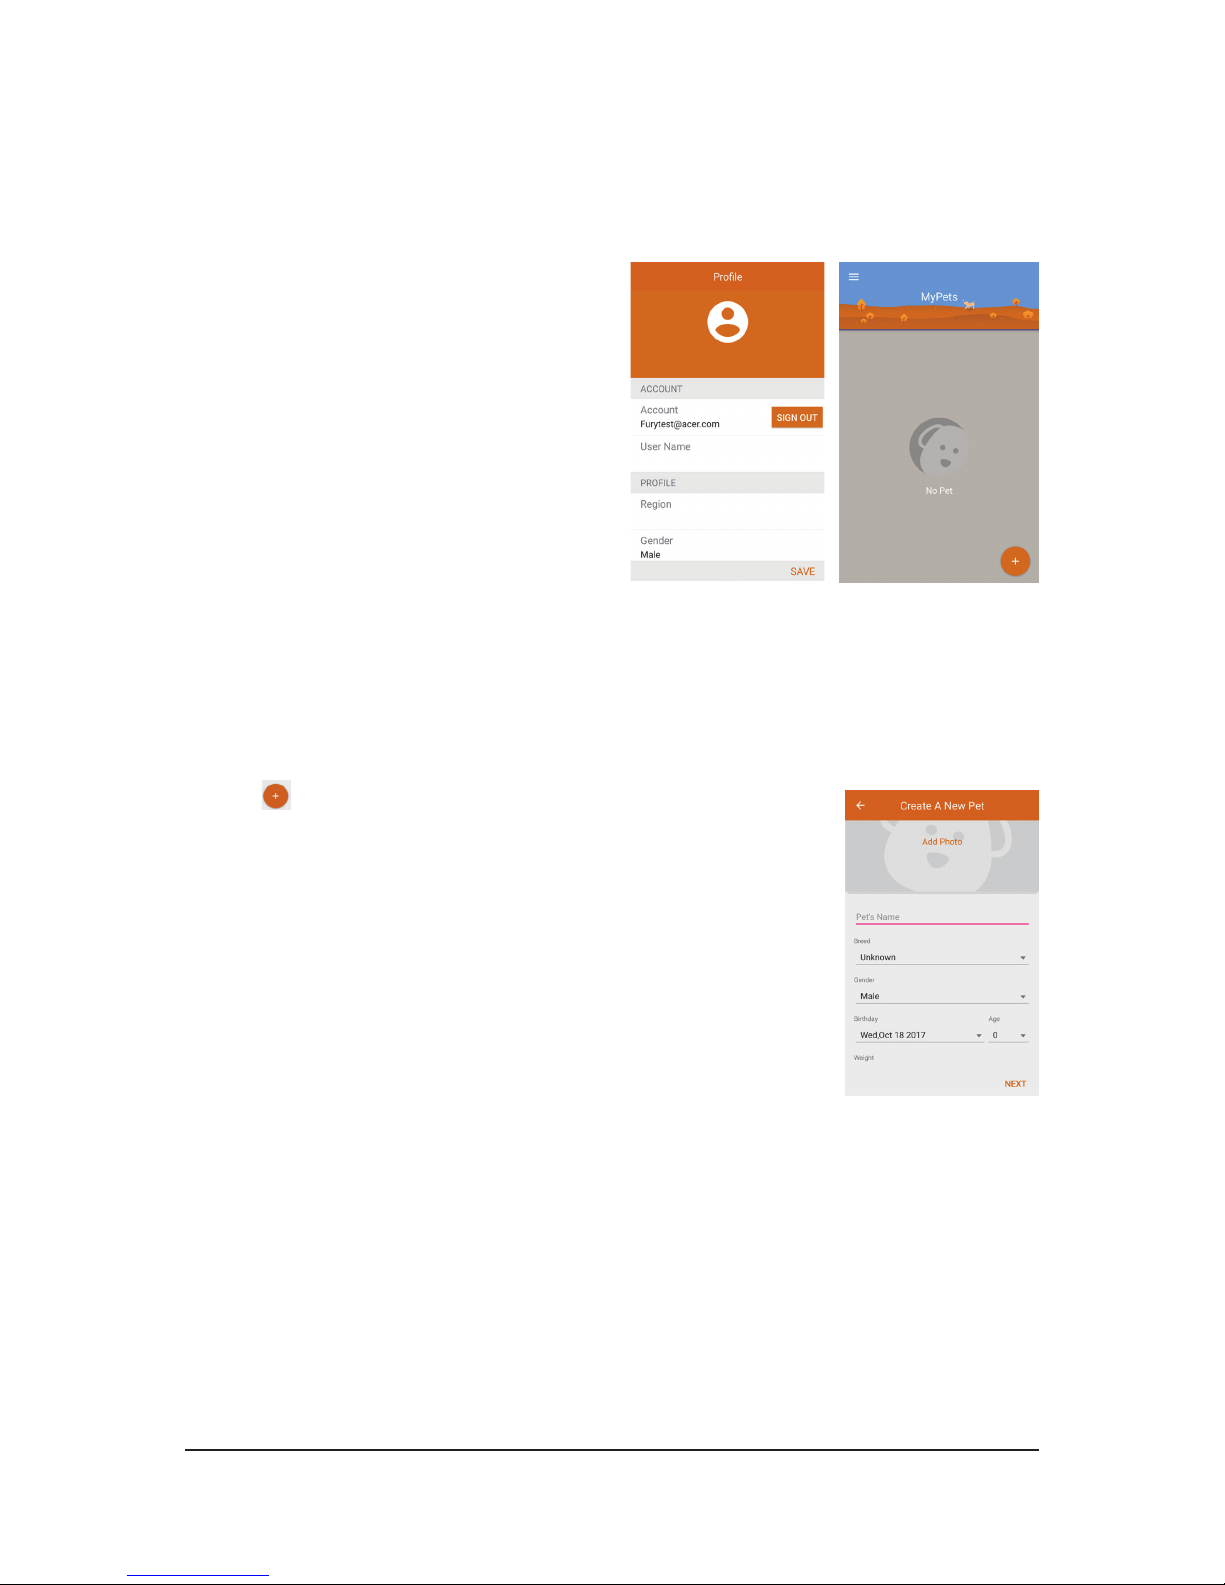
Edit user prole
When you sign in to WagTag app for the rst time, a user prole is created which
describes the personal data for the pet owner.
1. Fill the elds with the data required and
tap SAVE.
2. Then the MyPets screen appears.
Note: You can edit user prole at any time
later.
Add a pet
Please setup a prole for your pet, including photo, breed, birthday, weight and
length.
1. Tap icon to add a pet on MyPets screen.
2. Choose an existing photo from Library or use your
smartphone’s camera to take a new photo.
Note: For best results, use pictures that are in landscape
orientation.
3. Fill the elds with the data required and tap NEXT.
4. Then the screen will prompt you to pair a WagTag device.
Note: You can edit pet prole at any time later.

10
Pair your WagTag
1. Press and hold the POWER button of
your WagTag for 5 seconds to power on
(indicator will ash green).
2. Enable smartphone's Bluetooth function.
3. Tap PAIR on the screen to begin pairing
process.
4. Once pairing successfully, follow the
on-screen instructions to choose your
desired service plan term.
Note: If you have more than one pet, you can pair all WagTag and track all pets at the
same time.
Choose a service plan
The service plan enables data to be transmitted from WagTag to a cellular network,
and then through your WagTag app, you can nd your pet’s location, activity status
and more.
1. Scroll screen down to view available
pricing options.
2. Choose a service plan to t your needs
and tap NEXT.
3. Enter your credit card number,
expiration and CVC Code (a 3 digit
number located on the back of your
card). Then tap CHECK OUT.
4. Once the transaction is successfully
done, the SIM Activate Completed
screen appears. Then tap DONE.
5. A pop-up dialog box appears on the
screen to conrm the activation of GSM
service. Tap OK.
6. The tutorial screen displays. Swipe left
to go through a quick tutorial. It gives
you some ideas of what your WagTag
can do.

11
WiFi connection
It's recommended that using WiFi if available to get the activity and location data
more accurately. In addition, you can conserve battery power by reducing the use of
3G mobile network.
• Tap CONNECT TO WIFI on the tutorial
screen to connect your WagTag to a
network.
• If you do not want to connect network
currently, tap SKIP. You can make a
WiFi connection later on Pet page when
necessary.
Note:
• WagTag will upgrade the rmware automatically after connecting to network.
• WagTag only supports 2.4GHz wireless networks.
• If a WiFi connection isn't available, WagTag may transfer data over your carrier's
cellular network (built-in 3G SIM card), which may result in additional fees.
12
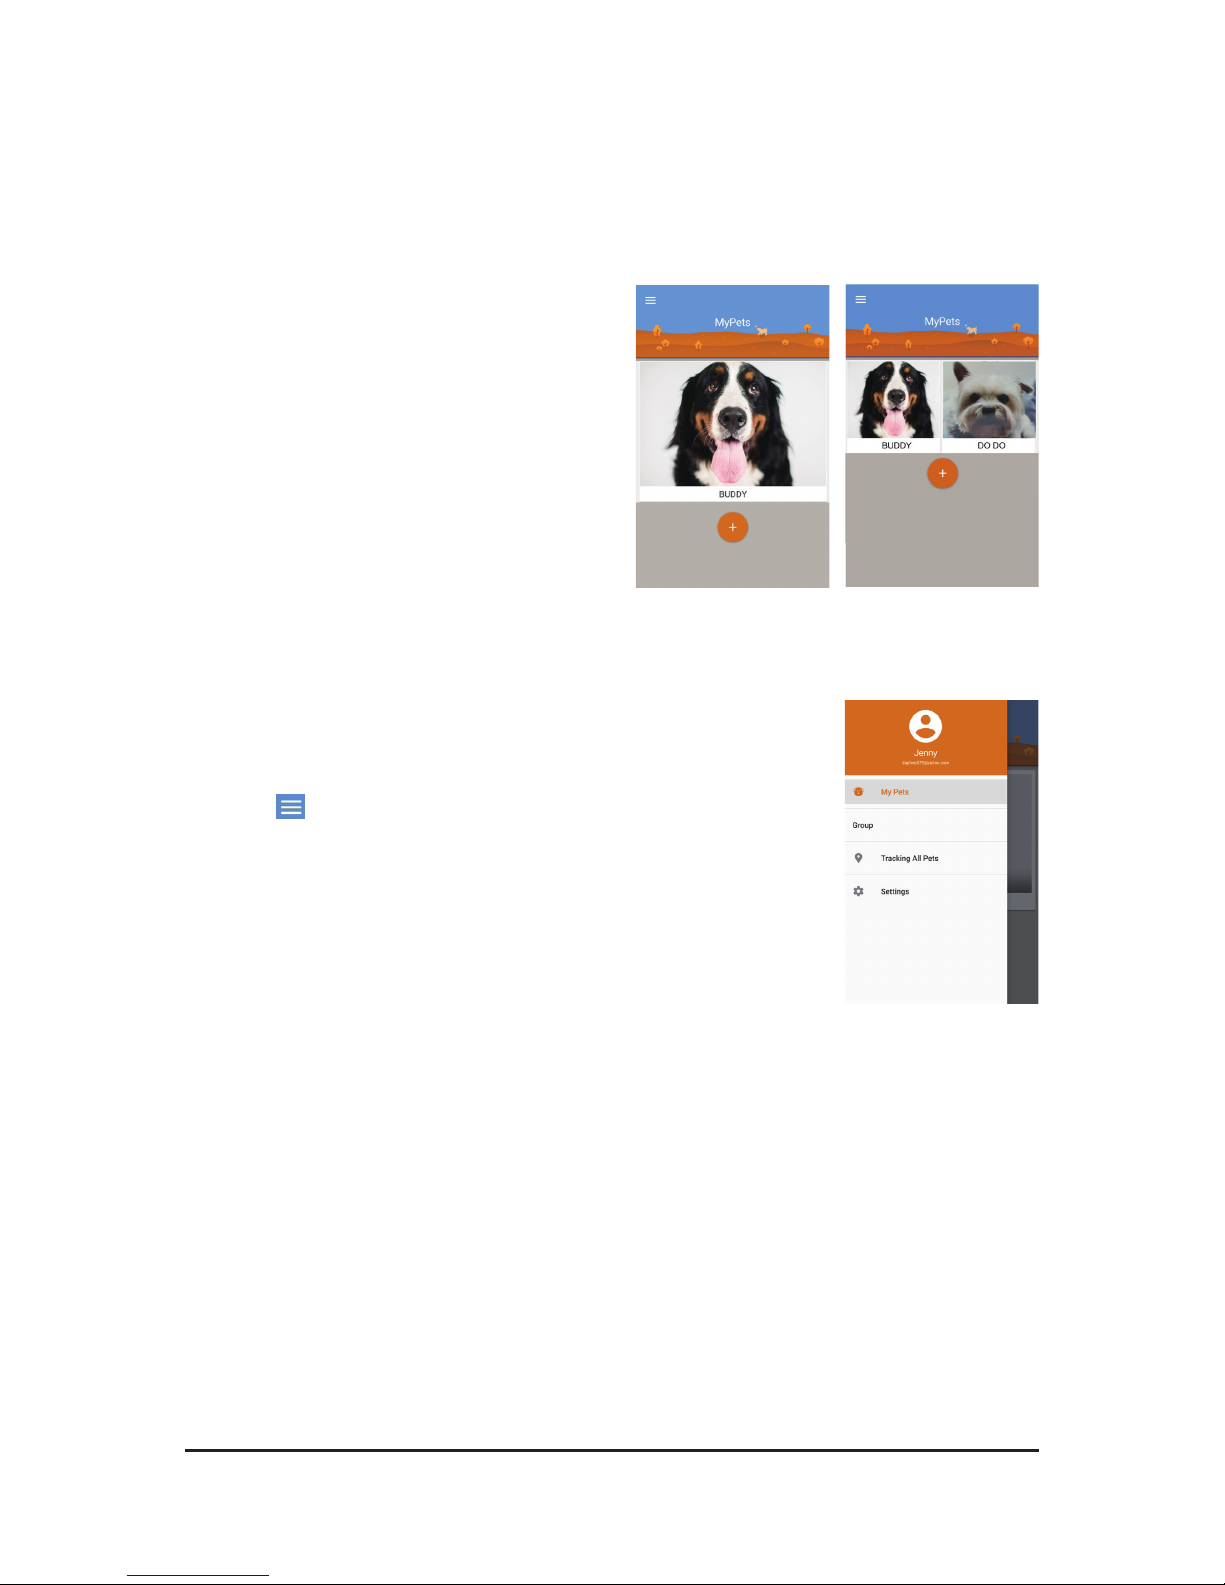
Using the application
MyPets screen and Side menu
• MyPets screen
When you log into your account, the MyPets
screen is the rst screen you’ll see. From
this screen you can:
- View all of your pets on one screen
- Add a new pet
- Access Side menu
One pet More pets
• Side menu
Side menu contains many useful features to manage your pets
easily. Please refer to the following sections which describe
each feature in more details.
- Tap on MyPets screen or swipe right from the left edge
of the screen to open the side menu.
- Tap My Pets on the side menu or swipe left on the screen
to go back to MyPets screen.

13
Pet page
Pet page contains activity data and location tracking information. You can edit pet
prole and change other settings as well in Pet page (e.g., Activity Goal, Temperature
Warning, Refresh Frequency and Plan).
Tap one of the pet photos you’d like to see on MyPets screen and enter to its Pet
page.
In the Pet page:
Tap one photo in
MyPets screen to
enter the Pet page.
Swipe left from the pet's
photo to see other pets'
data (if you have more than
one pet).
Go back to MyPets screen.
Enable/Disable Smart
Leash feature.
Tap to edit pet prole and
settings.
Tap to record.
View Activity data.
View Track information.
Edit pet prole/settings
and change photo.
Warning message.
Note:
• If WagTag is not paired with your smartphone, the Acivity and Track function will
be inactive.
• The Smart Leash feature is like a moving safe zone (up to 20M) to protect your
pets anytime, anywhere you go. Enable this virtual leash feature, if your pets are
out of the Bluetooth range, a warning message will pop up to remind you.

14
Activity
Activity function lets you see the daily level of activity and rest your pet is getting
throughout a day.
Visualize the Activity by Daily, Weekly, or Monthly:
• Daily view
Show the hint of warning
status.*
Change the view mode.
Show how many
percentages your pet
reaches the activity goal.*
Show how many
percentages of a day your
pet spends on resting and
activity.
The Daily view shows a
daily breakdown split into
hours. Tap a certain hour
to see the activity status
at that hour.
Tap the arrows either
side of the date or swipe
right/left to go forwards or
backwards one day.
* Edit the activity goal for your pet in the Pet page.
* Warning status such as out of the safe zone, bark detection or temperature alert.
• Weekly view
Show how many days
your pet reaches the
activity goal in a week.
Show an average of the
activity goal for a week.
Tap the arrows either
side of the date or swipe
right/left to go forwards or
backwards one week.
• Monthly view
Tap a date to go back to
Daily view.
Tap the arrows either
side of the date or swipe
right/left to go forwards or
backwards one month.
* The date will be grayed out if there's no data to view.
15
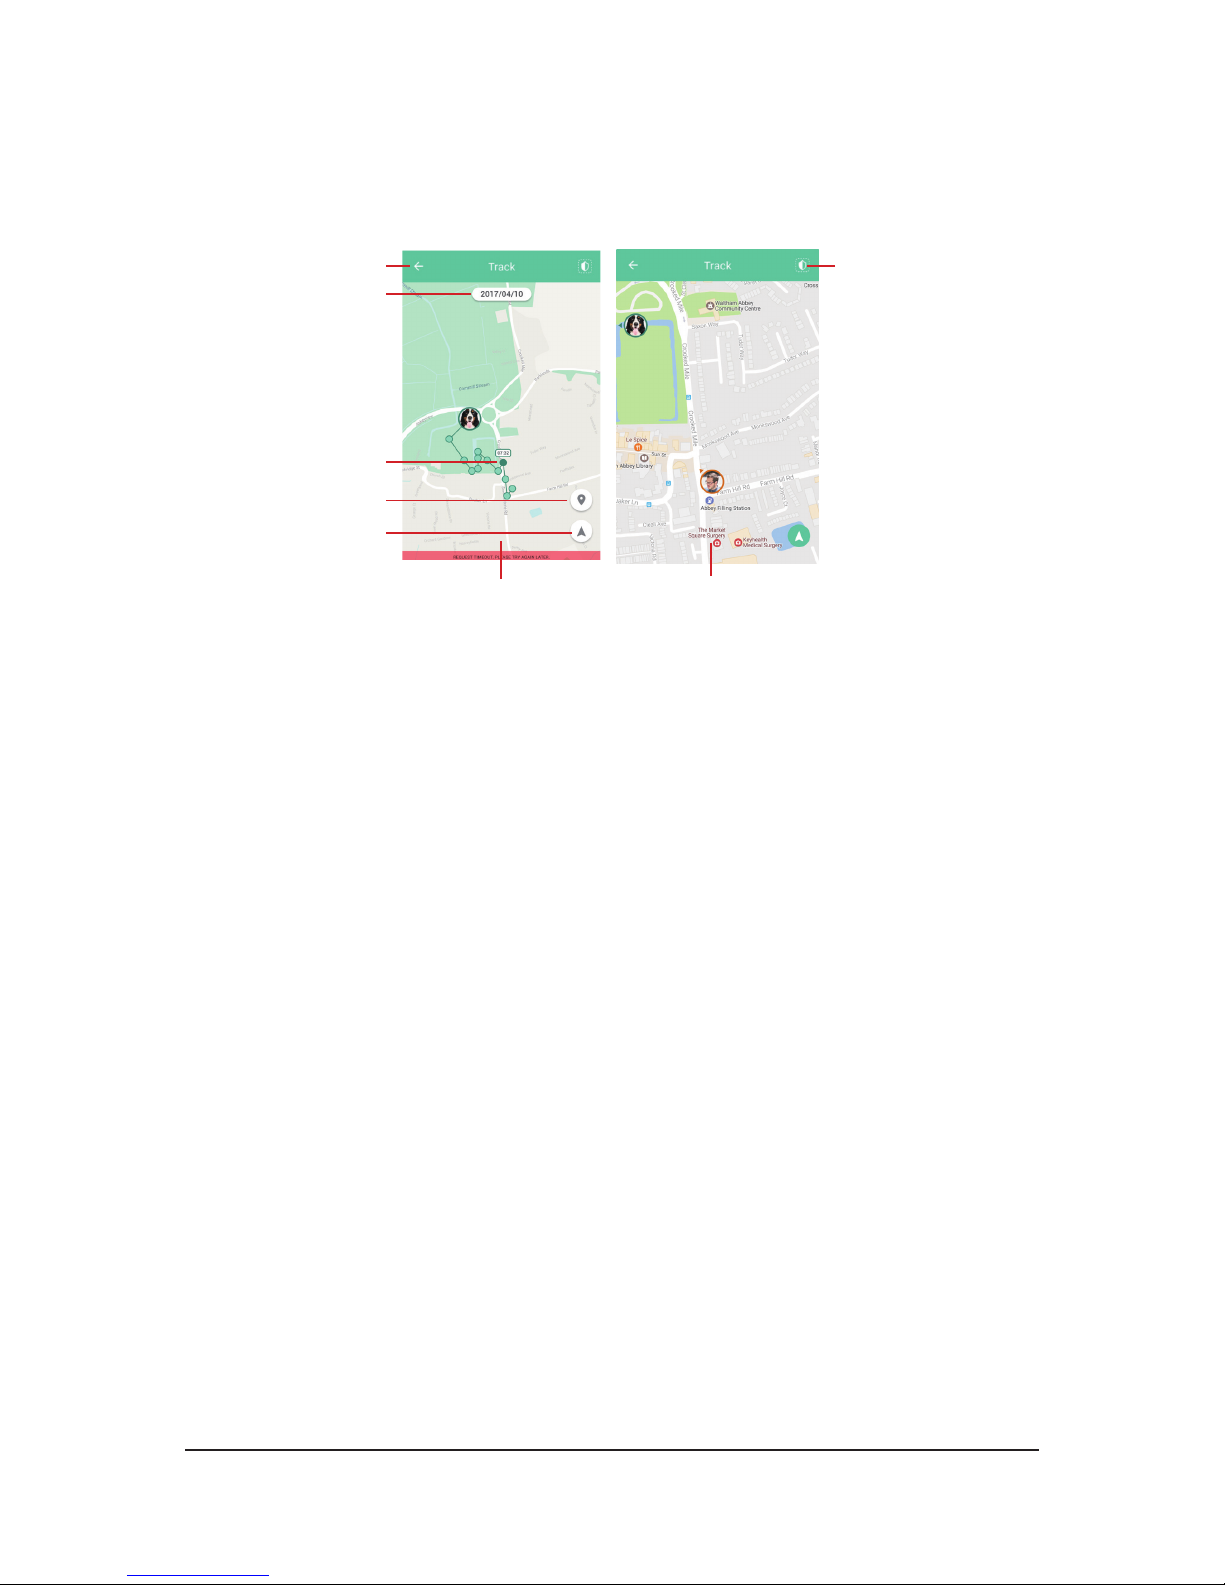
Track
With GPS connectivity, you can locate and track your pet anytime, anywhere.
Go back to the previous
page.
Hover over a dot to see
the time your pet was
there.
Change to Navigation
mode.
Position the current
location.
Date picker*
Trail mode
Navigation mode
Setup the safe zones.
Note:
• If you'd like to track all your pets at the same time, go to Side menu and select
Tracking All Pets.
• Spread or pinch with two ngers on the screen to zoom in or zoom out the map.
• The location trail is a dotted path that shows all of your pet's known locations.

16
Safe zone
You can dene multiple safe zones for your pet. Once your pet has left or entered
safe zones, you'll be informed by messages on your smartphone.
• Add safe zone
1. Tap at the upper right corner on Track
screen to enter Edit Safe Zone page.
2. Tap + or ADD to create a safe zone.
3. Give the safe zone a name (e.g., Home)
and tap OK.
4. Drag the map with your nger in the
direction to which you want it to move to
adjust your view.
Drag the Radius slider to adjust the
size of the safe zone; or tap on the
number eld to enter the desired number
manually.
5. Tap SAVE to store the safe zone, or tap
CANCEL to restart the setup.
6. The safe zone is displayed as a red
circle on the map in Track page.
Note:
• You can add as many safe zones as
necessary.
• It is recommended that a safe zone
radius is at least XXX m.

17
• Edit safe zone
1. Select the desired safe zone from the safe zone list.
2. Tap name/radius eld to enter a new name/number directly.
Or drag the slider to adjust the size of your safe zone.
3. Tap SAVE to apply the changes.
• Delete safe zone
Swipe from right to left on the safe zone which you'd like to
delete. Then tap button to delete it.
Note: To rearrange the order of the safe zones in the list, long-
press a zone you'd like to move, and then drag it to the desired
position.

18
Notication
• Bark Detection
Go to Pet page and choose the correct
barking detection sensitivity for your pet
from Low, Standard to High.
When your pet has an unusual barking
behavior, such as a consecutive barking
with the same pace for XXX seconds (for
a set amount of time), WagTag will start a
voice recording automatically. Meanwhile,
you’ll get a warning message on the
smartphone.
• Temperature Warning
A built-in temperature sensor will monitor
the ambient temperature and send a
message to your smartphone if your pet's
environmental temperature is higher or
lower than the specied range. You can
customize the maximum and minimum
temperature degrees in Pet page.
• Safe Zone Warning
Safe zones are virtual geo-fences enabling you to receive
warning messages on your smartphone anytime when your pet
enters or leaves the predened perimeter.
19
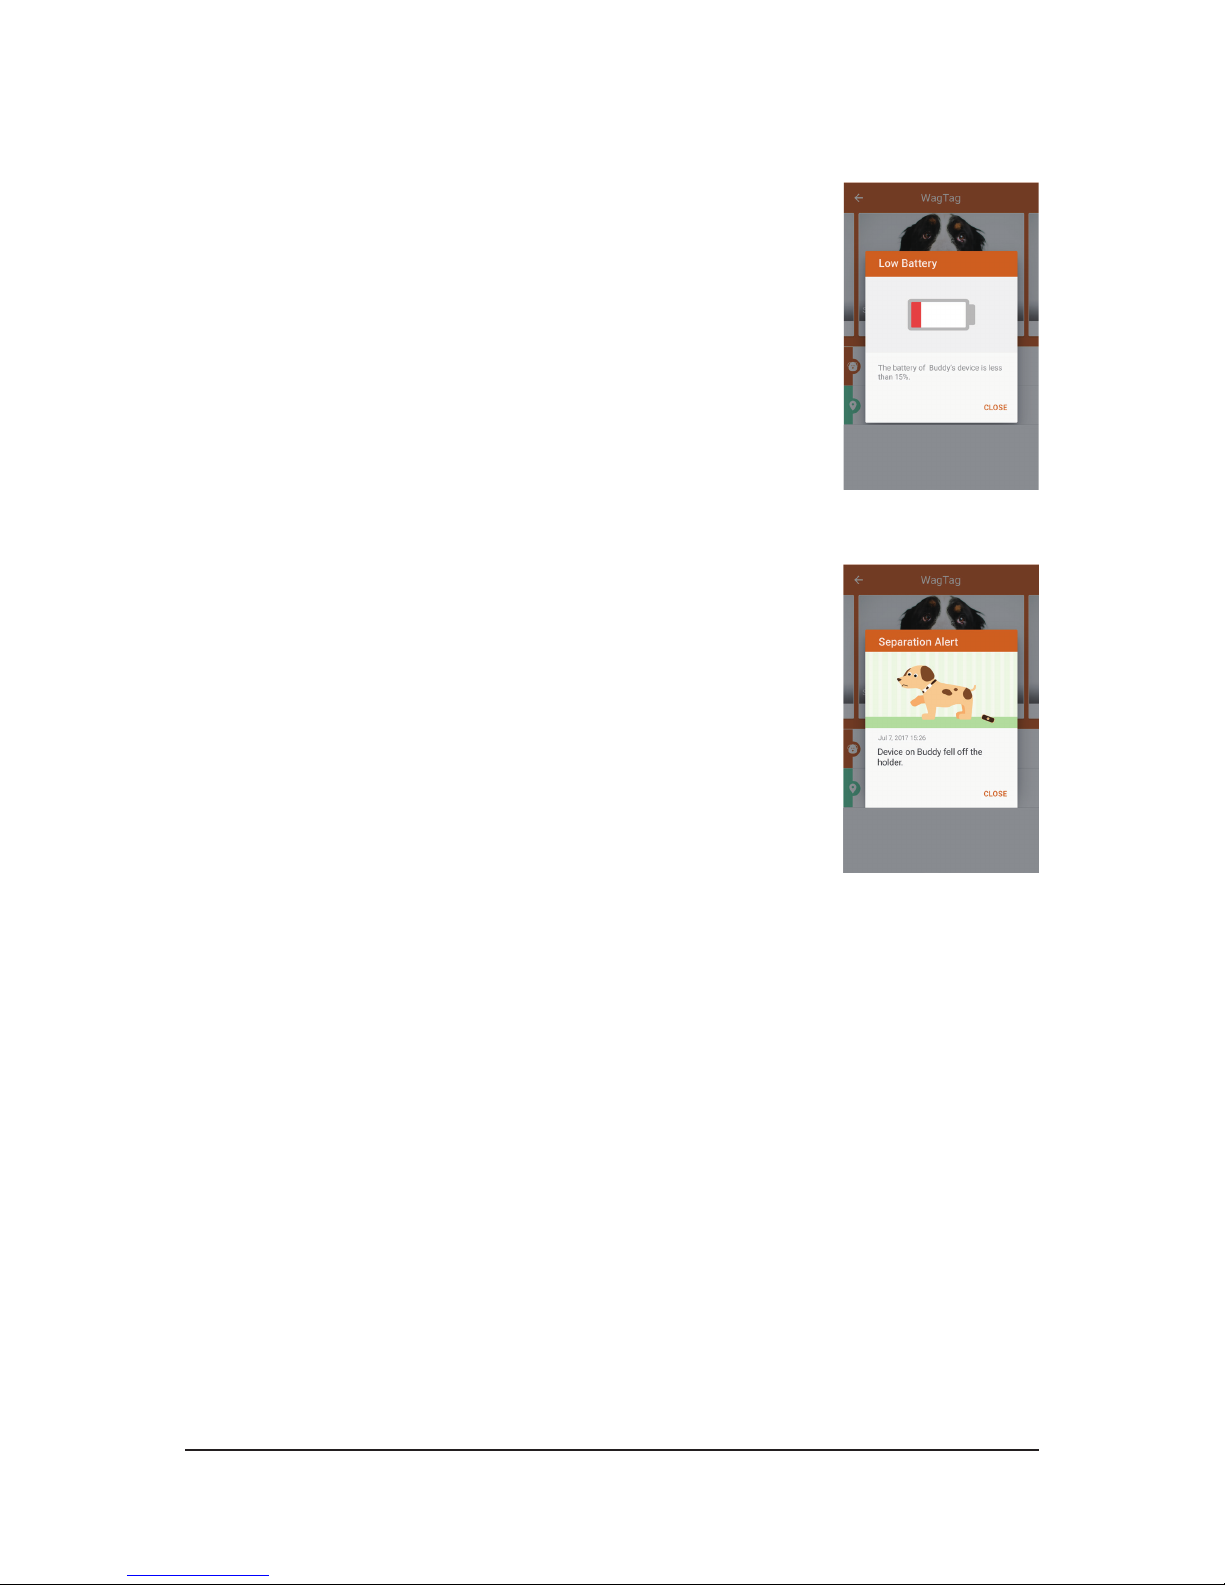
• Low Battery
You'll receive a warning message on the smartphone when
WagTag's battery reserve falls below XXX%. Please charge your
WagTag whenever possible in order to function properly.
• Separation Alert
If WagTag comes off the holder, you'll receive a warning message
and nd its location using GPS.

20
Service plan
You can change your service plan at any time. And be aware of switching plans may
result in the loss of service discounts and add-ons.
• To change your service plan:
1. Tap Edit icon on the Pet page.
2. Scroll down to Plan and tap Edit.
3. Select a service plan and tap SAVE to change.
Remaining days from the previous service plan will be added
to the new one automatically.
• To unsubscribe your service plan or edit payment method:
1. Tap Edit icon on the Pet page.
2. Scroll down to Plan and tap Edit.
3. Scroll down to the end of the plan list.
- Select STOP GSM SERVICE, and tap STOP to unsubscribe.
Your future subscription will be canceled and you won't be charged. In addition,
the past subscriptions will not be refunded.
- Select EDIT PAYMENT, and revise your payment details. Then tap UPDATE.
The payment information is updated, and a conrmation email will be also sent to
your registered email address.
You will be charged with your new credit card for any future subscription from your
renewal date.
Table of contents
Other Pawbo GPS manuals

Popular GPS manuals by other brands

Garmin
Garmin GPSMAP 8X17 installation instructions

ashtech
ashtech Z-Surveyor Operation and reference manual
ATTI
ATTI Shadow Tracker Micro Vision installation instructions

Garmin
Garmin StreetPilot c330 Setup guide

Magellan
Magellan MobileMapper MobileMapper 6 Getting started guide

NavTour
NavTour NT-147 user manual

Garmin
Garmin zumo 665LM installation instructions

Furuno
Furuno GP-150-Dual Operator's manual

YOKO
YOKO TD300 quick start guide

SkyNanny GPS
SkyNanny GPS SkyNanny 1.0 quick start guide

Corvallis Microtechnology
Corvallis Microtechnology ALTO-G12 operating instructions

ROUTE 66
ROUTE 66 SYMBIAN S60 V3 user manual


