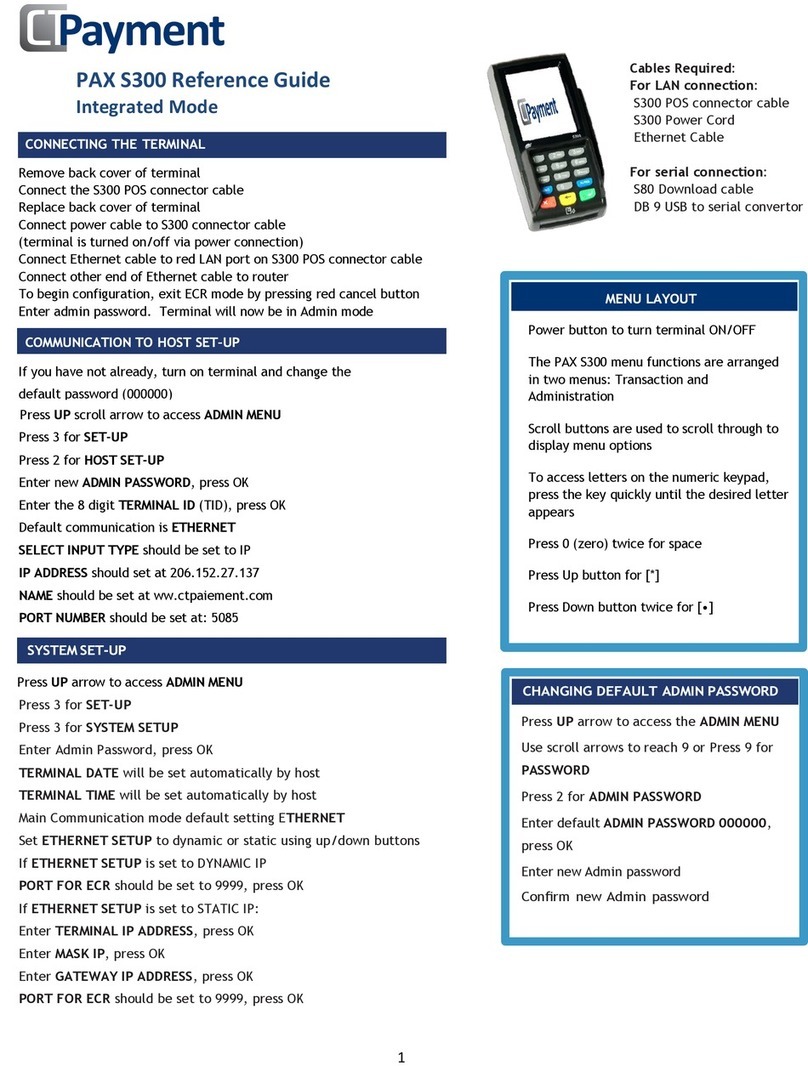
Payment PAX S300 User manual

Page 1of 3
PAX
S300
Set-Up Guide
1
Press
MENU
to access the Admin
MENU
Press 3 for SET-UP
Press 3 for SYSTEM SET-UP
Enter default Admin password 000000, press OK
Enter new Admin password
Confirm new Admin password
SETTING ADMIN PASSWORD
Press Menu to access
ADMIN MENU
.
Select 3 for
SET-UP
, press OK
Select 1 for OPTIONS, press OK
Key in Admin password, press OK
Select MERCHANT LANGUAGE using scroll arrows
Choose Language
CHANGING THE LANGUAGE
Press Menu to access
ADMIN MENU
(default password is 000000)
Use scroll arrows to each 9, or Press 9 to access
PASSWORDMENU
Options
CHANGING MERCHANT AND ADMIN PASSWORDS
TO CHANGE MERCHANT PASSWORD
PRESS1
Enter current password, press OK
Set new password, press OK
Confirm new password, press OK
PRESS 2
Enter current password, press OK
Set new password, press OK
Confirm new password, press OK
To access letters on the numeric
keypad, press the key quickly until
the desired letter appears.
For [ .] press UP scroll arrow
Useyellow Arrow Button to go back
Lit arrows on the terminal screen
indicate more menu options. Press
up or down arrows to reach options
Remove back cover of terminal
Connect the S300 POS connector cable
Replace back cover of terminal
Connect power cable to S300 connector cable
(terminal is turned on/off via power connection)
Connect Ethernet cable to red LAN port on S300 POS connector cable
Connect other end of Ethernet cable to router
To begin configuration, exit ECR mode by pressing red cancel button
Enter admin password. Terminal will now be in Admin mode
To return to ECR mode press yellow arrow button
CONNECTING THE TERMINAL
TO CHANGE ADMIN PASSWORD
PAX S300 Reference Guide
Integrated Mode
Cables Required:
For LAN connection:
S300 POS connector cable
S300 Power Cord
Ethernet Cable
For serial connection:
S80 Download cable
DB 9 USB to serial convertor

Page 2of 3
Set-Up Guide
2
3
If you have not already, turn on terminal and change
default password (000000)
from 000000 (see Change Password instructions)
Press Menu to access
ADMIN MENU
Press 3 for SET-UP
Press 2 for HOST SET-UP
Enter new Admin password, press OK
Enter the 8 digit terminal ID (TID), press OK
Default communication is Ethernet
Select INPUT TYPE
Select up scroll arrow for IP
IPADDRESS should set at206.152.27.137
NAME should be set at www.ctpaiement.com
PORT NUMBER should be set at: 5085
Press Menu to access
ADMIN MENU
Press 3 for SET-UP
Press 3 for SYSTEM SET-UP
Enter Admin Password, press OK
TERMINAL DATE will be set automatically by host
TERMINALTIME will be set automatically by host
Main Communication mode default setting
ETHERNET
Set ETHERNET SETUP to dynamic or static using scroll arrows
If ETHERNETSETUPis set to STATICIP:
Enter terminal static IP address, press OK
Enter Mask IP, press OK
Enter Gateway Address, press OK
If ETHERNET SETUP is set to DYNAMIC IP:
To Set AUTOMATIC DNS to YES, use scroll arrows, press OK
If AUTOMATICDNS is set to NO:
Enter primary and secondary IP addresses
Use the Up scroll arrow to enter [ •]
SYSTEM SET-UP
COMMUNICATION TO HOST SET-UP
Changing Language
Press Up scroll arrow to access
Admin menu
Select 3 then 1
Enter ADMIN password, press OK
Press OK until Merchant
Language appears
Choose Language
Press Cancel twice to return to
main screen
IMPORTANT NOTE: When terminal
is in training mode any Sale
transactions will not be processed.
Please ensure you turn Training
OFF to begin accepting payments.
Batch must be closed (settlement) to
be in training mode
Press Menu
Press/scroll to 8 for
TRAINING mode
Enter merchant password, press OK
Select
TRAINING
YES/NO, press OK
Training Mode
Press Menu to access
ADMIN MENU
Press 9 to access
PASSWORD MENU
Options
Enter the Admin password, press OK
For each function choose:
Yes= Turn On No=Turn Off
ENABLE PASSWORD TO RESTRICT VARIOUS TERMINAL FUNCTIONS
PAX S300 Reference Guide

Page 3of 3
4
Press Menu to access the ADMIN MENU
Press 3 for SET-UP
Press 1 for OPTIONS
Enter Admin Password, press OK
NOTE: Debit
SURCHARGE
Fee is configured by CT-Payment at the time of merchant set-up
SetLANGUAGE
Set APPLICATION MODE (Retail/Restaurant/Driver) using scroll arrows, press OK
Set
TERMINAL TYPE
to Debit only or both Debit and Credit using scroll arrows, press OK
Set
TIP OPTION
to ON/OFF using scroll arrows, press OK
IMPORTANT: If Tip is YES, set the 3 TIP PRESET amounts
Set
CASH BACK OPTION (Debit Only)
to ON/OFF using scroll arrows, press OK
If Cash Back Option is set to YES you can predefine cashback amounts.
Set
PRESET 1
Cashback amount
Set
PRESET 2
Cashback amount
Set
PRESET 3
Cashback amount
Set Cash Back Signature Line to ON/OFF using scroll arrows, press OK
Set ENTER LAST 4 DIGITS to activate fraud protection of swiped transactions
.
Set to ON/OFF using scroll arrows
Set
INVOICE NUMBER
to OFF or
Manual or Auto if tracking
invoice numbers with transaction IDs, press OK
Set
TERMINAL BACKLIGHT
from0 (dimmest)to99(brightest),press OK
Set
TERMINAL BUZZER
to ON/OFF using scroll arrows
TERMINAL FUNCTIONS/OPTIONS SET-UP
Set-Up Guide
5
Press the UP scroll arrow to access
ADMIN MENU
Press 4 for KEYEXCHANGE function
Terminal will automatically connect to Host and update KEYS
CT-PAYMENT KEY EXCHANGE
Press the UP scroll arrow to access ADMIN MENU
Press 6 for MAINTENANCE function, press OK
Press 1 for DLLPARAMETERS, press OK
Terminal will automatically connect to Host and update DLL parameters
Press 2 for EMVPARAMETERS, press OK
Terminal will automatically connect to Host and update EMV parameters
CT-PAYMENTHOST DOWNLOADS
For assistance contact us:
1 888 800 6622
support@ctpayment.com
Technical Support
This function can also be completed in ECR mode
Press Menu
Press 1 for Settlement
Enter merchant password, press OK
Complete pre-authorizations if required
Confirm total Sales and Transaction Count details, press OK
Confirm refunds and transaction count details, press OK
CT-PAYMENT HOST DOWNLOADS
CT-PAYMENT HOST DOWNLOADS
CT-PAYMENT HOST DOWNLOADS
BATCH CLOSE (SETTLEMENT)
PAX S300 Reference Guide
Other Payment Touch Terminal manuals
Popular Touch Terminal manuals by other brands
Beijer Electronics
Beijer Electronics X2 base 10 v2 Hardware and installation manual
HP
HP Rp5000 - Point of Sale System Getting started

Muller
Muller TOUCH800 Installation and operating instructions
Carel
Carel PLD Series quick start guide
Autonics
Autonics AFS Series product manual

PostFinance
PostFinance PAX A35 user manual
