PCD c5017 User manual

1 Preface
Thank you for purchasing this cellular phone.
To guarantee your cellular phone works properly, please follow the instructions in this manual to prevent
any possible incidents or malfunctions.
Follow all safety warnings to avoid injury or property damage.
Screen displays and illustrations in this user’s manual are designed to help you to operate your phone.
We continuously strives to improve our products. Therefore, we reserves the rights to revise this
user manual or withdraw it at any time without prior notice.

Contents
1 Preface------------------------------------------------------------------------------------------------------------------------------1
2 Introduction -----------------------------------------------------------------------------------------------------------------------3
2.1 PHONE DISPLAY .........................................................................................................................................3
2.2 KEY...........................................................................................................................................................4
2.3 ICONS &SYMBOLS......................................................................................................................................5
3 Getting Started -------------------------------------------------------------------------------------------------------------------7
3.1 INSERTING THE SIM CARD...........................................................................................................................7
3.2 TURNING THE PHONE ON............................................................................................................................10
3.3 CHARGING THE BATTERY...........................................................................................................................10
3.4 INSERTING A T-FLASH CARD......................................................................................................................11
3.5 IMPORTANT PASSWORD.............................................................................................................................11
3.6 SUB-SCREEN............................................................................................................................................12
4 Text Entry------------------------------------------------------------------------------------------------------------------------13
4.1 INPUT METHOD.........................................................................................................................................13
4.2 PREDICTIVE TEXT ENTRY............................................................................................................................13
4.3 MULTI-TAP INPUT......................................................................................................................................14
4.4 NUMERIC INPUT ........................................................................................................................................14
5 Calling-----------------------------------------------------------------------------------------------------------------------------15
5.1 MAKING A CALL ........................................................................................................................................15
5.2 ANSWERING A CALL ..................................................................................................................................15
6 Function Menu ----------------------------------------------------------------------------------------------------------------- 16
6.1 HOW TO USE ...........................................................................................................................................16
6.2 MENU ......................................................................................................................................................16

2
6.3 MESSAGES...............................................................................................................................................17
6.4 FUN &GAMES..........................................................................................................................................19
6.5 STK........................................................................................................................................................19
6.6 CALL CENTER...........................................................................................................................................20
6.7WAP.......................................................................................................................................................22
6.8 PHONEBOOK.............................................................................................................................................23
6.9 MULTIMEDIA .............................................................................................................................................25
6.10 ORAGNIZER............................................................................................................................................32
6.11 SETTINGS...............................................................................................................................................35
7 Precautions----------------------------------------------------------------------------------------------------------------------46
8 Troubleshooting ---------------------------------------------------------------------------------------------------------------49
9 Safety Information and Notices-------------------------------------------------------------------------------------------52
12 MONTH LIMITED WARRANTY------------------------------------------------------------------------------------------- 58

3
2Introduction
2.1 Phone Display

4
2.2 Key
Key
Function
Pick-Up Press to answer a call or dial a call after you enter a phone number. In idle mode, press
to view the call log.
Hang-Up Press to end a call. Press and hold to turn the phone on/off. Within a menu, press to
return to idle mode.
Left Soft Key In idle mode, press to enter the Menu. Press to access the option listed directly above it
on the display.
Right Soft
Key
In idle mode, press to access the Phonebook list. Press to access the option listed
directly above it on the display. Within a menu, press to return to the previous screen.
OK
Within a menu, press to confirm and/or select the option listed above it.
Numeric key Press to enter the corresponding number, letter or symbol located on the key. Within a
menu, press to access the corresponding menu option.
*
Press the * Key twice quickly to enter ‘+’ to make an international call. Press and hold
the * key to toggle between *, +, P, and W. Press to enter symbol when editing text.
# In idle mode, press and hold to toggle between Silent mode and general mode. Press to
switch input modes when entering text.
Navigation
Key
Within a menu, press up, down, left or right to scroll through menu options. In idle mode,
press left to enter Phonebook; press right to enter Fun & Games; press up to access

5
Messages; press down to enter STK.
Note: “Press” in this manual, means to press and release the key; “press and hold” means to press
and hold the key for at least 2 seconds.
2.3 Icons & Symbols
In idle mode, network and battery icons are displayed all the time. The rest of the icons appear if the
feature is available and do not appear if the feature is unavailable. If the network symbol is not displayed,
the network is currently unavailable. You may be in a bad reception area moving to a different location
may help.
Icon
Description
Network - The left portion indicates whether your phone is already registered with a
network and the right portion indicates signal strength (from no signal to strongest).
Battery - Indicates battery level. When charging, a scrolling icon will be displayed.
The more bars, the stronger the charge.
Message - Indicates you have one or more unread messages.
Missed call - Indicates there is a missed call.
Call Divert - Indicates that “Divert All Voice Calls” is activated.

6
Alarm-Indicates that the alarm clock is on.
Headset-Indicates that headset profile is activated.
Indicates your phone is locked.
Alert type is “Ring”.
Indicates your phone uses the alert type of “Vibrate and ring”.
Indicates your phone uses the alert type of “Vibrate then ring”.
Indicates your phone uses the alert type of “Vibrate”.
Indicates your phone has logged onto GPRS.
Push message-Indicates that you have received new push message.
Voicemail- Indicates voice messages that have not been heard.

7
3 Getting Started
Please read the safety instructions in the "Safety Information and Notices" section before use.
Before using your phone, you must insert a valid SIM card supplied by your GSM operator or retailer. The
SIM card contains your subscription information, your mobile telephone number and a small quantity of
memory in which you can store phone numbers and messages.
You can also insert a memory card. This provides you with expanded memory capability, which allows
you to store additional music, photo and video files separate from the phone's built-in memory.
3.1 Inserting the SIM Card
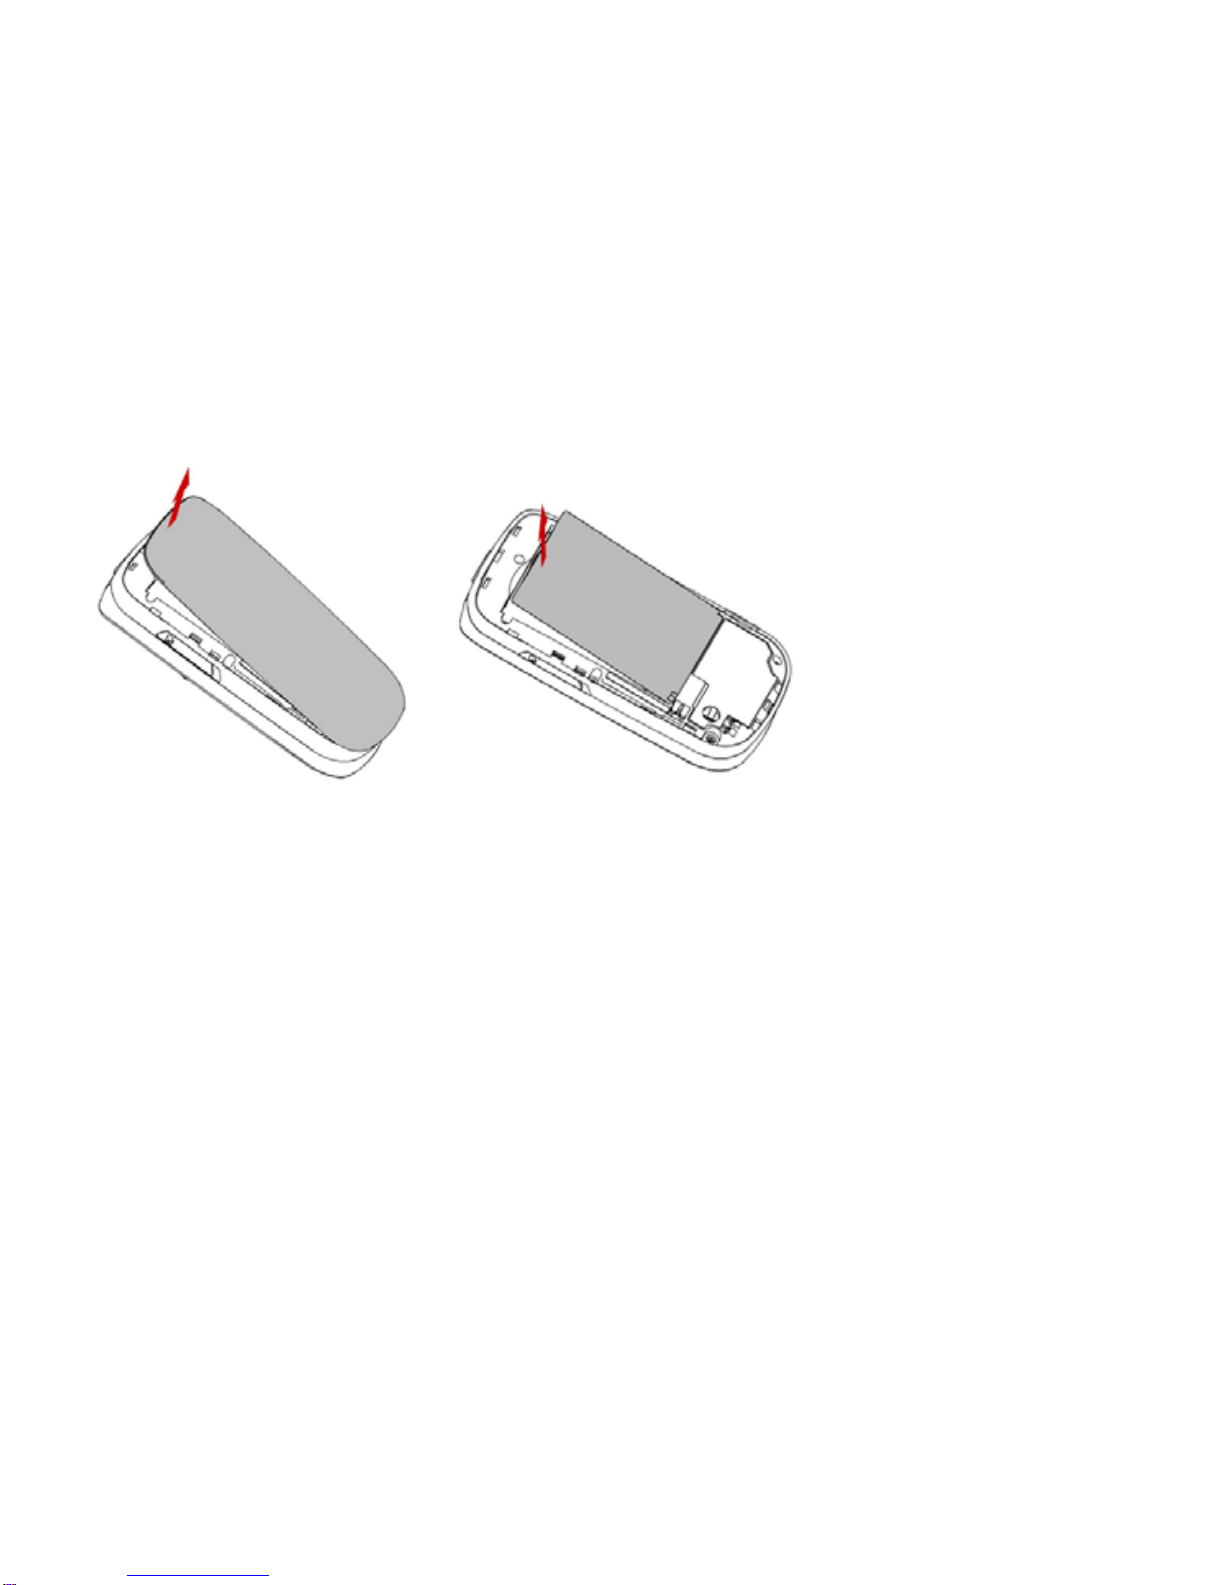
Remove the back cover and battery
Make sure the phone is switched off. You need to remove the back cover of your phone before you can
insert the SIM card. Hold the phone with the front facing downwards; press and pull the back cover down;
lift the back cover up to remove it.
Put your finger on the black holder located on the bottom of the battery slot and lift the battery up to
remove it.
8
Insert the SIM card
Make sure that the clipped corner of the SIM card is facing the correct direction (clipped corner at down
right) and the metallic contacts are facing downwards. Slide the SIM card into the card slot until it stops.

9
Install the battey and back cover
With the metallic contacts of the battery facing the metallic contacts in the battery slot, press the battery
down into its slot until it locks into place.
Align and hook the back cover to the top of the battery slot and then press the back cover down until it
locks into place.

10
3.2 Turning the phone on
To turn the phone on, press and hold the Hang-Up key. Enter the PIN code if required (the 4 to 8 digit
secret code of your SIM card). It is preconfigured and provided to you by your network operator or retailer.
If you enter an incorrect PIN code 3 times in succession, your SIM card will be locked. To unlock it, you
must obtain the PUK code from your network operator.
3.3 Charging the Battery
Your phone is powered by a rechargeable battery. The new battery is partially charged. A sound alert will
warn you when the battery level becomes low.
Make sure the battery is not removed. To charge the battery, plug in the connector at the top of your

11
phone (USB interface) and then plug the other end into an AC power socket.
The battery symbol indicates the charging status.
During charging, the charge indicators will scroll.
When all the scroll bars are steady, the battery is fully charged. You can then disconnect the charger.
3.4 Inserting a T-Flash Card
Lift up the T-Flash card cover on the right side of your phone.
With the metal contacts facing down, gently slide the T-Flash card into the slot.
3.5 Important Password
Phone lock password is 1122.

12
3.6 Sub-screen
When you close the cover, the sub-screen shows the date and time. Network and signal icons are
displayed on the submenu too.
If you are listening to the music, the sub-screen will show the name of the song.
13
4 Text Entry
4.1 Input Method
Your cellular phone supports several input methods, which include:
ABC/abc/Abc/ES/es
Numberic(123)
4.1.1 Changing the input modes
During text editing, you can press the # Key to switch input modes,
or press the Left Soft Key [Options] and choose Input Method to select different input modes.
4.1.2 Entering Symbols
In any input mode, press the * Key to open the symbols input screen. Use the navigation key to choose
the desired symbol and the OK key to select it.
4.2 Predictive text entry
Letters and symbols represented by each key are as follows:
2 to 9 Press to input letters.
0
Press 0 to enter a space.
1 Press to input symbol.
◀/▶
Press to browse the previous or next available word.
▲/▼Press to browse the available words in previous or next line.

14
Left Soft Key
Select the letter or word.
OK Key Press to confirm the letter or word.
Right Soft Key
Press to clear a letter, press and hold to clear all entries.
# Switch between input mode.
*
Press to activate punctuation mode.
Example: How to enter the word "HOME"
1. Press the # Key to switch to ABC.
2. Press 4 6 6 3, the first word “GOOD” appears.
3. Press ▶to select “HOME”.
4. Press the OK Key to confirm “HOME”.
4.3 Multi-tap Input
This method requires multiple key presses to reach the desired character: the letter "h" is the second
letter on the 4 key, so you must press 4 twice quickly to enter "h". Using this mode requires you to press a
key as many times as needed to enter the desired letter.
Example:
To enter the word «home» in Multi-tap input mode “ abc”, press key 4(GHI) twice, press key 6(MNO)
thrice, press key 6(MNO) once and key 3(DEF) twice.
4.4 Numeric Input
Press the # Key to select "123" input option then you can enter the numbers.

15
5 Calling
5.1 Making a Call
1.In idle mode, enter the phone number.
2.Press the Dial/Answer Key to make a call.
3.Press the End/Power Key to end the call.
5.1.1 Making an International Call
1. In idle mode, press * key twice to enter "+".
2. Enter the country code.
3. Enter the area code (normally without the 0 before it) followed by the phone number.
4. Press the Dial/Answer Key to make a call.
5.2 Answering a Call
Press the Dial/Answer Key or Left Soft Key Options > Answer to answer it.
Press End/Power key to reject it.
Note: You can make a call only when the network name appears on the screen.
1. Enter the phone number.
2. Press the Pick-Up Key to dial the number.

16
6Function Menu
6.1 How To Use
Select Menu
Press the Left Soft Key [Menu] to enter Menu in idle mode.
Press the Navigation Key Up/Down to change menus and press the Left Soft Key [OK] to enter the
selected menu.
Note: The functions described below only appear when a SIM card is inserted. If you power on
your phone without a SIM card, you will have limited access to menu functions when you press the
Left Soft Key [Options]. Press the Right Soft Key [SOS] to make an emergency call.The aim of this
function is to allow you to dial emergency number by keypad when you do not have a SIM card.
You can exit a menu and return to idle mode by pressing the Right Soft Key [Back] or the Hang-Up Key.
6.2 Menu
Messages Fun & Games STK
Call center WAP Phonebook
Multimedia Organizer Settings

17
6.3 Messages
6.3.1 Creating a text message
1. Select Menu > Messages > Write message > Text message.
2. Write a message, please refer to the Text entry section of this manual for detailed information.
3. After entering text, you can press the Left Soft Key [Options] and then select Send to.
4. Enter the recipient number, or choose a contact from phonebook.
Note: Make sure the SMS Centre Address in the activated profile is correct; otherwise, you
cannot send or receive the messages.
6.3.2 Creating a multimedia message
1. Select Menu > Messages > Write message > Multimedia message.
2. Edit the content of the message. You can add pictures, sound, and other objects to the multimedia
message. You can also insert a new slide, preview the message, and set the slide duration.
3. After you have completed inserting content, press the Left Soft Key [Options] and select Send to.
4. Enter the recipient, or choose a contact from phonebook.
Note: Make sure the activated profile is correct; otherwise, you cannot send or receive the
multimedia messages.

18
6.3.3 Broadcast Message
1. Select Menu > Messages > Broadcast message.
2. Press the Left Soft Key [On] to activate this function.
3. Press the Navigation Down Key to select Channel settings to enter the channel number.
Note: To obtain the codes corresponding to the different types of messages, you must
contact your operator.
6.3.4 Email
1. Select Menu > Messages > Email.
2. Select Email accounts to add an email account.
3. Touch Options and select New account to create an email address. Now you can enter the email
address, protocol, data account, incoming server, outgoing server, user name, password, and
account name.
4. When you finish, the account will be saved automatically. You can now select Options and choose
Activate to activate this account.
5. Go back to the previous menu and select Send and receive to refresh your mailbox.
Note: Make sure the data account is correct. If it’s incorrect, you can go to Menu > Settings >
Connectivity > Data account to change it.
6.3.5 Others

19
In this “Messages” menu, you can view the message you have sent, saved, unsent or received in the
Inbox, Drafts, Outbox,.Sent messages,
Select “Menu > Messages > Delete messages” to delete the message if you need.
Select “Menu > Messages > Templates” to use the default SMS and MMS templates
Select “Menu > Messages > Message settings” to adjust the message settings.
The menus described in this section allow you to send/receive messages and manage your messages.
Only devices that have compatible features can receive and display multimedia messages. The
appearance of the message may vary depending on the receiving device.
6.4 Fun & Games
This phone provides you some built-in games.
To adjust the game settings, please select Menu > Fun & Games >Games > Games settings.
In this menu, you can also access the JAVA applications here.
6.5 STK
This menu allows you to access services supplied with your network, such as news, sports, weather, etc.
Please contact your operator for more information.
Table of contents
Other PCD Cell Phone manuals


