PCD TTX38 User manual

1
TTX38 User Manual

2
YOUR PHONE................................................................................................................................5
STANDBY MODE..............................................................................................................................6
GETTING STARTED.......................................................................................................................6
INSTALLING THE SIM CARD AND THE BATTERY ...................................................................................6
INSTALLING A MICROSD CARD .........................................................................................................7
CHARGING THE BATTERY.................................................................................................................7
SWITCHING THE PHONE ON AND OFF.................................................................................................7
CALL FUNCTIONS.........................................................................................................................7
MAKING A CALL...............................................................................................................................7
ANSWERING OR REJECTING AN INCOMING CALL .................................................................................8
CALL WAITING................................................................................................................................8
INPUT METHOD.............................................................................................................................8
CALL CENTER...............................................................................................................................8
CALL HISTORY................................................................................................................................9
Missed Calls.............................................................................................................................................. 9
Dialed Calls.............................................................................................................................................. 9
Received Calls........................................................................................................................................... 9
Delete call logs ......................................................................................................................................... 9
Call timers................................................................................................................................................. 9
Call Cost ................................................................................................................................................... 9
Text message counter................................................................................................................................ 9
GPRS Counter........................................................................................................................................... 9
CALL SETTINGS ............................................................................................................................10
Advance settings ..................................................................................................................................... 10
SERVICES....................................................................................................................................10
INTERNET SERVICE .......................................................................................................................10
Homepage............................................................................................................................................... 10
Bookmarks ...............................................................................................................................................11
Recent Pages............................................................................................................................................11
Offline Pages............................................................................................................................................11
Input Address ...........................................................................................................................................11
Service Inbox............................................................................................................................................11
Settings.....................................................................................................................................................11
FILE MANAGER...........................................................................................................................12
USER PROFILES .........................................................................................................................12
PHONEBOOK...............................................................................................................................13
SEARCH ......................................................................................................................................13
ADD NEW CONTACT .....................................................................................................................13
CALLER GROUP ...........................................................................................................................13
PHONEBOOK SETTINGS ................................................................................................................13
MESSAGING ................................................................................................................................14
WRITE MESSAGE .........................................................................................................................14
INBOX..........................................................................................................................................14

3
DRAFTS.......................................................................................................................................14
OUTBOX......................................................................................................................................14
SENT MESSAGES..........................................................................................................................14
ARCHIVE .....................................................................................................................................15
DELETE MESSAGES ......................................................................................................................15
EMAIL..........................................................................................................................................15
VOICEMAIL SERVER ......................................................................................................................15
BROADCAST MESSAGE .................................................................................................................15
TEMPLATES .................................................................................................................................15
MESSAGE SETTINGS.....................................................................................................................15
MULTIMEDIA................................................................................................................................16
CAMERA......................................................................................................................................16
IMAGE VIEWER .............................................................................................................................17
VIDEO RECORDER........................................................................................................................17
VIDEO PLAYER.............................................................................................................................17
PHOTO EDITOR ............................................................................................................................17
AUDIO PLAYER.............................................................................................................................18
Play the music......................................................................................................................................... 18
SOUND RECORDER.......................................................................................................................18
FM RADIO ...................................................................................................................................18
SCHEDULE FM RECORD................................................................................................................19
SLIDE SHOW................................................................................................................................19
FUN & GAMES.............................................................................................................................19
ORGANIZER.................................................................................................................................19
CALENDAR...................................................................................................................................19
TASKS.........................................................................................................................................20
ALARM ........................................................................................................................................20
WORLD CLOCK ............................................................................................................................21
STK (SIM TOOLKIT).....................................................................................................................21
SETTINGS ....................................................................................................................................21
PHONE SETTING ..........................................................................................................................21
Time and date.......................................................................................................................................... 21
Schedule power on/off............................................................................................................................. 21
Language ................................................................................................................................................ 21
Display.................................................................................................................................................... 21
Themes .................................................................................................................................................... 22
Greeting text............................................................................................................................................ 22
Auto update of date and time.................................................................................................................. 22
Flight mode............................................................................................................................................. 22
Misc.settings ........................................................................................................................................... 22
NETWORK SETTINGS ....................................................................................................................22
SECURITY SETTINGS.....................................................................................................................22
CONNECTIVITY.............................................................................................................................22
Bluetooth (BT)......................................................................................................................................... 22
Data Account .......................................................................................................................................... 24
MOUSE............................................................................................................错误!未定义书签。

4
RESTORE FACTORY SETTINGS .......................................................................................................24
SOUND EFFECTS ..........................................................................................................................24
EXTRA..........................................................................................................................................24
CALCULATOR ...............................................................................................................................24
CURRENCY CONVERTER...............................................................................................................24
STOPWATCH ................................................................................................................................24
PEDOMETER ................................................................................................................................25
GENERAL INFORMATION...........................................................................................................26
ACCESSORIES..............................................................................................................................26
PRECAUTIONS............................................................................................................................26
TROUBLESHOOTING..................................................................................................................27
SAFETY INFORMATION AND NOTICES.....................................................................................29
12 MONTH LIMITED WARRANTY...............................................................................................31

5
Your Phone
Left/Right soft Key
Press to perform the function
currently displayed in the bottom
left/right corner of the screen.
Home Key Press to access WAP
homepage
Camera Key Press to access the
camera menu.
Navigation Key
In the standby mode, quick
access four build-in functions.
OK Key
In the standby mode, press to
enter the main menu.
Confirm a selection.
Dial/Answer Key
Press to make a call.
Press to answer a call.
Press and hold to redial the last
number called.
End/ Power Key
Press to end a call.
Press and hold to power on/ off
the phone.
Message Key
Press to create a new message.
+- Key
In multimedia applications, press
+ key to increase the volume,
press the – key to decrease the
volume.
In idle mode, press the – key to
enter the volume adjusting
screen.

6
Standby mode
In the main display, you may see several icons displayed on your status bar. The meaning for each icon is
explained below:
Vertical bars indicate the signal strength of the GSM network signal.
Indicates the battery charge level.
Indicates your phone is locked.
Indicates your phone uses the alert type of “Ring”.
Indicates your phone uses the alert type of “Vibrate and ring”.
Indicates your phone uses the alert type of “Vibrate then ring”.
Indicates your phone uses the headsets profile settings.
Indicates the alarm clock is set.
Indicates a missed call.
Indicates new text message(s).
Indicates new multimedia message(s).
Indicates new voice mail message(s).
Indicates WAP push messages.
Indicates stopwatch is enabled.
Indicates your phone has logged onto EDGE.
Indicates you are using Bluetooth.
Getting started
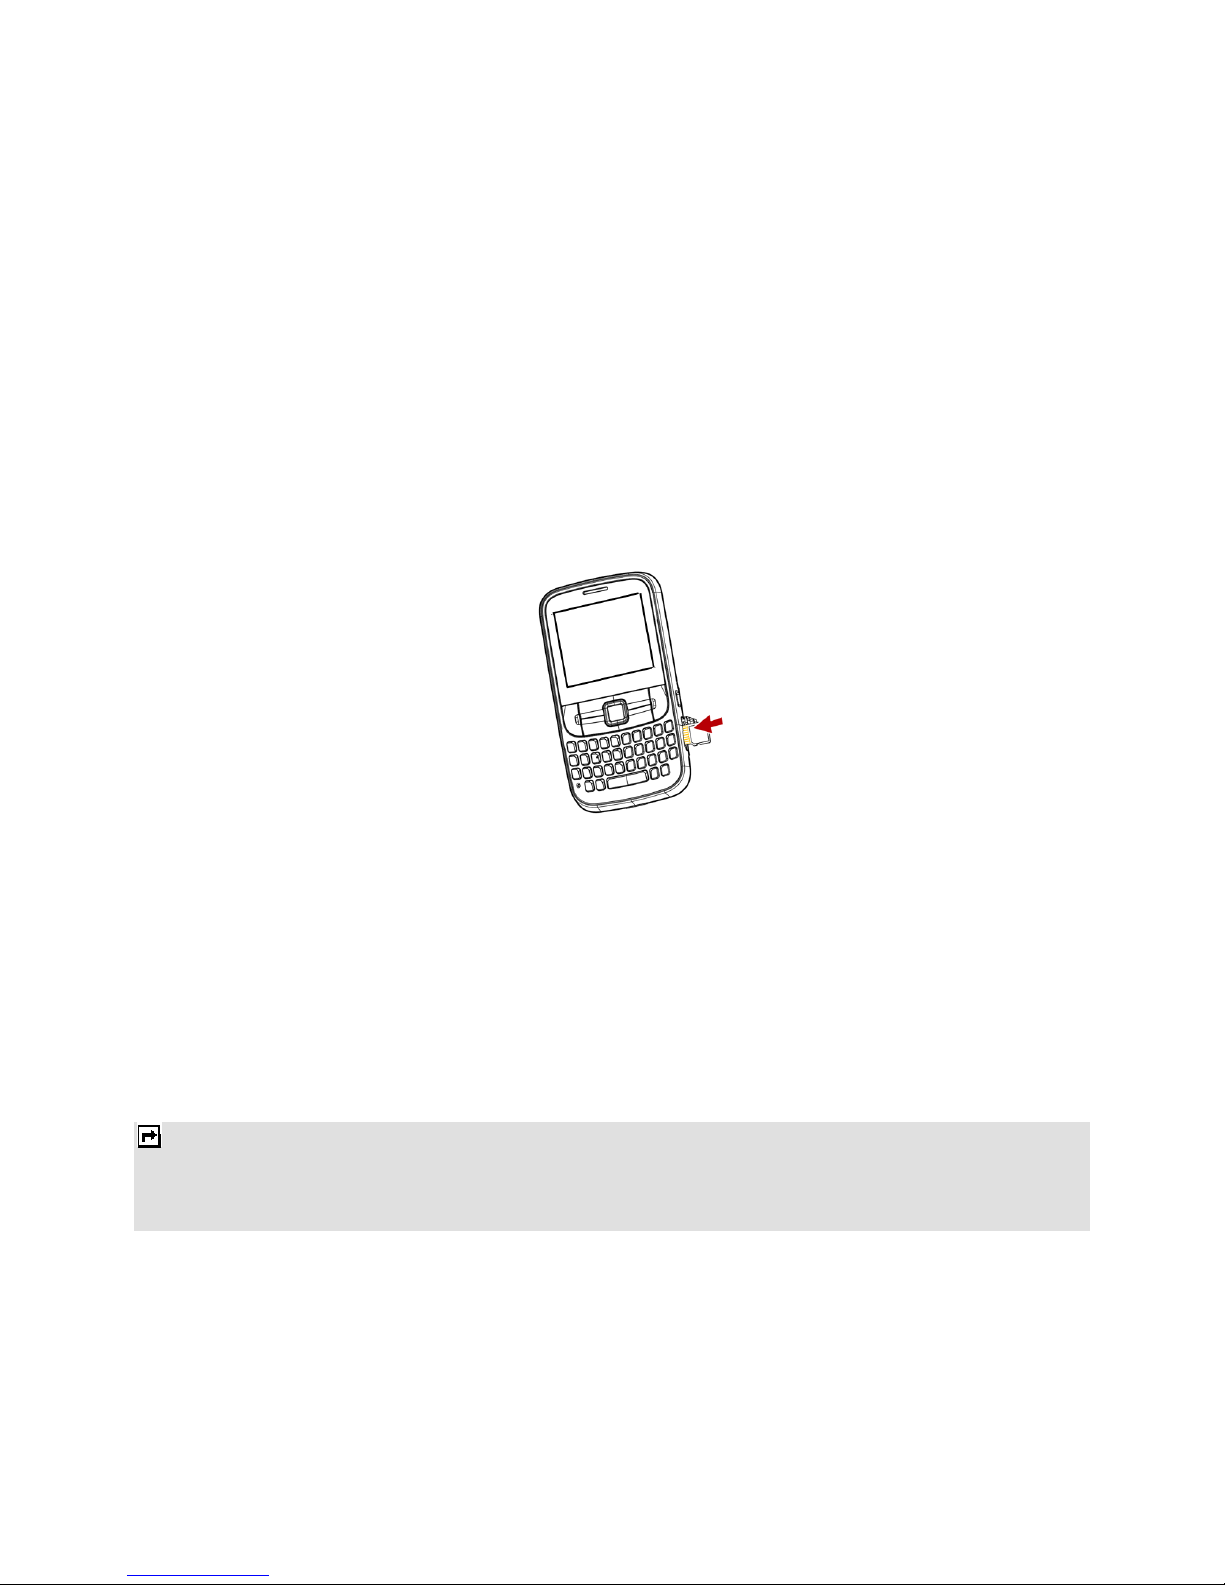
Installing the SIM card and the battery
You need to insert the SIM card and charge the battery before using the phone.
Keep all miniature SIM cards out of the reach of little children.
Be careful to handle, insert or remove the SIM card since the SIM card and the contacts inside can easily be
damaged by scratching or bending.
Before installing/removing the SIM card, always make sure that the phone is switched off.
1. Remove the back cover (1) and lift the battery away (2).
(1) (2)
7
2. Insert the SIM card (3), install the battery (4) and attach the battery cover as shown (5).
(3)
(4) (5)
Note: make sure that the metallic contacts of the battery are facing the metallic contacts in the battery slot.
Installing a microSD Card
1. The microSD card slot is on the right side of your phone.
2. With the metal contacts facing to the metal contacts in the slot, gently slide the SD card into the slot and press
down until the card locks into place (6).
Note: the metal contacts are facing front.
3. If you want to get the microSD card out, gently press the microSD card, then you can remove it from your
phone.
(6)
Charging the battery
You must fully charge the battery before using your phone for the first time.
1. Connect Charger cable to the micro charger port on the right of your phone.
2. Connect charger to an AC wall outlet.
When all the battery scroll bars are steady, the battery is fully charged. You can then disconnect the charger.
Switching the phone on and off
Press and hold the Power Key.
Notes:
1. You can also use the phone without SIM card. If the phone asks PIN code, key in the PIN code, and press the Left Soft
Key (LSK) to confirm.
2. Do not switch the phone on when the phone use is prohibited or when it may cause interference or danger.
Call Functions
This section gives you information about the calling service supported in your phone.
Making a call
In standby mode, key in the number, including the area code, and press the Dial Key.
To make a call from the Phonebook

8
In the standby mode, press the Left soft key to enter the main menu, and then select Phonebook. Scroll to
the desired contact name or type the name in the search bar,and then press the Dial Key to make the call.
To make an international call
1. For international calls, enter the international prefix (character +).
2. Key in the country code, area code and the phone number.
3. Press the Dial Key to call.
Answering or rejecting an incoming call
To answer the incoming call
Press the Answer Key to answer the call when the phone rings.
To reject an incoming call, press the End Key to reject the call.
Call Waiting
If you want to answer another incoming call, you should activate the call waiting function for the SIM at first.
During a call, press theAnswer Key to answer the new incoming call. You can swap back anytime by pressing the
Left Soft Key (LSK) and select Swap.
Input Method
You can key in text by pressing the keypad.
To select an input method
Before you key in text, press Options and select Input Method.
To insert a space
You could press the space key to insert spaces.
To insert the symbols
Press the symbol key can access the symbols.
To activate or deactivate the FN mode
Press the FN Key once to activate it once, press the FN Key twice can activate FN mode all the time. Press the FN
Key thrice can deactivate the FN mode.
Example: How to enter the word "Happy2009!"
1. Press the Shift Key to activate the “ABC” mode, press the HKey to enter “H”.
2. Press the Shift Key to activate the “abc” mode, press the a, p, p, y key to enter “appy”.
3. Press the FN Key twice to activate FN mode, press the 2, 0, 0, 9, ! Key to enter “2009!”.
Call center
Your phone can save the call records of missed calls, received calls, dialed calls, durations and cost of calls in the
Call Record menu.
Notes:

9
1. Once the call list exceeds the memory limitation, the oldest one is deleted.
2. For the call logs, you can press the Dial Key in standby mode to have a quick review.
Call history
Missed Calls
To view Missed Calls
In Call center menu, choose Call history > Missed calls, and press the Navigation Key to view the records.
Dialed Calls
To view Dialed Calls
In Call center menu, choose Call history > Dialled calls, and press the Navigation Key to view the records.
Received Calls
To view Received Calls
In Call center menu, choose Call history > Received calls, and press the Navigation Key to view the records.
Delete call logs
Your phone allows you to delete call from the Missed Calls list, Dialed Calls list, Received Calls list, or All Call lists.
Call timers
Your phone allows you to view the duration of your incoming and outgoing calls.
Call Cost
This function allows you to check the cost of your last phone call or total cost. Some SIM card cannot support this
function.
Text message counter
This function allows you to check the numbers of message. You may press Reset to reset the counter.
In Call center menu, choose Call history > Text message counter to view the records.
The following items are available for SMS counter:
Sent: The number of SMS messages you have sent.
Received: The number of SMS messages you have received.
GPRS Counter
This function allows you to check the data size (both message and WAP) of GPRS packet you used.
In Call center menu, choose Call history > GPRS counter to view the content.
The following options are available for GPRS counter:
Last Sent: The GPRS volume you sent last time.
Last Received: The GPRS volume you received last time.
All Sent: The total GPRS volume you have sent.

10
All Received: The total GPRS volume you have received.
Reset Counters: Press to reset the counters.
Call settings
Caller ID: Allows you to either send or hide your ID during calling or sending out the message. Your phone
is defaulted in Set by network, which means your ID is determined by your service provider.
Call Waiting: Allows you to enable call waiting function.
Call Divert: Allows you to set the call condition by which calls are diverted to another number.
Call Barring: Allows you to restrict incoming calls and outgoing calls from your phone.
Line Switching: This is a network service to select phone line 1 or 2.
Closed user group: This is a network service.
Advance settings
Blacklist: Allows you to filter and block incoming calls for certain contacts you defined.
Auto redial: If it is on, your phone will make a maximum attempts to connect the call after an unsuccessful
call attempt.
Background sound: Allows you to set the background sound when you make a call.
Call time display: Allows you to enable or disable the call time display on the phone screen.
Call time reminder: Allows you to set a time reminder during a call.
Auto quick end: Allows you to set the time when the call will be ended automatically.
Reject by Messaging: Allows you to set it on or off. If it is on, you can reject a call by sending a message
when a call is incoming.
Services
Services described in the following are supported by your service provider. If you cannot connect either one of
those services, you might contact with your service provider for further information.
Internet service
Your phones support Web Browser. You can obtain various services such as up-to date news, weather, sport, and
other information as well as other Internet services. These services are designed and maintained by WAP service
providers.
Notes:
1. To activate WAP service, you may need to contact your service provider.
2. Do not switch the phone on when the wireless phone use is prohibited or when it may cause interference or danger.
Homepage
To access the browser from the standby mode, go to Internet service in Services and select Homepage. Once
connected, the homepage is displayed. The content depends on the service provider. To exit the browser, press the
End Key.
You can set the homepage address in Services > Internet service > Settings > Profiles.

11
Bookmarks
You can use this menu to save URL addresses to quick access a website.
Recent Pages
You can view the recent pages you have visited.
Offline Pages
You can view the saved offline pages you have visited.
Input Address
You can key in the URL address. When you are done, select Options > Done. Your phone will connect the URL
you just keyed in.After the address is entered, you may select the URL and select Options > Go to to connect next
time.
Service Inbox
WAP push messages are saved here.
Settings
GPRS (General Packet Radio Service) is a technology that use for sending and receiving data over the mobile
network.
WAP Setting
If the settings have made by the service provider, you may begin immediately. If the accessed profiles have been
assigned by your service provider, select a profile and activate it. Otherwise, you may key in setting manually. For
appropriate settings, contact your network operator or service provider.
Key in the service settings manually
1. From the main menu, select Services > Internet service > Settings.
2. Select a profile from the list. Select Activate profile to activate the selected profile. You may edit the
profile in Homepage, Data account, Connection Type, User name, and Password. To get more
information, you may need to contact your operator.
Note: In most cases, you only need to use one of the default profiles to access the Internet. The settings are different from
operator to operator. Please consult your operator or service provider for the correct settings and proceed with care.
Wrong settings will cause the connection to fail.
Browser Options
You can set the timeout value for the browser. The purpose is to stop the browser from connecting the website if
the website does not respond within the timeout.Also, you can choose to either turn On or Off the image while
browsing.
Service Message Settings
You can choose either receive or reject the service messages which are saved in the service inbox sent by your
service provider.
Clear Cache
The information or date you have accessed is all stored in the cache of the phone. A cache is a file buffer used to
store date only temporarily. You can clear the cache by selecting this option.
Clear Cookies
Under the consideration of privacy and security issue, we would suggest you to clear cookies which may contain

12
sensitive information just in case your phone is misplaced, lost or stolen.
Trusted Certificates
This function is to indicate your trusted certificate while browsing and allows you to manage your trust list.
File Manager
In this menu, you can manage images, audio, music, photos, videos and other contents you have downloaded.
Two storages will be displayed:
To check files saved in the File Manager
1. From the main menu, select File Manager. You may see one more drive named Memory Card if you insert
the T-Flash card in.
2. Scroll to the menu to Phone and press Options to open options list.
3. When you choose Open, you will see a list of the folders. Note, some folder, such as My Music may be
hidden until you enter the menu of Music Player.
Note, the Java applications folder lists the JAVA applications you have downloaded
User profiles
Your phone provides 6 different profiles, including general, meeting, outdoor, indoor, headset, and Bluetooth
profiles.
Note: If you customize the alert type, the indication icon may be changed.
The Headset profile is activated when the headset is plugged in.
To activate a Profile
1. In Profile menu, select a profile.
2. Select Options > Activate.
To edit the Profile
You can customize Profile settings to meet your preference.
1. In Profile menu, select a profile.
2. Select Options > Customize.

13
Phonebook
Your phonebook list is saved either on the SIM card’s memory or Phone’s memory. You can also choose to save on
both.
Search
In standby mode, press the Left Soft key to enter the main menu, and then select Phonebook.
Now you can search names and numbers saved in the Phonebook
Key in full name or first character of contact person’s name, the phonebook list will automatically jump to the
character you have entered or the matched contact will be displayed.
Add New Contact
Allows you create a new entry into the phonebook list. It will be saved either in phone memory or SIM card.
To add a new contact
1. In Phonebook menu, choose Add new contact > Select, and then enter the contact information.
2. Press Done or OK to save the new contact.
Note, If you want to change the storage location, please select Add new contact > Phonebook settings >
Preferred storage,
Notes:
1. Your phone allows you to save 1,000 entries of phone numbers.
2. Image and video can be selected from both default and file manager.
Caller Group
In standby mode, press the Left Soft key to enter the main menu, and then select Phonebook > Add new
contact > Caller groups.
There are five default caller groups on the phone. You can edit each group’s name. With the caller group function,
you can send a message to all members of a group at the same time.
Phonebook Settings
To access the Caller Group, in standby mode, press the Left Soft key to enter the main menu, and then select
Phonebook > Add new contact > Phonebook settings
Your phone provides you various setting options to personalize your phone, including,
Preferred Storage: You can choose your preferred storage in phone, SIM or both.
Speed dial: If you assign the number to one of the speed dialing Keys (from the key 2 to key 9) saved in
the phonebook list, you can dial the phone number by pressing and holding the key in the standby mode.
First, you should turn this feature on, and then set the number by associating with a contact.
My Number: Allows you to define number or name.
vCard version: Allows you set the vCard version.
Extra numbers:Allows you to view owner number, service dialing number and SOS number, some SIM
card cannot support it.

14
Memory Status: You can check how many entries are stored in SIM card’s and Phone’s memory.
Copy contacts: Allows you to copy the contacts among two storages.
Move contacts: Allows you to move the contacts among two storages.
Delete all contacts: Allows you to delete the contacts from Phone or SIM.
Messaging
Your phone supports voice mail notification messages and text messages. Voice mails, short message service
(SMS) and multimedia message (MMS) are network service. Please check your service provider for further details
on the fees.
Write Message
To write a message:
1. From the main menu, select Messaging.
2. Choose Write message > Text message / Multimedia message.
3. In multimedia message content, you are able to add picture, sound, video and attachment into your
message.
4. After finished, select Options and then Send to.
5. Add the recipient by inputting the number manually or searching them in the phonebook.
6. Finally, select Options and select the send option to send the message.
Notes:
1. To key in the content, please refer to “Input Method“.
2. To use the multimedia message function, your network operator or service provider support is necessary. Only phones
equipped with this function can receive and display multimedia messages.
Inbox
Your phone saves the text messages (SMS) and multimedia messages (MMS) that have been received in the
Inbox folder.
To read messages
When you have received a message, icons will indicate this message is from SIM card or Phone in inbox. If your
inbox is full since the messages you have received are saved in SIM as default setting, there will be a pop-up
window to remind you to delete some of your old messages. Otherwise, your message will be saved in the phone
instead of SIM card.
1. From the main menu, select Messaging.
2. Then select Inbox. All received messages are listed in this folder.
Drafts
Your phone saves the saved messages in the Draft folder.
Outbox
Your phone saves the messages sent failed in the Outbox folder.
Sent messages
Your phone saves the messages sent successfully in the Sent messages folder.

15
Archive
The menu has the messages you move from other mail boxes to Archive box.
Delete messages
You are able to delete all messages in a folder or even all messages at once.
Email
To create an account
1. First, you must create the data account. In idle mode, press the Left Soft key to access the main menu, and
then select Settings > Connectivity > Data account > GPRS. This is where you can input the APN.
2. Go back to idle mode by pressing the Hang-up Key. Select Menu > Messaging > Email > Email accounts.
3. SelectOptions > New account to add a new email account, follow the steps which prompt you to go ahead.
4. You should enter the email address, choose protocol, and choose data account, enter the address of the
incoming and outgoing server, enter user name and password, and enter the account name.
5. After you have finished, your phone will save the new account automatically.
6. Choose one of your favorite accounts, Select Options > Activate to activate the selected account.
To write an email
1. In idle mode, press the Left Soft key to access the main menu, and then select Messaging > Email >Write
Email.
2. Add the Email address in the fields of To, Cc, and Bcc of where you would like the message sent.
3. Scroll to the subject field, enter the subject by selecting Edit, attach the files, set priority, and edit the email
content.
4. When you have finished, select Done. A popup screen will indicate the mail size.
5. Select OK to send, send and save, save to drafts, or quit without saving.
Voicemail server
Your phone allows you to access your voice mailbox quickly if your operator supports this function. Your voice mail
number will be provided by your service provider and displayed in the phone. In the standby mode, press and hold
the 1 Key to access your voice mail directly.
Broadcast Message
Your phone allows you to receive commercial messages. You can either enable or disable the receiving mode and
set some other settings based on your personal preference.
Templates
There are several default SMS and MMS templates in your phone.
Message Settings
Your phone allows you to set up default setting on the SMS and MMS features.
1. Go to Message and choose Message settings.
2. Then select Text message or Multimedia message to change settings.
3. Choose the field you would like to change.
SMS message provide following options to customize:
Profile Setting: If more than one message profiles are allowed by your SIM, you may edit the
profiles separately.
Common Settings: If Delivery Report is on, the network will sends delivery reports on your
messages. If Reply Path is on, you will transmit the number of your SMS message center together
with message, the recipients can then reply using your SMS centre and not theirs, this speed up the

16
rate of transmission. This feature is subscription dependent. If Save sent message is on, the sent
successfully messages will be saved in Sent box.
Memory status: Allows you check memory status in the Phone or SIM card.
Preferred Storage: Allows you to change your preferred storage as SIM or phone.
Preferred connection: Allows you to set your preferred connection.
MMS message provide the following options to customize:
Profile: You may receive and send multimedia messages through a certain network or service provider. To
activate a profile setting, select it and then choose Activate Account.
Common settings: see following settings.
Compose: You can set compose format based on the option listed below.
Slide Time: Define the time for the delay between each slide.
Creation Mode: If you select Restricted, the device prevents you from sending messages that
may not be supported. To include content in your message without notifications, select Free.
Picture Resizing: Define the size of the image in an MMS.
Auto Signature: Define whether you want to add a signature at the end of an MMS
automatically.
Signature: Define the signature that you want to be added.
Sending: This setting contains the options, such as priority, delivery report, and so on.
Retrieval: This setting contains the options, such as roaming, read report, and so on.
Memory status: Allows you check the used and free memory.
Note: You may contact with your network service operator to consult MMS settings.
Multimedia
Camera
You can use this phone to take photos with the phone’s built-in camera and adjust its settings. The camera lens is
on the back of the phone, and the display of the phone works as a viewfinder. If there’s not enough memory for
camera, you need to delete old photos to free some spaces for new photos or you can choose to save photos in
memory card. The status of your camera setting will be displayed on the top of preview mode.
Note: Do not use this feature when it violates local laws.
To start using Camera
1. In the main menu, select Multimedia > Camera.
2. To take the picture, press the Camera Key.
Note: The photo will be saved in the Photos folder in File Manager menu. You can also view the picture by selecting
Photos from option list or open Photos folder from File Manager menu.
To setup the Camera
1. Press the Left Soft Key in the preview mode. All options will be displayed, and then you can adjust the
setting through the preview mode directly.
2. Now you can set the image size, quality, scene mode, and so on.

17
Image viewer
All images from MMS, WAP and camera can be reviewed from here and storage is located in either the phone or
memory card. You may choose to view your images in List Style or Matrix Style.
To change the storage, please select Options and select Storage.
Video Recorder
You can record a video clip through the built-in camera. The status of your video recorder setting will be displayed
on the top of the preview mode.
To start using Video Recorder
1. In Multimedia menu, select Video Recorder.
2. Press the Left Soft Key to personalize your setting; otherwise, you might start video recording by press the
Camera Key.
3. You can also press the Camera Key to pause and resume the recording. If you want to stop recording,
please press the Right Soft Key, the video clip will be saved in the Video folder of File Manager
automatically.
4. You may preview your video clips from Video Player.
Note: The video clip will be saved in Video folder in File Manager. You can also play the video via Video player from the
option list.
Video Player
It stores videos saved from your phone or downloaded from your PC.
To play the video
1. In Multimedia menu, choose Video Player, and select the file you wish to play.
2. After a certain video clip is selected, select Options > Play.
Photo Editor
You can edit the photos saved in your phone or memory card.
Your phone provides the following selections for your option:
Photo Artist: Allows you to edit the image or photo files saved in your phone or memory card.
Image Tiles: Allows you to split images based on the number of segments per image.
To start using Photo Artist
1. In Multimedia menu, select Photo Editor.
2. Select Photo Artist > Select from file.
Note: if you want to edit a new photo, please select Capture from camera, and then go to step 4 for
reference. If you want to resize an image, select Resize image.
3. Select Memory Card or Phone.
4. Select an image file you like to edit, select OK to start photo editing. Options includes:
Auto Resize: Allows you to adjust the selected image.
In the submenu of Auto Resize, you can add icon, add text, and rotate the picture, and so on.

18
Main LCD clip: Allows you to select a certain part of the selected image for the full screen display.
Manual clip: Allows you to select a certain part of the selected image.
Clip help: Allows you to review the instructions on how to clip the image described above.
Audio Player
Your phone provides you a friendly music player device for entertainment purpose. You may also download the
music content via USB or other connection. Music tracks must be saved in My Music folder in File Manager in
order to be automatically detected and added into the default play list. You may listen to the music through the
headset or loudspeaker. The user-friendly interface is specially designed to enable users to control, play, pause,
and stop the music player as you wish.
Note: You can make or answer a call while using the music player. During a phone call, the music playback will be paused
and resumed after you end the call.
Play the music
If you are a first-time user, select List > Options > Settings > Player settings > Pre.playlist to set the storage for
adding music tracks. Your music player will automatically detect and add all the music tracks into the default play
list.
While playing the music, you can press the +,- Key to adjust the volume.
Note: MPEG Layer-3 audio coding technology licensed from Fraunhofer IIS and Thomson. Supply of this product does not
convey a license nor imply any right to distribute MPEG Layer-3 compliant content created with this product in
revenue-generating broadcast systems(terrestrial, satellite, cable and/or other distribution channels), streaming
applications(via internet, intranets and/or other networks), other content distribution systems(pay-audio or
audio-on-demand applications and the like) or on physical media(compact discs, digital versatile discs,
semiconductor chips, hard drives, memory cards and the like). An independent license for such use is required. For
details, please visit http://mp3licensing.com.
Sound recorder
The Sound recorder is a simple sound-recording tool, providing all the required functionalities for you to manage
voice files.
To start recording
1. In Multimedia menu, choose Sound Recorder.
2. Select Options >New record to start recording.
Notes:
1. During recording, you can pause or stop the voice recording anytime by pressing OK Key.
2. After the recording is completed, the voice file is saved asAMR, WAV or AWB format.
FM Radio
This feature allows you to listen to your favorite FM radio station anytime with frequency ranging from 87.5MHz to
108.0MHz.
To start using
1. First, please plug in the earphone.
2. From main menu, choose Multimedia >FM Radio.
3. If FM is off, press the Navigation Down Key to turn on the FM radio.
4. You can choose to either turn on or off the auto search by pressing the Navigation Up Key.

19
5. Press the Navigation Left or Right Key to start searching.
Your phone provides the following selections for your option:
Channel list: Allows you to bookmark up to 9 radio stations by entering the channel name and frequency.
You can have quick access to 9 radio stations by Numeric Key. You are allowed to play, delete or edit a
selected radio station frequency.
Manually input: Allows you to key in the radio station frequency manually.
Auto Search: Allows you to auto scan the radio station and the station searched will be memorized in the
channel list.
Settings: Allows you to change the settings of background play, skin, loud speaker, record format, audio
quality or record storage.
Record: Allows you to record your favorite program.
Append: Allows you to resume the file you have recorded and continue to record at the same file.
File List: Allows you to list the radio program you have recorded. You may send the file to your friends.
Motion FM: If it is on, you can switch to previous or next channel by motion.
Schedule FM record
This phone allows you to pre-schedule programs from the radio. You are allowed to record 4 programs according to
your personal setting. You can edit following items: to set up the period of pre-scheduling, to set the repeat period,
to set up channels by listing or manually inputting the frequency, and to make the record settings.
Slide Show
1. In Multimedia menu, select Slide Show.
2. Select Memory Card or Phone.
3. Select a folder you like to play.
Fun & Games
This phone is built with creative games.
You can get the game instructions from the "Help" submenu.
In this menu, you can also access the JAVA applications here.
Organizer
Calendar
This feature allows you to keep track of your schedule and tasks saved in the calendar. You can also switch on the
alarm with the task for reminding.
To make a note and reminder in Calendar for the first time:
1. In Organizer menu, choose Calendar.
2. Select a day in the calendar.

20
3. Select Options > View to view the task. You can also select Options > Add event to add a new task.
4. Choose a type of the task. Input the start and end time of your task, and describe the task contents in
Subject and Details.
5. After you finish editing the contents of your task, select Options > Done to save your description.
7. Choose Alarm clock to turn on or off.
8. Choose Once/ Everyday/ Custom/ Weekly/ Monthly in Repeat.
9. Then you can edit other information.
10. Press Done to save the task.
Tasks
You can also view, edit or delete the tasks from the options under this feature. For the first-time user, you will need
to follow the steps below:
1. Select Add in the Task List. Then choose the task type.
2. Edit your Task by entering date, time, Subject, reminder, repeat and other information.
3. You can choose to turn the alarm on as the reminder.
4. Select Done and Yes to save your to do list.
Alarm
This function allows you to set the alarm to ring at the time specified. The alarm clock works even when the phone
is switched off.
1. In the Organizer menu, choose Alarm.
2. Select Edit to set alarm time. First, you should turn it on.
3. To set the alarm, directly input the hours and minutes via the Numeric Keys.
4. Choose Once/Everyday/Custom in Repeat option for your ring mode.
5. In Alarm Tone option, you may customize the alarm tone from Tone selections provided or from an FM
Radio channel. Press the Navigation Left/Right Keys to switch between Tone / FM radio options.
6. In Snooze (min) option, you may set the alarm as default or set it to snooze from 1 to 10 minutes after the
alarm time is up. After the phone alerts you at the set alarm time, you may select Snooze to activate the
snooze function. If you don’t like your phone to alert you the second time, select Stop to end the Snooze
function.
7. In Alert Type option, you may set the alert method that you like your phone to remind you. You may select
from three options: Vib. only, Vib. and ring, and Ring only.
8. After you finish all the settings above, select Done to save the alarm setting.
When the alarm expires:
If the alarm time is reached while the device is powered off, the phone will switch itself on and the alarm will start to
alert. If you select Stop, the phone asks whether you want to power on the phone or not. Select No to power off the
phone or Yes to power on the phone. When the alarm alerts while the phone is powered on, the display flashes the
alarm clock image, and shows the current time. To turn off the alarm, select Stop. To stop the alarm for snooze
minutes, select Snooze.
Table of contents
Other PCD Cell Phone manuals


