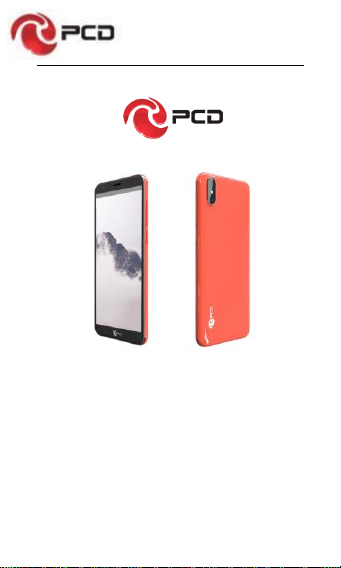
PCD JAGUAR PRO II User manual

PL571 User Manual
1
PL571 User Manual
2
PL571

PL571 User Manual
3
CONTENTS
1. Phone Overview.........................................................4
2. Get Started.................................................................4
3.Basic Operations ........................................................5
4. Touchscreen Usage...................................................6
5. Home Screen..............................................................7
6. Phone Settings...........................................................8
7. Move/Uninstall apps ..................................................9
8. Call............................................................................10
9. Contacts...................................................................11
10. Message .................................................................12
11. Browser ..................................................................13
12. E-mail......................................................................14
13. Gallery....................................................................14
14. Clock.......................................................................15
15. Multimedia Function..............................................15
16. Manage File............................................................16
17. Troubleshooting.....................................................17
18. PCD LIMITED WARRANTY.....................................19
PL571 User Manual
4
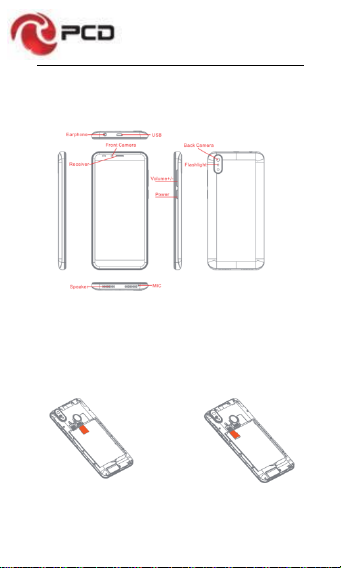
1. Phone Overview
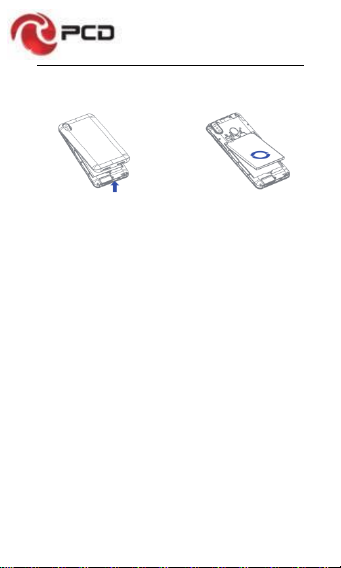
2. Get Started
Install the SIM card Install the memory card
PL571 User Manual
5
Remove the back cover Attach/Detach the battery
3.Basic Operations
Switch on
Touch and hold the Power button until the phone switches
on.
Note: If you have enabled USIM/SIM lockingin the Settings
menu, enter the correct PIN number upon power-on before
you use the phone.
Caution: Three consecutive attempts of entering an
incorrect PIN will lock the SIM card. If it is locked, use a
PUK provided by the operator to unlock it.
Switch off
Touch and hold the “Power button” until the Phone Options
screen displays. Tap “Power off” to switch off the phone.
Unlock
Short press the “Power button” light up the screen,
according to the clues of the screen interface can be
unlocked.

PL571 User Manual
6
4. Touchscreen Usage
Use your fingers to perform operations directly on icons,
buttons, and the on-screen keypad.
Tap/Touch/Click
Tap the icon of an App tostart it.
Touch & Hold
Touch and hold an item to display a pop-up menu of
options. For example, go toAddress Book, touch and
hold a contact on the Address Book page, and a menu of
options pops up.
Drag
Tap an item on the screen and drag it to another place.
Slide/Sweep
To sweep vertically or horizontally across the screen, you
can view apps, pictures, and webpages in a convenient
manner.
Scroll
Similar to sweeping, but faster.

PL571 User Manual
7
Pinch
Put two fingers on the screen to pinch in or out an item,
such as a webpage or picture.
5. Home Screen
1. Status bar: allows you to view status icons and notices,
such as signal, battery, current time and data service.
2. Notification bar: On the Home screen, tap the status
bar and drag it down to display the notification bar. Tap this
bar. Then you can view the notices. Touch the return button
to switch back to the previous page.
3. App icon: Tap an app to open it.
4. Main menu: Drag it up to enter the app main menu.

PL571 User Manual
8
6. Phone Settings
To display the Settings menu, tap the Settings icon directly.
1. SIM card: In the Settings menu, select WLAN to
configure your radio network,choose SIM Card. You can
then manage your SIM cards on the pop-up page.
2. Network: In the Settings menu, select WLAN to
configure your radio network; or select Traffic usage to
View the details of usage; or select Mobile Network
configure data services of your phone
3. Sound: In the Settingsmenu, choose Sound. The allows
you to set the volume, enable/disable vibration during
ringing, and select ringtones for incoming calls and alarm
clock, as well as enable/disable keypad touch sound effect,
touch alert tone, and screen lock tone
4. Display: allows you to configure the brightness,
wallpaper, automatic device rotation, sleep duration, and
font size.
5. Security: In the Settings menu, choose Security. The
Security page allows you to set the screen locking mode
and USIM/SIM locking mode.
6. Application and notification: In the Settings menu,
chooseApps. Then you canview or manage your apps.
Note: Disable or unload certain apps if available space is

PL571 User Manual
9
less than 100MB.
7. Message: On the Message page, tap the Menu button
and choose Settings, you can open and close message
send prompt sound, you can enable/disable Message
report obtain,view SMS in SIM.
8. Call: To display the Call Settings page, choose Settings
on the Call page.
7. Move/Uninstall apps
1. Access the App main menu from the Home screen. On
the ALL App page, tap and hold an app to be put on the
Home screen, and drag it left or right to locate it at a proper
place. In this way, a desktop app is created.
2. On the All App page, tap and hold an app, and drag it to
Uninstall on the desktop. In this way, the app is removed
from the phone.
Note: You are not allowed to uninstall basic apps of the
phone.
3. On the All App page, tap and hold an app, then select
the application information,In this way details about the
app is displayed.

PL571 User Manual
10
8. Call
This phone allows you to make or answer a call, initiate an
emergency call, and launch a multi-party call.
On the bottom left of the Home screen, tap the Dial-up icon.
The Dial-up page is displayed. Enter a phone number and
choose between card 1 and card 2 to make the call. When
you enter the number, the phone will automatically search
among all contacts a number that best matches the
entered numerals, to facilitate your operation.
During a call, tap Add a Call, and this call automatically
switches to Silent mode. Enter the number of another
contact, tap Dial-up, and the previous call automatically
switches to On-hold mode. After the second call is
answered, tap Join. In this way, a teleconference is
established to achieve a multi-party talk.
Note: You need to subscribe to this service from your
carrier before you use it.
You are also allowed to initiate a call by selecting a phone
number from the list of contacts or the Message page.

PL571 User Manual
11
9. Contacts
Tap Contacts to open it. The Contacts page offers
management functions. It allows you to view the list of
contacts and related details,make a call or send an SMS to
a certain contact, and share the contact.
Contact import: On the Contacts page, tap the setting
button, and choose Import/Export to select a mode for
importing or exporting a contact.
Add a contact: On the lower right of the Contacts page,
tap the Add button to add a contact to your phone or
USIM/SIM. Enter the name and number, and tap Finish. In
this way, a contact is created.
Contact list: On the Contacts page, tap the image of a
contact. Details about the contact are displayed. This
allows you to quickly make a call or send an SMS to the
contact.
Search contact: On the Contacts page, tab Search, and
enter related information about a certain contact to
search it among the list of contacts.

PL571 User Manual
12
10. Message
Tab Message on the desktop. Then you can create and
send an SMS or MMS.
New message: Tap the Add icon on the upper right of the
Message page. The message creating page is displayed.
Enter the name or phone number of the target contact into
the Recipient bar. The phone will automatically search
among the list of contacts for one that best matches the
entered info. (You can also select the contact from the list
of contacts or groups.)
Input method: Tap the text editing zone to invoke the
keypad. Long press the space bar to switch your input
method.
Send: After an SMS is complete, tap Send and choose
between card 1 and card 2 for sending the SMS.

PL571 User Manual
13
11. Browser
Tap Browser to open it. The Browser page allows you to
access and manage WAP and WWW webpages.
During a browse, tap the Menu button; choose Bookmark
to display the Bookmark list. In addition, tapping the Menu
button helps save the webpage that you are viewing to the
Bookmark.
Tap the Menu button during a webpage browse: also allow
you to share the webpage, search on the webpage, and
view history records.
Add a webpage bookmark to desktop: On the Bookmark
page, tap and hold a bookmark, and choose “Add shortcut
to the Home screen”. In this way, you can add frequently
used webpages to the desktopfor future access.
Browser settings: Tap the Menu button and choose
Settings. The Browser Settings page allows you to
configure the browser as desired, such as common content
settings and privacy & security settings. Advanced settings
allows for resetting to default settings.

PL571 User Manual
14
12. E-mail
Tap E-mail to open it. The E-mail page is display. On this
page, you can send and receive an e-mail via the phone.
For the first time you use this function, enter your e-mail
account and password to set up an account. You can also
set more accounts for ease of uniform management of all
mails.
13. Gallery
Gallery saves and manages all pictures obtained via the
camera, Internet, and the MMS received.
On the Home screen, tap Gallery to open it. The Gallery
page is displayed. It supports management of all pictures.
Open a picture and then click the share button at the top. In
this way, the picture is shared via the Bluetooth, message,
and mail.

PL571 User Manual
15
14. Clock
Tap Clock to open it. The Clock page is displayed.
Set clock: Tap the alarm clock on the upper left. The Alarm
Clock page is displayed.
Add clock: On the Alarm clock page, tap “+” on the top to
add an alarm. Edit the alarm time and tap Finish. When
editing the alarm time, select Hour before Minute. For
example, in the 12-hour format, select 8 as the hour and 0
as the minute, and select a.m.
15. Multimedia Function
The phone also supports many multimedia functions, such
as camera, music, and recorder. Tap any icon of theirs to
open any one of them.

PL571 User Manual
16
16. Manage Files
This function allows you to copy, paste, share and delete a
file stored on the SD card or other memory cards.
Search
On the Home screen, Tap Google, and enter keywords. In
this way, you can search for a webpage, app, contact, and
music. The result will be displayed below the search bar.
Voice Search
In the network-connected state, tab Voice Search, and
speak to the microphone what you want to search, such as
weather and other information.
Play Store
This store allows you to download the latest Android apps,
games, music, movies, TV programs, books, and
magazines to your phone.

PL571 User Manual
17
17. Troubleshooting
To save time and avoid unnecessary cost, please conduct
the following checks before contacting our after-sale
personnel:
1. Unable to turn on the phone: Check whether you have
tapped and hold the Power button for over two seconds.
Check whether the battery is in good contact. If not,
remove the battery, reinstall it, and turn on the phone again.
Check whether the battery runs out. If yes, charge it.
2. Poor signal: It is possibly because of where you are, for
example, on the basement or near a high-rise, that
deteriorates the reachability of radio waves. Please move
to someplace with better signal reachability.
3. Echo or noise: The network trunk line of certain carriers
may be in poor quality. Please tap the hang-up icon and
redial, so that you may switch to another trunk line with
better quality.
4. Unable to charge the battery: Your battery may fail.
Please contact the dealer.

PL571 User Manual
18
5. SIM card error: The metal surface of the SIM card is
dirty. Rub the metal contact terminals with a clean dry cloth.
The SIM card is not installed properly. Install it again as
specified in the user manual.
The SIM card breaks down. Contact the network service
provider.
6. Unable to enter anything into Phone Book: This is
possible because that your phone book memory is full.
Please delete needless data from Contacts.

PL571 User Manual
19
18. PCD LIMITED WARRANTY
PCD, LLC (the “Company”) warrants to the original retail
purchaser of this wireless device, that should this product
or any part thereof during normal consumer usage and
conditions, be proven defective in material or workmanship
that results in product failure within the first twelve (12)
month period from the date of purchase, such defect(s) will
be repaired or replaced (with new or rebuilt parts) at the
Company’s option, without charge for parts or labor directly
related to the defect(s).
The rechargeable battery and battery charger, if included,
are similarly warranted for twelve (12) months from date of
purchase.
This Warranty extends only to consumers who purchase
the product in the United States, Latin America, and other
countries if purchased through an authorized distributor
and it is not transferable or assignable.
This Warranty does not apply to:
(a)
(b) Product subjected to abnormal use or conditions, accident,
mishandling, neglect, unauthorized alteration or
programming of the original firmware and/or operating

PL571 User Manual
20
system, misuse, improper installation or repair or improper
storage;
(c)
(d) Product, whose mechanical serial number or electronic
serial number has been removed, altered or defaced.
(e)
(f) Damage from exposure to moisture, humidity, excessive
temperatures or extreme environmental conditions;
(g)
(h) Damage resulting from connection to, or use of any
accessory or other product not approved or authorized by
the Company;
(i)
(j) Defects in appearance, cosmetic, decorative or structural
items such as framing and non-operative parts;
(k)
(l) Product damaged from external causes such as fire,
flooding, dirt, sand, weather conditions, battery leakage,
blown fuse, theft or improper usage of any electrical
source.
The Company disclaims liability for removal or
reinstallation of the product, for geographic coverage, for
inadequate signal reception by the antenna or for
communications range or operation of the wireless system
as a whole.
This manual suits for next models
1
Table of contents
Other PCD Cell Phone manuals


