PCE Health and Fitness VR 10 User manual
© PCE Instruments
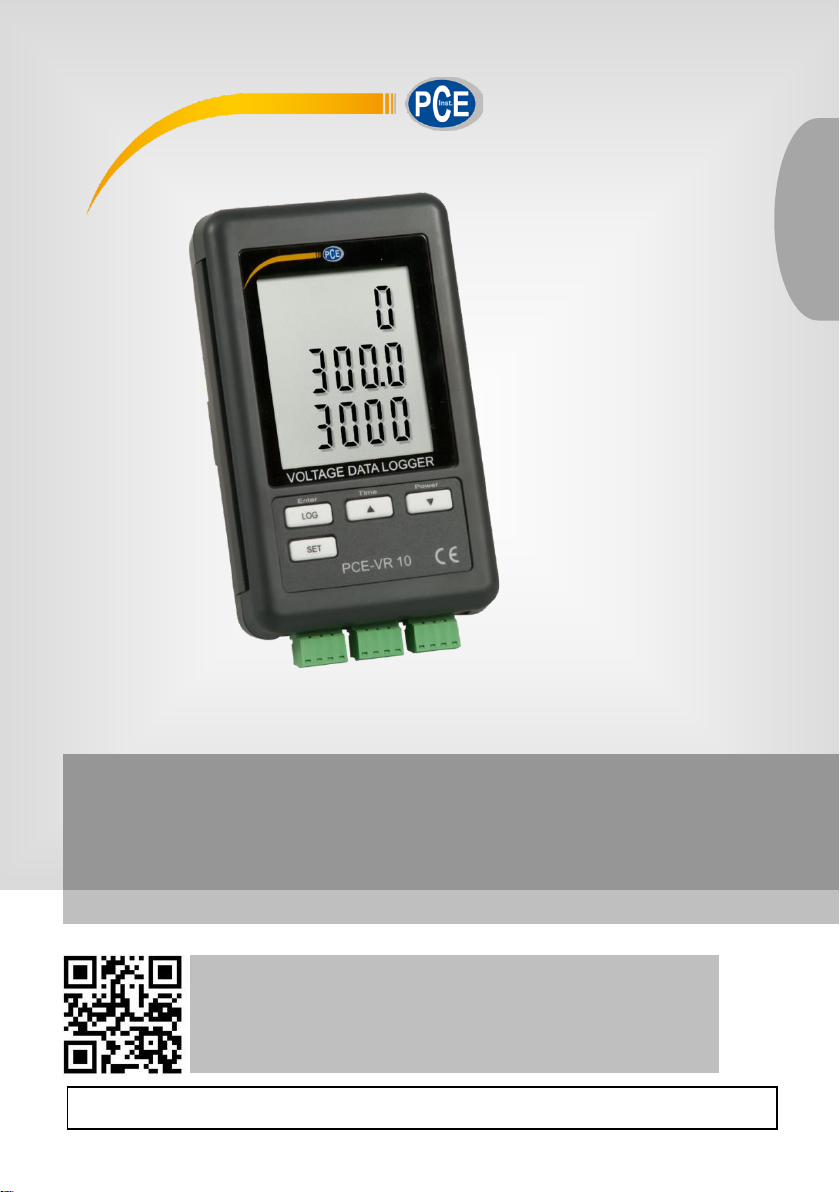
PCE-VR 10 Voltage Data Logger
User Manual
User manuals in various languages (français,
italiano, español, português, nederlands, türk, polski,
русский, 中文) can be found by using our
product search on: www.pce-instruments.com
Last change: 22 February 2021
v1.1
English

© PCE Instruments
Contents
1Safety notes........................................................................................... 1
2Function................................................................................................. 2
3Specifications........................................................................................2
4Scope of delivery .................................................................................. 2
5System description...............................................................................3
6Operation ............................................................................................... 4
6.1 Measurement preparation ................................................................................................ 4
6.2 Display information........................................................................................................... 5
6.3 Measuring / Logging......................................................................................................... 5
6.4 Backlight.......................................................................................................................... 6
6.5 Switchin the meter off and on........................................................................................... 6
6.6 Data transfer to the PC..................................................................................................... 6
6.7 Advanced settings............................................................................................................ 7
6.8 Measurement range......................................................................................................... 9
7Battery replacement.............................................................................. 9
8Reset system....................................................................................... 10
9RS232 interface ...................................................................................10
10 Warranty...............................................................................................11
11 Disposal ...............................................................................................11

© PCE Instruments
1
1 Safety notes
Please read this manual carefully and completely before you usethe device for the first time. The
device may only be used by qualified personnel and repaired by PCE Instruments personnel.
Damage or injuries caused by non-observance of the manual are excluded from our liability and
not covered by our warranty.
•The device must only be used as described inthis instruction manual. If usedotherwise,
this can cause dangerous situations for the user and damage to the meter.
•The instrument may only be used if the environmental conditions (temperature, relative
humidity, …) are within the ranges stated in the technical specifications. Do not expose
the device to extreme temperatures, direct sunlight, extreme humidity or moisture.
•Do not expose the device to shocks or strong vibrations.
•The case should only be opened by qualified PCE Instruments personnel.
•Never use the instrument when your hands are wet.
•You must not make any technical changes to the device.
•The appliance should only be cleaned with a damp cloth. Use only pH-neutral cleaner,
no abrasives or solvents.
•The device must only be used with accessories from PCE Instruments or equivalent.
•Before each use, inspect the case for visible damage. If any damage is visible, do not
use the device.
•Do not use the instrument in explosive atmospheres.
•The measurement range as stated in the specifications must not be exceeded under
any circumstances.
•Non-observance of the safety notes can cause damage to the device and injuries to
the user.
We do not assume liability for printing errors or any other mistakes in this manual.
We expressly point to our general guarantee terms which can be found in our general terms of
business.
If you have any questions please contact PCE Instruments. The contact details can be found at
the end of this manual.
© PCE Instruments
2
2 Function
The data logger can display voltages within a range of 0 ... 3000 mV DC and make 3-channel
recordings at different storage intervals.
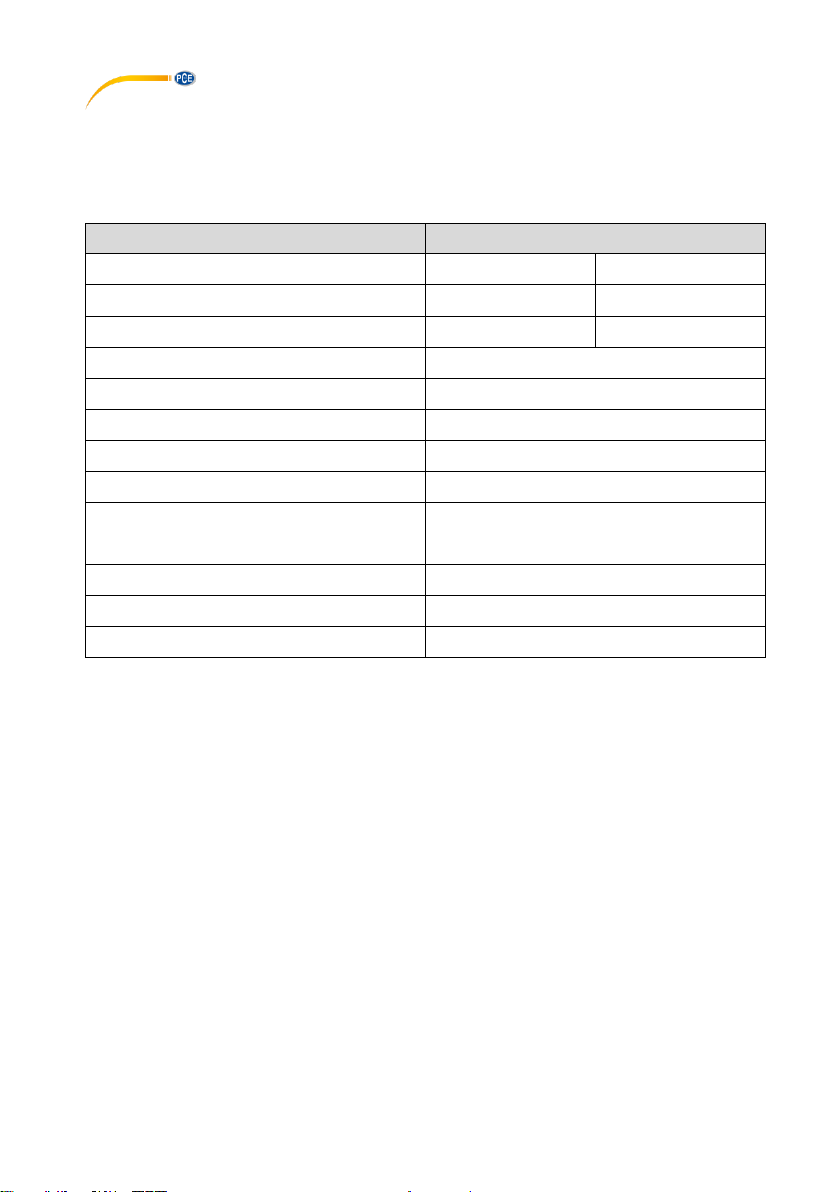
3 Specifications
Specification
Explanations
Measurement range
0 ... 300 mV DC
0 ... 3000 mV DC
Measurement accuracy
±(0.5 % + 0.2 mV)
±(0.5 % + 2 mV)
Resolution
0.1 mV
1 mV
Log interval in seconds
1, 2, 5, 10, 30, 60, 120, 300, 600, Auto
Battery life when logging on battery power
approx. 30 h at 2 s log interval
Memory
SD card up to 16 GB
Display
LCD with backlight
Display refresh rate
1 s
Power supply
6 x 1.5 V AAA battery
Plug-in mains adaptor 9 V / 0.8 A
Operating conditions
0 ... 50 °C / 32 ... 122°F / <85 % RH
Dimensions
132 x 80 x 32 mm
Weight
approx. 190 g / <1 lb
4 Scope of delivery
1 x voltage data logger PCE-VR 10
3 x connection terminals
1 x SD memory card
1 x wall bracket
1 x adhesive pad
6 x 1.5 V AAA battery
1 x user manual

© PCE Instruments
3
5 System description
①
9 V DC input
⑪
Stand
②
Reset key opening
⑫
Battery compartment
③
RS232 output
⑬
Battery compartment screw
④
SD card slot
⑭
Measuring input channel 1
⑤
Display
⑮
Measuring input channel 2
⑥
LOG / Enter key
⑯
Measuring input channel 3
⑦
Set key
⑰
Wall bracket
⑧
▼ / Power key
⑱
Connector measuring input channel 1
⑨
▲ / Time key
⑲
Connector measuring input channel 2
⑩
Mounting hole
⑳
Connector measuring input channel 3

© PCE Instruments
4
6 Operation
6.1 Measurement preparation
•Before using the device for the first time, insert the batteries correctly into the device
as described in chapter 7. The batteries are absolutely necessary to operate the
internal clock when the meter is switched off.
•Insert an SD card into the card slot. Format the card before using it for the first time or
if the card has been formatted by other devices. To format the SD card, proceed as
described in chapter 6.7.1
•Switch on the unit with the "▼ / Power" key.
•Check the date, time and sampling time (log interval).
Press the "▲ / Time" key for approx. 2 seconds. The set values are displayed one
after the other. You can change the date, time and sampling time as described in
6.7.2and 6.7.3
•Make sure that the decimal character is set correctly. The default decimal character is
a dot. In Europe, however, the comma is customary. If the decimal character is not
set correctly in your country, this can lead to incorrect values and complications when
reading out the memory card. You can make the setting as described under chapter
6.7.5
•Enable or disable the key and control sounds as described in chapter 6.7.4
•Enable or disable the RS232 output described in chapter 6.7.6
•Set the desired measurement range as described in chapter 6.8
•Connect the signal line to the corresponding plugs of the measuring inputs, observing
correct polarity.
Attention!
Maximum input voltage 3000 mV. For higher voltages, a voltage divider must be
connected upstream!

© PCE Instruments
5
6.2 Display information
SD card is full or defective.
Clear and format the SD card.
If the indication continues to appear, replace the SD card.
or
Battery level low
Replace the batteries.
No SD card inserted
6.3 Measuring / Logging
•Plug the measuring input connectors into the corresponding channel input, observing
correct polarity.
•Switch on the meter with the "▼ / Power" key.
The current measured values are displayed.
6.3.1 Starting the log function
•To start the logger, press and hold the "LOG / Enter" key for 2 seconds. Scan"
appears briefly in the upper part of the display as confirmation. “Datalogger" appears
between the channel 2 and 3 displays. The lettering "Datalogger" flashes and the
control sound is audible at the set log interval (if not disabled).
6.3.2 Exiting the log function
•To exit the log function, press and hold the "LOG / Enter" key for 2 seconds.
The unit returns to measuring mode.

© PCE Instruments
6
6.4 Backlight
6.4.1 Battery operation
Press the "▼ / Power" key to switch on the display backlight for approx. 6 seconds when the
mezter is switched on.
6.4.2 Mains operation
Press the "▼ / Power" key to switch the display backlight on or off when the meter is switched
on.
6.5 Switchin the meter off and on
•If necessary, disconnect the plug-in mains adaptor from the mains and the meter.
•Press and hold the "▼ / Power" key for 2 seconds.
•To switch the meter back on again, briefly press the "▼ / Power" key once.
It is not possible to switch off the meter while power supply is provided by mains adaptor.
6.6 Data transfer to the PC
•Remove the SD card from the meter when the log function is finished.
Attention!
Removing the SD card while the log function is running can lead to data loss.
•Insert the SD card into the corresponding SD card slot on the PC or into an SD card
reader connected to the PC.
•Start the spreadsheet programme on your PC, open the file on the SD card and read
out the data.

© PCE Instruments
7
6.6.1 SD card structure
The following structure is automatically created on the SD card when it is used for the first time
or after formatting:
•Folder "MVA01
•File "MVA01001" with max. 30000 data records
•File "MVA01002" with max. 30000 records if MVA01001 overflows
•etc. to "MVA01099
•File "MVA02001" if MVA01099 overflows
•etc. to "MVA10....
Example file
6.7 Advanced settings
•With the meter switched on and the data logger not activated, press and hold the
"SET" key until "Set" appears on the display.
•With the "SET" key, you can call up the following setting options one after the other.
Display indication
Action
1
Sd F
Format SD card
2
dAtE
Set date / time
3
SP-t
Sampling time / log interval
4
bEEP
Key &/ control sound on / off
5
dEC
Decimal character . or ,
6
rS232
RS 232 output on / off
7
rng
Measurement range 300 mV or 3000 mV
If no entries are made for 5 seconds, the meter returns to measuring mode.

© PCE Instruments
8
6.7.1 Format SD card
•Navigate to the advanced settings as described above.
The prompt Sd F appears on the display.
•Use the "▼ / Power" or "▲ / Time" keys to select yes or no.
•Confirm the selection with the "LOG / Enter" key.
•If you select "yes", you must confirm the security query again by pressing the "LOG /
Enter" key.
•Press the "SET" key repeatedly until you return to measuring mode or wait for 5
seconds; then the meter will switch to measuring mode automatically.
Attention!
If you select "yes" and confirm the security query, all data on the SD card will be deleted and the
SD card will be reformatted.
6.7.2 Date / time
•Navigate to the advanced settings as described above.
•Press the "SET" key repeatedly until "dAtE" appears on the display.
After a short time, the year, month and day appear on the display.
•Use the "▼ / Power" or "▲ / Time" keys to select the current year and confirm the
entry with the "LOG / Enter" key.
•Proceed with the entry of the month and the day as with the entry of the year. After
confirming the day, the hour, minute and second will appear on the display.
•Proceed with these entries as with the year, etc.
•Press the "SET" key repeatedly until you return to measuring mode or wait for 5
seconds; then the meter will switch to measuring mode automatically.
6.7.3 Sampling time / log interval
•Navigate to the advanced settings as described above.
•Press the "SET" key repeatedly until "SP-t" appears on the display.
•Select the desired log interval with the "▼ / Power" or "▲ / Time" keys and confirm
the entry with the "LOG / Enter" key. The following can be selected: 1, 2, 5, 10, 30,
60, 120, 300, 600 s and auto.
•Press the "SET" key repeatedly until you return to measuring mode or wait for 5
seconds; then the meter will switch to measuring mode automatically.
Attention!
"auto" means that each time the measured values are changed (>±10 digit), the values are
saved once.
If the setting is 1 second, individual data records may be lost.

© PCE Instruments
9
6.7.4 Key / control sounds
•Navigate to the advanced settings as described above.
Press the "SET" key repeatedly until "bEEP" appears on the display.
•Use the "▼ / Power "or "▲ / Time" key to select yes or no.
•Confirm the selection with the "LOG / Enter" key.
•Press the "SET" key repeatedly until you return to measuring mode or wait for 5
seconds; then the meter will switch to measuring mode automatically.
6.7.5 Decimal character
•Navigate to the advanced settings as described above.
Press the "SET" key repeatedly until "dEC" appears on the display.
•Use the "▼ / Power" or "▲ / Time" keys to select "Euro" or "USA".
"Euro" corresponds to the comma and "USA" corresponds to the dot. In Europe, the
comma is mainly used as the decimal character.
•Confirm the selection with the "LOG / Enter" key.
•Press the "SET" key repeatedly until you return to measuring mode or wait for 5
seconds; then the meter will switch to measuring mode automatically.
6.7.6 RS232 output
•Navigate to the advanced settings as described above.
Press the "SET" key repeatedly until "rS232" appears on the display.
•Use the "▼ / Power" or "▲ / Time" key to select yes or no.
•Confirm the selection with the "LOG / Enter" key.
•Press the "SET" key repeatedly until you return to measuring mode or wait for 5
seconds; then the meter will switch to measuring mode automatically.
6.8 Measurement range
•Navigate to the advanced settings as described above.
Press the "SET" key repeatedly until "rng" appears on the display.
•Use the "▼ / Power" or "▲ / Time" keys to select 300 mV or 3000 mV.
•Confirm the selection with the "LOG / Enter" key.
•Press the "SET" key repeatedly until you return to measuring mode or wait for 5
seconds; then the meter will switch to measuring mode automatically.
7 Battery replacement
•Replace the batteries when the low battery indicator appears in the left corner of
the display. Low batteries can lead to incorrect readings and loss of data.
•Loosen the middle screw in the lower area on the back of the unit.
•Open the battery compartment.
•Remove the used batteries and insert 6 new 1.5 V AAA batteries correctly.
•Close the battery compartment and fasten the locking screw.
© PCE Instruments
10
8 Reset system
If a serious system error occurs, resetting the system can solve the problem. To do this, press
the reset key with a thin object while the instrument is switched on. Note that this resets the
advanced settings to the factory default.
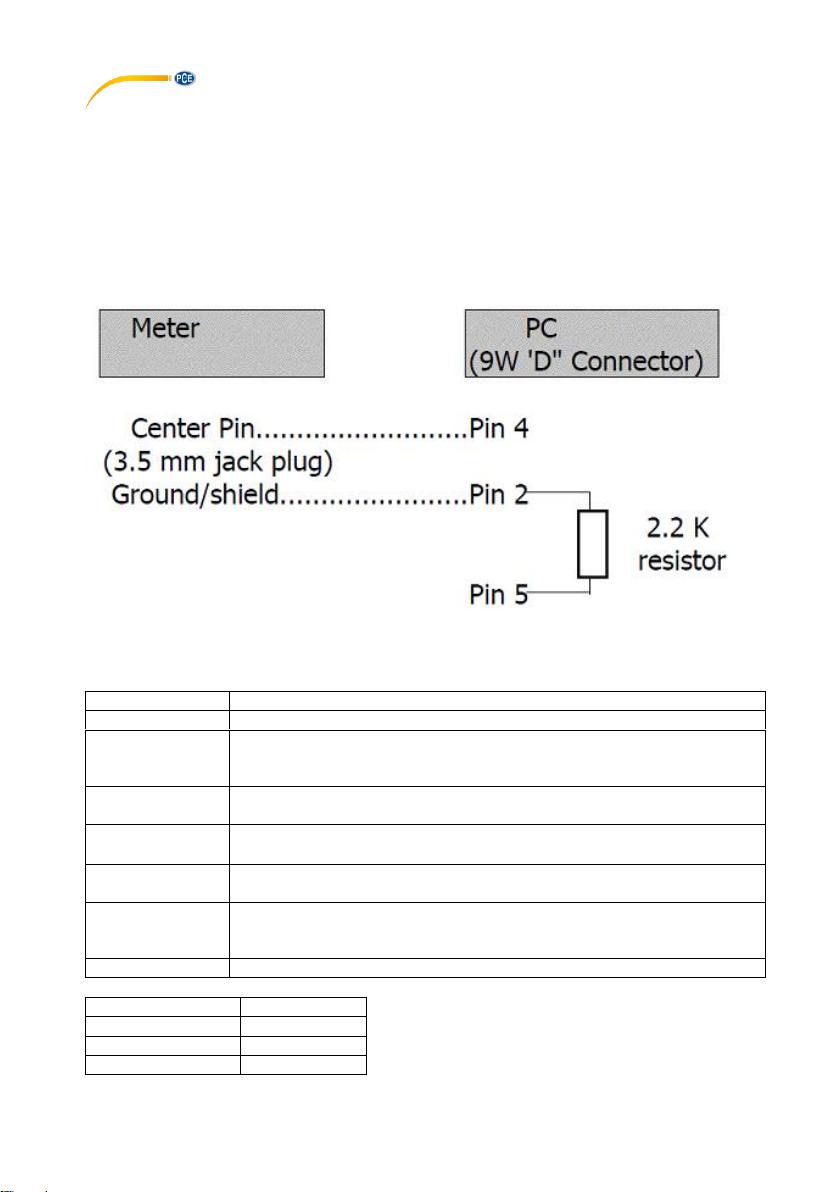
9 RS232 interface
The unit has an RS232 interface via a 3.5 mm socket. The output is a 16-digit data string that can
be set up according to user-specific requirements. An RS232 cable with the following features is
required to connect the unit to a PC:
The 16-digit data string is displayed in the following format:
D15 D14 D13 D12 D11 D10 D9 D8 D7 D6 D5 D4 D3 D2 D1 D0
The numbers stand for the following parameters:
D15
Start word
D14
4
D13
When upper display data is sent, 1 is sent
When medium display data is sent, 2 is sent
When lower display data is sent, 3 is sent
D12 &
D11
Annunciator for display
mA = 37
D10
Polarity
0 = Positive 1 = Negative
D9
Decimal point (DP), position from right to left
0 = No DP, 1= 1 DP, 2 = 2 DP, 3 = 3 DP
D8 to D1
Display indication, D1 = LSD, D8 = MSD
For example:
If display is 1234, D8 ... D1 is 00001234
D0
End word
Baud rate
9600
Parity
No parity
Data bit no.
8 data bits
Stop bit
1 stop bit
© PCE Instruments
11
10 Warranty
You can read our warranty terms in our General Business Terms which you can find here:
https://www.pce-instruments.com/english/terms.
11 Disposal
For the disposal of batteries in the EU, the 2006/66/EC directive of the European Parliament
applies. Due to the contained pollutants, batteries must not be disposed of as household waste.
They must be given to collection points designed for that purpose.
In order to comply with the EU directive 2012/19/EU we take our devices back. We either re-use
them or give them to a recycling company which disposes of the devices in line with law.
For countries outside the EU, batteries and devices should be disposed of in accordance with
your local waste regulations.
If you have any questions, please contact PCE Instruments.

© PCE Instruments
12
PCE Instruments contact information
Germany France Spain
PCE Deutschland GmbH PCE Instruments France EURL PCE Ibérica S.L.
Im Langel 4 23, rue de Strasbourg Calle Mayor, 53
D-59872 Meschede 67250 Soultz-Sous-Forets 02500 Tobarra (Albacete)
Deutschland France España
Tel.: +49 (0) 2903 976 99 0 Téléphone: +33 (0) 972 3537 17 Tel. : +34 967 543 548
Fax: +49 (0) 2903 976 99 29 Numéro de fax: +33 (0) 972 3537 18 Fax: +34 967 543 542
www.pce-instruments.com/deutsch www.pce-instruments.com/french www.pce-instruments.com/espanol
United Kingdom Italy Turkey
PCE Instruments UK Ltd PCE Italia s.r.l. PCE Teknik Cihazları Ltd.Şti.
Unit 11 Southpoint Business Park Via Pesciatina 878 / B-Interno 6 Halkalı Merkez Mah.
Ensign Way, Southampton 55010 Loc. Gragnano Pehlivan Sok. No.6/C
Hampshire Capannori (Lucca) 34303 Küçükçekmece - İstanbul
United Kingdom, SO31 4RF Italia Türkiye
Tel: +44 (0) 2380 98703 0 Telefono: +39 0583 975 114 Tel: 0212 471 11 47
Fax: +44 (0) 2380 98703 9 Fax: +39 0583 974 824 Faks: 0212 705 53 93
www.pce-instruments.com/english www.pce-instruments.com/italiano www.pce-instruments.com/turkish
The Netherlands Hong Kong United States of America
PCE Brookhuis B.V. PCE Instruments HK Ltd. PCE Americas Inc.
Institutenweg 15 Unit J, 21/F., COS Centre 1201 Jupiter Park Drive, Suite 8
7521 PH Enschede 56 Tsun Yip Street Jupiter / Palm Beach
Nederland Kwun Tong 33458 FL
Telefoon: +31 (0)53 737 01 92 Kowloon, Hong Kong USA
Table of contents
Other PCE Health and Fitness Data Logger manuals


