PCI EFP-500 User manual

Safety in Practice
EFP-500
Endo-Flush
Endoscope Flushing Pump
Instruction Manual
CLEN218

EFP-500 M0001-006 07/26/2011 - 2 -
Endo-Flush # EFP-500 Instruction Manual
04/2011
Printed in the United States of America
No part of this publication may be reproduced without the express written permission of PCI medical inc.
PCI medical inc.
Location: 8 Inspiration Lane, Chester, CT 06412
Mailing: PO Box 188, Deep River, CT 06417
Tel: (860) 526-2862
(800) 862-3394
Fax: (866) 271-5982
web: www.pcimedical.com
CLEN218

EFP-500 M0001-006 07/26/2011 - 3 -
Contents
1INTRODUCTION ..............................................................................................4
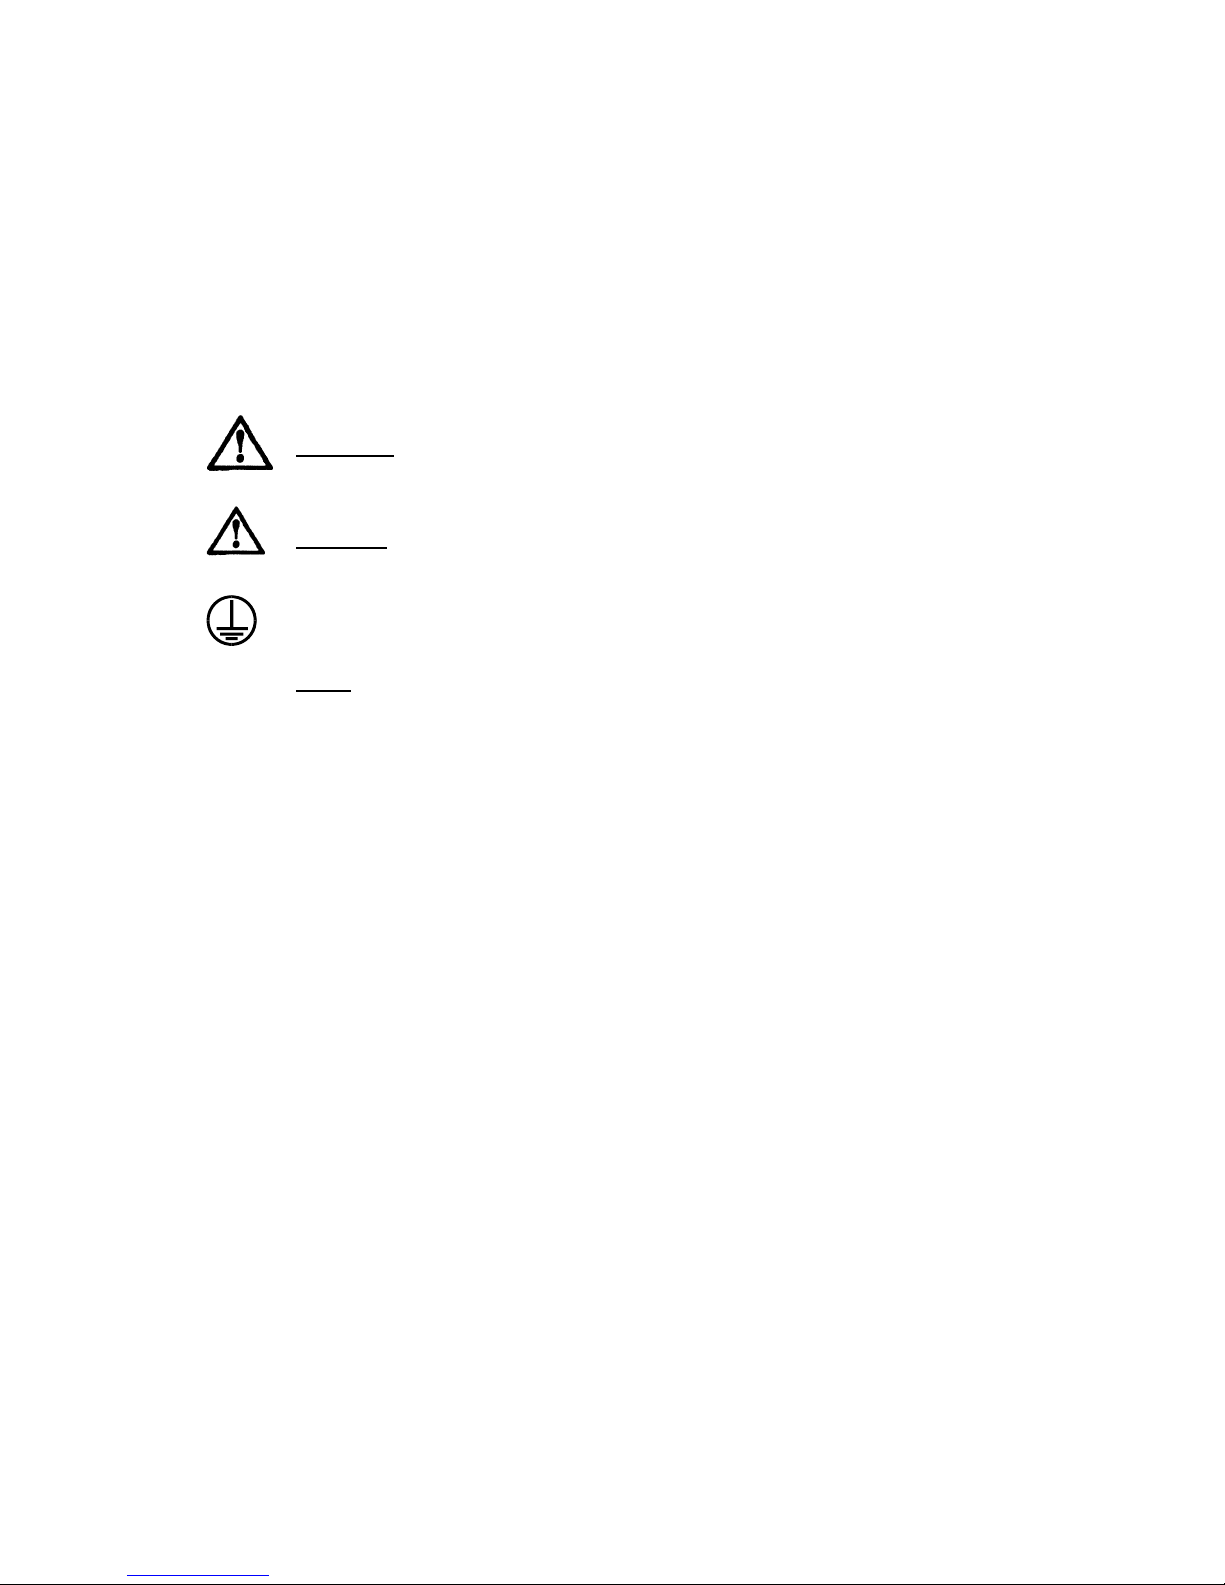
Labels, Symbols & Signal Words..................................................................................................4
Environmental Conditions..............................................................................................................4
Supply Ratings....................................................................................................................................4
2IMPORTANT INFORMATION .........................................................................5
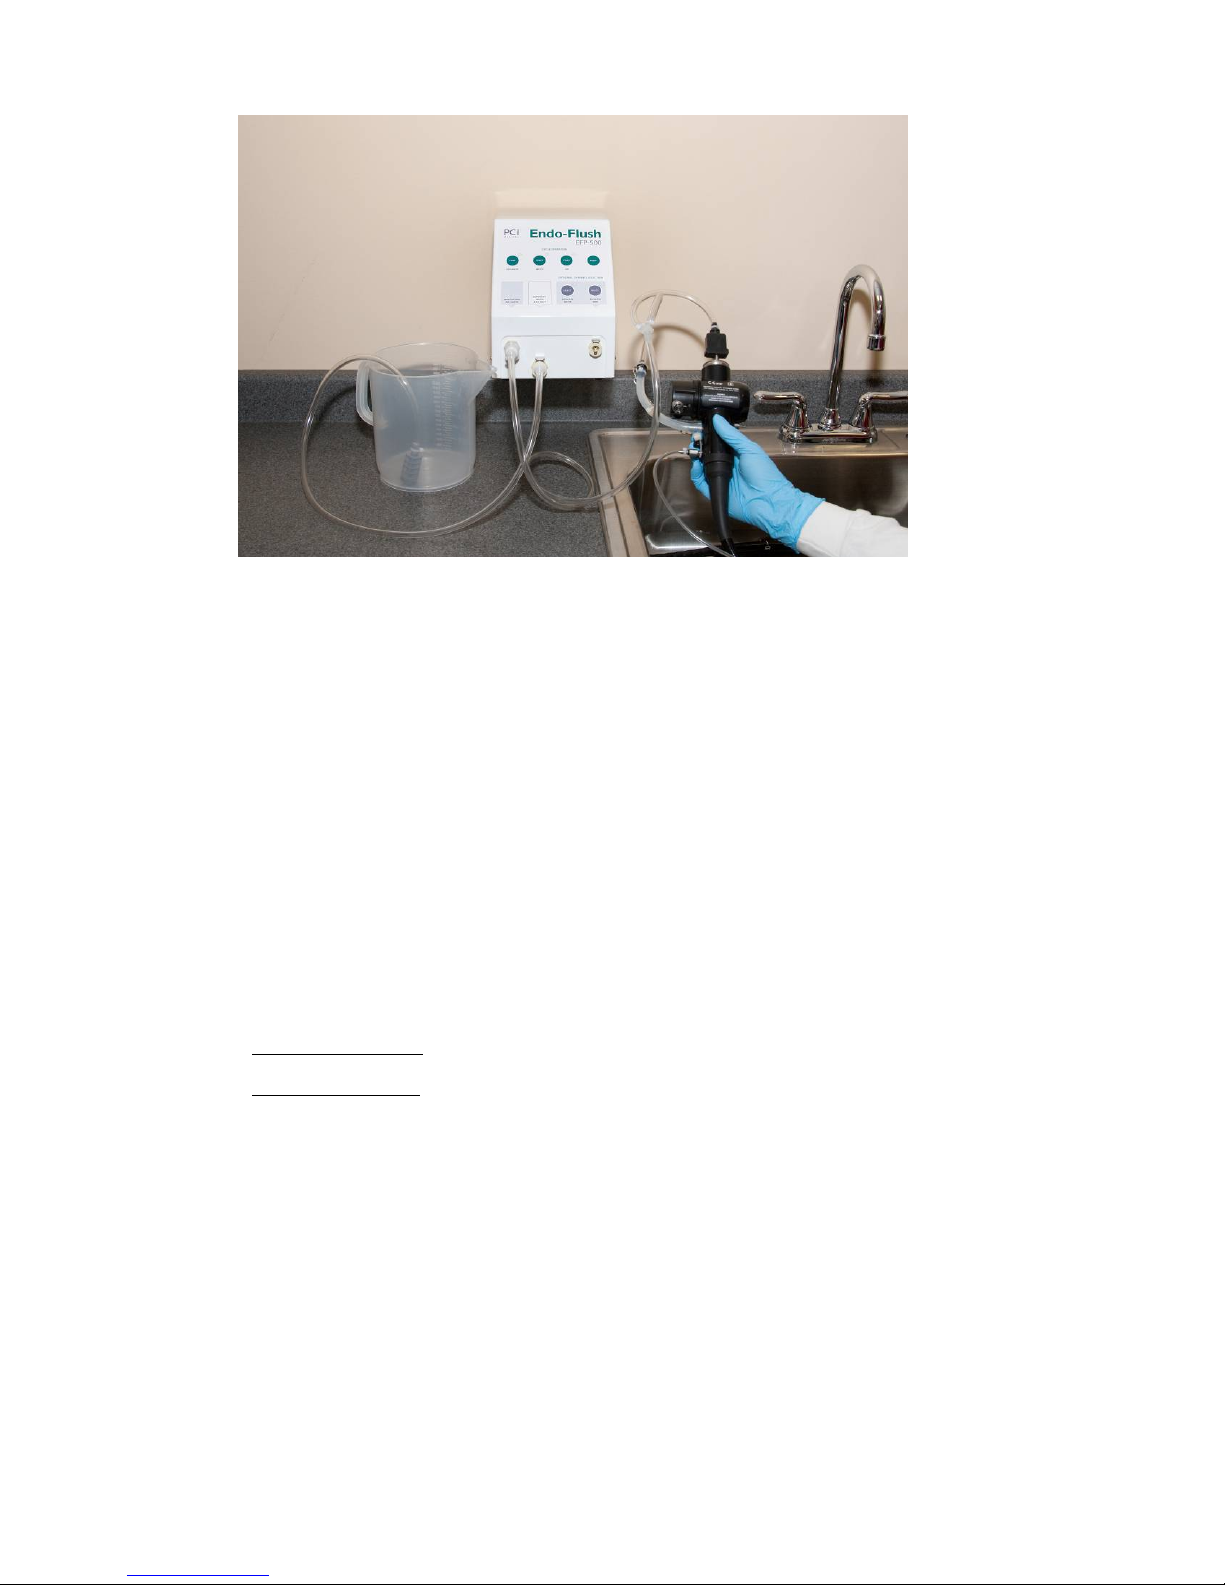
Product Overview..............................................................................................................................5
Intended Use.......................................................................................................................................5
Instruction Manual ...........................................................................................................................5
Repair and Modification..................................................................................................................5
Safety Precautions............................................................................................................................6
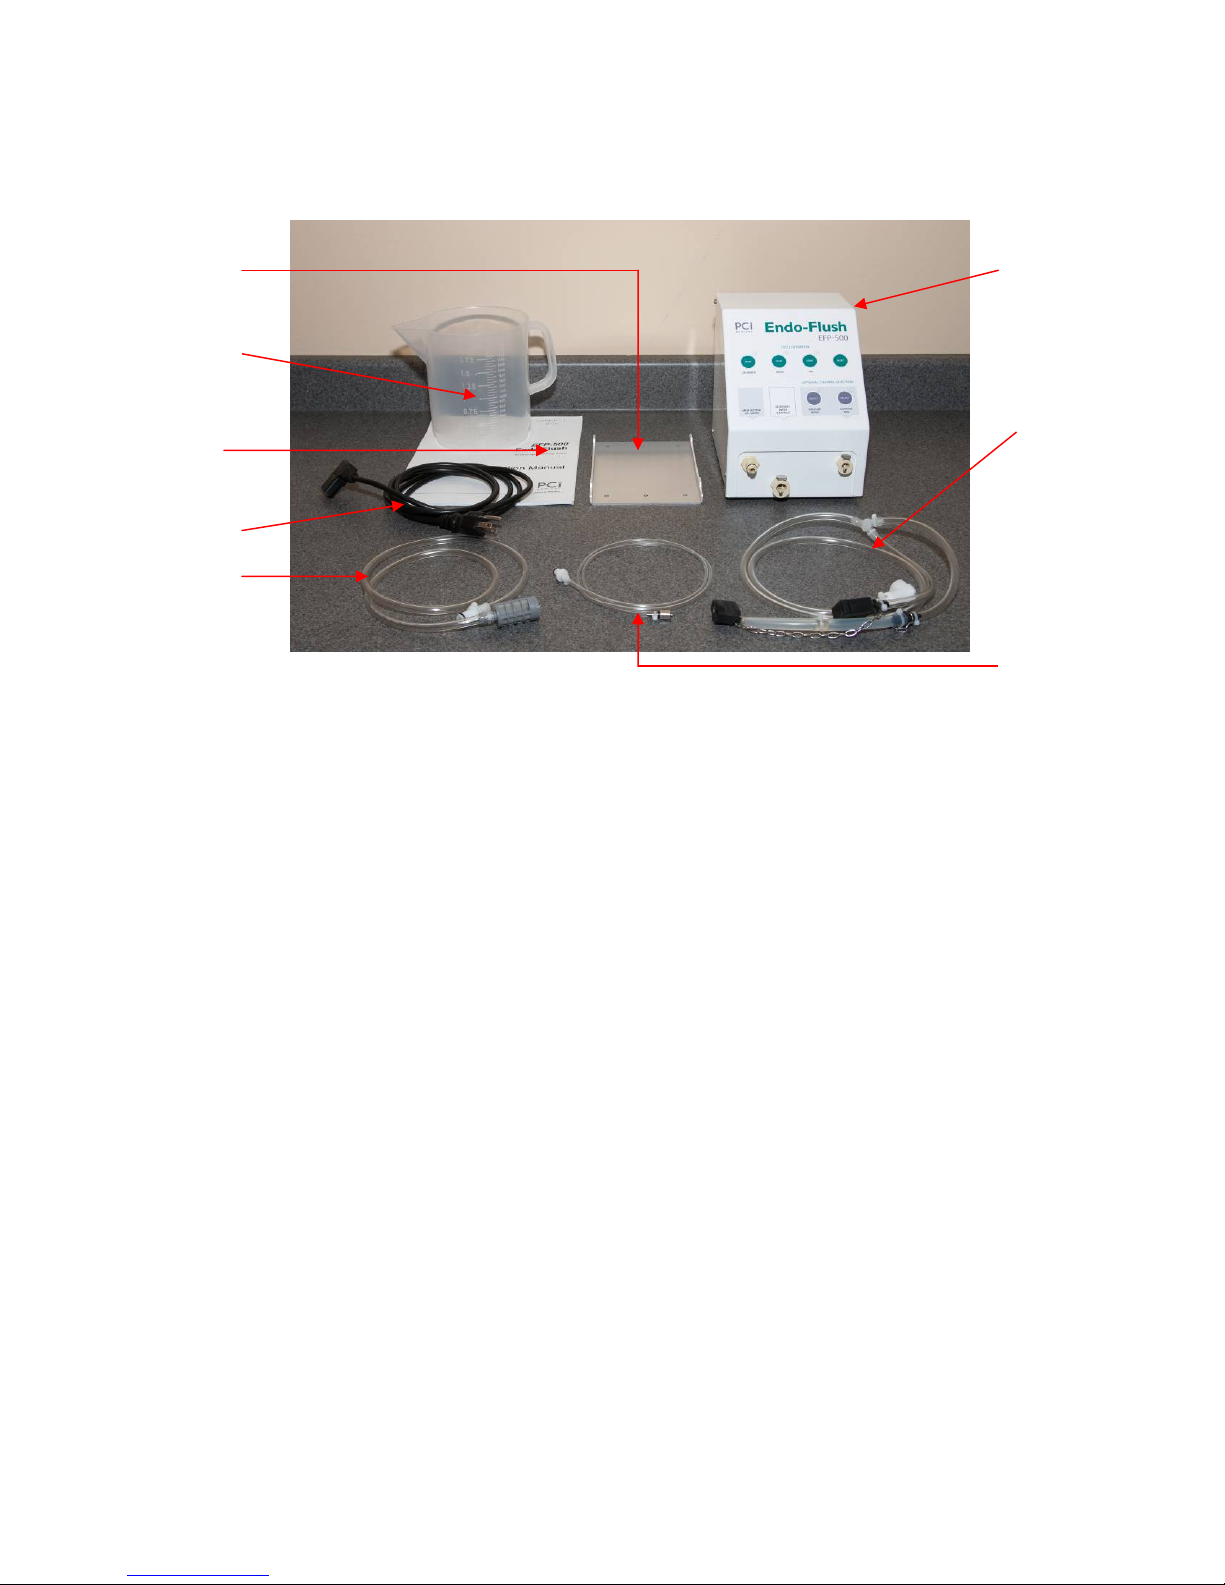
3SETTING UP YOUR EFP-500..........................................................................7
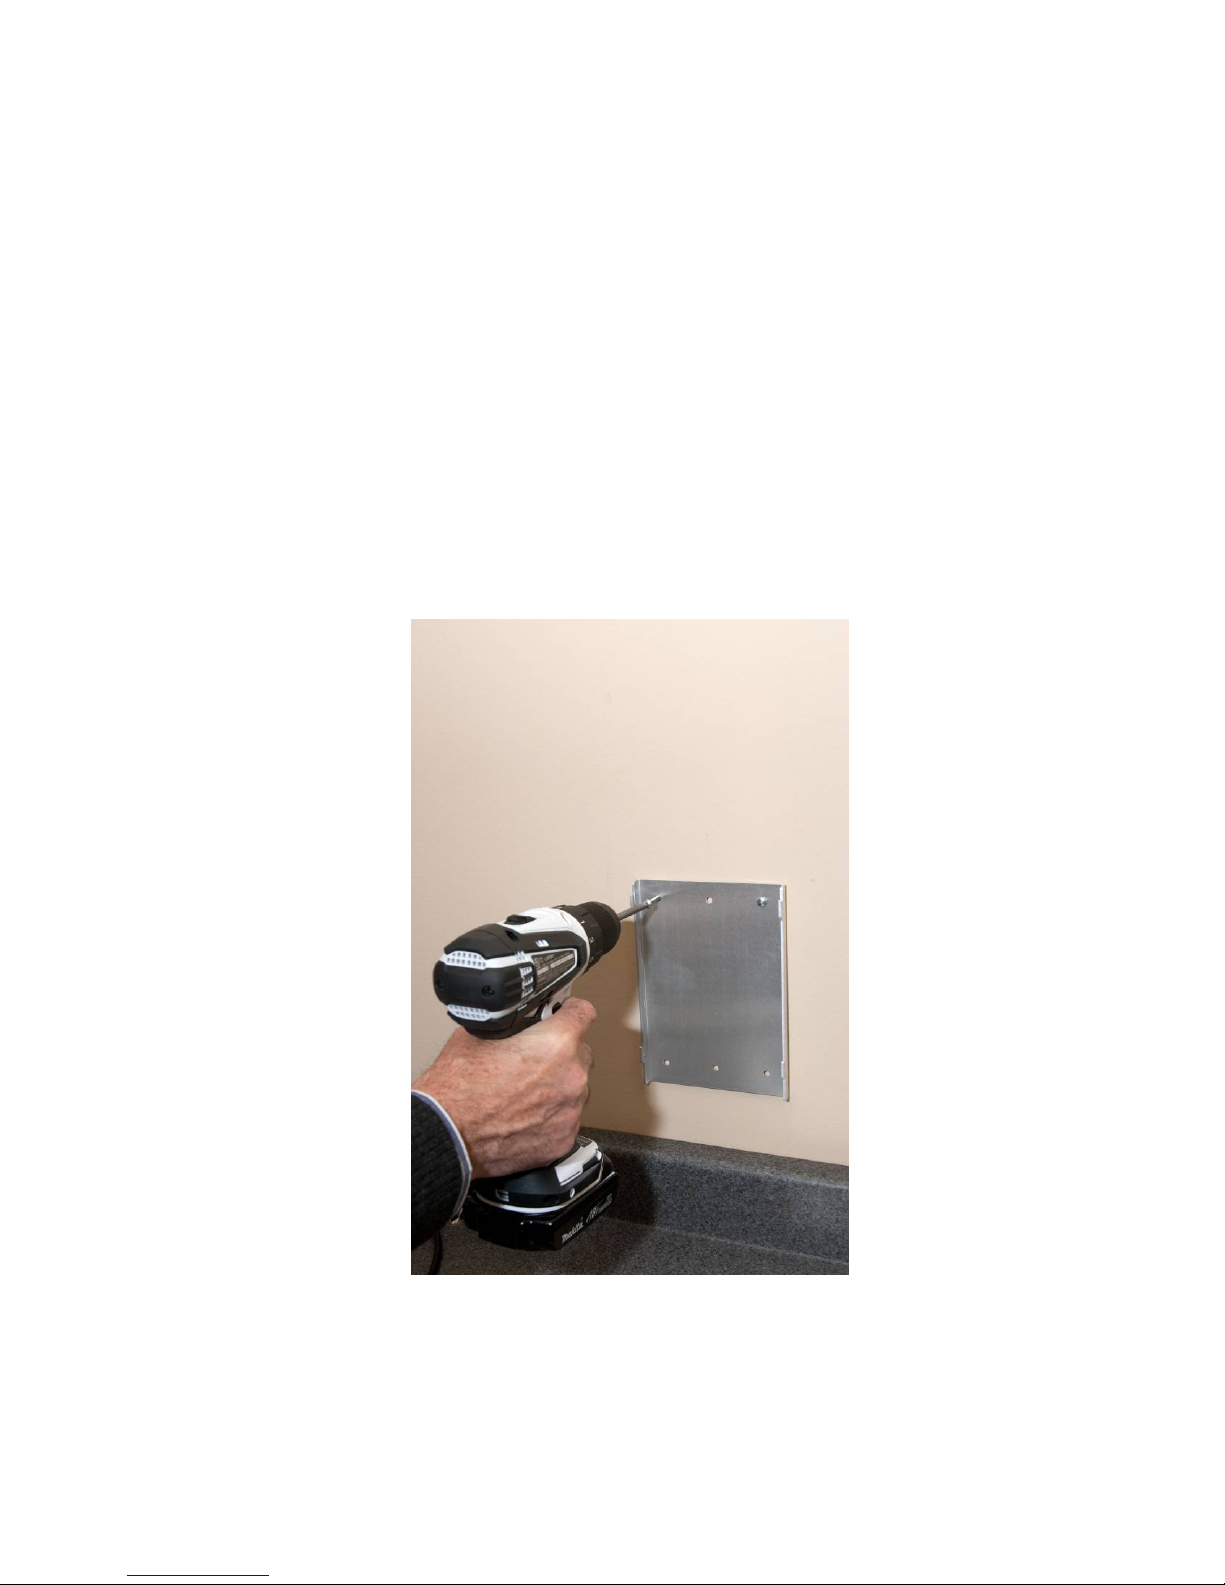
Wall Mounting your EFP-500.........................................................................................................8
4OPERATION.....................................................................................................9
Start-Up ................................................................................................................................................9
Connecting Your Endoscope to the EFP-500.........................................................................10
Channel Selection Process...........................................................................................................11
Flushing with Detergent...............................................................................................................12
Flushing with Water.......................................................................................................................13
Flushing with Air..............................................................................................................................13
Storage................................................................................................................................................13
5ROUTINE MAINTENANCE............................................................................14
Daily Maintenance ...............................................................................................................14
Monthly Maintenance..........................................................................................................14
6SYSTEM MAINTENANCE..............................................................................14
7DECONTAMINATION CYCLE.......................................................................14
A. EFP-500 Channel Assembly Decontamination ................................................................14
B. EFP-500 Decontamination.....................................................................................................15
8FLOW VERIFICATION..................................................................................16
9QUICK TROUBLESHOOT & FAQS................................................................17
Frequently Asked Questions........................................................................................................17
10 LIMITED WARRANTY...................................................................................18
11 COMPATIBLE ENDOSCOPES.......................................................................19
12 SPECIFICATIONS AND TECHNICAL DATA................................................19
Electrical:............................................................................................................................................19
Construction:.....................................................................................................................................19
Dimensions:.......................................................................................................................................19
13 REGISTRATION CARD .................................................................................19
CLEN218

EFP-500 M0001-006 07/26/2011 - 4 -
1 Introduction
Labels, Symbols & Signal Words
The meanings of the labels, symbols and signal words that appear on the packaging, manual and/or
instrument are as follows:
The following signal words are used throughout this manual:
WARNING Indicates a potentially hazardous situation which, if not
avoided, could result in death or serious injury.
CAUTION Indicates a potentially hazardous situation which, if not
avoided, may result in minor or moderate injury. It may
also be used to alert against unsafe practices or
potential equipment damage.
Protective Grounding
NOTE
Indicates additional helpful information.
Environmental Conditions
For indoor use only.
Temperature range: 5C/41F to 40C/104F
Main supply voltage fluctuations not to exceed +/-10% of the nominal voltage.
Supply Ratings
Voltage: AC 110-120V 0.7A 50/60 Hz
Fuse: 2 each Type 5 x 20 mm SloBlo 2 amp 250VAC externally mounted.
The EFP-500 is tested and listed to the following standards:
The EFP-500 was tested by Met Laboratories, a Nationally Recognized Testing Laboratory (NRTL),
and was certified to UL 61010-1 and CSA C22.2 No 61010-1 safety standards. File # E112640
CLEN218

EFP-500 M0001-006 07/26/2011 - 5 -
2 Important Information
Please Read Before Use
Product Overview
The Endoscope Flushing Pump (EFP-500) is a compact unit that contains a single pump. It is used
to replace the manually operated syringe for flushing detergent, rinse water and air through
endoscope channels during the manual cleaning phase of endoscope reprocessing. The pump
flushes the Suction/Instrument, Air/Water channels and the Auxiliary Water or Elevator-Wire
channels.
Intended Use
The EFP-500 is designed to flush the internal channels of specific Olympus flexible endoscopes listed
on page 21 in accordance with Olympus reprocessing instructions.
NOTE: The EFP-500 is a substitute for manual flushing with a syringe prior
to the endoscope being placed in an automated endoscope
reprocessor (AER) for disinfection.
Follow the endoscope manufacturer’s instructions for manual cleaning. When endoscope
manufacturer’s instructions specify to flush channels with detergent/water/air using a syringe, follow
the EFP-500 instructions for automated detergent/water/air flushing.
Instruction Manual
This instruction manual contains essential information on using this system safely and effectively.
Before use, thoroughly review this manual and the manuals of all equipment that will be used during
the procedure, and use all equipment as instructed.
Keep this and all related instruction manuals in a safe, accessible location.
If you have any questions or comments regarding any information in this instruction manual, please
contact PCI medical inc.
Repair and Modification
Do not modify or attempt to repair the EFP-500 without consulting PCI medical inc. Equipment
damage can result from user attempts to repair or modify system components.
Before attempting to perform routine maintenance on the system, thoroughly review and understand
this manual for complete familiarization with the system and its operation.
CLEN218

EFP-500 M0001-006 07/26/2011 - 6 -
Safety Precautions
WARNING
The EFP-500 must be plugged into a GFCI outlet.
WARNING
The EFP-500 is an electrical device, do not immerse in water.
Follow the installation instructions to secure the device in a
safe location.
WARNING
The EFP-500 is not to be used with flammable liquids. Do not
flush with alcohol.
CAUTION
Disconnect power before moving the EFP-500.
CAUTION
The EFP-500 is not intended for use as part of the endoscope
high-level disinfection procedure.
CAUTION
Always use fresh detergent and clean water in the two-liter
container supplied with unit.
CAUTION
Always wear Personal Protective Equipment, including
eyewear. Avoid splashing and squirting fluid. Keep the fluid
outputs under water except when checking for flow through the
endoscope channels.
CAUTION
Ensure that fluid exiting the distal tip of the endoscope is not
pointed in a direction that would allow fluid to contact
personnel, electrical fixtures or the user.
CAUTION
Do not press the Auxiliary-Water or Elevator-Wire ‘Select’ button if
not in use. This will create back pressure and might damage your
EFP-500.
CAUTION
The EFP-500 is intended for use in flushing detergent, water and air
through the endoscope channels. Use of a dedicated EFP-500 for
detergent flushing alone without water rinsing may lead to the
development of biofilm in the inlet hose and/or EFP-500 unit.
NOTE
Use detergent in accordance with the detergent manufacturer’s
instructions regarding the correct dilution, temperature and
contact time.
NOTE The EFP-500 is LATEX FREE.
CLEN218

EFP-500 M0001-006 07/26/2011 - 7 -
3 Setting up your EFP-500
Included with your new EFP-500 system are the following parts:
Replacement Parts:
EFP-500-HC1 Two-piece hose assembly, including the Inlet Hose and Screen and the
Suction /Instrument & Air/Water Channels (referred to as ‘Main Channel
Assembly’)
EFP-500-HC2 Two-piece hose assembly, including the Inlet Hose and Screen and the
Auxiliary Water or Elevator Wire Channels (referred to as ‘Special Channel
Assembly’)
EFP-500-HC3 Three-piece hose assembly, including the Suction/Instrument & Air/Water
Channels (referred to as “Main Channel Assembly”); the Auxiliary Water or
Elevator Wire Channels (referred to as “Special Channel Assembly”) ; and
the Inlet Hose and Screen
EFP-500-HC4 Two-piece hose assembly including the Suction/Instrument & Air/Water
Channels (referred to as “Main Channel Assembly”); the Auxiliary Water or
Elevator Wire Channels (referred to as “Special Channel Assembly”)
EFP-500-WB Wall-mounting Bracket (includes four E-Z mount wall anchors and screws)
EFP-500-PC Power Cord
EFP-2L Two-liter graduated container
EFP-500-AK2 Cleaning Adapter Kit
EFP-OR* O-ring replacement pack
EFP-F5* Screens for Inlet Hose (5-pack)
EFP-500 Manual Instruction Manual
EFP-500-4123* Rinse Bottle (not shown)
Replace hoses as necessary, or when cracks and/or excessive wear are observed. To order
replacement parts, please contact your Olympus sales representative or Olympus Customer Care at
800-848-9024. *Order directly from PCI Medical 800-862-3394
Power Cord
Inlet Hose
Assembl
y
Wall-mounting
Bracket &
Assembly
Hose Assembly for
Suction/Instrument &
Air/Water Channels
EFP-500
Container
Instruction
Manual
Hose Assembly for
Auxiliary Water or
Elevator Wire
Channels
CLEN218

EFP-500 M0001-006 07/26/2011 - 8 -
Wall Mounting your EFP-500
Your EFP-500 can be placed on a countertop or can be wall-mounted.
(Tools needed: #2 Phillips head screwdriver, pencil and electric drill)
1. There must be a minimum of 4” of clearance on the right side of the unit to allow for access to
the power receptacle and fuse.
2. Position wall bracket against the wall and mark the position of the four holes.
3. Install the four self-drilling wall anchors supplied with unit at these points until they are flush
with the wall. Place bracket over anchors and install using the four Phillips head screws
provided.
4. For masonry walls, use suitable lead or plastic anchors and bolts. These anchors are not
supplied.
5. Place the EFP-500 on wall bracket. Check to ensure that it is securely mounted.
6. If mounting on a stud, use the two center locations.
CLEN218

EFP-500 M0001-006 07/26/2011 - 9 -
Connection for
Aux-Water or
Elevator Wire
Channels
4 Operation
The EFP-500 is designed to flush the internal channels of Olympus flexible endoscopes in
accordance with Olympus reprocessing instructions.
NOTE: The EFP-500 is intended for use with the endoscope manufacturer’s
manual cleaning instructions. The EFP-500 is a substitute for
cleaning activities that require the use of a manual syringe prior to
manual high-level disinfection or the endoscope being placed in an
automated endoscope reprocessor (AER) for disinfection.
Start-Up
The unit may be placed on a countertop. However, it is preferred that the unit be mounted on the wall
to prevent inadvertent movement of the device. Plug the power cord into the right side of the EFP-
500 and into a 115V GFCI protected wall receptacle.
WARNING Since the EFP-500 is used around water, it must be
plugged into a GFCI (Ground Fault Circuit Interrupter)
outlet.
Inlet Hose
Connection
Connection for
Suction/Instrument &
Air/Water Channels Air/Water Channel
Connection
Auxiliary Water Channel
Connection
Suction/Instrument
Channel Connection
Container
CLEN218

EFP-500 M0001-006 07/26/2011 - 10 -
Connecting Your Endoscope to the EFP-500
1. Fill a separate basin/sink with fresh detergent solution per manufacturer’s instructions. The
basin/sink must be large enough to completely submerge the endoscope.
2. Fill the supplied two-liter container with fresh detergent solution and place it to the side of
the EFP-500
3. Connect the Main Channel Assembly to the appropriate connections on the endoscope. Plug
the other end of the Assembly into the left quick-disconnect on the EFP-500
CAUTION To prevent detachment of these connections from the
endoscope during operation, make sure the connections are
dry before you insert them. If wet, spray isopropyl alcohol on
both connections and connectors (see below) before insertion
and air dry.
4. Prior to submerging the endoscope, ensure that the channel plug and water resistant cap
(videoscopes only) are attached to the endoscope. Submerge the endoscope and
connections into the prepared basin/sink.
For those endoscopes with Auxiliary-Water or Elevator-Wire Channels:
Connect the Special Channel Assembly to the appropriate connections on the endoscope.
Then plug the other end of the Assembly into the right side quick-disconnect fitting on the
EFP-500.
5. Plug the Inlet Hose into the connection marked “INLET” on the EFP-500. Place the end
with the screen into the bottom of the container with detergent.
NOTE: Always pump fresh, clean solutions through the EFP-500.
Do not place the Inlet Hose in the basin/sink along with the
endoscope. Doing so will circulate contaminated fluids
through the EFP-500.
Air Pi
p
e Connecto
r
Connector PlugAir Pipe Port Air & Water Su
pp
l
y
Main Channel Assembly Connections Main Channel Assembly Connectors
CLEN218

EFP-500 M0001-006 07/26/2011 - 11 -
6. Push the power switch on the right side of the EFP-500 to activate the unit. The switch will
illuminate when the device is on.
You are now ready to flush your endoscope with the EFP-500.
NOTE: If problems occur when inserting connectors, make sure the
metal release buttons on the EFP-500 are depressed before
inserting.
Channel Selection Process
1. If the endoscope does not have an auxiliary or elevator wire channel proceed to the Flushing
with Detergent section.
2. If the endoscope has an auxiliary or elevator wire channel select the appropriate channel by
pressing the corresponding select button on the bottom right of the front panel.
3. The LED next to the button will light when the button is selected.
4. If the selection is made in error simply press the intended button without pushing the Reset
button.
5. Selecting the proper channel is important as it sets the EFP-500 to the proper cycle times for
the endoscope.
6. Selection of the channel cannot be changed once the flushing cycles have been started.
EFP-500 Overlay
CLEN218

EFP-500 M0001-006 07/26/2011 - 12 -
Flushing with Detergent
NOTE
The EFP-500 replaces manual flushing with a syringe.
Suctioning, brushing and external cleaning are still required
according to manufacturer’s instructions.
1. With the endoscope submerged in fresh detergent, push the Detergent Start button on the
EFP-500 to pump detergent through the Channel Assemblies. The LED light will flash during
pumping operations.
NOTE
To prevent spraying liquid, ensure that the distal end of the
endoscope is submerged prior to activating the pump.
2. Carefully lift the distal tip out of the solution in the basin/sink and confirm that fluid is coming
out of all channels of the endoscope.
CAUTION Ensure that fluid exiting the distal tip of the endoscope is not
pointed in a direction that would allow fluid to contact
personnel, electrical fixtures, or the user.
3. When the cycle time is complete the Detergent LED will stop flashing and stay lit. This
confirms that the detergent pumping cycle is complete.
NOTE The EFP-500 can be immediately stopped at any time by
pressing the reset button, or by turning off the main power
switch.
4. Soak the endoscope in the detergent solution for the time recommended by the detergent
manufacturer.
5. Discard used detergent
6. Rinse the basin/sink with clean water.
CLEN218

EFP-500 M0001-006 07/26/2011 - 13 -
Flushing with Water
1. Transfer the endoscope into a basin/sink filled with clean water and reconnect the Main
Channel (and Special Channel Assembly) to the EFP-500.
2. Fill the container with two liters of clean water and place the Inlet Hose into it.
3. With the endoscope submerged in clean water, push the Water Start button on the EFP-500.
The LED indicator light will flash during the pumping operation.
4. Observe that fluid is coming out of all channels of the endoscope.
CAUTION Ensure that fluid exiting the distal tip of the endoscope
is not pointed in a direction that would allow fluid to
contact personnel, electrical fixtures, or the user.
5. The EFP-500 will stop automatically after the completion of the water flushing cycle. The
Water LED will stop flashing and remain lit to signal that the flushing is complete.
6. Discard used rinse water.
Flushing with Air
1. Place the screened end of the inlet hose in an empty container or on the countertop. Push
the Air Start button. The LED indicator light will flash to indicate the air cycle is running. The
EFP-500 will stop after the time parameters have been met for air flush. The LED will stop
flashing and remain lit to indicate the air cycle is complete.
2. When all three LED’s (Detergent, Water and Air) are lit this signals that the scope is ready for
High Level Disinfection.
3. Remove all hose assemblies from the endoscope.
4. Dry the surface of the endoscope following the endoscope manufacturer’s instructions.
The endoscope is now ready to be manually high-level disinfected or placed in an automated
reprocessor (AER) for high-level disinfection.
Storage
1. Store the EFP-500 unit according to the environmental conditions specified on page 4.
2. Store inlet hose and channel assemblies by hanging vertically in a clean, temperature-
controlled area.
CLEN218

EFP-500 M0001-006 07/26/2011 - 14 -
5 Routine Maintenance
Daily Maintenance
Daily Cleaning: refer to Section 6
Decontamination: refer to Section 7A
Flow Verification: refer to Section 8
Monthly Maintenance
Decontamination: refer to Section 7B
6 System Maintenance
Turn the main power switch “OFF” and disconnect the power cord from the electrical outlet. First
clean the external surface of the unit using a clean cloth dampened with a mild detergent solution.
Then wipe with a clean cloth dampened with water to remove detergent. Dry with a clean cloth. Hard
to clean spots may be cleaned with a light abrasive such as “Soft Scrub”.
NOTE
The housing of the EFP-500 is water resistant and can be
cleaned as described above. However, never immerse the
EFP-500 in any fluid.
CAUTION Never clean the EFP-500 while connected to an electrical
outlet.
After each reprocessing cycle, wipe external surface of Channel Assemblies with clean cloth soaked
in detergent solution. Rinse with clean water.
7 Decontamination Cycle
A. EFP-500 Channel Assembly Decontamination
NOTE: The Inlet Hose is not autoclavable.
NOTE: The Inlet Hose is decontaminated along with the EFP-500.
NOTE: The Inlet Hose should be rinsed with water and flushed with alcohol
at the end of each day of use.
NOTE: Periodically check the hoses for cracks, dents and or excessive
wear. Replace as necessary.
NOTE: Do not use the EFP-500 to flush an endoscope with high-level
disinfectant.
NOTE: Do not use the EFP-500 to flush alcohol (ethyl or isopropyl).
CLEN218

EFP-500 M0001-006 07/26/2011 - 15 -
CAUTION Do not use bleach to decontaminate your channel assemblies or
EFP-500. Bleach can deteriorate your quick disconnect fittings.
Decontaminate the channel assemblies daily according to the following procedure.
1. Disinfect or sterilize channel assemblies using one of the 2 methods:
i. Disinfect the channel assemblies using an FDA-cleared high-level
disinfectant/sterilant (HLD)
1. Immerse assemblies in HLD
2. Attach adapter assemblies to channel assemblies and use 50-60 cc
syringe to flush with HLD
3. Detach adapter assemblies and soak the time and at the
temperature recommended by the HLD manufacturer.
4. Re-attach adapter assemblies and fill syringe with air. Attach syringe
to adapter assemblies and flush with air to remove HLD from
assemblies.
5. Remove assemblies from HLD and immerse in clean water.
6. Fill syringe with clean water and flush channel assemblies with clean
water. Repeat one additional time. Detach adapter assemblies and
agitate assemblies in water to rinse.
7. Remove assemblies from water and place in a clean basin. Attach
adapter assemblies to channel assemblies and purge with air.
8. Fill a sterile syringe with 70% isopropyl or ethyl alcohol.
9. Reattach the adapter assemblies and flush channel assemblies with
alcohol.
10. Detach syringe and fill syringe with air. Flush assemblies with air to
remove alcohol.
11. Wipe external surface with a clean, lint-free cloth.
12. Store assemblies hanging vertically.
ii. Steam sterilize at 121C at 15 psig for 30 minutes.
NOTE: Autoclaving at a higher temperature can shorten the life of your
hose assemblies.
B. EFP-500 Decontamination
1. Fill a container with enough high-level disinfectant to immerse the inlet hose and channel
assemblies. Place the screened end of the Inlet Hose into the container and attach the
quick-disconnect into the connection marked “INLET” on the EFP-500.
Flush with HLD
CLEN218

EFP-500 M0001-006 07/26/2011 - 16 -
2. Connect the Main Channel Assembly and Special Channel Assembly to the quick-
disconnects on the EFP-500. Place these assemblies into the container with the high-
level disinfectant.
3. Push the Detergent start button. Allow the unit to circulate the high-level disinfectant for
approximately 45 seconds. Disconnect the inlet hose and channel assemblies and
immerse in high-level disinfectant for as long as recommended by HLD manufacturer.
(See bottle label.) DO NOT RESET THE UNIT.
4. Fill a separate container with fresh water and place the Inlet Hose and channel
assemblies into the container. Connect the quick-disconnect to the connection marked
“INLET” on the EFP-500. Reattach the Main and Special Channel Assemblies and press
the Water start button to allow the water to circulate for a full cycle, which is
approximately 60 seconds. Disconnect the inlet hose and channel assemblies and
immerse in water. Remove inlet hose and channel assemblies from water. Discard the
rinse water.
5. Repeat Step 9 for two more times with fresh water (Note: There is no need to disconnect
the inlet hose and channel assemblies for the second and third rinse). Ignore Water
start button indicator light.
6. Remove the inlet hose and channel assemblies from the water and place in a clean,
empty container. Press the Air start button to flush air through the EFP-500 and channel
assemblies. Allow to run for a full cycle.
7. Disconnect the channel assemblies.
8. Wipe the external surface of the assemblies with a clean, lint-free cloth.
9. Attach the adapter assemblies to the channel assemblies. Flush with alcohol and then
air.
10. Store channel assemblies hanging vertically.
8 Flow Verification
Verifying the flow of the EFP-500 can be easily done and should be checked daily to make sure the
unit is operating to output specifications. Flow verification is performed without the EFP-500
connected to an endoscope.
Flow Verification of Main Channel Assembly:
1. Fill a container with approximately three liters of clean water.
2. Connect the inlet tube assembly to the EFP-500 and place the screened end into the
container with the three liters of water making sure it is fully submerged.
3. Connect the Main Channel Assembly to the EFP-500 and place other ends into the two-liter
graduated container supplied with unit. Disconnect the Special Channel Assembly from the
EFP-500.
4. Press the Water Start button and allow the unit to operate for a full cycle making sure the
hose assembly remains in the graduated container.
5. Once the EFP-500 completes its cycle, observe the volume in the graduated container. This
should be no less than 1.10 liters.
Flow Verification of Special Channel Assembly:
1. Fill a container with approximately three liters of clean water.
Flush with Air
Flush with Water
CLEN218

EFP-500 M0001-006 07/26/2011 - 17 -
2. Connect the inlet hose assembly to the EFP-500 and place the screened end into the
container with the three liters of water making sure it is fully submerged.
3. Connect the Main channel and Auxiliary hose assemblies to the EFP-500. Place the end of
the Auxiliary channel assembly into the two-liter graduated container. Place the outlets of the
Main channel assembly into a sink allowing the water to discharge into the sink (not into the
two-liter container). Make sure this channel assemble is we secured as it will pump under
pressure.
4. Select the Auxiliary channel cycle by pushing the button on the channel selection section of
the units overlay. The LED will light up confirming the selection
5. Press the Water Start button and allow the unit to operate for a full cycle.
6. Once the EFP-500 completes its cycle, observe the volume in the two-liter graduated
container. This should be no less than 0.33 liters.
NOTE: If the unit does not meet the above specifications, look for kinked hoses and other
restrictions, such as a blocked inlet screen, and repeat the test. If the unit still does not meet the
minimum flow requirements, call PCI medical inc. (800 862 3394) for assistance.
9 Quick Troubleshoot & FAQs
If your EFP-500 is not running check the following:
1. Ensure that the unit is plugged into a live wall outlet. Make sure that the GFCI breaker
has not been tripped.
2. Make sure the On/Off switch (located on the right side) is on.
3. In the event that the system is still not working, check the fuses. The fuses are located
on the right side of the EFP-500 in a pullout drawer on the power receptacle.
WARNING UNPLUG UNIT BEFORE PULLING OPEN FUSE DRAWER
4. Pull open drawer and remove the fuse. If the filament is damaged, replace the fuse with
an equivalent type 5 x 20 mm SloBlo 2amp 250VAC fuse.
5. If unit is still not working, call PCI medical inc. Customer Service at (800) 862-3394.
Frequently Asked Questions
1. Can my hoses from my EFP250 be used on the EFP-500?
No. The hoses on the EFP-500 are not compatible due to the difference in pressure (psi) of
the unit.
2. Can the EFP be used for disinfection at clinics that manually disinfect their equipment?
No, the machine is designed and has an intended use to replace syringe flushing during
manual cleaning. The materials of the EFP-500 are not designed to be compatible with
repeated exposure to a high-level disinfectant.
CLEN218

EFP-500 M0001-006 07/26/2011 - 18 -
3. Does the machine eliminate the need for suction?
No. Customers still need to suction according to the Olympus reprocessing instructions, refer
to the manual cleaning instructions in the Olympus reprocessing manual. If the customer
does not have wall suction, a suction machine should be purchased.
4. Can alcohol be pumped through the EFP-500?
No, the EFP-500 is intended for use as a cleaning device. Alcohol is part of the post-
disinfection procedure. The EFP-500 should not be used with any flammable liquid.
5. I’m having a problem meeting the minimum flow verification.
Flow verification should be performed with just the EFP-500 and its hose assemblies - make
sure that an endoscope is not part of the procedure.
6. Is the EFP-500 LATEX FREE?
Yes, the EFP-500 is LATEX FREE.
10 Limited Warranty
Please complete and return the attached Warranty Card to PCI medical inc.
PCI medical inc. warrants the EFP-500 Endoscope Flushing Pump to be free of defects in material
and workmanship under normal use, for a period of one year from the date of delivery.
The electronics and pumps are covered for eighteen months. The connectors on the EFP-500 are
covered for 90 days.
If the system is not working correctly or is defective, contact PCI medical inc. and we will repair or
replace the unit at our option during the warranty period.
PCI medical inc. assumes no liability for consequential damages of any kind as a result of the use or
misuse of the system by the purchaser, the purchaser’s employees, or any others.
This warranty is expressly in lieu of all other warranties, guarantees, obligations or other liabilities,
expressed or implied.
This warranty gives you specific rights and you may also have other rights, which vary from state to
state.
Items not covered by this warranty:
1. Two-liter graduated container.
2. Conditions and damages resulting from any of the following:
Improper installation, delivery within the facility, or maintenance
Any repair, modification, alteration or adjustment not authorized by the manufacturer
Misuse, abuse, or accidents
Incorrect electric current, voltage or supply
Failure to follow proper procedures for use outlined in this manual
Main Channel Assembly, Secondary Channel Assembly and Inlet Hose.
Consequential or incidental damages sustained by any person as a result of any breach
of these warranties.
Some states do not allow the exclusion or limitation of consequential or incidental damages, so the
above exclusion may not apply.
CLEN218

EFP-500 M0001-006 07/26/2011 - 19 -
11 Compatible Endoscopes
The following Olympus endoscopes are compatible with the EFP-500:
GIF-140, 160 and 180 series gastroscopes except 2-channel models (e.g. GIF-2T160)
CF-140, 160 and 180 series colonoscopes except 2-channel models (e.g. CF-2T160I, CF-
2T160L)
PCF-140, 160 and 180 series colonoscopes.
JF-140, TJF-140 and 160 series duodenoscopes.
GF-UCI40P-AL5, GF-UCTI40-AL5, GF-UC160P-OL5, GF-UCT160-OL5, GF-UE160-AL5,
GF-UM160 Ultrasound Endoscopes
12 Specifications and Technical Data
Electrical:
115 V 50/60Hz 0.7A
The EFP-500 was tested by Met Laboratories, a Nationally Recognized Testing Laboratory (NRTL), and was certified
to UL 61010-1 and CSA C22.2 No 61010-1 safety standards. File # E112640
Construction:
Frame ................................................Steel, Powder Coated
Wall bracket.......................................Aluminum
Dimensions:
Unit ...................................................6.5” Wide X 8.5” Deep X 8.25” High
Weight...............................................11 lbs
13 Registration Card
Please complete and return the attached Warranty Card to PCI medical, Inc.
You may complete this warranty card online at: www.pcimedical.com
CLEN218
Table of contents
Other PCI Medical Equipment manuals
Popular Medical Equipment manuals by other brands

EyeQue
EyeQue Personal Vision Tracker EQ101 product manual

Medline
Medline HCSM70P quick start guide

Braun
Braun Aesculap MACS II Instructions for use

Mercado Medic
Mercado Medic REAL 8200 PLUS EL 24V SCREENING Instructions for use

Nellcor
Nellcor OXIMAX N-595 Service manual

Dentsply Sirona
Dentsply Sirona TENEO Installation requirements

Derma Sciences
Derma Sciences TCC-EZ instructions

Vaunn Medical
Vaunn Medical M881N-STCR-YYVM quick start guide

Karl Storz
Karl Storz ENDOFLATOR 50 instruction manual

Direct Supply
Direct Supply Attendant owner's manual

Kimberly-Clark
Kimberly-Clark MIC-KEY manual

laerdal
laerdal Thomas Select Tube Holder user guide