PCS edventures RubiQ Technical specifications


COPYRIGHT NOTICE | Copyright © 2018 PCS Edventures, Inc. All rights reserved.
Permission is hereby granted to owners of this PCS Edventures! curriculum to make photocopies of the student pages
ONLY, BUT use is restricted to students attending your program ONLY. Beyond this use, any reproduction of these
pages for wider dissemination or for commercial sale is strictly prohibited. The content of this manual is furnished for
educational use only, is subject to change without notice and should not be construed as a commitment by
PCS Edventures, Inc.

Get ready to meet RubiQ, your modular, open-source training drone! She’d get up to shake your hand, but as
you can see, she’s a little out of sorts right now. That’s where you come in. This guide includes your step-by-
step instructions for piecing RubiQ together. Follow them in reverse to disassemble. This kit includes all the
parts and tools needed for assembly, along with a few spares for any accidents along the road. Once RubiQ is
built, visit rubiq.edventures.com to access her online Conguration Guide. From there, you’ll need to have the
following standing-by in order to get RubiQ off the ground:
Battery: Any high-quality 3S 35C+ LiPo (2000-2500 mAh recommended)
Radio: Rubi’s receiver is compatible with FrSky radios
FPV Goggles: Rubi’s video transmitter is compatible with any 5.8 GHz goggles
Li-Po Compatible Balance Charger: Any
All these items are included in the full Discover Drones package and can be purchased, along with any spare
parts, at edventures.com/collections/drones
DISCLAIMER:
• Drones are powerful and can be dangerous — RubiQ is no exception. Flying requires experience
and thorough knowledge of ight safety. Only start ying after proper training and with a full
understanding of the drone regulations in your area.
• When cared for properly, LiPo batteries provide the reliable, lightweight power that makes
multirotor ight possible. However, LiPo batteries pose a severe re hazard if improperly charged
or poorly maintained. Review all battery warnings and instructions carefully, and follow all safety
procedures when handling LiPo’s.
• There’s always a slight chance that RubiQ’s motors could spin unexpectedly, causing bodily harm.
Play it safe: remove her props when inside and disconnect the battery whenever possible!
• Be sure the video antenna is attached whenever you connect the LiPo battery! Powering up any
drone without an antenna may cause permanent damage to the VTX (video transmitter).
PCS Edventures accepts no responsibility, or liability, for any injury, or damage, to persons or property, caused
by the use of RubiQ, radio transmitters, FPV goggles, LiPo batteries or LiPo battery chargers. PCS Edventures
also accepts no responsibility for damage caused to RubiQ by operating without a TX antenna installed or by
connecting cables in an improper conguration.
FLIGHT MANUAL
CAUTION

2RubiQ FLIGHT MANUAL
INVENTORY
To build RubiQ, you’ll need:
Video Transmitter (VTX)
(Qty 1)
Power Distribution Board (PDB)
(Qty 1)
Lower Chassis
(Qty 1)
Arms
(Qty 4)
FPV Camera
(Qty 1)
Camera Mounts & Camera Screws
(Qty 2)
CW Motors
(Qty 2)
CCW Motors
(Qty 2)
M3x12 Screws
(Qty 12)
M3x7 Motor Screws
(Qty 16)
M3x6 Screws
(Qty 28)

3RubiQ FLIGHT MANUAL
EXTRA PARTS:
• Camera Mounts and Camera Screws
• M3x6 Screws
• M3x7 Motor Screws
• M3x12 Screws
• 12mm Standoffs
• 25mm Standoffs
• Zip Ties
• Props
• Prop Nuts
Props
(Qty 4)
TX Antenna
(Qty1)
Battery Plate
(Qty 1)
Prop Nuts
(Qty 4)
Zip Ties
(Qty 5)
Battery Strap
(Qty 1)
LEGEND:
FLIP
2
REPEAT 2 TIMES
12mm Standoffs
(Qty 4)
25mm Standoffs
(Qty 16)

4RubiQ FLIGHT MANUAL
TOP VIEW:
POWER DISTRIBUTION BOARD
BOTTOM VIEW:
DIPSWITCH TO ADJUST
VIDEO (VTX) CHANNEL
RECEIVER (RX)
LED’s
MICRO-USB PORT
MOTOR
CONNECTORS
GPS
BATTERY
CONNECTOR
CAMERA
CONNECTOR
FLIGHT CONTROLLER
(Do not remove the foam; it's needed by
the barometer to accurately measure air pressure.) VIDEO TRANSMITTER (VTX)
CONNECTORS

BUILD PLAN
&
CONFIGURATION
GUIDE

6RubiQ BUILD PLAN
1
ASSEMBLY
PARTS 1
CAUTION
Orient the VTX so each pin slides into its own connector.
Hold the SMA connector below the board and tighten the nut with the prop wrench until snug. Do not
allow the SMA connector to twist as you tighten to avoid damaging the cable. Do not overtighten to avoid
stripping the threads.
CAUTION
Video Transmitter (VTX)
1
34
2
SMA Connector
Lock Washer
Lock Nut
Power Distribution Board (PDB)

7RubiQ BUILD PLAN
1
PARTS
ASSEMBLY
2
3 4
21
CAUTION
Attach all screws as rmly as possible to keep the frame stable during ight.
Camera Mounts 25mm Standoffs M3x6 Screws
8RubiQ BUILD PLAN
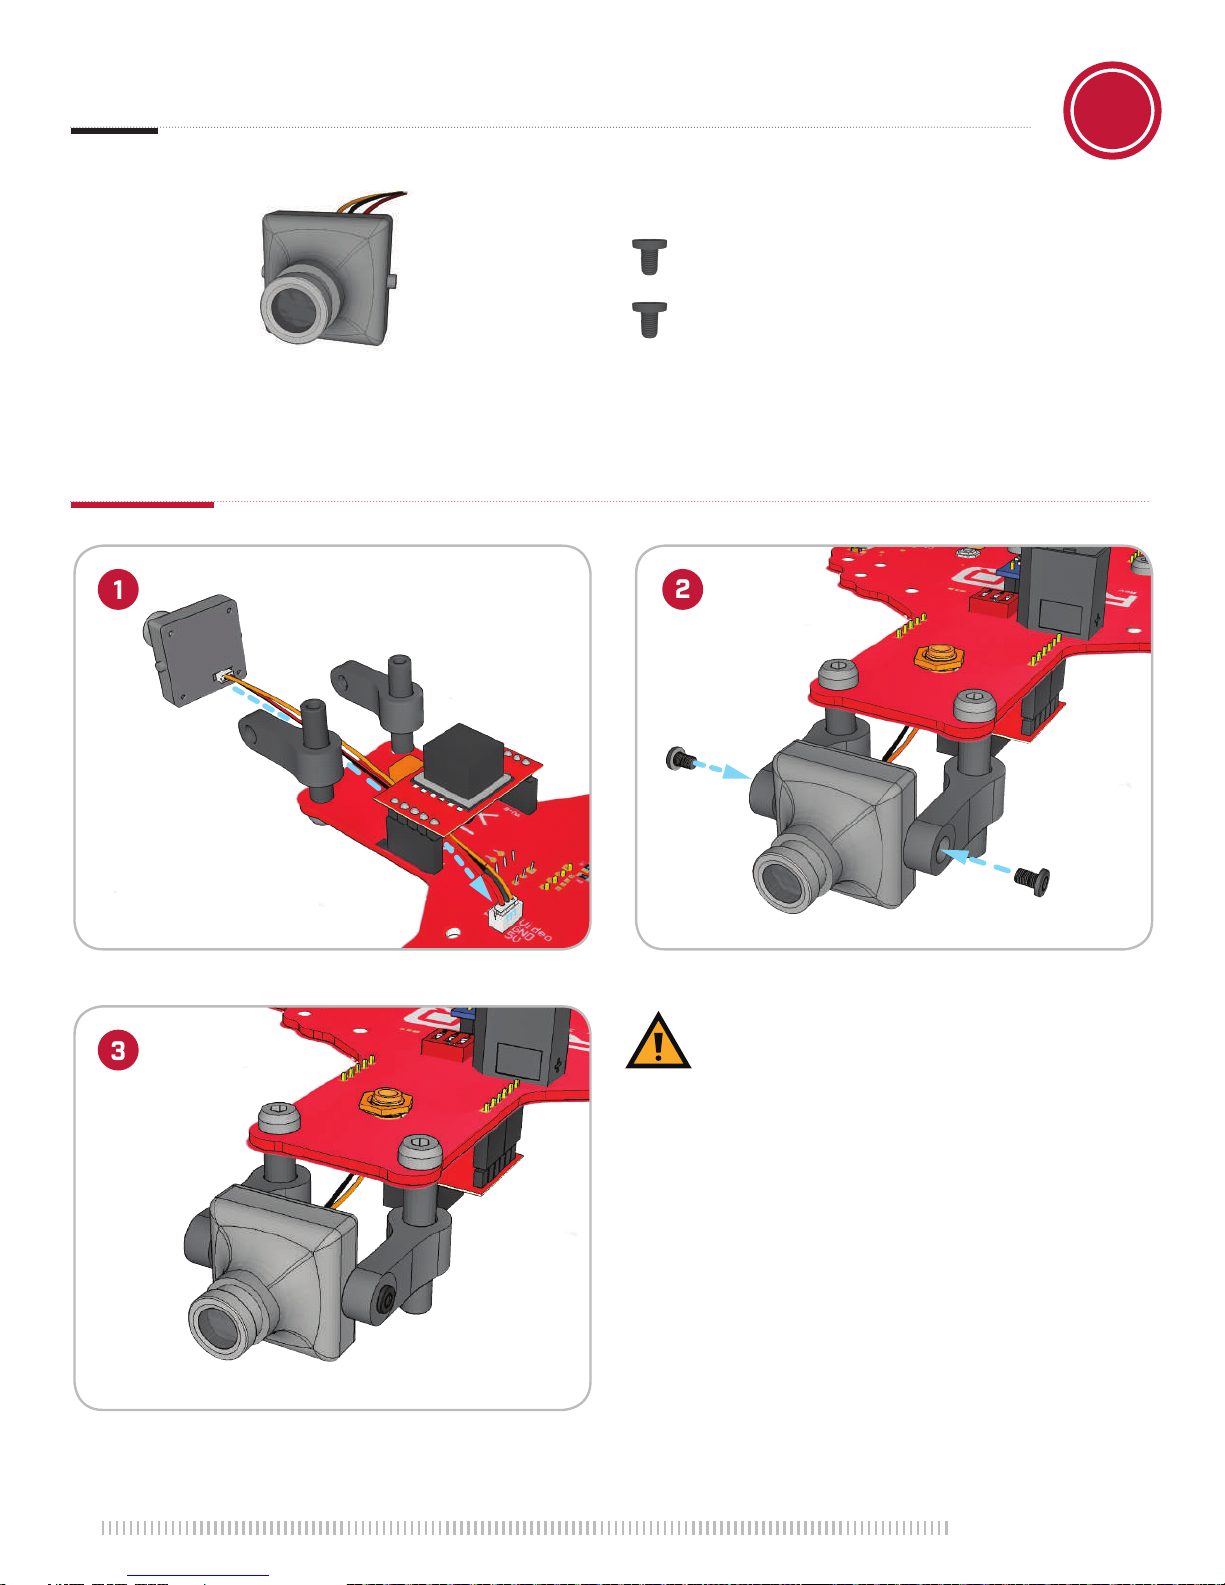
ASSEMBLY
PARTS 3
1
3
2
FPV Camera
Attach camera with wires close to PDB for
right-side-up camera feed.
CAUTION
Camera Screws
Other manuals for RubiQ
2
Table of contents
Other PCS edventures Drone manuals


 user manual")


