PDi PDI-P14T2 User manual
PDi Communication Systems, Inc. 40 Greenwood Lane Springboro, Ohio 45066 USA PH 1-800-628-9870 FX 937-743-5664
Document No: PD196-251R4 PDI-P14T2 LCD HDTV with Android Page 1 of 64
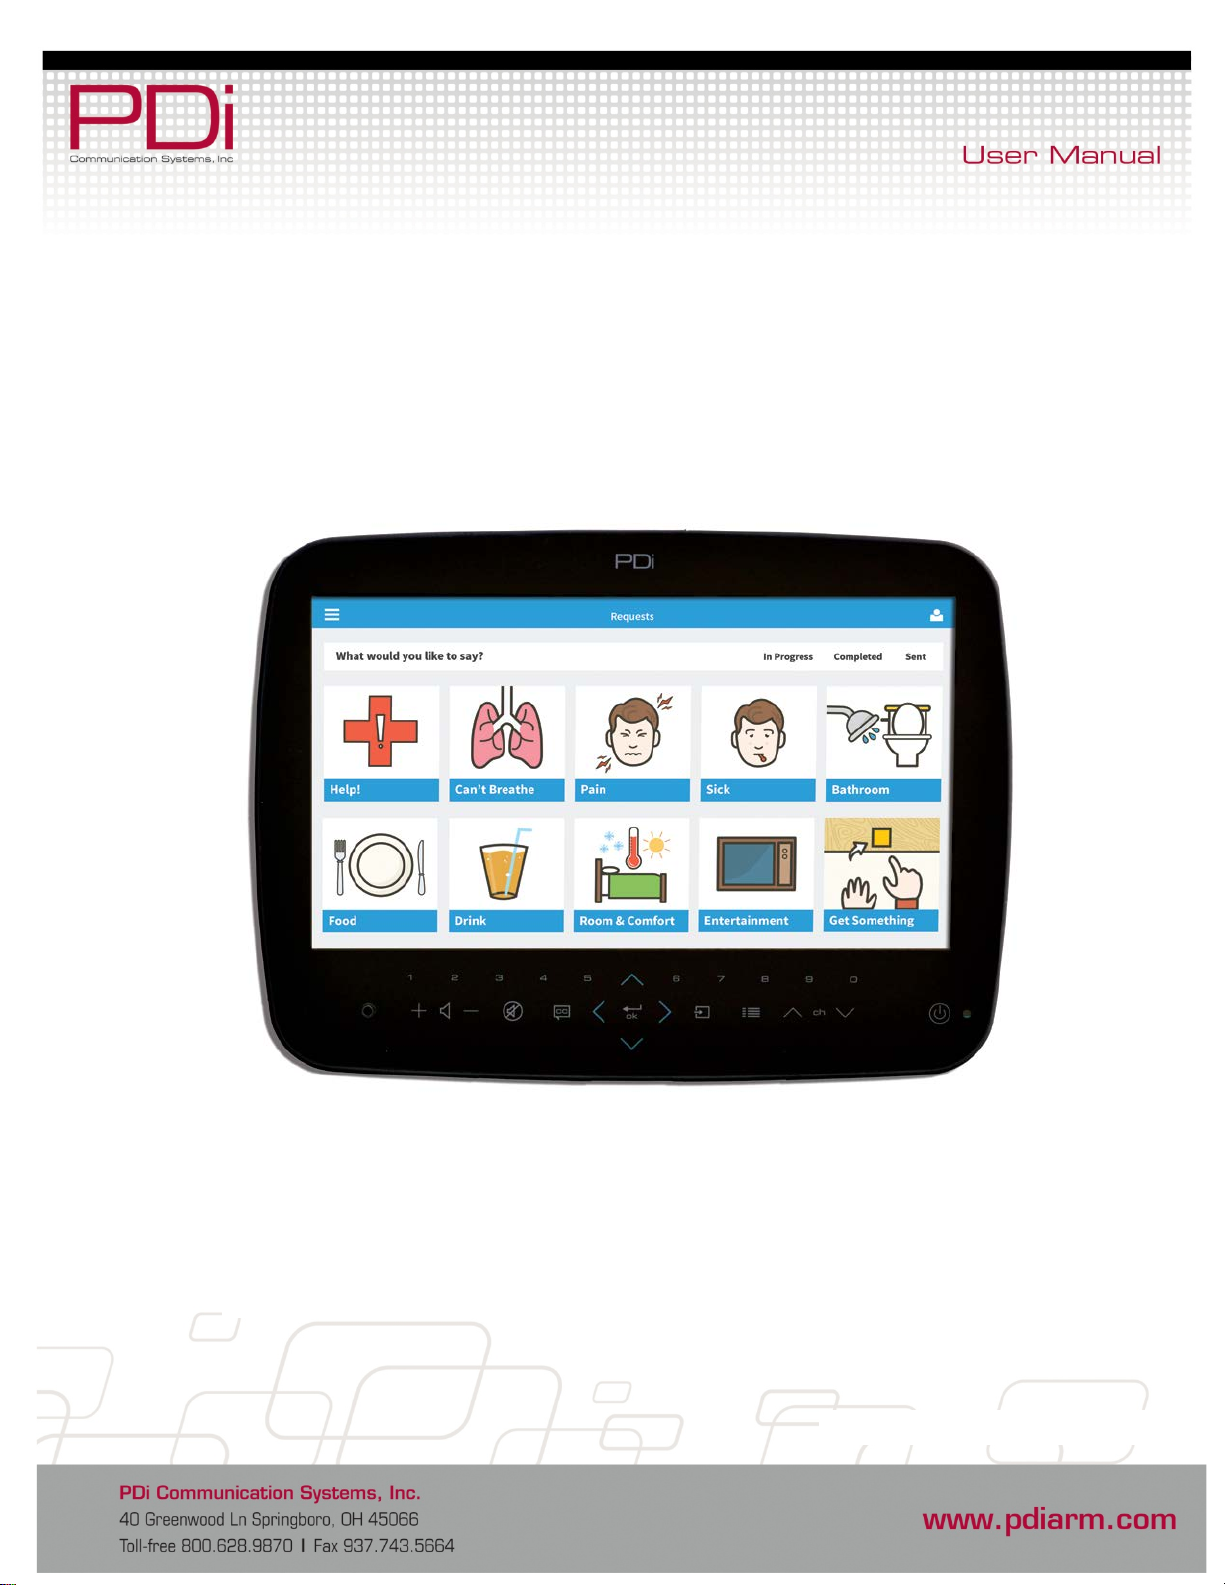
PDI-P14T2
Arm-Mounted, Healthcare-grade
LCD HDTV with Android
Document Number: PD196-251R4
P14T2 shown with VerbalCare software system

PDi Communication Systems, Inc. 40 Greenwood Lane Springboro, Ohio 45066 USA PH 1-800-628-9870 FX 937-743-5664
Document No: PD196-251R4 PDI-P14T2 LCD HDTV with Android Page 2 of 64
CAUTION
RISK OF ELECTRIC SHOCK,
DO NOT OPEN!
CAUTION: TO REDUCE THE RISK OF ELECTRIC SHOCK,
DO NOT REMOVE COVER. NO USER SERVICEABLE
PARTS INSIDE. REFER SERVICING TO QUALIFIED
SERVICE PERSONNEL
This symbol indicates that dangerous
voltage constituting a risk of electric
shock is present within this unit.
This symbol indicates that there are
important operating and maintenance
instructions in the literature
accompanying this unit.
Overhead Falling Hazard
WARNING: To prevent injury, this apparatus must
be securely attached to the floor/wall in
accordance with the installation instructions. TV’s
can pose a striking hazard when mounted at an
elevated position. Use only PDi mounting brackets, support
arms, and appropriate hardware to assure TV will not fall from
the mounted position. Failure to do so may cause injury or
death.
Rain and Moisture
WARNING: To avoid the hazards of fire or
electrical shock, DO NOT expose this television to
rain or moisture or use in a wet location.
Oxygen Environment
WARNING: Do not use in any oxygen tent or
oxygen chamber. Such use may cause a fire
hazard.
Note to Cable TV Installer
This reminder is provided to call the cable TV systems
installer’s attention to Article 820-40 of the National Electrical
Code. The code provides guidelines for proper grounding and,
in particular, specifies that the cable ground shall be connected
to the grounding system of the building, as close to the point of
the cable entry as practical. Canadian installations shall be
properly grounded in accordance with the Canadian Electrical
Code, Part 1.
FCC
This equipment has been tested and found to comply with the
limits for a Class A digital device, pursuant to part 15 of the
FCC Rules. These limits are designed to provide reasonable
protection against harmful interference when the equipment is
operated in a commercial environment. This equipment
generates, uses, and can radiate radio frequency energy and, if
not installed and used in accordance with the instruction
manual, may cause harmful interference to radio
communications. Operation of this equipment in a residential
area is likely to cause harmful interference in which case the
user will be required to correct the interference at his own
expense.
Maintenance and Servicing
The TV does not require periodic maintenance other than
cleaning. Never remove the back cover of the TV; this can
expose you to high voltage and other hazards. If the TV does
not operate properly, unplug it and call an authorized service
center or PDi.
Cleaning and Disinfection
Clean the exterior of this television by removing dust with a lint-
free cloth. CAUTION: To avoid damage to the surface of the
television, do not use abrasive or chemical cleaning agents.
Spot test a new disinfectant by test cleaning a non-obvious
small spot on the TV’s back cabinet, keypad, and LCD panel.
Allow the disinfectant to soak per its instructions and then wipe
clean. Do not use the disinfectant if the TV’s surfaces show
any sign of discoloration or softening.
Product Modification
Do not attempt to modify this product in any way without
written authorization. Unauthorized modification could void the
user’s authority to operate this product.
Underwriters Laboratories
The model PDI-P14T2 Hospital Grade LCD HDTV is a
specialized TV and should be installed to National Electrical
Code specifications.
This device is safety tested and listed by the
Underwriters Laboratories as a product
suitable for use in health-care facilities in
both the United States and Canada.
Copyright,Trademarks
© 2014 PDi Communication Systems, Inc. All rights reserved.
PDi-TAB® is a registered trademark of PDi Communication
Systems, Inc. Product logos, brands and other trademarks
displayed within PDi’s products are the property of their
respective trademark holders, who are not affiliated with,
endorsing, or sponsoring PDi Communication Systems, Inc. or
our products.
Disclaimer
The author and publisher have used their best efforts in
preparing this manual. PDi Communication Systems, Inc.
makes no representation or warranties with respect to the
accuracy or completeness of the contents of this manual and
specifically disclaims any implied warranties or merchantability
or fitness for any particular purpose and shall in no event be
liable for any loss of profit or any other damages. The
information contained herein is believed accurate, but is not
warranted, and is subject to change without notice or
obligation.
PDi Communication Systems, Inc. 40 Greenwood Lane Springboro, Ohio 45066 USA PH 1-800-628-9870 FX 937-743-5664
Document No: PD196-251R4 PDI-P14T2 LCD HDTV with Android Page 3 of 64
Danger chute d’objets
AVERTISSEMENT: Afin d’éviter toute blessure, cet
appareil doit être solidement fixé au sol/mur conformément
aux instructions d'installation. Les télévisions peuvent
présenter un risque de heurt lorsqu’elles sont montées en
position élevée. Utiliser uniquement des supports de
montage, des bras de support et le matériel approprié de
PDi afin d’assurer que la télévision ne tombe pas de sa
position de montage. Le non-respect de ces instructions peut causer des
blessures ou la mort.
Pluie et humidité
AVERTISSEMENT: Afin d’éviter les risques d'incendie ou
de choc électrique, NE PAS exposer cette télévision à la
pluie ou à l'humidité ou l’utiliser dans un endroit humide.
Environnement d'oxygène
AVERTISSEMENT: Ne pas utiliser dans une tente à oxygène ou
chambre à oxygène. Une telle utilisation peut causer un risque
d'incendie.
Remarque à l’intention des installateurs de câble TV
Le but de ce rappel est d’attirer l'attention de l’installateur de câble TV
sur l'article 820-40 du Code national de l'électricité. Le code fournit des
directives pour une mise à la terre appropriée et, précise que le câble de
mise à la terre doit être connecté au système de mise à la terre du
bâtiment, aussi près que possible du point d'entrée du câble dans le
mesure du possible. Les installations canadiennes doivent être
correctement mises à la terre conformément aux dispositions du Code
canadien de l'électricité, Partie 1.
FCC
Cet équipement a été testé et s'est avéré conforme aux limites pour un
appareil numérique de Classe A, conformément à la partie 15 des règles
de la FCC. Ces limites ont été conçues afin de fournir une protection
raisonnable contre les interférences nuisibles lorsque l'équipement est
utilisé dans un environnement résidentiel ou commercial. Si cet
équipement provoque des interférences nuisibles à la réception radio ou
télévision, ce qui peut être déterminé en éteignant et rallumant l’appareil,
l'utilisateur peut essayer de corriger l'interférence par une ou plusieurs
de
Réparations et entretien
Le téléviseur ne nécessite pas d’entretien périodique autre que le
nettoyage. Ne jamais retirer le couvercle arrière du téléviseur ; cela peut
vous exposer à des points de tension dangereuse ou à d'autres risques.
Si le téléviseur ne fonctionne pas correctement, le débrancher et appeler
un centre de service autorisé ou PDi.
Nettoyage et désinfection
Nettoyer l'extérieur de la télévision en enlevant la poussière avec un
chiffon non pelucheux. AVERTISSEMENT: afin d’éviter d'endommager
la surface de la télévision, ne pas utiliser de produits abrasifs ou
chimiques. Effectuer un test ponctuel avec un nouveau produit
désinfectant en nettoyant une petite surface non évidente à l’arrière du
meuble du téléviseur, sur le clavier et sur le panneau LCD. Laisser le
désinfectant tremper selon les instructions et puis essuyer. Ne pas
utiliser le désinfectant si les surfaces de la télévision révèlent un signe
de décoloration ou de ramollissement.
Modification du produit
Ne pas essayer de modifier ce produit de quelque façon que ce soit
sans une autorisation écrite. Toute modification non autorisée peut
annuler le droit de l'utilisateur à utiliser cet appareil.
Droit d'auteur
PDi Communication Systems, Inc. revendique des droits exclusifs sur le
contenu de ce manuel de l’utilisateur. Ce manuel a été rédigé à titre
d’information pour l'utilisateur et ne peut pas être utilisé pour fabriquer
tout élément montré ou décrit à l'intérieur. Droits d'auteur 2009-2014 par
PDi Communication Systems, Inc. Tous droits réservés.
Marques de commerce
Tous les noms de marques et noms de produits mentionnés dans ce
manuel sont des marques de commerce, des marques déposées ou des
noms commerciaux de leurs détenteurs respectifs. PDi et Better
Solutions Within Reach sont des marques déposées de PDi
Communication Systems, Inc., Springboro, Ohio, fabriqué sous licence
de Dolby Laboratories. Dolby et le symbole double-D sont des marques
déposées de Dolby Laboratories.
Underwriters Laboratories
Le modèle de télévision LCD HDTV, PDI-P14T2 de qualité hospitalière
est un appareil spécialisé et doit être installé selon les spécifications du
code national de l’électricité. Cet appareil a été testé quant à la sécurité
et homologué par Underwriters Laboratories comme un produit adapté
pour une utilisation dans les établissements de
santé aux États-Unis et au Canada

PDi Communication Systems, Inc. 40 Greenwood Lane Springboro, Ohio 45066 USA PH 1-800-628-9870 FX 937-743-5664
Document No: PD196-251R4 PDI-P14T2 LCD HDTV with Android Page 4 of 64
IMPORTANT SAFETY INSTRUCTIONS
THIS INSTALLATION SHOULD BE MADE BY A QUALIFIED SERVICE PERSON AND SHOULD CONFORM TO
ALL
LOCAL CODES. READ AND FOLLOW THE SAFETY INSTRUCTIONS BEFORE ATTEMPTING THIS
INSTALLATION.
1. Read Instructions – All the safety and operating
instructions should be read before the product is
operated.
2. Keep these Instructions – The safety and operating
instructions should be retained for future reference.
3. Heed all Warnings – All warnings on the product and in
the operating instructions should be adhered to.
4. Follow all Instructions – All warnings on the product
and in the operating instructions should be followed.
5. Water and Moisture – Do not expose this product to
rain or moisture. Do not use this product near water –
for example, near a bath tub, wash bowl, kitchen sink,
or laundry tub; in a wet basement; or near a swimming
pool; and the like.
6. Cleaning – Unplug this product from the wall outlet
before cleaning. Do not use liquid cleaners or aerosol
cleaners. Clean only with a dry cloth.
7. Ventilation – Slots and openings in the cabinet are
provided for ventilation to ensure reliable operation of
the product and to protect it from overheating. These
openings must not be blocked or covered. The
openings should never be blocked by placing the
product on a bed, sofa, rug, or other similar surface.
This product should not be placed in a built-in
installation such as a bookcase or rack unless proper
ventilation is provided or the manufacturer’s
instructions have been adhered to.
8. Heat – The product should be situated away from heat
sources such as radiators, heat registers, stoves, or
other products (including amplifiers) that produce heat.
9. Power-Cord Protection – Protect the power cord from
being walked on or pinched, particularly at plugs,
convenience receptacles, and the point where they exit
from the product.
10. Attachments – Only use attachments/accessories
specified by the manufacturer.
11. Use only with cart, stand, tripod, bracket, or table
specified by the manufacturer, or
sold with the apparatus. When a
cart is used, use caution when
moving the cart/apparatus
combination to avoid injury from
tip-over.
12. Lightning – For added protection for this product
during a lightning storm, or when it is left
unattended and unused for long periods of time,
unplug it from the wall outlet and disconnect the
antenna or cable system. This will prevent
damage to the product due to lightning and power-
line surges.
13. Servicing –Refer all servicing to qualified service
personnel. Servicing is required when the
apparatus has been damaged in any way, such as
power cord or plug is damaged, liquid has been
spilled or objects have fallen into the apparatus,
the apparatus has been exposed to rain or
moisture, does not operate normally, or has been
dropped.
14. Oxygen Environment – Do not use in an oxygen
tent or oxygen chamber. Such use may cause a
fire hazard.
15. To prevent injury, this apparatus must be securely
attached to the wall in accordance with the
installation instructions. TV’s can pose a striking
hazard when mounted at an elevated level.
16. Power Sources – This product should be operated
only from the type of power source indicated on
the marking label. If you are not sure of the type of
power supply to your home, consult your product
dealer or local power company. For products
intended to operate from battery power, or other
sources, refer to the operating instructions.

PDi Communication Systems, Inc. 40 Greenwood Lane Springboro, Ohio 45066 USA PH 1-800-628-9870 FX 937-743-5664
Document No: PD196-251R4 PDI-P14T2 LCD HDTV with Android Page 5 of 64
Table of Contents
Programming Menus and Setup ................................................................................................................................................8
Service Level..........................................................................................................................................................................8
Picture ....................................................................................................................................................................................8
Color Temperature..............................................................................................................................................................9
Noise Reduction .................................................................................................................................................................9
Sound .....................................................................................................................................................................................9
Balance...............................................................................................................................................................................9
Minimum Volume................................................................................................................................................................9
Maximum Volume.............................................................................................................................................................10
Power on Volume..............................................................................................................................................................10
Internal Speaker Enable...................................................................................................................................................10
HDMI Audio Ports.............................................................................................................................................................11
Composite Sound Mode ...................................................................................................................................................11
Volume Leveling ...............................................................................................................................................................11
Headphone Sound Mode..................................................................................................................................................11
Signal................................................................................................................................................................................12
Auto Program....................................................................................................................................................................12
Add / Delete Channels......................................................................................................................................................13
Clear Service Level...........................................................................................................................................................13
Copy Service Level...........................................................................................................................................................14
Channel Aliasing...............................................................................................................................................................14
Parental Control................................................................................................................................................................23
TV Rating ......................................................................................................................................................................24
Television Rating Guides..............................................................................................................................................24
MPAA Rating ................................................................................................................................................................24
Change Password.........................................................................................................................................................25
Block Aux. Sources .......................................................................................................................................................25
Parental Lock Duration ................................................................................................................................................25
Parental Lock................................................................................................................................................................25
Power on Channel............................................................................................................................................................25
Channel Lock....................................................................................................................................................................26
Channel MemoryOverride................................................................................................................................................26
Pro:Idiom...........................................................................................................................................................................26
Features ...............................................................................................................................................................................26
Power on Caption Mode ...................................................................................................................................................26

PDi Communication Systems, Inc. 40 Greenwood Lane Springboro, Ohio 45066 USA PH 1-800-628-9870 FX 937-743-5664
Document No: PD196-251R4 PDI-P14T2 LCD HDTV with Android Page 6 of 64
Auto Power On/Lock.........................................................................................................................................................26
Inactive Power Off (h: mm)...............................................................................................................................................27
Bed A/B.............................................................................................................................................................................27
Caption Text Modes..........................................................................................................................................................27
Digital Captions.................................................................................................................................................................27
Digital Mode Time Setup...................................................................................................................................................28
Channel up Power Off.......................................................................................................................................................28
Channel to Other Source..................................................................................................................................................28
Power on ARC Mode........................................................................................................................................................28
Front Button Backlight.......................................................................................................................................................28
OSD Language (On-Screen Display) ...................................................................................................................................29
Sources ................................................................................................................................................................................29
Source Enable..................................................................................................................................................................29
Source Name....................................................................................................................................................................29
Power on Source ..............................................................................................................................................................29
System..................................................................................................................................................................................30
Diagnostics .......................................................................................................................................................................30
Reset to Factory Defaults .................................................................................................................................................30
Standby Power..................................................................................................................................................................30
USB Cloning and FW Update...........................................................................................................................................30
Restore Settings to TV..................................................................................................................................................30
Save Settings to USB ....................................................................................................................................................31
Upload Boot Code to TV...............................................................................................................................................31
Upload Firmware to TV ................................................................................................................................................31
Support.....................................................................................................................................................................................31
Android Setup ..........................................................................................................................................................................32
Interacting with Android - TOUCH & TYPE..............................................................................................................................32
Lock Screen..........................................................................................................................................................................32
Signing On as a New User...................................................................................................................................................33
Home Screen........................................................................................................................................................................35
Pull Down Panels .................................................................................................................................................................37
Application Drawer ...............................................................................................................................................................37
Installing Android Applications.................................................................................................................................................39
Media formats supported by Android................................................................................................................................39
Applications for the Administrator ............................................................................................................................................40
Settings.................................................................................................................................................................................40
Wireless and Networks.........................................................................................................................................................41

PDi Communication Systems, Inc. 40 Greenwood Lane Springboro, Ohio 45066 USA PH 1-800-628-9870 FX 937-743-5664
Document No: PD196-251R4 PDI-P14T2 LCD HDTV with Android Page 7 of 64
Wi-Fi..................................................................................................................................................................................41
Bluetooth...........................................................................................................................................................................42
Data Usage.......................................................................................................................................................................43
More…..............................................................................................................................................................................43
VPN (Virtual Private Network) .....................................................................................................................................43
Ethernet Configuration ................................................................................................................................................44
Device...................................................................................................................................................................................44
Sound................................................................................................................................................................................44
Display..............................................................................................................................................................................45
Storage .............................................................................................................................................................................45
Apps..................................................................................................................................................................................45
Users.................................................................................................................................................................................45
Personal ...............................................................................................................................................................................46
Location access................................................................................................................................................................46
Security.............................................................................................................................................................................46
Language & input..............................................................................................................................................................46
Backup & Reset................................................................................................................................................................46
Accounts...............................................................................................................................................................................47
Adding POP3 account.......................................................................................................................................................47
Adding Exchange account................................................................................................................................................48
System..................................................................................................................................................................................49
Date & Time......................................................................................................................................................................49
Accessibility......................................................................................................................................................................49
Over the Air (OTA)............................................................................................................................................................49
About tablet .......................................................................................................................................................................51
Android Cloning....................................................................................................................................................................51
Copy Settings from Android – Master Configuration........................................................................................................52
Restore Settings to Android – Slave Configuration ..........................................................................................................55
FAQ..........................................................................................................................................................................................56
Android Troubleshooting Tips..................................................................................................................................................61
Specs .......................................................................................................................................................................................63
Firmware..................................................................................................................................................................................63
Micro USB Cable......................................................................................................................................................................63
Limited Warranty......................................................................................................................................................................64

PDi Communication Systems, Inc. 40 Greenwood Lane Springboro, Ohio 45066 USA PH 1-800-628-9870 FX 937-743-5664
Document No: PD196-251R4 PDI-P14T2 LCD HDTV with Android Page 8 of 64
Programming Menus and Setup
Note: A programming remote control is required to perform all setup operations for the television. The programming
remote (Part Number PD108-420) is NOT packaged with the TV and must be ordered separately. The following
instructions assume you have a programming remote, have correctly mounted the TV, and connected a coax cable that
provides both power and RF signal.
Service Level
This TV offers a disable and three different programmable Service Levels: Free, Basic, and Premium. Only one Service
Level is usable at a time.
Disabled is like a mechanical key lock – when in Disabled service level, the TV can be turned OFF and ON, but cannot
be used for viewing. A standard message appears on a black screen.
Free lets patients watch hospital education and information
channels without renting the TV. The channels containing
programming for no charge are typically programmed into this
level of service. This is the factory default setting for service
level.
Basic service typically allows additional channels beyond
those offered in the FREE level.
Premium is the highest Service Level with typically the
most channels available for viewing.
Press the SETUP button to display the SETUP MODE menu.
Press the VOL► to disable or select desired service level.
(Free, Basic, Premium)
Picture
Adjustment of picture Brightness, Contrast, Color, Tint, Color Temperature and Sharpness is available to customize the
levels you prefer using the on-screen menus.
Brightness, Contrast, Color, Tint, and Sharpness
These settings have a range of 1-100. To change one of them, simply change the number by following this process.
Press the SETUP button to display the SETUP MODE
menu. Select the Picture menu item.
1. Press the CH▲/ CH▼buttons to highlight the desired picture item – Brightness, Contrast, Color, Color
Temperature, Sharpness, and Noise
Reduction.
2. Adjust the picture item using the VOL◄/ VOL►buttons to the desired level.
3. Press the SETUP button to store the picture values.
PDi Communication Systems, Inc. 40 Greenwood Lane Springboro, Ohio 45066 USA PH 1-800-628-9870 FX 937-743-5664
Document No: PD196-251R4 PDI-P14T2 LCD HDTV with Android Page 9 of 64
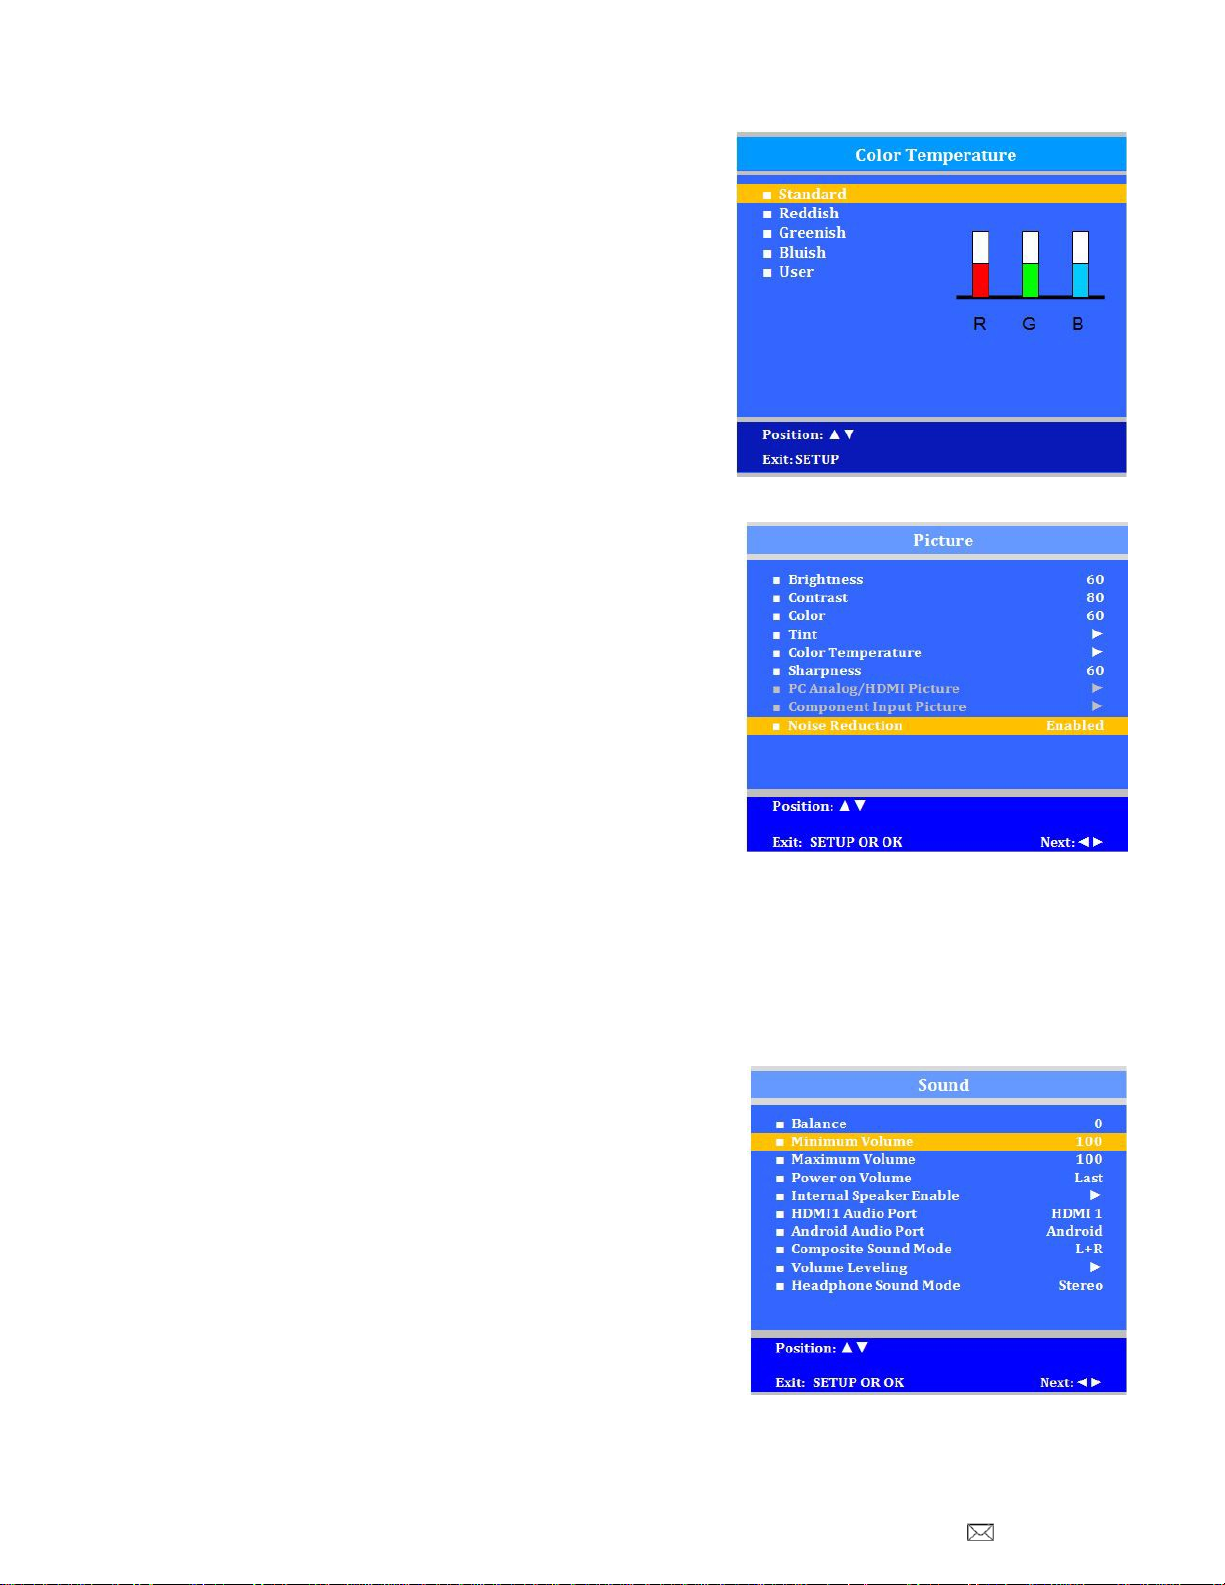
Color Temperature
The color temperature menu adjusts the color balance of the picture.
“Standard”, “Reddish”, “Greenish”, “Bluish” color temperatures are
available for selection; however the individual colors are not adjustable.
The “USER” setting allows individual adjustment of each of the TV’s
primarycolors. The color temperature setting is best set using a
calibrated signal source capable of generating a test signal containing
both pure white and pure black picture components.
1. Enter the Picture menu
2. Press CH▲ / CH▼ to highlight Color Temperature.
3. Press VOL► to enter it.
4. Press CH▲ / CH▼ to see the individual settings.
5. On User, press VOL◄/ VOL► to highlight R,G, or B or to get
out of the customized adjustments.
6. Press CH▲ / CH▼ to adjust R,G, or B
Note: When you select one of the three colors to adjust, the
other two will turn gray.
7. Press SETUP to return to the previous menu. To exit, press
SETUP until the programming menus disappear.
Noise Reduction
Additional picture improvement maybe achieved by enabling the Noise
Reduction function found in the Picture menu.
1. Press the SETUP button to display the SETUP MODE menu.
2. Select the Picture menu item.
3. Press the CH▲/ CH▼buttons to highlight the Noise Reduction.
4. Use the VOL◄/ VOL►
bu
ttons to alternate, Enable or Disable.
5. Press the SETUP button to return to the previous menu.
Sound
The Sound menu allows precise adjustment of several parameters.
1. Press the SETUP button to display the SETUP MODE menu.
2. Press the CH▲/ CH▼buttons to highlight the Sound menu item.
3. Use the VOL◄/ VOL►to displaythe Sound Menu.
Balance
This will adjust the volume balance of the left and right speakers.
1. In Sound menu, press the CH▲ / CH▼ to select Balance.
2. Press the VOL◄ / VOL► to select desired speaker balance from
L50 – R50 with 0 being equal balance.
3. Press SETUP to return to the preceding menu.
Minimum Volume
Sets the minimum volume level the TV can reach. Setting this to any
value other than 0 guarantees that some level of sound will always be
heard when the TV is operating.
4. In Sound menu, press the CH▲ / CH▼ to select Minimum
Volume.
5. Press the VOL◄ / VOL► to select your preferred minimum
volume.
6. Press SETUP to return to the preceding menu.
PDi Communication Systems, Inc. 40 Greenwood Lane Springboro, Ohio 45066 USA PH 1-800-628-9870 FX 937-743-5664
Document No: PD196-251R4 PDI-P14T2 LCD HDTV with Android Page 10 of 64
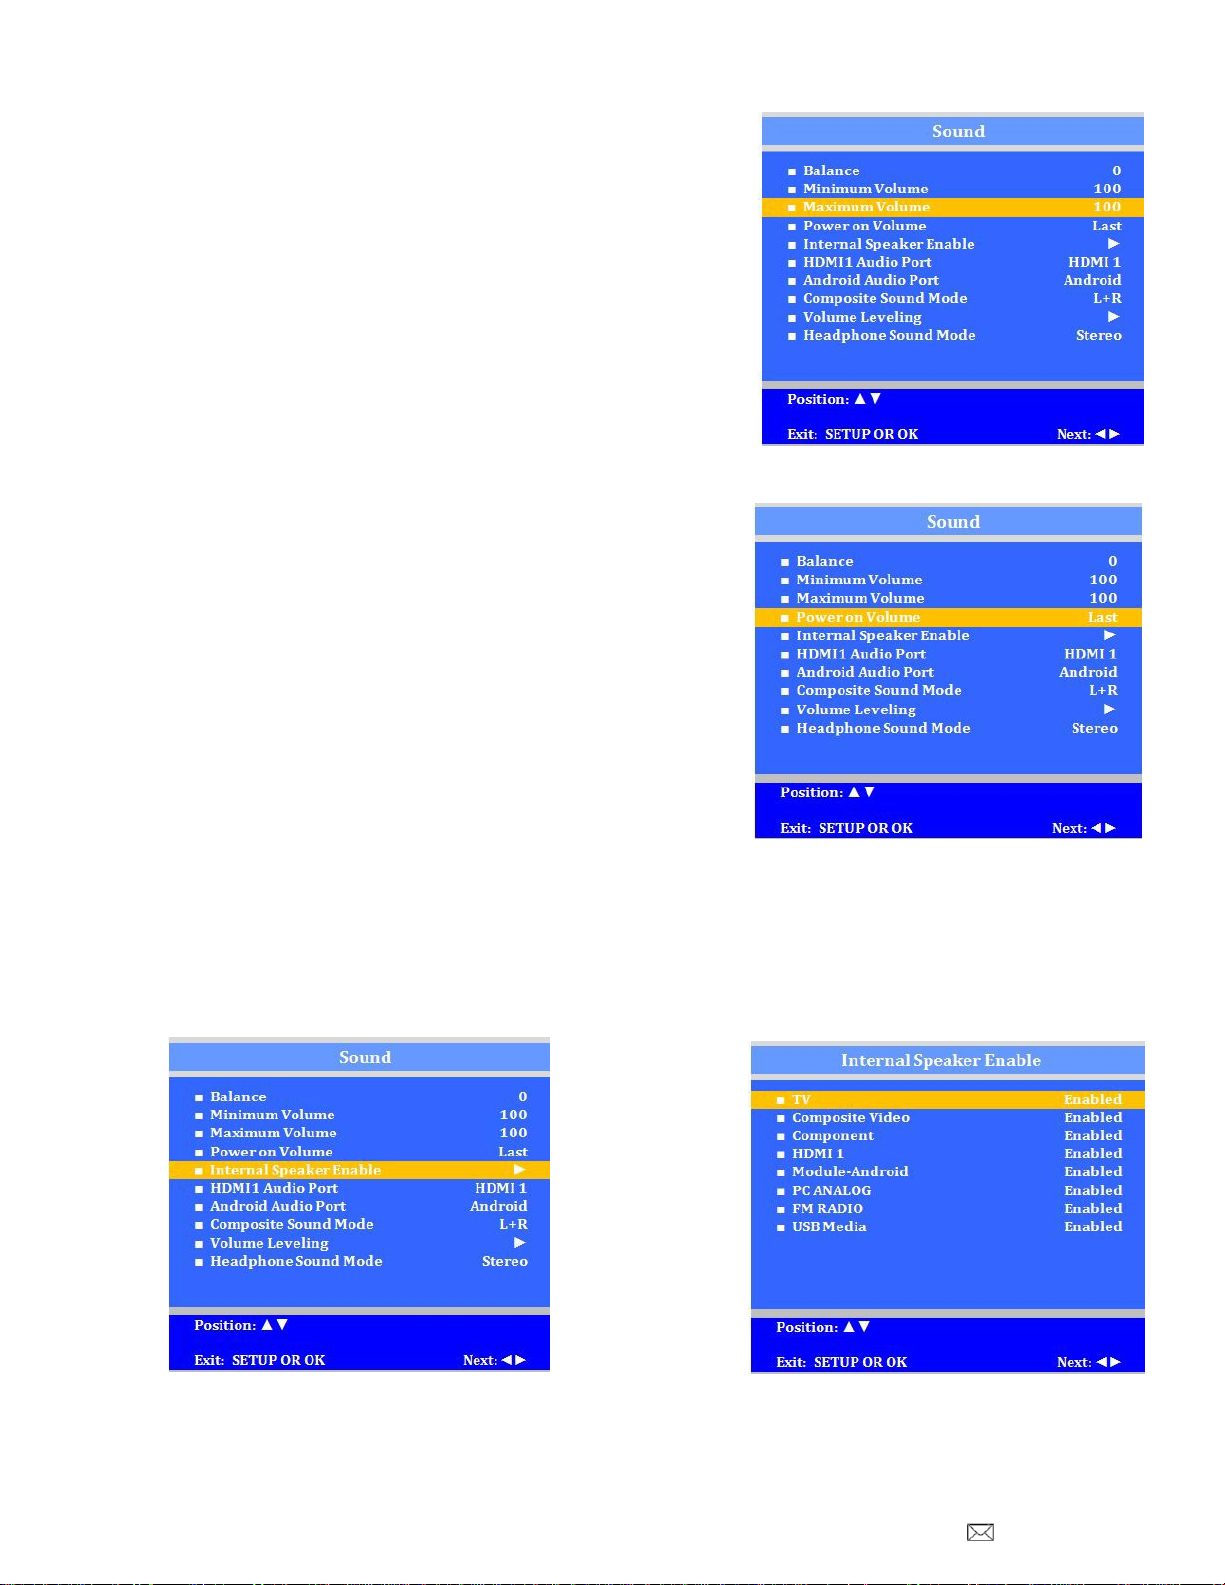
Maximum Volume
Sets the maximum volume level the TV can reach.
1. In Sound menu, press the CH▲ / CH▼ button to select Maximum
Volume.
2. Press the VOL◄/ VOL►button to determine your preferred
maximum volume allowed.
3. Press the SETUP button to return to the preceding menu.
Power on Volume
This screen allows the setting of the initial volume for the TV upon powering on. Once the TV is on, the volume can be
set to any allowable level.
Note: If “Power on Volume” is set to LAST, and physical power is
removed, the TV will power on with a volume of zero.
1. In Sound menu, press the CH▲ / CH▼ button to select Power
on Volume.
2. Press the VOL◄/ VOL►button to determine your preferred
volume when the TV turns on. Setting the level to LAST causes
the TV to remember the last volume level used by the TV prior to
turning off.
3. Press the SETUP button to return to the preceding menu.
Internal Speaker Enable
The speaker’s inside the TV’s cabinet can be turned on or off for each TV
Service Level. Note: Sound to the earphone jack remains on at all times.
1. In the Sound menu, press CH▲ / CH▼ button to select the Internal Speaker Enable menu item.
2. Press VOL◄/ VOL►to enter the menu.
3. Press the CH▲/ CH▼ button to select the desired Service Level.
4. Press VOL◄/ VOL►to select Disable or Enabled.
5. Press the SETUP button to return to the preceding menu.

PDi Communication Systems, Inc. 40 Greenwood Lane Springboro, Ohio 45066 USA PH 1-800-628-9870 FX 937-743-5664
Document No: PD196-251R4 PDI-P14T2 LCD HDTV with Android Page 11 of 64
HDMI Audio Ports
The HDMI1 Port has three settings: HDMI 1, PC, and Component. A
device connected to the HDMI ports can receive audio from one of these
sources.
1. In the Sound menu, press CH▲ / CH▼ to highlight HDMI1.
2. Press VOL◄ / VOL► to choose between HDMI and PC, or
Component.
3. Press SETUP to return to previous menu.
The second audio port can be between Component, Android, or PC.
Composite Sound Mode
The settings are L+R, L+L, and R+R
1. In the Sound menu, press CH▲ / CH▼ to highlight Composite
Sound Mode.
2. Press VOL ◄/ VOL ►to choose between settings.
3. Press SETUP to return to previous menu.
Volume Leveling
The settings can be adjusted from 50% to 100%
Headphone Sound Mode
The earphone jack sound can be used with either a mono (single ear) or
stereo (dual ear) style.
1. In the Sound menu, press CH▲ / CH▼ to highlight Headphone
Sound Mode.
2. Press VOL ◄/ VOL ►to choose between settings.
3. Press SETUP to return to previous menu.Channels
The Channels menu allows you to program different signal sources to either
disable or select from three Service Levels (Free, Basic, or Premium) and to
add or delete individual channels. It also allows you to block channels, TV
programs, movies, and auxiliary sources that can be input to the TV. Each
Service Level contains a different channel map.

PDi Communication Systems, Inc. 40 Greenwood Lane Springboro, Ohio 45066 USA PH 1-800-628-9870 FX 937-743-5664
Document No: PD196-251R4 PDI-P14T2 LCD HDTV with Android Page 12 of 64
Signal
1. Press the SETUP button on the remote control.
2. Press CH▲ or CH▼ to highlight Channels.
3. Press VOL► to enter the Channels sub-menu.
4. Four different tuning types are available depending upon the healthcare facility’s signal type. Selection of the
correct signal type is required for the TV to recognize all possible channels before any channel programming can
begin.
5. Enter the Channels menu
6. Press CH▲ or CH▼ to highlight Signal.
7. Press VOL ►to select Air, Cable STD, Cable IRC, or Cable HRC.
Note: Most hospitals use the Cable STD signal style.
Auto Program
The TV automaticallyscans each available channel for activity. Channels that display activity are memorized into the
selected Service Level.
Analog Only: TV searches for analog channels only.
Digital Only: TV searches for digital channels only.
Analog and Digital: TV searches for both analog and digital channels.
Interleave A+D: In the order of channel number regardless of the system.
All A then D: Digital channels are displayed after all analog channels.
1. From the Channels menu, select Auto Program
2. In the Auto Program menu, press the VOL► button to select Mode.
3. Press VOL► to set the scope of channel scanning.
4. Press the CH▼ button to select the Channel Sequence menu item.
5. Press ◄VOL►to set the Channel Sequence in which the channels are displayed after searching.
6. Press the CH▲ CH ▼ button to select the Service Level you wish to program. The menu displays the current
programming status of each level as either Programmed or Blank. Press the VOL► to choose the service level.
Note: A Programmed service level can also be reprogrammed if desired.
7. A confirmation menu will appear before proceeding. Press Yes▲to select YES and start auto programming. The
TV will now search all available channels with an on-screen progress percentage displayed. Once complete,
press the SETUP button to return to normal TV viewing.
Note: Any tuning mode that includes Digital channels will require several minutes to complete the auto
programming.

PDi Communication Systems, Inc. 40 Greenwood Lane Springboro, Ohio 45066 USA PH 1-800-628-9870 FX 937-743-5664
Document No: PD196-251R4 PDI-P14T2 LCD HDTV with Android Page 13 of 64
Add / Delete Channels
Individual analog TV channels that are missing can be manually added to a Service Level. Or, analog TV channels that
require deletion can be manuallyremoved from a Service Level. Digital channels found during Auto Programming can be
enabled or disabled in each service level.
1. From the Channels menu, press the CH▲/ CH▼ to select Add/Delete Channels. Press VOL◄/ VOL► to
select.
2. Press CH▲ / CH▼ to select the Service Level you wish to add or delete channels.
3. Press VOL◄ / VOL► to enter the Add/Delete Channels menu for that Service Level.
4. Press CH▲ / CH▼ to select Analog Channel
5. Press VOL◄ / VOL► to scroll through everyavailable channel. The channel number changes to indicate the
current channel viewed.
6. Press CH▲ / CH▼ to select Add/Delete Analog Channel.
7. Press VOL◄ / VOL► to alternately Add or Delete the current Analog Channel from the Service Level.
8. Press CH▲ / CH▼ to select Enable/Disable Digital Channel.
9. A listing of all digital channels found during Auto Programming will be displayed.
NOTE: If the Enable/Disable Digital Channels states “no Channels”, either the TV did not locate any channels
during Auto Programming or the Mode was set to “Analog Only” during Auto Programming.
10. Press CH▲ / CH▼ to select a Digital Channel.
11. Press VOL◄ / VOL► to alternately Enable or Disable the current Digital Chanel from the Service Level.
12. Press SETUP to return to the previous menus.
Clear Service Level
This empties a service level of all its programmed channels, leaving it
blank.
1. From the Channels menu, press the CH▲/ CH▼ to highlight
Clear Service Level.
2. Press VOL► to select.
3. Press CH▲ / CH▼ to highlight the Service Level (Free, Basic,
or Premium).
4. Press VOL► to select the highlighted Service Level.
5. A confirmation page will appear. Press Yes▲to proceed.
Press ▼or SETUP to return to the previous menu.
Note: After a Service Level is cleared, the TV returns to the
Clear Service Level menu. “Blank” will appear to the right of
the Service Level.
6. Press SETUP to return to the previous menu. To exit, press
SETUP until the programming menus disappear.
PDi Communication Systems, Inc. 40 Greenwood Lane Springboro, Ohio 45066 USA PH 1-800-628-9870 FX 937-743-5664
Document No: PD196-251R4 PDI-P14T2 LCD HDTV with Android Page 14 of 64
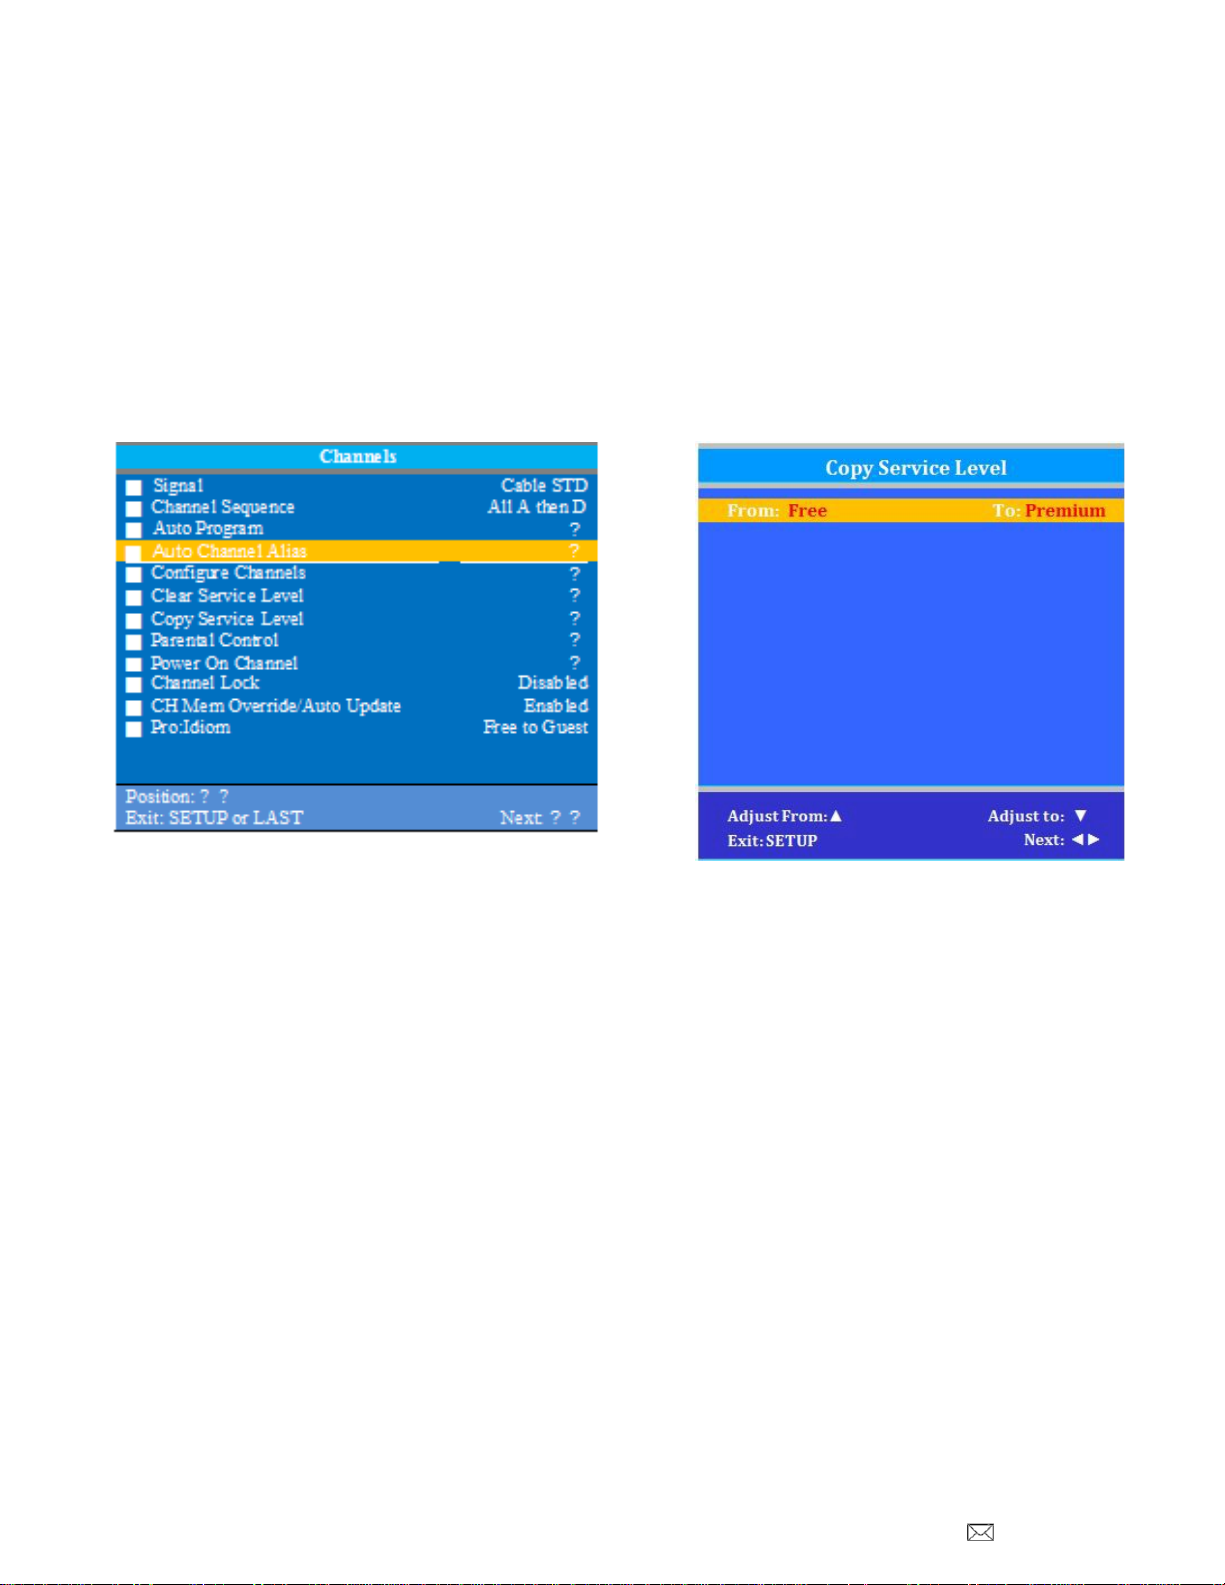
Copy Service Level
Allows the copy of one service level’s channels to another.
1. In the Channels menu, Press CH▲ / CH▼to highlight Copy Service Level.
2. Press VOL► to select.
3. Press CH▲ to set the From Service Level. Press CH▼ to set the TO Service Level.
4. Press VOL ►to copy the Service Level.
5. A confirmation screen will appear. Press CH▲to proceed. Press CH▼or SETUP to return to the previous
menu.
Note: After a Service Level is copied, the TV returns to the Copy Service Level menu. If the To Service Level
has been set to active in the Service Level setting (see Service Levels on page 4), TV programming will appear.
6. Press SETUP to return to the previous menu. To exit, press SETUP until the programmingmenus disappear.
Channel Aliasing
The enhanced feature “Channel Aliasing” provides custom setup of channels. A new menu item now appears in the TV’s
setup menu beginning with TV firmware version 2.19 and later on PDi LED television models. This feature and its benefits
are explained in detail below.
CHANNEL ALIASING (Channel Number Remapping)
Digital channels contain both a major channel number as well as a minor sub-channel number. Channel Aliasing
(Channel Number Remapping) allows a digital channel containing major and minor numbers to be remapped or
aliased to a major channel number only. As an example, the following digital channel numbers contain both Major
and Minor numberings that are remapped (Aliased) to a Major channel number.
10-7 becomes channel 10
10-8 becomes channel 11
10-22 becomes channel 12
Channel Aliasing creates ready channel tuning, eliminating the requirement to enter a minor channel number.
Channel Aliasing also provides flexibility as many local channels may appear with unusual digital channel numbers
on a hospital’s cable system. For example, a local CBS TV affiliate always appeared on channel 5. Patients may
be accustomed to locating their favorite programs and news by tuning to channel 5. However, the cable system
now places this local CBS TV affiliate on channel 17-22. Channel aliasing is used to modify the channel numbering
in the TV, allowing channel 5 to be tuned directly as channel 5, and also appearing on the TV’s screen as channel
5, as would be expected.
17-22 is aliased as channel 5

PDi Communication Systems, Inc. 40 Greenwood Lane Springboro, Ohio 45066 USA PH 1-800-628-9870 FX 937-743-5664
Document No: PD196-251R4 PDI-P14T2 LCD HDTV with Android Page 15 of 64
CHANNEL LABELS
A custom channel label may be created that appears on screen with the displayed channel number. For example,
the aliased channel 5 is labeled as “CBS” and appears on the TV’s screen as follows:
5 CBS
CHANNEL ALIASING PROCEDURE
Begin by verifying that the TV supports Channel Aliasing.
1. Use a PDI programming remote control
such as the PD108-420.
2. Turn the TV On and press the remote’s SETUP
button to activate the TV’s menu system.
In the Setup menu, Press CH▲ / CH▼to highlight
Channels. Press VOL► to select.
3. In the Channels menu, Press CH▲ / CH▼to highlight
Auto Channel Alias. Press VOL► to select.
If the TV’s Channels menu lacks this item, the TV does
not support Channel Aliasing.
Channels
Signal
Cable STD
Channel Sequence
All A then D
Auto Program
►
Auto Channel Alias
►
Configure Channels
►
Clear Service Level
►
Copy Service Level
►
Parental Control
►
Power On Channel
►
Channel Lock
Disabled
CH Mem Override/Auto Update
Enabled
Pro:Idiom
Free to Guest
Position: ▲▼
Exit: SETUP or LAST
Next: ◄►

PDi Communication Systems, Inc. 40 Greenwood Lane Springboro, Ohio 45066 USA PH 1-800-628-9870 FX 937-743-5664
Document No: PD196-251R4 PDI-P14T2 LCD HDTV with Android Page 16 of 64
The remainder of these instructions assumes the TV has already been Auto Programmed with channels. Channel Aliasing
can be accomplished in either a manual or automatic means.
Manual Channel Aliasing
The Manual Channel Aliasing entry technique provides a hands-on approach to channel setup. Once a TV is configured
correctly, a clone file can be generated to reproduce the original TV’s setup including the aliased channels on additional
televisions, greatly reducing the amount of time to program televisions.
1. In the Setup menu, Press CH▲ / CH▼to highlight
Channels. Press VOL► to select.
2. In the Channels menu, Press CH▲ / CH▼to highlight
Configure Channels. Press VOL► to select.
3. The Configure Channels menu display provides a list of active channels found after an auto channel search.
NOTE: Your display will appear different, since your channel lineup is likely different.
Channels
Signal
Cable STD
Channel Sequence
All A then D
Auto Program
►
Auto Channel Alias
►
Configure Channels
►
Clear Service Level
►
Copy Service Level
►
Parental Control
►
Power On Channel
►
Channel Lock
Disabled
CH Mem Override/Auto Update
Enabled
Pro:Idiom
Free to Guest
Position: ▲▼
Exit: SETUP or LAST
Next: ◄►

PDi Communication Systems, Inc. 40 Greenwood Lane Springboro, Ohio 45066 USA PH 1-800-628-9870 FX 937-743-5664
Document No: PD196-251R4 PDI-P14T2 LCD HDTV with Android Page 17 of 64
TYPE
The type of channel listed on the far left with the
following abbreviations.
AC Analog Cable
DC Digital Cable
AA Analog Air
DA Digital Air
CHAN
White channel numbers indicate the channel contains signal and is active in at least one Service Level.
Blue channel numbers are either empty without signal following an Auto Search, or were once active, but have been
excluded from all Service Levels – turned off for viewing. The example screen shows inactive analog channels 5, 6
and 10 following an Auto Search.
ALIAS
The Alias channel number is manually entered and represents the channel the patient directly enters for desired
viewing.
LABEL
Labels are also manually entered to provide a description of the channel. Only the channel number appears if the label
field is blank.
SVC LEVEL
Channels may be in no Service Level (Disabled), one or multiple Service Levels. The Channel’s membership in the
Free, Basic, or Premium Service Levels is shown in the “SVC Level” column.
Configure Channels
Type Chan Alias Label
Svc Level
AC 2 --- --------
F
Free
AC 3 --- --------
F
Basic
AC 4 --- --------
F
Premium
AC 5 --- --------
AC 6 --- --------
AC 7 --- --------
F
AC 8 --- --------
F
AC 9 --- --------
F
AC 10 --- --------
DC 10-73 --- --------
F
DC 10-74 --- --------
F
DC 10-75 --- --------
F
AC 12 --- --------
F
Position: ▲▼◄►
Tune: OK
Exit: SETUP or LAST
Page Up/Down: PSM SAP
PDi Communication Systems, Inc. 40 Greenwood Lane Springboro, Ohio 45066 USA PH 1-800-628-9870 FX 937-743-5664
Document No: PD196-251R4 PDI-P14T2 LCD HDTV with Android Page 18 of 64
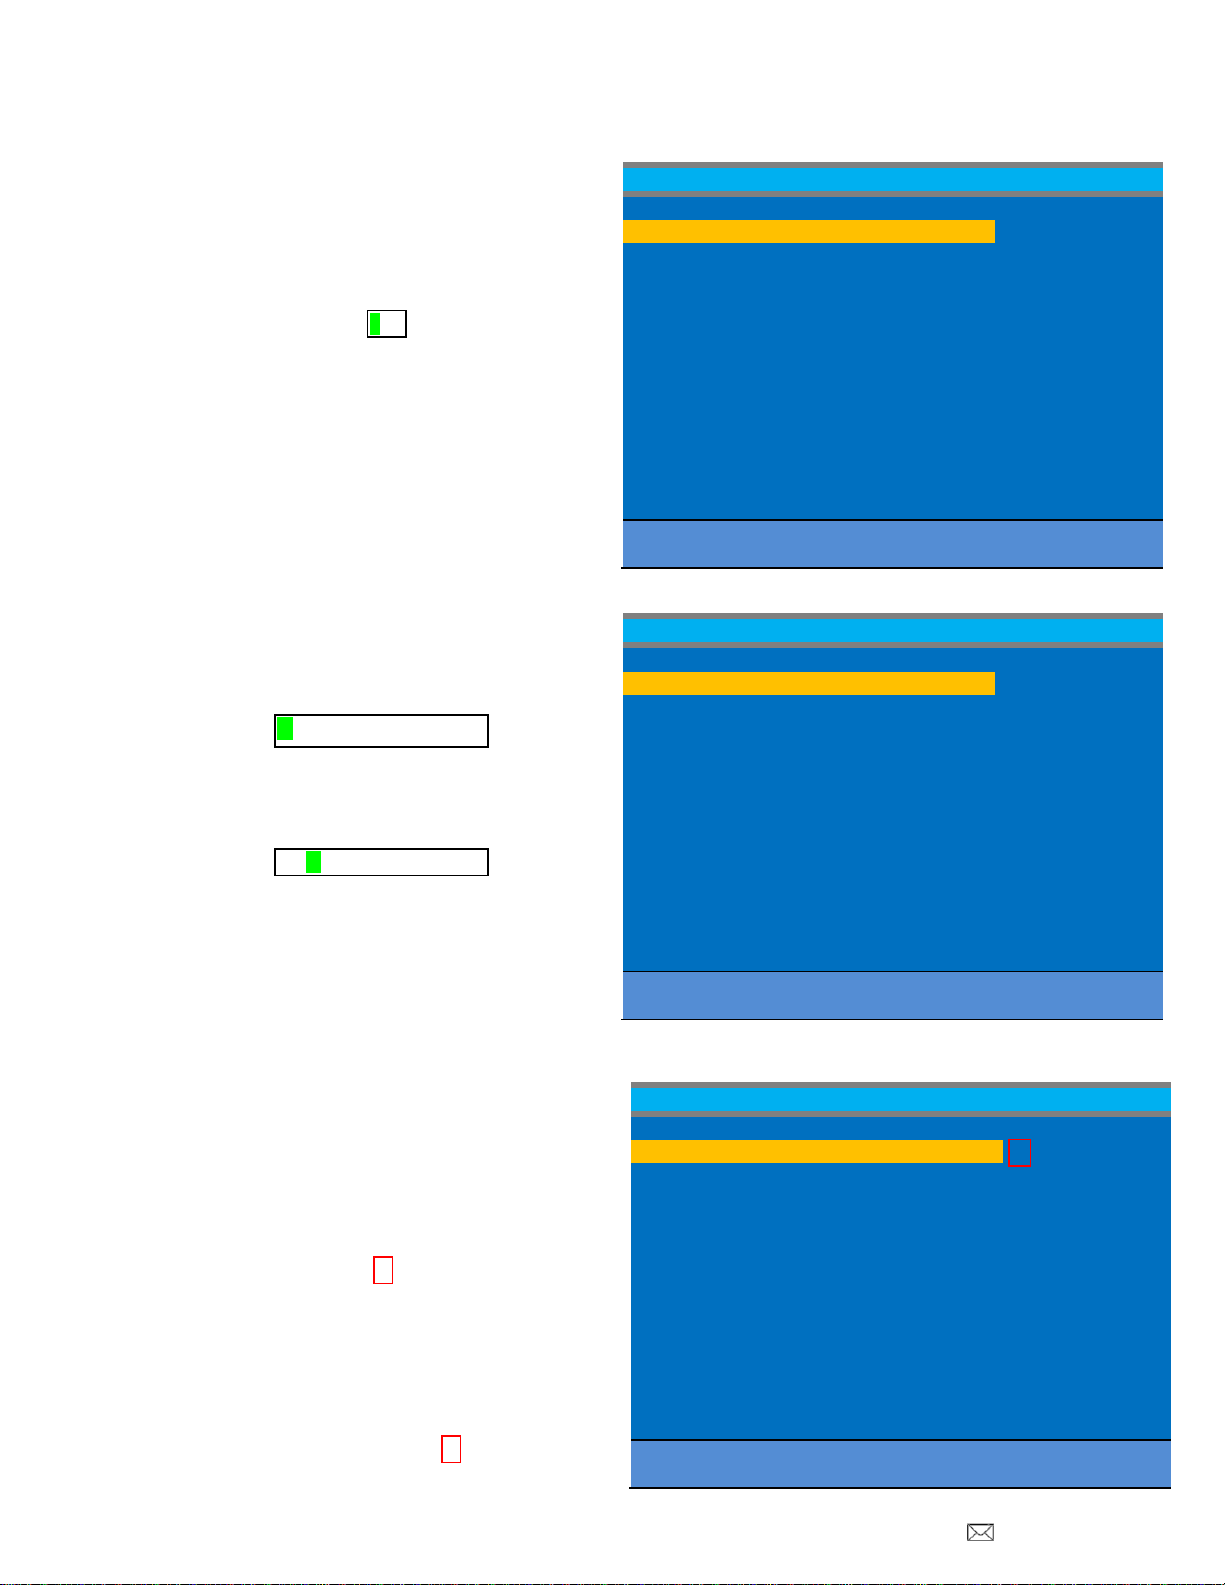
4. Use the TV’s remote control and highlight the
channel you wish to Alias.
a. Press the VOL►to highlight the Alias
entry field. The field appears red when it
is ready for editing.
b. Press OK. A three digit entry window
will appear above the dash placeholder.
Use VOL◄►to select the hundredths,
tens, or ones place. Use CH▲▼ to
index the number to the desired value.
c. Press OK when complete.
5. Press the VOL►to highlight the Label field.
The field appears red when highlighted.
a. Press the OK button. A label entry window
appears above the dash placeholders.
b. Use CH▲▼ to index to the desired alpha/
numeric value. Use VOL ◄►to select the
position within the label.
c. Press OK when complete.
6. The use of Service Levels is optional. Only one
active Service Level is required to make the
channel available for viewing.
a. Press the VOL►button and highlight the
Svc Level field.
b. Press the OK button to alternately Add or
Remove the channel from the Free Service
Level.
c. Press the VOL►button again to advance
to the next Service Level Basic.
Press the OK button to Add or Remove
the channel from the Service Level.
d. In like manner, press the VOL►button
again, advance to the final Service Level
Premium. Press the OK button to alternately
Add or Remove the channel from the
Premium Service Level
Configure Channels
Type Chan Alias Label
Svc Level
AC 2 --- --------
F
Free
AC 3 --- --------
F
Basic
AC 4 --- --------
F
Premium
AC 5 --- --------
AC 6 --- --------
AC 7 --- --------
F
AC 8 --- --------
F
AC 9 --- --------
F
AC 10 --- --------
DC 10-73 --- --------
F
DC 10-74 --- --------
F
DC 10-75 --- --------
F
AC 12 --- --------
F
Position: ▲▼◄►
Tune: OK
Exit: SETUP or LAST
Page Up/Down: PSM SAP
Configure Channels
Type Chan Alias Label
Svc Level
AC 2 2 --------
F
Free
AC 3 --- --------
F
Basic
AC 4 --- --------
F
Premium
AC 5 --- --------
AC 6 --- --------
AC 7 --- --------
F
AC 8 --- --------
F
AC 9 --- --------
F
AC 10 --- --------
DC 10-73 --- --------
F
DC 10-74 --- --------
F
DC 10-75 --- --------
F
AC 12 --- --------
F
Position: ▲▼◄►
Tune: OK
Exit: SETUP or LAST
Page Up/Down: PSM SAP
Configure Channels
Type Chan Alias Label
Svc Level
AC 2 2 QVC
F
Free
AC 3 --- --------
FBasic
AC 4 --- --------
F
Premium
AC 5 --- --------
AC 6 --- --------
AC 7 --- --------
F
AC 8 --- --------
F
AC 9 --- --------
F
AC 10 --- --------
DC 10-73 --- --------
F
DC 10-74 --- --------
F
DC 10-75 --- --------
F
AC 12 --- --------
F
Position: ▲▼◄►
Tune: OK
Exit: SETUP or LAST
Page Up/Down: PSM SAP
F
000
Q
QVC
B
P

PDi Communication Systems, Inc. 40 Greenwood Lane Springboro, Ohio 45066 USA PH 1-800-628-9870 FX 937-743-5664
Document No: PD196-251R4 PDI-P14T2 LCD HDTV with Android Page 19 of 64
NOTE: A channel number without any indicated Service Level will not be viewable.
EXAMPLE
The example Channel Configuration display on the
right represents the enhancements possible.
Channels have been Aliased with several analog
channels using the same channel number. However,
any channel number may have been used.
Digital numbers with sub-channels have been
Aliased to major channel numbers with the following
changes:
10-73 becomes 10
10-74 becomes 11
10-75 becomes 13
NOTE: Channel 4 was not Aliased and will not be available for viewing. Only channels that have been Aliased are
available for viewing.
Several channels have been included in the Basic service level, namely: 7, 8, 9, 13, and 12.
NAVIGATION
To page through additional channel screens, press the PSM or SAP buttons on the TV’s remote control to change to the
previous or next channel listing screen.
PSM = Previous Channel Screen
SAP = Next Channel Screen
Automatic Channel Aliasing
This enhanced feature provides a means to alias channels automatically with minimal manual intervention.
1. Turn the TV On and press the remote’s
SETUP button to activate the TV’s menu
system.
In the Setup menu, Press CH▲ / CH▼to
highlight
Channels. Press VOL► to select.
Configure Channels
Type Chan Alias Label
Svc Level
AC 2 2 QVC
F
Free
AC 3 3 HSN
F
Basic
AC 4 --- --------
F
Premium
AC 5 --- --------
AC 6 --- --------
AC 7 7 CBS
F B
AC 8 8 FOX
F B
AC 9 9 ABC
F B
AC 10 --- --------
DC 10-73 10 C-SPAN
F
DC 10-74 11 C-SPAN2
F
DC 10-75 13 EWTN
F B
AC 12 12 WKRC
F B
Position: ▲▼◄►
Tune: OK
Exit: SETUP or LAST
Page Up/Down: PSM SAP
SETUP
Service Level
Free
Picture
►
Sound
►
Channels
►
Features
►
OSD Language
English
Sources
►
FM Radio
►
System
►
Position: ▲▼
Exit: SETUP or LAST
Next: ◄►

PDi Communication Systems, Inc. 40 Greenwood Lane Springboro, Ohio 45066 USA PH 1-800-628-9870 FX 937-743-5664
Document No: PD196-251R4 PDI-P14T2 LCD HDTV with Android Page 20 of 64
2. In the Channels menu, Press CH▲ / CH▼to highlight
Auto Channel Alias. Press VOL► to select.
Channels
Signal
Cable STD
Channel Sequence
All A then D
Auto Program
►
Auto Channel Alias
►
Configure Channels
►
Clear Service Level
►
Copy Service Level
►
Parental Control
►
Power On Channel
►
Channel Lock
Disabled
CH Mem Override/Auto Update
Enabled
Pro:Idiom
Free to Guest
Position: ▲▼
Exit: SETUP or LAST
Next: ◄►
3. In the Auto Channel Alias menu, three
Different methods are available to Alias
Channels. Each method is illustrated below.
Select the first menu item, Fill Analog Gaps
with Digital Channels.
If a previous channel alias exists, a
confirmation window appears “Remove
existing aliases and renumber channels.”
Select Yes to Continue.
Auto Channel Alias
Fill Analog Gaps with Digital Channels
►
Renumber Only Enabled Channels
►
Renumber All Channels
►
Remove All Aliases
►
Position: ▲▼
Exit: SETUP or LAST
Next: ◄►
Other manuals for PDI-P14T2
1
Table of contents
Other PDi LCD TV manuals


 Service manual")
