Peachtree Audio BP1 User manual


IMPORTANT SAFETY INSTRUCTIONS
0
Read these instructions
-All
the safety and operating instructions should be
read before this product is operated.
8
Keep these instructions -The safety and operating instructions should be
retained for future reference.
8
Heed all warnings
-All
warnings on the apparatus and in the operating
instructions should
be
adhered to.
8
Follow all instructions.
0
Do
not use this apparatus near water -The appliance should not be used
near
water
or
moisture-
for example, in a wet basement
or
near a swimming
pool.
e
Unplug the apparatus before cleaning. Clean with a
dry
cloth.
8
Do not install near any heat sources such as radiators, heat registers, stoves,
or
other apparatus (including amplifiers) that produce heat.
0
Protect
the
power
cord
from
being
walked on
or
pinched
particularly
at
the
plugs,
convenience
receptacles, and at the pointwhere they exitfrom the apparatus.
f)
Only use the attachments/accessories specified bythe manufacturer.
GJ)
Unplug this apparatus during lightning storms orwhen unused for long periods of time.
4D
Refer all servicing to qualified personnel. Servicing is required when the apparatus has
been damaged in anyway such as the power cord or plug isdamaged. Otherdamage
mayoccur if liquid orobjects have been dropped orspilled intothe apparatus. Dropping
the apparatus, exposure to rain, and excessive moisture may also cause damage.
$ Keep the unit in a well ventilated environment.
4D
CAUTION: These servicing instructions are for use byqualified service per$onnel only.
To
reduce the risk
of
electric shock,
do
not perform any servicing other than that
contained in the operating instructions unless you are qualified to do so.
4D
WARNING:
To
reduce the risk of fire or electric shock, do not expose this apparatus
to rain or moisture. The apparatus shall not be exposed to dripping
or
splashing and
objects filled with liquids, such asvases, shall not be placed on the apparatus.
4D
WARNING: The mains plug/apparatus coupler is used as disconnect device, the
disconnect device shall remain readily operable.
CD
The lightning flash with arrowhead symbol within an equilateral triangle is intended to
alert the user to the presence
of
non-insulated "dangerous voltage" within the
apparatus enclosure that may
be
of sufficient magnitude to constitute a risk of electric
shock.

CAUTION:
TO
REDUCE
THE
RISK
OF
ELECTRIC
SHOCK,
DO
NOT
REMOVE
COVER
(OR
BACK).
NO
USER-SERVICEABLE
PARTS
INSIDE.
REFER
SERVICING
TO
QUALIFIED
SERVICE
PERSONNEL
WARNING:
To
reduce the risk
of
electric shock,
do
not remove cover (or
back) asthere are no user-serviceable parts inside. Refer servicing to qualified
personnel.
The exclamation point within an equilateral triangle is intended to alert the
user to the presence
of
important operating and maintenance instructions
in the literature accompanying the apparatus.
fi
No naked flame sources, such as lighted candles, should be placed on the apparatus.
Correct disposal of this product. This marking indicates that this product
should not be disposed with other household wastes throughout the
EU.
To
. prevent possible harm to the environment or human health from uncontrolled
waste disposal, recycle it responsibly to promote the sustainable reuse of material
resources.
To
return your used device, please use the return and collection systems or
contact the retailer where the product was purchased. They can take this product
for environmentally safe recycling.
f)
Use only the accessories provided.
UNPACKING AND WARRANTY
0 Keep all packing materials for future shipments.
8 Keep a record of your bill
of
sale and a copy ofthe serial number for warranty and
insurance purposes.
8
You
may register your product on our website: www.peachtreeaudio.com.

•Introduction
• Connections
• Pairing Apple Devices
• Pairing Android Devices
•
~Jseful
Tips and More...
_,
• TroubleSQooting
~
'"""~
~
• Product Warranty and Service
(Rev. 5/2014)

Thank you for purchasing a Peachtree Audio
BP!
At
Peachtree Audio we design products that utilize a unique combination of analog
and digital technologies that work together
to
provide a
compelling
_
musio
listening
experience. The Bt1 combines a high performance aptX Bluetooth receiver and
built-in Digital-to-Analog Converter (DAC) to add a high-performance wireless
inputto almost any playback system. The Bt1 also provides a digital audio outputs so
you can bypass the internal DAC if you are able to utilize a higher-performance
DAC available
in
a connected device. In addition, the Bt1 can connect to up to 8
Bluetooth devices to expand the number of devices your system can.
Although compressed music files transmitted wirelessy over Bluetooth willprobably
never sound as good as uncompressed files sent over a wired digital audio
connection to a high-performance DAC, we think you will surprised by how good
this
type
of
connection
(especially
if
you
utilize
the
digital
audio
output
and
a higher-performance DAC like the ones provided in Peachtree Audio products) can
sound. In addition, you can enjoy the user interface of your Bluetooth device and the
freedom that a wireless connection provides. The performance and flexibility
of
the Bt1
will expand the capabilities of your high performance music reproduction system and
allow you to enjoy all of your music to the highest regardless
of
where it comes from.
This manual is a intended as a guide to the set up and of your Bt1• We sincerely hope
the Bt1 provides you with many years of music listening enjoyment.
Please visit our website at www.peachtreeaudio.com for the latest tips on getting the
best sound quality from the music stored or streamed from your computer and from all
of your sources. Please contact your dealer or us directly if you have any questions
that this manual does not answer. Also, now is a great time to go to our website and
register your Bt1•
Thanks again and happy listening!
-The
team at Peachtree Audio
4
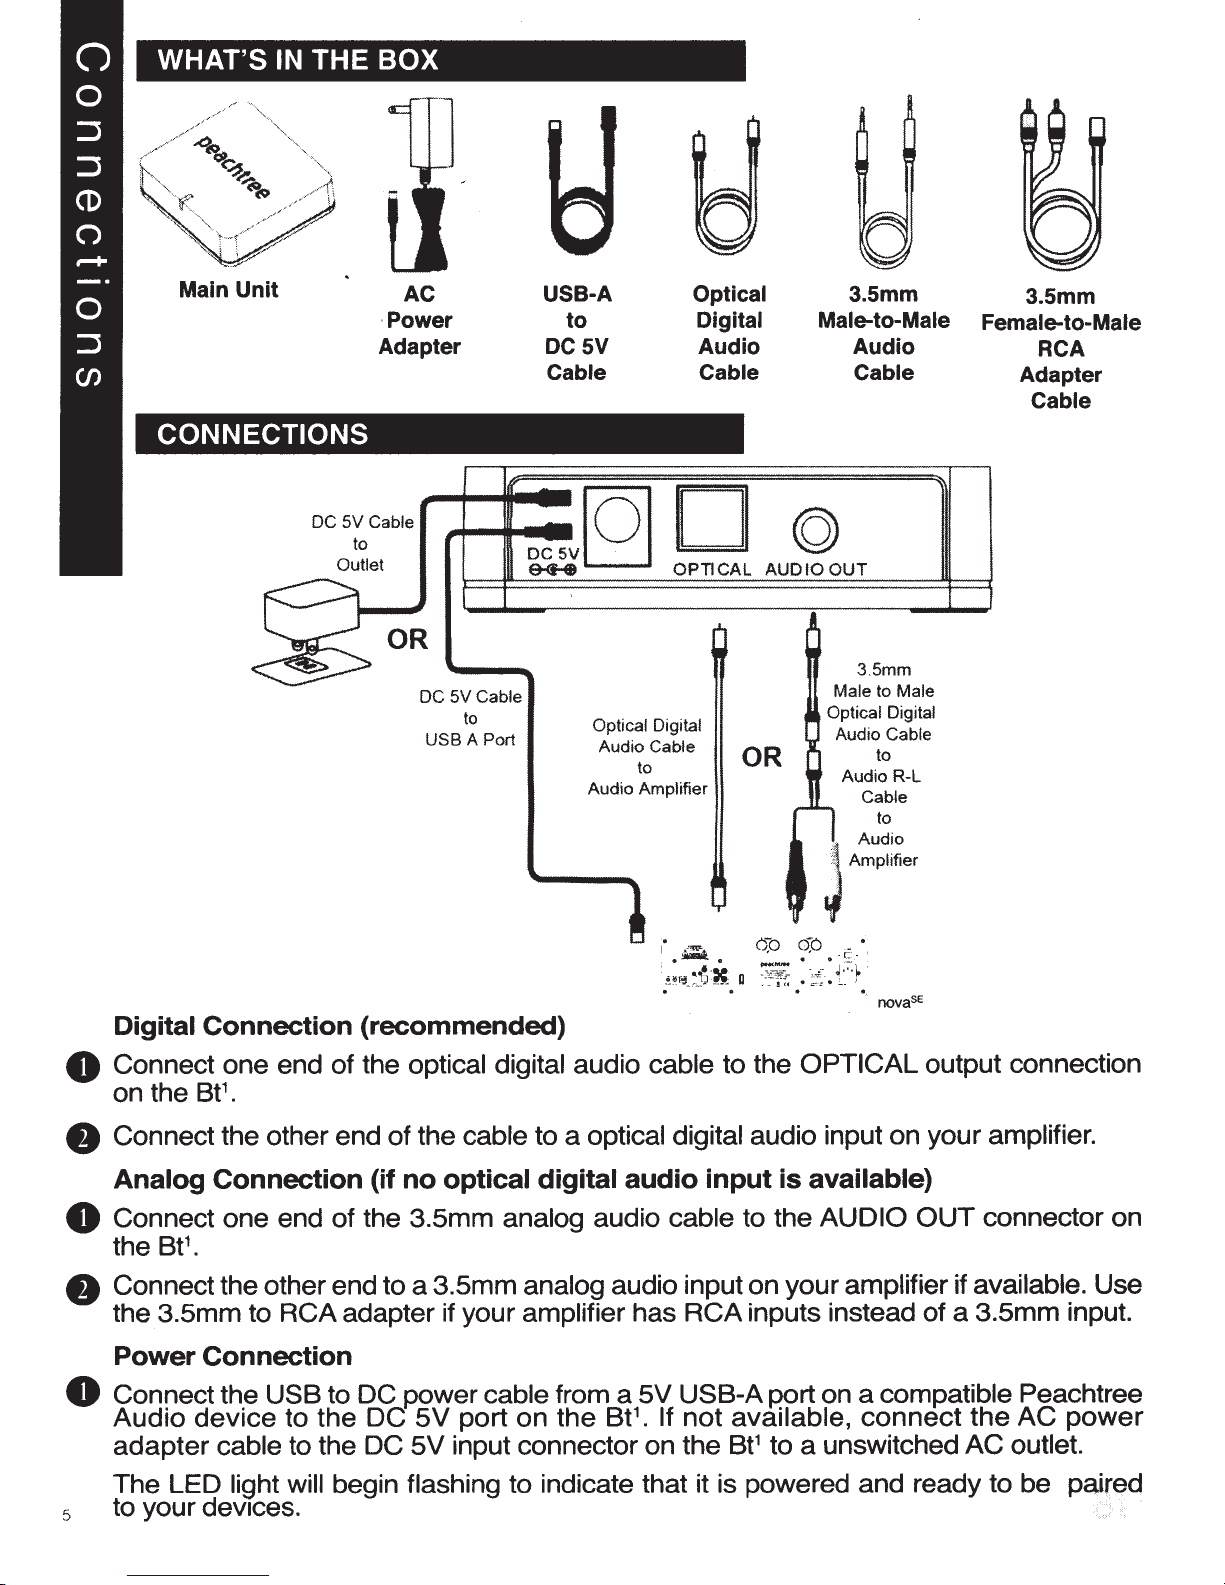
WHAT'S
IN
THE
BOX
Main
Unit
AC USB·A Optical 3.5mm
·Power
to
Digital Male-to-Male
Adapter DCSV
Audio
Audio
Cable Cable Cable
CONNECTIONS
DC 5V Cable
to
Outlet
,..._.._DC
5V[Q]
©
&4-e
OPTICAL AUDIO
OUT
OR
DC
5VCable
to
USB A Port
Digital
Connection
(recommended)
Optical Digital
Audio Cable
to OR
3.5mm
Male to
Male
Optical Digital
Audio Cable
to
Audio R-L
Audio Amplifier
.
I
_
-
·
~
......
~~1'3-~~x
u
. .
Cable
to
Audio
JAmpllfie<
0~0
0:0 _ •
• • -c..-
~~
.
-
~
~
;
-
.
{
~;-,
~
. •.
novasE
3.5mm
Female-to-Male
RCA
Adapter
Cable
O Connect one end
of
the optical digital audio cable to the OPTICALoutput connection
on the Bt1.
8 Connectthe otherend of the cable to a optical digital audio input on your amplifier.
Analog
Connection
(if
no
optical
digital
audio
input
is
available)
0 Connect one end
of
the 3.5mm analog audio cable to the AUDIO
OUT
connector on
the Bt1•
8 Connecttheotherend to a 3.5mmanalog audio inputon your amplifierif available. Use
the 3.5mm to RCAadapter if your amplifier has RCAinputs instead
of
a 3.5mm input.
Power
Connection
0 Connectthe USB to DC power cable from a
5V
USB-Aporton a compatible Peachtree
Audio device to the DC
5V
port on
the
Bt
1• If not available,
connect
the
AC
power
5
adapter cable tothe DC
5V
input connector on the Bt1 to a unswitched AC outlet.
The LED light will begin flashing to indicate that it is powered and ready to be
pa.ired
to your
dev1ces.

Apple iOS Devices:
OGoto the Bluetooth managerofyourApple iOS Device touch bythe following steps:
a.
From
your
iOS
Device
touch home page,
se
lect
"setting
".
<
SGttngs
Bluetooth
Settings
II
Notlfle.tlonCenter
m
Control
Center
C!l
Do Not Disturb
b.
Inside
Settings select
"Biuetooth"
.
c.
Inside
"Biuetooth
"
select
Bluetooth
if it
is not alreadyset
on
.
8
Your
iOS device
will
automatically
search for available devices.
Select "Music Receiver."
<Sllttings Bluetooth
Bluatooth
Audl
MM
I
5526
B
8Now
you can enjoymusic on
your
iOS
device as you normallywould and the
sound will come through the system
the
Bt
1 is connected to.
<Settings Bluetoottl
Blvetooth
OE\IICES
Aud
l
MM
I 5526
Log
1
tech
KB
11
Mu
s
ic
Receiver
6

Android Phone/Tablet (v 4.0 as Example)
0 Go
to
the Bluetooth managerofyoursmart phone by the following these steps:
a-
m
OioeloJ
_
__
_
...
-~-
"""'
......
_
RSlOfTICX
...........
lyXU.
_
..
_
a.
From
yoursmart phone touch
home
page
,select "setting
".
b.
In
the settings
menu
,enable
Bluetooth.
c.
Bluetooth
is
enabled
.
8
Bluetooth Devices will be listed,
please select "Music Receiver''. 8 Once paired, the LED on the Bt
1
will
flash once. The LED will remain on
when the connection is established.
Your connected Bluetooth device may
also indicate a successful connection.
-·-
Note:
Some
devices
,
Apple
iOS
for
example
, will
connect
immediately
after pairing so
the LED will turn ON. Other devices, such as a notebook PC,
may
ask you if you wish
to connect and the LED will turn off after pairing until the connection is established.
Although the Bt1 can only play music from.one device at a time, it is capable
of
being
paired with up to 8 devices.
ONow you can enjoy music on your device as you normally would and the sound will
come through the system the Bt1 is connected to. B
7

Reconnecting
Your
Device
If you move out
of
range
or
turn off the Bluetooth connection on your tablet
or
smartphone, the Bt1 will be disconnected from your device and the LED will flash.
To
reconnect, simply open the Bluetooth menu on your device and select the "Music
Receiver'' to reestablish the connection.
Adding
a
New
Bluetooth
Device:
If you want to switch from one device to another, please follow these steps:
0 End the existing Bluetooth connection by sleeting a different Bluetooth device
or
turning off the Bluetooth connection until another device
is
connected tothe Bt1•
8 The Bt1 can now be connected to another device.
8 Follow the section "Pairing for Apple Devices" or "Pairing for Android Devices" to
connect a new device.
Out
of Range or Lost
Signal
When the paired device is more than
-33
feet/1 0 meters
away
from the Bt1
or
there is something interfering with the Bluetooth signal, the LED will be off to
indicate the connection between the device and the Bt1 has been lost.
To
reestablish a
lost connection:
0 Move the connected device back into range (within
-33
feet/1 0 meters), and make
sure the Bluetooth device and the Bt1 are not in close proximity to other wireless
devices that may be interfering with the wireless signal.
8 Within 15 seconds, the connection will automatically be reestablished and the LED will
turn on.
8 Ifthe connection is lostfor morethan 15seconds, you will need to reconnect the device
to
the Bt1 again. Please follow the "Reconnecting Your Device" instructions above.
LED
Status
Status Meaning Description
LED Flashing Pairing
Mode
Waiting for connection.
LED On Connected Device and main unit are connected.
LED Off Power off No power supplied or a lost connection.
8
9
Make sure Bluetooth is
enabled
on
your
device.
Make sure the Bt
1
is powered and connected. If the LED is flashing the
Bt1 is NOTconnected.
Move
the
Bt1
away
from
other
wireless
devices
that
could be causing
interference.
Make
sure
your
Bluetooth
device
is within -
33
feet
of
the
Bt1.
Move
closer
or
adjust
the
position
of
the
Bt1
to
establish
a
connection.
Make sure an analog
audio
cable
or
an
optical digital
audio
cable is
correctly and firmly connected
to
Bt
1
and
the amplifier.
Make sure that the correct input on your amplifier is selected.
Make sure the volume
of
the stereo is setto a comfortable listening level.
Make
sure
music
is playing
on
your
device
and
that
the
volume
on
the
device is
not
muted
or
set
to a
very
low
level.

International Warranty and
Claims Under Warranty
International Warranty
The Bt1 has a 1 year Parts and Labor warranty from the date of purchase. Units
that are covered under this warranty include Bt
11
s purchased directly from
authorized Peachtree Audio dealers or distributors.
Peachtree Audio takes no responsibility for defects arising from accident,
misuse, abuse, unusual wear and tear, neglect,.unauthorized adjustment
or
repair. This warranty does not cover shipping costs. Visit www.peachtreeaudio.
com for a copy ofthe complete warranty. ·
Claims Under Warranty
In
the unlikely event that you experience a failure with your product please email
shipping the product for service. Any product received without an RA number
may
be
refused.
You
may also wish to route your repair through your dealer or
distributor, which we encourage.
The unit should be packed in its original shipping carton and packaging and
returned to the dealer from whom it was purchased, or if unavailable, directly to
the service center as directed by Peachtree Audio.
Please use a suitable carrier like FedEx or UPS.
DO
NOT SEND
BY
POSTAL
SERVICE. Peachtree Audio cannot accept responsibility for products while they
are in transit to the dealer, distributor, or service facility. Please insure the product
against potential loss or damage while
in
transit.·
For technical support (not
RA
number requests), please call 704-391-9337.
Main office:
Peachtree Audio
2045 120thAvenue NE
Bellevue, WA 98005
704-391-9337
www.peachtreeaudio.com
10

Table of contents
Other Peachtree Audio Media Converter manuals

Peachtree Audio
Peachtree Audio t1 User manual

Peachtree Audio
Peachtree Audio t1 24 User manual

Peachtree Audio
Peachtree Audio DAC iT User manual

Peachtree Audio
Peachtree Audio iDac User manual

Peachtree Audio
Peachtree Audio Deepblue User manual

Peachtree Audio
Peachtree Audio Deepblue User manual

Peachtree Audio
Peachtree Audio DAC iT User manual


