Pearl River PRK-300 User manual


1
Precautions
Location
Using the unit in the following locations can result in a mal-
function.
• In direct sunlight
• Locations of extreme temperature or humidity
• Excessively dusty or dirty locations
• Locations of excessive vibration
• Closetomagneticelds
Power supply
Please connect the designated AC adapter to an AC outlet of
the correct voltage. Do not connect it to an AC outlet of volt-
age other than that for which your unit is intended.
Interference with other electrical
devices
Radios and televisions placed nearby may experience recep-
tion interference. Operate this unit at a suitable distance from
radios and televisions.
Handling
To avoid breakage, do not apply excessive force to the switch-
es or controls.
Care
If the exterior becomes dirty, wipe it with a clean, dry cloth.
Do not use liquid cleaners such as benzene or thinner, or
cleaningcompoundsorammablepolishes.
Keep this manual
After reading this manual, please keep it for later reference.
Keeping foreign matter out of your
equipment
Never set any container with liquid in it near this equipment.
If liquid gets into the equipment, it could cause a breakdown,
re,orelectricalshock.
Be careful not to let metal objects get into the equipment.
If something does slip into the equipment, unplug the AC
adapter from the wall outlet. Then contact your nearest dealer
or the store where the equipment was purchased.
*
All product names and company names are the trademarks
or registered trademarks of their respective owners.
Notice regarding disposal (EU only)
When this “crossed-out wheeled bin” symbol is
displayed on the product, owner’s manual, bat-
tery, or battery package, it signifies that when
you wish to dispose of this product, manual,
package or battery you must do so in an ap-
proved manner. Do not discard this product,
manual,packageorbaeryalongwithordinary
household waste. Disposing in the correct manner will
prevent harm to human health and potential damage
to the environment. Since the correct method of dis-
posal will depend on the applicable laws and regula-
tions in your locality, please contact your local admin-
istrativebodyfordetails.Ifthebaerycontainsheavy
metals in excess of the regulated amount, a chemical
symbol is displayed below the “crossed-out wheeled
bin”symbolonthebaeryorbaerypackage.
IMPORTANT NOTICE TO CONSUMERS
This product has been manufactured according to strict
specifications and voltage requirements that are ap-
plicable in the country in which it is intended that this
product should be used. If you have purchased this
product via the internet, through mail order, and/or via
a telephone sale, you must verify that this product is
intended to be used in the country in which you reside.
WARNING: Use of this product in any country other
than that for which it is intended could be dangerous
and could invalidate the manufacturer’s or distributor’s
warra nt y.
Please also retain your receipt as proof of purchase
otherwiseyourproductmaybedisqualiedfromthe
manufacturer’s or distributor’s warranty.

2
Table of Contents
Introduction------------------------------------------------------------ 2
Main features ---------------------------------------------------- 2
Parts and their functions ------------------------------------- 3
Preparation and demo performances------------------ 4
Before you begin playing ------------------------------------- 4
Listening to demo performances --------------------------- 5
Playing the PRK-300---------------------------------------------- 6
Playing a single sound (Single mode)--------------------- 6
Playing two sounds at the same time
(Layer mode) ---------------------------------------------------- 6
Performing with another person
(Partner mode) -------------------------------------------------- 7
Using pedals ----------------------------------------------------- 7
Eects ------------------------------------------------------------- 7
The metronome ------------------------------------------------- 8
Other functions------------------------------------------------------ 9
Touch settings --------------------------------------------------- 9
Transpose -------------------------------------------------------- 9
Function mode -------------------------------------------------- 9
MIDI----------------------------------------------------------------------- 12
What is MIDI? ------------------------------------------------- 12
What can you do with MIDI? ----------------------------- 12
Connections --------------------------------------------------- 12
MIDI function mode ------------------------------------------ 12
Appendix -------------------------------------------------------------- 14
Troubleshooting - --------------------------------------------- 14
Specications-------------------------------------------------- 14
Assembling instruction -------------------------------------- 15
Attention ------------------------------------------------------- 15
Other notice---------------------------------------------------- 15
Assembly instruction ---------------------------------------- 15
After checking the installation----------------------------- 16
MIDI implementation chart---------------------------------- 17
Introduction
Main features
Thirty high-quality sounds
The PRK-300 provides 30 built-in expressive high-quality
sounds, including a stereo concert grand piano. You can use
Layer mode to simultaneously play two sounds at once, or
you can use Partner mode, which allows two players to play
the same range, one on each half of the keyboard.
Eects
The PRK-300 provides 3 built-in digital effects. These effects
can adjust the brightness of the tone (Brilliance), simulate the
natural ambience of a concert hall (Reverb) and add richness
to the sound (Chorus).
Pedal eects
As on an acoustic piano, the PRK-300 has three pedals that
control the damper, sostenuto and soft effects. The damper
pedal and soft pedal will respond to half-pedaling, allowing
you to vary the depth of the effect by how far you’re pressing
the pedal. When pressing the damper pedal, you can also
add the damper resonance to the classic piano and the grand
piano tone (bank 1 and 2 of Piano 1).
Metronome
The built-in metronome allows you to select the time
signature,tempo, and volume, and you can even choose a bell
sound as the accent.
Touch control
You can choose from three different settings to adjust how the
sound will respond to your keyboard playing dynamics.
Temperaments
For authentic performance of a wide range of music, the
PRK-300 allows you to select from nine temperaments,
including the equal temperament, pure temperaments
(major and minor), classical temperaments (Kirnberger and
Werckmeister) as well as temperaments used with Middle
Eastern and Indian folk music. When an acoustic piano
sound is selected, the stretched tuning used on pianos is
automatically selected.
Adjustable pitch
The Transpose function lets you change the pitch of the piano,
and the Pitch Control function allows you to make finely
tuned adjustments.
Two headphone jacks
Two headphone jacks are provided, allowing two people to
listen simultaneously.
LINE OUT jack
An amplified speaker or recording equipment can be
connected by using the LINE OUT jack.
MIDI capabilities
The PRK-300 supports the MIDI protocol, the standard
that allows music data to be transferred between musical
instruments and computers. MIDI allows two or more devices
to control or be controlled by each other, and also allows you
to use the PRK-300 as a 16-part multitimbral tone generator.

OUTMIDIIN--
LINEOUT
DC 19VSPEAKERPEDAL
oco

OUTMIDIIN--
LINEOUT
SPEAKERPEDAL
OUTMIDIIN--
LINEOUT
SPEAKERPEDAL
DC 19V
oco
DC 19V
oco

1,3
1,3 1

6
order 1, 2, 3, 1, ..., and the corresponding LED to the right
of the BANK button will light up.
For example, to select the electric grand piano sound,press
the PIANO2 button,after which its button lights up.
Then,press the BANK button twice to select bank 3
(electric grand piano); the LED below and to the right of
the BANK button will light up.
In addition, the bank selected for a sound button re-
mains the same, even if a different sound button is
pressed.
Each time the PRK-300 is turned on, the sound in bank 1
is selected for all sound button.
Playing two sounds at the same time(Layer mode)
You can play two sounds at the same time on the key-board.
This is called the Layer mode.
Simultaneously press the two sound buttons for the sounds to
be played at the same time.
The two selected sound buttons will light up.
The leftmost or uppermost selected sound button is layer 1,
and the other (rightmost or lowermost) one is layer 2 (see
the diagram at the below).
For example, if E.PIANO1 and ORGAN1 are selected,
E.PIANO1 is layer 1 and ORGAN1 is layer 2. In order to
use sounds in different banks, first select the banks in the
Single mode for the sound buttons to be pressed.
For example, to play by layering the grand piano and
jazz organ 2 sounds, select bank 1 (grand piano) for the
PIANO1 button and bank 2 (jazz organ 2) for the ORGAN1
button, and then press both buttons simultaneously.
When selecting Layer mode, the total number of voices
that can play at the same time is reduced, depending on the
total number of oscillators used by the selected sounds. (refer
to “About maximum polyphony” on page 14.)
Sounds in different banks for the same sound button (
grand piano and jazz piano for the PIANO1 button) cannot be
selected.
Returning to the Single mode
To return to Single mode, just press a single sound selection
button.
Layer mode settings
In Layer mode, the volume balance between sounds can be
adjusted, the octave for each sound can be shifted, and the
damper pedal can be enabled or disabled for each sound. (refer
to “Function mode” on page 9)
2
1
1
2
2
1
Layer2
Layer1
Playing a single sound (Single mode)
You can select a sound from the thirty sounds supplied with
the instrument (10 sounds x 3 banks).
Sound button Bank Sound name #
PIANO 1 1Classic Piano 3
2Grand Piano 3
3Jazz Piano 2
PIANO 2 1Live Piano 2
2Honky-Tonk 2
3Elec.Grand 1
E .PI A N O 1 1St a g e E .pi a n o 1
2Bright E.Piano 2
3Tremolo EP 3
E .PI A N O 2 1D ig .E .P ia n o1 2
26 0 's E .P i a n o 1
3Dig.E.Piano2 2
HAR PSI/CLAV. 1Harpsichord 2
2Clav 1
3Synth Clav 2
VIBES/GUITAR 1Vibraphone 1
2Marimba 1
3 Acoustic Guitar 2
ORGAN 1 1Jazz Organ1 2
2Jazz Organ2 2
3Jazz Organ3 2
ORGAN 2 1Pipe Organ1 2
2Pipe Organ2 2
3Positive Organ 2
STRINGS 1Strings 2
2Cinema Strings 2
3 Analog Strings 2
CHOIR 1Aah Choir 2
2Ooh Voices 2
3Classical Choir 3
(#) These columns show the number of oscillators per voice
that are used by each sound. (refer to “About maximum
polyphony” on page 14.)
1. Press the sound button for the sound that you want to
play.
The selected button will light up.
2. Press the BANK button to select one of the three
sounds.sounds.
Each press of the BANK button switches the bank in the
Playing the PRK-300

7
Eects
Brilliance
This effect changes the brightness of the tone.
The setting can be changed by holding down the BRIL-
LIANCE button and pressing the UP or DOWN button
beside the display.
The setting appears in the display with 3 producing a brighter
sound and 1 producing a less bright sound.
The same setting is applied to all sounds and remains applied
until the PRK-300 is turned off. When the instrument is
turned on, the default setting 2 is selected.
Brilliance cannot be turned off.
Reverb
This effect adds ambience and depth to the sound, producing
the sense of performing in a concert hall. As a factory default,
the on/off setting for this effect as well as this effect’s setting
are saved with each sound.
Each press of the REVERB button turns th e reverb on (b
utton lights up) or o( button turns o)
To change this setting, hold down the REVERB button
and press the UP or DOWN button beside the display.
The setting appears in the display with 3 producing a deep
reverb effect and 1 producing a light reverb effect.
If a different sound is selected or if the PRK-300 is turned off, the
on/off setting for this effect as well as this effect’s setting return to
their factory defaults (default settings).
Chorus
Chorus adds modulation to the sound, producing an ex-
pansively rich sound. As a factory default, the on/off setting
for this effect as well as this effect’s setting are saved
with each sound.
Each press of th e CHORUS butt on turns th e Chorus
eect o n ( button lights up) or o ( button turns o).
To change this setting, hold down the CHORUS button
and press the UP or DOWN button beside the display.
The setting appears in the display with 3 producing a deep
chorus effect and 1 producing a light chorus effect.
If a different sound is selected or if the PRK-300 is turned off,
the on/off setting for this effect as well as this effect’s setting
return to their factory defaults (default settings).
Performing with another person (Partner mode)
Two people can play in the same range with the keyboard
divided in half between them. This is called the Partner mode.
1. Press the FUNCTION button.
The FUNCTION and PIANO1 buttons will light up.
2. Press the E .PIANO1 button.
The E.PIANO1 sound button lights up, and oFF appears in
the display.
3. Press the UP button beside the display to select on.
Partner mode is turned on, and the PIANO1 sound is used
for both the left and right sides of the keyboard.
While the Partner mode is ON, a dot in the lower right
of the display appears.
The right side of the keyboard, from E4 to C8, produces
sounds in a range two octaves lower (E2–C6).
The left side of the keyboard, from A0 to Eb4, produces
sounds in a range two octaves higher (A2–Eb6).
4. To exit Partner mode, press the DOWN button beside
the display to select oFF.
5. Press the FUNCTION button.
The FUNCTION button turns off.
In Partner mode, the sound for the left and right sides can be
changed, and the volume can be adjusted. For details, refer to
“Partner mode settings” on page 10.
Using pedals
The PRK-300 has three pedals; damper, sostenuto, and soft.
You can use the pedals to make your playing more expressive
and realistic.
Soft pedal(left)
Pressing this pedal will make the tone softer. You can control
the softness of the tone depending on how far down you press
the pedal (“half-pedaling”).
Select pedal(center)
Pressingthispedalwillapplythedampereectonlytothe
notes that are already being held down on the keyboard. Only
thesenoteswillbetsustained.Thedampereectwillnotbe
applied to any additional notes that you play while holding
down the Select pedal.
Sustain pedal(right)
Pressing this pedal will sustain the sound, producing a richly
resonant decay. In addition, you can change the applied
conditions of the damper according to the depth that the tone
pedal of piano 1 and 2 is pressed. (“half-pedaling”).
In Layer mode, you can select the sound(s) where you
want to apply the pedal. (refer to “Specifying layer
pedals” on page 11)
In Partner mode (see page 10), the damper effect can be
applied independently by both players.
Ꮊ䖍ⓨ༣㗙Փ⫼
$㟇(
ⱘ䷇催DŽ
ে䖍ⓨ༣㗙Փ⫼
(㟇&ⱘ䷇催DŽ
E
4
A0 E4
C8
2
1,5 3
4
ড়ᓣ
3
4
1,5 2
Partner mode
Pitches A2 to Eb6 for the
player on the left side Pitches E2 to C6 for the
player on the right side

8
Touch settings
The keyboard sensitivity, or touch, can be programmed.
To change the setting, hold down the TOUCH button and
press the UP or DOWN button beside the display.
Display
Touch sensitivity
1 Light. Loud notes can be produced even by
playing lightly.
2Normal. Normal piano touch.
3 Heavy. Loud notes can be produced only by
playing very hard.
When the instrument is turned on, the touch setting is
reset to Normal.
The settings are applied to all sounds.
Transpose
In some cases, a song may be written in a difficult key (e.g.,
many black keys), or you may wish to shift the pitch to
match another instrument or vocalist. In such cases, you
can transpose (shift the pitch) so that you can use an easier
fingering, or use the same familiar fingering to play at a
different pitch. This is called the Transpose function.
For example if you transpose upward by one semitone,
playing the notes shown at the lower left will produce the
pitches shown at the right.
When the instrument is turned on, the transposing is
reset.
While holding down the TRANSPOSE button, press the
keyboard key (F#6–F7) for the desired transposition.
If a keyboard key other than C7 is pressed, the TRANS-POSE
button lights up to indicate that the keyboard is transposed.
The pitch of the entire keyboard is transposed according
to the pitch of the pressed keyboard key in relation to C7.
To return to the original pitches, hold down the TRANSPOSE
button and press the C7 key. The TRANSPOSE button turns
off, and transposition is canceled.
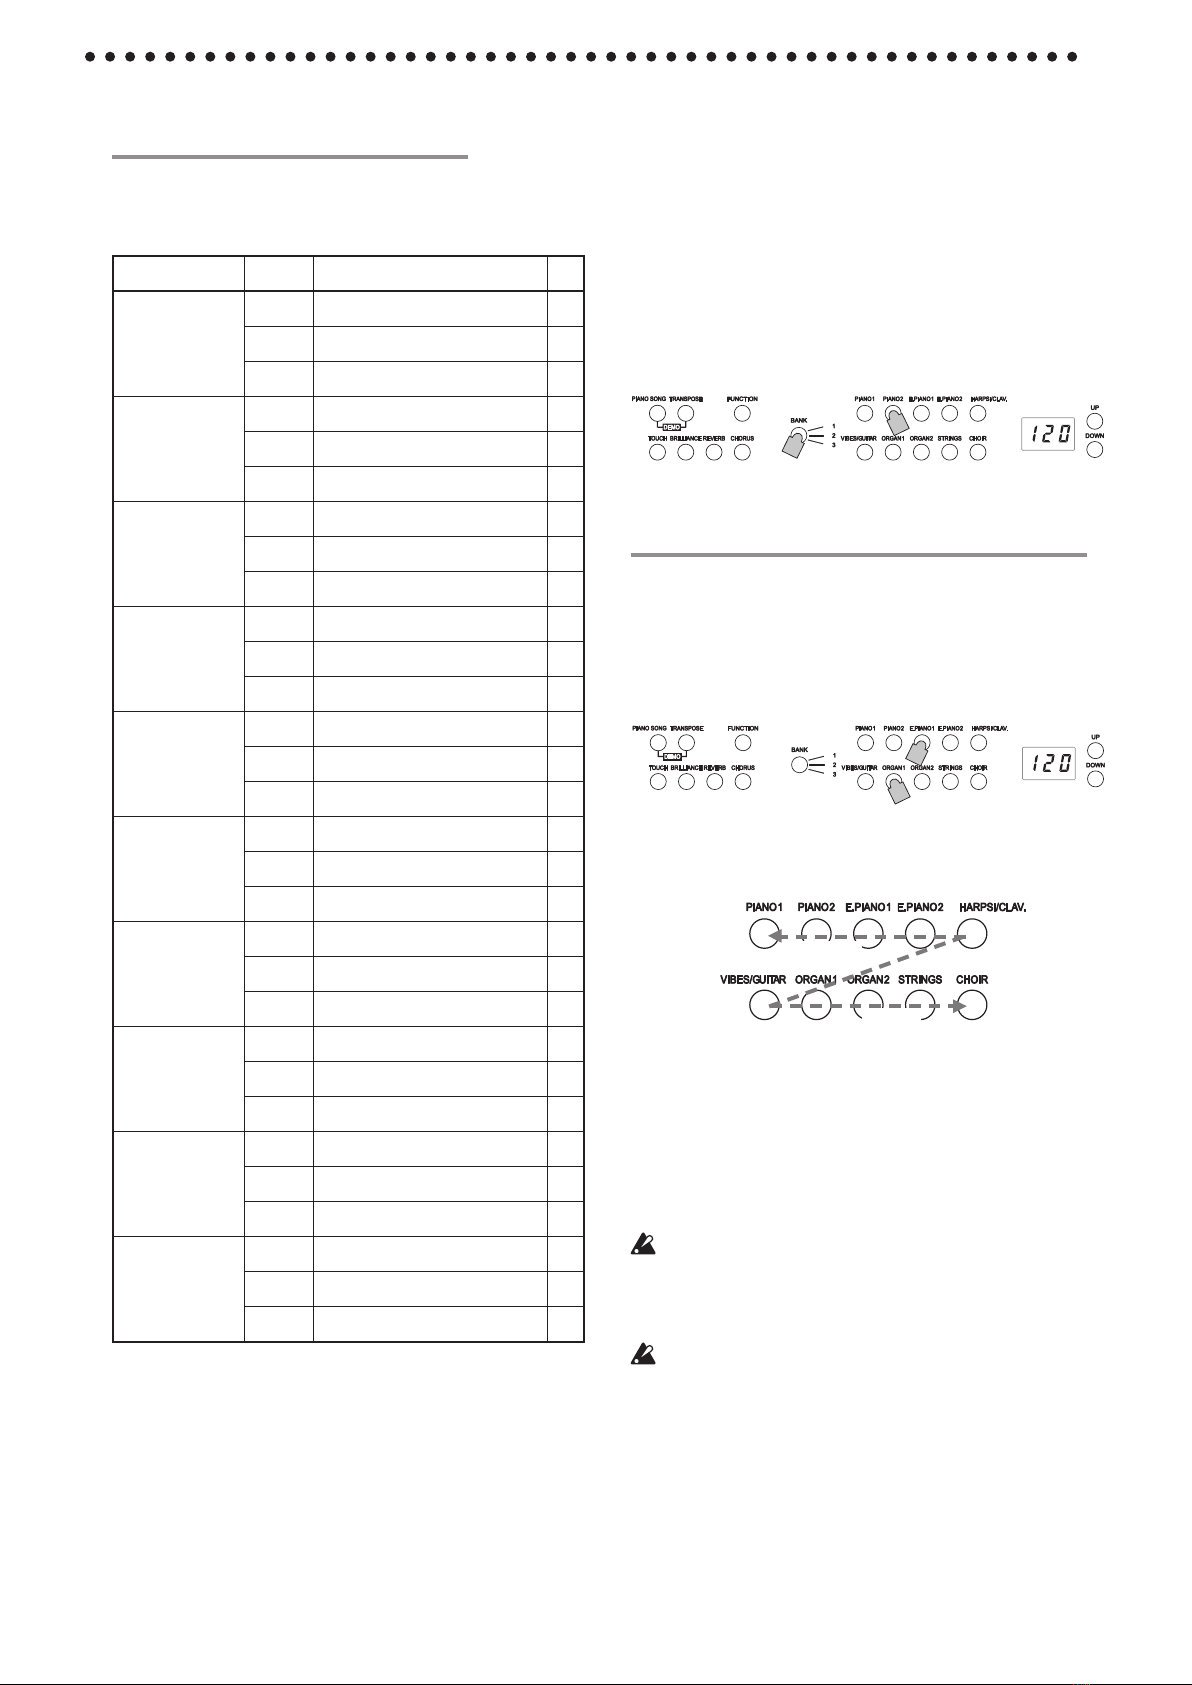
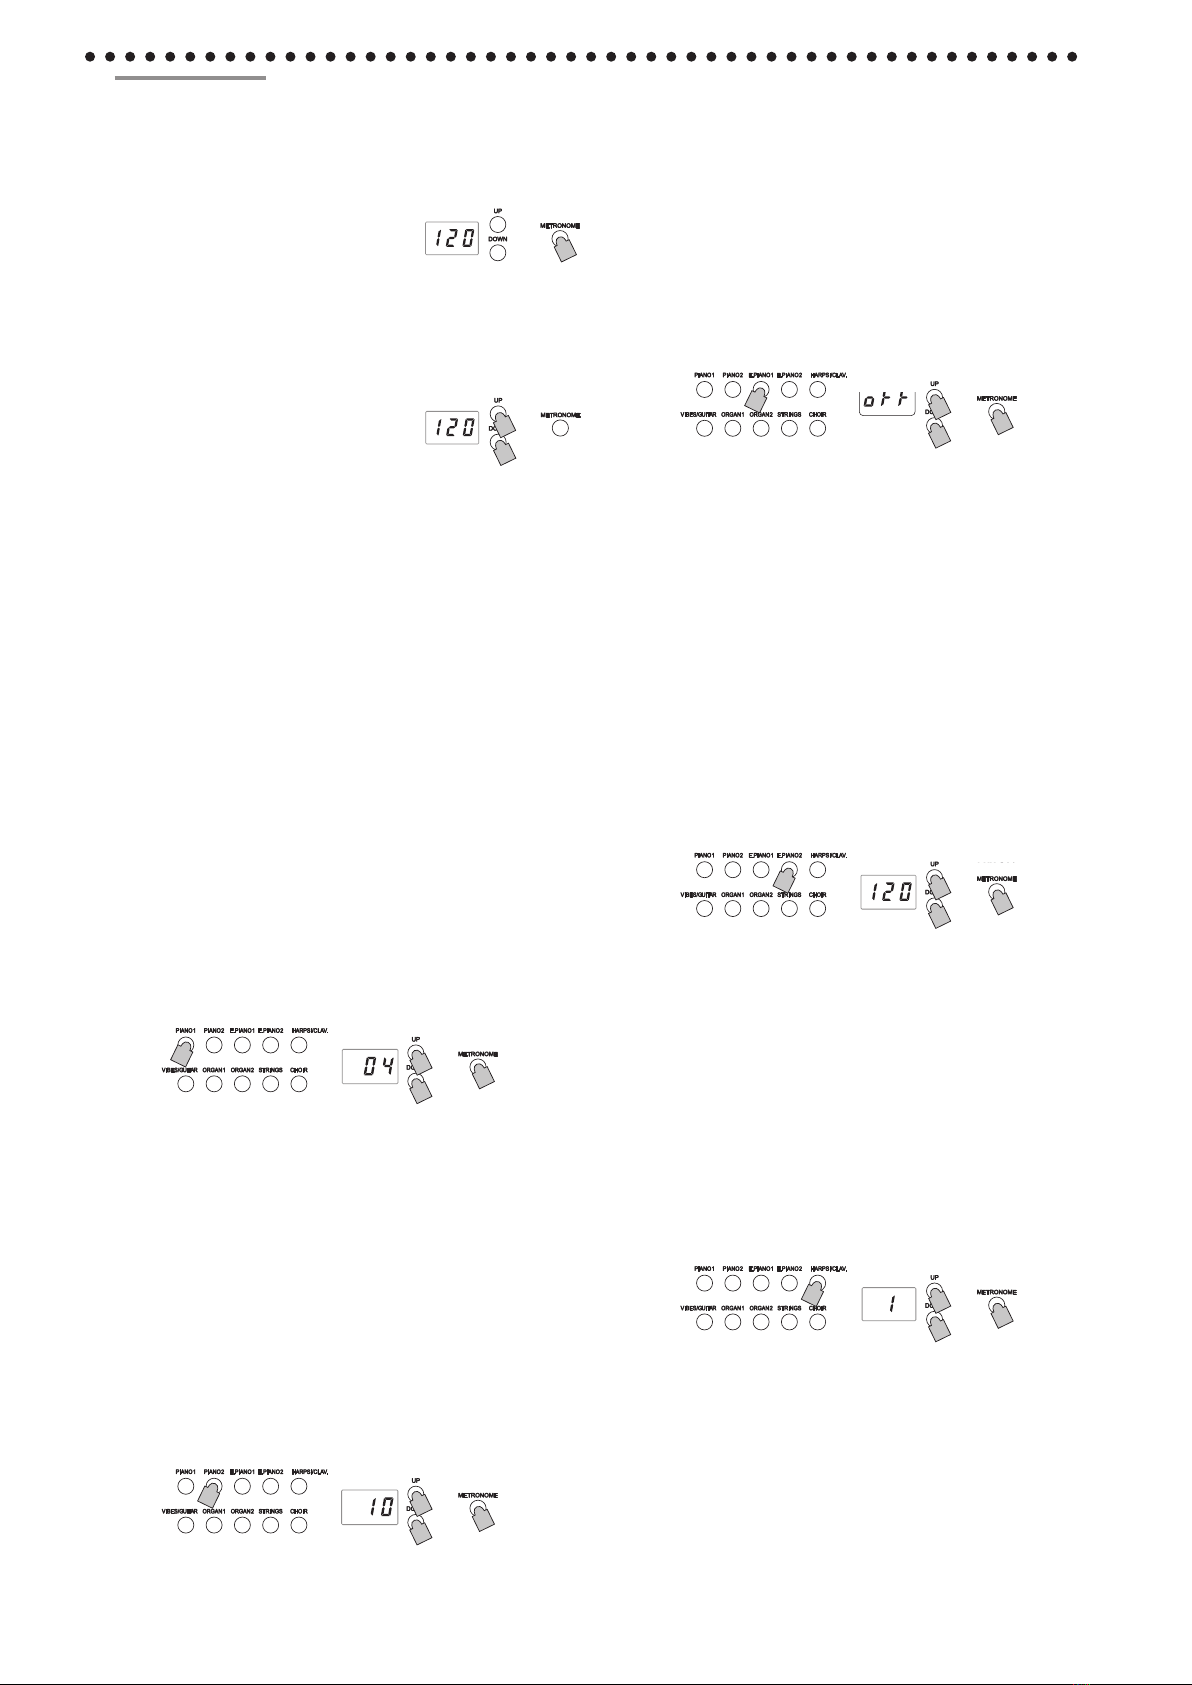
Selecting a bell for the accent
1. Hold down the METRONOME button until the Met-
ronome settings mode is entered.
2. Press the E.PIANO1 button,and the accent sound
setting will appear in the display.
3. Select the setting with the UP or DOWN button
beside the display.
The setting range consists of oFF (no accent sound), on1
(emphasized sound for the accent beat) and on2 (bell
sound for the accent beat); the default setting is oFF.
4. Press the METRONOME button to exit the Metronome
settings mode.
Specifying the tempo (Metronome settings
mode)
1. Hold down the METRONOME button until the Met-
ronome settings mode is entered.
2. Press the E.PIANO2 button, and the tempo will appear
in the display.
3. Specify the setting with the UP or DOWN button that’s
located beside the display.
The setting range is q = 40–240; the default setting is 120.
To return to the default settiing, simultaneously press the
UP and DOWN buttons.
4. Press the METRONOME button to exit the Metro-
nome settings mode.
Selecting the Metronome Sound
1. Hold down the METRONOME button until the Met-
ronome settings mode is entered.
2. Press the HARPSI/CLAV button,and the metronome
sound setting will appear in the display.
3. Specify the setting with the UP or DOWN button that’s
located beside the display.
The setting range consists of 1 (acoustic) and 2 (electronic
sound); the default setting is 1.
4. Press the METRONOME button to exit the Metro-
nome settings mode.
The metronome
The PRK-300 is equipped with a metronome, which can be
changed to a bell sound, which is convenient for practicing.
Turning on/o the metronome
Press the METRONOME button. The
button lights up, and the metronome
starts.
To stop the metronome, press the METRONOME button
again. The button turns off.
Specifying the tempo
When the tempo appears in the display
(default setting of 120), regardless of
whether the metronome is turned
on or off, the tempo can be specified
with the UP and DOWN buttons beside the display.
The setting range is q = 40–240.
To return to the default setting, simultaneously press the
UP and DOWN buttons.
Selecting the time signature
1. Hold down the METRONOME button until the Met-
ronome settings mode is entered.
The METRONOME button blinks, the PIANO1 sound
button lights up, and the time signature (04) appears in
the display.
When the Metronome settings mode is entered, the
time signature setting normally appears.
2. To select the time signature after changing other
settings in the Metronome settings mode, press the
PIANO1 button.
3. Select the setting with the UP or DOWN button beside
the display.
The setting range consists of 02 (2/4), 03 (3/4), 04 (4/4)
and 06 (6/4); the default setting is 04.
To return to the default setting, simultaneously press
the UP and DOWN buttons.
4. Press the METRONOME button to exit the Metro-
nome settings mode.
Adjusting the metronome volume
1. Hold down the METRONOME button until the
Metronome settings mode is entered.
2. Press the PIANO2 button, and the volume will appear
in the display.
3. Specify the setting with the UP or DOWN button that’s
located beside the display.
The setting range is 1–13; the default setting is 10.
To return to the default setting, simultaneously press
the UP and DOWN buttons.
4. Press the METRONOME button to exit the Metro-
nome settings mode.
3
2
3
1,4
2
1,4
3
3
3
2
3
1,4
3
2
3
1,4
3
2
3
1,4
2
1,4
3
3
3
2
3
1,4
PRK-300
PRK-300
PRK-300
PRK-300
PRK-300
PRK-300
PRK-300

9
key Effect
F#6–B 6 6– 1 semitones below
C7 Standard pitch
C#7–F 7 1– 5 semitones higher
Function mode
The temperament as well as other pitch settings can be
specified from the Function mode.
Setting procedure for functions in the Function mode.
1. Press the FUNCTION button.
The FUNCTION and PIANO1 buttons light up.
2. Press the sound button corresponding to the
desired
The current setting appears in the display.
3. Specify the desired setting.
4. After specifying the desired settings, press the
FUNCTION button to return to the mode for playing.
The FUNCTION button turns off.
When the PRK-300 is turned off, all functions, except the
auto power off function, return to their default settings.
The settings are applied to all sounds.
Fine tuning
In order to adapt the PRK-300 pitch to that of another
instrument, you can adjust the pitch in steps of 0.5 Hz over a
range of A4 = 427.5–452.5 Hz .
27.5–52.5 appears in the display.
The standard pitch is A = 440 Hz, and the default setting is
40.0.
1. When you enter the Function mode, the PIANO1
sound button lights up.
When the Function mode is entered, the pitch setting
normally appears.
2. To specify the pitch after changing other settings in
the Function mode, press theP IANO1 button.
3. Specify the setting with the UP or DOWN button
beside the display.
Simultaneously press the UP and DOWN buttons to
return to 440 Hz.
Touch settings
The keyboard sensitivity, or touch, can be programmed.
To change the setting, hold down the TOUCH button and
press the UP or DOWN button beside the display.
Display
Touch sensitivity
1 Light. Loud notes can be produced even by
playing lightly.
2Normal. Normal piano touch.
3 Heavy. Loud notes can be produced only by
playing very hard.
When the instrument is turned on, the touch setting is
reset to Normal.
The settings are applied to all sounds.
Transpose
In some cases, a song may be written in a difficult key (e.g.,
many black keys), or you may wish to shift the pitch to
match another instrument or vocalist. In such cases, you
can transpose (shift the pitch) so that you can use an easier
fingering, or use the same familiar fingering to play at a
different pitch. This is called the Transpose function.
For example if you transpose upward by one semitone,
playing the notes shown at the lower left will produce the
pitches shown at the right.
When the instrument is turned on, the transposing is
reset.
While holding down the TRANSPOSE button, press the
keyboard key (F#6–F7) for the desired transposition.
If a keyboard key other than C7 is pressed, the TRANS-POSE
button lights up to indicate that the keyboard is transposed.
The pitch of the entire keyboard is transposed according
to the pitch of the pressed keyboard key in relation to C7.
To return to the original pitches, hold down the TRANSPOSE
button and press the C7 key. The TRANSPOSE button turns
off, and transposition is canceled.
䴭
䴭
ડ
᪁ᬒᔎᑺ
ડ
ડᑺ
䕏ᑺ
᱂䗮
䞡ᑺ
䴭䴭
ડ
᪁ᬒᔎᑺ ડ
ડᑺ
䕏ᑺ
᱂䗮
䞡ᑺ
1212/
/12
3
3
1,4
2
1,4
2
3
3
C4 C7
F 6
F7
C4 C7
F 6
F7
3
3
1,4
2
13
3
2
Other functions
Light
Normal
Heavy
Loud
Quiet
Quiet Playing
strength Loud
Loudness

10
Simultaneously, a dot on the lower right of the display
appears (Partner mode indication).
The right side of the keyboard, from E4 to C8, produces
sounds in a range two octaves lower (E2–C6). The left side of
the keyboard, from A0 to Eb4, produces sounds in a range
two octaves higher (A2–Eb6)
The division for the left and right sides of the keyboard
as well as the range (pitches) cannot be changed.
In the Partner mode, the transposition settings are
ignored. In addition, keyboard information (Note On and
Note Off) is not sent with MIDI.
Selecting the sound for the left side
Exit the Function mode, and then press the sound button
for the sound to be used with the left side of the keyboard.
The right side of the keyboard remains set to the PIANO1
sound.
Selecting sounds for the left and right sides
Exit the Function mode, and then simultaneously press the two
sound buttons for the sounds to be used.
The two selected sound buttons light up.
The leftmost or uppermost selected sound button is for
the left side of the keyboard, and the other (rightmost or
lowermost) one is for the right side of the keyboard.
For example, if E.PIANO1 and ORGAN1 are selected,
E.PIANO1 is for the left side of the keyboard and ORGAN1
for the right side of the keyboard.
In order to use sounds in different banks, first select the
banks in the Single mode for the sound buttons to be
pressed.
If the Partner mode is turned off and the Function mode is
exited with the left and right sides of the keyboard set to
different sounds, the sounds whose buttons are lit will be
selected.
Using the same sound (other than PIANO1)for both the
the left and right sides
Exit the Function mode, and then simultaneously press
two sound buttons, making sure that the rightmost
one is for the sound to be used. Then, press the right-
most selected sound button again. For example, after
pressing the PIANO2 and ORGAN1 buttons, press the
ORGAN1 button again to use the ORGAN1 sound with
both the left and right sides of the keyboard.
Changing the volume for the left and right sides
If the sounds for the left and right sides of the keyboard have
been changed, the volume can be specified for each sound. refer
to “Specifying the volume balance for layers” on page 11.
Using dampers
The damper pedal and the soft pedal can be used as
separate damper pedals for the right and left sides of the
keyboard respectively.
Selecting a temperament
You can select from nine temperaments, including the
equal temperament, pure temperaments (major and mi-
nor), classical temperaments (Kirnberger and Werckmeister)
as well as temperaments used with Middle Eastern and
Indian folk music.
Display Te mperament
00 Equal temperament (default setting):
Spacing all semitones at equal pitch
intervals,this temperament is the most
widely used.
01 Pure temperament [major]:Major chords in
the selected key are perfectly tuned.
02 Pure temperament [minor]: Minor chords in
the selected key are perfectly tuned.
03 Arabic: This scale includes the quarter
-tone intervals used in Arabic music.
04 Pythagorean:This ancient Greek scale is
especially effective for playing melodies.
It consists of perfect fifths; however,
other intervals – the major third in
particular – is out of tune.
05 Werckmeister:The Werckmeister III scale was
created in the later Baroque period to
allow relatively free transposition.
06 Kirnberger:The Kirnberger III scale is used
mainly for tuning harpsichords.
07 Slendro scale:This is an Indonesian gamelan
scale with five notes per octave.
08 Pelog scale:This is an Indonesian gamelan
scale with seven notes per octave.
1. Enter the Function mode, and then press the PIANO2
button.
The PIANO2 sound button lights up, and the tempera-
ment setting (00) appears in the display.
2. Select the setting with the UP or DOWN button be-
side the display.
About stretched tuning
In order to produce the most natural resonance, PIANO1 and
PIANO2 sounds use a “stretched tuning” that makes the notes
of the lower range slightly flatter than equal temperament,
and the upper range slightly sharper. This is how an acoustic
piano is normally tuned by professional tuners.
Partner mode settings
1. Enter the Function mode, and then press the E.
PIANO1 button.
The E.PIANO1 sound button lights up, and the on/off
setting appears in the display.
2. Each press of the UP or DOWN button beside the di
s-play turns the mode on (on)or o(oFF).
When the Partner mode is turned on, the PIANO1 sound is
used for both the left and right sides of the keyboard, and the
PIANO1 button lights up.
2
2
1
12
2
2
2
1
12
2
Sound for right
side of keyboard
Sound for left side of keyboard

11
Specifying layer pedals
In the Layer mode, a damper setting can be specified for each
sound.
The settings are only for the layer 1 sound (o – –), only for the
layer 2 sound (– – o) and for both sounds (o – o).
The default setting is o – o.
1. Enter the Function mode, and then press the VIBES/
GUITAR button.
The VIBES/GUITAR sound button lights up, and the
damper setting (o – o) appears in the display.
2. Select the damper setting with the UP or DOWN but-
ton besidet he display.
If the sound is in the Single mode, – – – appears in the
display, and a setting cannot be specified.
Specifying the auto power o function
wWhen 30 minutes have passed without a key pressed on
the keyboard or without an automatic performance played,the
instrument is automatically turned off. To disable this
function, turn off (oFF) this function. The default setting is
this function turned on. If this setting is changed, the new
setting is saved and remains selected, even if the PRK-300 is
turned off.
1. Enter the Function mode, and then press the ORGAN1
button.
The ORGAN1 sound button lights up, and the setting (on)
appears in the display.
2. Select the on/o setting with th e UP or DOWN but-
ton beside the display.
Specifying the volume balance for layers
The volume balance for sounds in the Layer mode (or the
Partner mode) can be adjusted. The setting range is 1 – 9... 9 –
9...9 – 1, with the number on the left for layer 1 (or the left side
of the keyboard) and the number on the right for layer 2 (or
the right side of the keyboard).
The default setting is 9 – 9.
1. Enter the Function mode,and then press the E.
PIANO2 button.
The E.PIANO2 sound button lights up, and the balance
setting (9 – 9) appears in the display.
2. Specify the volume balance setting with the UP or
DOWN buttonbeside the display.
To return to the default setting, simultaneously press the
UP and DOWN buttons.
If the sound is in the Single mode, – – – appears in the
display, and a setting cannot be specified.
Specifying layer octaves
In the Layer mode, the octave for each sound can be specified.
The setting range is ±1 octave for each sound, and –01, 00 and
01 appear in the display. The default setting is 00.
1. Enter the Function mode,and then press the HARPSI/
CLAV button.
The HARPSI/CLAV sound button lights up, and the layer
(L1) whose octave is to be specified appears in the display.
2. Select the layer with the UP or DOWN button beside
the display.
L1 appears for layer 1, and L2 appears for layer 2.
3. Press the BANK button.
The octave setting (00) appears in the display.
4. Select the octave setting with the UP or DOWN
button beside the display.
To return to the default setting, simultaneously press the
UP and DOWN buttons.
To select the octave for the other layer, press the HARPSI/
CLAV button to select the layer.
If the sound is in the Single mode, – – – appears in the
display, and a setting cannot be specified.
2
2
1
2
2
1
3
2,4
1
32,4
2,4
2,4
1
2
2
1
2
2
1
2
2
1
2
2
1

12
What is MIDI?
MIDI,is the abbreviation of Musical Instrument Digital
Interface. It is an international standard that was created
to connect and transfer data between electronic musical
instruments, computers and other devices.
What can you do with MIDI?
Thanks to MIDI, you can use the PRK-300 to control other
instruments, use other instruments to control the PRK-300,
and use a sequencer to create complex musical pieces.
When you use the PRK-300 keyboard or pedal, or select a
sound, the notes, pedal activation and change in sound are
transmitted to another instrument, or are recorded by a
sequencer.
Connections
Commercially available MIDI cables are used to transfer MIDI
data. Connect these cables from the MIDI connectors of the
PRK-300 to the MIDI connectors of the external MIDI device
that you want to exchange data with. There are two types of
MIDI connector.
MIDI IN connector
This connector receives MIDI messages.
The MIDI IN connector lets you play the PRK-300’s sounds
from an external MIDI device (e.g., MIDI keyboard or
sequencer). Use a MIDI cable to connect the PRK-300’s MIDI
IN connector to your external MIDI device’s MIDI OUT
connector.
MIDI OUT connector
This connector transmits MIDI messages.
The MIDI OUT connector lets you control an external MIDI
device using the MIDI messages transmitted from the PRK-
300. Use a MIDI cable to connect the PRK-300’s MIDI OUT
connector to your external MIDI device’s MIDI IN connector.
MIDI function mode
When the PRK-300 is turned on, the MIDI parameters are set
to transmission channel 1, all reception channels (1–16), Local
On and Omni Off.
These settings can be changed from the MIDI function mode.
Setting procedure for parameters in the MIDI
function mode
1. Hold down the FUNCTION button with the function
mode not established.
The PIANO 1 button lights up, and the MIDI channel
setting (C01) appears in the display. The FUNCTION
button is blinking.
2. Press the sound button corresponding to the desired
parameter.
The current setting appears in the display.
3. Specify the desired setting.
4. After specifying the desired settings, press the
FUNCTION button to return to the mode for playing.
The FUNCTION button turns off.
When the PRK-300 is turned off, all parameters return to
their default settings.
3
3
1,4
2
3
3
2
1,4
Changing the MIDI channels
Data can be transmitted and received on MIDI channels 1
through 16 (C01–C16).
When the PRK-300 is turned on, transmission channel 1 (C01)
is automatically selected.
•When you enter the MIDI function mode, the PIANO1
sound button lights up.
When the MIDI function mode is entered, the MIDI
channel setting normally appears.
To specify the MIDI channel setting after changing other
settings in the MIDI function mode, press the PIANO1
button.
In the Layer mode, selecting the transmission channel
specifies the channel for layer 1. The transmission channel for
layer 2 will automatically be set to the following channel. For
example, if MIDI channel 7 is selected for the sound of layer 1,
MIDI channel 8 will automatically be specified for the sound
of layer 2. If MIDI channel 16 is selected for the sound of layer
1, channel 1 will be specified for the sound of layer 2.
Local On/O
With the Local On setting, playing the PRK-300’s keyboard
produces the sounds of the performance as well as transmits
MIDI data. With the Local Off setting, playing the PRK-300’s
keyboard does not produce the sounds of the performance;
MIDI data is only transmitted. Normally this parameter is set
to Local On (default setting: on).
The Local Off setting should be selected when using the PRK-
300 as a master keyboard, for example, to play sounds from a
connected MIDI device (a keyboard, sound module, etc.). The
PRK-300 will not produce sound, but the performance will be
played by the connected MIDI device.
Select the Local Off setting (oFF) when using the PRK-300 as
a sound module, for example, when the PRK-300 is connected
to a sequencer with its Echo Back setting (function that sends
back data that the sequencer received) selected in order to
prevent echoing of returned data.
•Enter the MIDI function mode, and then press the
PIANO2 button.
The PIANO2 sound button lights up, and the Local On Off
setting (on) appears in the display.
Enabling/disabling program change transmis-
sion/reception ltering
The programs on a connected MIDI device can be changed
by sending a MIDI change number from the PRK-300. In
addition, the programs on the PRK-300 can be changed by
receiving a MIDI change number from a connected MIDI
device.
For program change numbers and their corresponding
sounds, refer to “Table of sounds and corresponding
program change numbers” below.
To transmit/receive program change messages, disable this
function (oFF: default setting). To not transmit/receive the
messages, enable this function (on).
•Enter the MIDI function mode,and then press the E.
PIANO1 button.
The E.PIANO1 sound button lights up, and the setting
(oFF) appears in the display.
MIDI

13
• Enter the MIDI function mode, and then press the
E.PIANO2 button.
The E.PIANO2 sound button lights up, and the setting (oFF)
appears in the display.
Using the PRK-300 as a multi-timbral sound
module
The PRK-300 can operate as a 16-part multi-timbral sound
module when an external MIDI device is used to control its
internal sound generator.
1. Connect a MIDI cable to the PRK-300’s MIDI IN
connector and to the MIDI OUT connector of ase
quencer or other MIDI device.
2. Transmit MIDI data from the connected sequencer or
other MIDI device.
For details on transmitting data from the connected
sequencer or other MIDI device, refer to its user’s manual.
3. When the PRK-300 receives the program change
message along with the performance data, it will pl
ay with the sound corresponding to that program
number.
If the PRK-300 is not to be used as a multi-timbral sound
module, disable this function (oFF).
• Enter the MIDI function mode,and then press the
HARPSI/CLAV button.
The HARPSI/CLAV sound button lights up, and the
setting (on: default setting) appears in the display.
Transmitting program changes
When a sound is selected using the sound buttons and BANK
button on the PRK-300, the corresponding MIDI program
change number is transmitted.
Receiving program changes
When the PRK-300 receives a MIDI program change number,
the sound is changed to the corresponding number.
If an incompatible program change number is received,
the PRK-300 sound is not changed.
Table of sounds and corresponding program change
numbers
CC0: Bank Select (MSB) for all sounds is set to 121.
Sound Button Bank
CC32 PC
Sound
PIANO1 1 1 0 Classic Piano
2 0 0 Grand Piano
3 0 1 Jazz Piano
PIANO2 1 2 0 Live Piano
2 0 3 Honky-Tonk
3 0 2 Elec.Grand
E.PIANO1 1 0 4 Club E.piano
2 1 4 Vi nt a g e E .Pi a n o
3 3 4 Tremoro EP
E .PI A N O 2 1 0 5 D ig .E .P ia n o1
2 2 4 6 0 's E .P i a n o
3 1 5 Dig.E.Piano2
HARPSI/CLAV 1 0 6 Harpsichord
2 0 7 Clav
3 1 7 Synth Clav
VIBES/
GUITAR
1 0 11 Vibraphone
2 0 12 Marimba
3 0 24 Acoustic Guitar
ORGAN1 1 0 16 Jazz Organ1
2 1 16 Jazz Organ2
3 0 17 Jazz Organ3
ORGAN2 1 0 19 Pipe Organ1
2 1 19 Pipe Organ2
3 2 19 Positive Orga n
STRINGS 1 0 48 Strings
2 0 50 Cinema Strings
3 1 50 Analog Strings
CHOIR 1 0 52 Aah Choir
2 1 52 Ooh Voices
3 2 52 Classical Choir
Enabling/disabling control change transmission/
reception ltering
Messages, such as usage of the PRK-300’s damper pedal, can
be transmitted to a connected external MIDI device to control
it, and these messages can be received from the external MIDI
device to control the PRK-300.
To transmit/receive control change messages, disable this
function (oFF: default setting). To not transmit/receive the
messages, enable this function (on).

14
Troubleshooting
If during use any of the following problems should occur
carefully examine the instrument to see if you can find out
what the problem is, and try resolving it by following the
suggestions below. If the instrument will still not function
properly refer to your dealer.
The instrument will not turn on
• Check that the AC adapter is correctly connected to the
piano and the outlet.
No sound
• Is the speaker cord of the speaker box on the stand con-
nected with the speaker connector on the PRK-300 cor-
rectly?
• Make sure that the volume is not set on MIN. If it is, bring
it up to an adequate level.
• Make sure that the MIDI Local function is not set on OFF.
If it is, set it to ON (or turn the instrument off and then on
again).
• Make sure there is not a jack plugged into one of the
Headphones jacks. This would turn the internal speakers
off. if so, unplug the jack.
Notes are interrupted
•
You have exceeded the maximum polyphony. see “About
maximum polyphony.”
The pitch or tone of the piano sounds wrong in some key
regions
• The PRK-300’s piano sounds replicate the sound of an
actual piano as faithfully as possible. This means that
in some regions of the keyboard, you may feel that the
overtones seem stronger, or that the tone or pitch seems
wrong. This is not a malfunction.
The connected MIDI device does not respond to trans-
mitted MIDI data
• Make sure that all MIDI cables are correctly connected.
Make sure that the PRK-300 is receiving MIDI data on the
same channel as the MIDI device
About maximum polyphony
If the number of notes being played simultaneously exceeds
the maximum polyphony, some notes will be lost since the
PRK-300 is equipped with a mechanism that stops the first
note being played to give priority to notes played with keys
pressed later. Some PRK-300 sounds, although they may be
a single sound, are generated by two or more oscillators (one
note of a sound-generating circuit). Sounds using just one
oscillator, such as those in banks 1 and 2 of VIBES/GUITAR,
have a maximum polyphony of 120 notes. Sounds using two
oscillators, such as those in banks 1 and 2 of PIANO2 and in
banks 1 and 3 of E.PIANO2, have a maximum polyphony of
60 notes.
120 ÷ Number of sound oscillators = Maximum polyphony
Keep the maximum polyphony in mind and carefully
choose sounds when using Layer mode to play two sounds
simultaneously or when using the damper pedal.
Appendix
Specications
Keyboard NH keyboard: 88 note (A0–C8)
Touch selection Light, Normal, Heavy
Pitch Transpose, Fine tuning
Temperament
9 kinds
Sound generation Stereo PCM System
Polyphony 120 notes (max)
Sounds 30 sounds (10 x 3 banks)
Eects Brilliance, Reverb, Chorus (3 levels each)
Demo 30 (Sound demo song x 10, Piano Songx 20)
Metronome Tempo, Time signature, Accent, sound
and Volume controls
Pedal Accoustic grand piano pedal features
Connections LINE OUT, MIDI (IN, OUT),
Headphones×2, PEDAL, SPEAKER
Controls Power, VOLUME, PIANO SONG,
TRANSPOSE, FUNCTION, TOUCH,
BRILLIANCE, REVERB, CHORUS, BANK,
Sound × 10, UP, DOWN,METRONOME
Amplication 22 W × 2
Sperkers (5inch8Ω)x2
Power supply DC 19 V, AC adapter (included)
Power consumption
15 W
Dimensions (W × D × H)
88-key version:
1402 × 954 × 405 mm (with the key cover opened)
1402 × 777 × 380 mm (with the key cover closed)
Weight 88-key version 37 kg
Accessories AC adapter, Guarantee card, Certificate of
qualification, User manual
* Specifications and appearance are subject to change
without notice for improvement.

15
Notice
● The assembly requires at least 2 persons.
Attention
Pleasepayaentiontothefollowingpointsinordertoassem-
ble correctly.
• Make sure the direction of parts and follow instructions be-
low.
Other notice
Pay attention to the following points after the assembly of
stand.
• Loose screws
After a long period of playing, some of t
he screws may get
loose. We suggest to check them periodically. If the stand
waggles, it might be caused by the loose of screws. In such
case, please tighten up the screws.
• Transport
To transport an assembled stand may cause unpredictable
damages.
Please disassemble the PRK-300 stand before transporting.
After transporting, please reassemble the stand by follow-
ing the assemble instruction.
• Disassemble
Please reverse the steps of assembly to unload the piano.
After disassembly, please keep the screws and parts in
right place in case of missing.
Assembly instruction
Allen wrench (packed in carton) and screw driver are needed.
Anti Dumping Bracket (optional)
Anti dumping bracket to prevent the piano from dumping
caused by external force. User shall decide whether to install
according to their need. The installation of the bracket or not
doesnotaecttheoverallstructureofthepianoandlocation.
Install the anti dumping bracket on the side board with 3 pcs
of 3.5*16 cross countersunk head screw.
1. Place the protect mat which protects the PRK-300 body
on the oor, and put the body, speakers box and pedal
bar of PRK-300 on the mat with the front bar facing up.
Make sure not to open the key cover before the
assembly is finished (the key cover is sealed by
tapes, do not remover the tapes until the assembly is
completed)
2. Make sure the parts below are easy to reach.
&URVVFRXQWHUVXQNKHDGVFUHZ
$QWLGXPSLQJ
EUDFNHW
6LGHERDUG
3URWHFWPDW
6SHDNHUV
ER[
%RG\
3HGDOEDU
/HIWVLGH 5LJKWVLGH
6FUHZ03FVδ:KLWH φ3FV%ODFN φ
3FVε
6FUHZ03FV
6FUHZFRYHU3FV
&URVVFRXQWHUVXQNKHDGVFUHZ3FV
Assembling instruction

16
3. Install the body (white 4*M6*50) , speakers box and
pedal bar (black 8*M6*50)on the lest and right side
with 12 pcs of crew (M6).
Fasten the screws temporarily on the right side first, then
fasten the screws temporarily on the left side.
1.
2.
3.
4. Lift up the stand carefully with two people.
5. After lifting up, fasten the screws in step 3 above until
they are xed.
When fastening the screws of body, make sure to adjust
the side boards in order to reach balance.
6. Make sure there is no gap on the stand, and no in-
cline with all screws xed.
7. Fix the body on the sides beneath the body with 2
pcs of screw (M4*8), and install the screw covers on
screws on the sides.
8. Connect the speakers cable to the connector
behind the body of PRK-300. (see picture)
Pay attention to the right direction of cable. The cable can
be plugged or removed by using the jack lock.
9. Connect the pedal cable to the connec-
tor behind the body of PRK-300 (see picture)
Payaentiontotherightdirectionofcable.Thecablecan
be plugged or removed by using the jack lock.
10. Use the cable bayonet to fasten the pedal cable.
Make sure the cable is not pressed with too much
pressure by the bayonet.
11. Connect the power adapter to suitable cable. Con-
nect the DC 12V connector to the power adapter,
and settle the cable along the cable hook of piano.
12. Put the PRK-300 to an appropriate position.Please
make sure the oor of location is even and stable.
13. Cables behind the back (for reference).
14.
15.
16.
After checking the installation
• If there is any part missing?
In case of any part is missing, please double check the
assembly procedure carefully and the position of each part.
• Make sure every screw is fastened.
Check whether the adjustable screw beneath the pedal
bar is against the floor, or the pedal bar would be
easily damaged.
:KLWHVFUHZ
0
%ODFNVFUHZ
0
%
Z
/HIWVLGH
:KLWHVFUHZ
0
%ODFNVFUHZ
0
%ODFNVFUHZ
0
5LJKWVLGH
3HGDOFDEOH6SHDNHUVFDEOH
&RQQHFWRU
&RQQHFWRU
3HGDO
FDEOH
6SHDNHUV
FDEOH
3RZHUFDEOH
&DEOHFODPS
3RZHUFDEOHȽ3HGDOFDEOH
Pedal
Adjustable screw Floor
6FUHZ
FRYHU
6FUHZ
0
6FUHZ
0
6FUHZ
FRYHU
To fasten the screws temporarily meas remaining
at least 2 mm from fixing.
Be careful not to clip to the fingers.
When assembling the piano, make sure the stand
is not pressing the adapter cable or pedal cable.

17
MIDI implementation chart
Function... Transmitted Received Remarkst
Basic Channel Default
Changed
1
1-16
1
1-16
Mode
Default
Messages
Altered
×
***************
3
×
Note Number True Voice
3-125
***************
0-127
0-127
Reception range diers depending on sound.
Velocity Note On
Note O
0 9n, V=1-127
× V=64
0 9n, V=1-127
×
After Touch Key’s
Channel
×
×
×
○
Pitch Bend × ○
0,32
1
6
38
5
65
7
Control Change 11
10
91,93
64,66,67
71
72,73
74
75,76,77,78
100,101
120
121
○
×
×
×
×
×
○
×
×
×
○
×
×
×
×
×
×
○
○
○
○
○
○
○
○
○
○
○
○
○
○
○
○
○
○
○
BankSelect(MSB,LSB) *1
Modulation *1
Data Entry MSB *1
Data Entry LSB *1
Portamento Time *1
Portamento On/O *1
Volume *1
Expression *1
Pan *1
Reverb Send, Chorus Send *1
Damper, Sostenuto, Soft *1
Resonance *1
EG Time (Release, Attack) *1
Brightness *1
Decay Time, Vibrato Rate, Depth, Delay *1
RPN(LSB,MSB)
*1
All Sounds O *1
Reset All Controllers *1
Program Change
True Number
○
***************
○
×
*1
System Exclusive ○ ○ *2
Song Position
System Common Song Select
Tune Request
×
×
×
×
×
×
System
Clock
Commands
×
×
×
×
Local On/Off
All Notes Off
Aux Meassages Active Sense
System Reset
×
○
○
×
○
○(123-125)
○
×
*1
*1
Notes *1: Transmitted and received when the MIDI lter is disabled.
*2: Includes Inquiry and GM Mode On. Received when GM Mode On, but all GM sounds are unsupported.
Mode 1: Omni On, Poly Mode 2: Omni On, Mono
○: Yes
Mode 3: Omni O, Poly Mode 4: Omni O, Mono × :
No
Consult your local distributor for more information on MIDI IMPLEMENTATION.

Presented by
Guangzhou Pearl River Piano Group Co.,Ltd
Manufactured by
Gangzhou Pearl River Amason Digital Musical Instrument Co.,Ltd
Add:No.38.Xiangshan Ave,Zengcheng Economic and Technological
Development Zone,Guangzhou China
Tel:+86-20-36574618
Fax:+86-20-81764948
Email:wmk@pearlriverpiano.com
Website:http://www.amasonmusic.cn 2B010374
Table of contents
Other Pearl River Musical Instrument manuals
Popular Musical Instrument manuals by other brands

AMV Playground Solutions
AMV Playground Solutions Emperor Chimes installation instructions

Yamaha
Yamaha Arius YDP-144 user manual

lowrey legend
lowrey legend a4000 owner's guide

Suzuki
Suzuki HP-8 owner's manual

Schoenhut
Schoenhut 2514 operating instructions

Yamaha
Yamaha Disklavier Mark III Series Brochure & specs