2
Troubleshooting
If you perceive any malfunction, check the following
suggestions. If the problem persists, contact your nearest
distributor.
Power does not turn on
•Make sure that the AC adapter is properly connected
to the PRK-80 and the AC outlet.
•Make sure that the power light is illuminated.
No sound from the speakers
•Rotate the VOLUME knob on the rear panel to the right
toward MAX.
•The speakers will be muted if the headphones are con-
nected.
Sound is interrupted
•The preset sounds of the PRK-80 have been created
by sampling (recording) sounds of actual musical in-
struments. When you press a key, some sounds play
a single piece of sampled data, while other sounds
play two pieces of sampled data. The PRK-80 uses two
pieces of data for most of its preset sounds. When one
of these two-sample sounds is selected (regardless of
whether the Sustain pedal is being pressed), the maxi-
mum polyphony is 60 notes. However, Piano 2 sounds,
the maximum polyphony is 120 notes. If the maximum
polyphony is exceeded, some of the notes will not be
sounded.
The pitch or tone of the piano sounds wrong in some key
regions
•The PRK-80’s piano sounds replicate the sound of an
actual piano as faithfully as possible. This means that
in some regions of the keyboard, you may feel that
the overtones seem stronger, or that the tone or pitch
seems wrong. This is not a malfunction.
Pedal is not effective
•Make sure that the pedal cable is properly connected.
Connected MIDI device does not respond to MIDI messag-
es
•Make sure that all MIDI cables are properly connected.
•Make sure that the PRK-80 is transmitting MIDI data
on the same MIDI channel as the connected MIDI de-
vice.
Keyboard NH keyboard: 88 keys (A0 - C8)
Maximum polyphony
120/60 (stereo)
Sounds 10
Jacks
Headphone x 2 (can be used as output)
MIDI OUT, pedal
Amp output 11W x 2
Speakers (16CM*8CM)*2
Power supply DC 12V
Power Consumption 13W
Weight
35kg
Size 1442(W)x 368(D)x767(H)mm
1442(W)x 395(D)x941(H)mm
(cover opened)
Included items Poweradapter,guaranteecard,certicate
ofqualication,usermanual
* Specifications and appearance are subject to change
without notice for improvement.
Warning
At least one other person must help you
assemble the stand.
Caution during assembly
In order to assemble the stand safely, please observe the
following points.
•Make sure that you have the correct part in the correct
orientation, and perform the assembly in the order giv-
en.
•The PRK-80 may fall when applying force too much
to the front side of it before fixing the PRK-80 to the
stand. You should be careful in handling it.
Other cautions
Please check the following points after assembly.
• Loosened screws
The screws may loosen as time passes after assembly.
You should periodically check whether any screws
have become loose. If you feel that the stand vibrates
excessively, it is possible that screws have come loose.
If so, re-tighten them.
• When moving the digital piano to another location
To move the assembled stand, remove the AC adapter
cord and the pedal cord from the stand, close the key
cover, and then move it slowly with at least two people
keeping it as level as possible.
• Disassembly
If you need to disassemble the stand, do so by revers-
ing the steps of the assembly procedure. After disas-
sembly, keep the screws and other parts in a safe place
so that they are not lost.
The PRK-80 should always be laid down before
it’s disassembled.
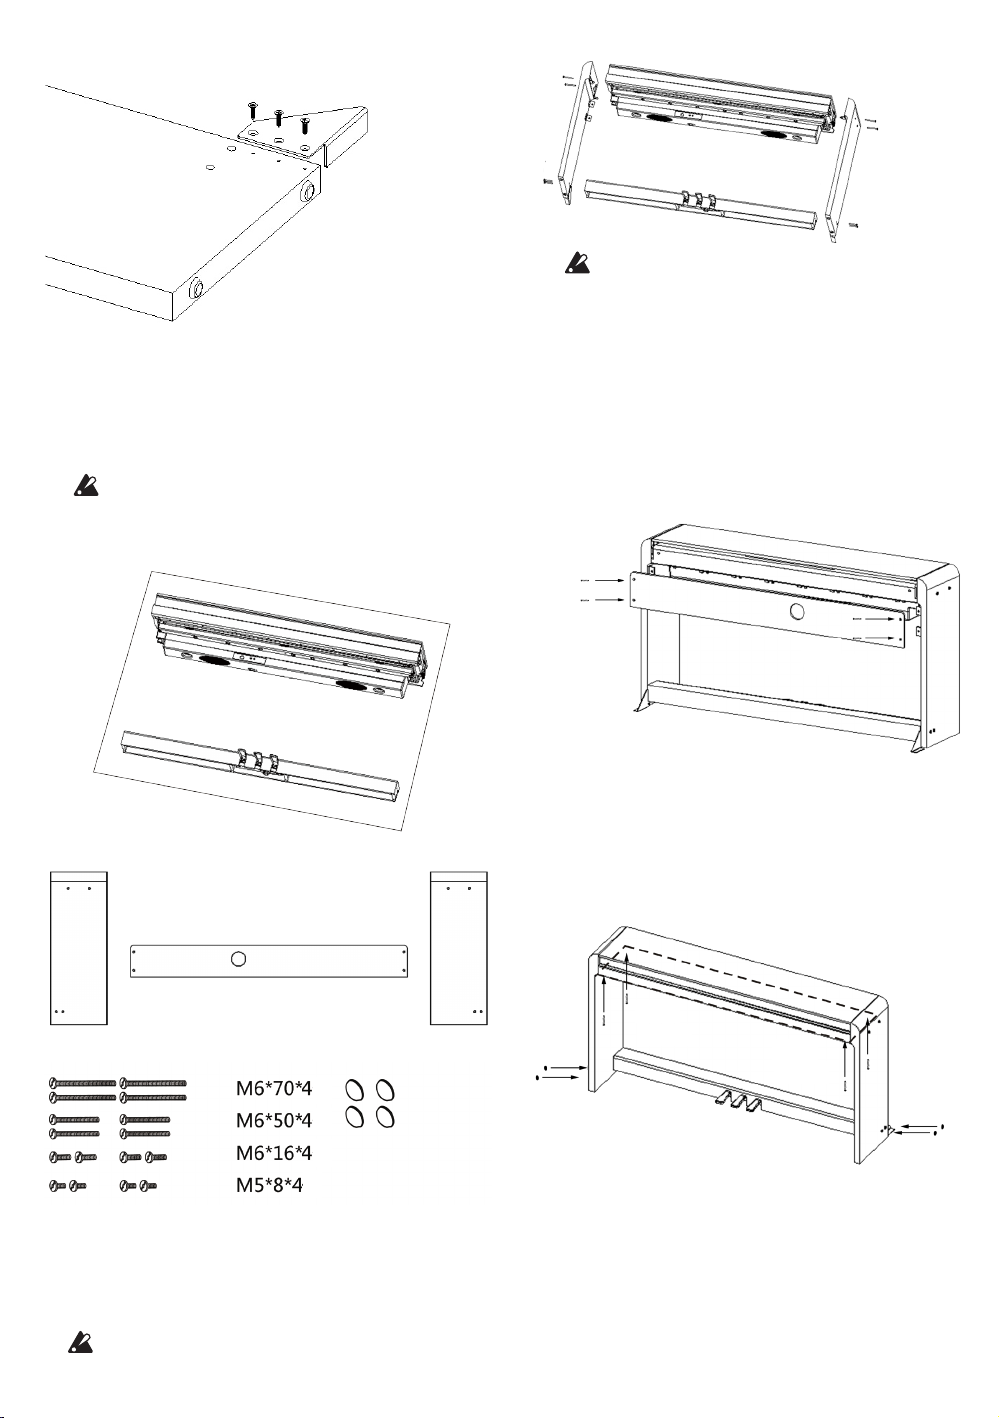
Assembly
Allen wrench (packed in carton) and screw driver are
needed.
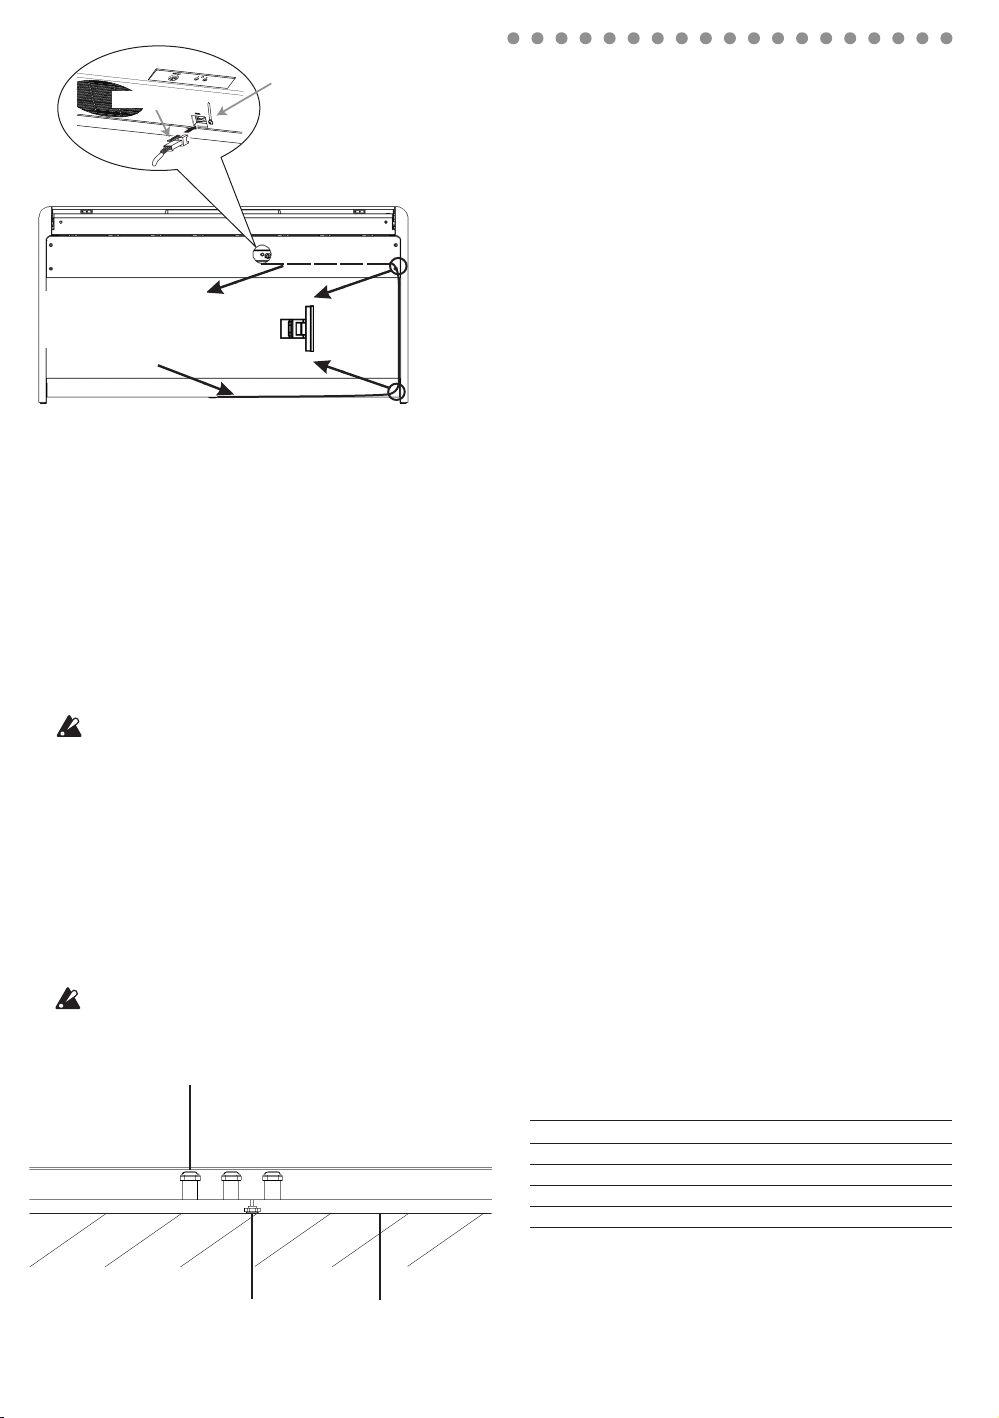
Anti Dumping Bracket (optional)
Anti dumping bracket to prevent the piano from
dumping caused by external force. User shall decide
whether to install according to their need. The instal-
lationofthebracketornotdoesnotaecttheoverall
structure of the piano and location.
Assembling the Stand
Specications