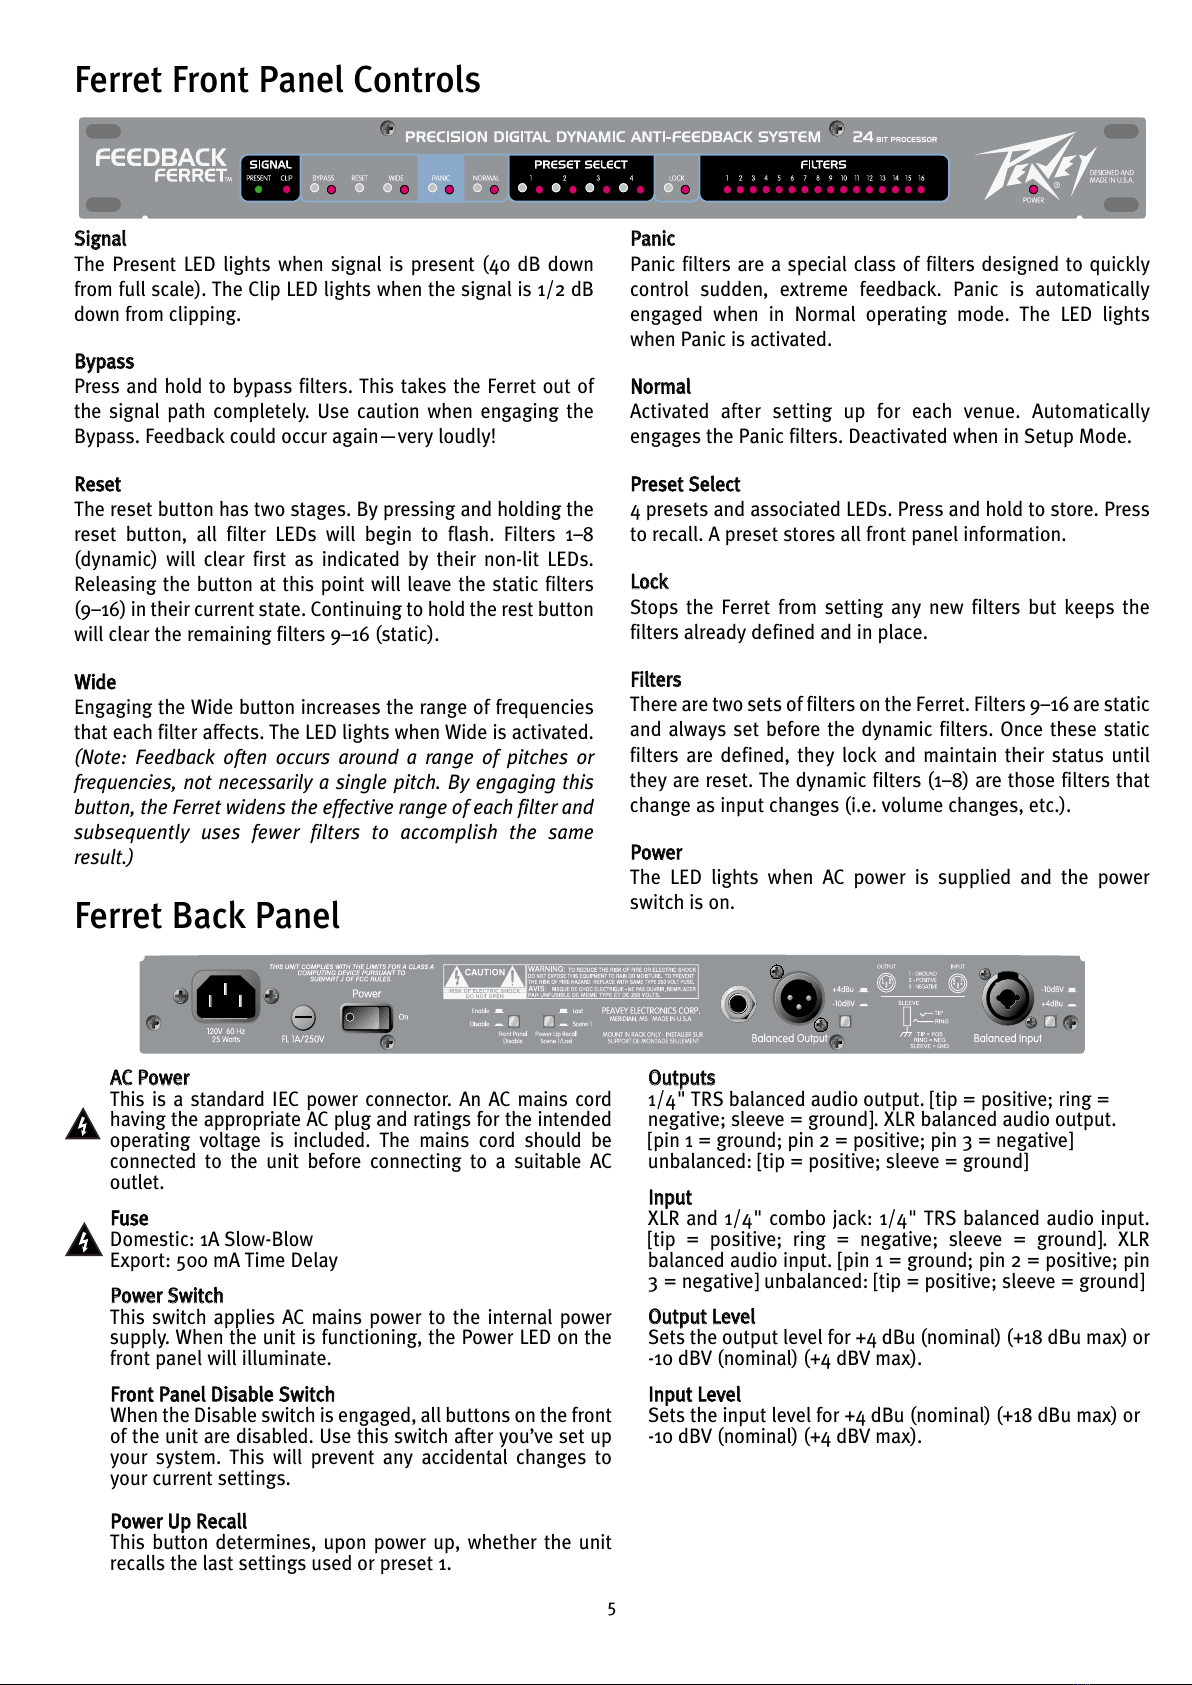
Peavey Feedback Ferret D User manual

Feedback Ferret™Operation Manual
For more information on other great Peavey products, go to your local Peavey dealer or online at www.peavey.com
All manuals and user guides at all-guides.com
all-guides.com

2
Intended to alert the user to the presence of uninsulated “dangerous voltage” within the product’s
enclosure that may be of sufficient magnitude to constitute a ris of electric shoc to persons.
Intended to alert the user of the presence of important operating and maintenance (servicing)
instructions in the literature accompanying the product.
CAUTION: Ris of electrical shoc — DO NOT OPEN!
CAUTION: To reduce the ris of electric shoc , do not remove cover. No user serviceable parts inside.
Refer servicing to qualified service personnel.
WARNING: To prevent electrical shoc or fire hazard, do not expose this appliance to rain or moisture.
Before using this appliance, read the operating guide for further warnings.
Este símbolo tiene el propósito, de alertar al usuario de la presencia de “(voltaje) peligroso” sin
aislamiento dentro de la caja del producto y que puede tener una magnitud suficiente como para
constituir riesgo de descarga eléctrica.
Este símbolo tiene el propósito de alertar al usario de la presencia de instruccones importantes sobre la
operación y mantenimiento en la información que viene con el producto.
PRECAUCION: Riesgo de descarga eléctrica ¡NO ABRIR!
PRECAUCION: Para disminuír el riesgo de descarga eléctrica, no abra la cubierta. No hay piezas útiles
dentro. Deje todo mantenimiento en manos del personal técnico cualificado.
A VERTENCIA: Para evitar descargas eléctricas o peligro de incendio, no deje expuesto a la lluvia o
humedad este aparato Antes de usar este aparato, Iea más advertencias en la guía de operación.
Ce symbole est utilisé dans ce manuel pour indiquer à l’utilisateur la présence d’une tension dangereuse
pouvant être d’amplitude suffisante pour constituer un risque de choc électrique.
Ce symbole est utilisé dans ce manuel pour indiquer à l’utilisateur qu’il ou qu’elle trouvera d’importantes
instructions concernant l’utilisation et l’entretien de l’appareil dans le paragraphe signalé.
ATTENTION: Risques de choc électrique — NE PAS OUVRIR!
ATTENTION: Afin de réduire le risque de choc électrique, ne pas enlever le couvercle. Il ne se trouve à
l’intérieur aucune pièce pouvant être reparée par l’utilisateur. Confiez I’entretien et la réparation de
l’appareil à un réparateur Peavey agréé.
AVERTISSEMENT: Afin de prévenir les risques de décharge électrique ou de feu, n’exposez pas cet
appareil à la pluie ou à l’humidité. Avant d’utiliser cet appareil, lisez attentivement les avertissements
supplémentaires de ce manuel.
Dieses Symbol soll den Anwender vor unisolierten gefährlichen Spannungen innerhalb des Gehäuses
warnen, die von Ausreichender Stär e sind, um einen ele trischen Schlag verursachen zu önnen.
Dieses Symbol soll den Benutzer auf wichtige Instru tionen in der Bedienungsanleitung aufmer sam
machen, die Handhabung und Wartung des Produ ts betreffen.
VORSICHT: Risi o — Ele trischer Schlag! Nicht öffnen!
VORSICHT: Um das Risi o eines ele trischen Schlages zu vermeiden, nicht die Abdec ung enfernen. Es
befinden sich eine Teile darin, die vom Anwender repariert werden önnten. Reparaturen nur von
qualifiziertem Fachpersonal durchführen lassen.
ACHTUNG: Um einen ele trischen Schlag oder Feuergefahr zu vermeiden, sollte dieses Gerät nicht dem
Regen oder Feuchtig eit ausgesetzt werden. Vor Inbetriebnahme unbedingt die Bedienungsanleitung lesen.
All manuals and user guides at all-guides.com

3
IMPORTANT SAFETY INSTRUCTIONS
WARNING: When using electrical products, basic cautions should always be followed, including the following:
1. Read these instructions.
2. Keep these instructions.
3. Heed all warnings.
4. Follow all instructions.
5. Do not use this apparatus near water.
6. Clean only with a dry cloth.
7. Do not bloc any of the ventilation openings. Install in accordance with manufacturer’s instructions.
8. Do not install near any heat sources such as radiators, heat registers, stoves or other apparatus (including
amplifiers) that produce heat.
9. Do not defeat the safety purpose of the polarized or grounding-type plug. A polarized plug has two blades with one
wider than the other. A grounding type plug has two blades and a third grounding plug. The wide blade or third
prong is provided for your safety. If the provided plug does not fit into your outlet, consult an electrician for
replacement of the obsolete outlet.
10. Protect the power cord from being wal ed on or pinched, particularly at plugs, convenience receptacles, and the
point they exit from the apparatus.
11. Only use attachments/accessories provided by the manufacturer.
12. Use only with a cart, stand, tripod, brac et, or table specified by the manufacturer, or sold with the apparatus. When
a cart is used, use caution when moving the cart/apparatus combination to avoid injury from tip-over.
13. Unplug this apparatus during lightning storms or when unused for long periods of time.
14. Refer all servicing to qualified service personnel. Servicing is required when the apparatus has been damaged in
any way, such as power-supply cord or plug is damaged, liquid has been spilled or objects have fallen into the
apparatus, the apparatus has been exposed to rain or moisture, does not operate normally, or has been dropped.
15. Never brea off the ground pin. Write for our free boo let “Shoc Hazard and Grounding.” Connect only to a power
supply of the type mar ed on the unit adjacent to the power supply cord.
16. If this product is to be mounted in an equipment rac , rear support should be provided.
17. Exposure to extremely high noise levels may cause a permanent hearing loss. Individuals vary considerably in
susceptibility to noise-induced hearing loss, but nearly everyone will lose some hearing if exposed to sufficiently
intense noise for a sufficient time. The U.S. Government’s Occupational and Health Administration (OSHA) has
specified the following permissible noise level exposures:
Sound Duration Per Day In Hours Sound Level dBA, Slow Response
890
692
495
397
2100
1 1/2 102
1105
1/2 110
1/4 or less 115
According to OSHA, any exposure in excess of the above permissible limits could result in some hearing loss. Ear plugs or protectors to the
ear canals or over the ears must be worn when operating this amplification system in order to prevent a permanent hearing loss, if exposure
is in excess of the limits as set forth above. To ensure against potentially dangerous exposure to high sound pressure levels, it is
recommended that all persons exposed to equipment capable of producing high sound pressure levels such as this amplification system be
protected by hearing protectors while this unit is in operation.
SAVE THESE INSTRUCTIONS!
All manuals and user guides at all-guides.com

4
FFeeeeddbbaacc FFeerrrreett™™pprreecciissiioonn ddiiggiittaall ddyynnaammiicc aannttii--ffeeeeddbbaacc ffiilltteerr aarrrraayy
Features
◆sophisticated seek & destroy algorithms find‚ loc and reduce offending frequencies
◆24-bit resolution provides the greatest dynamic range and best signal-to-noise ratio
◆16 digital dynamically controlled notch filters configured for 1/12 octave performance give the Ferret more feedbac
control than any other unit on the mar et
◆4 preset locations allow you to store settings for your most common performance venues
◆front panel disable button (located on rear panel) allows you to quic ly disable the front panel once your settings are
made
◆wide/narrow button enables you to change the width of filters (more on this later)
◆reset button allows you to reset some or all of the filters
EENNGGLLIISSHH
Than you for purchasing the Feedbac Ferret™by Peavey—the most cutting-edge feedbac control system currently
on the mar et. The Ferret applies 16 digital dynamic filters at a resolution of 24-bits‚ automatically controlling
feedbac without sacrificing volume or tone. The Ferret‚ armed with sophisticated algorithms‚ distinguishes between
music and feedbac ‚ see ing and destroying the feedbac ‚ leaving your music alone. Although there is no substitute
for a good soundman‚ the Ferret can greatly improve your sound application.
Please read this guide carefully to ensure your personal safety as well as the safety of your equipment.
QQUUIICCKK SSEETTUUPP
1. Turn off power to all units.
2. Connect the Ferret between your mixer and power amp. (Ma e sure your spea ers are connected.) Connect the
main output or monitor output (depending on your application) on your mixer to the input on the Ferret. Connect
one of the Ferret’s outputs to the input on your power amp. Connect all microphones you plan on using.
3. Power up all units with the master volume completely down. (Remember: You should turn your power amp on
last and off first.) Ma e sure the Ferret is NOT set to Normal Mode (LE off). (Remember: you want a fairly quiet
room with no signal going through the system and the microphone levels up.)
4. Slowly bring up the master volume. As feedbac occurs‚ the Ferret starts to wor beginning with filter 16. As the
filters are needed‚ the associated LEDs will blin letting you now that a feedbac frequency has been found and
the filter defined. Expect some LEDs to light solid as filters loc down on a problem!
5. Once the feedbac is eliminated and filters are set‚ depress the Normal button on the front panel of the Ferret and
return the mixer gain to a normal level. That’s it! Your Ferret is wor ing for you!
PLEASE REA THE ENTIRE OPERATING GUI E FOR THE BEST RESULTS.
All manuals and user guides at all-guides.com

5
SSiiggnnaall
The Present LED lights when signal is present (40 dB down
from full scale). The Clip LED lights when the signal is 1/2 dB
down from clipping.
BByyppaassss
Press and hold to bypass filters. This ta es the Ferret out of
the signal path completely. Use caution when engaging the
Bypass. Feedbac could occur again—very loudly!
RReesseett
The reset button has two stages. By pressing and holding the
reset button‚ all filter LEDs will begin to flash. Filters 1–8
(dynamic) will clear first as indicated by their non-lit LEDs.
Releasing the button at this point will leave the static filters
(9–16) in their current state. Continuing to hold the rest button
will clear the remaining filters 9–16 (static).
WWiiddee
Engaging the Wide button increases the range of frequencies
that each filter affects. The LED lights when Wide is activated.
(Note: Feedbac often occurs around a range of pitches or
frequencies‚ not necessarily a single pitch. By engaging this
button‚ the Ferret widens the effective range of each filter and
subsequently uses fewer filters to accomplish the same
result.)
PPaanniicc
Panic filters are a special class of filters designed to quic ly
control sudden‚ extreme feedbac . Panic is automatically
engaged when in Normal operating mode. The LED lights
when Panic is activated.
NNoorrmmaall
Activated after setting up for each venue. Automatically
engages the Panic filters. Deactivated when in Setup Mode.
PPrreesseett SSeelleecctt
4 presets and associated LEDs. Press and hold to store. Press
to recall. A preset stores all front panel information.
LLoocc
Stops the Ferret from setting any new filters but eeps the
filters already defined and in place.
FFiilltteerrss
There are two sets of filters on the Ferret. Filters 9–16 are static
and always set before the dynamic filters. Once these static
filters are defined‚ they loc and maintain their status until
they are reset. The dynamic filters (1–8) are those filters that
change as input changes (i.e. volume changes‚ etc.).
PPoowweerr
The LED lights when AC power is supplied and the power
switch is on.
Ferret Front Panel Controls
AACC PPoowweerr
This is a standard IEC power connector. An AC mains cord
having the appropriate AC plug and ratings for the intended
operating voltage is included. The mains cord should be
connected to the unit before connecting to a suitable AC
outlet.
FFuussee
Domestic: 1A Slow-Blow
Export: 500 mA Time Delay
PPoowweerr SSwwiittcchh
This switch applies AC mains power to the internal power
supply. When the unit is functioning‚ the Power LED on the
front panel will illuminate.
FFrroonntt PPaanneell DDiissaabbllee SSwwiittcchh
When the Disable switch is engaged‚ all buttons on the front
of the unit are disabled. Use this switch after you’ve set up
your system. This will prevent any accidental changes to
your current settings.
PPoowweerr UUpp RReeccaallll
This button determines‚ upon power up‚ whether the unit
recalls the last settings used or preset 1.
OOuuttppuuttss
1/4" TRS balanced audio output. [tip = positive; ring =
negative; sleeve = ground]. XLR balanced audio output.
[pin 1 = ground; pin 2 = positive; pin 3 = negative]
unbalanced: [tip = positive; sleeve = ground]
IInnppuutt
XLR and 1/4" combo jac : 1/4" TRS balanced audio input.
[tip = positive; ring = negative; sleeve = ground]. XLR
balanced audio input. [pin 1 = ground; pin 2 = positive; pin
3 = negative] unbalanced: [tip = positive; sleeve = ground]
OOuuttppuutt LLeevveell
Sets the output level for +4 dBu (nominal) (+18 dBu max) or
-10 dBV (nominal) (+4 dBV max).
IInnppuutt LLeevveell
Sets the input level for +4 dBu (nominal) (+18 dBu max) or
-10 dBV (nominal) (+4 dBV max).
Ferret Back Panel
FUSE
FUSE
All manuals and user guides at all-guides.com

6
Ferret™Hookup iagrams
Ferret—Main PA
Ferret—Monitors
All manuals and user guides at all-guides.com
all-guides.com

7
Ferret—Channel Insert
Ferret—Sub Insert
Ferret—Instrument Amp
Ferret—Powered Mixer
All manuals and user guides at all-guides.com

8
Operating Instructions
Where To Put Your Ferret™
The Feedbac Ferret can be used in a variety of locations within a sound system. Place a Ferret at the input
insert of every microphone or you could process many microphones together by placing a single Ferret on
the output of a vocal subgroup. One of the most common connections is to install the Ferret between the
mixer’s output and the power amp’s input. This mixer output may be from the main output or the monitor
output‚ depending on your needs. You can also place the Ferret on a single channel’s insert to eliminate
feedbac from a single microphone or instrument. Once the Ferret has determined the problem
frequencies for a particular setup‚ you can save that group of filter settings to one of the four preset
buttons for instant recall.
How oes It Work?
The Ferret includes a set of 16 digital notch filters that employ sophisticated algorithms that see out and
destroy feedbac ‚ without destroying your tone. There are two sets of filters on the Ferret‚ static and
dynamic. Filters 9–16 are static and always set before the dynamic filters (1–8). Once these static filters are
set‚ they loc and maintain their status until they are reset by the user or a different preset is selected. The
dynamic filters (1–8) are those filters that change as your needs change. Any filter (static or dynamic) that
is set‚ but not loc ed (as indicated by blin ing filter LED)‚ will slowly release and return to flat (0 dB) and
be available for further use.
When the Ferret locates an offending frequency (feedbac )‚ it applies a filter‚ starting with filter 16. This
filter is centered at the feedbac frequency and uses only as much attenuation as needed to remove the
feedbac . If feedbac continues‚ the filter depth is progressively increased until the feedbac is gone. If the
feedbac is momentary‚ such as a short squeal‚ the Ferret applies a filter but slowly releases it in .10 dB
steps until it is returned to flat (0 dB). If the same frequency causes feedbac again‚ the same filter will be
reapplied. This process continues as additional filters are engaged‚ starting from the right side of the Ferret‚
until all feedbac is gone. Monitoring continues as the Ferret attempts to release each active unloc ed filter
.10 dB at a time. Once a filter reaches 0 dB‚ the Ferret returns the filter to the queue. The Feedbac Ferret
continuously applies the least amount of attenuation required to eliminate feedbac .
All manuals and user guides at all-guides.com

9
Setup
For best results‚ complete the Setup in a relatively quiet room. This allows the Ferret to find primary
acoustic feedbac frequencies. Every room and setup has problem frequencies. This ma es each room
different and creates different feedbac problems. It is also important to understand that while in Setup
mode‚ the Ferret does not distinguish between feedbac and music. If you play music through the system
while in Setup mode‚ the Ferret will try and eliminate it.
Step One
These instructions assume you have connected the Ferret from the mixer outputs and not from a single
channel insert. Ma e sure the Normal LED is off (this engages Setup mode) and that your microphone levels
are set. Slowly bring up the master level. You should see the filters begin to see and loc as feedbac
begins to occur. This will begin with filter 16 and progress from right to left automatically. You will notice
that each filter will begin by blin ing and then light solidly when each frequency is loc ed down. This is
accomplished with the minimum amount of attenuation.
Step Two
Continue bringing the master level up until you’ve reached the required volume level. As you start to hear
feedbac ‚ momentarily stop adjusting the levels to allow the Ferret to complete the adjustment of its filter.
Normally‚ you should hear the onset of feedbac before the Ferret ta es control. In most applications‚ this
should give you plenty of gain and still leave additional filters open for later use. If all or most of the filters
are lit up‚ bring the master level bac down‚ reset the filters and start over. But this time‚ hit the Wide button
on the front panel. The Wide button allows each filter to wor on a wider range of frequencies thereby
freeing up additional filters for other use. (Note: If all or most of the filters light up it’s probably an
indication that it is a bad room‚ a bad system setup or you are just too loud!)
Step Four
Finally‚ put the unit in Normal mode. This mode automatically engages the Panic button. Your system
should be performance ready! At this point‚ it is advisable to engage the Front Panel Disable Switch to
minimize accidental changes. Once you are content with your settings‚ press and hold one of the preset
buttons (1–4) to save your filter settings.
Note: The Ferret is not a replacement for a good soundman. Good sound sytem performance starts with
good placement of the microphones and speakers.
All manuals and user guides at all-guides.com

10
Input Impedance:
40 ohm
Output Impedance:
100 ohm
ynamic Range:
103 dBr @ 1 Hz ref to +18 dBu output
22 Hz to 22 Hz unweighted
Total Harmonic istortion:
0.002% @ 1 Hz typical
Input Sensitivity:
+4 dBu nominal‚ +18 dBu full scale
-10 dBV nominal‚ +4 dBV full scale
Output rive:
+4 dBu nominal‚ +18 dBu full scale
-10 dBV nominal‚ +4 dBV full scale
imensions:
Width: 19.000 in (48.26 cm)
Depth: 8.000 in (20.32 cm)
Height: 1.750 in (4.45 cm)
Weight: 7 lbs (3.17 g)
Power:
Domestic: 120 VAC; 60 Hz; 25 watts
Export: 230 VAC; 50/60 Hz; 25 watts
Bypass:
True power off bypass
Feedback Ferret™
SPECIFICATIONS
All manuals and user guides at all-guides.com

Características
◆Algoritmos sofisticados de búsqueda y destrucción de retroalimentación encuentran y reducen las frecuencias ofensivas
◆Resolución de 24 bits que provee el mejor rango dinámico a la menor razón entre señal y ruido
◆16 filtros configurados a _ octava dan al Ferret más control sobre la retroalimentación que cualquier unidad en el
mercado
◆4 presets que permiten salvar ajustes para los lugares más comunes
◆Botón de cancelación del panel frontal que permite desactivar rápidamente el panel frontal una vez que los ajustes han
sido hechos
◆Botón ancho/estrecho permite cambiar el rango de los filtros (más de esto más adelante)
◆Botón de reajuste permite iniciar algunos o todos los filtros
FFiillttrroo ccoonnttrraa rreettrrooaalliimmeennttaacciióónn ddiinnáámmiiccooFFEEEEDDBBAACCKK FFEERRRREETT™™
11
EESSPPAAÑÑOOLL
Gracias por tu compra del Feedbac Ferret de Peavey, el sistema contra retroalimentación más avanzado del
mercado. El Ferret aplica 16 filtros dinámicos a una resolución de 24 bits, controlando automáticamente la
retroalimentación sin sacrificar volumen o tono. El Ferret, armado con algoritmos sofisticados, distingue entre la
música y la retroalimentación, buscando y destruyendo la retroalimentación, y dejando la música en paz. Aunque
no hay substituto para un buen ingeniero de sonido, el Ferret puede marcar la diferencia entre una sonorización
amateur y profesional.
Por favor lee cuidadosamente esta guía para asegurar tanto tu seguridad como la de tu equipo.
IInnssttaallaacciióónn RRááppiiddaa
1. Apagar todas la unidades
2. Conectar el Ferret entre la consola y el amplificador. (Asegurándose que los parlantes están conectados). Conectar la
salida principal o salida de monitor (dependiendo de la aplicación) de la consola a la entrada del Ferret. Conectar una
de las salidas del Ferret a la entrada del amplificador. Conectar todos los micrófonos que se planea usar.
3. Encender todas las unidades con el volumen maestro completamente abajo. (Recuerda: El amplificador debe ser lo
último en encenderse y lo primero en apagarse.) Hay que asegurarse que el Ferret no esté en Modo Normal.
(Recuerda: quieres estar en un cuarto relativamente silencioso sin señal pasando por el sistema y los niveles de los
micrófonos arriba.)
4. Lentamente levanta el nivel maestro. Conforme comience la retroalimentación el Ferret comenzará a funcionar comen-
zando con el filtro 16. Conforme se vayan necesitando filtros, los LEDs asociados se encenderán intermitentemente
para avisar que se ha encontrado la frecuencia de retroalimentación y se ha definido el filtro. Algunos LEDs se encen-
derán constantemente conforme localizan las frecuencias y resuelven el problema.
5. Una vez que la retroalimentación ha sido eliminada y los filtros han sido ajustados, oprime el botón Normal en el
panel frontal del Ferret. ¡Eso es todo! El Ferret está trabajando para ti.
Por favor lee la guía de operación completa para obtener mejores resultados.
All manuals and user guides at all-guides.com
all-guides.com

12
SSeeññaall
El LED de señal presente se ilumina cuando hay señal
presente (40 dB debajo de la escala completa). El LED de
saturación se enciende cuando la señal está saturando (1/2
dB debajo de la escala completa).
BByyppaassss
Oprime y mantén oprimido para cancelar los filtros. Los 16
LEDs dejarán de encenderse intermitentemente y se
mantendrán encendidos cuando la unidad esté en modo
bypass. Esto saca completamente los filtros del Ferret de la
ruta de la señal.
RReeaajjuussttee ((RReesseett))
El botón de reajuste cuenta con dos funciones. Oprimirlo y
mantenerlo oprimido hará que todos los LEDs de filtros se
enciendan intermitentemente. Los filtros 1-8 (dinámicos) se
reajustarán primero como se indicará por sus LEDs no
encendidos. Soltar el botón en este punto dejará los filtros
estáticos (9-16) en su estado actual. El mantener oprimido el
botón de reajuste reajustará el resto de los filtros 9-16
(estáticos).
AAnncchhoo ((WWiiddee))
Activar el botón de Ancho incrementa el rango de frecuencias
que cada filtro afecta. El LED se enciende cuando el Ancho es
activado. (Nota: La retroalimentación muchas veces ocurre
alrededor de un rango de frecuencias o tonos, no
necesariamente en un solo tono. Al activar este botón, el
Ferret incrementa el rango efectivo de cada filtro y por ende
usa menos filtros para llegar al mismo resultado).
PPáánniiccoo
Los filtros de pánico son una clase especial de filtros
diseñados para controlar retroalimentación extrema y
repentina. El Pánico es activado bajo modo de operación
Normal. El LED indica cuando el Pánico es encendido.
NNoorrmmaall
Se activa después de ajustar para cada lugar. Activa los filtros
de Pánico automáticamente. Se desactiva cuando está en
modo de Instalación.
SSeelleecccciióónn ddee PPrreesseett
4 presets y sus LEDs asociados. Oprimase y manténgase
oprimido para salvar. Oprímase para recordar. Un preset
recuerda toda la información del panel frontal.
BBllooqquueeoo ((LLoocc))
No permite al Ferret hacer ajustes en nuevos filtros, pero
mantiene los filtros ya definidos en su posición.
FFiillttrrooss
Hay dos tipos de filtros en el Ferret. Los filtros 9-16 son
estáticos y siempre ajustados antes que los filtros dinámicos.
Una vez que estos filtros estáticos han sido definidos, se
bloquean y mantienen su estatus hasta que sean reajustados.
Los filtros dinámicos (1-8) son los filtros que cambian
conforme cambia la entrada (Ej. Cambios de volumen, etc.)
EEnncceennddiiddoo
El LED se enciende cuando se le aplica corriente CA y la
unidad es encendida.
Controles del Panel Frontal del Ferret
Panel Trasero del Ferret
CCoorrrriieennttee CCAA
Este es un conectador estándar IEC para corriente. Un cable
de corriente CA con el conectador apropiado y con
capacidad de voltaje apropiada es incluido. El cable de
corriente debe ser conectado a la unidad antes de conectar
a la fuente eléctrica.
FFuussiibbllee
Doméstico: 1A de explosión lenta. Exportación: 500 mA de
retraso de tiempo.
IInntteerrrruuppttoorr ddee CCoorrrriieennttee
Este interruptor aplica corriente a la fuente de corriente
interna. Cuando la unidad está funcionando, el LED de
Encendido en el panel frontal debe estar iluminado.
IInntteerrrruuppttoorr ddee BBllooqquueeoo ddeell PPaanneell FFrroonnttaall
Cuando activado, todos los botones del panel frontal de la
unidad son desactivados. Usa este interruptor después de
que el sistema esté funcionando. Esto puede prevenir
cambios accidentales a los ajustes.
FUSE
FUSE
All manuals and user guides at all-guides.com

13
RReeccoorrddaarr PPoossiicciióónn ((PPoowweerr UUpp RReeccaallll))
Este botón determina si la unidad recordará los últimos
ajustes o el preset 1 a la hora de encenderla.
SSaalliiddaass
Balanceadas de 1/4" TRS [punta = positivo; anillo =
negativo; manga = tierra]. Salida balanceada XLR [aguja
1 = tierra; aguja 2 = positivo; aguja 3 = negativo].
EEnnttrraaddaa
Conectador combo XLR y _": entrada de audio balanceada
de _" TRS [punta = positivo; anillo = negativo; manga =
tierra]. Entrada balanceada XLR [aguja 1 = tierra; aguja 2 =
positivo; aguja 3 = negativo].
NNiivveell ddee SSaalliiddaa
Ajusta l nivel de salida de + 4 dBu (nominal) (+18 dBu máx.)
ó -10 dBV (nominal) (+4 dBV máx.).
Instrucciones de Operación
DDóónnddee ppoonneerr eell FFeerrrreett™™
El Ferret puede ser usado en lugares variados dentro de un sistema de sonido. Se puede poner un Ferret
en la entrada de cada micrófono o procesar muchos micrófonos usando un solo Ferret en la salida de un
subgrupo de micrófonos. Una de las conexiones más comunes es instalar el Ferret entre la salida de una
mezcladora y la entrada del amplificador. La salida de la mezcladora puede ser la salida principal (main) o
la salida de monitores, dependiendo las necesidades. También se puede poner el Ferret en el punto de
inserción de un solo canal para eliminar retroalimentación de un solo micrófono o instrumento.
En aplicaciones donde hay un gran numero de micrófonos abiertos, un Ferret puede ser usado en cada
entrada de micrófono primario. Esto es especialmente cierto cuando se usan micros condensadores dis-
eñados para funcionar a distancias más grandes del usuario. También hay que saber que el Ferret puede
ser usado como un aparato temporal cuando se instalan sistemas en diferentes formas dentro de un
mismo espacio o cuando se está experimentando con diferentes opciones de un mismo sistema. Una vez
que el Ferret ha determinado las frecuencias problema para una instalación, se puede salvar ese grupo de
ajustes de filtros a uno de los cuatro botones de preset para recordarlos de manera instantánea.
¿¿CCóómmoo FFuunncciioonnaa??
El Ferret es un grupo de 16 sofisticados filtros que pueden buscar y destruir la retroalimentación sin
destruir el tono. Hay dos tipos de filtros en el Ferret, estáticos y dinámicos. Los filtros 9-16 son estáticos y
siempre se ajustan antes que los filtros dinámicos (1-8). Una vez que estos filtros estáticos han sido ajus-
tados, se bloquean y mantienen su estatus hasta que sean reajustados por el usuario o la selección de
otro preset. Los filtros dinámicos (1-8) son aquellos que cambian dependiendo de las necesidades.
Cuando el Ferret localiza una frecuencia ofensiva (retroalimentación), aplica un filtro, comenzando por el
numero 16. Este filtro se centra en la frecuencia de retroalimentación y usa sólo la cantidad de reducción
necesaria para quitar la retroalimentación. Si la retroalimentación continua, la profundidad del filtro se
incrementa progresivamente hasta que este desaparezca. Si la retroalimentación es momentánea, como
un chillido aislado, el Ferret aplica un filtro, pero lo suelta lentamente en pasos de .10 dB hasta que
regrese a una respuesta plana (0 dB). Si la misma frecuencia vuelve a causar retroalimentación, el mismo
filtro se aplicará una vez más. Este proceso continua conforme se aplican más filtros, comenzando del
lado derecho del Ferret, hasta que toda la retroalimentación desaparezca. El monitoreo se sigue llevando
a cabo conforme el Ferret intenta soltar cada filtro en pasos de .10 dB. Una vez que un filtro llega a 0 dB,
el Ferret regresa ese filtro a la búsqueda. El Ferret continuamente aplica la menor cantidad de atenuación
requerida para eliminar la retroalimentación.
Cuando ya no se necesita, estos filtros dinámicos lentamente se sueltan y quedan disponibles para ser
usados de nuevo. Cualquier filtro (estático o dinámico) es ajustado pero no bloqueado (indicado por el
LED intermitente del filtro) y regresará lentamente a su posición plana (0 dB) y quedará disponible para
otro uso.
All manuals and user guides at all-guides.com

14
IInnssttaallaacciióónn ((SSeettuupp))
Para mejores resultados se recomienda llevar a cabo la instalación en un cuarto silencioso. Esto permite
al Ferret encontrar las frecuencias primarias de retroalimentación acústicas. Piénsalo de esta forma: cada
cuarto tiene una serie de frecuencias acentuadas, al igual que un instrumento acústico. Esto hace que
cada cuarto sea diferente y crea problemas de retroalimentación diferentes. También es importante
entender que en el modo de Instalación el Ferret no distingue entre retroalimentación y música. Si tocas
música por el sistema mientras esté en modo de Instalación, el Ferret tratará de eliminarla.
PPaassoo UUnnoo
Estas instrucciones asumen que el Ferret ha sido conectado de las salidas de la mezcladora y no del
punto de inserción de un canal. Hay que asegurarse que el LED de Normal está apagado (lo cual nos pone
en modo de Instalación) y que los niveles de los micros han sido ajustados. Lentamente levanta el nivel
maestro. Debes ver que los filtros comienzan a buscar y bloquear conforme comienza la
retroalimentación. Esto comenzará con el filtro 16 y sucesivamente de la derecha a la izquierda
automáticamente. Notarás que cada filtro comenzará por encenderse intermitentemente y luego lo hará
de manera continua conforme se van bloqueando las frecuencias. Esto se lleva a cabo con la menor
cantidad de atenuación.
PPaassoo DDooss
Continua elevando el nivel maestro hasta que llegues al nivel requerido. Conforme comiences a escuchar
retroalimentación, para momentáneamente el movimiento del volumen para dar tiempo al Ferret de
ajustar sus filtros. Normalmente, se debe escuchar el comienzo de la retroalimentación antes que el
Ferret tome control. En la mayoría de las aplicaciones el Ferret dejará suficiente ganancia y dejará
suficientes filtros abiertos para uso futuro. Si todos o la mayoría de los filtros están encendidos, se debe
reducir el volumen maestro, reiniciar los filtros y comenzar de nuevo, pero esta vez oprimiendo el botón
Ancho (Wide) en el panel frontal. El botón Ancho permite que cada filtro trabaje con un rango de
frecuencias más amplio, liberando filtros para uso futuro. (Nota: Si todos, o la mayoría de los filtros están
encendidos, probablemente es una indicación de un mal cuarto, una mala instalación del sistema o
simplemente está demasiado fuerte).
PPaassoo TTrreess
Una vez que estés conforme con los ajustes, oprime y mantén oprimido uno de los botones de preset
(1-4) para salvar los ajustes.
PPaassoo CCuuaattrroo
Finalmente, pon la unidad en modo Normal. Este modo automáticamente activa el botón de Pánico. El
sistema debe estar listo para su uso. En este punto, se recomienda activar el Interruptor de Bloqueo del
Panel Frontal para minimizar cambios accidentales.
All manuals and user guides at all-guides.com

15
Input Impedance:
40 ohm
Output Impedance:
100 ohm
ynamic Range:
103 dBr @ 1 Hz ref to +18 dBu output
22 Hz to 22 Hz unweighted
Total Harmonic istortion:
0.002% @ 1 Hz typical
Input Sensitivity:
+4 dBu nominal‚ +18 dBu full scale
-10 dBV nominal‚ +4 dBV full scale
Output rive:
+4 dBu nominal‚ +18 dBu full scale
-10 dBV nominal‚ +4 dBV full scale
imensions:
Width: 19.000 in (48.26 cm)
Depth: 8.000 in (20.32 cm)
Height: 1.750 in (4.45 cm)
Weight: 7 lbs (3.17 g)
Power:
Domestic: 120 VAC; 60 Hz; 25 watts
Export: 230 VAC; 50/60 Hz; 25 watts
Bypass:
True power off bypass
Feedback Ferret™
SPECIFICATIONS
All manuals and user guides at all-guides.com

Merkmale
◆Ausgefeilte Algorithmen für das Ermitteln und Ausschalten stellen Störfrequenzen fest, bloc ieren und verringern sie.
◆24-Bit-Auflösung bietet den größten Dynami bereich und den geringsten Rauschabstand.
◆16 dynamisch ontrollierte Kerbfilter, die für 1/12-O tave onfiguriert sind, verleihen dem Ferret eine Feedbac -
Kontrolle, die die sämtlicher anderen Geräte auf dem Mar t übersteigt.
◆Vier Preset-Tasten erlauben Ihnen das Speichern der Einstellungen derjenigen Veranstaltungsorte, an denen Sie das
System am häufigsten einsetzen.
◆Über den Front-Panel-Disable-Schalter önnen Sie die Vorderseite dea tivieren, wenn alle Ihre Einstellungen stehen.
◆Über die Taste Wide/Narrow önnen Sie die Breite von Filtern verändern (mehr dazu später).
◆Mit der Rüc stelltaste önnen Sie einige oder auch alle Filter zurüc stellen.
FFeeeeddbbaacckk FFeerrrreett™™ddiiggiittaalleess ddyynnaammiisscchheess AAnnttii--FFeeeeddbbaacckk--PPrrääzziissiioonnss--FFiilltteerrssyysstteemm
16
DDEEUUTTSSCCHH
Wir möchten uns bei Ihnen dafür bedan en, dass Sie sich für ein Feedbac Ferret von Peavey entschieden
haben – das derzeit fortschrittlichste Feedbac -Kontrollsystem auf dem Mar t. Der Ferret arbeitet mit 16
dynamischen Filtern bei einer Auflösung von 24 Bit und ann damit das Feedbac automatisch ontrollieren,
ohne dass Lautstär e oder Klang beeinträchtigt werden. Der Ferret, der mit ausgefeilten Algorithmen
ausgestattet ist, unterscheidet zwischen Musi und Feedbac ; er ermittelt das Feedbac und schaltet es aus,
sodass ausschließlich Ihre Musi zu hören ist. Ein guter Soundtechni er ist durch nichts zu ersetzen, aber mit
dem Ferret zeigt sich der Unterschied zwischen einer unprofessionellen und einer professionellen
Beschallungsarbeit.
Lesen Sie sich diese Anleitung bitte sorgfältig durch, damit sowohl Ihre Sicherheit als auch die Ihrer
Ausrüstung gewährleistet ist.
RRaasscchhee IInnbbeettrriieebbnnaahhmmee
1. Schalten Sie alle Geräte aus.
2. Schließen Sie den Ferret zwischen Ihr Mischpult und Ihren Verstär er an. (Stellen Sie sicher, dass die Lautsprecher
angeschlossen sind). Schließen Sie den Hauptausgang oder Monitorausgang (je nach Einsatzzwec ) an Ihrem
Mischpult an den Eingang des Ferret an. Schließen Sie einen der Ausgänge des Ferret an den Eingang Ihres
Verstär ers an. Schließen Sie alle Mi rophone an, die Sie einsetzen wollen.
3. Schalten Sie sämtliche Geräte ein, wobei das Master-Volume vollständig heruntergedreht sein muss (Den en Sie bitte
daran, dass Ihr Verstär er als letztes Gerät ein- und als erstes ausgeschaltet werden muss.) Achten Sie darauf, dass
sich der Ferret nicht im Normal-Modus befindet. (Den en Sie daran, dass Sie einen relativ ruhigen Raum erzielen
wollen, bei dem eine Signale durch das System gehen und die Mi ropegel hochgedreht sind.)
4. Drehen Sie das Master-Volume allmählich herauf. Wenn Feedbac eintritt, beginnt der Ferret, mit Filter 16 zu arbeiten.
Je nach benötigtem Filter blin en die zugehörigen LEDs, so dass Sie er ennen önnen, dass eine Feedbac -Frequenz
ermittelt und der Filter definiert wurde. Einige LEDs önnen ontinuierlich leuchten, wenn Filter bei einem Problem
bloc ieren!
5. Wenn das Feedbac ausgeschaltet ist und die Filter eingestellt sind, drüc en Sie die Normal-Taste auf der Vorderseite
des Ferret. Das war’s! Ihr Ferret arbeitet jetzt für Sie!
Lesen Sie sich bitte die vollständige Bedienungsanleitung durch, um die optimalen Ergebnisse zu erzielen.
All manuals and user guides at all-guides.com
all-guides.com

17
Regler des Ferret auf der Vorderseite
SSiiggnnaall
Die Present-LED leuchtet auf, wenn ein Signal vorhanden ist
(40 dB unterhalb S alenendwert). Die Clip-LED leuchtet auf,
wenn ein Signal-Clipping vorliegt (1/2 dB unterhalb
S alenendwert).
BByyppaassss
Wird diese Taste gedrüc t gehalten, werden die Filter umgan-
gen. Sämtliche 16 LEDs hören auf zu blin en und leuchten
ontinuierlich auf, wenn das Gerät umgangen wird. Die Ferret-
Filter werden dadurch vollständig aus dem Signalweg her-
ausgenommen.
RReesseett
Die Reset-Taste verfügt über zwei Stufen. Wird die Reset-Taste
gedrüc t gehalten, beginnen sämtliche Filter-LEDs zu blin en.
Die dynamischen Filter (1 - 8) werden zuerst ausgeschaltet,
was dadurch angezeigt wird, dass ihre LEDs nicht leuchten.
Wird die Taste auf dieser Stufe losgelassen, wird der Status
der statischen Filter (9 - 16) beibehalten. Wird die Reset-Taste
jedoch weiterhin gedrüc t gehalten, werden die verbleiben-
den statischen Filter (9 - 16) ebenfalls ausgeschaltet.
WWiiddee
Durch Drüc en der Wide-Taste wird der Frequenzbereich für
jeden Filter erweitert. Wird Wide a tiviert, leuchtet die LED
auf. (Hinweis: Feedbac tritt häufig bei bestimmten Bereichen
von Tonlagen oder Frequenzen und nicht so sehr bei einer
einzigen Tonlage auf. Wird diese Taste gedrüc t, erweitert der
Ferret den Wir ungsbereich jedes Filters, sodass weniger
Filter erforderlich sind, um dasselbe Ergebnis zu erzielen.)
PPaanniicc
Panic-Filter sind eine spezielle Art von Filtern, die entwic elt
wurden, um plötzlich auftretendes, sehr star es Feedbac zu
ontrollieren. Im Modus Normal sind die Panic-Filter automa-
tisch a tiviert. In diesem Fall leuchtet die zugehörige LED auf.
NNoorrmmaall
Normal wird a tiviert, wenn das System für den jeweiligen
Veranstaltungsort eingerichtet ist. Dadurch werden die Panic-
Filter automatisch a tiviert. Im Setup-Modus wird Normal
dea tiviert.
PPrreesseett SSeelleecctt
Dies sind vier Presets mit ihren LEDs. Wird diese Taste
gedrüc t gehalten, önnen die Einstellungen gespeichert wer-
den. Durch Drüc en önnen sie abgerufen werden. Ein Preset
speichert sämtliche Informationen des vorderen Bedienfeldes.
LLoocc
Dadurch wird der Ferret daran gehindert, neue Filter
einzustellen; die bereits definierten und a tivierten Filter wer-
den jedoch beibehalten.
FFiilltteerrss
Hierbei handelt es sich um zwei Gruppen von Filtern am
Ferret. Die Filter 9 - 16 sind statisch und werden immer vor
den dynamischen Filtern eingestellt. Sind diese statischen
Filter definiert, werden sie gesperrt, sodass ihr Status
beibehalten wird, bis sie zurüc gestellt werden. Die dynamis-
chen Filter (1 - 8) sind diejenigen Filter, die sich entsprechend
dem Input verändern (z.B. bei Lautstär everänderungen).
PPoowweerr
Die LED leuchtet auf, wenn das Gerät mit Wechselstrom ver-
sorgt wird und eingeschaltet ist.
Rückseite des Ferret
FUSE
FUSE
WWeecchhsseellssttrroomm
Hierbei handelt es sich um einen genormten IEC-
Netzstec er. Ein Wechselstrom-Netz abel mit dem
entsprechenden Wechselstromstec er und den
entsprechenden Werten für die erforderliche
Betriebsspannung liegt bei. Das Netz abel muss an
das Gerät angeschlossen werden, bevor es an eine
geeignete Wechselstromstec dose angeschlossen
wird.
FFuussee
USA: 1 A, träge Sicherung. Export: 500 mA,
Zeitsicherung.
All manuals and user guides at all-guides.com

18
NNeettzzsscchhaalltteerr
Über diesen Schalter wird die interne Stromversorgung
mit Wechselstrom versorgt. Wenn das Gerät arbeitet,
leuchtet die Power-LED auf der Vorderseite auf.
SScchhaalltteerr FFrroonntt PPaanneell DDiissaabbllee
Wird dieser Schalter gedrüc t, werden sämtliche Tasten
auf der Vorderseite des Gerätes dea tiviert. Drüc en
Sie diesen Schalter, wenn Sie Ihr System eingerichtet
haben. Dadurch vermeiden Sie, dass Ihre derzeitigen
Einstellungen versehentlich geändert werden.
PPoowweerr UUpp RReeccaallll
Mit dieser Taste legen Sie beim Einschalten fest, ob
das Gerät die zuletzt verwendeten Einstellungen oder
Preset 1 aufrufen soll.
OOuuttppuuttss
Symmetrierter 1/4" TRS-Audioausgang. [Spitze =
positiv, Ring = negativ, Masse = Erde.] Symmetrierter
XLR-Audioausgang. [Stift 1 = Erde, Stift 2 = positiv, Stift
3 = negativ.]
IInnppuutt
XLR- und 1/4"-Combo-Klin e: symmetrierter 1/4"-TRS-
Audioeingang. [Spitze = positiv, Ring = negativ, Masse
= Erde]. Symmetrierter XLR-Audioeingang. [Stift 1 =
Erde, Stift 2 = positiv, Stift 3 = negativ.]
OOuuttppuutt LLeevveell
Hiermit wird der Drive-Pegel des Ausgangs für +4 dBu
(nominal) (+18 dBu maximal) oder –10 dBV (nominal)
(+4 dBV maximal) festgelegt.
BBeettrriieebbssaannlleeiittuunngg
AAnnsscchhlluusssssstteellllee IIhhrreess FFeerrrreett™™
Der Feedbac Ferret ann innerhalb eines Beschallungssystems an vielen verschiedenen Stellen angeschlossen
werden. Sie önnen einen Ferret am Eingang jedes Mi ros anschließen oder viele Mi ros zusammenfassen, indem
Sie einen einzigen Ferret an den Ausgang einer Subgroup für Stimmen anschließen. Mit am häufigsten wird der
Ferret zwischen dem Ausgang des Mischpults und dem Eingang des Verstär ers angeschlossen. Der
Mischpultausgang ann entsprechend Ihren Anforderungen vom Hauptausgang oder vom Monitorausgang
erfolgen. Sie önnen den Ferret auch an den Eingang eines Einzel anals anschließen, um Feedbac von einem
einzelnen Mi ro oder Instrument auszuschalten.
Bei Einsätzen, bei denen eine große Anzahl von offenen Mi ros verwendet wird, ann ein Feedbac Ferret an jeden
Mi ro-Haupteingang angeschlossen werden. Dies trifft insbesondere beim Einsatz von Kondensatormi ros zu,
deren Abstand zum Benutzer größer sein soll. Zudem ann der Ferret als Behelfsgerät eingesetzt werden, wenn
Systeme bei einer anderen Anordnung in demselben a ustischen Raum eingesetzt werden sollen. Dies ist
hilfreich, wenn unterschiedliche Bands in demselben Raum auftreten oder wenn Sie mit der Positionierung des
Systems experimentieren. Hat der Ferret die problematischen Frequenzen für ein bestimmtes Setup ermittelt,
önnen Sie diese Gruppe von Filtereinstellungen auf eine der vier Preset-Tasten speichern, sodass Sie sie sofort
wieder abrufen önnen.
FFuunnttiioonnsswweeiissee
Der Ferret ist ein Set von 16 ausgefeilten Kerbfiltern, die Feedbac ermitteln und ausschalten önnen, ohne
dadurch Ihren Klang zu zerstören. Hierbei handelt es sich um zwei Gruppen von Filtern am Ferret, einer statischen
und einer dynamischen. Die Filter 9 - 16 sind statisch und werden immer vor den dynamischen Filtern 1 - 8
eingestellt. Sind diese statischen Filter definiert, bloc ieren sie, sodass ihr Status beibehalten wird, bis sie vom
Anwender zurüc gestellt werden oder ein anderes Preset gewählt wird. Die dynamischen Filter 1 - 8 sind
diejenigen Filter, die sich entsprechend Ihren Anforderungen verändern.
Wenn der Ferret eine störende Frequenz (Feedbac ) ermittelt, a tiviert er einen Filter, wobei mit Filter 16
begonnen wird. Dieser Filter wird an der Feedbac -Frequenz zentriert und setzt nur so viel Dämpfung ein, wie zur
Ausschaltung des Feedbac s erforderlich ist. Dauert das Feedbac an, wird die Filtertiefe immer weiter gesteigert,
bis das Feedbac ausgeschaltet ist. Tritt das Feedbac nur vorübergehend auf, etwa als ein urzes Quietschen,
a tiviert der Ferret einen Filter, den er jedoch langsam in Schritten von 0,10 dB wieder freigibt, bis wieder 0 dB
erreicht sind. Sollte bei derselben Frequenz erneut Feedbac auftreten, wird derselbe Filter wieder a tiviert.
Dieser Vorgang wird fortgesetzt und es werden weitere Filter a tiviert, wobei auf der rechten Seite des Ferret
begonnen wird, bis das Feedbac vollständig ausgeschaltet ist. Die Überwachung wird fortgesetzt, wobei der
Ferret versucht, jeden a tivierten nicht bloc ierten Filter um jeweils 0,10 dB freizugeben. Hat ein Filter 0 dB
erreicht, reiht der Ferret den Filter wieder in die Warteschlange ein. Der Feedbac Ferret wendet ontinuierlich
möglichst wenig Dämpfung an, d.h. nur soviel, wie zur Ausschaltung von Feedbac erforderlich ist.
All manuals and user guides at all-guides.com

19
Wenn sie nicht mehr benötigt werden, dann werden diese dynamischen Filter freigegeben und stehen
nun für weitere Einsätze zur Verfügung. Jeder Filter (statisch oder dynamisch), der eingestellt aber
nicht bloc iert ist (dies wird durch die blin ende Filter-LED angezeigt), wird langsam freigegeben und
erreicht wieder 0 dB, so dass er anderweitig eingesetzt werden ann.
SSeettuupp
Um die besten Ergebnisse zu erzielen, sollten Sie das Setup in einem relativ ruhigen Raum
durchführen. So ann der Ferret die wichtigsten a ustischen Feedbac -Frequenzen ermitteln. Dies
önnen Sie sich folgendermaßen vorstellen: Jeder Raum hat – ähnlich wie ein a ustisches Instrument
– seine ganz eigenen Frequenzen. Dadurch ist jeder Raum anders, und es ergeben sich
unterschiedliche Probleme durch Feedbac . Zudem müssen Sie berüc sichtigen, dass der Ferret im
Setup-Modus nicht zwischen Feedbac und Musi unterscheidet. Falls Sie also Musi mit dem
System abspielen, solange sich der Ferret im Setup-Modus befindet, wird er versuchen, die Musi
auszuschalten.
SScchhrriitttt 11
Hierbei wird davon ausgegangen, dass Sie den Ferret von den Mischpultausgängen und nicht von
einem Einzel anal-Insert angeschlossen haben. Stellen Sie sicher, dass die Normal-LED nicht
aufleuchtet (dies würde bedeuten, dass der Setup-Modus a tiviert ist) und dass Ihre Mi ropegel
eingestellt sind. Drehen Sie den Master-Pegel allmählich herauf. Nun sollten die Filter beginnen,
Feedbac bei Auftreten zu ermitteln und zu bloc ieren. Dieser Vorgang beginnt bei Filter 16 und setzt
sich automatisch von rechts nach lin s fort. Jeder Filter beginnt zu blin en und danach ontinuierlich
aufzuleuchten, sobald eine Frequenz bloc iert wird. Dies erfolgt mit einer möglichst geringen
Dämpfung.
SScchhrriitttt 22
Drehen Sie nun den Master-Pegel herauf, bis Sie den erforderlichen Lautstär epegel erreicht haben.
Sobald Sie hören, wie Feedbac einsetzt, unterbrechen Sie das Einpegeln vorübergehend, so dass der
Ferret die Einstellung seines Filters abschließen ann. In der Regel sollten Sie das Auftreten von
Feedbac hören, bevor der Ferret eingreift. Bei den meisten Einsätzen sollten Sie so über ausreichend
Verstär ung verfügen und noch weitere Filter für spätere Einsätze zur Verfügung haben. Leuchten alle
oder fast alle Filter auf, drehen Sie den Master-Pegel wieder herunter, stellen Sie die Filter zurüc ,
und beginnen Sie von vorne. Drüc en Sie diesmal jedoch die Wide-Taste auf der Vorderseite. Durch
die Wide-Taste ann jeder Filter mit einem breiteren Frequenzbereich arbeiten, sodass weitere Filter
für anderweitige Einsätze verfügbar werden. (Hinweis: Leuchten alle oder fast alle Filter auf, weist
dies möglicherweise darauf hin, dass der Raum ungeeignet ist, das System-Setup nicht orre t ist
oder Sie einfach zu laut sind!)
SScchhrriitttt 33
Wenn Sie mit Ihren Einstellungen zufrieden sind, drüc en Sie eine der Preset-Tasten (1 - 4) und halten
Sie sie gedrüc t, um Ihre Filtereinstellungen zu speichern.
SScchhrriitttt 44
Schließlich schalten Sie das Gerät in den Normal-Modus. Dadurch wird die Panic-Taste automatisch
a tiviert. Ihr System ist jetzt einsatzbereit! Nun sollten Sie den Front-Panel-Disable-Schalter drüc en,
um versehentliche Änderungen zu vermeiden.
All manuals and user guides at all-guides.com

20
Input Impedance:
40 ohm
Output Impedance:
100 ohm
ynamic Range:
103 dBr @ 1 Hz ref to +18 dBu output
22 Hz to 22 Hz unweighted
Total Harmonic istortion:
0.002% @ 1 Hz typical
Input Sensitivity:
+4 dBu nominal‚ +18 dBu full scale
-10 dBV nominal‚ +4 dBV full scale
Output rive:
+4 dBu nominal‚ +18 dBu full scale
-10 dBV nominal‚ +4 dBV full scale
imensions:
Width: 19.000 in (48.26 cm)
Depth: 8.000 in (20.32 cm)
Height: 1.750 in (4.45 cm)
Weight: 7 lbs (3.17 g)
Power:
Domestic: 120 VAC; 60 Hz; 25 watts
Export: 230 VAC; 50/60 Hz; 25 watts
Bypass:
True power off bypass
Feedback Ferret™
SPECIFICATIONS
All manuals and user guides at all-guides.com
Other manuals for Feedback Ferret D
2
Table of contents
Other Peavey Music Equipment manuals

Peavey
Peavey DPM C8 User manual

Peavey
Peavey Wireless Performer User manual

Peavey
Peavey THE CENTRY User manual

Peavey
Peavey Nashville 112 User manual

Peavey
Peavey Vypyr VIP Series User manual

Peavey
Peavey Valverb User manual

Peavey
Peavey IDL 655 User manual

Peavey
Peavey DPM SP User manual

Peavey
Peavey DPM V3 User manual

Peavey
Peavey DPS 1000 User manual