Pebaro 2010 User manual

LEISTUNGSSTARKER
Operating instructions for storage battery screwer with accessories
Instructions pour l’emploi de la visseuse à batteries et accessoires
Istruzioni d’uso avvitatrice a batteria con accessori
MIT ZUBEHÖR
Anleitung • Instructions • Les instructions • Istruzione • Instructies

A
B
CD
E
F
G H
E

de
gb
fr
it
A Bit-Aufnahme
B Ein/Aus
C Akku-Kapazitätsanzeige
D Taste Akku-Kapazitätsanzeige
E Akku-Ladebuchse
F Netzstecker-Ladegerät
G Kleinstecker für Ladebuchse
H Geräte-Gürteltasche mit 4 Bit-Einsätzen
A Bit slot
B On/Off
C Charge indicator
D Charge indicator key
E Charging plug
F Plug-in charger
G Connecting plug
H Belt tool bag with bit compartment
A Siège des pointes
B Interrupteur
C Témoins de charge
D Commande des témoins
E Prise de charge de la batterie
F Chargeur avec prise de courant
G Fiche de contact pour la batterie
H Porte-outil pour ceinture avec gousset pour les pointes
A Sede delle punte
B Interruttore
C Spie di controllo della carica
D Tasto di controllo della carica
E Presa di carica della batteria
F Caricatore con spina di corrente
G Spinotto per la presa alla batteria
H Porta-utensile da cintura con scomparto per gli accessori

Bevor Sie das Gerät in Betrieb nehmen, lesen Sie diese Gebrauchsanlei-
tung aufmerksam und beachten Sie die Sicherheitshinweise! Für Schäden
oder Unfälle, die durch Nichtbeachtung der Anleitung und Sicherheitsvorgaben
entstehen, übernehmen wir keine Haftung. Die Anleitung ist sorgfältig aufzube-
wahren und bei Weitergabe des Gerätes mit zu übergeben.
Der Akku-Schrauber und das Zubehör darf nur nach seiner Bestimmung verwen-
det werden. Das Produkt ist nur für den Hausgebrauch konzipiert und ausgelegt.
Achtung!
• Benutzung nur unter unmittelbarer Aufsicht von Erwachsenen.
• Das Laden des Akku-Schraubers darf nur von Erwachsenen vorgenommen
werden!
• Kinder dürfen elektrische Geräte nicht an Netzstecker anschließen und
unbeaufsichtigt in Betrieb nehmen.
• Ladegerät nicht zum Laden oder Betreiben anderer Geräte verwenden!
• Zum Laden des Akku-Schraubers nur das beigelegte Ladegerät verwenden!
INBETRIEBNAHME
Akku laden
Der integrierte Lithium-Ionen-Akku ist bei Auslieferung bereits vorgeladen.
Die volle Kapazität erreicht der Akku nach mehreren Lade- und Entladevorgängen.
Überprüfen Sie, ob die am Typschild des Netzstecker-Ladegerätes (F) angegebene
Netzspannung mit der vorhandenen Netzspannung übereinstimmt. Stecken Sie
das Ladegerät in die Steckdose und verbinden Sie den Klein-Stecker (G) mit der
Ladebuchse (E) am Akku-Schrauber. Die LED-Anzeige rot zeigt die korrekte Ver-
bindung an. Durch drücken der Taste (D) kann der Ladezustand überprüft werden.
Die drei LED-Lampen signalisieren den Ladezustand des Akkus. Die Ladezeit
beträgt bei leerem Akku ca. 5 Stunden.

Schraub-Bit einsetzen
Erforderlichen Bit-Einsatz in die Bit-Aufnahme (A) des Akku-Schraubers ein-
stecken. Darauf achten, dass die Bit-Form und -Größe mit der Schraubenkopfform
übereinstimmt.
Bedienung
Das EIN-/AUS-Schalten des Akku-Schraubers erfolgt mit dem Geräteschalter (B),
mit dem gleichzeitig auch die Drehrichtung bestimmt wird. Zum Einschrauben
(Rechtslauf) den Schalter im unteren Bereich betätigen, zum Lösen (Linkslauf) den
Schalter im oberen Bereich drücken.
Prüfen der Akku-Kapazität
Um die Leistung des Gerätes optimal zu erreichen, sollte der Akku immer voll
aufgeladen sein. Alle drei farbigen LEDs leuchten beim Betätigen der Taste (D)
gleichzeitig auf. Die Kapazität reduziert sich nacheinander bei Erlöschen der
grünen und gelben LED.
REINIGUNG, PFLEGE UND WARTUNG
Reinigen Sie das Gerät nur mit einem trockenen Tuch. Nicht in Wasser tauchen
oder mit lösungshaltigen Mitteln reinigen. Der Akku-Schrauber ist wartungsfrei,
gehen Sie jedoch pfleglich damit um.
ENTSORGUNG
Dieses Produkt darf am Ende seiner Lebensdauer nicht im normalen
Haushaltsabfall entsorgt werden. Es muss an einem Sammelpunkt für das
Recycling von elektrischen und elektronischen Geräten abgegeben werden.
TECHNISCHE DATEN
Ladegerät 230 V - 50 Hz
Ladespannung 6 V =
Ladestrom 300 mA
Drehzahl max. 180 U/Min
Drehmoment max. 3 Nm
Akku Li–Ionen 3,6 V

Before using this tool, please, read attentively these instructions and fol-
low the safety rules when using it. No guarantee is given for damages or
accidents due to non-observance or these instructions and safety norms. Keep these
directions and hand them over together with the tool if and when giving it away.
The rechargeable screwer is not to be used for purposes different from the one
it was made for. This tool is meant for domestic and private use only.
Caution!
• To be used solely under the control and responsibility of an adult.
• The battery is to be charged by adults only!
• Children are not allowed to connect electric appliances to the mains or
use them without supervision of an adult.
• Charger not suitable for other types of tools!
• Charge exclusively with its pertaining charger!
OPERATING
Charging the battery
The screwer is delivered with the integrated Li-ion battery already charged.
After some charging and discharging the battery performance is at its top.
Make sure the voltage of the main is the same as the one mentioned on the plate
fixed on the charger (F). Plug the charger into the main tap and the connecting
plug (G) to the charging plug (E). The red LED indicates the battery is charging.
Pressing the key (D) one can see the charge level as the three LED lamps show
the state of charge of the Li-ion battery. It takes abt. 5 hours to charge a fully
discharged battery.
Fitting the screwing bit
Choose the screwing bit to match size and shape of the screw head and fit it into
the bit slot (A).

Operating the appliance
The on/off switch (B) starts the cordless screwer and fixes the direction of
rotation as well. To screw in – clockwise rotation – press the lower part of the
switch, to unscrew – left rotation – press the upper part of the switch.
Testing the battery capacity
To have the best performance the battery should always be fully charged.
All three LEDs light up when pressing the key (D). The charge reduction is given
by the LEDs getting green then yellow.
CLEANING, MAINTENANCE
Use only a dry cloth to clean the appliance. Never dip it in water or use detergents.
The screwer needs no further maintenance, just keep it clean.
DISPOSAL
When the appliance will have to be eliminated, do not throw it in the house-
hold dustbin. It must disposed of at the recycling collector for electric and
electronic instruments.
TECHNICAL DATA
Charger 230 V - 50 Hz
Charging voltage 6 V =
Charging amperage 300 mA
Revolutions 180 p.min. max.
Twisting moments 3 Nm max.
Li–Ion battery 3.6 V

Avant de mettre en marche l’appareil, veuillez lire attentivement les con-
seils d’usage et, lors de l’emploi veuillez observer les normes de sécurité
indiquées. Les dégâts ou accidents dûs au manque d’observance des instructions
d’usage et des normes de sécurité sont hors de notre responsabilité et garantie.
Veuillez garder ces indications et les remettre avec l’appareil en cas de cession
de celui-ci.
La visseuse rechargeable et ses accessoires s’emploient exclusivement pour
tourner les vis. C’est un appareil conçu pour les petits travaux ménagers et le
bricolage.
Attention !
• A employer seulement par des adultes ou sous leur responsabilité et
surveillance.
• Seuls les adultes peuvent charger la batterie !
• Les enfants ne doivent jamais brancher les appareils au courant et ne
peuvent les employer que sous surveillance d’un adulte.
• Employer le chargeur exclusivement pour charger la batterie de la visseuse
et non d’autres appareils !
• Charger la visseuse seulement avec ce chargeur !
MISE EN MARCHE
Chargement de la batterie
L’accumulateur Li-ion intégré est livré déjà chargé. Il atteint toutefois son rende-
ment optimal après avoir été déchargé et rechargé à plusieurs reprises.
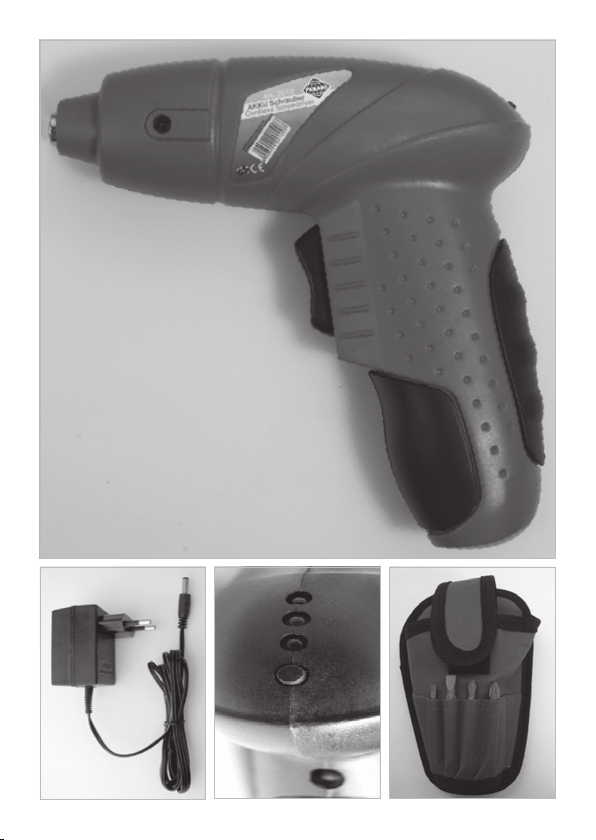
Assurez-vous que le courant du réseau soit identique à celui indiqué sur la pla-
quette du chargeur (F). Après avoir introduit la fiche du chargeur dans la prise de
courant branchez la fiche de contact (G) dans la prise de charge de la batterie (E).
La lampe témoin s’allume (rouge) si le branchement est correct. Appuyant sur
le bouton (D) on peut contrôler à quel point le chargement est arrivé. Pour une
batterie complètement déchargée il faut env. 5 heures.

Introduction des pointes de vissage
Choisir la pointe adaptée à la tête de la vis à serrer ou desserrer (type et dimen-
sions). Introduire la pointe dans son siège (A).
Emploi de l’appareil
L’interrupteur (B) non seulement allume et éteint la visseuse mais il en définit
également la direction derotation. Pour serrer les vis – rotation vers la droite –
appuyez sur le bas de l’interrupteur, pour les desserrer - rotation vers la gauche
– appuyez sur la partie haute de l’interrupteur.
Contrôle de l’état de chargement
Pour rendre au maximum la visseuse doit avoir la batterie complètement chargée,
c.à.d. en appuyant sur le bouton (D) toutes les trois lampes témoins s’allument.
Lorsque la charge se réduit les témoins passent au vert puis au jaune.
NETTOYAGE ET MANUTENTION
Pour nettoyer la visseuse il suffit de l’épousseter avec un linge propre et sec.
Aucun contact avec de l’eau ou des produits détergents ! Aucune manutention n’est
requise pour la visseuse, il faut toutefois en avoir soin.
ECOULEMENT
Pour se débarrasser de l’appareil lorsqu’il ne sert plus, il ne faut pas le jeter
à la poubelle domestique, mais le porter au service de voirie pour recyclage
des appareils électriques et électroniques.
DONNÉES TECHNIQUES
Chargeur 230 V – 50 Hz
Tension de chargement 6 V =
Courant de chargement 300 mA
Rotations max. 180 rev./min
Moment de rotation max. 3 Nm
Accu Li-ions 3,6 V

Prima di adoperare l’apparecchio è necessario leggere attentamente
le istruzioni ed osservare poi anche le norme di sicurezza indicate! Non
diamo alcuna garanzia e non abbiamo alcuna responsabilità per danni o incidenti
dovuti alla non-osservanza delle istruzioni e norme. Queste istruzioni vanno
custodite e nel caso di cessione dell’apparecchio consegnate insieme allo stesso.
L’avvitatrice a batteria ricaricabile ed i suoi accessori vanno usati esclusiva-
mente per avvitare e svitare, lavoro per cui sono stati prodotti.
Attenzione!
• Da usarsi esclusivamente da o sotto responsabilità di adulti.
• Solo adulti possono caricare la batteria!
• Non è permesso ai bambini di collegare apparecchi elettrici alla rete, né
di usarli in assenza di adulti.
• Non usare il caricatore per caricare o mettere in marcia apparecchi di
altri tipi!
• La batteria dell’avvitatrice va caricata solo con questo caricatore!
MESSA IN FUNZIONE
Caricamento della batteria
L’accumulatore integrato di Li-ioni è già carico quando viene fornito, ma il suo
rendimento è ottimale solo dopo alcune scariche e e ricariche. Assicurarsi che il
voltaggio della rete corrisponda a quanto indicato sulla targhetta del caricatore (F).
Collegare la spina del caricatore alla presa di rete e lo spinotto (G) alla presa di
caricamento della batteria (E). La spia rossa conferma il collegamento corretto.
Per controllare lo stato di carica dell’accumulatore di Li-ioni, premere il tasto (D),
le 3 lampade spia lo segnalano. La batteria completamente scarica si ricarica in
circa 5 ore.

Inserimento delle punte
Scegliere la punta adatta per tipo e dimensione alla testa della vite da girare
ed introdurla nella sede (A).
Uso dell’apparecchio
L’interruttore (B) dell’avvitatrice a batteria non solo accende e spegne l’apparec-
chio, ma comanda pure il senso di rotazione per l’avvitamento. Per avvitare –
rotazione in senso orario – premere la parte bassa dell’interruttore, per svitare
– rotazione in senso anti-orario – pigiare l’interruttore nella parte alta.
Controllo dello stato di carica
Perché l’apparecchio sia efficiente al massimo la batteria deve essere completa-
mente carica. Il tasto (D) comanda contemporaneamente tutte e tre le spie.
Diminuendo la carica le spie passano al verde poi al giallo prima di spegnersi.
PULIZIA E MANUTENZIONE
Pulire l’avvitatrice semplicemente con un cencio asciutto. Non mettere a contatto
con acqua o detergenti. L’avvitatrice a batteria ricaricabile non necessita manuten-
zione, tuttavia è bene averne cura.
SMALTIMENTO
Giunto alla fine della sua vita l’apparecchio non va semplicemente gettato
nella pattumiera di casa. Va portato al punto di scarico per il riciclaggio degli
elettrici ed elettronici.
DATI TECNICI
Caricatore 23 V – 50 Hz
Voltaggio di carica 6 V =
Corrente di carico 300 mA
Rotazioni mass. 180 giri/min
Momento di rotazione mass. 3 Nm
Accumulatore Li-ioni 3,6 V

Peter Bausch GmbH & Co. KG
Blombachstraße 21-23
42369 Wuppertal, Germany
www.pebaro.de
Stand 4/2019
Other manuals for 2010
1
Table of contents
Languages:
Other Pebaro Toy manuals