PED Bicycles Birdy User manual

BIRDY
owners manual
v 2.01 prepared Nov. 2002

Birdy Manual Copyright PED Bicycles P/L © 2002
Page 2 of 60
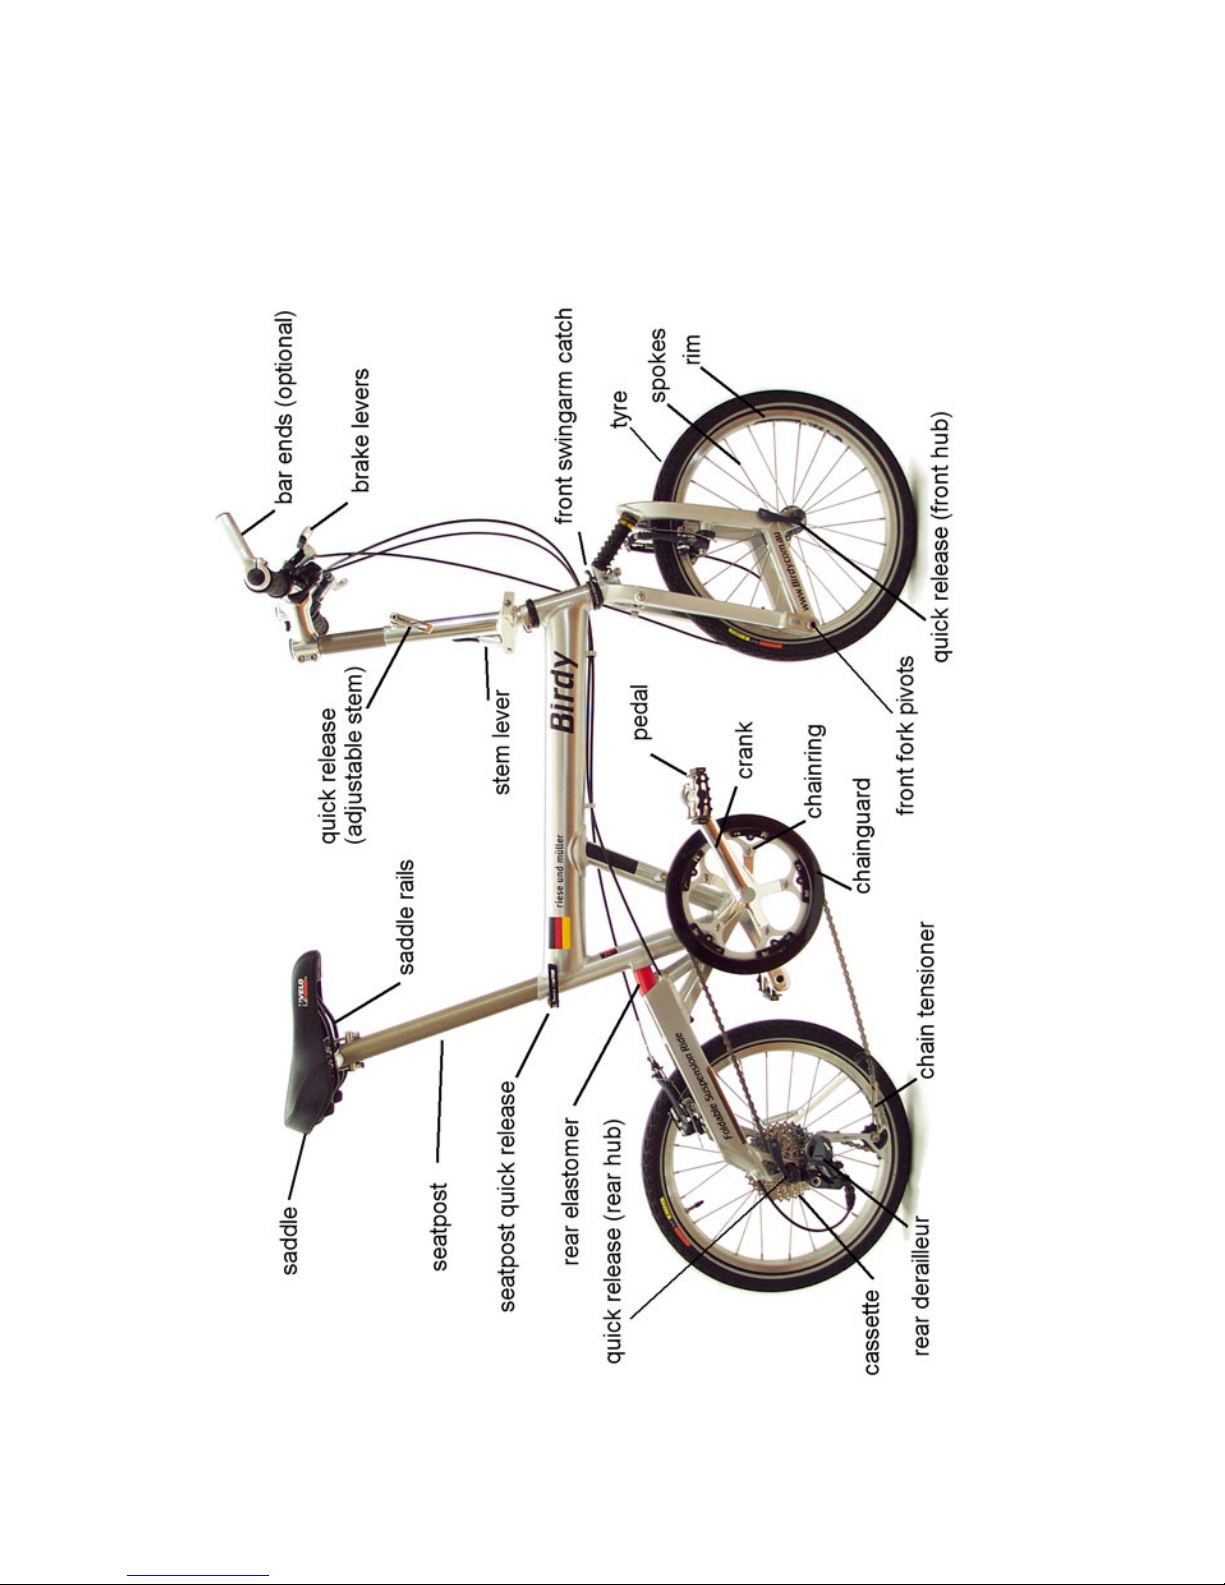
1ANATOMY OF A BIRDY.......................................................................................... 4
2INTRODUCTION ...................................................................................................... 5
3LEGAL REQUIREMENTS ....................................................................................... 7
4BEFORE THE FIRST RIDE ..................................................................................... 8
5BEFORE EVERY RIDE............................................................................................ 8
6FITTING THE BIRDY TO THE RIDER ................................................................... 10
6.1 ADJUSTING FOR THE CORRECT SADDLE HEIGHT .................................................................................................. 10
6.2 ADJUSTING THE HANDLEBARS............................................................................................................................. 10
6.3 ADJUSTING REACH AND SETTING THE SADDLE ANGLE .......................................................................................... 11
6.4 ADJUSTING THE REACH OF THE BRAKE LEVERS ................................................................................................... 12
6.5 ADJUSTING ANGLE OF HANDLEBARS, BAR ENDS AND BRAKE LEVERS .................................................................... 12
7FOLDING & UNFOLDING YOUR BIRDY .............................................................. 14
7.1 UNFOLDING YOUR BIRDY.................................................................................................................................... 14
7.2 FOLDING YOUR BIRDY........................................................................................................................................ 17
8HOW DO I USE A QUICK-RELEASE?.................................................................. 23
9BRAKES ................................................................................................................ 24
9.1 HOW BRAKES WORK, AND HOW THEY GET WORN OUT.......................................................................................... 24
9.2 CHECKING, ADJUSTING AND BALANCING BRAKES................................................................................................. 25
10 GEARS............................................................................................................... 26
10.1 DERAILLEUR GEARING................................................................................................................................. 26
10.1.1 How they work / Maintenance .................................................................................................................... 27
10.1.2 Checking and adjusting the gears.............................................................................................................. 27
10.1.3 End-limit adjusters: ..................................................................................................................................... 28
10.2 HUB GEARS .................................................................................................................................................... 29
10.2.1 How they work and how to use them. ........................................................................................................ 29
10.2.2 Adjustment and checking ........................................................................................................................... 29
11 CHAIN CARE AND MAINTENANCE................................................................. 29
11.1 CHAIN WEAR ...................................................................................................................................................... 29
11.2 CHAIN CLEANING ............................................................................................................................................... 30
11.3 THE CHAIN TENSIONER ....................................................................................................................................... 30
12 WHEELS AND TYRES ...................................................................................... 30
12.1 TYRES, TUBES, RIM TAPE, VALVES AND AIR PRESSURE........................................................................................ 31
12.2 RIM TRUING & SPOKE TENSION.......................................................................................................................... 32
12.3 SECURING WHEELS WITH AXLE NUTS OR QUICK-RELEASES................................................................................ 32
13 FIXING A PUNCTURE ....................................................................................... 33
13.1 WHEEL REMOVAL ............................................................................................................................................... 33
13.2 REMOVING THE TYRE ......................................................................................................................................... 33
13.3 FITTING THE TYRE .............................................................................................................................................. 34
13.4 MOUNTING THE WHEELS..................................................................................................................................... 35
14 STEERING BEARINGS OR HEADSET............................................................. 35
14.1 CHECKING THE STEERING .................................................................................................................................. 36

Birdy Manual Copyright PED Bicycles P/L © 2002
Page 3 of 60
14.2 ADJUSTMENT ..................................................................................................................................................... 36
15 STEM HINGE LEVER ADJUSTMENT............................................................... 38
16 BIRDY FOLDING JOINTS ................................................................................. 38
16.1 THE REAR SWING-ARM CATCH................................................................................................................... 38
16.2 THE FRONT SWING-ARM CATCH ................................................................................................................ 39
16.3 FRONT SUSPENSION BEARINGS........................................................................................................................... 40
16.4 REAR SUSPENSION BEARINGS ............................................................................................................................ 40
17 ADJUSTING THE SUSPENSION ...................................................................... 40
17.1 CHANGING THE REAR ELASTOMER ...................................................................................................................... 40
17.2 CHANGING THE FRONT ELASTOMER .................................................................................................................... 41
18 TRANSPORTING YOUR BIRDY ....................................................................... 41
18.1 TRAIN TRAVEL.................................................................................................................................................... 41
18.2 AIR TRAVEL........................................................................................................................................................ 42
19 ACCESSORIES ................................................................................................. 42
19.1 LIGHTING ........................................................................................................................................................... 42
19.2 MUDGUARDS...................................................................................................................................................... 43
19.3 FRAME-FIXED CARRIER RACK.............................................................................................................................. 43
19.4 KICKSTAND ........................................................................................................................................................ 43
19.5 PUMP................................................................................................................................................................. 43
19.6 CHANGING THE STEM ......................................................................................................................................... 44
20 GENERAL CARE AND INSPECTION TIPS ...................................................... 44
20.1 WASHING AND CARE........................................................................................................................................... 45
20.2 STORAGE........................................................................................................................................................... 46
20.3 SERVICING AND MAINTENANCE INTERVALS .......................................................................................................... 46
21 STAYING UP TO DATE..................................................................................... 47
22 GUARANTEE..................................................................................................... 48
23 TIGHTENING TORQUES................................................................................... 49
24 BIRDY SPECIFICATIONS ................................................................................. 50
25 SERVICE AND MAINTENANCE INTERVALS .................................................. 52
26 PRESSURE CONVERSION TABLE.................................................................. 53
27 ACCESSORY AND SPARE PART STOCK CODES......................................... 54
28 WHICH DOCUMENTS ARE IMPORTANT? ...................................................... 57
29 BICYCLE PASSPORT ....................................................................................... 58

Birdy Manual Copyright PED Bicycles P/L © 2002
Page 4 of 60
1 ANATOMY OF A BIRDY
This picture shows the anatomy of a Birdy. If there are any technical words used in this
manual that you are unfamiliar with, you should be able to find them on this picture.

Birdy Manual Copyright PED Bicycles P/L © 2002
Page 5 of 60
2 INTRODUCTION
Dear customer,
Congratulations on being a new Birdy owner. We hope the Birdy brings you lots of fun and
years of enjoyment.
The Birdy is a very high tech bike – it is made from lightweight Aluminium alloy, has full
suspension, high-end components and a comfortable riding position. The Birdy has been
carefully manufactured with the benefit of years of experience and fully tested to ensure
the highest standards of safety and comfort.
In order to fully enjoy your bicycle, a certain amount of care and maintenance is required.
This owners manual will guide you in the safe usage and correct maintenance of your new
bicycle. However, this manual is not intended as a fully comprehensive workshop manual.
There are certain maintenance procedures and tasks described in this manual that should
only be carried out by qualified bicycle mechanics who have the required knowledge and
tools necessary to complete the job.
Please read this manual thoroughly and pay special attention to the safety warnings.
Remember that the Birdy uses unique innovative technology, so even if you’re very familiar
with bicycles, you should still read this manual and perform the quick check procedure
before every ride. See Page 8 for more details.
Because of regular model changes and improvements, it is possible that the instructions
given in this manual may be out of date. Please visit www.birdy.com.au to find the latest
version of this manual in downloadable PDF format.
If you are in any doubt about any of the advice or procedures in this manual, please
consult your dealer.
Your Birdy also comes equipped with some specialised components from other
manufacturers. Manuals from these manufacturers will be included with your Birdy when
you purchase it. These may have important maintenance and safety information that
should be read in conjunction with this manual. You are strongly advised to read these
we will send you out a new one.

Birdy Manual Copyright PED Bicycles P/L © 2002
Page 6 of 60
About this manual
Important information in this manual is highlighted in grey and will have one of three large
labels: Danger, Warning or Tip. Definitions of these three labels are provided below:
Danger: If you see the label ‘Danger’ in this manual, then if the advice is
NOT followed, there is a high chance you will be involved in a serious
accident.
Warning: If you see the label ‘Warning’ in this manual, then the advice is
intended to improve your riding safety.
Tip: If you see the label ‘Tip’ in this manual, then the advice that follows
will normally give you a shortcut or some handy information that will
make things easier for you.
Although this manual has considerable useful information relating to Birdys in general, it
has been especially developed and prepared for Birdys sold in Australia and New Zealand.
If you have purchased a Birdy overseas you will most likely have a different model from the
Australian and New Zealand range. We can in no way warrant that this manual is suitable
for Birdys obtained outside of Australia and New Zealand.
General Warning:
Bicycling can be a hazardous activity even under the best circumstances. Proper
maintenance of your bicycle is your responsibility as it helps reduce the risk of injury to you
or others. This manual contains many “Warnings and Danger” messages that should be
read and thoroughly understood before you ride your bike.
Before you ride, be sure you familiarize yourself with all of the following safeguards:
¤ Be sure that the Birdy has been fitted to your size. See Page 10 for more information.
¤ Check your bicycle before every ride. Special attention should be given to brakes,
derailleurs, wheels and tyres and all quick release levers.
¤ In traffic, always ride with full attention so that you do not endanger yourself or others.
¤ Always wear a helmet.
¤ Wear bright or light coloured clothing so that you can be easily seen.
¤ Know and obey traffic laws of the country or state where you will be riding your
bicycle. Your bicycle is regarded in most countries as a vehicle when on the road and
is subject to the same rules as motor vehicles.
¤ Always ride single file and with the traffic, never against it.

Birdy Manual Copyright PED Bicycles P/L © 2002
Page 7 of 60
¤ Use proper hand signals to warn other road users, other cyclists, and pedestrians of
your intention to stop or turn.
¤ Never ride at night without reflectors and a proper lighting system.
What can I and can’t I do with my Birdy?
Your Birdy is a highly innovative quality bicycle that will bring you years of enjoyment and
open up new forms of cycling that you may not have experienced. However please keep in
mind that:
Your Birdy is NOT designed for stunts or jumps
Your Birdy is NOT as strong or robust as a mountain bike
Your Birdy is NOT designed for the high speeds of a road-racing bike.
The Birdy has a very strong frame and strong welding joints. You do not need to treat your
Birdy delicately and riding off footpaths and other general use activities are fine. However
using it for jumps or stunts is extremely likely to damage the frame, void your warranty and
may result in an injury.
The Birdy should generally be used on sealed roads, however use on well packed dirt
roads is OK. Bear in mind that the rear derailleur has limited ground clearance so any kind
of mountain bike track or muddy puddles may cause problems. Also you will find stability
on loose metal roads and other off-road areas more challenging with small wheels than a
large wheeled mountain bike.
The smaller 18” wheels of the Birdy and any slight play in the folding section of the front
fork system can lead to instability in the form of speed wobble under high speed (This is
also known as shimmy). This can be overcome by always ensuring that both hands are
firmly on the handlebars. Some riders like to ride for short distances without any hands on
the handlebars so they can sit upright. Not only is this dangerous, it is also virtually
impossible on a small wheeled bike because of its geometry. Please do not attempt it.
When going down a very steep hill, you can reach very high speeds on any bike, however
remember to always ride at a speed that is comfortable for you and within the limits of your
bike. At high speed on a Birdy remember that you are not riding a high performance racing
bike designed for speed, you are on a high performance multi-purpose road bike with small
wheels that is designed to fold.
3 LEGAL REQUIREMENTS
Legal requirements vary from country to country and you should always comply with them.
They can be confusing and may not always appear intuitive. For example, in some
countries it is not mandatory to wear a helmet, but it is mandatory to have a dynamo light
system fitted. In other countries it is mandatory to wear a helmet but not mandatory to have
a dynamo installed on your bike.
As another example of potential confusion, in Australia, it is possible to purchase a helmet
that meets standards requirements, but is not permitted for use on public roads. To avoid
inadvertently breaking the law, always consult your bike dealer for their professional
opinion.

Birdy Manual Copyright PED Bicycles P/L © 2002
Page 8 of 60
4 BEFORE THE FIRST RIDE
Before the first ride, work through the following checklist of important safety messages.
Load capacity
The Birdy is designed for a maximum rider height of around 1.95m (6’ 5“) – depending on
leg length – and for a maximum loading (rider weight and luggage weight) of 110kg
(245lb). Exceeding these parameters could damage the frame and void your warranty or
lead to a serious accident.
Use the Birdy only on streets and surfaced roads
We take no responsibility for the consequences of inappropriate use, assembly errors,
accidents, racing, jumping or similar activities.
Are you confident using the brakes?
In compliance with the mandatory safety standard AS/NZS 1927:1998, your Birdy will be
setup so that the right brake lever operates the front brake and the left lever operates the
rear brake.
Modern brakes are much more powerful than old ones. Before you take to the streets, test
your brakes and get familiar with them away from the traffic. You can read more about the
braking system on Page 24.
Are you confident that you know how to change gears and how the gears work?
Ensure that you get familiar with the gears somewhere where there’s no traffic. You can
read more about gearing systems on Page 26.
Are the saddle and handlebars correctly adjusted?
The saddle should be adjusted so that with the pedal in its lowest position, you can just
reach it with your heel. Check that you can stay in the saddle and still reach the ground
with your tiptoes. Your dealer will be able to help you if you’re not happy with your saddle
position. You can read more about adjusting the saddle on Page 10.
5 BEFORE EVERY RIDE
It is important to check the following items before every ride. Some of these are Birdy
specific, so even if you are very familiar with bikes, you should still read this list and
perform the checks.
¤ Make sure that the rear swing-arm catch and the front swing-arm catch are both
correctly engaged. See Page 38 for more information.
¤ Ensure that the front fork pivot sets on the front suspension fork are securely
fastened. See Page 40 for more details.
Danger: If the Front Fork Pivot Sets are loose, speed wobble can occur
which may result in a serious accident.

Birdy Manual Copyright PED Bicycles P/L © 2002
Page 9 of 60
¤ Make sure that the Birdy is properly unfolded and all folding joints are securely
closed. See Page 14 for more information.
¤ Make sure that the quick-releases and nuts on front and rear wheels are all
correctly fastened. Read more about quick release systems on Page 22.
¤ Make sure that the quick release on the handlebar stem is correctly and firmly
fastened. Hold the front wheel between your legs and attempt to twist the handlebar
with your hands. If it doesn’t turn it is secure.
¤ Make sure that the quick release on the seatpost is securely fastened. Grasp the
front and rear of the saddle and attempt to twist it. If the seatpost doesn’t move at all,
it’s secure.
¤ Check whether the tension lever on the stem hinge is correctly closed. Ensure that
both hinge bolts for the stem hinge present, and secured with spring-clips. See Page
37 for more information.
Danger: If quick-releases and securing nuts are not correctly fastened,
parts of the bike could come loose which could result in a serious
accident.
¤ Check that the tyres are in good condition. Ensure that they don’t wobble when you
spin them and they are at the correct pressure. Also look for any obvious signs of
wear or any deep cuts or grooves in the tread. Remember your tyres are your contact
points with the road - you should never take any chances with tyres. If you are in any
doubt, consult your dealer. Learn more about tyres on Page 30.
¤ Perform a stationary brake test by pulling the levers hard towards the handlebar.
The brake blocks should press with their full area against the rims, without touching
the tyre. You should not be able to pull the lever right up to the handlebar Further
information on braking can be found on Page 24.
¤ If you are riding at night, ensure that you have an adequate lighting system installed.
Generally this means a white light at the front and a red light at the rear, however you
should determine the legal requirements in the country you are riding your bike.
Danger: Do not ride the bike if your bike fails any of these checks. If you
are in any doubt, always consult your dealer or a qualified bicycle
mechanic. A defective bike can lead to serious accidents.
As you ride, always listen out for unusual rattling noises or unusual handling – these could
indicate a problem. If this occurs, check bearings, pivots, all fastenings and parts of the
folding mechanism. Or, if you are not sure or confident take your bike to a qualified bicycle
mechanic.

Birdy Manual Copyright PED Bicycles P/L © 2002
Page 10 of 60
6 FITTING THE BIRDY TO THE RIDER
Fitting the Birdy to the rider is important for comfort, efficiency, but most importantly for
safety. Please read this section to fully understand how your Birdy can be adjusted to fit
you. Your dealer should have made any adjustments for you, however if you are confident
you may wish to fine-tune the adjustments yourself.
6.1 Adjusting for the correct saddle height
In order to obtain the most comfortable riding
position, and to obtain the best possible pedalling
efficiency, the height of the saddle should be set
correctly in relation to the riders leg length. The
correct saddle height should not allow leg strain from
over-extension, and the hips should not rock from
side to side while pedalling.
While sitting on the bicycle with one pedal at its
lowest point, place the ball of your foot on that pedal.
The correct saddle height will allow the knee to be
slightly bent in this position. If the rider then places
the heel of that foot on the pedal the leg should be
almost straight.
When you have closed the seatpost quick release, check that the seatpost is securely fixed
by grasping the front and rear of the saddle and attempt to twist it. If it doesn’t move at all,
it’s secure.
Danger: Never ride your bike if the seatpost is withdrawn beyond the
‘MINIMUM INSERTION’ mark. This marking must not be visible: if it is,
the seatpost could crack or the frame could be damaged by additional
torque action from the rider’s weight. This could cause serious injury
and/or void your warranty on the frame.
Warning: When closing the quick release for the seatpost, ensure that
the lever is in-line with the frame and not sticking out at an odd angle.
This will minimise any chance of you catching the quick release with your
trouser leg while pedalling and opening it while riding.
6.2 Adjusting the handlebars
Birdys equipped with ‘adjustable handlebar including extension’ (Silver, Lime Green and
Blue).
You can adjust the height of the stem easily. Just undo the quick-release, adjust the height
and fasten the quick release again. You must ensure that the handlebars are straight
whenever you have adjusted the stem.

Birdy Manual Copyright PED Bicycles P/L © 2002
Page 11 of 60
Tip: Maximum height is usually obtained when the handlebar height is
equal to the height of the seat.
Danger: Make sure that the adjustable stem is fastened securely after
adjusting the height of the stem. Hold the front wheel between your legs
and attempt to twist the handlebar with your hands. If it doesn’t turn, it’s
secure. This particular quick release is one of the most important on
the Birdy. If this quick release is loose, you are extremely likely to have
a serious accident.
Danger: Do not ride if the stem is withdrawn beyond the ‘MINIMUM
INSERTION’ mark. Serious injury may result if you do.
If the distance from the handlebar to the saddle is too long or too short for you, it is
possible to change the handlebar extension to achieve a better riding position. Consult
your dealer who will be able to supply alternate length stem extension pieces. Gear and
brake cables may need to be lengthened if this is altered. Birdys equipped with ‘Allround
stem’ (Birdy Red for Australia and New Zealand). The height on the all round handlebar is
not adjustable so no special instructions are required.
6.3 Adjusting reach and setting the saddle angle
To obtain maximum comfort and safety, make
sure that you do not overextend your arm reach
while riding. While placing your elbow against the
seat and stretching out your arm, the distance
between the out-stretched fingertips and the
handlebar should be between 2cm-5cm. To
adjust this distance, there are two options: either
slide the saddle forwards or backwards on its
rails or replace the stem with a shorter or longer
stem. Details are provided below:
The position of the saddle can be altered by sliding it along the rails at the top of the
seatpost. This will also affect pedalling: if the saddle is right back, you’ll be pedalling more
‘from behind’, and vice versa.
Another option for adjusting reach is to increase/decrease the length of the stem. All Birdys
except Birdy Red have an 80mm stem fitted as standard.
The geometry of the Birdy was designed so that for normal use, the saddle is positioned as
far forwards as possible. This minimises folded size.
The angle of the saddle should in general be set level, however the final setting relates to
personal preference. To change the angle or position on the rails, follow these steps:
¤ Loosen both seatpost clamp bolts; turning each of them at most two or three turns
anticlockwise. Do not completely unscrew as the whole assembly can fall apart and it

Birdy Manual Copyright PED Bicycles P/L © 2002
Page 12 of 60
can be quite fiddly to re-assemble. Observe the recommended tightening torque of 9-
12 Nm for the bolts.
¤ Slide the saddle forwards or backwards as required. Often a sharp slap to the saddle
is needed to free it up after the bolts have been loosened. (Re-tighten the bolts firmly,
turning them clockwise).
¤ Depending on which of the bolts is done up first, the saddle angle may be changed.
¤ When you’ve tightened everything, check whether the saddle tilts, by pushing
alternately on the front and back. Listen for creaking noise or any obvious play when
moving the saddle. Tighten the bolts if you think it is still loose.
Danger: If you attempt to fit a different saddle to the Birdy, check that the
saddle rails are designed for a 7mm clamp. Other types of saddle rail
may cause failure of the seat clamp, which may result in a serious
accident.
6.4 Adjusting the reach of the brake levers
The distance between brake levers and
handlebar grips is adjustable. The levers can be
brought closer to the bars, making them easier to
use for riders with small hands. The lever
position where the brakes start to ‘bite’ will also
need to be adjusted for finger length if you adjust
the reach.
To adjust the brake lever reach, perform the
following steps:
¤ There’s a small adjuster screw just near where the cable goes into the lever housing
(see arrow on diagram). Screw this adjuster in, and observe how the lever position
changes.
¤ When you’ve reached the desired position, you must check that there’s still enough
available motion so that there is a little lever movement before the brakes ‘bite’. If
not, you will need to adjust the cable length.
Danger: You should never be able to pull the levers all the way to the
handlebar. Maximum braking power should be reached before this.
6.5 Adjusting angle of handlebars, bar ends and brake levers
The handlebars on the Birdy bend at a slight angle towards the ends. Adjust the
handlebars so that your wrist joints and hands are relaxed and are not too sharply angled
outwards. To adjust the handlebar position, follow these steps:

Birdy Manual Copyright PED Bicycles P/L © 2002
Page 13 of 60
¤ Undo the hex bolts on the top of the stem a few turns.
¤ Rotate the handlebar until it reaches the desired position.
¤ Check that the stem clamp is exactly in the middle of the handlebars.
¤ Re-tighten the hex bolts with a torque of 12-14Nm.
If you’ve adjusted the handlebar angle, you will also need to adjust the brake lever position
and gear changers.
¤ Loosen the Allen key on the lever housing clamps of the brake lever.
¤ Rotate the brake lever on the handlebar until it feels like it is in a comfortable position.
Sit on the saddle and grip the levers with your fingers. Check that your hand makes a
straight line with your forearm.
¤ Re-tighten the bolts and check that the brake lever housings don’t rotate on the
handle bar.
Bar ends offer additional hand positions while riding. They are generally fitted so that the
hands rest comfortably on them, when the rider is in a slightly leant-forward position. They
usually make about a 25-degree angle upwards. To adjust, follow these steps:
¤ Undo the screws, usually found on the lower part of the bar-end clamps, at most one
or two turns.
¤ Rotate the bar ends as desired and check that both sides are at the same angle. (It is
not recommended to point the bar ends back towards you as they may injure you if
you fall forward in an accident).
¤ Re-tighten the bar end clamp bolts with the appropriate tightening torque as provided
by the bar end manufacturer.
¤ Check that everything is tight by attempting to rotate the bar ends by hand.
Danger: Always be sure that the securing bolts on the stem, handlebars,
bar ends and brakes are tightened with the appropriate tightening torque.
The appropriate values are listed on Page 23. Over tightening these
parts could be as serious as leaving them loose in that the bolts may
crack or parts may be crushed.

Birdy Manual Copyright PED Bicycles P/L © 2002
Page 14 of 60
7 FOLDING & UNFOLDING YOUR BIRDY
7.1 Unfolding your Birdy
¤ Stand on the left hand side of your Birdy (see Photo A). Unfold the handlebar stem
upwards and close the hinge lever (see Photo B).
¤ Open the seat-post quick-release and pull out the seat-post to your usual riding
height (see Photos C, D). (If you don’t know this yet, you can fine-tune it later). Close
the quick release. You can mark the seat post with a pencil for the optimum position,
but do NOT scratch the surface of the seat post with any object. Any scratch into the
surface may alter the strength of the anodised aluminium seatpost.
Danger: Never ride with the seatpost pulled out beyond the “Minimum
Insertion” mark. (Ensure that you have seen this mark on the seat post
and are familiar with what it looks like.)
¤ Turn the handlebar anticlockwise a few centimeters so that the (still folded) front-
wheel moves slightly away from the frame (see Photo E). At the same time lift the
bike by the saddle so that the rear wheel swings backwards. While still holding the
bike up, push the rear wheel back with your foot and lower the bike down to the
ground (see Photos F, G, H).
¤ The black rear swing-arm catch (next to the elastomer) should lock into place. Ensure
that the catch is in place. Secure manually if required.
¤ Lift the bike by the handlebars (while leaving the back wheel on the ground) and
swing the front-wheel under the bike (around a 180 degree rotation) until the front
suspension clicks into the swing-arm (see Photo I, J, K, L). You do not need to rotate
or move the handlebars at all while swinging the front wheel into the correct position.
The suspension spring on the front swing-arm should automatically click into place.
Secure manually if required.

Birdy Manual Copyright PED Bicycles P/L © 2002
Page 15 of 60
Unfolding Your Birdy: Steps A-F

Birdy Manual Copyright PED Bicycles P/L © 2002
Page 16 of 60
Unfolding Your Birdy: Steps G-L

Birdy Manual Copyright PED Bicycles P/L © 2002
Page 17 of 60
7.2 Folding Your Birdy
¤ Stand on the left hand side of the bike (see Photo A) and change into the highest
gear (smallest sprocket). Rotate the pedals to ensure the bike has in fact changed
into the highest gear and ensure that the pedal on the left hand side is down to its
lowest position (see Photo B).
¤ Place your left hand on the right handlebar. Lift the bike by the handlebar off the
ground and pull it towards your left armpit until you can reach the front suspension
quick release with your free right hand (see Photo C). The back wheel should still be
on the ground.
¤ With your right hand push the release lever on the front suspension spring forward to
disengage the front swing-arm. With your right hand rotate the swingarm (and wheel)
around until the wheel grips up against the fixing screw on the front fork (see Photos
D, E).
¤ Gently pull the rear swing-arm release lever with your right hand (see Photo F) away
from the bike and at the same time lift the bike with your left hand by the saddle and
the rear swing-arm will start to rotate. Keep lifting the bike up and backwards until the
rear swing-arm is completely folded underneath the main tube (see Photo G, H, I).
¤ While performing this step turn the handlebar with your left hand a few centimeters
anticlockwise so that the back-wheel has enough room to fold under the main tube.
¤ Now turn the handlebar clockwise so that the front-wheel rests gently against the rear
wheel.
¤ Open the hinge lever on the stem and fold the stem down (see Photo J).
¤ Open the quick release for the seat-post and push the seat-post as far down as
possible. It is important that the seat post is fully inserted as it helps your Birdy to sit
up straight when folded (see Photo K).
Now relax (see Photo L).

Birdy Manual Copyright PED Bicycles P/L © 2002
Page 18 of 60
Folding Your Birdy: Steps A-F

Birdy Manual Copyright PED Bicycles P/L © 2002
Page 19 of 60
Folding Your Birdy: Steps G-L

Birdy Manual Copyright PED Bicycles P/L © 2002
Page 20 of 60
Tips for Folding
Tip 1: How do I stop my Birdy from falling over when folded ?
When the bike is folded, always make sure you put the seatpost in
the lowest position. The bottom of the seatpost builds a triangle
with the front and back wheel and helps your Birdy stand up
straight when folded. If the seatpost is not fully inserted the bike
may fall to one side when folded.
If your Birdy continues to want to fall over when
folded, there is a plastic adjustment plate that
can be moved. In the photo below, the plastic
plate can be moved by loosening the two bolts. If
you then push it downwards a few millimetres,
secure the bolts and retry folding you should find
the Birdy sits much better when folded. Repeat
this procedure a few times to get it just right.
Table of contents