Pedigo P-172 User manual

P-172P-172
Part Number: 504-0060-00
Revision: 08/2020
Installation & Operation Manual
* Shown with some accessories

1
Contents
Owner’s Product Identification .............................................2
Important Information ...................................................3
Scope and Purpose of This Manual ...................................................3
Intended Use of Product............................................................3
Safety Instructions ................................................................3
Explanation of Safety Symbols and Notes ..............................................4
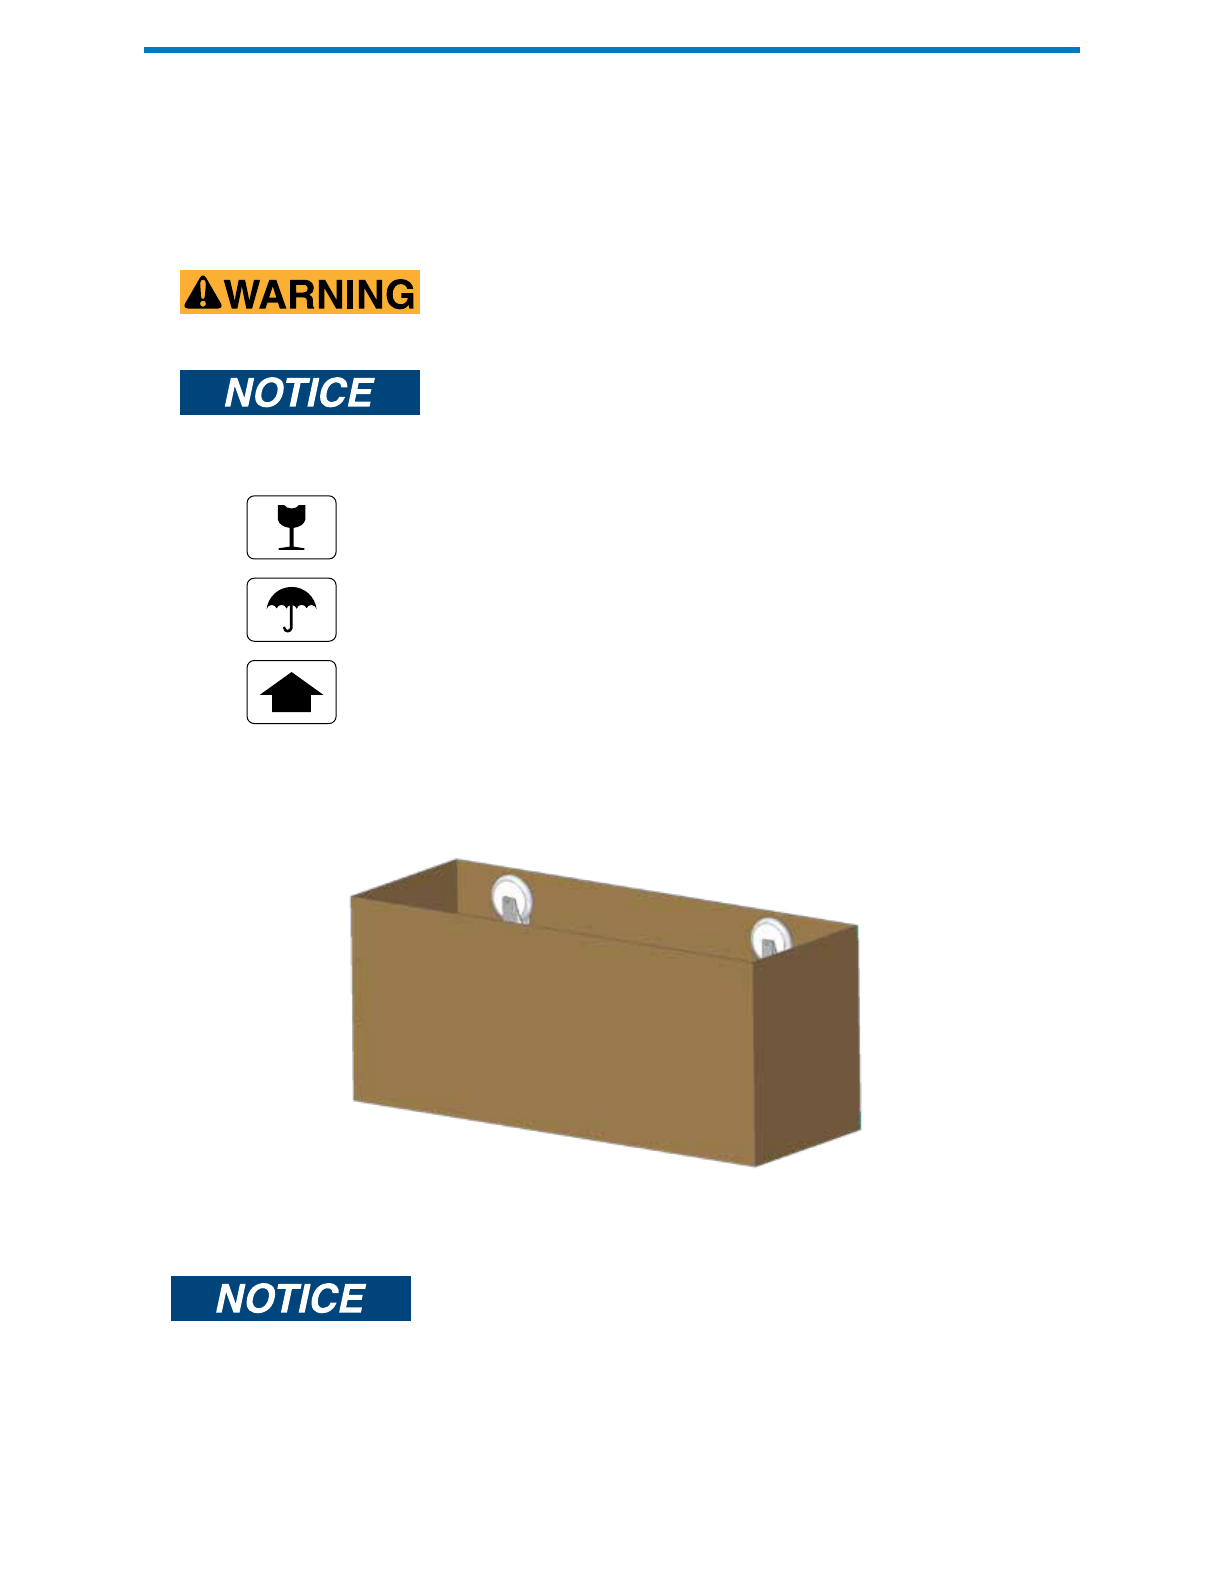
Transportation and Storage Conditions ................................................4
Installation ............................................................5
Unpacking ......................................................................5
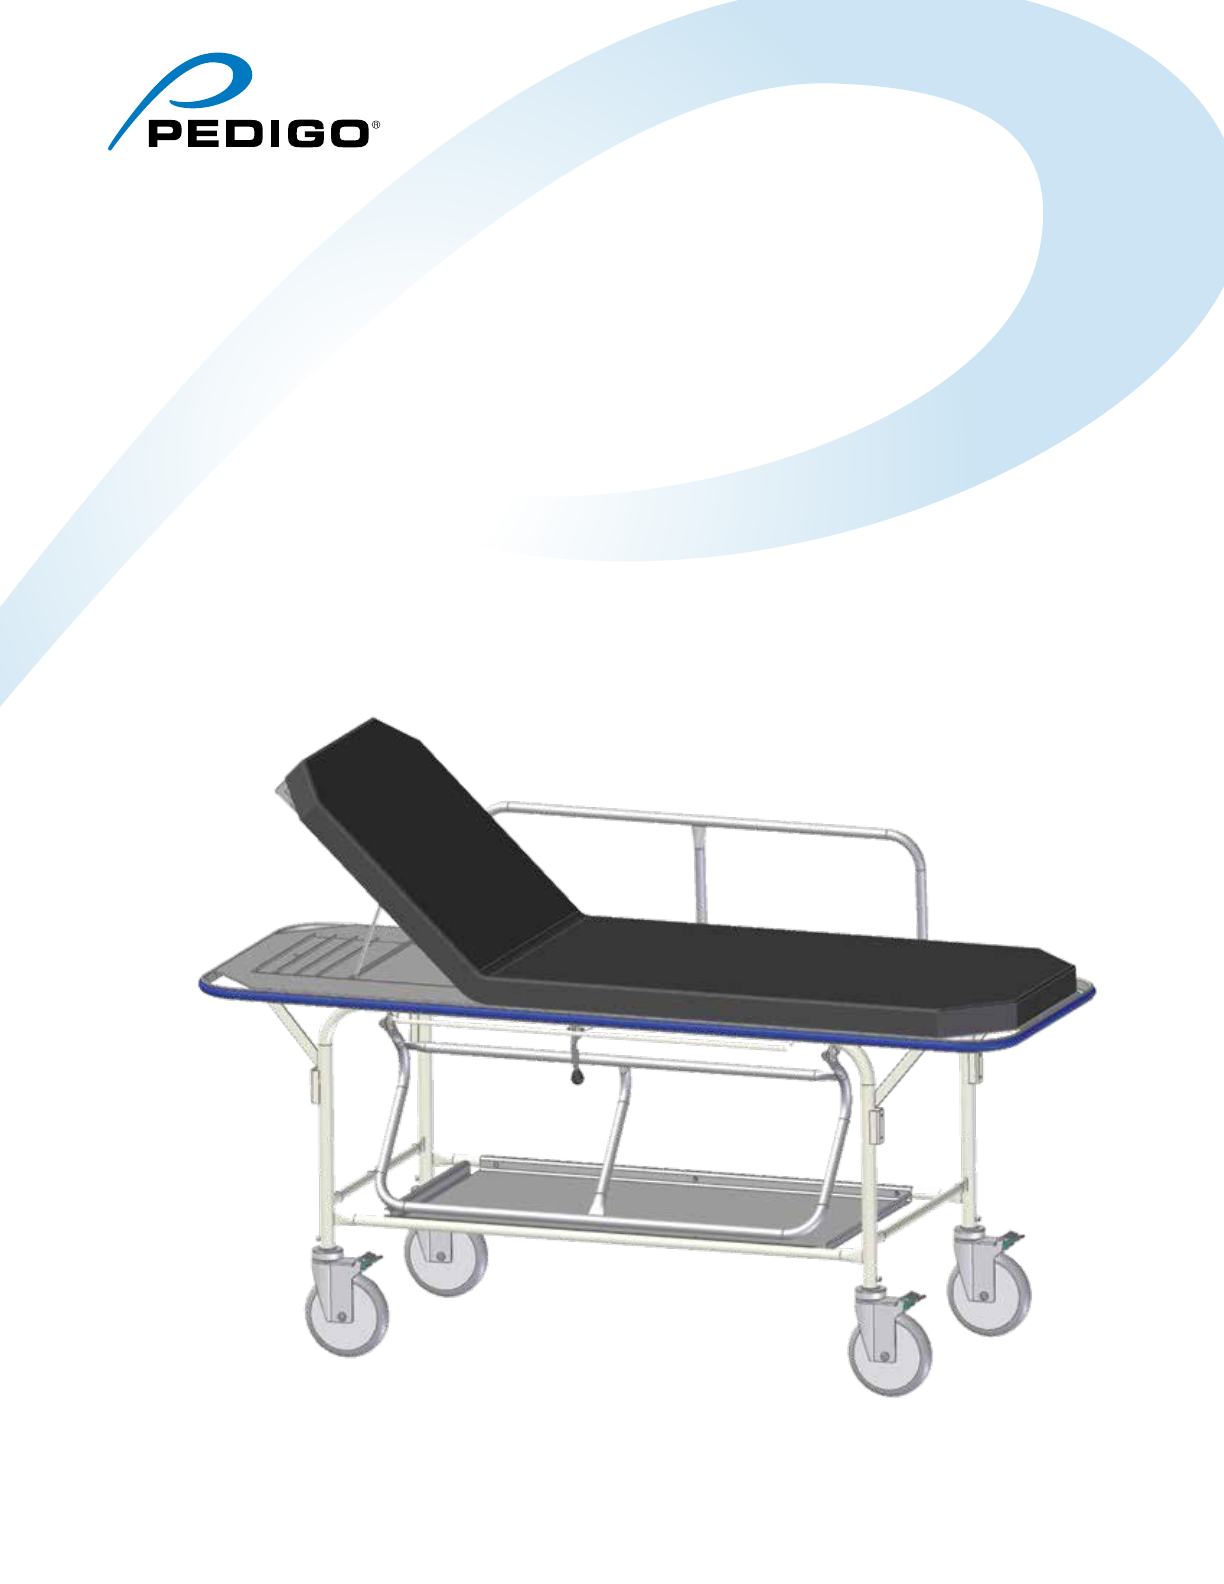
Description ...........................................................6
Introduction .....................................................................6
Features........................................................................6
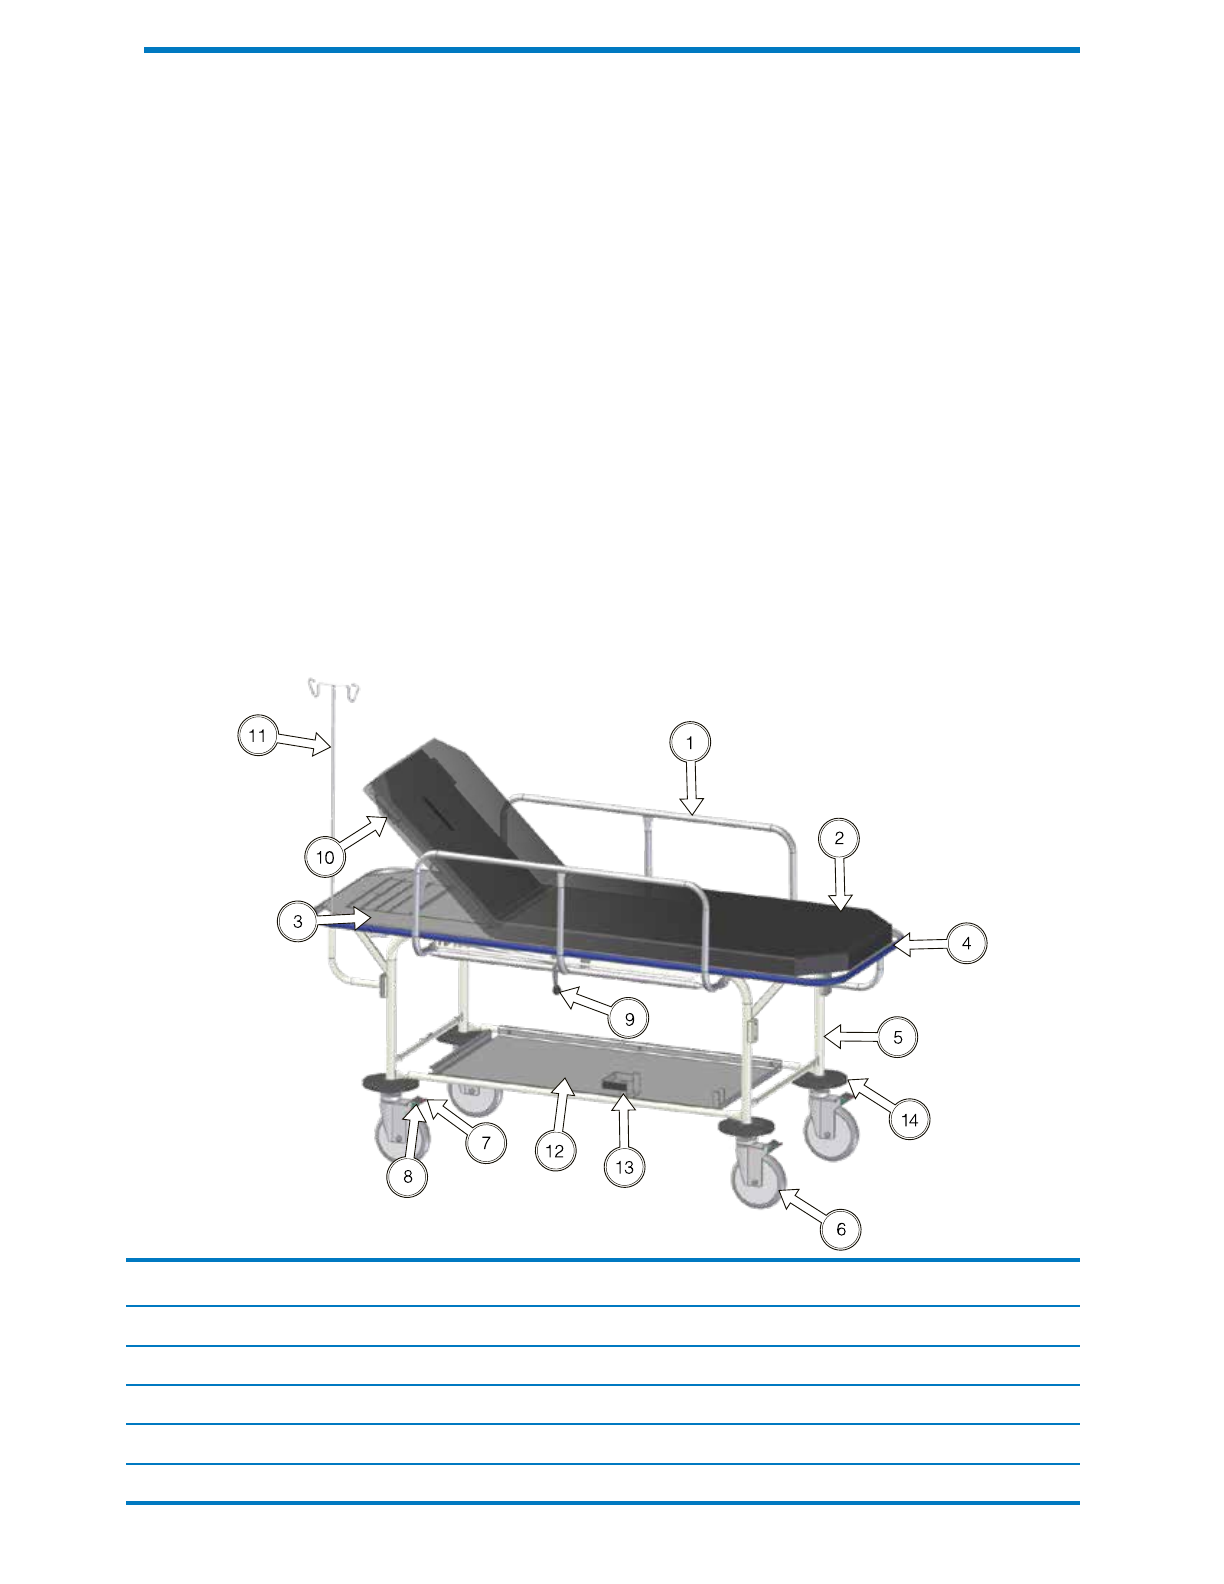
Components Overview ..................................................6
Controls and Indicators ..................................................7
Checklist of Installed Options & Authorized Accessories .........................8
Stretcher Operation .....................................................9
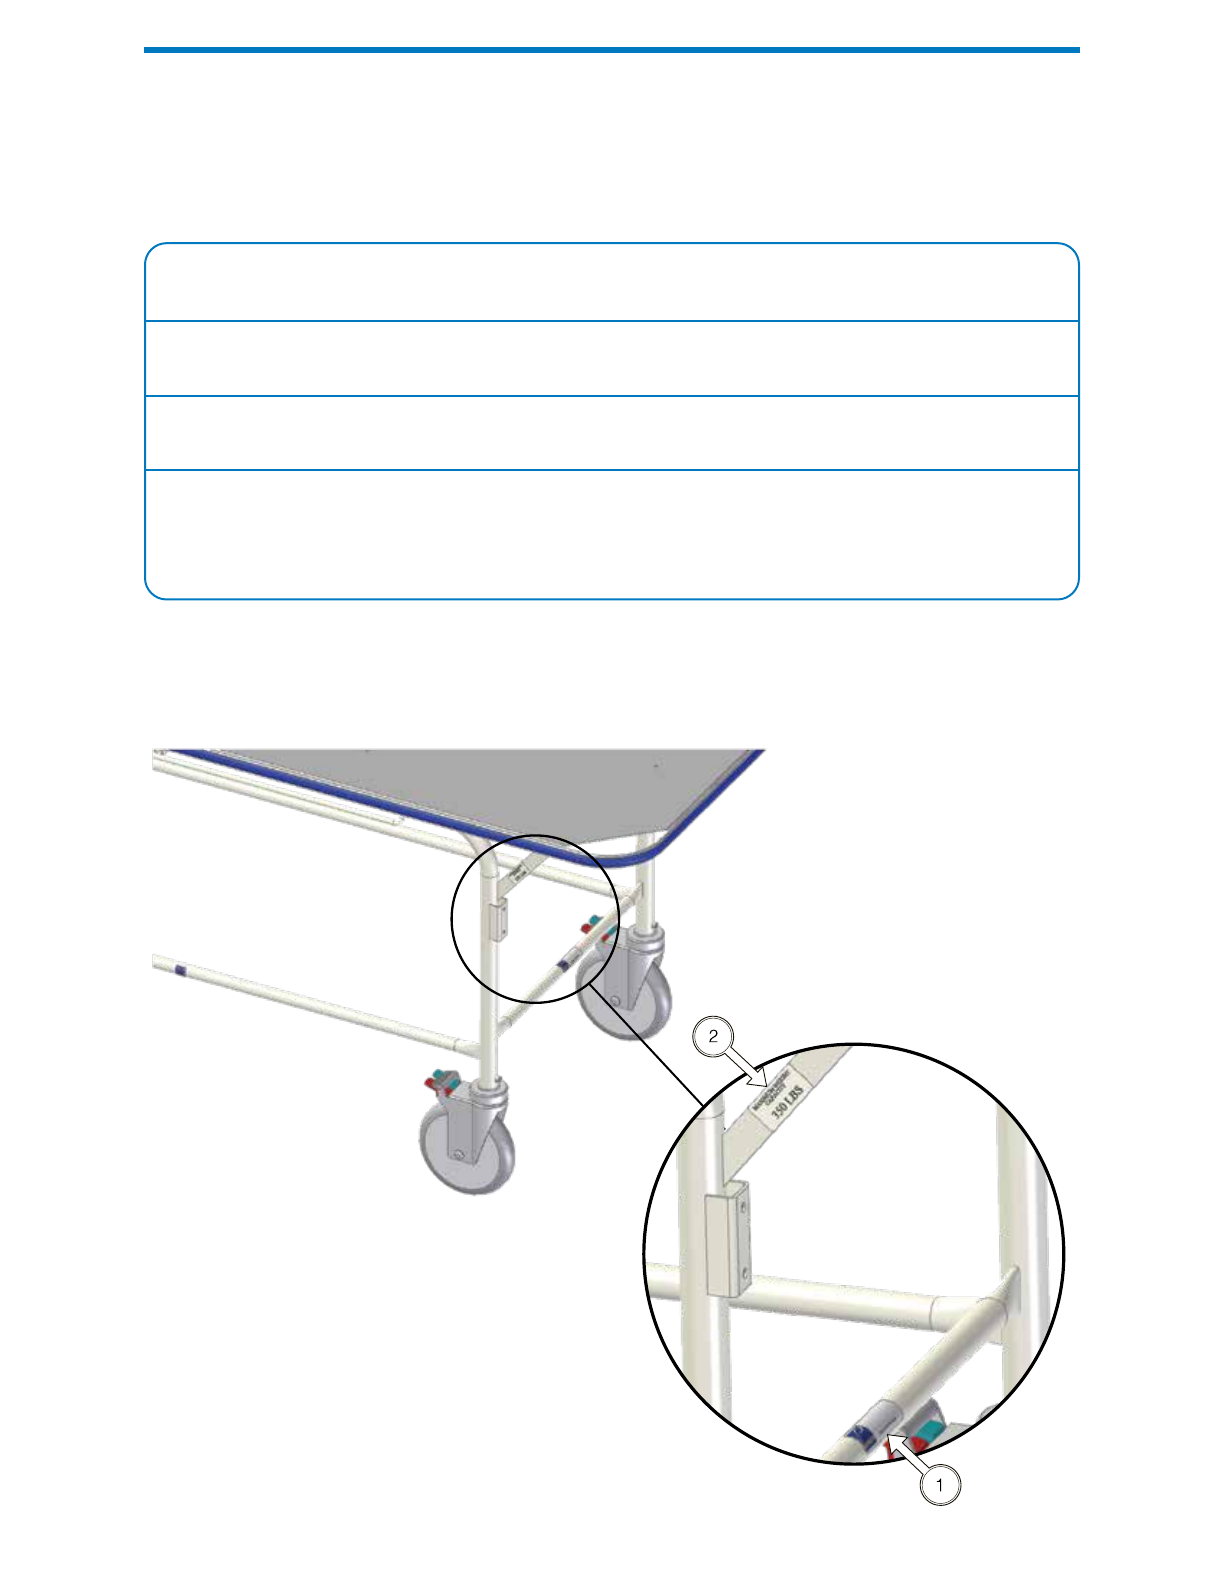
Braking and Steering Controls .......................................................9
Side Rails (Option) ...............................................................10
Fowler Section Positioning (Option) ..................................................11
Locating Sockets for I.V. Poles (Option) ...............................................12
Maintenance .........................................................13
Cleaning.......................................................................13
Preventive Maintenance...........................................................14
Scheduled Maintenance ..........................................................15
Calling for Service .....................................................15
Specifications ........................................................16
Limited Warranty ......................................................17

2
Owner’s Product Identification
Information that you will need to provide for servicing - key information is highlighted.
Date of Purchase Serial Number
Name of Owner / Facility / Department Weight Capacity
Name of Authorized Pedigo Dealer Telephone # of Authorized Pedigo Dealer
Address of Authorized Pedigo Dealer

3
Important Information
Scope and Purpose of This Manual
This manual covers complete instructions for the installation, operation, and normal care of the Model
P-172 General Transport Stretcher. It is intended that this manual be used by any medical personnel
responsible for operating the stretcher while transporting a patient, while performing a medical
examination or procedure, or while performing operator-level maintenance.
Intended Use of Product
The intended use of this product is to support and transport patients throughout the hospital, clinic,
same day or ambulatory surgery center, or any examination, treatment, or in-procedures environment.
This could be before, during, and/or after diagnostic, therapeutic, interventional medical and / or
surgical procedures, examinations, and/or treatment.
Safety Instructions
The primary concern of Pedigo is that this equipment is operated and maintained with the safety of the
patient and staff in mind. To assure safer and more reliable operation:
• Read and understand this manual before attempting to install or operate the stretcher.
• Assure that appropriate personnel are informed on the contents of this manual; this is the responsibility
of the purchaser.
The maximum patient weight allowed on the stretcher litter top is 350 lbs
(159 kg) . Failure to adhere to this limit could result in personal injury to
the patient or caregiver.

4
Explanation of Safety Symbols and Notes
Indicates a hazardous situation, that, if not avoided, will result in death or
serious injury. This signal word is limited to the most extreme situations.
Indicates a hazardous situation, that, if not avoided, could result in death
or serious injury.
Indicates a hazardous situation, that, if not avoided, could result in minor
or moderate injury. It may also be used to alert against unsafe practices.
Safety instructions (or equivalent) signs indicate specific safety-related
instructions or procedures.
Notice is used to address practices not related to physical injury. This
includes instructions relative to preventing equipment damage and
proper function.
Transportation and Storage Conditions
Ambient Temperature Range -30ºC to +60ºC (-22ºF to 140ºF)
Relative Humidity 10% to 90% (non-condensing)
Atmospheric Pressure 0.49 atm 1.05 atm (50kPa to 1.06kPa)

5
Installation
Unpacking
The P-172 stretcher weighs approximately 95 lbs (43 kgs) without options.
Get an assistant if necessary and use proper lifting techniques . Failure
to do so could result in serious injury.
To avoid damaging the stretcher’s upholstered top or other components,
do not use a knife or other sharp object to open the stretcher’s packaging.
Indicates that the product is fragile; do not handle roughly.
Indicates that the product must be kept dry.
Indicates the proper shipping orientation for the product.
1. Carefully remove the packaging from the stretcher.
2. Flip the stretcher over and allow caster wheels to rest firmly on the floor.
Inspect the stretcher for any shipping damage . Report any damage to the shipping company and fill
out a concealed damage report.
General items to inspect for shipping damage are:
1) Stretcher does not roll when the brakes are engaged.
2) Steering works properly - see page 9.
3) Adjustable Patient Fowler work properly. (Option).
4) Side rails work properly (option).
5) Mattress is not torn or damaged, etc.
6) Legs or other structural members are not bent or broken.

6
Description
Introduction
The P-172 General Transport Stretcher is a fixed height stretcher which is primarily used to support
and transport patients in any treatment or procedures environment.
Features
• Half length, tuck-away side rails that prevent finger pinching, allows closer access to the patient,
and allows for a zero transfer gap for easier patient transfer.
• Up to four I.V. rod locations for optional fixed or adjustable I.V. poles.
• Blue wrap-around bumpers.
• Four corner brake/steer casters.
Components Overview
The stretcher’s major components locations and names are shown below.
Description of Components
1. Side rails (option) 6. Casters 11. IV Pole (option)
2. Mattress (option) 7. Brake Pedal (red) 12. Shelf (option)
3. Litter Top 8. Steer Pedal (green) 13. O2Holder (option)
4. Perimeter Bumper 9. Side Rail Release Handle (option) 14. Rolling Bumpers (option)
5. Four Legs 10. Fowler Control (option)

7
Controls and Indicators
The illustrations below shows the location of the stretcher’s controls and indicators. The table below
describes their function
Reference / Control Function
1. Fowler Handles Fowler handles allows the fowler (back) section to be raised or lowered. See
“Fowler Positioning” on page 11.
2. Side Rail Latch Release Handles Side rail handles allow the side rails to lock in the upright position. See “Side
Rail Option” on page 10.

8
Options & Authorized Accessories
The options and accessories that are authorized for use with the P-172 stretcher are listed below .
Option Name - Factory Install Required Option Number Installed
Storage Shelf- Stainless Steel P-170-1
Side Rails - Stainless Steel P-170-2
Caster Roller Bumpers P-170-6
Option Name - Factory Install NOT Required Option Number
Fowler- Stainless Steel P-170-3
IV Pole- Fixed Height P-170-4
Restraint Straps- Velcro P-170-5
Mattress Pad (2.5” thick, Black) P-170-8
02 Holder (Requires Storage Shelf) P-170-9
Bed Exit Monitor 750216

9
Stretcher Operation
Brake and Steering Controls
Individual pedals control the steering and braking functions on each casters. The function is indicated
by the color of pedal. Pedal functions and positions are illustrated below:
Engage steering by pressing down on the green pedal on at least one caster before rolling the
stretcher down the hall. Caster will lock in the trailing position with an audible click. The proper position
to steer the stretcher is from the head-end.
Engage the brakes by pressing down on the red pedal on each caster. The casters will not roll or
swivel, preventing the stretcher from moving.
Disengage the steering or brakes by pressing the grey pedal on each caster.
Always engage steering on at least one caster when transporting
patients to ensure control over the stretcher’s path. Also, seek assistance
when transporting down a steep incline to prevent loss of control of the
stretcher. Failure to do so could result in personal injury to patient or staff.
Failure to do so could result in equipment damage.
Make sure the stretcher does not roll with the brakes engaged. Ensure
the brakes are engaged when the stretcher is left unattended. Failure to
do so could result in personal injury to patient or staff. Failure to do so
could result in equipment damage.
Disengage Pedal
(grey)
Steer Pedal
(green)
Brake Pedal
(red)

10
Side Rails Option - P-170-2
To lower the side rail:
1. Grasp the side rail (1) firmly with one hand.
2. Maintain grip on side rail while pulling the release latch handle (2) away from the stretcher.
3. Gently lower the side rail (1).
To raise the side rail:
1. Grasp the side rail (1) firmly with both hands and lift the side rail up until the latch automatically
locks and secures the side rail in the up position.
Firmly grasp the side rail while raising or lowering. Failure to do so could
result in personal injury to patient or the caregiver.

11
Fowler Option - P-170-3
The Fowler (1) can be positioned 6 different positions between (3˚) and (44˚). To raise or lower the
Fowler, do the following:
1. Firmly grasp the end of the Fowler (1), located on the head end of the stretcher.
2. Lift the Fowler (1) upward slightly and move the fowler bail (2) free of the positioning fins on
the litter. When the Fowler (1) is in the desired position, release the Fowler release handle (1)
and place the fowler bail into the nearest position.
Firmly grasp the Fowler section with both hands during positioning.
Failure to do so could result in serious injury to the patient or the caregiver.

12
Locating Sockets for I.V. Poles Option - P-170-4
I.V. Poles Socket Locations
I.V. Pole Storage Tube Location
There are two I.V. Pole sockets (1) on the stretcher when the I.V. Pole Option is installed. They are
located on the opposite corners, one at each end of the stretcher. An additional I.V. Pole Option can
be added to make I.V. Pole Sockets available at all four corners.
The I.V. Pole Option includes a storage tube (2) at the head end underneath the patient surface.
Additional IV Pole Holder
(mtg. locations)

13
Maintenance
Cleaning
Mattress Cover
Regular care should be maintained by daily wiping with a damp cloth or sponge, and periodic cleaning
with a mild soap and water solution.
The mattress cover material is resistant to most medicinal-type stains, but
may be damaged by solvents and dyes. Remove any fluids which are
spilled on the upholstery immediately. Also, avoid the use of abrasive
cleaners, steel wool, chlorinated bleaches, or solvents. Do not use high
pressure water jets, submerge, or sterilize.
Check the label on the mattress to determine the fabric type before using
any cleaning solution.
Acceptable Cleaning Fluids
Fabric Type Cleaning Solution
Trade Name
Cleaning Solution Type Cleaning Solution
Manufacturer
For Vinyl-covered
mattresses:
Galahad Phenolic Puritan
LPH Phenolic Steris Corp
Amphyl Phenolic Reckitt-Benckiser
One-Stroke Phenolic Steris Corp
Vesphene II Phenolic Steris Corp
For Urethane-covered
mattresses:
A33 Quaternary Ecolab
Blue Chip Quaternary S .C . Johnson Co .
Elimstaph Quaternary Walter G . Legge
Forward DC Quaternary S .C . Johnson Co
Lysol I . C Quaternary Reckitt-Benckiser
Omega Quaternary Ecolab
Pro-Tech RDI-36B Quaternary Central Solutions, Inc
Quat Sanitizer Quaternary Ecolab
Sanikleen Quaternary West Penetone
Virex 128 Quaternary S .C . Johnson Co
Super SaniCloth Quaternary/Isopropyl Professional
Disposables Inc
SaniCloth Plus Quaternary/Isopropyl Professional
Disposables Inc
For Either type of
mattress
Viro-Chek Hypochlorite Bob Barker Co .
Alcide LD Chlorine Oxide Alcide Corporation
Disinfectants: Phenolic disinfectants are the best choice for vinyl products, though properly diluted
quaternaries are also acceptable. Quaternary disinfectants are recommended for urethane products.
Phenolics should be avoided on urethane. Quaternary/Isopropyl disinfectants are recommended
for urethanes, but not recommended for vinyls. All mattresses may be cleaned with a 1:10 dilution
of household bleaches containing 5.25% sodium hypochlorite as recommended by the Center for
Disease Control in Atlanta, Georgia. There is no harmful effect on the fabric. Disinfectants applied
at full concentration or in highly concentrated solutions will decrease the useful life of mattresses.
Iodophor type disinfectants used on mattresses may result in staining.

14
Soils or Stains: Use neutral soap suds and lukewarm water. Do not use harsh cleansers, solvents or
detergents.
Hard-To-Clean Spots: Use standard household/vinyl cleansers and a soft bristle brush on troublesome
spots or stains. Pre-soak heavy, dried-on soil.
Painted Metal Surfaces: Wipe all painted metal surfaces with a clean cloth at least once a week.
Unpainted Metal Surfaces: Wipe all unpainted metal surfaces with a clean cloth. Use petroleum
jelly or other white lubricants on moving parts. Lubrication will allow free movement of sliding parts
and reduce noise.
Preventive Maintenance
Use the following daily inspection table to assure quiet, smooth, and dependable operation.
Have your authorized dealer inspect your stretcher every six months.
Inspection or Service Action*
Upholstery Wipe with a clean damp cloth or sponge. Use mild soap and water solution for hard-to-clean areas and
stained areas. If disinfectant cleaners are used, do not exceed manufacturer’s recommended dilution rate or
life expectancy of upholstery may be shortened.
Obvious damage Visually check condition of stretcher/crib for obvious damage: cracks in components, missing components,
dents in components, torn upholstery, leaking fluids, or any other visible damage which would cause
stretcher/crib to be unsafe for usage. Repair stretcher/crib before using
Painted metal and
plastic surfaces
Wipe with a clean soft damp cloth.
Unpainted metal and chromed
surfaces
Wipe with a clean soft damp cloth and dry thoroughly. Check all metal surfaces for dents or damage that
could result in sharp edges. Replace damaged metal.
Restraint Straps Check restraint straps for fraying, rips, and proper operation. Replace restraint straps if necessary
Fasteners / hardware Check stretcher for missing or loose fasteners/hardware. Replace any missing hardware and tighten any
loose hardware as necessary using removable threadlock if applicable.

15
Scheduled Maintenance
Inspection or Service Action*
Moving parts Lubricate with lithium white grease or petroleum jelly, except linkages, which should be lubricated with Teflon
or Silicon based lubricant.
Caster pedal labels If labels are missing, replace as necessary.
Warning & instructional
decals
Check for missing or illegible decals. Replace warning and instructional decals as necessary.
Side rail operation Check for proper side rail operation, making sure that side rails release and latch easily. Adjust side rails if
necessary. Adjust or repair latching mechanism if necessary.
Side rail pivot points Lubricate side rail pivot points with Teflon or Silicon based lubricant. Check that pivot points move freely
during operation of side rails. Repair pivot points if necessary. If bolts/nuts are loose, remove bolts/nuts, apply
removable threadlock and reinstall bolts/nuts
Side rail latch mechanism Lubricate latch mechanism with lithium white grease or petroleum jelly. Check that latch mechanism releases
and latches easily. Adjust or repair latch mechanism if necessary.
Caster stem screws Check caster stem screws for tightness. Remove any loose screws, apply removable threadlock, and reinstall
screws and lockwashers.
Caster control pedal Check control pedals for proper operation. Make sure all pedals work in the brake, neutral, and steer positions.
Brake engaged (red pedal down): Check that wheel of caster will not move when brake is engaged. Check on
each of the four casters. Neutral (grey pedal): Check that all four wheels operate in free wheel when grey pedal
is depressed. Steer engaged (green pedal down):
Calling for Service
If you are having a problem or have a question, refer to the inside front cover of this manual and call
Technical Support at the number below. Make sure that you have the information that is highlighted on the
inside front cover of this manual available.
Technical Support:
800.822.3501
8:00 a.m. – 5:00 p.m. (Pacific Standard Time in the U.S.)
Monday – Friday, except for standard U.S. holidays.

16
Specifications
Model Number P-172
Weight Capacity 350 lbs. (159 kg)
Overall Length 78" (198 cm)
Overall Width 28" (71 cm)
Height Range
Fixed 33¼" (85 cm)
Fowler Positioning (option)
Fowler Backrest 3°, 12°, 26°, 38°, 44°
Patient Surface 77" x 26" (196 x 66 cm)
Side Rails 12" x 43" (30 x 109 cm)
Casters 8" (20 cm)
Warranty 1 year parts and labor

17
Limited Warranty
Scope of Warranty
Pedigo Products, Inc. warrants to the original purchaser its new hospital stretchers and components
(except for components not warranted under “Exclusions”) manufactured by Pedigo to be free from
defects in material and workmanship under normal use and service. Pedigo’s obligation under
this warranty is limited to the repair or replacement, at Pedigo’s option, of the parts or the products
the defects of which are reported to Pedigo within the applicable warranty period and which, upon
examination by Pedigo, prove to be defective.
Applicable Warranty Period
The applicable warranty period, measured from the date of delivery to the original user, shall be one
(1) year for all warranted products and components.
Exclusions
This warranty does not cover and Pedigo shall not be liable for the following: (1) repairs and replacements
because of misuse, abuse, negligence, alteration, accident, freight damage, or tampering; (2)
products which are not installed, used, and properly cleaned as required in the Pedigo “Installation”
and or “Installation / Operation Manual” for this applicable product; (3) products considered to be of a
consumable nature; (4) accessories or parts not manufactured by Pedigo; (5) charges by anyone for
adjustments, repairs, replacement parts, installation, or other work performed upon or in connection
with such products which is not expressly authorized in writing in advance by Pedigo.
Exclusive Remedy
Pedigo’s only obligation under this warranty is the repair or replacement of defective parts . Pedigo
shall not be liable for any direct, special, indirect, incidental, exemplary, or consequential damages or
delay, including, but not limited to, damages for loss of profits or loss of use.
No Authorization
No person or firm is authorized to create for Pedigo any other obligation or liability in connection with
the products.
THIS WARRANTY IS PEDIGO’S ONLY WARRANTY AND IS IN LIEU OF ALL OTHER WARRANTIES,
EXPRESS OR IMPLIED PEDIGO MAKES NO IMPLIED WARRANTIES OF ANY KIND INCLUDING
ANY WARRANTIES OF MERCHANTABILITY OR FITNESS FOR ANY PARTICULAR PURPOSE.
THIS WARRANTY IS LIMITED TO THE REPAIR OR REPLACEMENT OF DEFECTIVE PARTS.

© Pedigo Products, Inc. 2013 Printed in the U.S.A.
4000 SE Columbia Way Vancouver, Washington 98661 USA
www.pedigo-usa.com • TEL 800.822.3501 • FAX 360.696.1700
Installation & Operation Manual
P-170 Series Stretchers

19
Table of contents
Other Pedigo Medical Equipment manuals