pela tools 533428 User manual

Mattvätt
Carpet cleaner
Item No:
533428

Kontaktinformation
Verktygsboden Erlux AB
Källbäcksrydsgatan 1
SE-507 42 Borås
Telefon: 033-202650
Mejl: [email protected]
Miljöskydd/Skrotning
Återvinn oönskat material, släng
det inte bland hushållssoporna. Alla
maskiner, tillbehör och förpackningar
skall sorteras ochlämnas till
en återvinningscentral och där
kasseraspå ett miljövänligt sätt.
Säkerhetsföreskrifter
• För din säkerhet läs noggrant och förstå alla
instruktioner. Felaktig användning kan leda till
skada och olyckor.
• När du använder elektriska apparater måste du
följa grundläggande försiktighetsåtgärder.
• Produkten för endast användas av personer
som har god kunskap om den.
• Kontrollera att den elektriska spänningen är
korrekt före användning.
• Rikta inte munstycket direkt mot människor
eller djur när du använder denna produkt.
• Tillverkaren ansvarar inte för skador på grund
av felaktig användning.
• Andas inte in brandfarliga, giftiga vätskor,
såsom bensin, olja, syror etc för att undvika
farliga faror.
• Reparation ska endast göras av professionella
reparatörer.
• Förvara inte apparaten i för varma miljöer.
• Använd inte rengöringsmedel som innehåller
lösningsmedel.
• Denna produkt bör inte användas nära barn.
• Ej godkända reservdelar eller tillbehör från
tredje part kan vara farliga att använda och gör
garantin ogiltig.
• Använd inte produkten i ett fuktigt rum.
• Andas inte in het damm eller farliga partiklar.
• Slangen kan inte böjas för mycket, för att då
kan den gå sönder.
• Fyll inte rengöringsmedlet med för mycket
vatten. Om läckage uppstår, stäng av tvätten
och ta bort vattnet innan du fortsätter att
använda den.
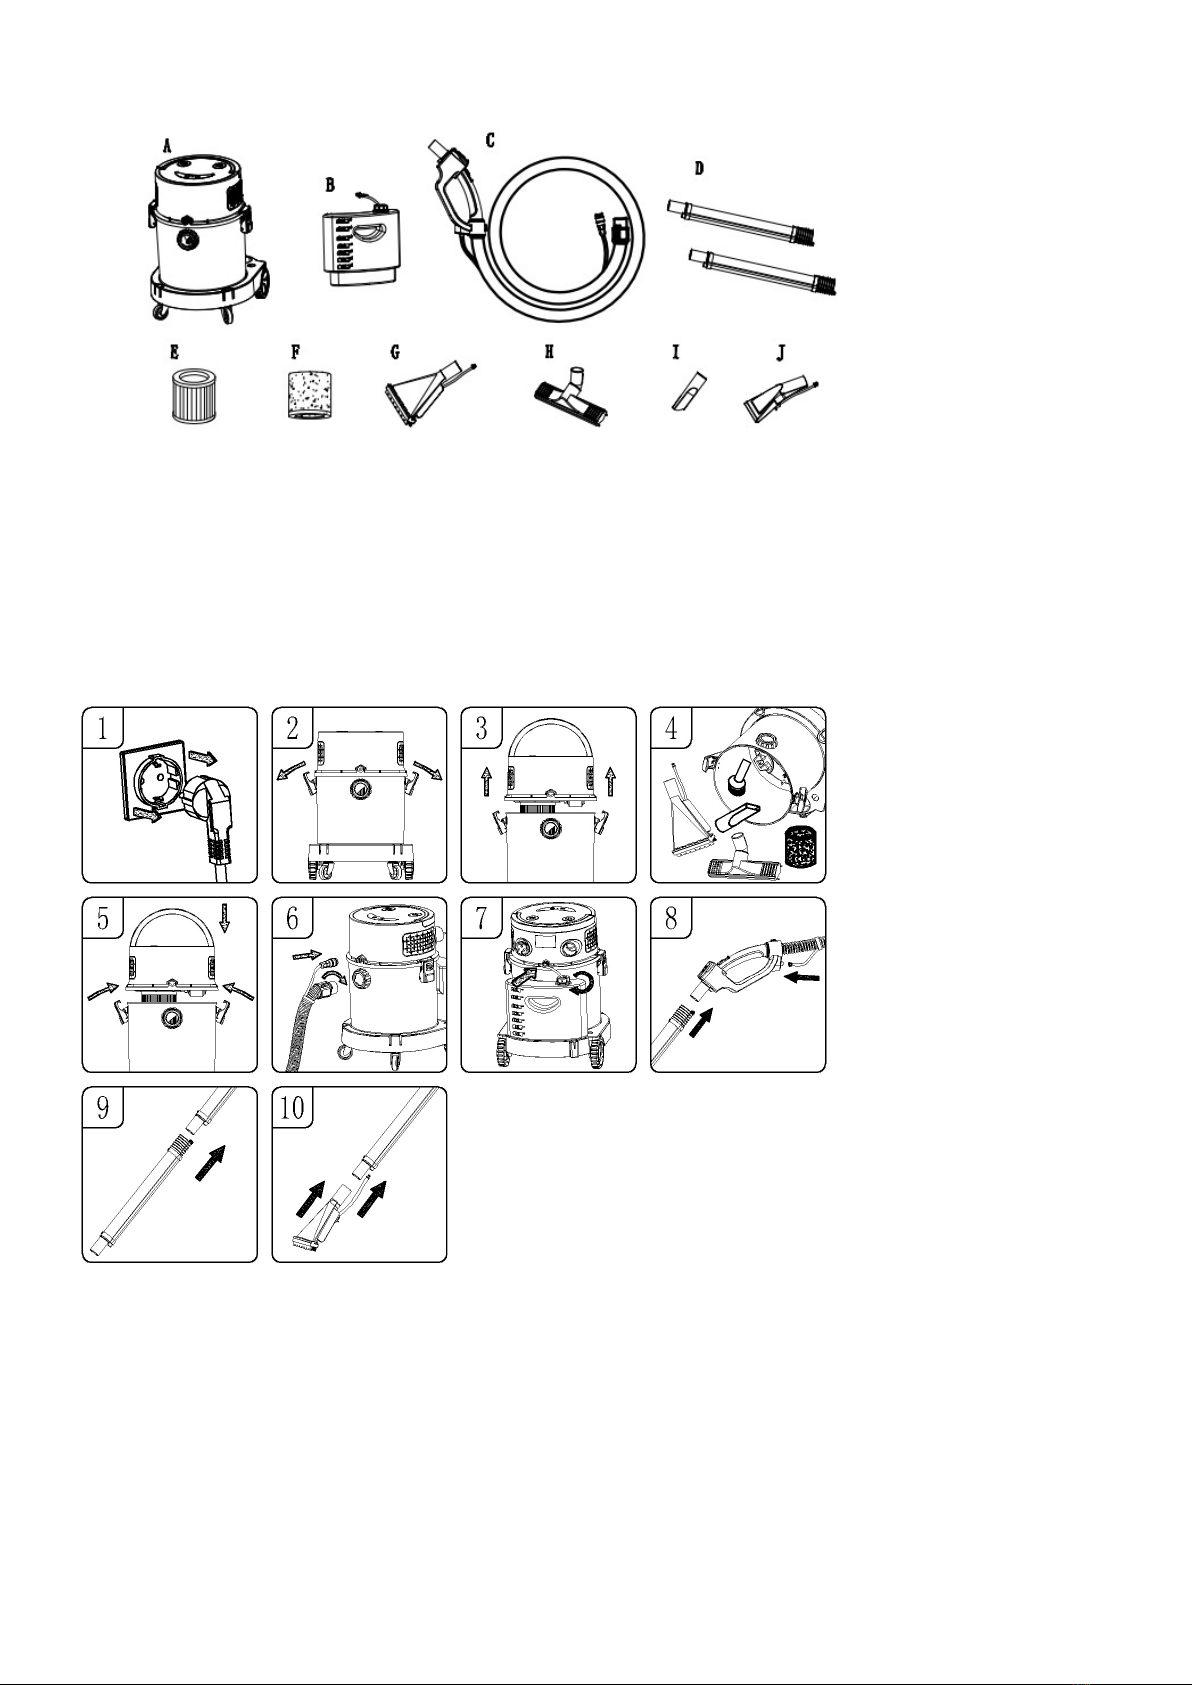
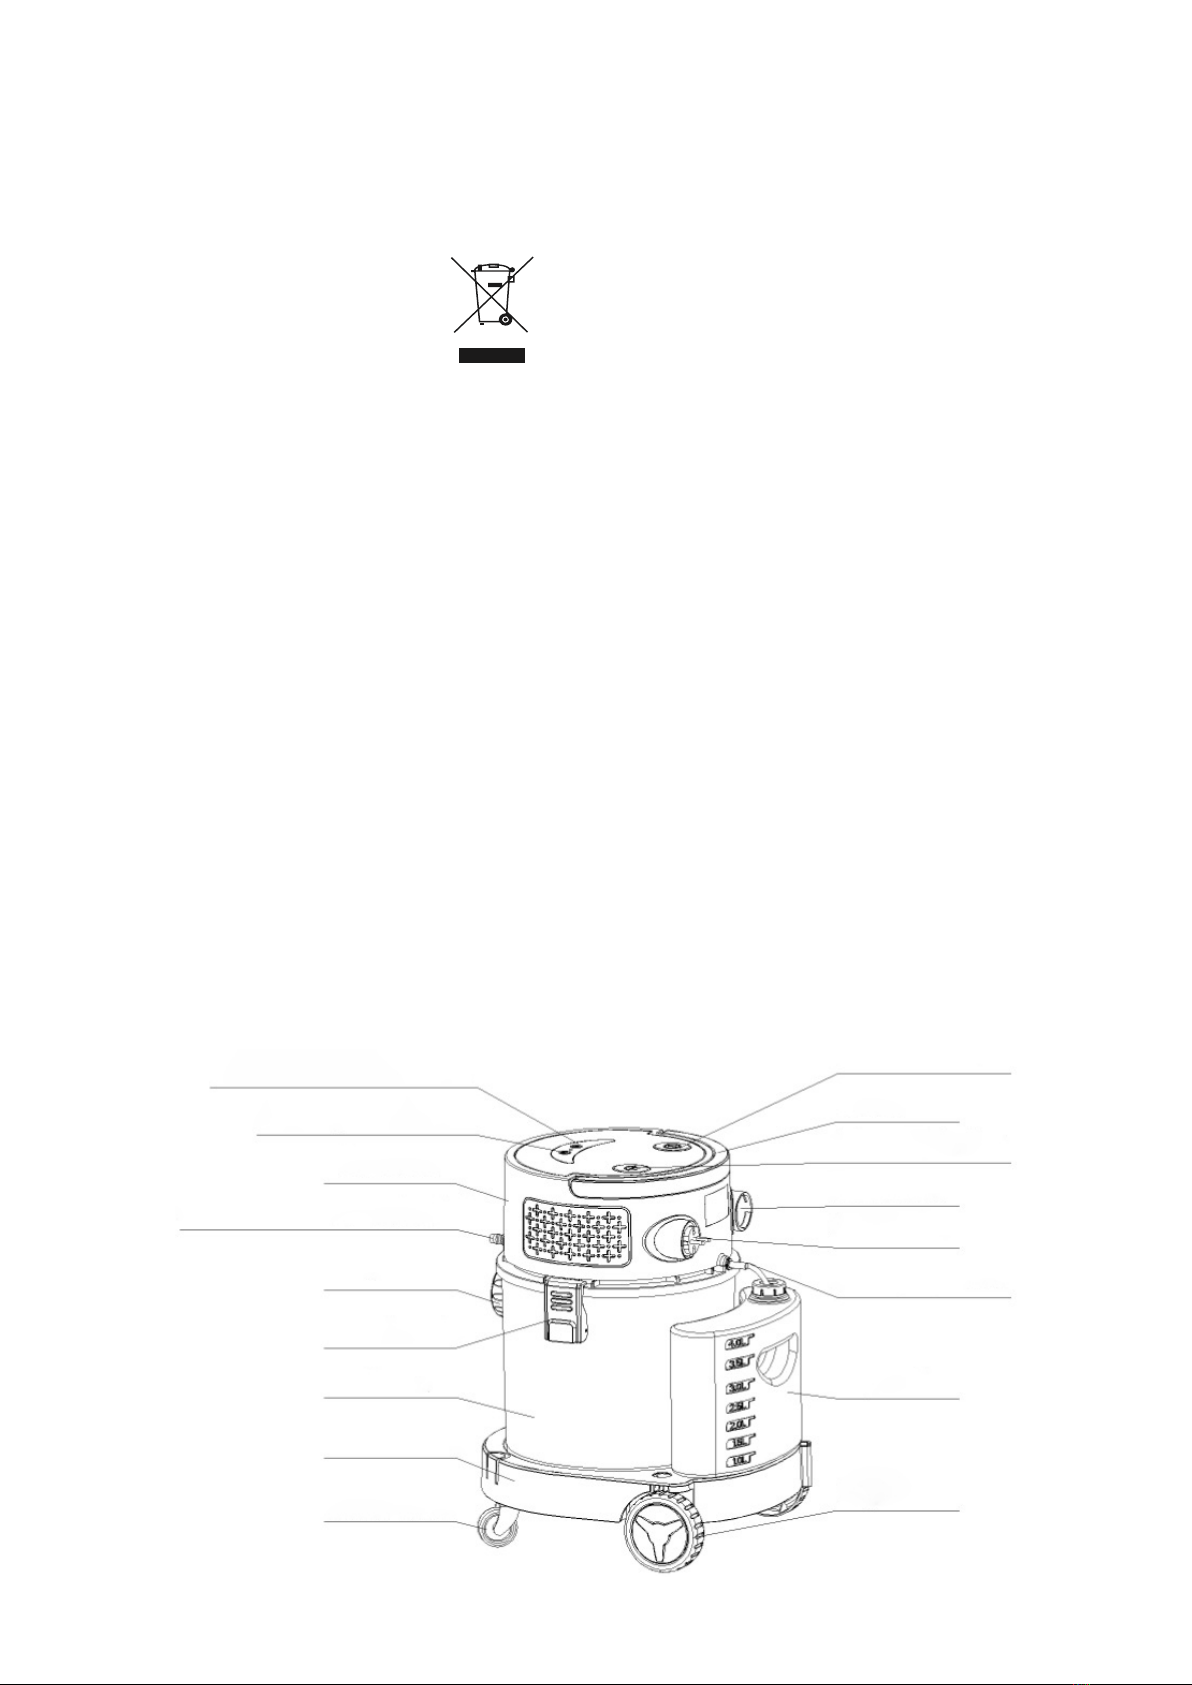
Knapp för dammsugningsläge
Mattvättsläge
Topplock
Vattenpumpens kontakt
Uppsugning
Klämma
Behållare
Sockel
Svänghjul
Av/på knapp
Handtag
Knapp för tvätt
Luftuttag
Strömsladd
Vattenpumpens anslutning
Behållare för
rengöringsvätska
Hjul

Tillbehör
A. Dammsugare
B. Behållare för tvättmedel och anslutningsrör
C. Fjärrhandtagsslang
D. Förlängningsrör i aluminium
E. HEPA
Montering
F. Vattenabsorberande svamp
G. Munstycke för rengöring
H. Våt/torrt golvmunstycke
I. Vinklat munstycke
J. Mindre munstycke för rengöring
1. Se till att nätsladden är bortkopplad från
uttaget. (Figur 1)
2. Lossa klämmorna. (Fig 2)
3. Lyft upp munstyckena från behållaren. (Fig 3)
4. Ta ut alla tillbehör från behållaren. (Fig 4)
5. Placera munstycket på behållaren som redan
har en lterenhet och lås den på båda sidor
med hjälp av klämmorna. (Fig 5)
6. Anslut slangen till tvätten. (Fig 6)
7. Dra åt locket på tvättbehållaren samtidigt
som du sätter in anslutningsslangen vid
vattenpumpen på ovansidan. (Fig7)
8. Fäst det långa aluminium munstycket. (Fig 8)
9. Anslut rören enligt bilden. (Fig9)
10. Anslut det bästa munstycket för ändamålet och
börja använda mattvätten. (Fig10)

Koppla upp fjärrkontrollen
1. Se till att mattvätten är ansluten till
strömkällan. (Fig1)
2. Tryck på knappen och indikatorlampan på
panelen lyser. (Fig 2)
3. Tryck samtidigt på sugläges- och
rengöringslägesknappen på huvudpanelen,
indikatorn tänds (Fig3)
4. Tryck på en av knapparna på fjärrkontroll-
handtagets rengöringsläge eller
dammsugningsläge. Det gör att
indikatorlampan på huvudpanelen blinkar en
gång för att sedan återgå till normalt ljus och
installationen av fjärrkontrollens är klar. (Fig4).
Använd för dammsugning
1. Se till att nätsladden är bortkopplad från
uttaget (Fig1)
2. Lossa klämmorna. (Fig 2)
3. Lyft upp huvudenheten från behållaren. (Fig 3)
4. Installera dammsugarltret och tryck fast det
ordentligt på bottenytan. (Fig 4)
5. Placera munstycket på behållaren och stäng till
på båda sidor med hjälpa av klämmorna. (Fig 5)
6. Anslut dammsugarslangen till huvudenheten.
(Fig 6)
7. Anslut slangen till röret. (Fig 7).
8. Använd förlängningsröret vid behov. (Fig 8)
9. Anslut önskat munstycke till aluminiumröret
(Fig 9)
10. Sätt i nätsladden i eluttaget. (Fig 10)
11. Tryck på strömbrytaren och indikatorlampan
påpanelen tänds. (Fig 11)
12. Tryck på dammsugningsknappen på
huvudpanelen eller fjärrkontrollhandtaget.
Sedan börjar den dammsuga. (Fig 12)

Töm dammsugaren så här
1. Dammbehållaren är full. (Fig 1)
2. Tryck på strömbrytaren och
indikatorlampan släcks. (Fig 2)
3. Dra ur nätsladden. (Fig3)
4. Lossa klämmorna. (Fig 4)
5. Lyft upp enheten från dammbehållaren.
(Fig 5)
6. Häll ut dammet. (Fig 6)
Använd som våtdammsugare
1. Se till att nätsladden är bortkopplad från
strömförsörjningen. (Fig 1)
2. Montera ltret. (Fig2)
3. Placera huvudenheten på behållaren och lås
den med båda sidor med klämmorna. (Fig 3)
4. Installera önskade munstycken på
slangenheten. (Fig 4)
5. Sätt i nätsladden. (Fig 5)
6. Tryck på strömbrytaren. Indikatorlampan och
panelen tänds. (Fig 5)
7. Tryck på uppsugningsfunktionen på
huvudpanelen eller fjärrkontrollhandtaget, så
börjar maskinen att arbeta. Välj hög eller låg
nivå. (Fig 6-7)
8. Uppsugningsfunktionen fungerar inte när
vatten- och rengöringsfunktionen används på
högsta nivå. (Fig 8)
9. Stäng av mattvätten och koppla sedan ur
nätsladden från uttaget. (Fig 9)
10. Häll ut det smutsiga vattnet. (Fig 10).
11. För att säkerställa bästa resultat, ta bort ltret
och rengör den regelbundet. (Fig 10)
12. Tvätta det smutsiga ltret med vatten och
montera tillbaka den för framtida användning.
(Fig 12)

Använd som mattvätt
1. Se till att nätsladden är bortkopplad från
strömförsörjningen. (Fig 1)
2. Montera ltret. (Fig2)
3. Placera huvudenheten på behållaren och lås
den med båda sidor med klämmorna. (Fig 3)
4. Anslut slangen. (Fig 4)
5. Fyll behållaren på sidan med rengöringsmedel
och vatten. Placera sedan tillbaka på enheten.
6. Anslut slangen till behållaren med
rengöringsmedel via behållarens lock, se
tillattden sitter fast ordentligt. (Fig 6)
7. Koppla ihop alla delar enligt bilden. (Fig 7).
8. Använd det extra aluminiumröret om det
behövs. (Fig 8)
9. Anslut munstycket med aluminiumröret. (Fig 9)
10. Sätt i nätsladden. (Fig 10)
11. Tryck på strömbrytaren och indikatorlampan
och panelen tänds. (Fig 11)
12. Tryck på knappen för rengöringsläge på toppen
av behållaren eller på fjärrkontrollhandtaget.
Sprinklerhuvudet på munstycket börjar
spruta vatten. Om du trycker på knappen
för dammsugning igen kommer maskinen
att spruta vatten och absorbera det
smutsiga vattnet. Efter användning, tryck på
huvudströmbrytaren för att stänga av, dra
sedan ur kontakten, töm det smutsiga vattnet
och rengör behållaren. (Fig 12)

Användning av blåsfunktionen
1. Se till att nätsladden är bortkopplad från
strömförsörjningen. (Fig 1)
2. Skruva loss slangenheten från anslutningen
genom att vrida åt vänster. (Fig 2)
3. Montera slangen vid luftutloppet på baksidan
av enheten och dra åt den. (Fig 3)
4. Sätt i nätsladden. (Fig 4)
5. Tryck på ON. (Fig 5)
6. Börja använda. (Fig 6)
Varning: Använd munskydd om damm uppstår som
är farligt att andas in.
Rengör filtret
1. Kontrollera rengöringsltret regelbundet för att
bibehålla prestanda.
2. Om uppsugningsfunktionen blivit sämre kan ltret
behöva rengöras oftare.
3. Tvätta vattenltret med kallt eller varmt vatten.
(Fig1Fig 2)
4. Förvara de rengjorda delarna på en bra plats där
de kan torka ordentligt innan de monteras tillbaka i
enheten.
Placera inte ltret i en diskmaskin, tvättmaskin, ugn,
mikrovågsugn eller under öppen låga. (Fig 3)
Användning av tillbehör
1. Rulla ut elsladden enligt anvisning på bilden.
2. Placera munstyckena på sidan av mattvätten
enligt bilden när de inte används.

Byt ut batteriet i fjärrkontrollhandtaget
1. Batterilocket kan öppnas genom att trycka på
framsidan av batterilådan med en skruvmejsel.
(Fig 1 )
2. Ta ut de gamla batterierna från batteripaketet.
(Fig 2)
3. Byt ut mot ett nytt 23A 12V alkaliskt batteri.
(Fig 3)
4. Placera tillbaka fjärrkontrollen på handtaget.
(Fig4)
VARNING: Använd endast 23A 12V alkaliskt
batteri andra batterier kan leda till olyckor och
att enheten inte fungerar.
Underhåll
1. Efter rengöring av tunnor, lter och tillbehör,
kontrollera för eventuella läckor. Rengör ltret
efter varje användning och använd inte ett vått
lter.
2. Kontrollera att kontakten inte är skadad.
3. Håll maskinen torr.
4. Om ltret är täckt med damm, tvätta det
med kallt vatten och använd vid behov
rengöringsmedel.
5. Låt inte maskinen arbeta under en längre tid.
Låt den vila efter 2 timmar för att få ut bästa
möjliga resultat av mattvätten.
6. Om du upptäcker onormala vibrationer, ljud
eller lukt måste mattvätten omedelbart stängas
av och repareras.

Felsökning
Varning! För att minska risken för elektriska stötar, dra ur kontakten före felsökning.
Problem Orsak Lösning
Mattvätten fungerar inte.
1) Ingen strömförsörjning.
2) Defekt nätsladd.
3) Behållaren är full.
1) Kontrollera
strömförsörjningen– sladd,
brotteller säkringar.
2) Koppla ur och kontrollera
nätsladden. Om den är skadad,
låten reparatör laga den.
3) Töm behållare.
Damm kommer ut från
motorn.
Inget lter är installerat, ltret är
inte installerat på plats eller ltret
är skadat.
Installera om och kontrollera om
ltret är installerat på plats. Byt
ut det nya ltret om någon skada
upptäcks.
Minskad effektivitet
och motor-/
hastighetsvibrationer.
Det nns en blockering i
munstycket, slangen eller
behållarens inlopp. Eller så är
damm ltret blockerat av nt
damm.
Kontrollera munstycket, slangen
och behållarens inlopp för
blockering. Ta ut ltret och rengör
det. Eller installera ett nytt lter.
Den sprutar inte ut
rengöringsvätska.
1)Rengöringsläget är inte valt.
2) Du har förbrukat
rengöringsvätskan i behållaren.
3) Anslutningsslangen är inte
korrekt installerad.
1) Tryck på ljuslägesknappen
på panelen eller f
järrkontrollhandtaget.
2) Fyll på med rengöringsvätska.
3) Kontrollera om
vattenrörsanslutningen är korrekt
på plats och kontrollera om
vattenledningen har några knutar.
Fjärrkontrollshandtaget
fungerar inte.
1) Batteriet i fjärrkontrollhandta-
get har tagit slut.
2) Anslutningen mellan
fjärrkontrollhandtaget och
dammsugaren är installerad rätt.
1) Byt ut batteriet i
fjärrkontrollhandtaget.
2) Läs om hur du korrekt
installerar och använder
fjärrkontrollen i en tidigare del av
denna manualen.


Contact
PELA Tools
Solängsvägen 13
SE-513 70 Borås
Phone: 033-202650
E-mail: order@pelatools.com
Environmental protection/
Scrapping
Recycle any unwanted material,
do not throw it in the household
rubbish. All machines, accessories
and packaging must be sorted and
left at a recycling center and disposed
of in an environmentally friendly manner.
Important safety instructions
• For your safety: carefully read and understand
all instructions, this appliance complies with
mandatory safety regulations for electrical
equipment. Improper use will harm users and
property, please read these instructions
carefully.
• When using electrical appliances, you must
follow basic precautions.
• The product can only be used by users with
good knowledge of the product.
• Check that the electrical voltage is correct befo-
re use.
• Do not point the air outlet directly against
people or animals when using this product.
• The manufacturer is not liable for damages due
to improper use or operation.
• Do not inhale ammable, toxic liquids, such as
gasoline, oil, acids or other volatile substances,
to avoid dangerous hazards.
• Only relevant professionals can repair
electrical equipment. Improper repairs may
result in considerable risk.
• Do not store the appliance directly at high
temperatures such as hot stoves or heat sinks.
• Do not use a cleaning agent or detergent
containing solvent.
• This device should not be used close to
children. Children should be supervised to
ensure that they do not play the device.
• Turn off the appliance when cleaning or
removing it. Before cleaning or servicing the
appliance, remove the plug from the socket.
• Unauthorized spare parts or third-party
accessories may be dangerous to use and
makes the warranty invalid.
• If you notice that the liquid leaks from your
equipment, immediately turn it off and unplug
the plug.
• Do not use the appliance in a damp room.
• Do not inhale hot dust ashes or sharp objects.
• Do not reverse the vacuum cleaner, it will cause
damage to the motor.
• The hose cannot be overly bent and forced
because then it will be deformed or damaged.
• Do not ll the cleaner with too much
water. If leakage occur, turn of the appliance
and remove the water before continuing the
use.
Dust removal mode button
Cleaning mode button
Top cover
Water pump outlet connector
Suction
Barrel lock
Barrel
Pedestal
Caster wheel
Switch button
Handle
Auto coil button
Air outlet
Power cord
Water pump inlet
Soap bucket
Wheel

Included accessories
A. Vacuum cleaner
B. Soap bucket and connecting pipe
C. Remote handle hose
D. Aluminum extension tube
E. HEPA
Installation
F. Water absorbing sponge
G. Water spray carper brush
H. Wet/dry oor nozzle
I. Crevice Nozzle
J. Spray brush
1. Make sure the power cord is disconnected from
the socket. (Fig 1)
2. Loosen the clips. (Fig 2)
3. Raise the nose assembly from the dust
container. (Fig 3)
4. Take out all accessories from the dust
container. (Fig 4)
5. Place the nose assembly on the dust barrel that
already has a lter assembly and lock it with
both sides of the clips. (Fig 5)
6. Align the hose assembly port with the suction
port and insert it and tighten it. (Fig 6)
7. Tighten the lid of the soap bucket while
inserting the water inlet joint at the water pump
on the top. (Fig7)
8. Insert the aluminum tube into the handle and
insert the water inlet pipe into the water inlet of
the handle (Fig 8)
9. Connect two aluminum tubes as the picture
shows. (Fig9)
10. Connect the best accessory for the job and
start using the carpet cleaner. (Fig10)

How to pair the remote control
1. Make sure the carpet cleaner is plugged into
power supply.(Fig1)
2. Press the switch and the indicator light on the
panel is on. (Fig2)
3. At the same time press the suction mode and
cleaning mode button on the head panel, the
indicator lights out (Fig3)
4. Press one of the buttons on the remote control
handle cleaning mode or vacuum mode, the
indicator light on the head panel ashes once
to return to normal light, and the remote control
pairing setting is complete. (Fig4).
Use the vacuum cleaner to remove dust
1. Make sure the power cord is disconnected from
the socket. (Fig1)
2. Loosen the clips. (Fig 2)
3. Raise the head assembly from the dust tank.
(Fig 3)
4. Install the cartridge lter and press it tightly on
the bottom cap basket. (Fig 4)
5. Place the nose assembly on the dust bucket
and lock it on both sides of the buckle. (Fig5)
6. Align the hose assembly port with the suction
port, insert it and tighten it. (Fig 6)
7. Insert the inlet joint of water spray aluminum
tube connect into the remote-control handle
(Fig 7).
8. Use the extension tube if needed. (Fig 8)
9. Connect the brush you need with the aluminum
tube (Fig 9)
10. Insert the power cord. (Fig 10)
11. Press the power switch and the indicator light
on the panel lights up. (Fig 11)
12. Press the vacuum mode button on the head
panel or remote-control handle. Then the
machine will start to work. (Fig 12)

How to empty the dust tank
1. The dust bucket is full. (Fig 1)
2. Press the power switch and the indicator
light goes off. (Fig 2)
3. Unplug the power cord. (Fig3)
4. Release the buckle. (Fig 4)
5. Raise the nose assembly from the dust
container. (Fig 5)
6. Pour out the garbage in the dust bucket.
(Fig 6)
Use the vacuum cleaner for water
1. Make sure the power cord is disconnected from
the power supply. (Fig1)
2. Cover the bottom cap basket with the watering
absorbing sponge, make sure to cover the
whole basket. (Fig2)
3. Place the head assembly on the dust barrel and
lock it with both sides of the clips. (Fig 3)
4. Install the required suction accessories on the
hose assembly. (Fig 4)
5. Insert the power cord. (Fig 5)
6. Press the power switch and the indicator light
on and the panel lights up. (Fig 5)
7. Press the vacuum mode button on the head
panel or remote-control handle, then machine
will start to work. Choose high or low level.
(Fig 6-7)
8. The vacuum function does not work when
the water and cleaning function is used in the
highest level. (Fig 8)
9. Turn off the power, disconnect the power cord
from the socket. (Fig 9)
10. Pour out the dirty water. (Fig 10).
11. To ensure the best results of water absorption,
please remove the air lter sponge and clean
it regularly. (Fig 10)
12. Wash the dirty sponge with water and put it back
in the carpet cleaner for future use. (Fig 12)

Use as carpet cleaner
1. Make sure the power cord is disconnected from
the power supply (Fig1)
2. Cover the bottom cap basket with watering
absorbing sponge, make sure to cover the
whole basket. (Fig2)
3. Place the top assembly on the dust barrel and
lock it with the clips on both sides. (Fig 3)
4. Align the hose assembly port with the suction
port and insert it and tighten it. (Fig 4)
5. Remove the soap bucket from the pedestal.
Then unscrew the lid to the left and ll it with a
your cleaner or detergent of choice. (Fig 5)
6. Insert one end of pipe into the inlet joint on the
top. Place the other end of inlet pipe with the
lter into the soap bucket and then tighten the
lid. (Fig 6)
7. Insert the aluminum tube connect into the
remote-control handle and insert the water inlet
pipe into the water inlet connector of the
remote-control handle (Fig 7).
8. Use the extra aluminum tube if needed. (Fig 8)
9. Connect the water spray carpet brush with the
aluminum tube. (Fig 9)
10. Insert the power cord. (Fig 10)
11. Press the power switch and the indicator light
on and the panel lights up. (Fig 11)
12. Press the clean mode button on the top or on
the remote-control handle. The sprinkler head
on the water spray carpet brush starts to spray
water. If the vacuuming mode button is pressed
again, the machine will spray water and absorb
the dirty water at the same time. After use,
press the main power button to shut down,
then unplug the power plug, empty the dirty
water in the bucket and clean the bucket. Fig
12)

How to use the air blower function
1. Make sure the power cord is disconnected from
the power supply. (Fig 1)
2. Unscrew the inserted hose assembly from the
suction port with a left-hand rotation. (Fig 2)
3. Insert the main hose of the assembly into the
air outlet at the back of the head and tighten it.
(Fig 3)
4. Insert the power cord. (Fig 4)
5. Start the switch button. (Fig 5)
6. Hold the hose assembly, let outlet port aimed at
the leaves and so on. (Fig 6)
Warning: Wear a dust mask if blowing creates dust
that is dangerous to inhale.
Clean the filter
1. Check the cleaning lter to maintain
performance regularly.
2. If the vacuum function has gotten worse, the lter may
need more frequent cleaning.
3. Wash lter sponge with cold or warm water without
the use of detergent. (Fig 1 Fig 2)
4. Keep the cleaned parts in an open area to dry and dry
for at least 24 hours.
Do not put the lter in a dishwasher, washing machine,
roller dryer, oven, microwave oven or open ame. (Fig3)
Use of accessories
1. Enclose the power cord:
- Hold the plug and press the auto coil.
- If you cannot fully get involved at once, pull out
the 3-5 cm wire and press the auto reel button.
2. Storage crevice nozzle and multi brush
- Insert the crevice nozzle into the wheel seat.
- Insert the water spray carpet brush into the wheel
seat.

Replace the battery in remote control handle
1. The battery cover can be opened by pressing
the front of the battery box with a screwdriver.
(Fig 1 )
2. Take out the old batteries from the battery
pack. (Fig 2 )
3. Replace with a new 23A 12V alkaline battery.
(Fig 3)
4. Insert the protruding xed buckle at the back
of the battery cover into the corresponding slot
on the battery box and press the front end of
the battery cover so that it is secured into the
battery case. (Fig4)
WARNING: The remote-control handle is only
applicable to 23A 12V alkaline battery. Do not
use batteries of other specications to avoid
damaging the remote-control handle.
Maintenance
1. After cleaning the barrels, lters and
accessories, check for any leaks. After each
use, clean the lter and do not use a wet lter.
2. Check the plug for damage and place the plug.
3. Keep the machine dry.
4. If the lter is covered with dust, wash it with
cold water and if necessary, use soap.
5. Do not let the machine work for a long time. Let
it rest after 2 hours to get the most out of your
appliance.
6. If you discover any abnormal vibration, noise or
smell the cleaner must immediately be turned
off and repaired by a professional.

Troubleshooting
Warning! To reduce the risk of electric shock-unplug before troubleshooting.
Problem Possible Causes Solution
Vacuum will not operate
1) No power supply.
2) Faulty power cord.
3) Container is full.
1) Check power supply –cord,
breaks or fuses.
2) Unplug and check the power
cord. If damaged, have it repaired
by a professional.
3) Empty container.
Dust comes out from motor
cover.
No lter is installed, the lter is
not installed in place or the lter
is damaged
1)Re-install and check whether
the lter is installed in place.
Replace the new lter if any
damage is found.
Reduced eciency and
motor/speed vibration.
There is a blockage in the nozzle,
hose or the container inlet. Or the
dust lter is blocked by ne dust.
Check the nozzle, hose and
container inlets for blockage.
Take out the lter and clean it. Or
install new cartridge lter.
It does not spray cleaning
uid
1) Cleaning mode is not selected.
2) You have used up the cleaning
uid in the soap bucket.
3) The pipeline is not properly
installed.
1) Press the light mode button
on the panel or remote control
handle.
2) Fill with the cleaning uid.
3) Check if the water pipe con-
nection is in place correctly and
check whether the water pipe is
knotted.
Foam coming out of the
machine head unit outlet.
High bubble cleaning uid was
used.
Replace with another cleaning
uid.
Remote control handle does
not work.
1) The battery in the remote-
control handle has run out.
2) Connection between remote
control handle and vacuum
cleaner is not correct.
1) Replace the battery in the
remote-control handle.
2) Read about how to properly
install and use the remote-control
in this manual.


Kontaktinformasjon
Verktygsboden Erlux AB
Källbäcksrydsgatan 1
SE-507 42 Borås
Telefon: 033-202650
E-post: [email protected]
Miljøvern/kassering
Gjenvinn uønsket materiale.
Detskal ikke kastes sammen med
husholdningsavfallet. Alle maskiner,
alt tilbehør og all emballasje
skal sorteres og leveres til en
gjenvinningsstasjon og kasseres
påen miljøvennlig måte.
Sikkerhetsinstruksjoner
• For din sikkerhet bør du lese og forstå alle
instruksjonene nøye. Feil bruk kan føre til
skader og ulykker.
• Når du bruker elektriske apparater, må du følge
grunnleggende forholdsregler.
• Produktet skal kun brukes av personer som har
god kjennskap til det.
• Kontroller at den elektriske spenningen er riktig
før bruk.
• Rett ikke munnstykket direkte mot mennesker
eller dyr når du bruker dette produktet.
• Produsenten er ikke ansvarlig for skader som
skyldes feil bruk.
• Inhaler ikke brennbare, giftige væsker, som
bensin, olje, syrer osv. for å unngå farlige farer.
• Reparasjoner skal kun utføres av profesjonelle
reparatører.
• Oppbevar ikke enheten i ekstremt varme
omgivelser.
• Bruk ikke rengjøringsmidler som inneholder
løsemidler.
• Dette produktet bør ikke brukes i nærheten av
barn.
• Ikke-godkjente reservedeler eller tilbehør fra
tredjepart kan være farlig å bruke og gjøre
garantien ugyldig.
• Bruk ikke produktet i et fuktig rom.
• Pust ikke inn varmt støv eller farlige partikler.
• Slangen kan ikke bøyes for mye, for da kan den
bli ødelagt.
• Fyll ikke rengjøringsmiddelet med for mye vann.
Hvis det oppstår lekkasje, slå av vasken og
fjern vannet før du fortsetter å bruke den.
Knapp for støvsuging
Teppevaskmodus
Topplokk
Vannpumpens kontakt
Oppsuging
Klemme
Beholder
Sokkel
Svinghjul
Av/på-knapp
Håndtak
Knapp for vask
Luftuttak
Strømledning
Vannpumpens tilkobling
Beholder for
rengjøringsvæske
Hjul
Table of contents
Languages:
Other pela tools Vacuum Cleaner manuals