PENANDFREE uBoard User manual

uBoard Installation Guide (V4.1)
2011. 5
PenAndFree Co.,Ltd

uBoard Installation Guide (V4.1)
2 | P a g e
This page is emptied intentionally

uBoard Installation Guide (V4.1)
3 | P a g e
Contents
[1] Overview of uBoard ---- 4
[2] Installation ---- 5
1. Preparation ---- 5
1.1 Verify components before Installation. ---- 5
1.2 Understanding uBoard station operation ---- 5
1.3 Understanding the digital pen operation ---- 6
1.4 Check environment ---- 9
2. Install uBoard Station ---- ..10
3. Install Software for MS Windows ---- ..12
3.1 Preparation ---- ..12
3.2 Install pre-requisite SWs ---- ..12
3.3 Install uBoard driver (MINT Control) and
. ..the annotation SW (MINT Interactive) ---- ..15
3.4 Option for uBoard setup ---- ..21
4. Install Software for Mac OS ---- ..25
4.1 Preparation ---- ..25
4.2 Install pre-requisite SWs ---- ..25
4.3 Install uBoard driver (MINT Control) and
. ..the annotation SW (MINT Interactive) ---- ..28
4.4 Option for uBoard setup ---- ..31

uBoard Installation Guide (V4.1)
4 | P a g e
[1] Overview of uBoard
uBoard is an innovative portable interactive whiteboard system which provides full
features of tablet functions and excellent performance as well as maximum user
convenience. Thanks to uBoard’s differentiated features, user can enjoy powerful
digital interactive functions at the most cost-effective way.
The uBoard’ s unique advantages are as follows;
Automatic pop-up virtual keyboard or character recognition input panel at
every input field without using vendor supplied software.
Support handwritten character recognition engine by Microsoft (some
languages are not supported by MS engine).
Use digital ink supported by Microsoft without using vendor-supplied software.
Save MS office document including annotation with same input file format.
Support virtual pressure features on the digital pen.
Easy mode switch between pen and eraser with one touch button click.
Support up to practically 120 inches working space.
Smooth pen touch and excellent inking speed by dedicated ASIC chipset.
Lithium polymer rechargeable battery for the digital pen and the station (for
wireless model).
Available Bluetooth wireless model.
Fully support mouse and pen functions on Mac OS.

uBoard Installation Guide (V4.1)
5 | P a g e
[2] Installation
1. Preparation
1.1. Verify Components before Installation.
Before hardware installation, firstly, check whether all components listed below are
included in the package. If you find a part to be missed, please contact the store
you purchased the product.
.
1.2. Understanding uBoard station operation.
When to use uBoard well in real environment, understanding the function of uBoard
system is highly required. uBoard mainly consists of the station, the digital pen and
the Active-link. Among them, this section describes main function of uBoard station.
uBoard station consists of function keys on the front of it, power button, led status
indicator, mini USB port and two receivers.
The wireless model has same shape but it has an additional LED indicator to show
the connection status on it.
The power for uBoard station is supplied by USB cable which is connected to the
computer. But wireless model includes Lithium polymer rechargeable battery inside
the station which can be charged by USB cable. Its full charging time requires about
2 hours and can last above 8 hours in continuous operating time. As the power
saving algorithm is applied to uBoard wireless mode, it automatically shuts off the
power after 20 minutes idle time. But pressing the power button wakes all activities
and automatically resumes everything quickly.
Station
Station
Digital pen
Spare pentip
Station Holder
Active-Link
Station
Laser pointer
USB cable/ Station
rechargeable cable[wireless model]
Pen Rechargeable cable

uBoard Installation Guide (V4.1)
6 | P a g e
The function of front touch panel is as follows.
Note:
Do not block receiver holes located on the right side of the station.
All function keys on the uBoard station except ‘Calibrate’ can be workable in only
annotation SW mode (later, you will see the name of annotation SW is MINT
Interactive.) (see 1.3.2)
[For wireless model]
When the battery recharging level is below 20%, ‘connect status indicator’lamp
starts to blink fast. Then please charge the station by connecting the station and
the computer with USB cable or USB charger immediately.
However, when the ‘connect status indicator’lamp blinks slowly, it means uBoard
station is trying to establish pairing between the station and the active-link on the
computer.
1.3. Understanding the digital pen operation.
1.3.1 General description.
The digital pen is transmitting signal to the station for tracing pen position on the
workspace. As transmitting signal requires external power, uBoard digital pen adopts
rechargeable battery for it. Rechargeable battery provides great benefits to avoid
environment contamination as well as maximizes user convenience. And you can
use the laser pointer which can be attached to the digital pen for efficient
presentation. As the laser pointer shares the power of the digital pen, do not use it
excessively to save the power.
Laser pointer
Upper button
Lower button
Pentip
Calibration
All erase current
workspace
Invoking web
Browser
Save Current
workspace
Print current
workspace
Power button
Power indicator
Connect status Indicator
(Wireless model only)
Receiver sensor
Mini USB port
Laser pointer
button

uBoard Installation Guide (V4.1)
7 | P a g e
①Recharging time & continuous operating time: It takes about 1.5 hour for full
recharge and lasts 18 hours with continuous operating time.
②Automatic power save function: When the pen has been idle for 10 seconds
since last click, it automatically enters the sleep mode to save battery power.
The digital pen can be waked up by pressing any button or clicking the pen
tip.
③Low battery indicator: when the red light turns on, please recharge the
digital pen.
1.3.2 Operating mode for the digital pen.
The digital pen supports two operating modes. One is for annotation mode with
‘MINT interactive’annotation SW and another is for window mode.
In window mode, the digital pen works like general mouse.
In each mode, buttons on the digital pen execute different functions as follows;
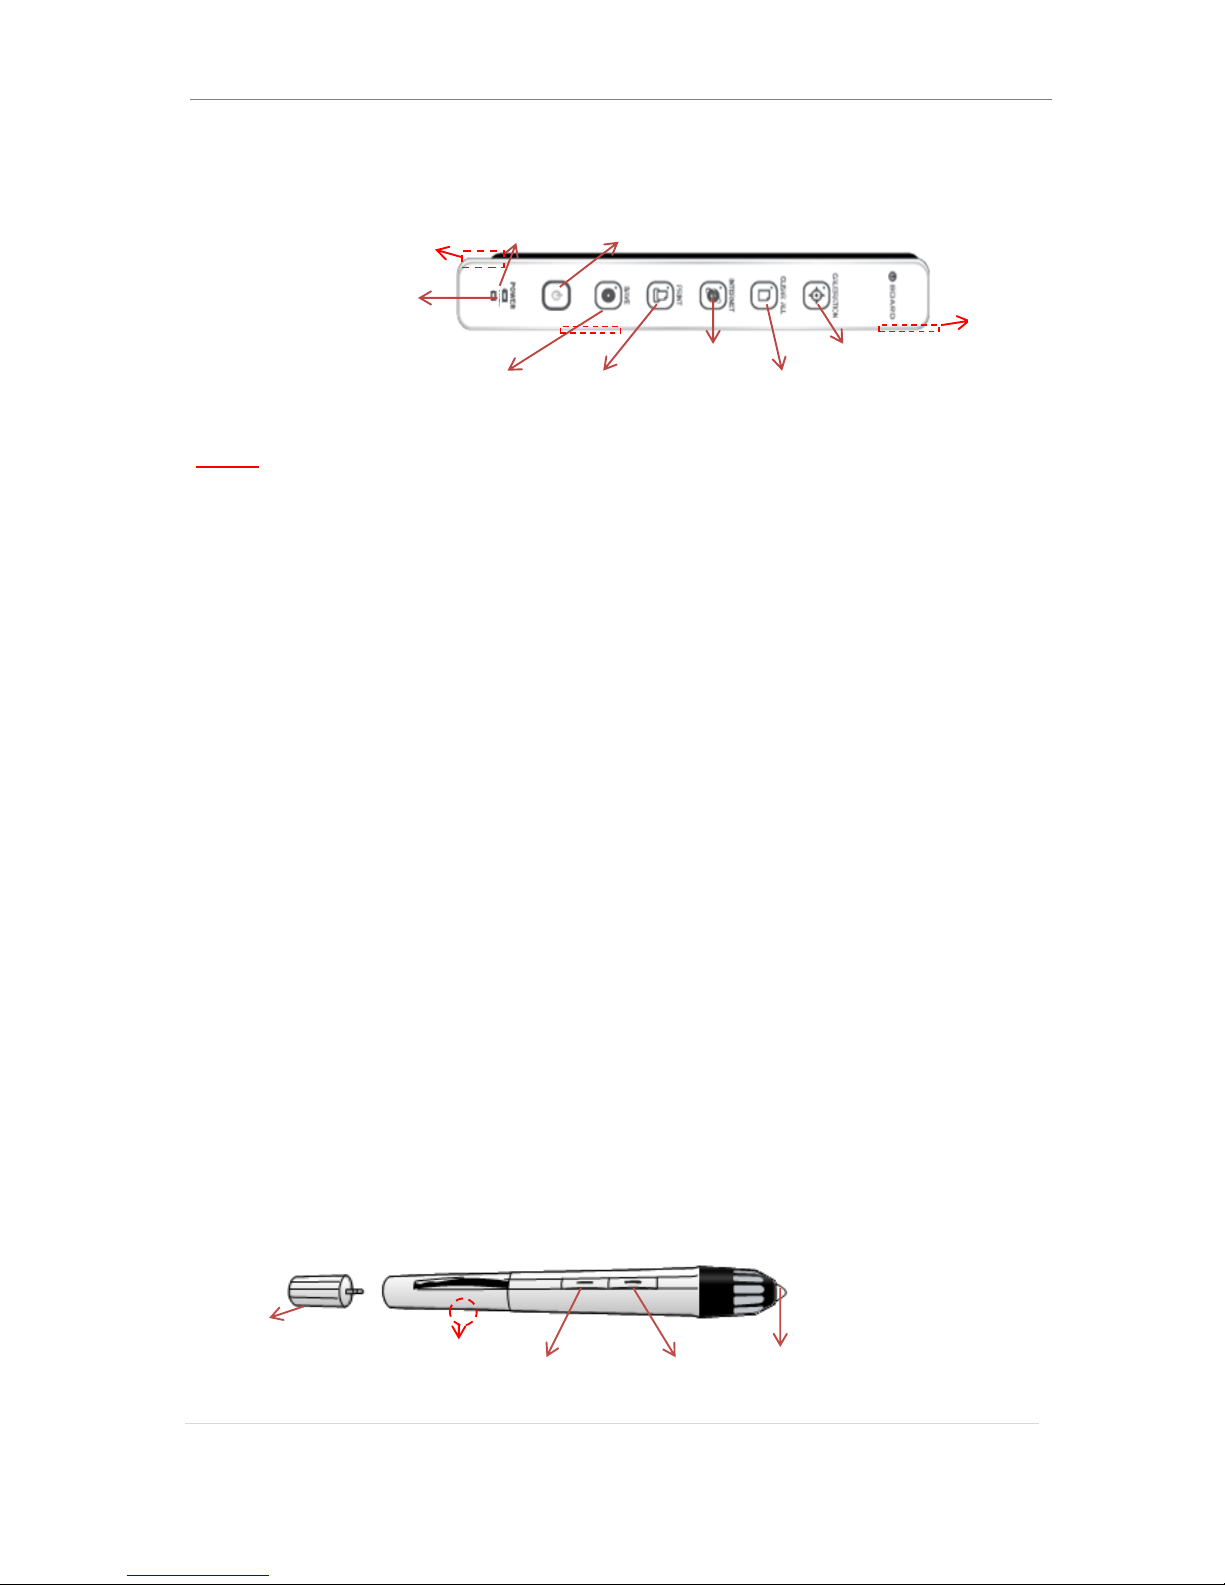
①Annotation mode.
Lower button : mouse right click
Upper button : mode switch from pen to eraser or vice versa
Note:
Please keep in mind that function keys on the station except ‘calibrate’
can be workable in only annotation mode.
②Window mode.
Lower button : mouse right click
Upper button : exit current window ( press it for a couple of second to be
exited)
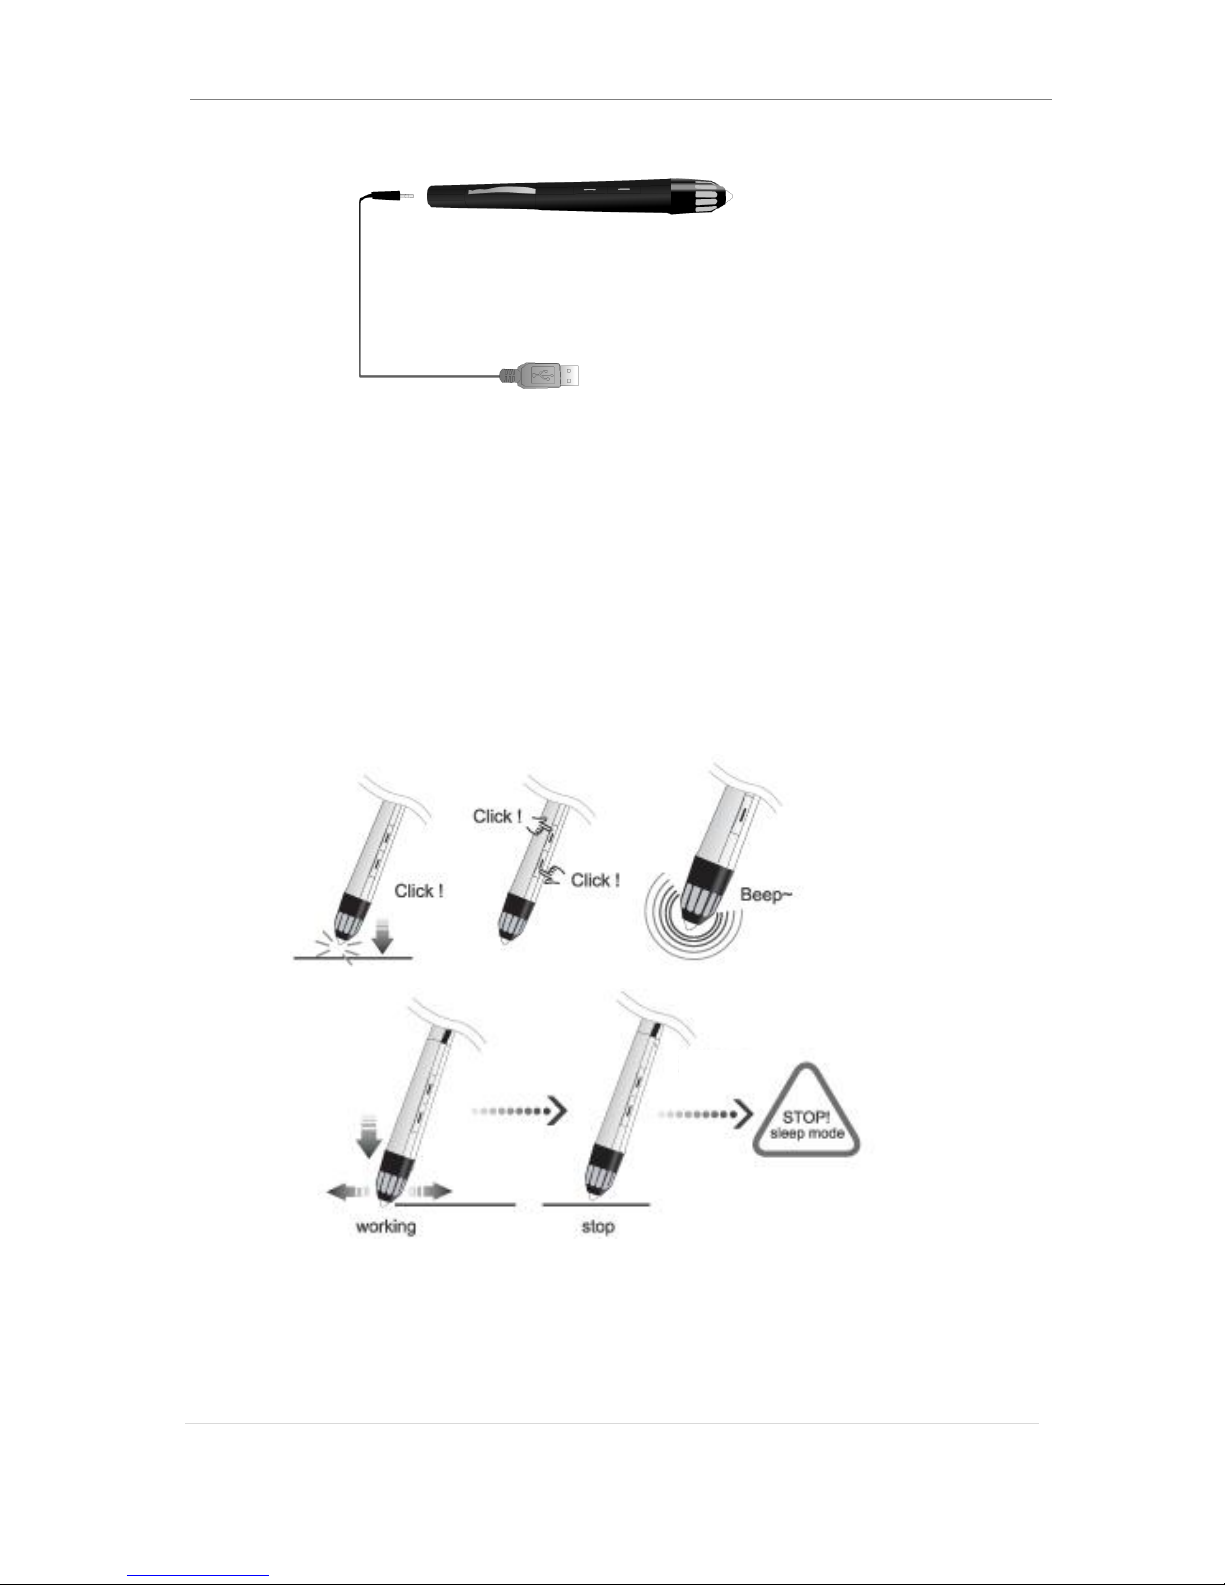
1.3.3 The way to recharge digital pen
To charge the digital pen safely, please use recharging cable enclosed in the
package. Before connecting ear-phone jack styled connector to the digital pen,
please make a sure to remove the laser pointer from the digital pen.
Then connect the recharging connector of the cable to the recharging hole located at
the end of pen body and plug USB knob of the other side of the cable to the
computer as depicted below.

uBoard Installation Guide (V4.1)
8 | P a g e
1.3.4 How to check the pen status.
In order to check whether the digital pen is working properly, press pen tip or pen
button. Then you can hear low beep sound generated by the pen when it works
properly. The digital pen adopted auto power saving algorithm. So it will
automatically enter to the hibernation mode to save power when the pen is idle for
10 seconds. In order to wake the pen in the hibernation mode, please touch the
pentip or click any button on it. Then the pen will be awakened immediately.
1.3.5 Pen tip change
When pen tip is worn-out, it can be replaced with new one. Please refer to the
following steps to replace it properly.
10 sec

uBoard Installation Guide (V4.1)
9 | P a g e
①To remove: Turn the pen-tip to right or left direction by 90 degrees with pulling
it out carefully.
②To insert: Insert the pen-tip into pen cage and turn it to right or left direction by
90 degrees to lock it.
Notice:
Do not expose to heat(130F), imapct, chops or etc
Careful of inhaled or bited case by children or pets
Prohibit inserting metals to the charging hole or sink in water.
1.4. Check Environment.
Please avoid the following environment when to use uBoard system.
①Avoid using uBoard in the environment that air is blown directly to uBoard
station from air conditioner or heater.
②Avoid using uBoard at the place using vacuum cleaner or some other
machines causing metallic sound. It may sometimes cause malfunction
temporary.
③uBoard is also using Infrared rays internally for reference signal. Therefore, it
may be sometimes affected by IR emitted from other devices. Thus, disabling
IR function on other infrared devices around uBoard is highly recommended
④[For wired model] Recommend to use USB repeater in case that USB
extension cable is longer than 10m.
⑤[ For wireless model ] In order to use Bluetooth wireless in a safe way, please
use it within 10m distance between the uBoard station and the computer.

uBoard Installation Guide (V4.1)
10 | P a g e
2. Install uBoard Station.
Before using uBoard system, uBoard station needs to be mounted properly on the
surface. Therefore, please read this section carefully and follow each step stated
below.
①Connect the Beam projector and the computer with RGB cable after turning
on the computer and the beam projector.
②Set the computer to the duplicate window mode to
display the window on both the computer screen and
the projected screen thru the projector.
(In general, F4 key functions the window mode
change. If it doesn’t work properly, please refer to the
computer manual.)
③Adjust the projected screen size and align the focus .
④Connect the micro USB connector of USB cable to
the micro USB port of the uBoard Station.
[For wireless model, skip this step.]
⑤Place the station holder to the backside of the station. As the magnet is
included in the station, the holder can be easily
attached to the station.
⑥Peel masking tape off from the station holder.
⑦Place the station on the left or upper side from the projected screen. When
placing the station, please keep it centered vertically
(left side) or horizontally (upper side) as well as in
parallel to the whiteboard frame.
Note :
When to place the station on the left or the right side,
maintain minimum 3 cm space between the station
and the projected screen. But when to place it on the

uBoard Installation Guide (V4.1)
11 | P a g e
upper side, keep 5 cm distance at least between them.
When to place the Station on the upper or the right side of the projected
screen, please refer to section 3.4 or 4.4 in this manual depending on the
Operating system.
⑧Press the station against the surface to adhere the station holder on the
whiteboard or wall. When you remove the station from it, you can see only the
station holder adhered to the surface.
(From next time, you can simply mount the station on the station holder after step
~)
⑨Connect the Active-link to the computer and USB cable to the Active-link in
order.
[For wireless model] Connect only the Active-link to
the computer.
Note:
Do not connect the USB cable to the Active-link or
to the USB port in the computer directly because
the wireless model doesn’t require USB cable for communicating between
the station and the computer.
After SW installation to the computer, when to connect the USB cable to
the computer directly without using the Active-link, the wireless model will
communicate by using USB cable connection. Therefore, the Active-link
always needs to be connected to the computer for wireless
communication.
⑩Press the power button on the Station. Then blue light is turned on.
[For wireless model] Wireless model is using
Bluetooth communication technology. As uBoard
wireless model adopted pre-pairing technology, it
never requires user intervention even in the case the
pairing was broken because it automatically recovers
the broken pairing.
When pairing is done successfully between the station
and active-link, the blue light on the station will be
turned on permanently from blinking status.
During annotation, when inking is not displayed, check the blue light status. If
it blinks, uBoard is under re-pairing process as the pairing was broken with
some reason.

uBoard Installation Guide (V4.1)
12 | P a g e
3. Install Software for MS Windows
After HW installation, the calibration and annotation software need to be installed for
using uBoard properly. This chapter describes the installation procedures for them.
3.1 Preparation
If you found uBoard SW was already installed on the computer, please remove it in
advance before new installation. The current SW can be uninstalled by using click
‘Start’in window > ‘All Programs’> ‘PNF’> ‘MINT’> ‘MINT uninstall’.
uBoard requires the pre-requisite SW before uBoard SW installation depending on
the type of Windows OS. Hence, uBoard checks the Windows type automatically
and installs them in advance.
The pre-requisite SWs for Windows XP, Window Vista Home Basic Edition and
Windows7 Starter edition are as follows;
Microsoft .NET framework V2.0
Microsoft Tablet SDK V1.7
Windows XP Tablet PC Edition 2005 Recognizer Pack.
Those pre-requisite SWs are included in the installation kit but the handwriting
recognizer should be downloaded individually from Microsoft web site due to MS
license policy.
After installing pre-requisite SWs, the installation procedure starts to install common
SWs which will be applied to all Microsoft windows OS.
Common SWs for every Microsoft widow OS:
oMINT Control ; Calibration and environment setup software
oMINT Interactive ; Annotation software
oMNT Image Printer ; Documents converting SW to import them to
.MINT Interactive workspace.
oInk Tool ; This tool is only available for XP, Vista Home
.Basic edition.
;
3.2 Install the pre-requisite SWs
As mentioned above, this section is necessary for only Windows XP and Vista Home
Basic. If you are working on Vista Professional or Win 7, skip this section.
Its installation procedure is as follows;

uBoard Installation Guide (V4.1)
13 | P a g e
①At first, it starts to install Microsoft .NET Framework 2.0 like below.
Step 1
Step 2
Step 3
Step 4
Step 5

uBoard Installation Guide (V4.1)
14 | P a g e
②After installing Microsoft .NET framework, it will start to install Microsoft
Windows XP Tablet PC Edition Development Kit Version 1.7 as follows;
Step 1
Step 2
Step 3
Step 4
Step 5
Step 6

uBoard Installation Guide (V4.1)
15 | P a g e
3.3 Install uBoard driver (MINT Control) and the annotation SW
(MINT Interactive)
All uBoard software and online manuals are included in theActive-link. Therefore,
connecting the Active-link to the computer is the starting point of SW installation
[refer to the step of section 2]
①When the Active-link is connected, the
system automatically displays the uBoard
startup window by the auto start procedure.
But depending on the windows setting, the
auto start procedure sometimes cannot be
executed properly. Then find the CD driver
labeled ‘PNF’in the computer and click the
device. In this case, come computer
executes “auto run”and invoke “uBoard
Startup window”automatically. But in some
other cases, it may list files on the CD
device. If so, click “POPStarter.exe”to run
uBoard Startup window”manually.
Step 7

uBoard Installation Guide (V4.1)
16 | P a g e
②The uBoard startup window has ‘Launch’and ‘Install’options.
The uBoard automatically finds window default language and then sets it as
uBoard default language. But
you can change your preferred
language in the language field of
uBoard startup window, if
necessary.
The function of each option is;
a. ‘Launch’mode: It invokes uBoard calibration ( from MINT Control) and
annotation software (named MINT Interactive) from the Active-link device
directly without installing them to the computer. It is very useful for
multiple users to share uBoard because every user doesn’t need to install
all software on his/her computer.
When ‘Launch’mode is selected,
The installation procedure automatically installs ‘MINT Image printer’
which is necessary for converting documents during importing it to the
current workspace or uBoard printing function.

uBoard Installation Guide (V4.1)
17 | P a g e
b. After installing the MINT Image printer, it automatically invokes MINT
Interactive from the
Active-link connected to
the computer directly.
Then you can see the
white background window
with MINT Toolbar on it.
c. ‘Install’mode.
It starts to install all software to the computer from the Active-link.
This mode is useful for the user who wants to use uBoard on his/her
owned computer.
[Wireless model], if you want to use USB cable communication as
well as Bluetooth wireless communication, select ‘Install’option
because this feature requires SW installation to the computer directly.
This step automatically installs the virtual printer driver called ‘MINT
Image Printer’which is necessary for converting documents during
importing it to the current workspace or uBoard printing function.
When uBoard SW installation finished successfully, it returns to the
window system.
Its installation procedure is as follows;
oAt first, it starts to
install the MINT Image
Printer.
oAfter installing the
MINT virtual printer, it will install the MINT Control which has
calibration and uBoard parameter setup functions and MINT
Interactive which is uBoard annotation SW, respectively.

uBoard Installation Guide (V4.1)
18 | P a g e
③Check the power button is on from the uBoard station which is mounted on
the whiteboard or wall surface. If power is still not on, press the power button
on the uBoard station.

uBoard Installation Guide (V4.1)
19 | P a g e
If the blue led light on the station is not on, please check the USB cable is
properly connected to the station and the computer.
[wireless model] wait till both “blinking blue light”on the station and the active-
link are permanently on. It means Bluetooth connection is successfully
established.
uBoard wireless model is using the Bluetooth technology and therefore it
doesn’t require USB cable connection between the station and the computer.
But the Active-link should be always connected to the computer because
uBoard tries auto-pairing between uBoard station and the Active-link. Auto-
pairing technology enables Bluetooth to be auto-connected like RF wireless
without requiring user intervention in the case even the pairing was broken.
[wireless model] If the user wants to use USB cable communication between
the station and the computer, connect USB cable to the computer directly
without using the Active link as the wireless communication has higher priority
than USB cable communication when the Active-link is connected to the
computer.
Note :
When uBoard is not configured by the computer, uBoard will not work properly.
So when the connection is failed, check whether it is properly configured by
Windows OS. [refer to 3.4 Option for uBoard setup]
④Press ‘Calibration’button on the station.
When you press ‘calibrate’button, uBoard displays calibration as depicted
below. Then touch the center of the circle with the digital pen. As uBoard uses
9 points calibration to recognize the screen size, it requires repeating this step
9 times as guided by the system.
After calibration is done successfully, uBoard returns its control to the MINT
Interactive if ‘Launch’is selected in step . But when SW installed to the
computer by selecting ‘Install’option, it returns to the window mode after
successful calibration. In this
case, click ‘MINT Interactive’
on the desktop windows to
launch annotation SW.
Calibration
Button
[ Calibration Window ]
Press

uBoard Installation Guide (V4.1)
20 | P a g e
Note :
As Window cursor position can be more or less swerved by titling angle of
pen, keep the pen tilting angle at calibration time same as you griped pen
in actual writing mode.
After successful calibration, it doesn’t require repeating it because
calibration data is saved to uBoard. But when cursor drift happens,
execute calibrate again to keep it accurate.
However, please keep in mind that calibration is always required if the
projected screen size or the beam projector position changed,
-1 When uBoard station is placed on the left side of the projected screen,
please skip this step. Otherwise, the station position needs to be recognized by
the uBoard SW before calibration with following steps.
a. When ‘Launch’mode is selected in step.
uBoard invokes MINT Interactive window at
default. Before pushing ‘Calibration’button,
uBoard station placement should be defined
with following steps.
i. click ‘menu ’icon on the MINT Interactive
toolbar as depicted on the right side.
ii. click ‘Device Option ’.
iii. click ‘Option’tab on the uBoard window.
iv. click ‘Upper’or ‘Right’position in the ‘Station
Placement’field which is same to the actual
placement of the uBoard station
b. When ‘Install’mode is selected in step .
When SW installation is done successfully, uBoard returns its control to
Upper position
Right position
Right position
(Default value)
[MINT Interactive toolbar]
Table of contents