Peraqua Ocean Main Drain PT User manual

--1--
Einbau- und Bedienungsanleitung
OCEAN BODENABLAUF
www.peraqua.com

--2--
Index
Preface to installation and operation manual ...........................................................................................................page 3
Appropriate application ...........................................................................................................................................
page 3
Warranty and liability .…….....................................................................................................................................
page 3
Residual risk ............................................................................................................................................................
page 3
1 General ......................................................................................................................................... page 4
1.1 Types
1.1.1 Ocean Main Drain PT for liner pools with PT screws (Part #.: 170842)
1.1.2 Ocean Main Drain M5 for liner pools with M5 screws (Part #.: 170843)
1.1.3 Ocean Main Drain for tile- and steel wall pools (Part #.: 170844)
1.2 Main dimensions and pipe connections
1.3 Flanges at the main drain
1.4 Installation of sealing and blind frame at the body for PT screw type
1.5 Installation of gasket and blind frame at the body for M5 screw type
1.6 Applying the solvent glue
2 Installation types…..........………………………………………………………………………….. page 9
2.1 Main drain for liner pools
2.2 Main drain for tile- and steel wall pools
3 Miscellaneous ……………………………………………...........................………………….…….page 12

--3--
Preface to installation and operation manual
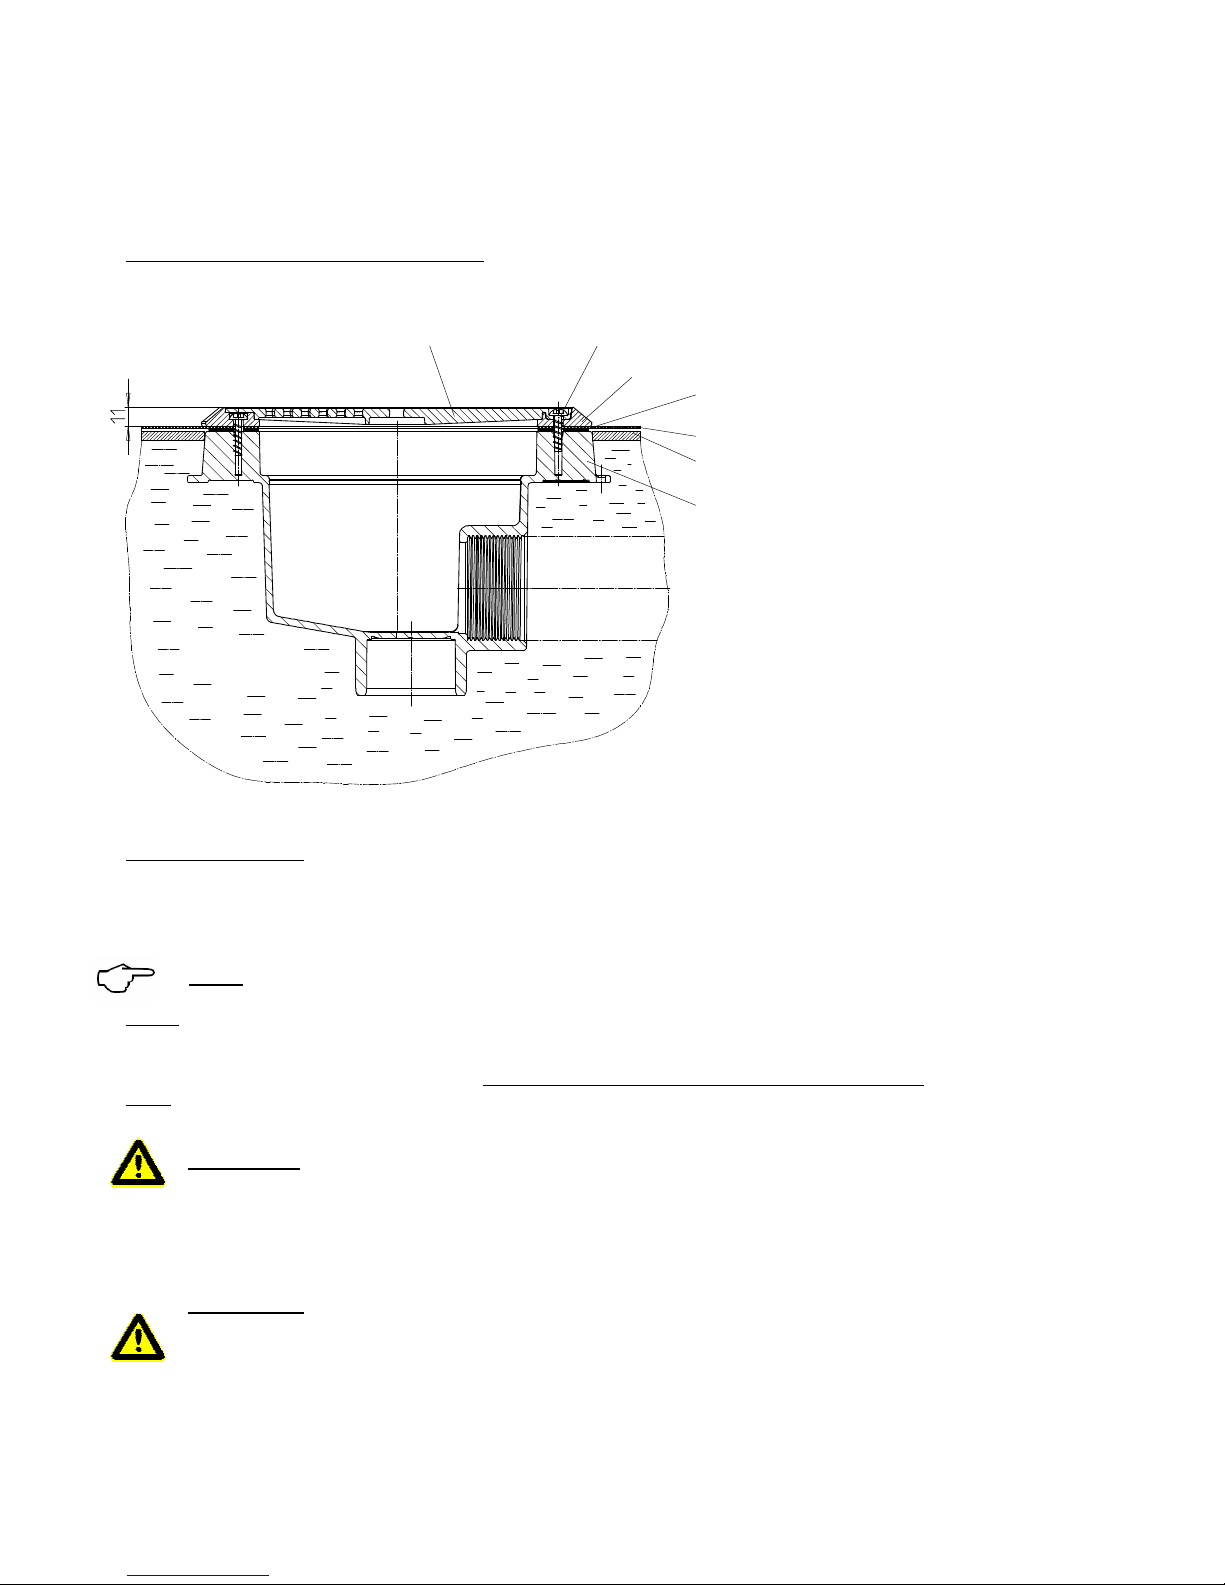
The installation and operation manual shall support and simplify the various types of main drains and use them
according to their designated applications.
The installation and operation manual contains important advice for safe, appropriate and economic operation of
the main drain. Compliance with the regulations will help to:
avoid danger
avoid repair expenses and breakdown
improve the reliability and life span of the inlet nozzles
Designated application
The main drain must only be used in following pool types:
steel wall pools with foil
polyester pools
solid pools concrete and Styrofoam
All other applications are not considered ‘appropriate’ and the manufacturer cannot be held liable for any claims
resulting thereof.
Warranty and liability
All warranties shall be in conformance with European Union rights.
Any warranty or personal liability claims shall be considered as ‘inappropriate’, if caused by one or more of the
following reasons
inappropriate use of the main drain
unprofessional installation, operation and servicing of the main drain
installation, operation and maintenance of the main drain without paying attention to the installation and
operation manual
unprofessional repairs of the inlet nozzles
damages caused due to weather related forces and/or natural disasters
Formatiert: Nummerierung und
Aufzählungszeichen
Formatiert: Nummerierung und
Aufzählungszeichen
Formatiert: Nummerierung und
Aufzählungszeichen

--4--
1 General
1.1 Types
1.1.1 Ocean main drain PT for linier pools with PT screws (Part #: 170842)
Screw blind frame with 8x screws PT. Premium screws PT (stainless steel A4) are specially developed screws
for thermoplastic, which are screwed directly into the plastic.
Advantages: *) Screw does not get stuck on another metal part due to corrosion
*) Reduction of metal parts in the pool area to a minimum, since no thread inserts are needed
1.1.2 Ocean main drain M5 for liner pools with M5 screws (Part #: 170843)
The body of the main drain contains premium thread inserts (stainless steel A2).
Screw blind frame with the 8 x M5 premium screws (stainless steel A4)
Differences between both types:
-) Screws
--) Ocean screw set PT
--) Ocean screw set M5
-) Stainless steel thread inserts
If a main drain PT needs to be converted to be a M5, stainless steel thread inserts M5 need to be screwed in the
second, therefore designated flange image.
All other parts are identical with both types.
1.1.3 Ocean main drain for tile- and concrete pools (Part #: 170844)
The grated lid is screwed together with the body with 2x PT screws.

--5--
1.2 Main dimensions and pipe connections
Body main drain liner pool: Body main drain concrete pool:
At the main drain there are 2 pipe connections:
-) Female thread (IG 2“ BSP)
ATTENTION: Do not seal female thread 2“ with manila!
NOTICE: It is recommended to seal the thread with PTFE-thread sealing tape!
-) metric glue connection (nozzle d63mm and socket d50mm)
(to break through)
NOTICE: For gluing it with the PVC pipe we recommend TANGIT, SABA!

--6--
Flanschbild für M5 - Schrauben
zur Verschraubung mit Gitterdeckel
Flanschbild für PT - Schrauben
zum Befestigen beim Einbetonieren
1.3 Flange connection
Advantages of the OCEAN main drain:
2 different flange connections (choice between PT und M5)
2 different connections (1x thread and solvent)
no step in the body, i.e. body is always fully emptied
solid assembly
blind frame and grated lid were adjusted as flat as possible to the pool wall
for fastening during setting in concrete
Flange for PT screws
Flange for M5 screws
For screwing with grated lid

--7--
Markierung
Markierung
1.4 Installation of gasket, blind frame and grated lid at the body for type with PT
screws
1) Gasket
2) Body main drain
The cut for the gasket has to be done exactly where marked (at the body)
1.5 Installation of gasket, blind frame and grated lid at the body for type with M5
screws
1) Gasket
2) Main drain body with stainless steel thread inserts M5
The cut for the gasket has to be done exactly where marked (at the body)

--8--
Bereich zum Auftragen des Klebers
1.6 Applying the glue
In order to secure the position of the gasket during applying the foil, the seal should be fixed to the
body on approx. 4 glue areas (see drawing).
WARNING: Do not apply too much glue. Just dots!
We do recommend PVC glue (TANGT, SABA)!
Area for applying the glue

--9--
2
3
4
5
6
1
2Installation types
2.1 Main drain for liner pools
Components:
1) 2x PT screws
2)
Ocean grated lid ……………………………………………………...…..Part. #: 150505
3) 8x PT screws
3) 8x M5 screws
4) Blind frame
5) Gasket for main drain
6) Main drain body for liner pools
6) Main drain body with thread inserts M5 for liner pools
Spare parts:
Ocean grated lid .....………………………………………………….......…...Part. #: 150505
Ocean blind frame set ……………………………………………….……….Part. #: 150506
contains:
*) Ocean grated lid
*) blind frame
*) gasket for Ocean main drain

--10--
Ocean Gitterdeckel
Schraube
Blendrahmen
Dichtung für Bodenablauf
Schwimmbadfolie
Beton
Isolierplatte
Gehäuse Bodenablauf
Installation of the main drain in the liner pool:
Assembly instructions:
1) Insert the main drain and the pre installed pipe in the pool floor, stick on the installation safety foil and
concrete.
Please mind that the top flange ring of the main drain is at the same level as the concrete. Safe-to-stand-
on insulating plates can be put on the floor for insulation.
Notice: The main drain is now higher than the concrete due to the insulation.
Notice: The information about the chemical resistance of ABS is only a guideline. Changes or characteristics in
the composition of the medium (i.e. liquid concrete, concrete, silicone, filling foam) as well as special operating
conditions may lead to variations. In case of doubt it is recommended to test the material behaviour
(components, white goods) by carrying out trials. The information about the ABS does not justify any warranty
claims!
ATTENTION:Please mind bracing, distortion and pressure!
2) Place the gasket between main drain and foil
3) Screw together blind frame with the correct flange connection of the body
4) Screw together grated lid and body with PT screws
ATTENTION: For screwing with AKKU screwdriver:
Screwdriver speed = max. 500 rpm
Force = max. 2Nm
grated lid
screw
blind frame
seal
for
main
drain
pool
foil
insulating
plate
body
main
dr
ain

--11--
3
2
1
Ocean Gitterdeckel Fliesen
Gehäuse für Bodenablauf
Schraube
Beton
2.2 Main drain for tile- und concrete pools
Components:
1) 2x PT screws
2)
Grated lid .......……………………………………………………..Part.#: 150505
3) Main drain body for tile- and concrete pools
Installation in tile pools:
screw
grated lid
tiles
main
drain
body

--12--
Assembly instructions:
5) Insert the main drain and the pre installed pipe in the pool floor, stick on the installation safety foil and
concrete.
Please mind that the top flange ring of the main drain is at the same level as the concrete. Safe-to-stand-
on insulating plates can be put on the floor for insulation.
Notice: The main drain is now higher than the concrete due to the insulation.
Notice: The information about the chemical resistance of ABS is only a guideline. Changes or characteristics in
the composition of the medium (i.e. liquid concrete, concrete, silicone, filling foam) as well as special operating
conditions may lead to variations. In case of doubt it is recommended to test the material behaviour
(components, white goods) by carrying out trials. The information about the ABS does not justify any warranty
claims!
.
ATTENTION:Please mind bracing, distortion and pressure!
1) Remove installation safety foil and screw together grated lid and body with PT screws.
ATTENTION: For screwing with AKKU screwdriver!
Screwdriver speed = max. 500 rpm
Force = max. 2Nm
3 General remarks
Notice: While changing the pool foil
Please take care, that after changing the pool foil, the thread that is cut by using the
PT screws, is used again for re-screwing the blind frame.
Turn the screw anti-clockwise until it ‘jumps’ into the thread.
The national and regional building regulations have to be followed and kept!
Prior to finishing the work it has to be test for tightness!
This manual suits for next models
2
Table of contents
Other Peraqua Lighting Equipment manuals