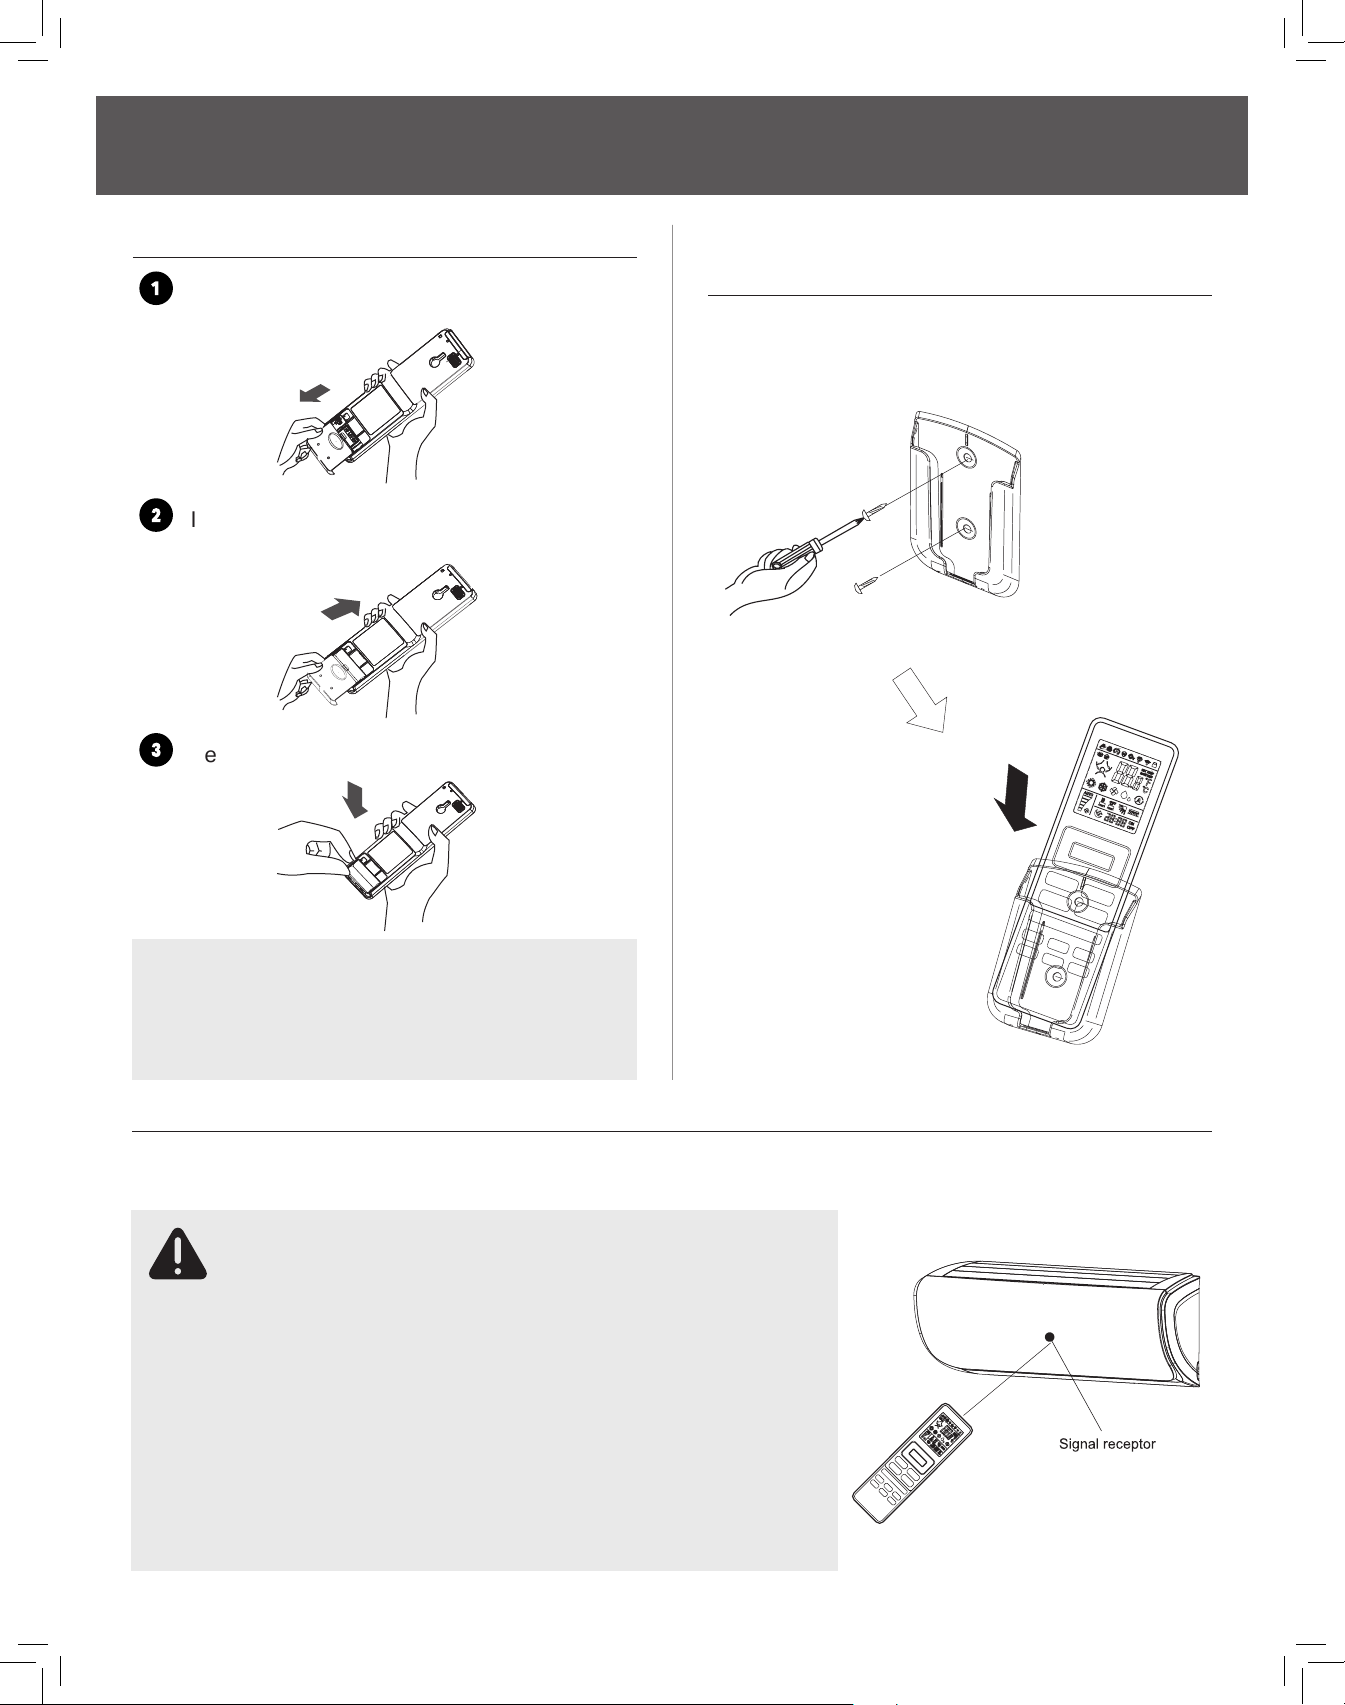
Perfect Aire 3PAMSH36B-SZW User manual

REMOTE CONTROL
OWNER’S MANUAL

2
IMPORTANT NOTE:
Read the manual carefully. Make sure to save this manual for future reference. Illustrations in this manual

3
TABLE OF CONTENTS
REMOTE CONTROL .......................................................................................................................................... 4
.......................................................................................................................... 5
................................................................................ 5
.......................................................................... 5
OPERATION INSTRUCTIONS ......................................................................................................................... 6
....................................................................................................................................................
............................................................................................................................ 7
........................................................................................................................................................... 7
.................................................................................................................................................................. 7
........................................................................................................................................................... 8
.................................................................................................................................................................. 8
................................................................................................................................................................. 8
............................................................................................................................................................... 9
..................................................................................................................................................................10
..........................................................................................................................................................10
.......................................................................................................................................................10
....................................................................................................................................................................11
SLEEP MODE................................................................................................................................................................11

4
REMOTE CONTROL
NOTE:
MODE
Press this button to select the operation mode.
TIMER ON / CLOCK
Used to set or cancel the timer operation.
Used to set the current time.
SWING
Adjust vertical (up/down) air ow.
QUIET
Used to set or cancel Quiet Mode operation.
ECO
Used to set or cancel Economy Mode operation.
iFEEL
Used to set or cancel iFeel Mode. In iFeel mode, the
air conditioner operates basis temperature sensor
tted in remote instead of machine. When using
iFeel you should place the remote control where it
will receive the signal easily.
CLEAN (Not available)
Used to set the Clean operation.
8°C HEAT
Used to start or stop 8°C Heat Mode.
SLEEP / DIMMER
Used to set or cancel Sleep Mode operation.
Press this button for about 5 seconds to start
Dimmer mode, press this button for about
5 seconds once again to stop it.
AI SMART
Used to enter Articial Intelligence
Smart Running Mode.
FAN / LOCK
Used to select fan speed in sequence: auto,
higher, high, medium, low and lower. Press this
button for about 5 seconds to start Lock mode.
Press this button for about 5 seconds once again
to stop it.
SUPER
Used to start or stop the fast cooling/heating.
(Fast cooling operates at high fan speed with
61°F/16°C set temp automatically; Fast heating
operates at auto fan speed with 86°F/30°C set
temp automatically.)
POWER
The appliance will be started when it is energized
or will be stopped when it is in operation, if you
press this button.
TIMER OFF
Used to set or cancel the Timer operation.
SWING
Adjust horizontal (left/right) air ow.
TEMP + -
Used to adjust the set temperature and the timer,
also real time.
NOTE:
Press -and MODE at same time to
toggle between °C to °F.
Dry indicator
Sleep 1 indicator
Sleep 2 indicator
Sleep 3 indicator
Sleep 4 indicator
Auto fan speed
Medium fan speed
Low fan speed
Lower fan speed
Quiet indicator
Economy indicator
Super indicator
Display temperature
Lock
Indoor clean indicator
Outdoor clean indicator
Display set timer
Display current time

5
REMOTE CONTROL
NOTE:
batteries with new ones of the same type
when the display becomes dim.
CAUTION
•
•
the remote control
consult your local dealer.
(Continued)
HOW TO INSERT THE BATTERIES
1
arrow direction.
2
3
into position.
STORAGE AND TIPS FOR
USING THE REMOTE CONTROL
wall with a holder.
TIPS & REGULATIONS FOR USING REMOTE CONTROL
Remote control
holder xing
Remote control
mounting

6
OPERATION INSTRUCTIONS
SELECTING MODE
Press button one by one
Result:
sequence:
FAN MODE
Press button one by one
Result:
not available.
SETTING TEMPERATURE
Result:
Raise temperature
Result: Raise temperature
RANGE OF AVAILABLE SET TEMPERATURE
HEATING, COOLING
DRY
FAN ONLY unable to set
NOTE: Dry Mode can be increased or
room at a comfortable temperature.
•
sometimes the unit does not respond at
•
•
OPERATION MODES
TURNING ON
Press button.
Result:

7
OPERATION INSTRUCTIONS (Continued)
VERTICAL AIRFLOW CONTROL
(WITH THE REMOTE CONTROL)
Press button once.
Result:
Press
Result:
HORIZONTAL AIRFLOW CONTROL
(WITH THE REMOTE CONTROL)
Press button once.
Result:
Press
Result:
AIRFLOW DIRECTION CONTROL
buttons of the remote control.
OPERATION MODE
DIRECTION OF AIRFLOW
Cooling, Dry
Heating, Fan Only Downward
Do not turn the vertical adjustment louvers manually, otherwise
malfunction may occur. If that happens, turn o the unit rst and
cut o the power supply. Wait three minutes to allow compressor
to fully stop, then restore power supply.
To prevent condensed water from dripping from indoor unit, do
not use downward tilted louver position for long periods of time.
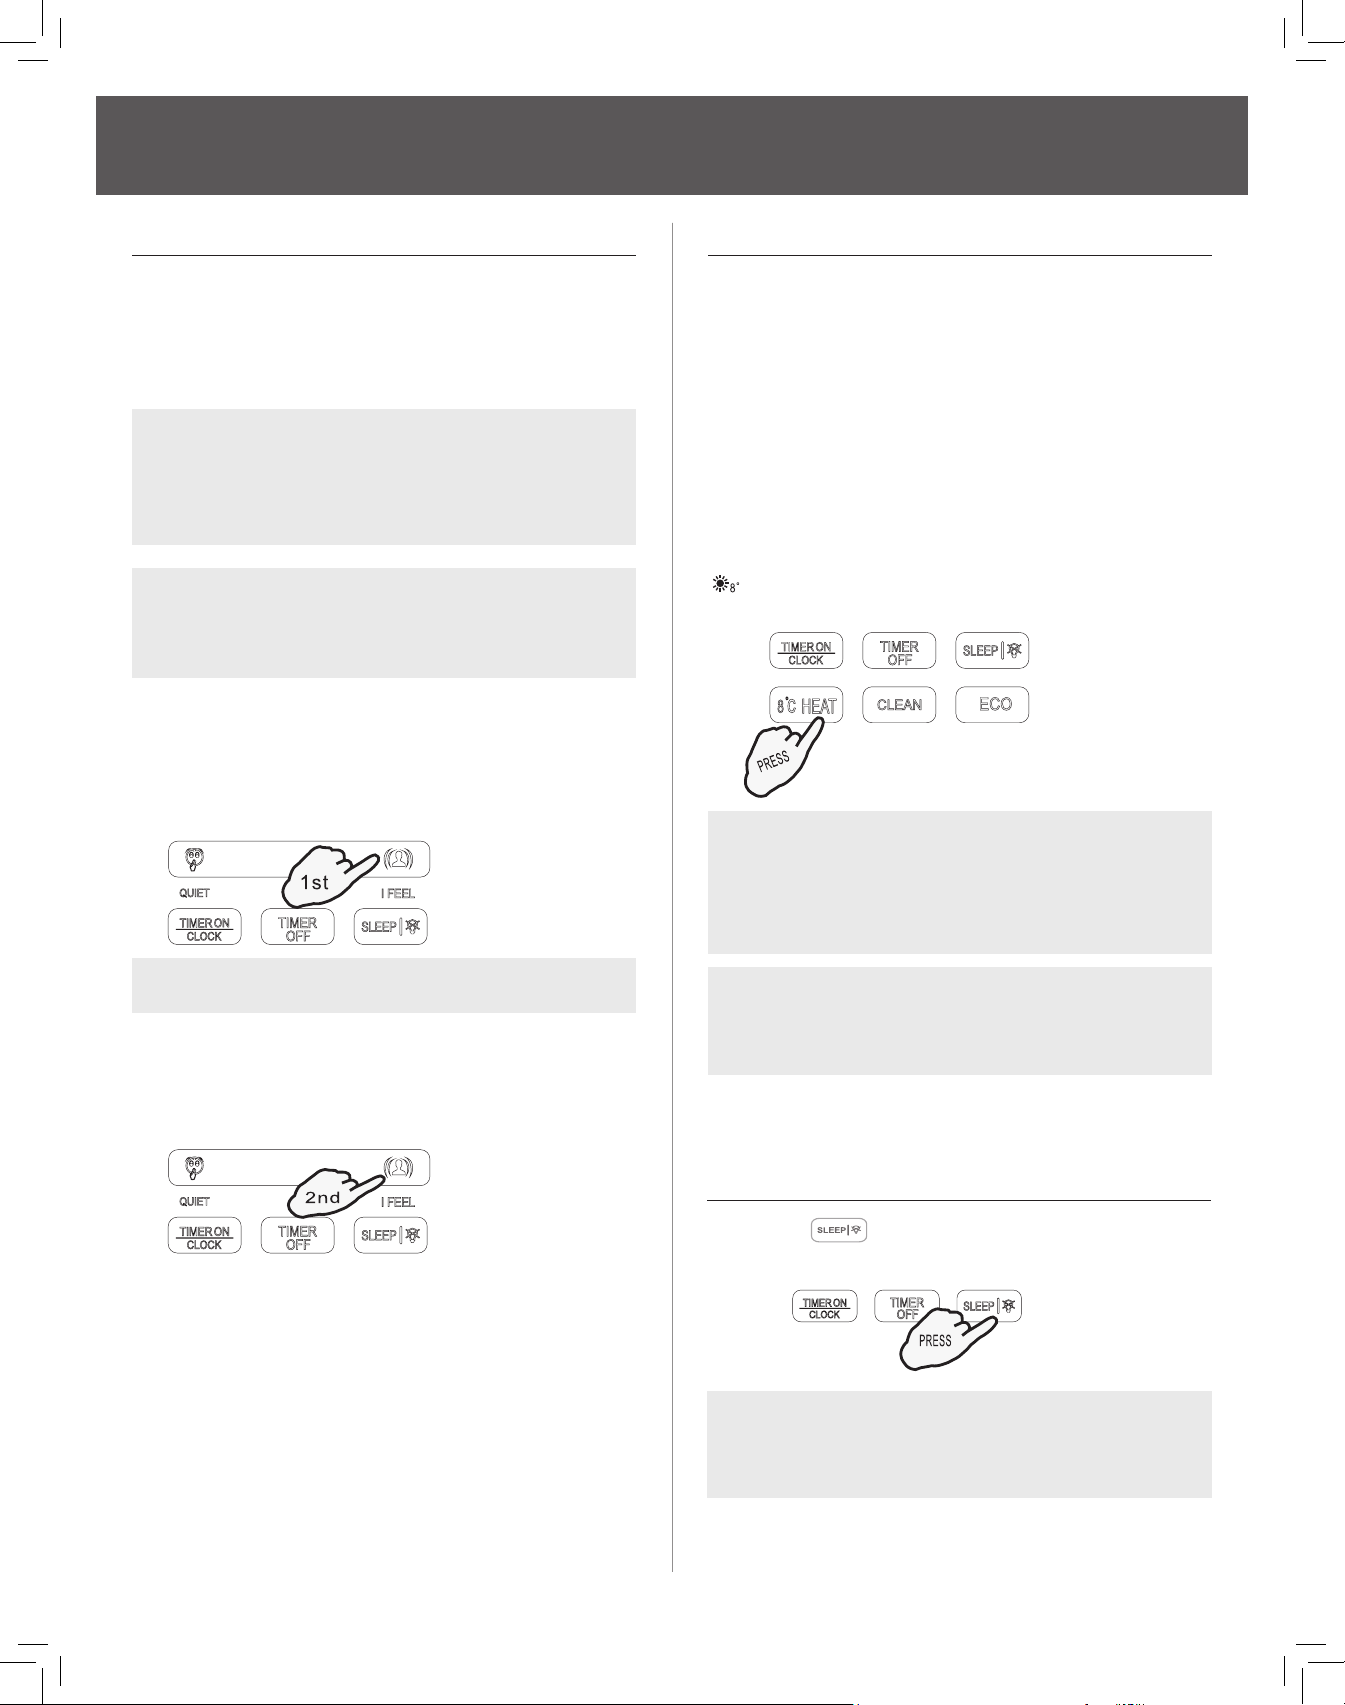
AI SMART MODE
HOW TO SET AI SMART MODE
Press the button.
Result:
NOTE:
are not available.
HOW TO CANCEL THE AI SMART MODE
Press the button.
Result:
QUIET MODE
compressor on a lower frequency for a quieter
performance.
Press
Result:
NOTE:

8
OPERATION INSTRUCTIONS (Continued)
CLOCK BUTTON
HOW TO ADJUST THE REAL TIME
1
Result:
2
Result: Press for 1 second to increase or
decrease the timer in 1 minute intervals.
Hold for 1.5 seconds to increase or decrease
the timer in 10 minute intervals.
Hold for about 2 seconds to increase or
decrease the timer in 1 hour intervals.
3
Result:
LOCK MODE
Press button for about 5 seconds to
on the display.
Press button for about 5 seconds once
disappears.
HOW TO CANCEL SUPER MODE
SLEEP button.
Result:
SUPER MODE
direction or timer.
HOW TO SET SUPER MODE
Press
mode.
Result:
Press button in Heat mode.
Result:
NOTE:
buttons mentioned above.

9
OPERATION INSTRUCTIONS (Continued)
TIMER MODE
the same 24 hour interval.
used independently.
HOW TO SET TIMER ON
1
Press button.
Result:
2
Result: Press for 1 second to increase or
decrease the timer in 1 minute intervals.
Hold for 1.5 seconds to increase or decrease
the timer in 10 minute intervals.
Hold for about 2 seconds to increase or
decrease the timer in 1 hour intervals.
3
Result:
4
After the set timer displayed for 5 seconds
remote control instead of set timer.
HOW TO SET TIMER OFF
1
Press button.
Result:
2
Result: Press for 1 second to increase or
decrease the timer in 1 minute intervals.
Hold for 1.5 seconds to increase or decrease
the timer in 10 minute intervals.
Hold for about 2 seconds to increase or
decrease the timer in 1 hour intervals.
3
Result:
4
After the set timer displayed for 5 seconds
remote control instead of set timer.
HOW TO CANCEL TIMER ON
Press button.
Result:
mode has been canceled.
NOTE:
your desired time.

10
OPERATION INSTRUCTIONS
8°C HEAT MODE
HOW TO SET THE 8°C HEATING
Press the 8°C HEAT
In 8°C HEAT
automatically.
8°C HEAT mode will be started when you
press 8°C HEAT
be cancelled.
NOTE:
temperature is set
.
NOTE:
keep areas that do not need to be fully heated
(Continued)
iFEEL MODE
temperature.
NOTE:
the remote control is placed on the opposite
side of the room as the indoor unit and out of
NOTE: Remote must still be within an
communicate with indoor unit.
HOW TO SET iFEEL MODE
Press the iFeel button once.
Result:
NOTE:
HOW TO CANCEL iFEEL MODE
Press the iFeel button once.
Result:
NOTE:
DIMMER BUTTON
Press the button for about 5 seconds to

11
OPERATION INSTRUCTIONS (Continued)
SLEEP MODE
SLEEP mode can be set in COOLINGHEATING
or DRYING mode.
environment for sleep.
•
•
HOW TO SET SLEEP MODE
Each time button is pressed.
Result:
sequence:
SLEEP MODE 1:
Heat Mode: Set temperature will decrease
SLEEP MODE 2:
Heat mode: Set temperature will decrease
SLEEP MODE 3:
Heat mode: Set temperature will decrease
SLEEP MODE 4:
Set temperature will stay steady.
NOTE:
function of those units.
ECO MODE
Result:
indicator appears on the display.

844-4PA-AIRE |844-472-2473 |support@perfectaire.us
CANADA SUPPORT 877-997-2473 |supportcanada@perfectaire.us
www.perfectaire.us
5401 Dansher Road
|1021_M873
This manual suits for next models
1
Table of contents
Other Perfect Aire Remote Control manuals

Perfect Aire
Perfect Aire 3PAMSH09A-SZW User manual

Perfect Aire
Perfect Aire 1PAMSHH series User manual

Perfect Aire
Perfect Aire RG51F/EU1 User manual

Perfect Aire
Perfect Aire 3PAMSHQCW09-U230 User manual

Perfect Aire
Perfect Aire PORT8000 User manual

Perfect Aire
Perfect Aire 1PACU8000 User manual

Perfect Aire
Perfect Aire RG10A/BGEFU1 User manual

Perfect Aire
Perfect Aire 3PAMSDH09 User manual