PERFECT FRY COMPANY PFA SERIES User manual

PFA SERIES
FULLY AUTOMATIC FRYERS
INSTALLATION - INSPECTION - MAINTENANCE
PERFECT FRY
www.perfectfry.com
42 Allen Martin Drive, Essex Junction, Vermont 05452 USA Telephone: (802) 658-6600 Fax: (802) 864-0183
PN 83497 Rev B (10/20)
© 2020 - Perfect Fry Company
Be sure ALL operators read, understand and have access to this manual at all times.

PFA SERIES INSTALLATION, OPERATION, MAINTENANCE 2
TABLE OF CONTENTS
Thank you for Purchasing a PFA Automatic Fryer from Perfect Fry!.....................................................................................3
Owner’s Responsibilities .......................................................................................................................................................4
Regulations & Recycling........................................................................................................................................................5
Safety First ............................................................................................................................................................................6
INSTALLATION
Electrical Power Supply (North American Models)................................................................................................................7
Electrical Power Supply (International Models).....................................................................................................................8
Accessory Outlets (North American Models).........................................................................................................................8
Prepare Countertop Area.......................................................................................................................................................9
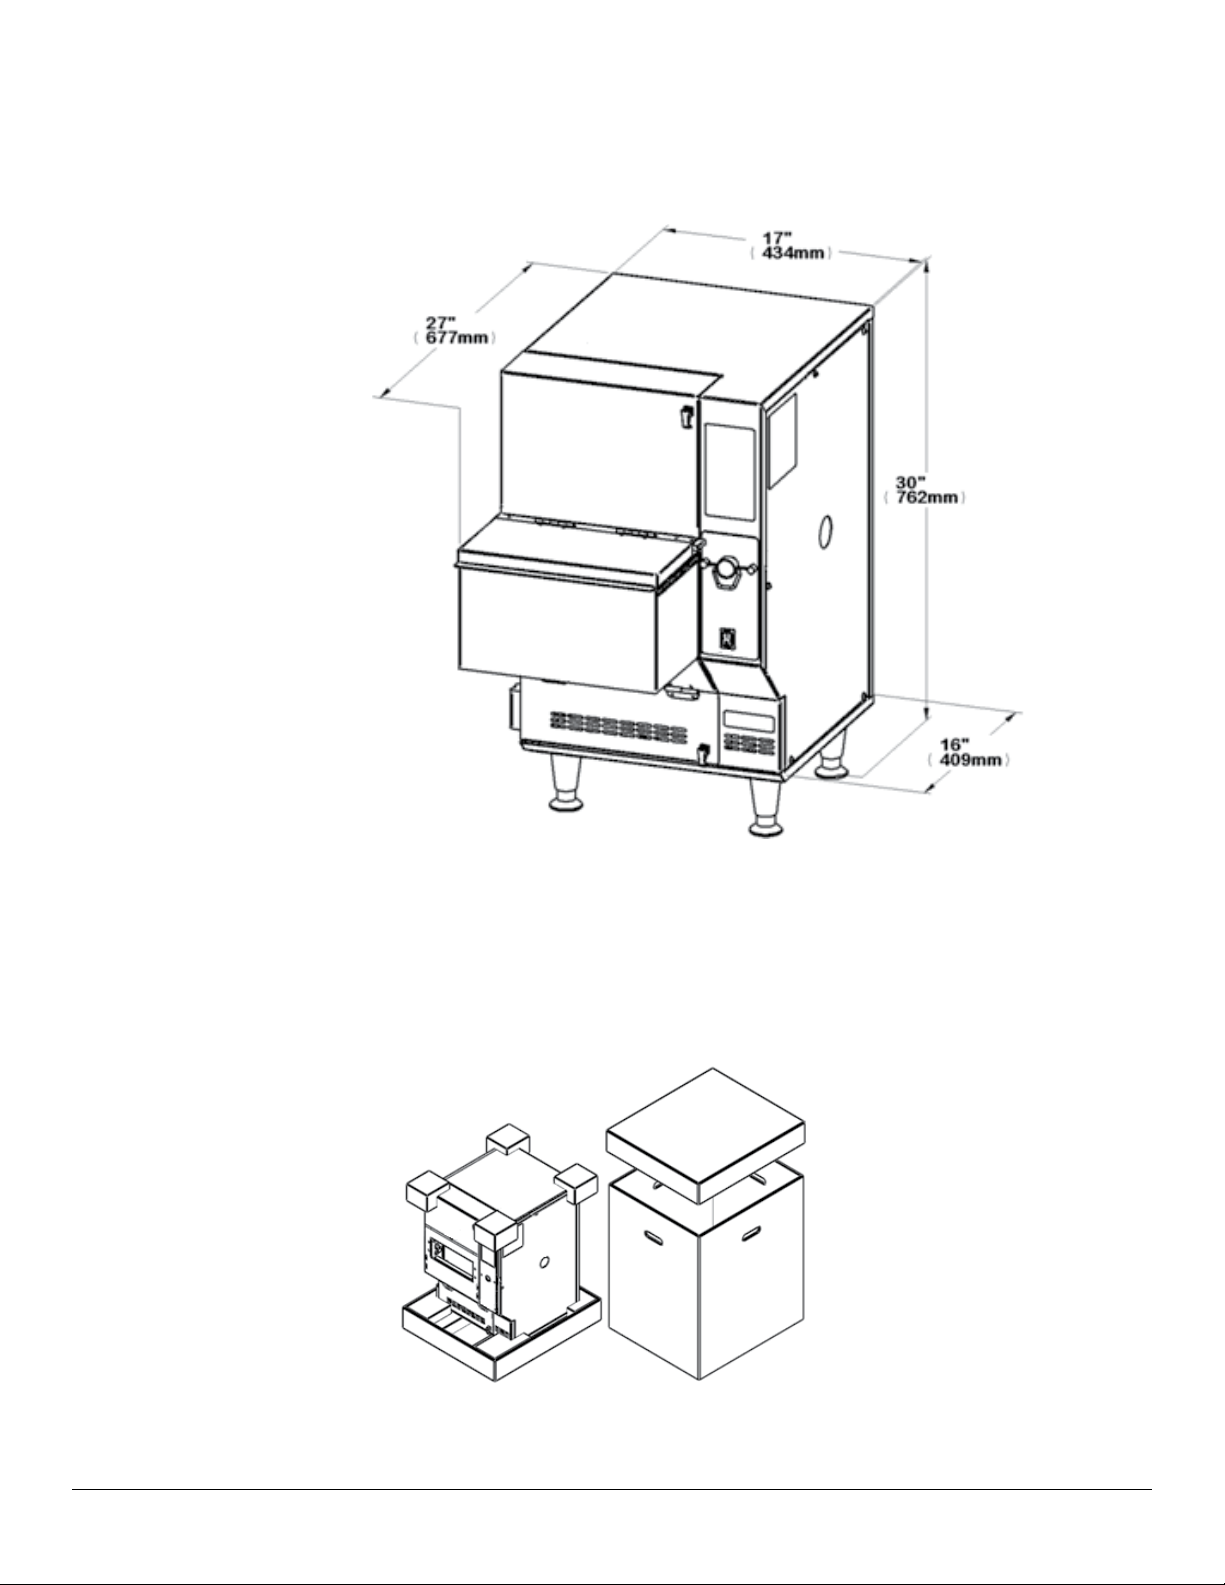
Unpack ..................................................................................................................................................................................9
ASSEMBLY........................................................................................................................................13
COOKING ..........................................................................................................................................19
CLEANING
Daily Maintenance...............................................................................................................................................................20
Weekly Maintenance ...........................................................................................................................................................20
Periodic Maintenance..........................................................................................................................................................22
TIPS ON DEEP FRYING...................................................................................................................23
OIL FACTS.........................................................................................................................................24
OPERATING INSTRUCTIONS.........................................................................................................27
Manual Mode.......................................................................................................................................................................28
Preset Mode ........................................................................................................................................................................29
Open Drawer Lid - Paused Cook Cycle...............................................................................................................................34
Shutting Down .....................................................................................................................................................................35
USER DEFINED OPTIONS ..............................................................................................................36
CTSTM (Cook Time Sensitivity).............................................................................................................................................37
Option Changes...................................................................................................................................................................43
Customizing Presets............................................................................................................................................................44
Customizing Presets on the Front Label .............................................................................................................................45
HELP
System Error Conditions......................................................................................................................................................46
Troubleshooting Table .........................................................................................................................................................49
PFS AUTOMATIC EXTINGUISHER ................................................................................................51
DECLARATION OF CONFORMITY.................................................................................................53
ORIGINAL STANDARD EQUIPMENT LIMITED WARRANTY
US & Canada.......................................................................................................................................................................54
International Units................................................................................................................................................................56

3 PFA SERIES INSTALLATION, OPERATION, MAINTENANCE
THANK YOU FOR PURCHASING A PFA AUTOMATIC FRYER
FROM PERFECT FRY!
WARRANTY REGISTRATION
Be sure ALL operators read, understand and have access to this manual at all times.
1. Simply ll out the online warranty registration form anytime at www.perfectfry.com and automatically receive your war-
ranty activation code.
FRYER ACTIVATION
SEE THIS LCD DO THIS GET THIS LCD
THANK YOU FOR
PURCHASING A PERFECT
FRYER SN# XXXXX
CALL OR GO ONLINE
ENTER WARRANTY CODE
AND PRESS START:
1. Enter your warranty activation code.
2. Press START.
3. Your PFA is now permanently activated.
HEATING
70ºF
For temporary access, enter 123456 then press START.
Temporary access is valid for 90 entries.
Now that you have registered and activated your fryer;
• Take comfort in knowing that the management and sta at Perfect Fry Company are dedicated to ensure that you, the
owner and operator of a Perfect Fry unit, receive a top quality product that is thoroughly inspected and tested prior to
shipment.
• Take comfort in knowing that our local Authorized Service and Parts Distribution (ASAPD) network is committed to
supplying your service and warranty needs. Each ASAPD has dedicated service sta that is able to answer any ques-
tions you may have regarding the operation of your Perfect Fry unit. We also have an online knowledgebase avail-
able 24/7/365 at perfectfry.com with many great tips and solutions.

PFA SERIES INSTALLATION, OPERATION, MAINTENANCE 4
OWNER’S RESPONSIBILITIES
IT IS THE OWNER’S RESPONSIBILITY TO:
• Ensure the Perfect Fry unit is properly maintained.
• Allow only properly trained personnel to operate, clean and maintain a Perfect Fry unit.
• Contact local authorities having jurisdiction to insure that the installation conforms to all local re, building and health
regulations.
• Schedule and maintain documentation that the appropriate inspection and maintenance of the PFS Automatic Extin-
guisher has been completed.
• Ensure that the model ready for installation matches the supply voltage.
• Ensure that the main power supply is disconnected before the Perfect Fry unit is serviced.
• Ensure that all safety devices are intact.
• Ensure that a proper surface is provided for the Perfect Fry unit to sit on.
• Ensure that proper clearances are kept.
• Operate and store the Perfect Fry unit above 32°F (0°C).
• Return the Perfect Fry unit for recycling when it reaches end of life.

5 PFA SERIES INSTALLATION, OPERATION, MAINTENANCE
REGULATIONS & RECYCLING
Installation of your Perfect Fry unit must conform to all local re and health regulations and building codes. The installa-
tion use and maintenance is to be in accordance with the Standard for Ventilation Control and Fire Protection of Commer-
cial Cooking Operations, NFPA 96 - 2004.
The table below describes the standards that your Perfect Fry unit has been tested to and the corresponding listing marks
depending on your region.
STANDARD DESCRIPTION LISTING MARK
UL 197
UL 197 SB
(UL 710B)
Commercial electric cooking appliances.
Commercial electric cooking appliances with recirculating systems.
UL 197 & UL 197 SB supplement also reference the following stan-
dards which your Perfect Fry unit meets applicable parts thereof:
• UL 1046: Grease Filters for Exhaust Ducts.
• UL 300: Fire Testing of Fire Extinguishing Systems for Protection
of Restaurant Cooking Areas.
• NFPA 17A: Wet Chemical Extinguishing Systems.
• NFPA 96: Standard for Ventilation Control and Fire Protection of
Commercial Cooking Operations.
• EPA 202: Determination of Condensable Particulate Emissions for
Stationary Sources.
CSA 22.2
No. 109-M1981
Commercial Cooking Appliances forming part of Canadian
Electrical Code, Part 2 Safety Standards for Electrical Equipment.
NSF 4 Commercial Cooking, Rethermalization, and Powered Hot Food Hold-
ing and Transport Equipment.
EN60335-1 Safety of Household and Similar Electrical Appliances Part 1. General
Requirements
Amendment 8913 - October 1995
Amendment 9475 - May 1997
EN60335-2-37 Safety of Household and Similar Electrical Appliances Part 2. Com-
mercial Electric Deep Fat Fryers
EN61000-6-1
EN61000-6-3
Electromagnetic Compatibility (EMC) – Emissions & Immunity for
Light Industrial Environments
The table below describes the recycling procedures for your PERFECT FRY PFA.
WEEE
(Waste Electrical &
Electronic
Equipment)
2002/96/EC
When your PFA has reached end of life, please deliver the fryer to your
local distributor. They will prepare and deliver the fryer for recycling to
the WEEE collection system in your country. Most of the fryer’s materials
can be recycled.
DO NOT DISPOSE OF THE FRYER IN MUNICIPAL WASTE!

PFA SERIES INSTALLATION, OPERATION, MAINTENANCE 6
SAFETY FIRST
CAUTION
LIFTING & MOVING:
• Your fryer’s gross shipping weight is 125 lb. (57 kg). Net weight = 110 lb. (50 kg). DO NOT LIFT THE FRYER BY
YOURSELF. ALWAYS REMOVE OIL BEFORE MOVING FRYER.
DEEP FRYING:
• Cooking oil is very hot ~350ºF (177ºC). Hot oil can cause severe burns. DO NOT TOUCH THE COOKING OIL UN-
LESS YOU ARE SURE IT HAS COOLED.
HEATER MODULE:
• DO NOT DROP
• DO NOT IMMERSE IN WATER
CLEANING:
• DO NOT OPEN DRAWER LID OR FRONT PANEL WHEN PRODUCT IS LOADING
• Before cleaning fryer or removing oil, let fryer cool to 122ºF (50ºC). DO NOT TOUCH HEATER MODULE, VAT OR
OIL UNLESS YOU ARE SURE IT HAS COOLED.
• Lubricate rails of shovel and bottom of drawer using an approved food grade grease or silicone lubricant
COOKING OIL MAINTENANCE:
• For sanitation and safety, we recommend that the cooking oil is replaced once a week, more often for higher volume
usage. Use a commercial grade deep-fryer formulated cooking oil. See Oil Facts on page 24.
SERVICING:
• DISCONNECT THE POWER SOURCE BEFORE SERVICING THE FRYER. There is no need to unplug your Perfect
Fry unit for normal cleaning or maintenance.
STORAGE:
• Do not store your fryer below 32°F (0°C)
• Intended for indoor use only

7 PFA SERIES INSTALLATION, OPERATION, MAINTENANCE
INSTALLATION
ELECTRICAL POWER SUPPLY (NORTH AMERICAN MODELS)
• Your PERFECT FRY PFA must be connected to a dedicated electrical circuit that meets your fryer’s requirements
(see table below).
CAUTION Improper installation may damage the fryer and void your warranty.
• All electrical connections to comply with local and national standards and codes.
• If your fryer’s plug does not t your wall outlet receptacle, have an electrician install the appropriate NEMA receptacle
within 4 feet of the fryer.
• See the manufacturer’s label on your fryer for the electrical Model No. PFAXXX, then check o your Model Number.
• Your PERFECT FRY is equipped with a heat lamp outlet for an optional PFW heat lamp rated at 400W (240V/2A).
PFC Model Voltage Amps Circuit Amps Watts Power Supply
PFA 720 240
32.0
Fryer 30
Acc. 2
Minimum 40
7600
Fryer 7200
Acc. 400
For Use on an individual branch circuit rated
40A minimum. For supply connectors, use
minimum no. 8 AWG wire (40A rated). This
Fryer must be properly connected to a ground-
ed dededicated 240 VAC single phase circuit
according to local installation standards and
codes
PFA 570 240
26.0
Fryer 24
Acc. 2
Minimum 30
6100
Fryer 5700
Acc. 400
For Use on an individual branch circuit rated
30A minimum. For supply connectors, use
minimum no. 8 AWG wire (40A rated). This
Fryer must be properly connected to a ground-
ed dededicated 240 VAC single phase circuit
according to local installation standards and
codes
PFA 570 208
29.5
Fryer 28
Acc. 1.5
Minimum 30
6000
Fryer 5700
Acc. 300
For Use on an individual branch circuit rated
40A minimum. For supply connectors, use
minimum no. 8 AWG wire (40A rated). This
Fryer must be properly connected to a ground-
ed dededicated 208 VAC single phase circuit
according to local installation standards and
codes
PFA 375 240
18
Fryer 16
Acc. 2
Minimum 20
4150
Fryer 3750
Acc. 400
For Use on an individual branch circuit rated
20A minimum. For supply connectors, use
minimum no. 12 AWG wire (25A rated). This
Fryer must be properly connected to a ground-
ed dededicated 240 VAC single phase circuit
according to local installation standards and
codes
PFA 720* 400/230/3Ø
Wye (4 wire) 11 15 7200
This Fryer must be properly Connected to a
grounded dededicated 400 VAC three phase
circuit according to local installation standards
and codes
PFA 570* 400/230/3Ø
Wye (4 wire) 9 15 5700
This Fryer must be properly Connected to a
grounded dededicated 400 VAC three phase
circuit according to local installation standards
and codes
International only, not available in US or Canada.

PFA SERIES INSTALLATION, OPERATION, MAINTENANCE 8
ELECTRICAL POWER SUPPLY (INTERNATIONAL MODELS)
• Your PERFECT FRY PFA must be connected to a dedicated electrical circuit that meets your fryer’s requirements
(see table below).
CAUTION
Improper installation may damage the fryer and void your warranty.
• If your fryer’s plug does not t your wall outlet receptacle, have an electrician install the appropriate NEMA receptacle
within 1/25 meters of the fryer.
• See the manufacturer’s label on your fryer for the electrical Model No. PFAXXX, then check o your Model Number.
• Heat lamp requires a standard 240 VAC receptacle located within 1.5 meters of the fryer.
PFA Model Volts Amps Circuit Amps Watts
PFA720 240 30.0 Minimum 30 7200
PFA570 240 24.0 Minimum 30 5700
PFA375 240 16.0 20 3750
ACCESSORY OUTLETS (NORTH AMERICAN MODELS)
Your PFA is equipped with 1 heat lamp outlet (North American models only) that can accept a Perfect Fry approved heat
lamp only. The front heat lamp for the PFA is rated at 400W (240V/2A).
CAUTION
Disconnect the fryer from the electrical supply before attempting the installation of any Perfect Fry heat
lamp. The heat lamp is for use only on Perfect Fry equipment equipped and marked with a heat lamp out-
let.
A FRONT PANEL MOUNT SWITCH CONTROLS THE POWER TO THE HEAT LAMP.
1
1

9 PFA SERIES INSTALLATION, OPERATION, MAINTENANCE
PREPARE COUNTERTOP AREA
Clear space for your PFA fryer on the counter. Refer to the following gure for product and clearance requirement dimen-
sions.
Clearances:
1” on sides
2” on back
0” on top
UNPACK
1. Cut straps on shipping box.
2. Remove box top and body
3. Remove outer plastic wrapping and keep box along with foam corners and sides
4. Remove all foam stung and parts

PFA SERIES INSTALLATION, OPERATION, MAINTENANCE 10
5. Put check mark in the box once the part is removed
1Air Filter Cage
2Air Filter Cartridge
3Grease Filter
4Grease Filter Tray
5Basket
6Heater Module
7Oil Vat
8Oil Spill Tray
9Oil Hose
10 Leg (x4)
11 Front Panel
12 Shovel
13 Drawer Cover
14 Drawer Sleeve
15 Drawer Ramp
16 Heat Lamp (optional)
17 Basket Ramp
18 Basket Ramp Spring (x2)
19 Receiving Tray (not included) 4” high full size pan recommended)
20 Heat Lamp Cordset (not shown)

11 PFA SERIES INSTALLATION, OPERATION, MAINTENANCE

PFA SERIES INSTALLATION, OPERATION, MAINTENANCE 12
6. Tilt Perfect Fry unit to one side and install 2 adjustable legs, repeat process for other side.
CAUTION
Do not operate your PERFECT FRY without legs.
7. Lift your Perfect Fry unit onto countertop and adjust legs as necessary.
CAUTION
Your PERFECT FRY weights 110 lbs (50 kg). Lift it carefully with your legs or with the help of another per-
son and place it in its nal location.
8. Ensure that blow-o caps on re extinguisher nozzles are kept in place
9. Proceed to ASSEMBLY section on the following page.

13 PFA SERIES INSTALLATION, OPERATION, MAINTENANCE
ASSEMBLY
1. Clean parts and inside of cabinet (all except air lter cartridge)
a. Wash in warm soapy water
b. Rinse with hot water
c. Rinse with vinegar solution (1 part vinegar to 2 parts water)
CAUTION
The heater box and heat lamp must NOT be immersed in water or other liquid.
2. Install grease lter into grease lter tray
Note: magnet should be on right side
3. Install grease lter/grease lter tray into lter
compartment by sliding along rails and towards back.
4. Fit air lter cage over air lter cartridge.
Note: Make sure arrows are pointing up.

PFA SERIES INSTALLATION, OPERATION, MAINTENANCE 14
5. Slide air lter cartridge rmly back into lter com-
partment and fasten down with latch.
6. Install spill tray into bottom cooking compartment.
NOTE: Indents on bottom of spill tray should t into
indents on bottom of cabinet.
7. Set heater module onto vat.
Note: “^” grooves on bottom of heater module
should t onto back of vat
8. Pour frying oil into vat. Fill to COLD level mark.
Use commercial grade deep fryer cooking oil. DO
NOT OVERFILL
COLD
HOT

15 PFA SERIES INSTALLATION, OPERATION, MAINTENANCE
9. Slide heater module/vat into cooking compart-
ment and push in all the way. Ensure electri-
cal connection is complete with rm push on
heater module.
10. Install basket
a. Tilt basket bottom forward and maneuver
rod past cabinet anges

PFA SERIES INSTALLATION, OPERATION, MAINTENANCE 16
b. Install rod into pivot slot – left side
c. Install rod into motor coupler – right side
11. Install front panel using lift o hinges and close front panel. Turn latches ¼ turn clockwise and press down.

17 PFA SERIES INSTALLATION, OPERATION, MAINTENANCE
12. Install drawer sleeve using 4 captive screws.
Tighten securely.
NOTE: Bottom of drawer sleeve should sit tight
on front panel
13. Install heat lamp. Connect cordset to connectors
on left side of heat lamp and back of fryer (acces-
sory outlet 1).
14. Install drawer cover
NOTE: Tabs on inside of cover should t into
slots on sides of drawer sleeve

PFA SERIES INSTALLATION, OPERATION, MAINTENANCE 18
15. Install basket ramp using hinges. Install basket
ramp springs onto mounts provided. For proper
airow and sanitation, basket ramp must always be installed.
16. Install drawer ramp into hole on right side and
slots on left side of inside of front panel.
17. Install drawer shovel into guides and push shovel in completely.
18. Close and lock the front panel by turning latches ¼ turn clockwise and pressing down.
Plug in fryer and press . The fryer will now begin heating. In a few minutes, you will be ready to start cook-
ing!

19 PFA SERIES INSTALLATION, OPERATION, MAINTENANCE
COOKING
Press PRESET to toggle between modes.
Manual Mode Preset Mode Preset Locked Mode RapidFry™ Mode
Load Food Load Food Load Food Load Food
Select Time Press PRESET Press PRESET #
Press START Press PRESET #
MANUAL MODE
1. Open drawer lid. 2. Fill drawer.
3. Close drawer lid. 4. Enter Time/Press Start.

PFA SERIES INSTALLATION, OPERATION, MAINTENANCE 20
CLEANING
DAILY MAINTENANCE
CAUTION
Do not unplug the fryer and always make sure the fryer is turned o.
CAUTION
Do not touch heater module, oil vat or oil unless you are sure it has cooled.
1. Wipe basket with paper towel to remove crumbs and food particles.
2. Wipe crumbs, oil and any other food matter from inside of drawer using a paper
towel.
3. Clean outside of fryer with a good stainless steel cleaner and wipe dry.
4. Lubricate rails of shovel and bottom of drawer using an approved food grade
grease or silicone lubricant.
CAUTION
Do not clean the outside or any other stainless steel part using abrasive
cleaners.
5. Check oil level on the back of vat to make sure it is up to cold line (at room temper-
ature). If not, add oil as necessary. Replace the cooking oil once a week or more
often if necessary. Use a COMMERCIAL GRADE DEEP FRY COOKING OIL.
WEEKLY MAINTENANCE
CAUTION
Do not unplug the fryer and always make sure the fryer is turned o.
CAUTION
Do not touch heater module, oil vat or oil unless you are sure it has cooled.
1. Open front panel by lifting and turning latches. Remove drawer parts and wash in soap and hot water. Rinse well in
hot water and dry
2. Remove air lter cartridge and set aside (for replacement, refer to “Steps to re-
place air lter cartridge” on page 22).
CAUTION
Do not wash air lter cartridge.
3. Remove grease lter tray from cabinet. Remove grease lter from tray and drain
any oil that has accumulated. Wash both parts in soap and hot water. Rinse well
in hot water and dry.
Other manuals for PFA SERIES
1
This manual suits for next models
3
Table of contents
Other PERFECT FRY COMPANY Commercial Food Equipment manuals
Popular Commercial Food Equipment manuals by other brands

ROCAM
ROCAM VEGA 1/1 C8+8 instruction manual

Omcan
Omcan 10839 instruction manual

Bartscher
Bartscher W3B-1 Original instruction manual

Hoshizaki
Hoshizaki HNC-120BE-L/R-B instruction manual

AAFIRST
AAFIRST DRINKTOWER Installation, use and maintenance handbook

Bartscher
Bartscher 6640 Original instruction manual