Permobil ADAPTOR PAD User manual

THE ADAPTOR®PAD
and ROHO®DRY FLOATATION®
Special Application Cushioning Devices
Operation Manual
shape fitting technology
®

Products:
THE ADAPTOR®PAD (THE ADAPTOR)
ROHO®HEAL PAD®Cushion (HEAL PAD)
ROHO®MINI-MAX®Cushion (MINI-MAX)
ROHO®PACK-IT® Cushion (PACK-IT)
ROHO®Shower/Commode Cushion (Shower/Commode Cushion)
ROHO®Toilet Seat Cushion (Toilet Seat Cushion)
ROHO®Recliner System (Recliner System)

Contents
Important Safety Information 2-3
Product Specifications 3
THE ADAPTOR
HEAL PAD
4
MINI-MAX
PACK-IT
5
Shower/Commode Cushion
Toilet Seat Cushion
6
Recliner System 7
Cleaning and Disinfecting 8
Care Symbols
Troubleshooting
Storage, Disposal and
Recycling
Limited Warranty
9
Español 10
Français 19
Deutsch 28
Italiano 37
Nederlands 46
Dansk 55
Svenska 64
Norsk 73
Suomi 82
Português 91
Please Note
Supplier: This manual must be given to the user of
this product.
Operator (Individual or Caregiver): Before using
this product, read the instructions and save for
future reference.
Products may be covered by one or more U.S.
and foreign patents and trademarks, including
ROHO®, DRY FLOATATION®, MINI-MAX®,
PACK-IT®, HEAL PAD®, THE ADAPTOR®,
Yellow Rope®and shape fitting technology®.
Zytel®is a registered trademark of DuPont.
Product information is changed as needed;
current product information is available at
permobilus.com.
ROHO, Inc. is part of Permobil Seating and
Positioning.
© 2007, 2019 Permobil
Rev. 2019-02-13
Safety Symbols
Warning:
Indicates that not following the specied
procedure could lead to potentially hazardous
conditions resulting in serious injury.
Caution:
Indicates that not following the specied
procedure could lead to potentially hazardous
conditions resulting in minor to moderate injury or
damage to the equipment or other property.
Contact Information
ROHO, Inc.
100 N. Florida Avenue
Belleville, IL 62221-5429 U.S.A.
U.S.A.:
800-851-3449
Fax 888-551-3449
Customer Support:
Outside the U.S.A.:
618-277-9150
Fax 618-277-6518
Customer Support:

2
THE ADAPTOR PAD and ROHO DRY FLOATATION Special Application Cushioning Devices Operation Manual
Important Safety Information
Warnings:
- Check inflation frequently, at least once a day!
- Skin/soft tissue breakdown can occur due to a number of factors, which vary by individual. Check
skin frequently, at least once a day. Redness, bruising, or darker areas (when compared to normal
skin) may indicate superficial or deep tissue injury and should be addressed. If there is any
discoloration to skin/soft tissue, STOP USE immediately. If the discoloration does not disappear
within 30 minutes after disuse, immediately consult a clinician.
- The cushioning device and the cover MUST be compatible sizes and MUST be used as directed
in this manual. IF THEY ARE NOT: 1) The benefits provided by the cushioning device may be
reduced or eliminated, increasing the risk to skin or to other soft tissue, and 2) the individual may
become unstable and vulnerable to falling.
- DO NOT use your cushioning device on top of, or in conjunction with, any other products or
materials, except as indicated in this manual. Doing so may cause the individual to become
unstable and vulnerable to falling.
- DO NOT place any obstructions between the individual and the cushion. USE ONLY a compatible
cover with the cushion; placing any other item directly under the individual, whether inside or
outside the cover, will make the cushion less effective.
- The cushion surface will acclimate to the surrounding temperature. Take appropriate precautions,
especially when the cushion will contact unprotected skin.
- DO NOT use your cushioning device as a water flotation device (e.g., a Life Preserver). It will NOT
support you in water.
- Use caution when skin will contact the seating surface. Tissue damage may result from increased
friction.
- DO NOT use an under-inflated cushioning device or an over-inflated cushioning device because
the product benefits will be reduced or eliminated, resulting in an increased risk to skin and other
soft tissue. If the cushioning device does not appear to be holding air, or if you are not able to
inflate or deflate the cushioning device, see "Troubleshooting". Immediately contact your clinical
caregiver, distributor, or Customer Support if the problem persists.
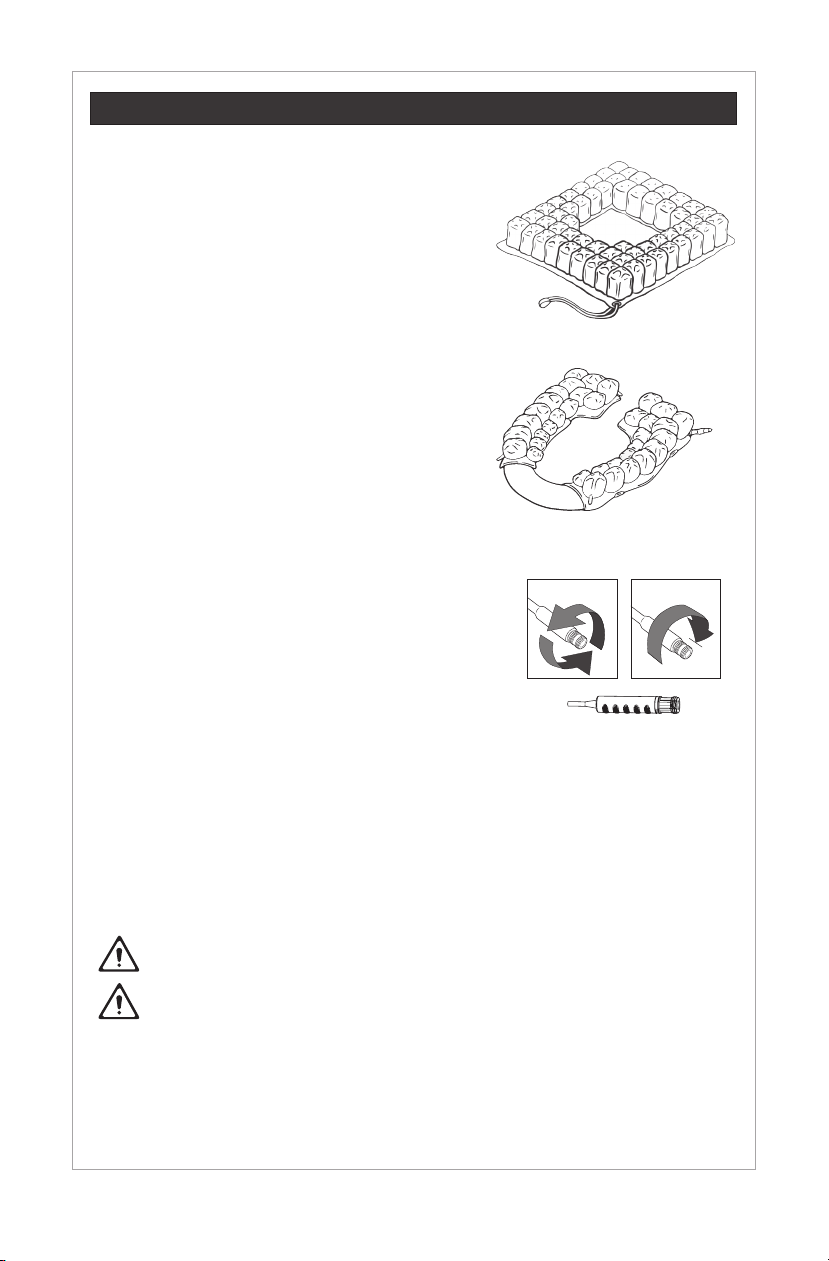
- Use caution when handling the cushioning device: Metal grommets on the corners may be a
finger trap hazard.
- Periodically, check the cover and components for damage, and replace if necessary.
- DO NOT expose the product to high heat, open flames or hot ashes. Testing or certification
claims, including for flammability, may no longer apply to this device when it is combined with
other products or materials. Check testing and certification claims for all products used in
combination with this device.
- If you are unable to perform any tasks described in this manual, seek assistance by contacting
your clinician, equipment provider, distributor, or Customer Support.
Cautions:
- Keep your cushioning device away from sharp objects.
- DO NOT allow your cushioning device to come into contact with oil-based lotions or lanolin. They may
degrade the material.
- Changes in altitude may require adjustment to a DRY FLOATATION cushioning device.
- Prolonged exposure to ozone may degrade materials used in the cushioning device, affect the
performance of the product, and void the product warranty.

3
THE ADAPTOR PAD and ROHO DRY FLOATATION Special Application Cushioning Devices Operation Manual
Important Safety Information, continued
Cautions, continued:
- DO NOT use an inflation valve as a handle for carrying or pulling your DRY FLOATATION
cushioning device. Carry your cushioning device by the cushion base or the carrying handle on the
cover.
- If a DRY FLOATATION cushioning device has been in temperatures lower than 32°F (0°C), and
exhibits unusual stiffness, allow the cushioning device to warm to room temperature.
- Using a pump, cover or repair kit other than those compatible with your product may void your
product’s warranty.
An experienced clinician should determine whether the product is appropriate for the individual’s particular
equipment needs. The product’s intended use statement alone should not be relied upon to make that
determination.
The medical products featured in this document are intended to be only one part of an overall care
regimen that includes all therapeutic equipment and interventions. An experienced clinician should identify
this care regimen after evaluating the individual’s physical needs and overall medical condition.
A clinician should also evaluate for visual, reading, and cognitive impairment to determine the need for
caregiver assistance or the need for other assistive technology, such as large-print instructions, to ensure
proper product use.
Product Specifications
Package Contents: All products featured in this manual include an operation manual, product registration
card, and Repair Kit. All products except THE ADAPTOR PAD include a ROHO Hand Pump. The MINI-MAX
Cushion, PACK-ITCushion, and Recliner Cushion include a cover.
To order replacement parts, contact your equipment provider or Customer Support.
Sizing Table Height or Height Range Width or Width Range Depth or Depth Range Average Weight*
in. cm in. cm in. cm lb. kg
ADAPTOR 12925 13½ 34 ½0.2
HEAL PAD ½ - 1½ 1.5 - 4 11½ 29.5 12½ 31.5 ¾0.3
MINI-MAX 1¼ 3 15 to 20½ 38.5 - 52 14¾ to 20¼ 37.5 - 51.5 2¼ 1
PACK-IT 1¼ 316¼ 41.5 9½ 24 1½ 0.7
Shower/Commode Seat 2¼ 5.5 14¾ -16½ 37.5 - 42 14¾ - 18¼ 37.5 - 46.5 2 1
Toilet Seat 1 - 2¼ 2.5 to 5.5 7¾ 20 15¾ 40 1¼ 0.5
Recliner Cushion Contact Customer Care for specications. * based on mid-sized cushioning devices
Cushion expected lifetime: 5 years
The serial number label is located on the bottom of the cushion.
Materials:
Cushioning devices: neoprene rubber (made without latex); Zytel valves
Components on some cushioning devices: Yellow Rope, buckles, snaps, hook and loop fastener, foam tab
(on HEAL PAD)
Covers: Standard: two-way stretch top, spacer fabric sides. Heavy Duty: two-way stretch, fluid-resistant top
and sides. Standard and Heavy Duty Covers: zipper or snaps and a non-skid bottom. Refer to the cover
care label for material content and for compliance to ammability requirements. Elastic strap and metal ring
included on the PACK-IT Cover.
If provided, straps or hook and loop fasteners should be used to secure the cushioning
device to the surface.

4
THE ADAPTOR PAD and ROHO DRY FLOATATION Special Application Cushioning Devices Operation Manual
THE ADAPTOR
Intended Use: THE ADAPTOR®PAD (THE ADAPTOR) is an air-filled, cellular-
design, neoprene surface intended for cushioning and shock absorption needs
and reduction of friction on surfaces such as a wheelchair side, headrest or
footrest to provide skin/soft tissue protection. There is no weight limit. The
ADAPTOR is not intended to be used as a supporting medium under the
buttocks.
Instructions: Use scissors to trim THE ADAPTOR to fit where needed (sides of wheelchairs,
trays, head rests, foot rests). Cut between the sealed air cells when possible. To attach the
product to the surface, use hook and loop fastener strips.
Warning: Air cells that have been cut WILL NOT provide cushioning.
HEAL PAD
Intended Use: The ROHO®HEAL PAD®Cushion (HEAL PAD) is an adjustable, air-filled, cellular-design,
neoprene surface and is intended to conform to an individual’s heel to provide skin/soft tissue protection
and provide an environment to facilitate wound healing. There is no weight limit.
Inflation Instructions:
1. Place the HEAL PAD flat, with the cells facing up.
2. Slide the hand pump nozzle over the inflation valve. Open the
inflation valve, at least one full rotation.
3. Inflate the HEAL PAD. Close the inflation valve until it comes
to a stop. Remove the hand pump. Make sure the inflation
valve is closed.
Note: The ination valve will spin freely when open.
CloseOpen
Attachment Instructions:
Fasten the snaps.
1Place the
individual's heel
on the cells.
2
Place the foam
tab over the
shin, insert the
strap through
the metal ring,
and adjust the
strap.
3Foam Tab
Strap
CHECK INFLATION! Confirm that there is NO CONTACT between the individual's heel and
the base of the HEAL PAD. If there is contact, add air.

5
THE ADAPTOR PAD and ROHO DRY FLOATATION Special Application Cushioning Devices Operation Manual
MINI-MAX and PACK-IT
Intended Use: The ROHO®MINI-MAX®Cushion (MINI-MAX) is an
adjustable, air-lled, cellular-design, neoprene surface intended as
a supplemental seating surface. There is no weight limit, yet the
cushion must be properly sized to the individual.
MINI-MAX
Intended Use: The ROHO®PACK-IT®Cushion (PACK-IT) is an adjustable,
air-lled, cellular-design, neoprene surface intended for short-term cushioning
needs. There is no weight limit, yet the cushion must be properly sized to the
individual.
PACK-IT
Atmospheric Adjustment Instructions for MINI-MAX and PACK-IT:
1. Slide the hand pump nozzle over the ination valve. Open the
ination valve, at least one full rotation. Inate until all of the
air cells feel rm.
2. Remove the hand pump. Do not close the ination valve. Allow
air to escape from the ination valve.
3. Listen (or place your hand in front of the ination valve) to
conrm that deation has stopped.
4. Close the ination valve until it comes to a stop. Make sure the
ination valve is closed.
5. Place the cushion on the surface, making sure the air cells
face the individual.
Note: The ination valve will spin freely when open.
CloseOpen
CHECK INFLATION! After atmospheric adjustment, conrm that there is NO CONTACT
between the individual and the base of the cushioning device. If there is contact, add air.
When possible, use hook and loop fasteners to further secure the cushion to the seating
surface. Hook fasteners are available upon request.
Cover Removal: Unzip the cover and remove the cushion.
MINI-MAX Cover Replacement: Insert the cushion into the cover. Pull the ination valve and
Yellow Rope through a corner opening.
PACK-IT Cover Replacement: Insert the PACK-IT into the cover. Close the zipper.

6
THE ADAPTOR PAD and ROHO DRY FLOATATION Special Application Cushioning Devices Operation Manual
Shower/Commode Cushion and Toilet Seat Cushion
Intended Use: The ROHO®Shower/Commode Cushion (Shower/
Commode Cushion) is an adjustable, air-lled, cellular-design,
support surface that utilizes DRY FLOATATION®technology
and is intended for short-term cushioning needs on bedside
commodes and shower chairs to provide skin/soft tissue
protection. There is no weight limit.
Shower/Commode Cushion
Intended Use: The ROHO®Toilet Seat Cushion (Toilet Seat
Cushion) is an adjustable, air-lled, cellular-design, neoprene
surface intended for short-term cushioning needs on toilets and
portable bedside commodes. There is no weight limit.
Toilet Seat Cushion
Instructions for Shower/Commode Cushion and Toilet Seat Cushion:
1. Slide the hand pump nozzle over the ination valve. Open
the ination valve, at least one full rotation. Inate the
cushion, and then close the ination valve until it comes
to a stop. Remove the hand pump. Make sure the ination
valve is closed. Repeat for all ination valves.
2. Place the cushion on the surface, making sure the air cells
face the individual. Conrm that the individual is in their
usual position. Conrm correct placement of the cushioning
device.
3. Adjust the ination level as required. When adjustment is
complete, close the ination valve.
Note: The ination valve will spin freely when open.
CloseOpen
Toilet Seat Cushion Attachment: Use the straps and snaps to secure the cushion to the
surface.
Contact between the skin and areas where the toilet seat is NOT covered by the Toilet Seat
Cushion could result in tissue damage.
CHECK INFLATION! After adjustment, conrm that there is NO CONTACT between the
individual and the base of the cushion. If there is contact, add air.

7
THE ADAPTOR PAD and ROHO DRY FLOATATION Special Application Cushioning Devices Operation Manual
Recliner System
Intended Use: The ROHO® Recliner System (Recliner System) is an adjustable, air-lled, cellular-design,
support surface that utilizes DRY FLOATATION®technology and is intended to conform to an individual's
seated shape to provide localized skin/soft tissue protection and an environment to facilitate wound healing.
There is no weight limit, yet the cushion must be properly sized to the individual.
Instructions:
1. Place the Recliner System on the chair with the air cells
facing up and the non-skid surface of the cover facing the
chair seat and chair back.
When possible, use the hook or loop fasteners to
further secure the cover to the seating surface. On the
back cushion, hook and loop fasteners are located inside the
cover and on the back of the cushion.
2. Slide the hand pump nozzle over the ination valve. Open
the ination valve, at least one full rotation. Inate until all of
the air cells feel rm. Close the ination valve until it comes
to a stop. Remove the hand pump. Make sure the ination
valve is closed. Repeat for all ination valves.
3. Conrm that the individual is in their usual position.
Conrm correct placement of the Recliner System.
4. Slide your hand between the cushion and the individual
and feel for bony prominences. With your hand in place,
open the ination valve, releasing air as prescribed. Close
the ination valve. Repeat for all ination valves.
Note: The ination valve will spin freely when open.
CHECK INFLATION! Make sure that there is at least ½ in.
(1.5 cm) of air between the cushion base and the individual’s bony
prominences. Follow the prescriber’s recommended ination
levels.
Recliner Cushion Cover Removal: Unsnap and remove the covers from the cushions.
Recliner Cushion Cover Replacement:
1. The zipper on the Back Cushion cover should be closed. For the Seat Cushion and Back
Cushion: The non-skid cover material should face up and the snapped opening of the cover
should face you. The air cells should face down: Insert each cushion into its cover, inflation
valve(s) first. Pull the inflation valve(s) and Yellow Rope through the corner opening(s).
The inflation valves will protrude at the front of the Seat Cushion and at the top of the Back
Cushion.
2. Place the two cushions with the snapped openings next to each other. Snap the Back
Cushion to the Seat Cushion. Snap the bottoms of the covers together. Turn the cushions
over so the air cells face up. Snap the tops of the covers together. The cushions should lie
flat inside the covers.
CloseOpen
Shown
without
cushion
covers.
The seated figure shows
standard orientation.

8
THE ADAPTOR PAD and ROHO DRY FLOATATION Special Application Cushioning Devices Operation Manual
Cleaning and Disinfecting
Instructions apply to the products featured in this manual.
Warnings:
- Cleaning and disinfecting are separate processes. Cleaning must precede disinfection. Before
use by a different individual: clean, disinfect, and check product for proper functioning.
- Follow all manufacturer bleach container and germicidal disinfectant safety guidelines.
- Note about sterilization: High temperatures accelerate aging and will damage the product
assembly. The products featured in this manual are not packaged in a sterile condition, nor
are they intended or required to be sterilized prior to use. If institution protocol demands
sterilization: First, follow the cleaning and disinfecting instructions; then, open the inflation
valve and use the lowest possible sterilizing temperature, but not to exceed 70°C (158°F), for
the shortest time possible. DO NOT autoclave.
Cover Care: Remove hook fastener pieces from bottom of cover prior to cleaning and
disinfecting. For the cover on the Recliner System back cushion: Turn the cover inside out,
close the zipper and snaps. Wash with like colors.
To Clean the Cover: First remove the cover from the cushioning device.
Machine wash in cold water (30°C) with mild detergent, gentle cycle, or wipe
clean with neutral detergent and warm water. Tumble dry low.
30C
To Disinfect the Cover: Hand wash in cold water (30°C) using 1 part
household liquid bleach per 9 parts water, then rinse thoroughly. Or
machine wash in hot water (60°C). Tumble dry low.
60C
or
1:9
+
30C
Cushion Care Cautions: DO NOT allow water or cleaning solution to enter the
cushion. DO NOT machine wash or sanitize the cushion or machine dry the cushion. Use of the
following may cause damage to the cushion: abrasives (steel wool, scouring pads); caustic,
automatic dishwasher detergents; cleaning products that contain petroleum or organic
solvents, including acetone, toluene, Methyl Ethyl Ketone (MEK), naphtha, dry cleaning fluid,
adhesive remover; oil-based lotions, lanolin, or phenolic-based disinfectants; ozone gas;
ultraviolet light cleaning methods.
To Clean the Cushion: Remove the cover and close the inflation valve. Hand
wash, using mild liquid hand soap, hand dishwashing liquid, laundry detergent,
or a multipurpose detergent (Follow product label instructions.) Gently scrub all
cushion surfaces, using a soft plastic bristle brush, a sponge or a cloth. Rinse
with clean water. Air dry. DO NOT expose to direct sunlight.
Caution: Rinse thoroughly. Detergent residue may cause air cells to stick together
To Disinfect the Cushion: Repeat cleaning instructions, using 1 part
household liquid bleach per 9 parts water. Follow the safety guidelines
on the bleach product label. Keep the product wet with the bleach
solution for 10 minutes. Rinse thoroughly with clean water. Air dry. DO
NOT expose to direct sunlight.
1:9
+

9
THE ADAPTOR PAD and ROHO DRY FLOATATION Special Application Cushioning Devices Operation Manual
Troubleshooting
For additional assistance, contact your equipment provider, distributor, or Customer Support.
Not Holding Air: Inflate the cushion. Confirm that the inflation valve is completely closed.
Look for holes in the cushion. If very small holes or no holes are visible,
follow the instructions in the Repair Kit provided with your product. For
inflation valve or hose damage, or for large holes or leaks in the cushion,
see the Limited Warranty supplement, or contact Customer Support.
Uncomfortable or
Unstable:
Check the inflation level (see the product instructions). Confirm that the air
cells and the top of the cover face the individual. Confirm that the cushioning
device is not too big or too small for the surface. Allow the individual at least
one hour to adjust to the cushioning device.
Cushioning
Device Slides:
Make sure the non-skid bottom of the cover is facing away from the
individual. Confirm that the hook and loop fasteners, straps, or snaps are
securely fastened. When possible, use hook and loop fasteners to further
secure the cushion to the seating surface. Hook fasteners are available
upon request.
Storage, Disposal and Recycling
Storage: Clean and disinfect the product before storing. Open the inflation valve(s). Deflate
the product (detach any product sections). Store the product in a container that protects the
product from moisture, contaminants and damage.
Disposal: The components of the products in this manual are associated with no known
environmental hazards when properly used and when disposed of in accordance with all
local/regional regulations. Incineration must be performed by a qualified, licensed waste
management facility.
Recycling: Contact a local recycling agency to determine recycling options for the product. For
more recycling information, contact Customer Support.
Limited Warranty
Limited Warranty Term: 24 months from the date the product was originally purchased.
The warranty does not apply to punctures, tears, burns, or misuse, nor does it apply to the
removable cover. See also the Limited Warranty supplement provided with your product, or
contact Customer Support.
Care Symbols
30C
Hand wash cold, maximum
temperature shown.
1:9
Bleach (1 part bleach: 9 parts water)
60C
Machine wash hot, normal, maximum
temperature shown.
30C Machine wash gentle, cold, maximum
temperature shown.
Hand wash. Line dry in the shade. Tumble dry low.

10
ES - Dispositivos acojinados para aplicaciones especiales ADAPTOR PAD y DRY FLOATATION Manual de instrucciones
Dispositivos acojinados
para aplicaciones especiales
ADAPTOR® PAD y DRY
FLOATATION®
Manual de Instrucciones
Índice
Información importante sobre seguridad 11
Especificaciones de los productos 12
THE ADAPTOR
HEAL PAD
13
MINI-MAX
PACK-IT
14
Cojín para silla de ducha/con orinal
Cojín para asiento de inodoro
15
Sistema de reclinación 16
Lavado y desinfección 17
Símbolos de cuidado
Solución de problemas
Almacenamiento, desechado y reciclado
Garantía limitada
18
Importante
Proveedor: Este manual debe entregarse al
usuario de este producto.
Operador (usuario o cuidador): Antes de utilizar
este producto, lea las instrucciones y guárdelas
en caso de que las necesite en el futuro.
Los productos pueden estar cubiertos por
una o más marcas comerciales y patentes
estadounidenses y extranjeras, incluidas
ROHO®, DRY FLOATATION®, MINI-MAX®,
PACK-IT®, HEAL PAD®, THE ADAPTOR®,
Yellow Rope®y shape fitting technology®. Zytel®
es una marca registrada de DuPont.
La información del producto puede modicarse
según sea necesario; la información del producto
actual está disponible en permobilus.com.
ROHO, Inc. es parte de Permobil Seating and
Positioning.
© 2007, 2019 Permobil
Rev. 2019-02-13
Símbolos de seguridad
Advertencia:
Indica que si no se sigue el procedimiento
especicado, se pueden generar condiciones
potencialmente peligrosas que podrían provocar
lesiones graves.
Precaución:
Indica que si no se sigue el procedimiento
especicado, se pueden generar condiciones
potencialmente peligrosas que podrían provocar
lesiones leves a moderadas, o daños al equipo u
otra propiedad.
Información de contacto
ROHO, Inc.
100 N. Florida Avenue
Belleville, IL 62221-5429 U.S.A.
EE. UU.:
800-851-3449
Fax 888-551-3449
Atención al Cliente:
Fuera de EE. UU.:
618-277-9150
Fax 618-277-6518
Atención al Cliente:

11
ES - Dispositivos acojinados para aplicaciones especiales ADAPTOR PAD y DRY FLOATATION Manual de instrucciones
Información importante sobre seguridad
Advertencias:
- Controle el inflado con frecuencia, al menos una vez al día!
- La degradación de la piel/el tejido blando puede ocurrir como resultado de numerosos factores,
los cuales varían según la persona. Inspeccione la piel con frecuencia, al menos una vez por
día. Las áreas con enrojecimiento, moretones o más oscuras (cuando se las compara con la piel
normal) podrían indicar lesiones superficiales o del tejido profundo y deben tratarse. Si la piel/el
tejido blando se decoloran, INTERRUMPA EL USO de inmediato. Si la decoloración no desaparece
dentro de los 30 minutos después de la interrupción del uso, consulte a un profesional clínico
inmediatamente.
- El cojín y el cobertor DEBEN tener tamaños compatibles y DEBEN usarse según se indica en este
manual. DE NO SER ASÍ: 1) Es posible que se disminuyan o eliminen los beneficios brindados
por el cojín, lo cual incrementa el riesgo para la piel u otros tejidos blandos y 2) la persona puede
volverse inestable y vulnerable a la caída.
- NO utilice el cojín sobre, o junto con, ningún otro producto ni material, excepto lo indicado
en este manual. Hacerlo puede provocar que la persona se vuelva inestable y vulnerable a las
caídas.
- NO coloque ningún obstáculo entre la persona y el cojín. USE ÚNICAMENTE una cubierta
compatible con el cojín. Si coloca algún otro artículo directamente debajo de la persona, ya sea
dentro o fuera de la cubierta, el cojín tendrá menos eficacia.
- La superficie del cojín se aclimatará a la temperatura ambiente. Tome las precauciones
apropiadas, especialmente cuando el cojín entre en contacto con la piel desprotegida.
- NO use el cojín como dispositivo de flotación (p.ej.: como salvavidas). El cojín NO lo mantendrá
a flote.
- Use precaución cuando la piel contacte la superficie de sentado. El daño de los tejidos puede
resultar por incrementos de la fricción.
- NO utilice un cojín subinflado ni un cojín sobreinflado ya que se pueden reducir o eliminar los
beneficios del producto, lo cual incrementa el riesgo para la piel u otros tejidos blandos. Si
parece que el cojín no retiene el aire o si no puede inflar o desinflar el cojín, consulte "Solución
de Problemas". Póngase en contacto con el proveedor de equipos, el distribuidor o o el equipo de
atención al cliente de inmediato si persiste el problema.
- Tenga precaución al manipular el cojín: Las arandelas metálicas en las esquinas pueden ser un
peligro para los dedos.
- De manera periódica, verifique el cobertor y los componentes en busca de daños y, si es
necesario, reemplácelos.
- NO exponga el cojín a temperaturas elevadas, llamas abiertas ni cenizas calientes. Los reclamos
de prueba o certificación, incluida la inflamabilidad, ya no se aplicarán a este dispositivo cuando
se combina con otros productos o materiales. Compruebe los reclamos de prueba o certificación
para todos los productos utilizados junto a este dispositivo.
- Si no puede realizar las tareas que se describen en este manual, busque ayuda y contacte al
profesional clínico, proveedor de equipos, distribuidor o Atención al cliente.
Precauciones:
- Mantenga el cojín lejos de objetos filosos.
- No permita que su dispositivo acojinado entre en contacto con cremas a base de aceite o lanolina. El
material podría degradarse.
- Los cambios en la altitud pueden requerir un ajuste de su cojín. Compruebe su cojín cuando cambie de
altitud.
- La exposición prolongada al ozono puede degradar algunos de los materiales usados en la fabricación de
este producto, afectar su funcionamiento y anular la garantía del producto.

12
ES - Dispositivos acojinados para aplicaciones especiales ADAPTOR PAD y DRY FLOATATION Manual de instrucciones
Información importante sobre seguridad (continuación)
Precauciones (continuación):
- NO use la válvula de inflado como manija para transportar o tirar del dispositivo acojinado DRY
FLOATATION. Transporte el dispositivo acojinado por la base del cojín o la manija de transporte sobre
el cobertor.
- Si el dispositivo acojinado DRY FLOTATION ha estado a temperaturas inferiores a 32 °F (0 °C) y
presenta una rigidez inusual, permita que el cojín se caliente hasta alcanzar la temperatura ambiente.
- NO utilice bombas, cobertores ni kits de reparación que no sean los suministrados por ROHO, Inc. De
lo contrario, la garantía de su producto podría quedar invalidada.
Un profesional clínico con experiencia en las posiciones y el asiento debe determinar si el producto es
adecuado para las necesidades de asiento específicas de la persona. No se puede basar solamente en la
declaración de uso específico del producto para realizar esa determinación.
Los productos médicos que se incluyen en este documento tienen el fin de ser la pieza única de un
tratamiento general que incluye todas las intervenciones terapéuticas y el equipo de movilidad y asiento.
Un profesional clínico con experiencia en las posiciones y el asiento debe identificar este tratamiento
después de evaluar las necesidades físicas y la condición médica general de la persona.
Un profesional clínico también debe evaluar si existe alguna discapacidad visual, cognitiva y de lectura
para determinar la necesidad de asistencia de un cuidador o la necesidad de tecnología asistiva, como
instrucciones con tamaño de letra grande, para garantizar el uso adecuado del producto.
Especificaciones de los productos
Contenido del paquete: Todos los productos que aparecen en este manual incluyen un manual de
instrucciones, una tarjeta de registro del producto y un kit de reparación. Todos los productos excepto
THE ADAPTOR PAD incluyen una bomba manual ROHO. El Cojín MINI-MAX, el Cojín PACK-IT y el Cojín
reclinable incluyen una cobertor.
Para ordenar piezas de repuesto, póngase en contacto con el proveedor de su equipo o Atención al cliente.
Tabla de medidas Altura o rango de altura
posible
Ancho o rango de ancho
posible
Profundidad o rango de
profundidad posible Peso medio*
pulg. cm pulg. cm pulg. cm lb. kg
ADAPTOR 12925 13½ 34 ½0.2
HEAL PAD ½ - 1½ 1.5 - 4 11½ 29.5 12½ 31.5 ¾0.3
MINI-MAX 1¼ 3 15 to 20½ 38.5 - 52 14¾ to 20¼ 37.5 - 51.5 2¼ 1
PACK-IT 1¼ 316¼ 41.5 9½ 24 1½ 0.7
Silla De Ducha/Con
Orinal 2¼ 5.5 14¾ -16½ 37.5 - 42 14¾ - 18¼ 37.5 - 46.5 2 1
Asiento Para Inodoro 1 - 2¼ 2.5 to 5.5 7¾ 20 15¾ 40 1¼ 0.5
Cojín Reclinable Póngase en contacto con el departamento de Atención al
cliente para obtener más especicaciones.
* con base en dispositivos acojinados de tamaño
mediano
Estimada vida útil del cojín: 5 años
La etiqueta con el número de serie se encuentra en la parte inferior del cojín.
Materiales:
Dispositivos acojinados: goma de neopreno (fabricada sin látex); válvulas de inflado de Zytel
Componentes de algunos de los dispositivos acojinados: Yellow Rope, hebillas, broches, sujetadores de abrojo,
lengüeta de gomaespuma (en el HEAL PAD)
Cobertores: Estándar: cubierta con elásticos bidireccionales y malla espaciadora lateral. Reforzada: cubierta con
elásticos bidireccionales resistente a los líquidos. Cobertor estándar y reforzado: cierres o broches y superficie de apoyo
antideslizante. Consulte la etiqueta de cuidado del cobertor para conocer el contenido del material y para el cumplimiento
de los requisitos de inflamabilidad. La correa elástica y el anillo de metal están incluidos en el cobertor del PACK-IT.
Si se incluyen, las correas o los sujetadores de abrojo deben utilizarse para asegurar el dispositivo
acojinado a la supercie.

13
ES - Dispositivos acojinados para aplicaciones especiales ADAPTOR PAD y DRY FLOATATION Manual de instrucciones
THE ADAPTOR
Uso Específico: THE ADAPTOR®PAD (THE ADAPTOR) es una superficie
de neopreno, llena de aire, de diseño celular destinado para amortiguación
y absorción de impactos y reducción de fricción en superficies tales como
el costado de una silla de ruedas, el reposacabezas o reposapiés para
proporcionar la protección de la piel y el tejido blando. No tiene un límite de
peso. THE ADAPTOR no está destinado a ser utilizado como un medio de
soporte debajo de los glúteos.
Instrucciones: Utilice una tijera para recortar THE ADAPTOR de manera que tenga el tamaño
apropiado para el lugar en el que se colocará (laterales de la silla de rueda, reposacabezas, reposapiés).
En lo posible, corte entre las celdas de aire selladas. Para asegurar el producto a la superficie, utilice los
sujetadores de abrojo.
Advertencia: Las celdas de aire que hayan sido cortadas NO proporcionarán protección.
HEAL PAD
Uso Específico: El cojín ROHO®HEAL PAD®(HEAL PAD) es una superfice de neopreno regulable, llena
de aire, de diseño celular y esta destinado a ajustarse al talón de un individuo para proveer protección a
la piel/tejido blando y proveer un entorno para facilitar la curación de heridas. No hay límite de peso.
Instrucciones de inflado:
1. Coloque el HEAL PAD sin inflar, con las celdas de aire orientadas
hacia arriba.
2. Deslice la boquilla de la bomba manual por sobre la válvula de
inflado. Abra la válvula de inflado, dando una vuelta de rosca como
mínimo.
3. Infle el HEAL PAD. Cierre la válvula de inflado hasta que se
detenga. Quite la bomba de mano. Asegúrese de que la válvula de
inflado quede cerrada.
Nota: La válvula de inado girará libremente cuando esté abierta.
CerrarAbrir
Instrucciones de colocación:
Asegure los broches.
1Coloque el talón
de la persona en
las celdas.
2
Coloque la
lengüeta de
gomaespuma
sobre la canilla,
inserte la correa
a través del
anillo de metal y
ajústela.
3
Lengüeta de
gomaespuma
Correa
CONTROLE EL INFLADO! Confirme que NO HAYA CONTACTO entre el talón del individuo y
la base del HEAL PAD. Si hay contacto, agrege aire.

14
ES - Dispositivos acojinados para aplicaciones especiales ADAPTOR PAD y DRY FLOATATION Manual de instrucciones
MINI-MAX y PACK-IT
Uso Especíco: El cojín ROHO®MINI-MAX®(MINI-MAX) es
una supercie de neoprene regulable, llena de aire, de diseño
celular, destinado como una supercie de asiento suplementario.
No hay límite de peso; sin embargo, el cojín debe ser medido
apropiadamente para el individuo.
MINI-MAX
Uso Específico: El cojín ROHO®PACK-IT®(PACK-IT) es una superficie
de neoprene regulable, llena de aire, de diseño celular, destinado para
necesidades de acolchonamiento por corto plazo. No hay límite de peso; sin
embargo, el cojín debe ser medido apropiadamente para el individuo.
PACK-IT
Instrucciones de regulación atmosférica para el MINI-MAX y el PACK-IT:
1. Deslice la boquilla de la bomba manual por encima de la
válvula de inado. Abra la válvula de inado, con una vuelta
de rosca como mínimo. Ine hasta que todas las celdas de
aire se sientan rmes.
2. Quite la bomba manual. No cierre la válvula. Deje que el aire
salga por la válvula.
3. Escuche (o ponga su mano delante de la válvula) para
vericar que ha dejado de desinarse.
4. Cierre la válvula de inado hasta que se detenga. Asegúrese
de que la válvula de inado quede cerrada.
5. Coloque el cojín sobre la supercie, asegurándose de que las
celdas de aire estén orientadas hacia la persona.
Nota: La válvula de inado girará libremente cuando esté
abierta.
CerrarAbrir
CONTROLE EL INFLADO! Después de ajustes atmosféricos, conrme que NO HAYA
CONTACTO entre el individuo y la base del dispositivo de acolchado. Si hay contacto,
agregue aire.
Cuando sea posible, utilice cintas de Velcro para asegurar aún más el cojín a la supercie de
asiento. Las cintas de Velcro están disponibles a petición.
Extracción del cobertor: Abra el cierre del cobertor y saque el cojín.
Reemplazo del cobertor del MINI-MAX: Inserte el cojín dentro del cobertor. Tire la válvula de
inado y la Yellow Rope por la apertura de la esquina.
Reemplazo del cobertor del PACK-IT: Coloque el PACK-IT dentro del cobertor y cierre.

15
ES - Dispositivos acojinados para aplicaciones especiales ADAPTOR PAD y DRY FLOATATION Manual de instrucciones
Cojín para silla de ducha/con orinal y Cojín para asiento de inodoro
Uso Especíco: El cojín ROHO®Shower/Commode (Cojín para
silla de ducha) es una supercie de apoyo regulable, llena de aire,
de diseño celular, que utiliza la tecnología DRY FLOATATION®
y esta destinado para necesidades de acolchonamiento a
corto plazo en inodoros portatiles y sillas de baño para proveer
protección a la piel/tejido blando. No hay límite de peso.
Cojín para silla de ducha
Uso Específico: El cojín ROHO®Toilet Seat (Cojín para asiento
de inodoro) es una superficie de neoprene regulable, llena de
aire, de diseño celular, destinado para necesidades a corto
plazo en los inodoros y sillas portables. No hay límite de peso.
Cojín para asiento de inodoro
Instrucciones del Cojín para silla de ducha/con orinal y el Cojín para asiento de inodoro:
1. Deslice la boquilla de la bomba manual por sobre la válvula
de inado. Abra la válvula de inado, dando una vuelta de
rosca como mínimo, ine el cojín y luego cierre la válvula
de inado hasta que se detenga. Quite la bomba manual.
Asegúrese de que la válvula de inado esté cerrada. Repita
el mismo procedimiento con todas las válvulas de inado.
2. Coloque el cojín sobre la supercie, asegurándose de
que las celdas de aire estén orientadas hacia la persona.
Compruebe que el individuo se encuentra en su posición
habitual. Verique la correcta ubicación del dispositivo
acojinado.
3. Regule el nivel de inado según sea necesario. Cuando
haya realizado el ajuste, cierre la válvula de inado.
Nota: La válvula de inado girará libremente cuando esté
abierta.
CerrarAbrir
Colocación del Cojín para asiento de inodoro: Utilice las correas y los broches para asegurar
el cojín a la supercie.
El contacto de la piel con las áreas donde el asiento del inodoro NO está cubierto por el
Cojín Toilet Seat, puede resultar en daños de la piel.
CONTROLE EL INFLADO! Después del ajuste, conrme que NO HAYA CONTACTO entre el
individuo y la base del dispositivo de acolchado. Si hay contacto, agregue aire.

16
ES - Dispositivos acojinados para aplicaciones especiales ADAPTOR PAD y DRY FLOATATION Manual de instrucciones
Sistema de Reclinación
Uso Especíco: El ROHO® Recliner System (Recliner System) es una supercie de apoyo regulable,
llena de aire, de diseño celular, que utiliza la tecnología DRY FLOATATION®y está destinado a ajustarse
a la forma de un individuo sentado para proporcionar protección a la piel/tejido blando y un ambiente
para facilitar la curación de las heridas. No hay límite de peso; sin embargo, el cojín debe ser medido
adecuadamente para el individuo.
Instrucciones:
1. Coloque el Sistema de reclinación sobre la silla con las celdas
de aire orientadas hacia arriba y la supercie antideslizante del
cobertor mirando hacia el asiento y el respaldo de la silla.
Cuando sea posible, utilice los sujetadores de abrojo
para asegurar aún más el cobertor en la supercie de
asiento. En el cojín de respaldo, los sujetadores de abrojo
están ubicados dentro del cobertor y en la parte posterior del
cojín.
2. Deslice la boquilla de la bomba manual por sobre la válvula de
inado. Abra la válvula de inado, dando una vuelta de rosca como
mínimo. Ine hasta que todas las celdas de aire se sientan rmes.
Cierre la válvula de inado hasta que se detenga. Quite la bomba
manual. Asegúrese de que la válvula de inado quede cerrada.
Repita el mismo procedimiento con todas las válvulas de inado.
3. Compruebe que la persona se encuentra en su posición habitual.
Verique la correcta ubicación del Sistema de reclinación.
4. Deslice la mano entre el cojín y el individuo y busque prominencias
óseas. Con la mano allí, abra la válvula de inado y deje salir el
aire según se le haya indicado. Cierre la válvula de inado. Repita
el procedimiento con todas las válvulas de inado.
Nota: La válvula de inado girará libremente cuando esté abierta.
CONTROLE EL INFLADO! Asegúrese de que haya al
menos ½pulgadas (1,5 cm) de aire entre la base del cojín y las
prominencias óseas del individuo. Tenga en cuenta los niveles de
inado recomendados por su médico.
Extracción del cobertor del Cojín reclinable:Desabroche y quite los cobertores de los cojines.
Reemplazo del cobertor del Cojín reclinable:
1. El cierre en el Cojín de respaldo debe estar cerrado. Para el Cojín de asiento y Cojín de respaldo: el
material antideslizante del cobertor debe estar orientado hacia arriba y la apertura con broches del
cobertor debe estar orientada hacia usted. Las celdas de aire deben mirar hacia abajo: coloque cada
cojín dentro de su cobertor, la(s) válvula(s) de inflado primero. Tire la válvula de inflado y la Yellow
Rope por la(s) apertura(s) de la esquina. Las válvulas de inflado sobresaldrán por la parte delantera
del Cojín de asiento y en la parte superior del Cojín de respaldo.
2. Ubique los dos cojines dejando las aperturas con broches una junto a la otra. Abroche el Cojín de
respaldo al Cojín de asiento. Abroche la base de los cobertores. Voltee los cojines de manera que
las celdas de aire queden orientadas hacia arriba. Abroche la parte superior de los cobertores. Los
cojines deben quedar estirados dentro de los cobertores.
Mostrado
sin los
cobertores
del cojín.
La figura sentada muestra
la orientación estándar.
CerrarAbrir

17
ES - Dispositivos acojinados para aplicaciones especiales ADAPTOR PAD y DRY FLOATATION Manual de instrucciones
Lavado y desinfección
Las instrucciones corresponden a los productos descritos en este manual.
Advertencias:
- El lavado y la desinfección son procesos separados. El lavado debe preceder a la desinfección.
Antes de que otro individuo lo utilice: lave, desinfecte y compruebe el correcto funcionamiento
del producto.
- Siga todas las reglas de seguridad del contenedor del blanqueador y desinfectante germicida.
- Nota sobre la esterilización:Las altas temperaturas aceleran el deterioro y pueden dañar
el montaje del producto. Los productos que se incluyen en este manual no se empacan en
condiciones estériles y tampoco presentan la necesidad ni la intención de ser esterilizados
antes de su uso. Si el protocolo de la institución demanda esterilización: primero, siga las
instrucciones de lavado y desinfección. Luego, abra la válvula de inflado y use la temperatura
de esterilización más baja posible, pero no exceda los 70 °C (158 °F), durante el menor tiempo
posible. NO esterilice en autoclave.
Cuidado del cobertor:Quite los sujetadores de abrojo de la parte inferior del cobertor antes de lavarla y
desinfectarla. Para el cobertor del Cojín de respaldo del Sistema de reclinación: dé vuelta el cobertor de
manera que quede del revés. Lave con colores similares.
Lavado del cobertor:Primero quite el cobertor del dispositivo acojinado. Lávela a
máquina en agua fría (30 °C) y detergente suave, con un ciclo de lavado lento, o límpiela
con un detergente neutro y agua tibia. Centrifugue en un nivel bajo.
30C
Desinfección del cobertor:Lave a mano en agua fría (30 °C) con 1 parte
de lejía de uso doméstico por cada 9 partes de agua; luego enjuague bien. El
cobertor también se puede lavar a máquina con agua caliente (60 ºC) para
desinfectarla. Centrifugue en un nivel bajo.
60C
o
1:9
+
30C
Precauciones sobre el cuidado del cojín:NO permita el ingreso de soluciones de limpieza ni
agua en el cojín. NO lave a máquina ni desinfecte el cojín ni tampoco lo seque a máquina. El uso de los
siguientes elementos puede causar daños al cojín: abrasivos (lana de acero, estropajo); detergentes
cáusticos para lavadoras automáticas; productos de limpieza que contengan petróleo o solventes
orgánicos, incluidos acetona, tolueno, metiletilcetona (MEK), nafta, fluidos para limpieza en seco,
eliminadores de adhesivos; lociones a base de aceite, lanolina o desinfectantes a base de fenólico; gas de
ozono; métodos de limpieza con luz ultravioleta.
Lavado del cojín:Quite el cobertor y cierre las válvulas de inflado. Lave a mano con
un detergente suave de lavandería o un detergente líquido para lavar platos a mano u
otros detergentes multiuso (siga las instrucciones de la etiqueta del producto). Friegue
cuidadosamente las superficies del cojín con un cepillo con cerdas de plástico, una
esponja o un paño. Enjuague con agua limpia y deje secar al aire libre. NO lo exponga a
la luz solar directa.
Precaución: Enjuague bien. El residuo de detergente puede ocasionar que las celdas de aire se
peguen entre sí.
Desinfección del cojín: Repita las instrucciones de lavado anteriores
utilizando 1 parte de lejía líquida de uso doméstico por cada 9 partes de agua.
Siga las pautas de seguridad que aparecen en la etiqueta de la lejía. Sumerja
el producto limpio en una solución con lejía durante 10 minutos. Enjuague bien
con agua y deje secar al aire libre. NO lo exponga a la luz solar directa.
1:9
+

18
ES - Dispositivos acojinados para aplicaciones especiales ADAPTOR PAD y DRY FLOATATION Manual de instrucciones
Solución de problemas
Para obtener mayor asistencia, póngase en contacto con el proveedor de equipos, distribuidor o Atención
al cliente.
No retiene el aire: Infle el cojín. Compruebe que la válvula de inflado esté completamente cerrada.
Busque orificios en el cojín. Si hay orificios muy pequeños o no hay orificios visibles,
siga las instrucciones en el Kit de reparación proporcionado con su producto. Para
daños en la válvula de inflado o en la manguera, o si hay agujeros grandes o fugas de
aire en el cojín, consulte el suplemento referente a la Garantía Limitada, proporcionado
con el producto, o contacte a Atención al Cliente.
Incómodo o
inestable:
Verifique el nivel de inflado (consulte las Instrucciones del producto). Compruebe que
las celdas de aire y la parte superior de el cobertor estén hacia arriba.
Asegúrese de que el cojín no sea demasiado grande o demasiado pequeño para la
superficie. Permita que el usuario se siente sobre el cojín durante al menos una hora
para que se acostumbre al dispositivo acojinado.
El dispositivo
acojinado se
desliza:
Asegúrese de que la base antideslizante del cobertor esté hacia abajo. Compruebe
que los sujetadores de abrojo, las correas y los broches están ajustados
correctamente. Cuando sea posible, utilice cintas de Velcro para asegurar aún más
el cojín a la superficie de asiento. Las cintas de Velcro están disponibles a petición.
Almacenamiento, desechado y reciclado
Almacenamiento: Lave y desinfecte el producto antes de guardar. Abra la válvula de inflado. Desinfle el
producto (separe cualquier sección del producto). Almacénelo en un recipiente que proteja al producto de la
humedad, la contaminación y cualquier daño.
Desechado: Cuando se utilizan y desechan adecuadamente, no existen amenazas medioambientales
asociadas con los componentes de los productos que aparecen en este manual. Deseche el producto y/o los
componentes de acuerdo con las regulaciones aplicables en su jurisdicción. La incineración debe realizarse
en una instalación de tratamiento de residuos calificada y autorizada.
Reciclado: Póngase en contacto con una agencia local de reciclaje para determinar las opciones de reciclaje
para el producto. Para obtener más información sobre el reciclaje, Póngase en contacto a Atención al Cliente.
Garantía limitada
Plazo de la Garantía: 24 meses a partir de la fecha en que se compró el producto originalmente. La garantía
no cubre perforaciones, roturas, quemaduras ni mal uso ni se aplica al cobertor extraíble. Revise también el
suplemento referente a la Garantía Limitada, proporcionado con el producto, o contacte a Atención al Cliente.
Símbolos de cuidado
30C
Lavado a mano con agua fría, se indica
la temperatura máxima.
1:9
Lejía (1 parte de lejía: 9 partes de agua)
60C
Lavado a máquina con agua caliente,
normal, se indica la temperatura
máxima.
30C Lavado a máquina suave, con agua fría,
se indica la temperatura máxima.
Lavar a mano Secar tendido en la
cuerda, a la sombra.
Centrifugue en un
nivel bajo.
This manual suits for next models
6
Table of contents
Languages:
Popular Automobile Accessories manuals by other brands

Mottez
Mottez A007P3RA Assembly instructions

Tessera4x4
Tessera4x4 SOT-ROLL Series installation manual

BOSSCO
BOSSCO LDV T90 user manual

BASETech
BASETech 2306533 operating instructions

IN-COMMAND
IN-COMMAND NCTP100 Installation and operation manual

Douglas Dynamics
Douglas Dynamics SnowEx 6800 installation instructions