PETDIARY F810 Plus User manual

F810 Plus
Outdoor GPS Wireless Electric Dog Fence
Please read this manual carefully before use

Contents
2
3
4
5
5
8
8
9
15
15
16
16
17
18
28
29
30
What You Get
Description of Buttons
1.At a glance
2.Charging
3.Installation
4.Function introduction
1.Wearing methods
2.Wearing precautions
Wearing Methods and Precautions
Frequently Asked Questions
About After-Sales
Compliance
FCC Warning
Safety Instructions
..............................................................
........................................................
........................................................................
.......................................................
..............................................................................
................................................................................
.............................................................................
............................................................
...................................................................
............................................................
3.How to Assemble the Collar Belt
..........................................
Reference sizes of different dogs
.................................
.........................................
..............................................................
...........................................................................
........................................................................
................................
Product Introduction

2
Safety Instructions
This product cannot be tested directly on
humans, otherwise it will violate local
laws.
4
This product is suitable for large and
medium dogs.
1
Do not use the product indoors or in
places with interference (Such as under
trees, indoors, or under eaves where
there is no GPS signal or weak signal.)
3
Product signals cannot locate the center
point in bars 2 and below. It also doesn't
trigger any penalties. Even if the dog is
outside the perimeter of the fence.
2
5
6
7
8
Turn off or remove the product before
playing with the dog.
Please do not wear the product on your
dog for a long time.
Do not place the product near a stove or
at high temperatures.
Do not open the shell of the product
which will cause the lithium battery to
disconnect or start a fire.

3
Product Introduction
1.The center point and the safe radius distance are set through
GPS satellite positioning, your pet can move freely within the
set safe range.
2.The product is designed to activate a warning tone, vibration,
and static stimulation when your pet goes beyond the set
distance range. Once your pet returns to the safe distance
range, the product will stop any warning signals.
3.Basically, you need to train your pet on how to stop the
warning triggered by the product.
GPS
Out of the radius range In the radius range
Positioning center point

4
What You Get
COMPONENTS
1
10
1
1
2 pairs
1
Boundary flag
F810 Plus outdoor GPS
wireless electric dog fence
Static stimulation test light
Magnetic charging cable
User manual
Contact points
F810 Plus
Outdoor GPS Wireless Electric Dog Fence
Please read this manual carefully before use

Collar strap
③ Safety radius distance adjustment button
① Multi- function button
Magnetic charging port
Contact points
② Center point setting button
5
Description of Buttons
1.At a glance

6
Multi- function
button
Used to turn on/off and mode
adjustment.
Center point
setting button
Used to set the center point and adjust
the safe radius distance
Up/down
button
Used to adjust the distance of safe
radius
①
②
③
GPS signal icon GPS signal strength
Positioning icon
Battery power
icon
Vibration mode
This icon is displayed when the
center point is successfully
positioned. If the positioning fails,
the icon will blink, and the product
will beep for 5 seconds.
Used to display the battery
power status.
If this icon is on, it indicates
that the product is currently in
vibration mode setting.
A successful location is indicated
by the displaying of the location
icon and "000".
①
②
③
④
⑤

7
Static stimulation
mode
If this icon is on, it indicates that the
product is currently in static
stimulation mode setting.
L level strength
icon
Current distance
from the center
point
Device status
description
Low signal
strength
No signal
It is the level icon displayed during
operation.
When the distance icon is displayed,
the number represents the currently
set safe distance radius, which is
not displayed when it is not set.
It indicates that the GPS searching
is in progress when the icon is
flashing. It indicates an
undetermined center point or a
sleep state when the icon does not
flash.
When the product shows a GPS
signal strength of 2 bars or lower.
If the product still does not find the
GPS signal within 6 minutes, it goes
into the deep sleep state, and the
GPS will be suspended to reduce
the power consumption.
⑥
⑦
⑧
⑨
⑩
⑪

8
❶ Install the
contact points
❸Tighten the static
stimulation column
with the test light
❷ As wrench
Tips: Please fully charge the product before use
Contact the magnetic charging cable port with the charging port,
and the product can be charged once they are adsorbed to each
other.
Red light means on charging Green Light means product
fully charged
Protection mode
The product enters the 1min
protection mode after every 6 times
of correction, the screen displays
P and beeps, and this mode lasts
for one minute to enter the next
cycle
⑫
2.Charging
3.Installation

9
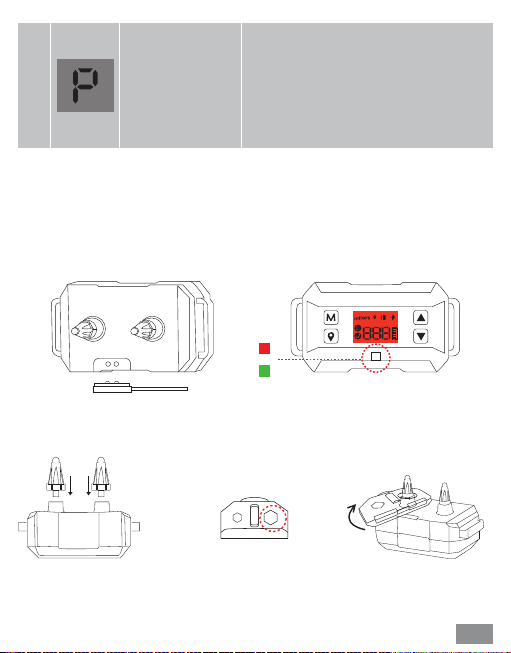
❸ Center point positioning
❶ Turn on/off
❷ GPS signal searching
Press and hold the M button about 3s to
turn on/off the product.
The product takes 3-5 minutes to search
for GPS signals after the product is turned
on. The GPS icon and == icon are flashing
is an indication that the signal is being
searched. When the signal is found, and it
is 3 bars or higher, you can move to the next
step. Recommended best use with 5 bars
GPS signal.
It is necessary to set the center point
before using the device for the first time.
To do this, when the screen is lit up (orange
background), press and hold the positioning
button until the screen displays the
positioning icon and '000', which is an
indication of a successful positioning of the
center point.
(The center point can only be positioned
when the signal strength ≥ 3 bars. If there is
no positioning symbol “ ’’ and “000”, it
means that the center point positioning is
failed)
4.Function introduction

10
❹Automatic memory function
❺Safe radius distance setting
The product automatically saves the last
center point and safety radius distance upon
startup. If the training location is changed,
please reset it according to Step 3.
(Note: To ensure optimal accuracy, it is
recommended to reset the center point and
safety radius distance every 5 days).
After the successful positioning of the center
point in Step 3, please click the positioning
button again, and the distance icon along with
the distance number will start flashing on the
screen. Then, press the up or down button to
adjust the desired safe radius distance
between 33 to 999 yards. The distance will be
automatically confirmed after 5 seconds.
However, if you do not want to wait, you can
click the positioning button to confirm it
instantly.
The minimum radius distance is 33 yards,
and the maximum radius distance is 999
yards (1 yard = 0.9144 meters)
The length of the adjustment increases by 1
yard if you press the button quickly, and by
10 yards if you long-press the button for
more than 3 seconds.

11
❻How to measure the distance?
❼How to adjust vibration and static stimulation
The number of yards displayed on the screen is a distance
from the established center point to current location.
Center point Desired boundary place
If you are unsure of the exact radius, you can measure it using the
collar. After successfully setting the center point, simply walk to the
desired boundary position. The collar will display on the screen the
distance in yards from the established center point to your current
location.
To activate the product, turn it on and
press the M button. Once the collar is
activated, select the desired mode of
vibration or static stimulation by pressing
the M button again to confirm.

12
❽Automatic mode
Description of Mode Levels
Automatic
Level state
Level state
Level 1
Level 2
Level 3
The automatic mode
automatically works
from level 1 to level 6.
Level 4
Level 5
Level 6
Level 1
Level 2
Level 3
Level 4
Level 5
Level 6
Static stimulation mode
Vibration mode
Remarks
Automatic
Tips: Product factory default setting is automatic mode +
static stimulation. The level cannot be adjusted in the
automatic mode, and the cycle warning is from level 1 to
level 6 by default.
After 30 seconds of inactivity, the product will automatically
turn off the backlight while keeping the LCD screen on. To
operate the product again, press any key to turn on the
backlight before proceeding.

13
❾How to test the static stimulation function?
In automatic mode, the device will emit a warning tone when it exceeds
the set radius for the first time. If the device continues to move outside
the safety area or exceeds the radius for the second time, the collar will
switch to level 2 activating sound, vibration, and static stimulation. To
test the shock function on levels 2-6, please attach the test tool to the
contact points of the device. When the static stimulation function is
triggered, the test light will turn on.

14
❿Description of P protection mode
①When your pet goes beyond the set safe radius distance range, the
product will be triggered to work and give the first warning cycle
consisting of 6 levels of tone, vibration, and static stimulation. After the
6th level, the first cycle ends, and the product enters the protection
mode for 1 minute emitting sound only.
②After the end of the protection mode, if your pet has not returned to
the safe area, the product will give the second cycle consisting of 6
levels of tone, vibration, and static stimulation. After the end of the 6th
level of second cycle, the tone warning will continue until the battery
runs out or your pet returns to the safety area.
Note: The product will stop the correction anytime when
your pet returns to the safe distance range.

15
1.Wearing methods
Please keep the dog in a
comfortable standing position and
ensure that the receiver is turned
off before wearing.
①
②
③
④
Please place the receiver in the
middle of the dog's neck and ensure
that the direction of the switch
button is upward, and the contact
point is aligned with the dog's throat.
Check the tightness of the receiver
collar,you should be able to easily
insert a finger between the collar and
your dog’s neck. If the collar is too
loose or too tight, the operation of the
device will be affected.
Mark the desired length of the collar
with a pen, remove the collar and
cut off the excess. Then carefully
singe the cut edges with a lighter
to stop the collar from unraveling.
D
Wearing Methods and Precautions

16
Step 1: Pass the belt through the receiver
Step 3: Pass the excess belt through the silicone ring
Step 2: Pass the belt through the tri-glides buckle
2.Wearing precautions
3.How to Assemble the Collar Belt
Prolonged or tight collar wearing may cause skin irritation to your dog,
which must be avoided.
Please make sure not to let your dog wear the collar for more than
12 hours a day.
Try to readjust the collar position on the pet's neck every 1 to 2
hours.
Regularly check the collar's tightness to prevent excessive pressure.
Do not attach a leash to this collar, as it may cause excessive
pressure on the device.
Clean your pet's neck area and the receiver's contact area with a
damp cloth every week.
Check the contact area daily for signs of rash or pain.
Stop using the collar and seek medical attention immediately if you
notice a rash or pain in your dog. If the condition persists for more
than 48 hours, stop using the collar.
①
②
③

17
11
12.2
13.8
15.7
23.6
13.7-16.5
16.2-18.5
18.1-20.8
20.5-23.2
30.0-33.0
9.0-11.0
9.6-12.2
11.8-13.4
13.0-14.5
17.0-18.9
Reference Sizes
Size
Medium-sized
dog
Large-sized
dog
Large-sized
dog
Large-sized
dog
Extra large-sized
dog
Neck (In) Back
length(In) Type
Maltese Dog,
Shih Tzu
Miniature
Schnauzer,
Pekingese
Schnauzer,
English
Cocker Spaniel
Beagle
Husky
Chest
measurement (In)
Reference sizes of different dogs

18
Frequently Asked Questions
Question
1.Cannot be
charged
2.The product
does not turn on
Charging cable is
damaged
Replace the charging
cable and try again
The battery needs to be
activated. Please extend
the charging time slightly
Please use the 5v 1 amp
adapter to charge the
device.
The product low
power enters the
low power
protection mode
Adapter does not fit
Check whether the
touch of the button
is normal
No display/sound
prompt Recharge again
The battery is out
of power
The battery needs to be
charged. Please attach the
charging cable and fully
charge the battery.
No response means it is
damaged
Analyse Suggestions
Wrong startup
method Long press 3s to turn on

19
Question
3.No static/No
vibration
Check if the level
of warning is set to
Level 1
Check to see if the
battery is low
The dog’s hair is
too long
Level 1 corresponds to a
tone warning only.
Charge the receiver
completely
Adjust the device so the
contact points touch the
dog’s skin
Analyse Suggestions
4.No GPS signal
is received or lost
Indoors or in other
places that affect
the GPS signal
Use and operate products
in outdoor areas without
shelter
Do not wait 1-3
minutes before
operating the
product
GPS signal search needs
to wait about 1-3 minutes
Table of contents
Other PETDIARY Pet Care Product manuals