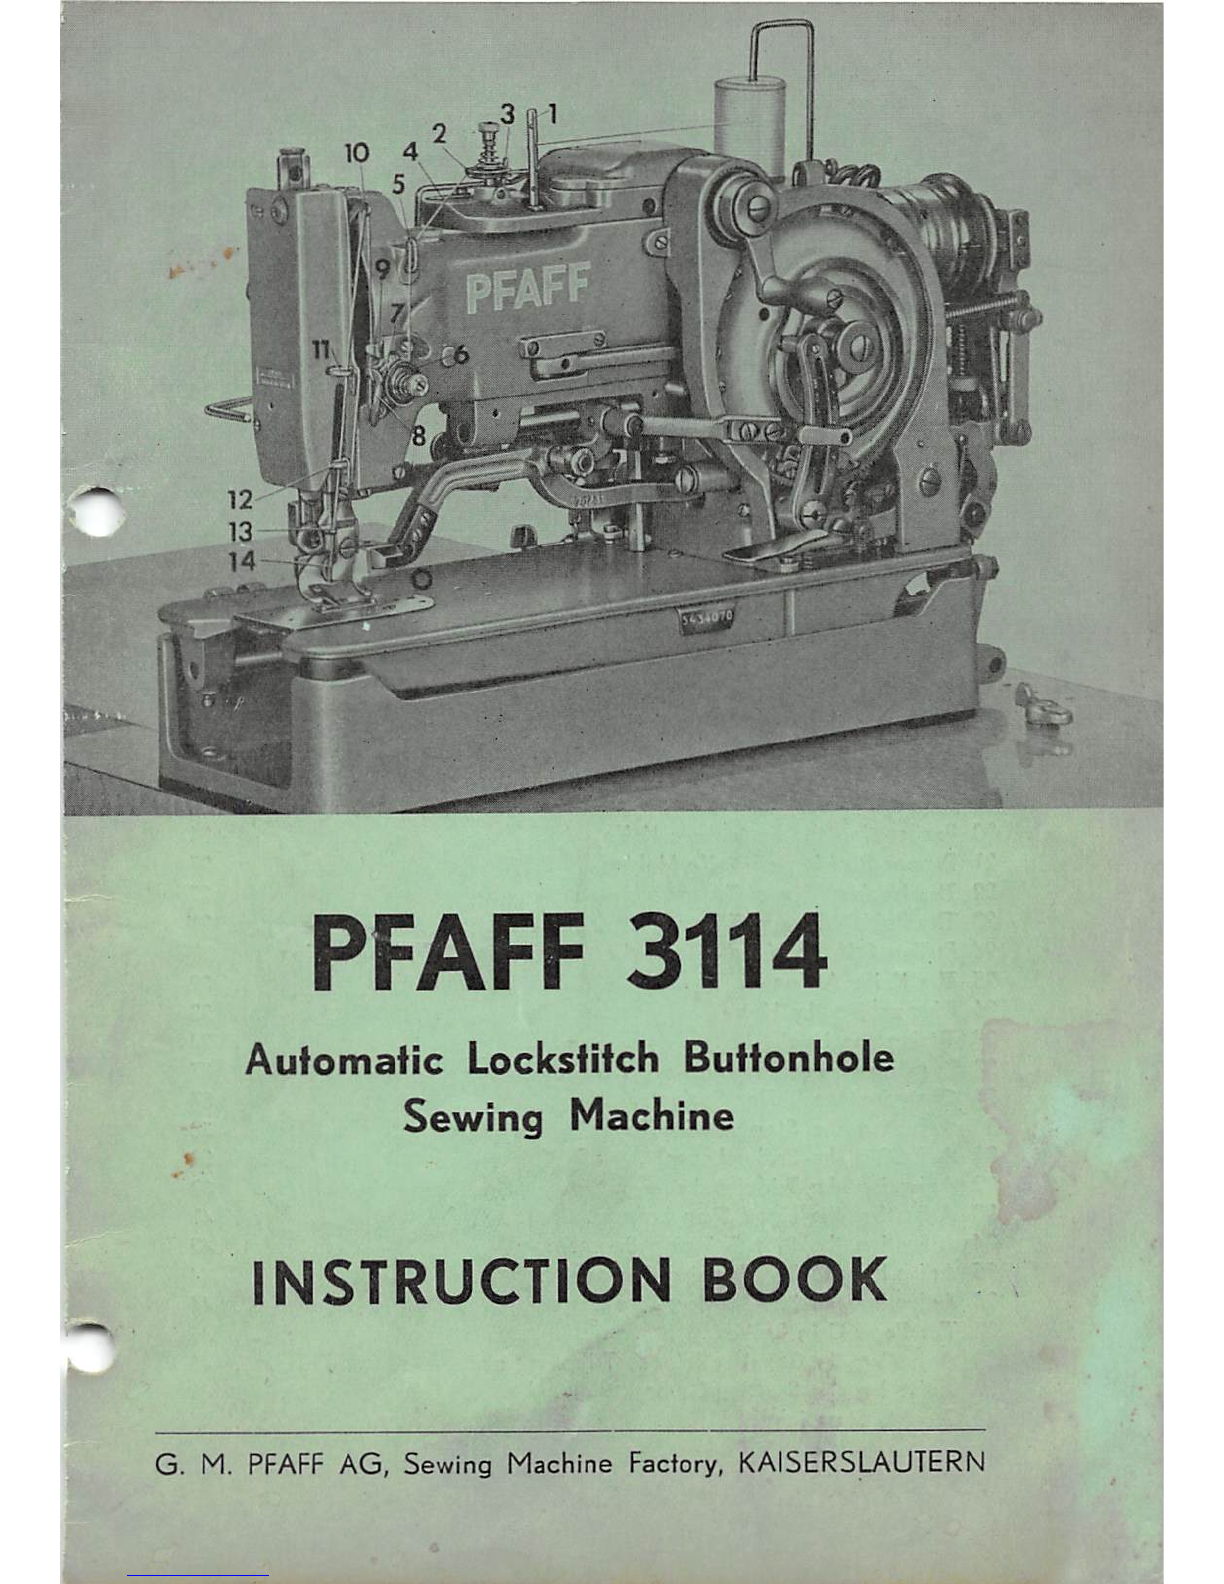
Pfaff 3114 User manual

r.
PFAFF
3114
Auiomatic
Locksfifch
Buttonhole
Sewing
Machine
INSTRUCTION
BOOK
•Jf/Zv-'
a )
G. M.
PFAFF
AG, Sewing Machine Factory, KAISERSLAUTERN
From the library of: Superior Sewing Machine & Supply LLC

Inde
X
Section
Page
1. Setting Up
the
Machine 5
2. Cleaning
and
Lubricating 7
3.
Needle
and
Thread
10
4. Inserting the
Needle
11
5. Threading
the
Needle
11
6. Winding the Bobbin 12
7. Changing the Bobbin 13
8. Threading the Bobbin Cose 13
9. Regulating
the
Bobbin
Thread
Tension 15
10. Regulating the Needle Threod Tension 16
11.
Placement
of
the
Work
18
12. Starting the Mochine 18
13. Stopping the Machine 19
14.
Stopping the Machine
While
Sewing 19
15. Regulating the Length of Buttonhole
.22
16.
Changing the Number of Stitches per Buttonhole 24
17. Changing the Width of
Bcur
and
Parallel 25
18. Adjusting the Position of the Buttonhole in Relation to the
Cutting
Space
26
19. Regulating the Distonce Between Parallels 26
20. Exchanging the Buttonhole Knife 26
21.
Proper
Position of Knife Holder 27
22.
The
Needle
Thread
Trimmer
27
23.
The
Bobbin
Thread
Trimmer
29
24.
Pulling
Off the Needle Thread and Releasing the Top Tension . .
31
25.
The
Knife
Action
32
26. Dismantling the Hook 33
27. Timing the Hook 34
28. Regulating the Pressure on the Material 37
29. Changing the Buffer Spring 37
30. Adjusting the Stop Motion Lever 38
31. Adjusting the Brake Lever 39
32. Adjusting the Tripping Lever 39
33.
Adjusting the Hand Stop Lever
41
34.
Adjusting the Stop
Tripping
Segment 42
35. Adjusting the Bar
Tripping
Segment 44
36. Adjusting the Needle Bar Zero Lug 44
37. The
Feed
Cam
Broke 46
38. Adjusting the Tension Release
Tripping
Point 46
39. Adjusting the Starting Lever 46
40. Trouble Shooting 47
From the library of: Superior Sewing Machine & Supply LLC

Instruction
Book
PFAFF
3114
Automatic
Lockstitch
Buttonhole
Sewing
Machine
This Instruction Book
contains
useful informoHon for
operators
and
mecha
nics
alike
and
therefore
should
be
made
available
to
both
rather
than
be
put
av/ay
in
your
files.
Photo
1
From the library of: Superior Sewing Machine & Supply LLC

Photo
2
From the library of: Superior Sewing Machine & Supply LLC

The PFAFF 3114 is a special
purpose
sewing
machine which stitches
both
whipstitch
and
purlstitch
buttonholes
with
two
straight
or
taper
bars,
from
—I'/ifi" long/ completely automatically. With equal facility, the ma
chine
makes
eyelet-end
buttonholes
with
one
taper
bar.
Its
range
of
applica
tions
extends
from lightweight to
heavyweight
fabrics
and
includes linen
goods,
tricot
and
knitwear,
sports
and
workwear
garments,
aprons
and
similar
articles;
in
short,
this
versatile
machine
is
used
In
every
case
where
straight
or
eyelet-end
buttonholes
are
to be
made.
An
exclusive
feature
of
the
PFAFF 3114 Is a
bedplate
which is
free
of
any
mechanism
whatsoever.
This large, clear
area
facilitates not only the
handling of the work but
also
the mounting of
attachments,
such as
edge
guides,
gauges
and
tape
guides which
are
used for manipulating knitted
fobrics.
Subclasses
The
various
subclasses
of
the
PFAFF 31 !4
differ
mainly
by
their
feed
cams,
work clamps
and,
in some instances, their
bar
tripping segments (see Table
of Subclasses). When converting machines from one subclass into
another,
note
that
subclasses
1
and
2; 3
and
4; 5, 6
and
12;
as
well
as
7, 8, 9
and
10
use
the
same
feed
cams.
The
various
subclass
machines
use
work
clamps
which
differ
according to the maximum length
of
the buttonhole tiie
res
pective machine mokes. For sewing buttonholes in tricot materials
and
knitted fabrics, we supply a tape guide which is to be mounted on the
bedplate. Upon special request, the machines of this class will be equipped
with collar
and
cuff guides.
In most instances, the size of the
button
is given in lignes, the length
of
the
buttonhole
slot
in
millimeters
or
inches.
40 lignes = 1 inch
(1
inch 25.4 millimeter)
The PFAFF 3114 is
available
In
the
following
varieties:
From the library of: Superior Sewing Machine & Supply LLC

Lenghf
of
Buttonhole
'/4"-l"
V/'-l"
"2"-lV4"
'//'-T/4"
V2"-l'/4'
Vs"
1"
^'4"-V
V4"-l'/4"
Model
Inside
Dimensions
of
Work
Feed
Frame
WIdfh
Length
"/S4
-•'Ui
'i/
li
It*
15/
It*
^-1.
IVs.'
1"/
]19j
2"/,
1"/s
]*9I
l"/44"
l"/4
1^744"
Class
of
Work
Lingerie
Blouses
Corsetry
Tricot
Knit
Goods
Ladies'
Wear
Sport
and
Work
Clothes
Extra
long
button
holes,
belt
slots
in
aprons
and
work
clothes
Ornamental
button
holes
In
lapels
and
sleeve
slashes
Buttonholes
in
trouser
front
flies
and
trouser
pocket
flaps
Work
Clothing
Staple
Goods
Work
Clothing
Staple
Goods
Work
Clothing
Staple
Goods
Stitch
Diagram
with 2
straight
bars
with
2
straight
bars
with
2
straight
bars
with 2
straight
bars
with
t
taper
bar
with
2
taper
bars
with
1
taper
and
1
conceoled
bar
and
pear-shaped
eye
with
1
straight
and
1
conceoled
bar
and
pear-shaped
eye
with
1
taper
and
1
concealed
bar
and
pear-shaped
eye
From the library of: Superior Sewing Machine & Supply LLC

10
30
12
30
14
Lenght
of
Buttonhole
^/4"-T/4'
V/'-V
Model
Inside
Dimensions
of
Work
Feed
Frame
Width
Length
732
Jl/..
l"/64
1''/S4
Class
of
Work
Work
Clothing
Staple
Goods
Tricot
Knitwear
(with
gimp
guide)
Tricot,
Knitwear
(with
gimp
guide)
Stitch
Diagram
with 1
straight
and
1
concealed
bar
and
pear-shabed
eye
with
1
taper
bar
with 1
taper
bar
1.
Setting
Up
the
Machine
As shown in
photo
1, the
PFAFF
3114 is
set
up with its
head
facing the
operator.
When
supplied with individual
power
table,
the
head
is
packed
separately
and
has to be mounted on the
power
table
which comes from the factor/i
ready-assembled.
For this purpose,
place
the cast-iron machine
base
and
the felt
pads
on the
table
so
that
the front
edge
of the
base
is flush with
the
front
edge
of the
table
projection
and
that
the
base
is
positioned
exact
ly in the middle of this projection. Now the machine
head
is carefully
mounted
on the
base
and
connected
with its hinges.
Make
sure
that
the machine
rests
properly
on the
rubber
blocks.
Mount
both
driving
belts,
attach
the
belt
guard
and
screw
it
down
on its
hinges.
Make
particularly sure
that
the machine pulley
always
rotates
in the right
direction,
as
indicated
by
the
arrow
in
photo
23.
The
Va
HP electric motor performs
at
aconstant
speed
of 1,400 r.p.m.
and
is provided with a
two-speed
pulley No. 99056 which
measures
S^/g"
and
in
diameter
and
permits
a
sewing
speed
of
1,800 s.p.m. A second
two-speed
pulley No. 99057, with
diameters
of ond P'/a:"* comes
with the machine
and
allows
for a
sewing
speed
of
2,000 s.p.m.
When in
permanent
operation, the
PFAFF
3114 should be
operated
at
1,800
r.p.m. for the first six weeks.
After
this time the
speed
may
be increased
to 2,000 r.p.m. by exchanging the mofor pulley.
-5
From the library of: Superior Sewing Machine & Supply LLC

When using first-rate thread, the sewing
speed
may
even be increased to
2,200 r.p.m. For this purpose, mqtor pulley No.
99058,
with diameters
of
4^/32"
and
is avoi-loble
at
extra
cost.
When ordering motor pulleys,
please
specify the
diameter
of the motor
shaft.
In
those
cases
where
a
motor
with
a
higher
speed
is
already
on
hand
end
has to be used, a
speed
reducer will be furnished for the
PFAFF
3114 when
set
up on individual
power
table. The
type
of
speed
reducer
required
should be specified on the order. High-speed motors
are
not recommended
because
the small pulleys
they
require
have
very
unfavorable
transmission
ratios.
To facilitote mounting the PFAFF 3114 on an existing
power
benching
system,
it is
advisable
to
procure
from us a
table
fop in the
proper
length
and with the
necessary
cutouts
and
holes. From the line
shaft
pulley,
power
is
conveyed
to
ihe
machine
by
means
of
two
jockey
pulleys
and
one
two-
speed
pulley.
With a line
shaft
speed
of
300 r.p.m., a line
shaft
pulley
of
9^'/32"
diameter
is
required
to
obtain
a
sewing
speed
of
1,800 s.p.m.
When
using
thread
of
a
superior
quality,
a line
shaft
pulley
of
11
diameter
may
be
used
after
the breaking-in
period
so
as
to
obtain
,a
sewing
speed
of
2,200 s.p.m.
Photo
3
From the library of: Superior Sewing Machine & Supply LLC

Photo
2
depicts
the
disposition
of
the
two-speed
and
jockey
pu'Ileys
and
the belt guard. The
treadles
for
operating
the macNine should be
screwed
on within
easy
reach
of
the
operator.
The long chain which
serves
to lift the
work
clamp
is
suspended
from
the
lifting lever L on the
left
side
of
the machine,
passed
through the
hole
ir>
the
toble
top,
and
connected
to
the
second
or third hole in the
left
treadle,
depending
on the angle
of
inclination
desired.
The short chain is suspended from the starting lever inside of the machine
base
end
is
connected
to
the
right
treadle.
Whereas
the
PFAFF 3114 is
exclusively
set
up
crosswise
of
the
table,
as
shown in
photos
1
and
2,
when
used
in
garment
manufacture,
it is
often
mounted
lengthwise of the
toble
(Photo 3)
when
used
in the
manufacture
of linen and tricot goods. Since the buttonholes in these articles, e.g. men's
shirts,
extend
lengthwise of the buttonhole facing, this
way
of setting up
the machine
greatly
facilitates
its
operotion.
2.
Cleaning
and
Lubricating
When
delivered,
all
polished
parts
of
the machine
are
coated
with a rust-
prevenlive
lubricant which,
together
with the
dust
accumulated
in transit,
should be
removed,
and
the machine thoroughly rinsed with
kerosene
ot
Photo
4
From the library of: Superior Sewing Machine & Supply LLC

all oiling points. Then
place
apiece of fabric under the work clamp,
prefer
ably
remove
the bobbin
cose
cap,
and
run the machine ashort while
without
being
threaded.
This
done,
apply
sewing machine oil
at
all oiling
points (see Section 12).
In
order
to
reach
the
oiling
points
in
the
machine
bed,
open
the
catch
o;f
the
belt
guord,
tip the
belt
guard
back,
tilt
over
the
head
of
the
machine
to the
left
and
rest
it carefully on the
wooden
machine
rest
pfini.
The oiling
points
ore
marked
by
arrows
in the illustrations
and,
as
far
as
feasible,
are
marked
with
red
pqint
and
the
work
"OEL"
on
the
machine.
UlUUIBBSf
Photo
5
Special
care
should be taken
that
the
PFAFF
3114 be oiled properly. With
amechanism
as
complex
as
th,is, it is impossible,
of
course,
to
mark
all
points of friction which should be oiled. Excessive oiling should be avoided
so
as
not
to
soil
the
work.
To
ensure
uniform
stitches,
the
hook
race
must
be
cleaned
and
oiled
every
day.
From the library of: Superior Sewing Machine & Supply LLC

n
•
.V
"t
Photo
6
After
oiling the hook,
sew
a
few
butfonlioles on a
rag
until there
are
no
traces
of
oil
left
on
the
material.
Special attention should be
paid
to oiling the slide collar x, on tripping
rod w so as to ensure reliable engaging and disengaging of the buttonhole
knife.
It cannot be emphasized enough
that
it is very important to remove the
accumulations
of
lint
with
a
brush
several
times
a
day
and
thus to
ensure
proper operation of the hook and the bobbin thread trimmer. This daily
cleoning and oiling witl increase the service life
and
the dependability of
the
hook
considerably.
From the library of: Superior Sewing Machine & Supply LLC

Phot-o
7
3.
Needle
and
Thread
The PFAFF 3114
uses
System
134R
needies
in
sizes
70—110.
The needle should be selected as thin as possible. The appropriate needle
size
depends
on the thickness of the
thread
which should permit the
thread
to
pass
through the
needle
eye
freely. For
dense
and
resistant
materials,
the
needle
must
not
be
chosen
too
thin
to
avoid
needle
and
thread
breaking.
For purlstitch buttonholes it is recommended to use a smooth No. 36-50/4-6-
cord,
thread
of
an
even
twist
in
the
needle,
and
o
soft
No.
60-120'3-cord
thread
in
the
bobbin.
10
From the library of: Superior Sewing Machine & Supply LLC

'Whipstitch
buttonholes
call for the
some
weight
of
needle
and
bobbin
thread.
For
best
results, o
soft
thread
oF an
even
and
moderate
twist
should
be
used
in
the
needle.
We
should like to
stress
at
ttvis
point
that
only the very
best
threads
in
the
weights
recommended
above
should
be
used
for sewing buttonholes.
Besides the quality of the
thread
it is its condition
at
the time of use whrch
should be given due consideration
because
even
threads
of superior quality
may
turn brittle
end
loose
their tensile
strength
when
stored
in
dry
rooms
for
too
long. Inferior
quality
threads
are
completely
unsuitable for this
type
of
work.
The
PFAFF 3114 is corefully stitched
off
with
threads
of the
grades
and
weights most suitoble for the purpose the machine is intended for.
No
guarantee
will be
assumed
for the
proper
working of the machine
end
the
neat
appearance
as well as the durability of the buttonhole if
thread
of
o
poor
quality
is
used.
If
there
is
any
doubt
about
the
cause
of
thread
breaking
and
you
want
to find
out
whether
the
thread
or
the
machine
is
at
fault,
press
the
right
treadle
halfway
down
and
sew
the
buttonhole
at
half the
normal
speed.
4.
Inserting
the
Needle
The needle. System 134R, is linserted inio the needle
bar
with the long
groove facing the arm standard, and is pushed up as far as it will go.
5.
Threading
the
Needle
As shown in
photc»s
4 and 8, the
PFAFF
3114
Js threaded as follows: Pass
the
thread
from the threod unwinder through the hole in spool pin 1,
be
tween the discs of top tension 2, at the beck of threod pull-off pin 3,
through
thread guide 4 and the upper hole of thread guide 5, between the
discs of main tension 6, through thread check spring 7, under thread regula
tor 8,
through
thread guide 9 and take-up lever
10,
through
thread guides
11,
12 and 13 on top and bottom of the face plote and on the needle bar, ond
back-front through the needle
eye
14.
After threading the needle and before commencing to sew the first button
hole, lay the needle thread toward you
under
the work clamp and hold the
bobbin
thread
with your
hand
under the
needle
plate.
11
From the library of: Superior Sewing Machine & Supply LLC

a
Phofo
8
6.
Winding
fhe
Bobbin
(Photo
9)
When
set
up for individual
power
drive, the bobbin winder is mounted on
the table top; when set up on power benching, it is disposed on c cast-
iron
base.
After
loosening the
set
screws,
the
winder
thread
tension which
is secured on the belt guard can be moved sideways as may be required
to
align
the
tension
discs
and
the
bobbin.
The thread is
passed
from spool 1 through thread guide 2, oround
and
between
tension
discs
3,
to
bobbin
4.
Depressing lever 5 will
engage
the bobbin winder.
When
the bobbin is
full,
the bobbin winder
will
throw off automatically.
The
amount
of thread
which
is to be
wound
on the
bobbin
is regulated by
screw
6:
Turning it right—More
thread
Turning it
left
—Less
thread
12
From the library of: Superior Sewing Machine & Supply LLC

Photo
9
7.
Changing
the
Bobbin
With thumb and forefinger of your left hand seize the bobbin
case
cap by
the latch and pull it out of the hook (Photo
10).
As long as the lotch is held
open, the. bobbin cannot fall out.
8.
Threading
the
Bobbin
Case
Insert
the
full
bobbin
into
the
bobbin
case
cap
so
that
it will
rotate
counter
clockwise
when
the
thread
,is
pulled
off
(Pholo 11).
Hold the bobbin and pull the
thread
info slot 1
and
toward
you under the
tension
spring.
13
From the library of: Superior Sewing Machine & Supply LLC

Photo
10
Photo
11
Photo
12
14
From the library of: Superior Sewing Machine & Supply LLC

Then
retain
the
thread
in
front
of the tip
of
the tension spring with the
forefinger of
yo-ur
left hand until the thread is pulled back into slot 3,
through the
gap
between the bobbin case and the bobbin, and through slot
4
into
the
delivery
eye
5.
When letting go of the
thread
and
pulling it through the delivery
eye,
it
will properly snap under the tension spring and be visible through
aper
ture
6
(Photo
4).
While holding the latch open, the bobbin
case
cap
and
the bobbin
ore
push
ed
onto
the
center
stud
in
the
bobbin
case
base
and
the
latch
is
closed.
A slight pressure exerted with the thumb will make the cap snap into posi
tion audibly. This is very important since an improperly inserted bobbin icase
may cause
damage
to the hook, the bobbin
case
or the needle.
Photo
13
Photo
14
9. Regulating the Bobbin Thread Tension
The bobbin thread tension is regulated by means of screw z (Photo
15).
Tightening
this
screw
will
increase
the
tension,-
and
loosening
it
wi-Ii
decrease
it.
Purlstitch buttonholes of any description require a very weak bobbin thread
tension.
The
tension
is properly regulated if the bobbin case
will
slowly
slide down
by its own weight when letting it hang on the threod.
(Photo
16).
On no
account
should the
bobbin
thread
tension be
increased
in
excess
of
the
15
From the library of: Superior Sewing Machine & Supply LLC

Photo
15
Photo
16
amount given above since this would necessitate increasing the needle
thread
tension
and
m.ight
result
in
thread breaking.
10.
Regulating
the
Needle
Thread
Tension
The
PFAFF
3114
has
two
needle
thread
tensions which
are
both
released
when the machine is inoperative.
When
startingthe
machine,
the top
tension
Sp 1
(Photo
17)
is engaged
first.
It is set for a
normal
amount
of
tension
and causes the
knotting
stitches,-
to
be
locked
inside
of
the
material.
After some stitches, the lateral tension Sp 2 is engaged and increases the
needle thread tension so that the bobbin thread
will
be
pulled
up and both
threads
will
interlace on the top surface of the
fabric
and
form
a straight
purl-line
along
either
parallel
of
the buttonhole.
To
prevent breaking of the needle threaa, the tension Sp 2
should
not be
set tighter than is absolutely necessary for obtaining a raised seam coti-
struction without risking thread breaking.
16
From the library of: Superior Sewing Machine & Supply LLC

Sp
Phofo
17
For
best
results, cotton No.
36-50/4
or 6-cord is used as needle threod.
It cannot be emphasized enough
that
only first-class thread should be .used
so
that
the high sewing
speed
of the
PFAFF
3114 can fully be utilized.
Toprevent ravelling of the buttonhole, tension Sp 2 is automatically released
when making the last
two
or three stitches
and
tension Sp 1 will cause
the
threads
to
form
a
durable
concatenation
inside
of
the
fabric.
Tension
Sp 1 is released when the machine has stopped.
To
ensure
that
the
needle
thread
will be pulled into the
material
securely,
tension Sp 1 is released by means of lever A (Photo
18)
while the buttonhole
is
cut
open.
In
case
inferior quality
thread
is used, only whipstitch buttonholes can be
sewn
on the PFAFF 3114. For this
purpose,
loosen
the
thumb nut
of
tension
Sp 2 so
that
only tension Sp 1 will remain active.
17
From the library of: Superior Sewing Machine & Supply LLC

1
Photo
18
11.
Placement
ol
the
Work
When depressing the left
treadle,
the work clamp is raised. Then the work
is
placed
into
the
machine
with
the
front
end
of
the
marked
buttonhole
under the needle. In
order
to ovoid crooked buttonholes, the buttonhole
marking should be placed exactly in the middle under the work clamp.
When the left treadle is released, the work clamp is again lowered onto
the
work.
Upon lifting the work clamp, lifting lever L is pulled between the vertical
guide
and
the
lower
end
of
locking lever S so
that
the machine
cannot
be
started
accidentally while the work clamp is
raised
(Photo 18).
12.
Slariing
ihe
Machine
Don't run the machine unless you have thoroughly familiarized yourself with
its operation. Make particularly sure that you know how to stop the mo-
chine
during
o sewing
cycle
and practise actuating the
knife
interlocking
mechanism (see Section
14).
Only when the operator is fully acquainted with
18
From the library of: Superior Sewing Machine & Supply LLC
Table of contents
Other Pfaff Sewing Machine manuals

Pfaff
Pfaff hobbymatic 933 User manual

Pfaff
Pfaff ClassicStyle 2025 User manual

Pfaff
Pfaff 1213 User manual

Pfaff
Pfaff 1029 User manual

Pfaff
Pfaff powerquilter 1600 User manual

Pfaff
Pfaff 1245 User manual

Pfaff
Pfaff Creative Vision User manual

Pfaff
Pfaff 1163 Guide

Pfaff
Pfaff performance 5.0 User manual

Pfaff
Pfaff hobby 1142 User manual