PFG ROTALOO RL650 User manual

RL650 Owners Manual
Compostable Batch Cycle Toilet System
Proudly manufactured in Australia by
PFG Group Victoria
87 - 93 Tramway Road Morwell Victoria 3840
www.rotaloo.com.au

CONGRATULATIONS AND THANK YOU FOR PURCHASING YOUR NEW ROTA LOO
The reasons for purchasing a Rota-Loo may be varied. It could be to conserve water, the pursuit of a more
sustainable life style, or that mains sewer is not available. Your decision will help towards conserving
water, reduce waste processing costs and contribute to a more sustainable future.
The rst portable composting toilet came into Australia from Sweden in the late 1970’s. From this idea the
Rota-Loo was born, and has been developed and improved over the years to become one of the best
Waterless Composting Toilet (WCT) systems in the world and have been successfully installed and operated
in thousands of places throughout Australia, New Zealand and further aeld.
Today, Waterless Composting Toilets are becoming more widely accepted and other products have
appeared on the market. With Rota-Loos installed decades ago still operating well and owners
recommending them to others, the Rota-Loo remains the simplest, most efcient and cost effective WCT
available.
We hope the Rota-Loo fullls your expectations and that it may even ignite a hidden passion to live a
sustainable lifestyle and pass on the message. If you have difculty in installing or maintaining your
Rota-Loo, please get in touch with your supplier or through our website at www.rotaloo.com.au.
OceanaMark
OPMK30059
AS/NZS 1546.2
PFG Group Victoria Pty Ltd
is a Quality Assured
company certied
as compliant to
ISO9001:2015
AS/NZS 1546.2:2008 is the Standard that sets out the
requirements for the design and performance of Waterless
Composting Toilets to assure of safe, effective and efcient
operation. Authorities regulating the installation of Waterless
Composting Toilets (local Councils etc) require Certication to the
Standard to approve the installation of a system like Rota-Loo
CONTENTS
Introduction..............................................................................................................................................................page2
The Composting Process....................................................................................................................................page 2
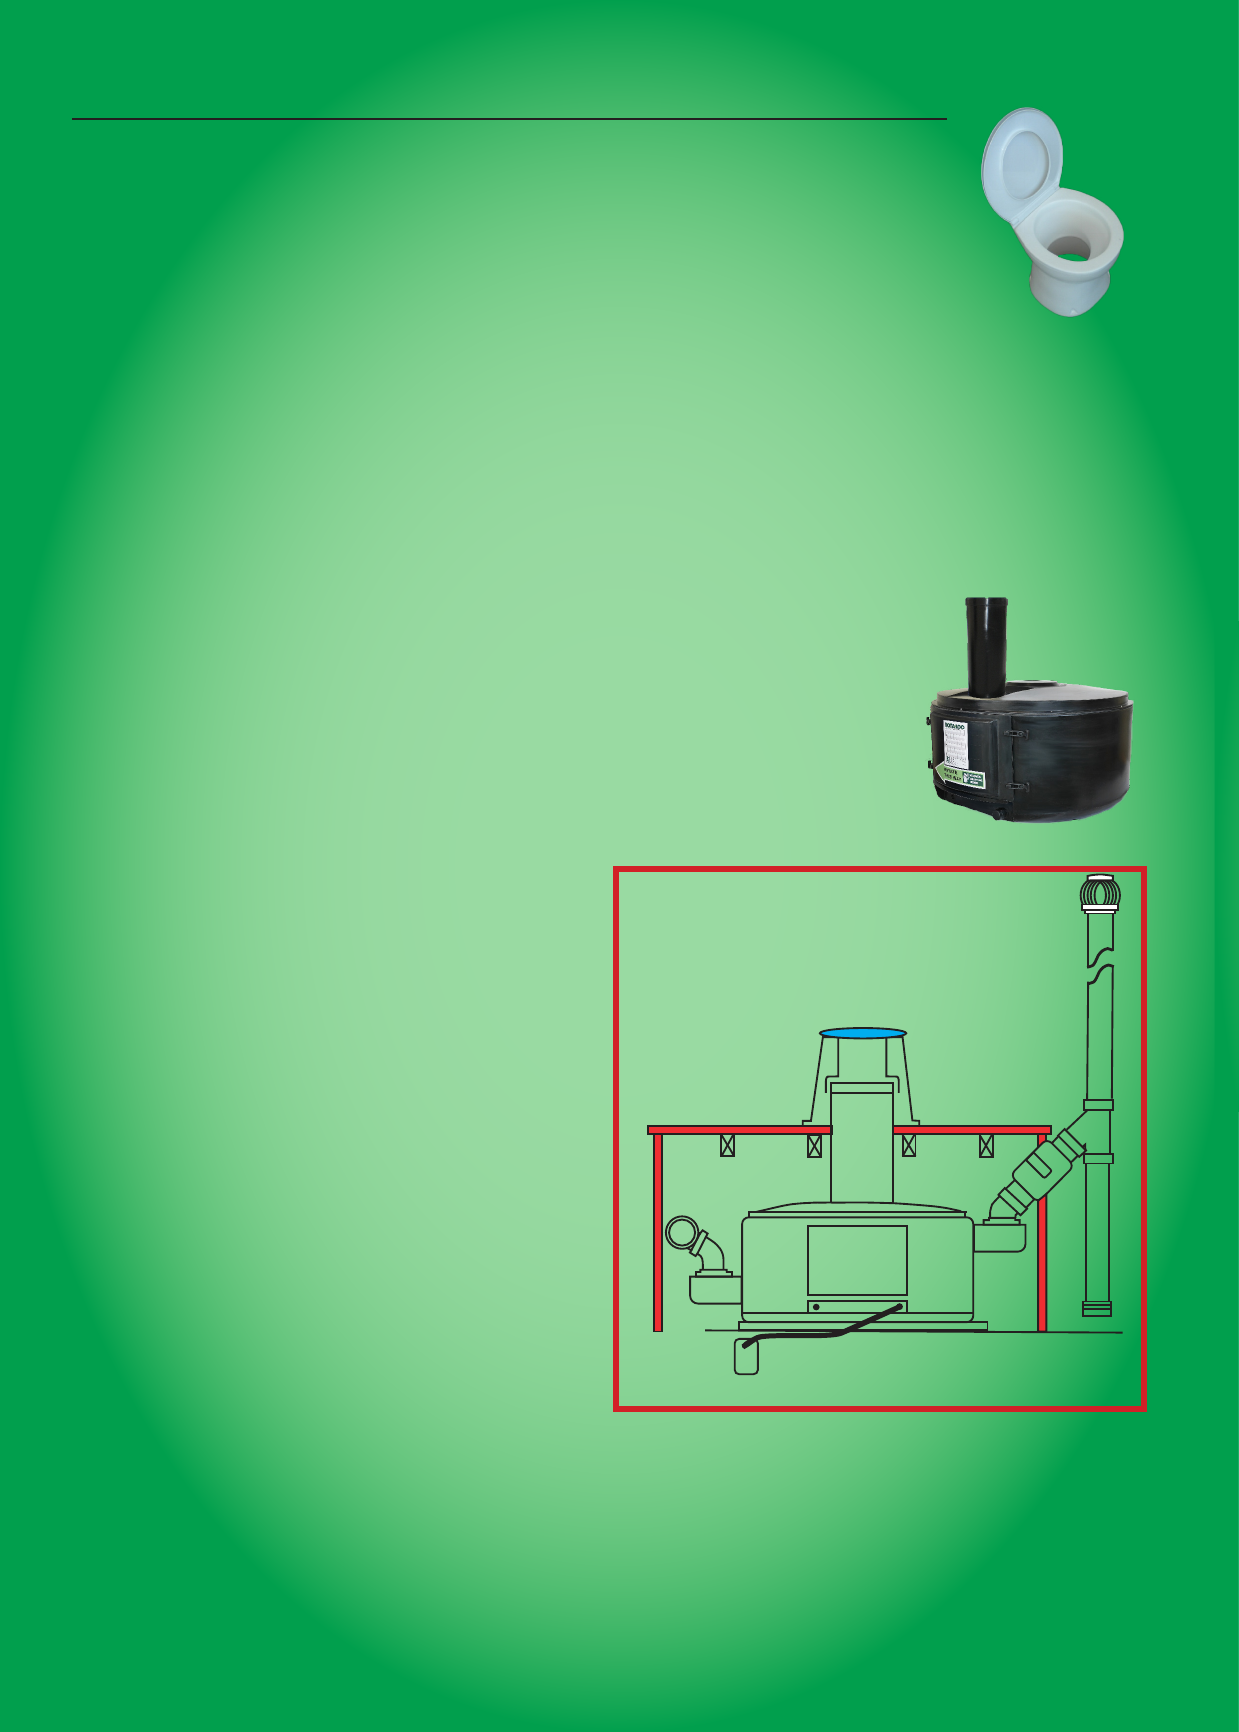
How Rota-Loo Works..........................................................................................................................................page 3
A Quick Guide..........................................................................................................................................................page 4
Installation Planning-Space Required..........................................................................................................page4
Installation Planning - Toilet Pedestal Location.........................................................................................page 5
Installation Planning - Structural Issues, Vent System, Excess Liquid................................................page 6
Installation - Locate Rota-Loo, Prepare Floor..............................................................................................page 7
Installation - Attach Pods, Final Location, Attach Inlet Piping................................................................page 8
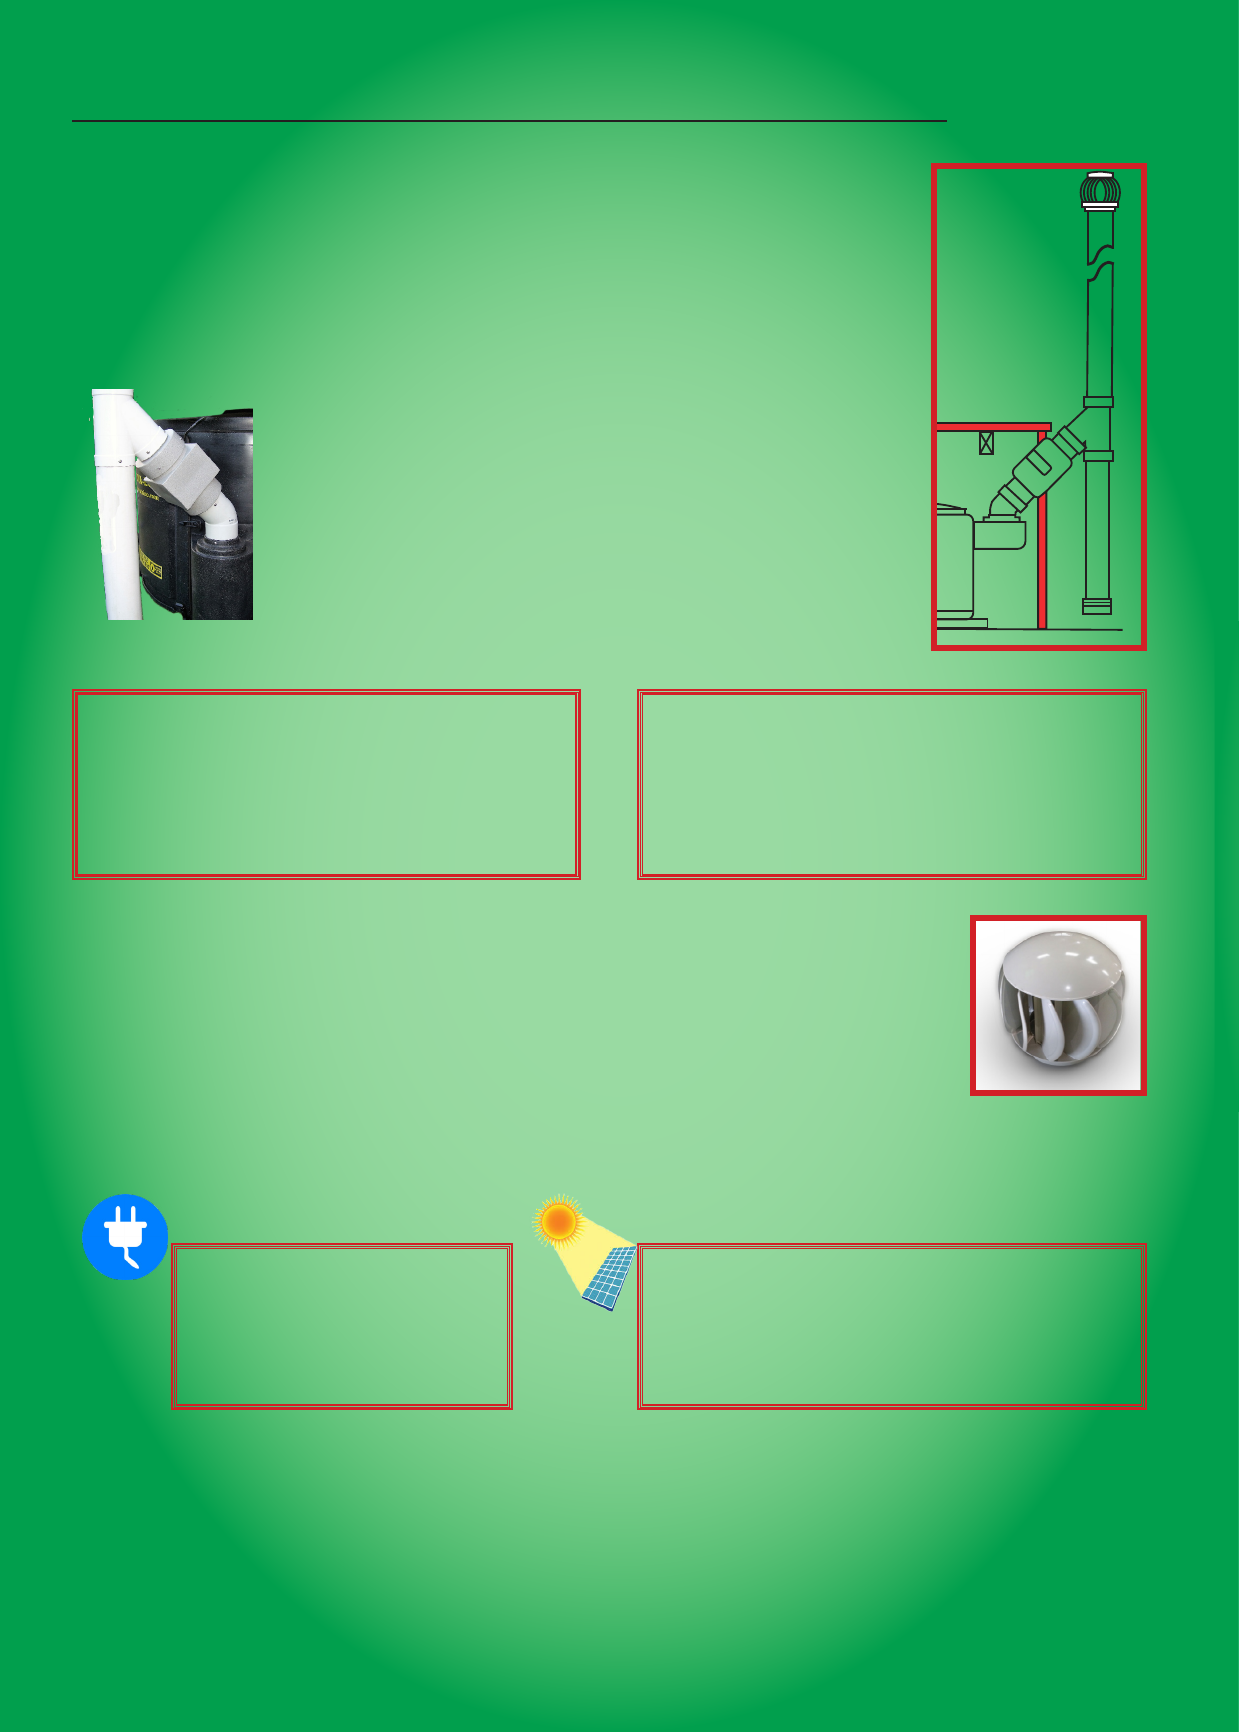
Installation - Attach Fan & Outlet Piping, Turbo Vent, Fan, Electrical Connection, Insulation.........page 9
Installation - Waste Chute & Pedestal, Final Checks................................................................................page 10
Operation Overview...........................................................................................................................................page 11
Operation - Start, Bin Filling............................................................................................................................page 11
Operation - What to put in, What NOT to put in, Cleaning Pedestal.................................................page 12
Operation - Bin Rotation, Keeping Record.................................................................................................page 13
PeriodicMaintenance- Salt Build up, Fan....................................................................................................page 14
Trouble Shooting...............................................................................................................................................page 15
Risk Assessment - Inspection, Storage, Access, Quality....................................................................page 17
Risk - Transfer of Ownership, No Bulking Material, Carousel Not Turned, Too Hot..................page 18
Risk - Too Cold, Too Humid, Is Removed Early, Poor Drainage, Flooding.....................................page 19
Risk - Decommissioning.................................................................................................................................page 20
Warranty..............................................................................................................................................................page 21
Appendix - Checklist, Kit Parts List, Tools List.......................................................................................Page 22

Page 2
INTRODUCTION
The aim of this section is to give you an overview of the use of a Waterless Composting Toilet and in
particular a Rota-Loo. It will cover the composting process, and how Rota-Loo works to ensure correct
composting and what you will need to consider in the installation of your Rota-Loo.
THE COMPOSTING PROCESS
Composting is nature’s recycling process. It is how organic material is broken down by micro-organisms to
produce a rich product called Humus, an organic fertiliser, mulch and soil conditioner made from decayed
organic material. Because human waste is an organic material, it can be composted to produce humus.
The quality of the humus from a Waterless Composting Toilet (WCT) will be inuenced by the design and
installation, the materials you are adding and climatic conditions. In a correctly installed and maintained
Rota-Loo you can create humus which is soil like in texture and smell.
There are two main groups of bacteria that can be used in
composting. Aerobic (requires oxygen) and anaerobic (no oxygen
required). Aerobic bacteria processes material faster and with
signicantly less odorous gases than anaerobic bacteria. If the
material in the bin gets too wet or compacted down, air (oxygen)
cannot circulate through the pile and aerobic bacteria will die out
and be replaced by anaerobic bacteria. Anaerobic bacteria are
responsible for creating odours (nitrous oxide or rotten egg gas”)
which are associated with some composting and septic systems.
To maintain aerobic decomposition, it is important to keep the moisture containment of the material below
70%, and ideally between 50% and 60%. As faecal matter is 70-80% moisture and urine about 95%, for a
WCT to work correctly there must be a method to separate the liquids from the solids.
The heat of the compost pile is also very important in composting. Depending on the temperature there
will be different dominant bacteria groups:
• Below 5°C very little activity takes place.
• From 6°C to 20°C – Psychrophilic,
• From 21°C to 45°C - Mesophilic,
• From 46°C - 71°C Thermophilic.
From the graph shown (from AS1546.2) the time for
organic material to be composted is very dependent
on the temperature. Heat will be generated by the
bacterial activity, but holding that heat and adding
to it is important for effective operation of a
waterless composting toilet system.
A realistic operation is to encourage the Mesophilic
bacteria by maintaining warmth in the WCT and
adding bulking materials to promote a loose textured
pile that allows good air ow (oxygen supply). The Carbon-Nitrogen ratio (C/N) is a further important
aspect in composting. Carbon and Nitrogen is the food required by micro organisms. The C/N Ratio can
vary from 40:1 to 25:1, but in general terms you need a lot of Carbon to a small amount of Nitrogen so for
optimum efciency some high carbon bulking materials should be added.
250
200
150
100
50
0
2 4 6 8 10 12 14 16 18 20 22 24 26 28 30 32 34 36 38 40 42 44
Compost Temperature
Days to Compost
Days of Composting with relation to temperature
To learn more about naturally disposal of human
waste and how to improve the composting
process and end product, the book “The Humanure
Handbook” by Joseph Jenkins is a useful resource.

Page 3
HOW ROTA-LOO WORKS AND ENSURES EFFICIENT COMPOSTING
Inside the Rota-Loo are six bins located on a turntable. When a bin is in use it is located directly below
the toilet pedestal and human waste, toilet paper and bulking material will be added to the bin. When the
bin is full the turntable is rotated to the next available bin and the full bin is allowed to compost until it is
needed again - typically about 12 months. By keeping the composting material inside the Rota-Loo, the
best composting environment is maintained, and there is no need to move uncomposted material.
In the bottom of the bins there are a number drainage holes and a replaceable Geo-textile lter which
allows liquid to seep through to the outer tank reducing the moisture content of the composting pile.
Oxygen is provided by air ow which is created by the continuous operation of the fan. This fan, located
evaporated in normal operation, there is provision to drain off the excess liquid to a secondary evaporator
or absorption trench.
Heat for composting is generated by the bacterial activity. Retaining the heat available is important and
adding extra heat will assist the process. Using good insulation within the structure and passive solar
heat are both important methods to create and retain internal warmth.
Typical air ow through the chamber
on the air outlet pipe, also creates a negative pressure at the pedestals,
making sure your toilet room is always fresh. The sides of the bins also
have a number of holes to allow warm air to ow around and through
the bin delivering oxygen to the bacteria.
Typically, the air ow through the Rota-Loo is sufcient to evaporate the
liquid that has collected in the base of the Rota-Loo chamber - note that
the design of the Rota-Loo has the inlet vent low and opposite the outlet
to promote cross-ow.
Where the usage of the Rota-Loo results in excess liquid that cannot be
The design of the Rota-Loo provides a natural air-gap insulation around the bins. It is recommended that
the Rota-Loo is installed in an insulated space to help retain heat - this is particularly important in cold
climates where temperatures are regularly below 10°C. Placing the Rota-Loo in a sun-facing position and/
or in a Soltran module will improve operation.
A signicant amount of heat is lost in the airow system, so a Rota-Loo installation requirement is that
the inlet air is drawn from a warm air area, preferably through piping that acts as a solar collector (being
placed in a sunny location and painted black are the simplest methods).
When a composted bin has rotated through the
Rota-Loo chamber, it will be ready to empty
before lling again. If all has been operating
well, the result will be a soil like Humus compost
which can be used as a fertiliser in the garden.
The Soltran Principal
Clear sheeting is angled at
60 degrees with the largest
surface preferably facing
north. The rays of the sun
heats up the cool air inside,
the warm air is drawn into
the Rota-Loo by the fan
in the vent pipe. The front
of the Soltran can also be
used as the access door to
the Rota-Loo room.
State Regulations often stipulate the disposal methods of
composted waste from a compostable toilet. Please check
with your local authority. Typically in Australia, authorities
require that humus from a composting toilet be buried with
300mm of soil on top and in a location that is not intended
to be used for food cultivation for three months.

Page
A QUICK GUIDE - INSTALLATION
It’s all in the planning! Read Pages 4 to 6 for a detailed guide in properly planning your installation.
For proper operation of the Rota-Loo you should consider a number of issues during the building design
stages to enable the natural composting processes the best chance to give trouble-free operation.
The design of the site and building needs to allow for:
• The location of the toilet pedestal in the building as well as the required structure to have the Rota-Loo
placed below oor level.
• Space for the Rota-Loo and a rm, dry and sheltered base for it to sit.
• Adequate access to service and maintain the Rota-Loo.
• Warmth to assist the composting process by locating the Rota-Loo in a sunny place and maybe
installing insulation, particularly in cooler climates around the structures cavity
• Good ventilation to provide oxygen and evaporate liquids
• Electrical supply (240VAC or 12VDC) to the fan location
The Rota-Loo RL650 is supplied as a kit containing most of the components required and can be installed
using basic building tools and materials available at plumbing suppliers or hardware shops. See the
Appendix on Page 22 for a list of supplied parts and required materials and tools. Pages 7 to 10
highlight your installation instructions.
Installation of the Rota-Loo involves:
• Positioning the Pedestal and Rota-Loo to ensure a vertical drop from the pedestal to the waste bins
• Preparing a at, level and rm base for the Rota-Loo to sit
• Installing the ventilation pipe-work, including vent pods, inlet, fan and Turbo Vent
• Connecting the Pedestal, waste chute and Rota-Loo
• Final checks before use.
4
INSTALLATION PLANNING
Space Required
There is no ideal set of measurements which will suit all applications
but you do need to provide enough space to locate and install the
Rota-Loo, enough space to t and maintain the air vent piping and
fan, and enough space to access the door to the bins. Remember that
you will be accessing the bins at approximately 8 week intervals so
allow space to get to the latches and manoeuvre the bins.
You will need:
ASNZ 1546.2 requires that the top
of the composting bin must be at
least 400mm below the toilet seat.
This requirement is assured with any
normal Rota-Loo installation.
Enough space to locate the
Rota-Loo in its nal place.
. Enough space above the Rota-Loo to
connect the Waste Chute
Enough space around the Rota-Loo to
connect the Air Inlet, Vent Pipe and to
maintain the Rota-Loo once installed.
Allow sufcient space to permit tting insulation throughout the build cavity. This is essential in cold
climates.

Page
INSTALLATION PLANNING Cont...
650mm
240mm
Rota-Loo
Pod
Waste Chute
Inlet
(use one only for a
650 installation)
1200mm
1200mm
Air Inlet
Pod
Air Inlet
Filter
Vent
Pod
fan
housing
Excess Liquid pipe into
absorption trench or tank
Rota-Loo
door
Do not underestimate the importance of acquiring and
maintaining heat in the Rota-Loo. The heat is used to
increase composting efciency, help evaporate liquids
and kill pathogens. Locating the Rota-Loo in a sunny
location, preferably on the north side of the building
(in the southern hemisphere) is worth considering and
will not necessarily interrupt the energy efciency of
the building. Using a solar collector (Soltran module
or similar), will greatly improve the efciency of the
operation and in cold climates may be necessary.
5
Toilet Pedestal and Rota-Loo
• The Rota-Loo must be located directly below the
Toilet Pedestal.
• The RL650 should have only 1 pedestal
connected.
• The height of the pedestal above the Rota-Loo
may vary according to the building design. We
recommend a minimum of 300mm from the
base of the pedestal to the top of the Rota-Loo.
The Waste Chute supplied allows for 800mm
from the base of the Pedestal to the top of the
Rota-Loo but additional Waste Chutes may be
added to increase this if desired.
• Don’t plan to install a light directly over the
pedestal/waste chute as this will attract ying
insects.
Typically the waste chute is located directly over the bin immediately at the access door as this provides
the easiest operation scenario. The waste chute cut-out in the lid comes from the factory in this actual
position, however the Rota-Loo lid can be rotated so the toilet drops into another bin location should the
building design requires this. But please consider the impact on the operation and making sure that the
active bin is always located directly under the waste chute.
Turbo
Vent and
100mm
adapter
100mm
PVC Pipe
Pedestal
in toilet
cubicle
Flooring
Waste
Chute
100mm
tting with
drain cap
Connection to an
absorption trench or
excess liquid container
100mm Y
Junction
Locations where the monthly average temperature falls
below 10 degrees Celsius for 3 months or more each year
will require the use of a solar collector and insulation in
the cavity.
Where monthly relative humidity exceeds 80% at any
time, a vent drain and insulation of the outlet vent should
be installed to ensure condensate does not re-enter the
Rota Loo.

Page 6
INSTALLATION PLANNING Cont...
Structural Issues
The Rota-Loo is installed sub-oor. It may be installed under a concrete slab or bearer and joist oor,
in a full or partial cellar as desired in the building design. Consider the spacing of joists or concrete slab
penetrations to allow for the waste chute. Consult a relevant Engineer to ensure support spacing and oor
spans are adequate for the size and position of the Rota-Loo.
Most Rota-Loos are installed in a location largely protected
from the elements and can sit freely on the base. If your
installation is likely to experience extremes, you may need
to consider anchoring the Rota-Loo to the ground to prevent it moving in the event of weather events.
Rota-Loo is not designed to be fully immersed in water so should not be installed where severe ooding
may occur without ood protection.
Vent System
The Rota-Loo airow requirement is provided by 100mm DWV piping (not supplied) from an inlet lter
(supplied) to a Turbo Vent (supplied) and incorporates a continuous running fan (supplied).
• The Rota-Loo 650 comes with 2 Pods for the vent piping. These may be placed as suits the
installation. The Inlet needs to be tted low and opposite the Outlet, which will be higher.
• The fan is to be tted on the outlet side. Consider how the fan will be powered (240VAC or 12VDC)
and ensure the fan housing is accessible for maintenance.
• The air inlet (inlet Filter) needs to be located lower than the Pedestal, otherwise you will draw air
from the toilet cubicle rather than where the air inlet is located. (To draw warm air down from ceiling
cavities typically requires a second fan)
• Remember that warm air naturally rises and that sharp bends restrict airow - designing the vent
piping correctly will improve natural operation.
• Warm air holding moisture entering cold air can result in condensation. Consider insulating the outlet
vent piping, and ensuring you install the supplied condensate trap, particularly in cold climates.
Excess Liquid
Under normal conditions, all liquids should be dealt with by normal evaporation. If the installation
experiences excessive use or does not get enough heat to evaporate the liquid internally, it may be
necessary to plan to install a secondary system to handle the excess liquid. This may be a secondary
evaporating tank, which should be installed in a sunny location, or an Absorption Trench System.
Speak to your supplier or Rota-Loo for advice if you think this may be needed.
AS 1546.2 requires that access to a WCT be
prevented from unauthorised people. Consider
whether your installation needs access restriction
methods to prevent young children or vandals
from access.
North
Facing
Hot air
If a 240VAC fan is to be
installed, a standard single
GPO needs to be provided
close to the fan position and
installed according to AS/NZ
3500 & AS/NZ 3820.
If solar power is planned,
consult a solar installer to
provide a system that will
keep the fan running 24/7
- the 12 DVC fan power
consumption is 3.0W
condensate
trap

Page 7
INSTALLATION
Locate Rota-Loo
The rst thing to do is to decide where in the toilet room you want to place the pedestal.
Mark a centre position for the waste chute using the pedestal as a guide.
Reminder Notes:
• Be careful not to install a toilet light directly above the pedestal.
• The oor joists will need to be clear of the waste chute and provision should be made
to secure the waste chute to the oor joists or another part of the building structure.
Once you have found the right spot in the toilet room, draw a 260mm circle and drill a small hole through
the centre point and through the oor. Go to where the Rota-Loo is to be located.
Attach a plumb bob through the centre point hole to line up the centre of the Rota-Loo waste chute hole
to locate the position of the Rota-Loo.
Consider the position and ensure there is enough room around the Rota-Loo to x the vent piping and fan
and there is at least 1m in front of the door to access the bins.
Note also:
• By maximising the length of the Waste Chute you will give yourself room to
install the Waste Chute as well as minimise the visual impact when you happen
to look down the Pedestal.
• Check you have clearance in the joists for the waste chute to pass through the
oor.
• You also need enough space above the Rota-Loo so that you do not hit your
head on the ooring joists when you service the unit.
Don’t cut out the Waste Chute hole in the oor
until you are sure you have everything lined up
in case you need to adjust the position.
Prepare Floor
When you have conrmed the desired location in the toilet room and right location for the Rota-Loo:
• Cut the marked 260mm circle with a jigsaw to create the Waste Chute opening.
• Prepare a rm base for the Rota-Loo to sit on. The base needs to be level, at, rm, dry and free
draining. It may be made from concrete, compressed sand or gravel or similar. Make sure there are no
protruding lumps or bumps.
• Place a water resilient board on the base for the Rota-Loo to sit on. This will provide a at surface as
well as some insulation to maintain heat in the Rota-Loo.
Turbo
Vent and
100mm
adapter
100mm
PVC Pipe
Pedestal
in toilet
cubicle
Flooring
Waste
Chute
100mm
tting with
drain cap
Connection to an
absorption trench or
excess liquid container
100mm Y
Junction
• We have already pre-cut one waste chute hole
in the lid of the Rota-Loo, if this location does
not suit your application you can undo the self
tappers and rotate the lid into the preferred
location, ensure that you line the waste chute
hole in the centre of the bin inside the Rota-Loo.
Also remember that when you eventually rotate
the bins you will need to line the bin up from the
access door. When the desired position is found,
x the lid down using at least 8 off screws.
• Determine where the Vent Pods will be
tted to the Chamber and mark the outline.
(Remember the Fan goes on the outlet side, so
make sure the Outlet Pod allows easy access
for Fan maintenance) - see page 9 for further
information

Page 8
INSTALLATION Cont...
Attach Pods
The air inlet and vent pipe pods will need to be attached to the side of the Rota-Loo, they must be located
diagonally opposite each other. The air inlet pod should be as low as possible to the base of the Rota-
Loo unit and the vent pipe pod should be as high as possible.
Place the inlet pod with the lower edge level with the at section of the
Rota-Loo. Draw a line around the pod onto the Rota-Loo. Measure in
40mm from this mark, which will create a small rectangle measuring
200mm long by 100mm wide. Place the pod back
onto the side of the Rota-Loo and look inside the
pod, you should be able to see the inner marked
rectangle. Cut out the 200mm by 100mm hole.
Drill 6 evenly spaced holes around the ange of
the pod. Secure the pod using the self-tap screws supplied.
The Outlet pod is done the same way except that it is placed as high up as possible
and located diagonally opposite the air inlet.
Locate the Rota-Loo in its Final Position
• Slide the Rota-Loo into place.
• Fit the Waste Chute through the hole in the oor above and ensure it is vertical - use a level or plumb
bob - the eye sometimes plays tricks!
• Adjust the position of the Rota-Loo as required, making sure that it is in the best rotation for access to
the bins - make sure the bin is central in the access door when the waste chute is directly over the bin.
This is particularly important if the active bin is not the one at the door and you may need to mark the
turntable to ensure you are always able to line up the bins correctly.
• If your installation needs the Rota-Loo to be anchored to the ground to protect it from movement due
to minor oods or storms, now is the time to do this.
Install the Air Inlet Vent Piping
The Vent Kit includes a 45° F-M PVC bend to t into the Pod and connect the pipework.
Fit the Air Inlet piping using 100DWV PVC pipe and ttings with the following considerations:
• The air inlet should be connected to a warm area
• Air does not like going around sharp corners.
• Hot air naturally rises.
• Wrapping the pipes in insulation will help in maintaining air
temperatures.
• The greater the distance warm air travels the cooler it becomes. We
have moved warm air 5m in an insulated 100mm PVC pipe and the
heat drop was approximately 5 degrees.
• Always do a dry run rst before nally joining the items together
with plumbers glue.
• Fit the Air Inlet Filter (provided in the kit) to the Inlet pipe - this is to
prevent ying bugs entering the Rota-Loo.
• Fit the Pipework to the Pod using 3x Self Tapping Screws and seal
with Sikaex.

Page 9
INSTALLATION Cont...
Install the Air Outlet and Fan
The Vent Kit includes a 45° F-M PVC bend to t into the Pod and connect the
pipework, a Y-Junction PVC and a Coupling & Cap as the water condensate.
The vent pipe can be installed either through the inside of the house or on the
outside. Any exposed vent pipe should be insulated to ensure that the evaporating
liquid does not condense and run back into the system. If pipe is situated in such
a way (or in cold climates) that condensation may occur, it is recommended that a
Y-connection is tted to allow condensation to drain away from
the fan.
The vent pipe should also be as straight as possible after leaving
the Fan Housing.
The Fan Housing should be easily accessible and secured to the
pipe by way of four (4) self tapping screws and placed on a 45°
angle as close to the pod sleeve as possible. Make sure it is put
in a place that enables access to the fan through the fan cover
hatch. The Fan Housing is secured to the PVC pipe using screws
and sealed with Sikaex.
The Wind Turbine Vent
The Wind Turbine Vent is manufactured with a 150mm tting and comes with an
adapter which is supplied with the kit. These adapters allow you to t the 150mm tting
to 100mm PVC pipe. Use self-tappers to attach the adapters to the Wind Turbine Vent.
Slide the adapter over the 100mm PVC Vent pipe and position, ensure the Turbine spins
freely and attach using three(3) self-tappers.
Do Not Use Glue.
Fan Electrical Connection
.
Insulation
Once everything is in place, the Rota-Loo structure should be well insulated, so that the temperature
inside the unit remains as warm as possible. This is particularly important in cold climate areas. Please
understand that insulation can work both ways and may keep the chamber cooler in warm climate
areas which may work against good composition.
The fan assembly should be placed on a 45° angle using
the 45° end coming from the Pod, this will ensure that
any condensing vapour does not adversely affect the
operation of the fan. It is not recommended that the Fan
Assembly be vertical, since condensation can drip down
the vent pipe and cause problems including shorting out
the fan and affecting your household electrics
To Ensure that your installation is Noise Free it is
important to make sure that the vent pipe is insulated
against causing vibrations to any surface with which it
may have contact. Areas that may cause vibration noise
are the vent pipe being in contact with oor, walls, joins
etc. If “stand off “ brackets are used on the outside of the
building ensure that foam strip or a similar material is
used to absorb any vibration.
Solar Powered - 12VDC Fan (or 24VDC if specied).
The 12VDC fan comes with stripped wires ready to
connect to the 12V power supply (controller). This must
be done in accordance with the instructions of the
supplier of the solar power system. It is important to
check the fan rotation to ensure it provides air ow in the
correct direction.
Mains Powered - 240VAC Fan.
A single GPO needs to be installed by
an electrician to the relevant electrical
standards in close proximity to the
fan housing. The fan is supplied with
a lead ready to be plugged into the
GPO.

Page 10
INSTALLATION Cont...
Waste Chute and Pedestal
Prepare the Waste Chute
• The standard waste chute is approximately 900mm long, which includes a 100mm joining ange. This
ange is only used to join two Standard Waste Chutes together, if this ange is not to be used, it will
need to be removed since it will hinder connection to the pedestal and the Rota-Loo.
• The waste chute should t neatly onto the lip of the Rota-Loo lid; trim off any internal ledges,
otherwise waste and liquid will accumulate on them.
• Place the Waste Chute into its location on the Rota-Loo lid and through the oor.
• Ensure the ends of the waste chute are level; slide the waste chute through the hole in the oor (Make
sure the ange on the waste chute has been removed if not being used). The waste chute will rest on
the lip located in the Rota-Loo lid waste chute hole. Use a level and ensure that the waste chute is
vertical.
• Determine the height required above the oor to t into the chosen pedestal correctly (make sure
you are allowing for any oor nish you may put in later). Cut the Waste Chute to the correct length
ensuring the cut is square.
• Relocate the waste chute and pedestal this should give you a snug t. It is important to check that
no pressure is placed on the Rota-Loo lid when the pedestal is sat on. You can check this by asking
someone to sit on the pedestal and with the door removed on the Rota-Loo to see if there is any
bowing in the lid around the waste chute entry. Make any adjustments required
• When the Rota-Loo has been nally installed you will need to attach the waste chute to the joists or
another part of the building structure using hoop iron, strapping or similar. The chute should not be
allowed to be supported only by the top of the Rota-Loo. Do not puncture the insides of the waste
chute when nally attaching the chute to the joists.
Attach Waste Chute to Rota-Loo
• Use plenty of Sikaex around the top of the Rota-Loo to join the waste chute, also use Sikaex to ll
any gaps between the side of the waste chute and the oor, also check the waste chute is still vertical.
• Place the pedestal on the waste chute, position and using the appropriate screws x the pedestal to
the oor.
• Remove the Rota-Loo door and inside the waste chute, remove/smooth any excess Sikaex from
where the waste chute connects to the Rota-Loo.
Final Checks
Once all is done, the Rota-Loo is ready to use.
• Check that the turntable rotates freely
• Place a Geo-textile lter into the base of each bin. Do this by taking the bin out, pushing the lter pad
down to the base and replacing the bin.
• Make sure Bin No 1 is directly under the waste chute and close the door.
• Check the fan operates when turned on.
We recommend leaving the Rota-Loo for 24 hours to allow the Sikaex to fully cure before use.
If you have any doubts or queries about your installation or maintenance, please contact
your supplier or manufacturer via www.rotaloo.com.au.
It is most important to ensure the
cuts made to the waste chute are
square

Page 1111
OPERATIONS - OVERVIEW
Using your Rota-Loo is great for the environment... you will use less water and less energy and you’ll
return nutrients to the local eco-system. But using a Rota-Loo requires some effort and care - it is not
the same as pushing a button and having someone else look after your waste, but with a little care and
maintenance you can expect many years of trouble free operation.
PLEASE READ THIS OPERATION MANUAL CAREFULLY. IT IS IMPORTANT THAT YOU MAINTAIN THE
ROTA-LOO PROPERLY
Using the Rota-Loo (Page 11-12)
The Rota-Loo is used as any other toilet but care must be taken:
• Always keep the toilet seat down when not in use
• The toilet may be used to compost other waste, but only certain materials
• Do not use disinfectants to clean the toilet
• Use good quality recyclable toilet paper
Rotating the Rota-Loo (Page 13)
You will need to check regularly to make sure the waste bins do not overow - this can be done by looking
down the waste chute with a torch. When a bin is full a bin rotation needs to be done - expect
to do this several times each year depending on use:
• Cover the waste pile with a suitable material
• Rotate the bin to the left
• Empty the bin that is next to be used.
Routine Maintenance and Checks (Page 13-14)
It is recommended that each time the Bins are rotated, you:
• Check that the fan is operating and air ow is unobstructed
• Flush out the base of the Rota-Loo with a bucket of water
• Unscrew and empty the condensate cap
Trouble Shooting (Page 15-16)
Sometimes things go wrong! Most problems are due to the composting process getting too wet or out of
balance. An outline of common problems and remedies are listed in the Manual.
When emptying the Bin, use gloves, eye
protection and a dust mask to protect
yourself from any residual pathogens that
may exist.
Bury the compost under 300mm of top
soil away from where food cultivation
may occur for a 3 month period - this is
a requirement of many Authorities and
an additional safe guard against disease
transmission
OPERATIONS - OPERATING THE ROTA-LOO
Each installation will be slightly different because we all have different lifestyles and diets and we live
in different climates. Rota-Loo is designed to operate in a wide range of conditions and in most cases
composting will be effective with a minimum attention.
Start -Up
Once installed correctly and the nal checks are done, the Rota-Loo is ready to use:
• Make sure Bin No. 1 is under the Waste Chute and tted with a Geo-textile lter
• Replace the door, switch on the fan and the toilet is now ready for use.
• Fill in the Diary Sticker with the date Bin 1 started being used.
Bin Filling
Use the Rota-Loo as you would any other toilet.
Periodically check the level of the waste pile in the bin - this can be done by shining a torch down the
waste chute or removing the bin through the access door. As you get to know the operation of the Rota-
Loo, you’ll get a feel for how long to leave the checking periods - we suggest you check weekly until you
are familiar with your system.
The Bin is considered full when the pile reaches 100mm below the waste chute (before the top rim of the
bin). Never let the bin overll as the result is a mess you’d rather not deal with!
It is a good idea to place a small amount of mushroom compost, potting
mix, pea straw or similar in the bottom of the bin - this will help start the
composting process more quickly

Page 1212
OPERATIONS Cont...
What to put in the Rota-Loo
• use only a good quality toilet paper (either unbleached, recycled or new white paper). Try not use
excessive amounts of toilet paper as the paper may break down slower than the heap.
• The recommended amount of Bio-stimulant per week
The following additives help to allow oxygen to ow around the solid material as well as add some carbon
rich matter ensuring that it remains aerobic and healthy so you obtain good quality compost. We
recommend that you at regularly intervals (about once a week) put down the toilet a handful of two of the
following:
• Chopped pea straw (compressed bales are at available from most garden supply shops)
• Hard vegetable peelings (ie. Potato or carrot). The peelings should be chopped to no larger than 30mm
(1”) square
• Fresh grass clippings
• Hay, Peat moss, Rice hulls, Peanut shells. Pop corn, or similar organic materials
• Wood shaving can be good but DO NOT USE PINE OR EUCALYPT as they are disinfectants!
Disinfectants kill the bacteria required for good composting.
The Rota-Loo can be used to help compost other household wastes, but please don’t expect it to do
everything. The aim is to safely handle human waste and adding other materials should be done with the
objective of improving the composting process only. Adding additional matter to the bins will ll the bins
more quickly so keep an eye on the bin levels more often. It may also mean that you will need to rotate the
bins more often, but remember that if the composting bacteria are healthy, decomposition will occur quickly.
What NOT to put in the Rota-Loo
• any burning materials such as cigarettes or matches,
• disposable nappies, tampons, wet wipes or sanitary napkins,
• plastic, rubber, metal or glass material.
• vegetable scraps, fruit scraps or meat/fat scraps, as they are subject to putrefaction and attract ies
and other vermin.
Cleaning of the Pedestal And Seat
Generally once a week, or more often if required, clean the pedestal and seat with water and if necessary,
a small amount of biodegradable detergent. No problem is caused if a small
amount of water is let into the system. Keep the use of disinfectant to a
minimum and wherever possible use only biodegradable disinfectant. When
using disinfectant, use it only on a damp sponge around the pedestal and seat
areas to prevent any spillage.
Be careful that disinfectant is not allowed to go down the chute. Should this
happen, add a dose of Bio-Stimulant and up to a small bucketful of peat moss or
potting mixture into the bin. This will help restart the bacterial activity and isolate
fresh wastes from the disinfected area. Alternatively you can rotate the Rota-
Loo. In this case add Bio-Stimulant and bulking material to give the bacteria
plenty to work on.
Bio-Stimulant is a sea-weed based pro-biotic, available from Rota-Loo, that helps keep the right environment and
balance in the composting pile for the aerobic bacteria to grow and work. Adding a small amount of Bio-Stimulant
regularly according to the instructions on the bottle will improve composting and control odours. It is recommended that
Bio-Stimulant be used weekly, or at least monthly, and whenever a bin (or the house) is being closed up for a period.
APPLICATION Dilute 1 part Bio-stimulant in 10 parts water 1:10). Apply 50ml of diluted mix three times a per week in
active bins (pour down the pedestal).

Page 13
OPERATIONS - Cont...
Bin Rotation
When the bin is full (the waste pile is no higher than 100mm below the top of the bin):
• Open the access door.
• Pour 2 to 3 litres of water into the bin – this can be done via the pedestal
• If available, we recommend you cover the compost with about 30mm
of mushroom compost, potting mixture, chopped straw or hay, or any
mixture of similar organic material.
• Rotate the bins one position in the clockwise direction (to the left).
• The bin now under the waste chute will be full of composted material
(unless it’s the rst use) and needs to be emptied.
• Empty the composted material in a safe place, taking care to retain the
Geo-textile lter.
• Replace the lter, return the bin to the Rota-Loo (place some mushroom
compost or potting mix in the bottom if desired) and close the door - it’s
ready to use again
Keeping Record
Use the Bin Rotation Diary supplied, either on the door of the
Rota-Loo or kept in a safe and accessible place, to keep a
record of when the bins are turned and emptied.
• In the ‘clear’ triangle ll in the date that bin was lled
and rotated to the next bin
• In the ‘greyed’ triangle note the date that bin was
emptied and rotated into the ‘active’ position.
If the rotation rate is such that a bin is to be emptied less that 12 months after it’s
‘lled’ date, composting may not be complete and it is advised that the bin be removed
and allowed to compost longer - spare bins and lids are available for this purpose.
Additional bins must be tted with a lid (supplied with spare bin) and provided with a
at and secure location to ensure waste material cannot be spilled or accessed until
properly disposed. The location should be in a dry warm place to assist composting.
Adding some earthworms to the full bin will further improve the
humus and speed up the composting process. If you wish to try
this, check to ensure you are using the right worms.
As a guide, well composted material will be soil like in texture and
appearance. It will be free of foul odours and there won’t be anything
that is recognisable as faecal matter.
Even if it passes all these tests, remember to bury it away from food
cultivation to ensure the natural process is complete.
DO NOT USE a bin that has already been used and
the contents composted until it has been emptied.
Manufactured by Kiel Industries
87-93 Tramway Road
Morwell, VIC 3840
Australia
+61 3 5135 3900
Use gloves, eye protection and a
dust mask to protect yourself
from any residual pathogens
that may exist.
Bury under 300mm of soil for
3 months or as required by your
local authority.
If contact is made between compost and skin,
wash immediately
BIN DATES FILLED AND EMPTIED
F
E
F
E
F
E
F
E
F
E
F
E
1
2
3
4
5
6
300mm
Please read the Operations Manual for correct maintenance procedures

Page 14
PERIODIC MAINTENANCE
It is wise to create a maintenance plan and carry out routine inspections of all equipment. A little
effort regularly can save a lot of trouble later.
When carrying out maintenance, wear appropriate protective clothing - at a minimum, wear gloves and
wash immediately if you come into contact with any compost, waste and/or surfaces directly impacted by
waste.
We recommend that each time you open the door to rotate the bins, you should also carry out the
following checks and maintenance.
1. Check the air inlet lter and brush off any dust that will have covered the mesh. Wash the lter if
required.
2. Pour water from a bucket into the bottom of the Rota-Loo. This will help to dissolve the salt build up.
Drain the liquid into the bucket through the 40mm drain tting, making sure that there is no blockage
of the outlet. Drain out only about one third of the liquid into the bucket and top with fresh water. Use
this mixture on your ower garden or lawn. If your Rota-Loo is connected to a permanent drain, make
sure that the outlet in the Rota-Loo tank is not blocked and that the liquid ows out.
3. Check the fan is operating.
4. Unscrew the condensate cap and clear of any liquid or materials.
Salt Build-Up
Over a period of time, depending on use (1-3 years), there will be a build-
up of urea salt in the bottom of the tank. Pouring 2 or 3 litres of fresh water
may reduce this build up. Allow the mixture to stand for twenty-four hours
and drain off into the emergency overow absorption trench. Regular
ushing will keep the tank free of build-up.
Fan
As the only moving part, the fan is likely to be the only part that will need
to be replaced if found not to be working.
Removing the fan periodically (annually) to check it and clean it may
pre-empt a failure which if not found could adversely impact the Rota-Loo
operation.
• Remove the fan cover from the fan housing.
• Remove the fan by sliding it out of the housing - carefully using a screw driver as a lever may help.
• Using a soft brush eg. a paint brush, clean off the dust which can build up around the fan-blades and
motor. Replace the fan.
• When the toilet is unoccupied, keep the lid closed over the seat. If the toilet seat lid is left open for long
periods, there will be a decrease in evaporation and odour could occur.
40mm Drain Plug on
a Rota-Loo 650

Page
TROUBLE SHOOTING
The Rota-Loo is a simple system that if maintained, will operate without problems for many years. However,
sometimes things go wrong! This section will help you diagnose and rectify some issues that may arise, and
addresses a few common questions. If in doubt, please call your dealer or contact Rota Loo for help and
advice.
If the Liquid level in the bottom of the Rota-Loo is greater than 50mm deep.
The liquid needs to be drained off. Do this by placing a container under the drain outlet (near the access
door) and removing the cap.
If the Rota-Loo emits an unpleasant odour.
The composting matter is probably too wet. Excess liquid may need to be drained off as above. Check the
fan operation and Turbo vent. Insufcient air ow which may be caused by a failed fan or blocked air piping
(a bird’s nest in the Turbo vent!) will reduce evaporation. Or, if the fan stops, the airow from the Rota-Loo
may ow up the pedestal bringing what odour there is into the room. Restart the fan (failed power supply
maybe) or replace the fan.
If the Liquid Level is continuously building.
Check the fan, as above. It may be that the airow is not enough to evaporate the liquids. Or, more heat
is needed for the system to evaporate the liquid properly. A Soltran Module may need to be installed or an
excess liquid handling system should be constructed.
If the turntable won’t rotate.
Check for obstructions. On the RL650 the bins are quite
close to the chamber sides and it may be that a bin has got
caught on a Vent Pod screw that is a little long. The Bins
may not be located on the right part of the carousel as per
the included photo. This would simply require the bins to
be relocated to lock onto the carousel properly.
On models with turntable castors (RL950 and RL2000),
check for salt build up on the base of the chamber as it
may be that salt crystals block the turntable wheel path
- ush with water and drain from the excess liquid outlet.
The turntable hasn’t been rotated and a Bin has become overlled.
Should the bin overow, the Rota-Loo will need to be cleaned out carefully. The overow bin will need to
be removed and excess waste transferred to the next bin (after emptying). Any overowed waste solids can
be cleaned out be ushing with water and pumping out the Rota-Loo base (block-off the excess liquid
outlet) to be disposed of properly (a septic pump out truck will take the waste to a proper disposal facility.
There was a power failure during the last few days.
This will not affect the composting? The heat generated from the composting process is usually
sufcient to maintain the correct temperature in the composting pile. Also, the heat from the
compost will set up a natural draught, which should take away the odours and keep the toilet free
of smell.
15

Page
What should be done if the area will be closed down for a while?
If the toilets will not be used for only a few days, we would recommend you keep the fan on, but if
the toilets are not to be used for a few weeks, the fan may be turned off. When you turn the fan
off, a smell may enter the room. However, this should be gone in a few hours, after the heat from
the composting process starts to push the gases up the vent on its own, or the fan is restarted on
return. It is also recommended that you add a dose of Bio-Stimulant down the pedestal before
closing down. This works to keep the right balance of bacteria whilst the system is not being used.
If there are too many ies in the composting chamber.
Generally, ies are attracted by excessive amounts of carbon dioxide and methane, which is a
result of anaerobic bacteria indicating that the composting pile is too moist, there is not enough
heat or the wrong things have been dropped down the pedestal.
A few ies may be part of the process and may be helpful, but if they become a nuisance they can
be dealt with.
• First check all the other ventilation systems (fan etc.) are working properly. and that liquid
drainage and evaporation is adequate.
• Commence using a bulking regime to aerate the pile. This allows more air through the pile and
will increase aerobic activity and evaporation.
• The most effective way to kill the ies is by using the Rota-Loo Bio-Stimulant. Bio-Stimulant
helps the compost pile by increasing and sustaining a higher metabolic rate of aerobic
bacteria, therefore increasing the compost rate and producing less gases to attract the ies.
• It is also recommended that a pyrethrum (natural insect repellent) spray or powder be added
to the pile and the bin rotated. Two tablespoons of boracic acid can also work.
• Another option to kill these ies is by pouring boiling water down the waste chute. The boiling
water kills the larvae and stops the breeding cycle. About 4 litres of boiling water down the
chute, everyday for about 14 days is required. Make sure you have a drainage system in place
rst.
• If ies are still present and all methods have failed, it would be worthwhile emptying all bins
and ushing the whole system out with water. This will allow you to start afresh.
16
Sphaeroceridae are a family of true ies in the order Diptera,
often called small dung ies The larvae are microbial grazers
found in abundance in many micro-environments with
decomposing organic material. Most species appear to be
associated with decaying plants or fungi and they are a part
of the nutrient cycle. Many species are associated with various
kinds of faeces including human faeces. Sphaerocerids
may abound in decomposer communities such as compost
and manure.
Vinegar Flies or Ferment Flies are a small, yellowish y
(3- 4mm) with distinct red eyes and are commonly seen
around rotting fruit. The Vinegar Fly is not actually a
fruit y as it does not feed on fruit directly, just the yeasts
associated with rotting fruit. They are common in homes
and restaurants and wherever food is allowed to rot and
ferment. With a life cycle of 1 week and the ability to lay
500 eggs, they can become very plentiful very quickly.
TROUBLE SHOOTING - Cont...

Page
RISK ASSESSMENT - OVERVIEW
The Australian Standard for Waterless Composting Toilets (AS/NZS1546.2:2008) requires that a Risk
Management Plan be provided to inform Rota-Loo Operators and Users how to cope with unusual or
emergency situations.
Most of these issues are dealt with in the Operations Manual. This Risk Management Plan contains
additional information and refers to the Operations Manual to demonstrate that a Risk Management
Analysis has been carried out and to provide additional support to operators and users if required.
Design and Operation of Rota-Loo
Inherent in the design of the Rota-Loo are factors that mitigate many of the risks, however it is essential
to understand that some care and maintenance is required. The design of the Rota-Loo intends to ensure
effective composting occurs in most environments with little operator effort (see Page 2 - The Composting
Process for greater understanding), however some occurrences may render the Rota-Loo ineffective.
PLEASE READ THIS OPERATION MANUAL CAREFULLY
IT IS IMPORTANT THAT YOU MAINTAIN THE ROTA-LOO PROPERLY
17
RISK ASSESSMENT
This assessment is based on the criteria set out in AS/NZS 1546.2:2008 Appendix J for WCT deemed to be
acceptable risk.
Inspections by Authorities
The Rota-Loo is a fully contained WCT system that has no need for inspection or maintenance by any
outside agent or authority for safe operation. The design cycle time for waste composting is 12 months so
should an authority require regular inspection, 12 monthly or greater is sufcient.
The Operations Manual contains sufcient information for the operator / user to carry out all servicing and
maintenance tasks and includes a Trouble-Shooting guide to address most unusual situations. The
manufacturers contact details are included on the serial number plate for contact in unknown situations.
Storage of, and access to Uncomposted Material
Being fully self contained, all uncomposted waste is retained inside the Rota-Loo in the controlled aeration
and drainage system until fully composted. All material is held inside the bin / bucket into which it is
deposited and moved only by rotating the turntable, which does not require operator contact with the
waste. The Operations Manual includes instruction to wear gloves when rotating to ensure random
contact with skin is not possible.
Service and maintenance access is by a door on the Rota-Loo. The door is securely tted with catches
and note is made in the Installation Manual that the installer should consider security of access against
unauthorised persons (e.g., small children) in the placement of and access to the Rota-Loo.
Waste is only removed from the Rota-Loo when fully composted and is removed by removing the entire
bin and emptying (instruction to bury as per Regulatory requirements) - with instruction to wear gloves,
even the composted material does not come into contact with persons.
An option noted in the Operation Manual is for the possibility in very high use situations for
additional bins to be purchased to extend the composting time outside the Rota-Loo. In these cases
the rst part of the composting (approx 6 months) will occur in the Rota-Loo controlled environment.
Instruction in the Operations Manual includes the need to store extra bins outside the Rota-Loo for
additional composting time in a at, safe place.
End Product Quality
Rota-Loos have been operating in diverse climates from cold and alpine to tropical for many years
achieving effective composting results and safe end product quality. Records of testing date back to 1975
showing end product quality conforming to AS/NZS 1546.2:2008 standards.

Page
RISK ASSESSMENT Cont...
As part of the Product Certication process, end product tests were carried out on an installation in a
temperate climate (monthly average temperature <12°C for 3 months and relative humidity ~80% for 2
months) under ‘worst case’ (high use, low maintenance) conditions and found end product results
conform with AS/NZS1546.2:2008 standards.
There is a high level of condence that Rota-Loo will deliver safe end product quality in all situations,
provided some operator / user care is taken and instructions are followed.
18
RISK IN UNUSUAL SITUATIONS
The following are “unusual situations” listed in AS/NZS 1546.2:2008 Appendix J that may be considered
to pose a risk to the safe operation of a WCT, together with notes on how these risks are or may be
mitigated. Appendix J, J3, d, e and g are not relevant to the Rota-Loo design.
Transfer of Owner / occupier
If on transfer of ownership the new owner / occupier does not receive information about how to operate
the Rota-Loo they may not attend to it’s operation properly.
Rota-Loo provide with the kit a Wall Poster to be attached near the toilet to inform users of the basic
operational needs of the system. Manufacturer contact details are also provided on the Rota-Loo access
door and serial number plate and the Operations Manual is readily available to anyone who requests it.
Should the new operator / user not learn of the need to attend to the Rota-Loo before a bin overlls,
they will need to address the issue as per “Carousel not turned” below and as addressed in the
Troubleshooting Guide on Page 15.
No Bulking Material is Fed in
While the addition of bulking material is recommended it is not essential for effective composting.
The use of toilet paper and the design to drain the compost pile of moisture is sufcient to ensure
correct composting conditions. The C/N balance may result in less efcient composting, but the design
composting time to sufcient to cope with this - test site for Product Certication veried this.
The Carousel/Turntable is not turned
If the Turntable (Carousel) is not rotated the waste bin will over-ll, which is not good.
The risk to health and safety in this event is mitigated by:
• The top of the bin is very close to the waste chute, so overow of waste to the turntable and ‘tank’
should be minimal before being noticed and rectied.
• The waste chute is long enough so that even if the waste chute starts to ll, the level of waste will be
greater than the minimum required by the Standard.
• The bin is contained within the Rota-Loo so all waste will be contained within the Rota-Loo system.
Should the bin overow, the Rota-Loo will need to be cleaned out carefully. The overow bin will need
to be removed and excess waste can be transferred to the next bin. Any overowed waste solids can
be cleaned out be ushing with water and pumping out the Rota-Loo base (block-off the excess liquid
outlet). It is recommended that this be done by a contracted septic clean out specialist. (This eventuality is
also addressed in the Troubleshooting Guide on Page 15).
The Compost gets too hot
The Rota-Loo design has continuous air ventilation so excess generated heat will be removed preventing
the compost pile retaining excess heat. Should the compost pile get hot, the chimney effect of the
ventilation system will increase air ow and remove more heat.

Page 19
RISK IN UNUSUAL SITUATIONS - Cont...
The Compost gets too cold
Should the compost pile fall below 6°C for an extended period (2-3 months) composting will slow to the
point that it’s retained time may not achieve full composting. This risk is mitigated by:
• The design has natural insulation which helps retain composting heat in cold climates.
• The Installation Instructions stipulates that in cold climates the Rota-Loo must be installed in a solar
collecting area and with further insulation. This allows the system to gain and retain heat to continue
the composting process even in cold periods.
• The Rota-Loo capacity design anticipates 12 months composting time, which in theory will ensure full
composting as low as 2°C (see Figure E1, AS/NZS 1546.2:2008 Appendix E) in with a safety factor of
about 50%.
In the rare event that the composting process has stopped due to low temperature and lack of
compostable material, it can be restarted by adding compostable material and a dose of Bio-Stimulant.
The Compost gets too humid
If the compost gets too humid, (above 70% moisture) the composting process will become anaerobic
which will be noticeable by the odour produced. This event can occur for a number of reasons and is
addressed in the Troubleshooting Guide on Page 15.
It is important to maintain aerobic composting and the Rota-Loo design uses a number of features to
separate and evaporate the liquids from the solids for this purpose. Should the composting become
anaerobic due to excessive liquid (high humidity of the pile) there is no immediate health risk. The odour
will be unpleasant which will encourage rectication. The fan-driven ventilation system will clear any
produced methane.
The Compost is removed too early
This should not occur - the design provides for a factor of safety in time for composting. In the case of
very high use when compost may be removed before the designed 12 months, instructions stipulate
storing in additional bins (Operations Page 13).
The Operations Manual instructs to bury the composted waste when emptying the bin and using
personal protective equipment (Operations Manual page 13) so in the case that composted waste is
inadvertently removed before full composting, there will not be personal contact or signicant health risk.
There is poor drainage of excess liquid
The Rota-Loo ‘tank’ has a signicant liquid capacity (to depth of about 150mm) while still being able to
properly drain the composting material pile.
The Excess Liquid drainage point is signicantly lower than this level. Should a blockage occur in the drain
point, the high liquid level will most likely cause some anaerobic composting which will produce an odour
that will be investigated - dealt with in the Troubleshooting Guide (Page 15)
The Rota-Loo is Flooded
The Rota-Loo is not intended to be installed underground or submerged. In the event of a major ood
event it may be possible that the water level is above the base of the Rota-Loo for a period of time. The
Rota-Loo is designed to be air tight to improve ventilation and will therefore resist ingress of water so in
minor events the waste material should be protected from ooding.
If signicant water does enter the Rota-Loo (to above the turntable deck) the water needs to be
considered contaminated. The sealed design of the Rota-Loo should prevent leakage and thus
contamination of the surrounds but the Rota-Loo must be pumped out by a septic tank specialist and
washed and reset before restarting use.
If the installation is in an area that may experience ooding, consideration should be given to
adequate drainage of the area around if necessary securing the Rota-Loo to prevent oating in a
ood situation (noted in Installation Page 7).
Table of contents
Other PFG Toilet manuals
Popular Toilet manuals by other brands

Swiss Madison
Swiss Madison Concorde SM-1T107 installation instructions

FV
FV Ginebra E149 installation instructions

Toto
Toto NEOREST NX CS902 Series installation guide

AM.PM
AM.PM BLISS SCANDI C518607WH manual

Gordon Ellis & CO
Gordon Ellis & CO SERENITY 64622 quick start guide

Laufen
Laufen Cleanet RIVA H894690 manual