GE, imagination at work and GE monogram are trademarks of
General Electric Company.
All goods and services are sold subject to the terms and conditions
of sale of the company within GE Healthcare which supplies them.
GE Healthcare reserves the right, subject to any regulatory and
contractual approval, if required, to make changes in specifications
and features shown herein, or discontinue the product described at
any time without notice or obligation. Contact your local
GE Healthcare representative for the most current information.
© 2006 General Electric Company – All rights reserved.
GE Healthcare Bio-Sciences AB, a General Electric Company.
GE Healthcare Bio-Sciences AB
Björkgatan 30
SE-751 84 Uppsala
Sweden
GE Healthcare Europe GmbH
Munzinger Strasse 5
D-79111 Freiburg
Germany
GE Healthcare UK Ltd
Amersham Place
Little Chalfont
Buckinghamshire, HP7 9NA
UK
GE Healthcare Bio-Sciences Corp
800 Centennial Avenue
P.O. Box 1327
Piscataway, NJ 08855-1327
USA
GE Healthcare Bio-Sciences KK
Sanken Bldg. 3-25-1, Hyakunincho
Shinjuku-ku, Tokyo 169-0073
Japan
www.gehealthcare.com
GE Healthcare Bio-Sciences AB
Björkgatan 30
751 84 Uppsala
Sweden
Asia Pacific Tel: +85 65 62751830 Fax: +85 65 62751829 • Australasia Tel: +61 2 8820 8299 Fax: +61 2 8820 8200 • Austria Tel: 01 /57606 1613 Fax: 01 /57606 1614 • Belgium Tel: 0800 73 890 Fax: 02 416 8206 • Canada Tel: 1 800 463 5800
Fax: 1 800 567 1008 • Central, East, & South East Europe Tel: +43 1 972 720 Fax: +43 1 972 722 750 • Denmark Tel: +45 70 25 24 50 Fax: +45 45 16 2424 • Eire Tel: 1 800 709992 Fax +44 1494 542010 • Finland & Baltics Tel: +358 9 512 3940
Fax: +358 9 512 39439 • France Tel: 01 69 35 67 00 Fax: 01 69 41 98 77 • Germany Tel: 0800 9080 711 Fax: 0800 9080 712 • Greater China Tel: +852 2100 6300 Fax: +852 2100 6338 • Italy Tel: 02 26001 320 Fax: 02 26001 399 • Japan
Tel: 81 3 5331 9336 Fax: 81 3 5331 9370 • Korea Tel: 82 2 6201 3700 Fax: 82 2 6201 3803 • Latin America Tel: +55 11 3933 7300 Fax: +55 11 3933 7304 • Middle East & Africa Tel: +30 210 96 00 687 Fax: +30 210 96 00 693 • Netherlands
Tel: 0800-82 82 82 1 Fax: 0800-82 82 82 4 • Norway Tel: +47 815 65 777 Fax: +47 815 65 666 • Portugal Tel: 21 417 7035 Fax: 21 417 3184 • Russia & other C.I.S. & N.I.S Tel: +7 495 956 5177 Fax: +7 495 956 5176 • Spain Tel: 902 11 72 65
Fax: 935 94 49 65 • Sweden Tel: 018 612 1900 Fax: 018 612 1910 • Switzerland Tel: 0848 8028 10 Fax: 0848 8028 11 • UK Tel: 0800 515 313 Fax: 0800 616 927 • USA Tel: +1 800 526 3593 Fax: +1 877 295 8102
59-6144-00 AK 12/2006
Elanders Östervåla 2007
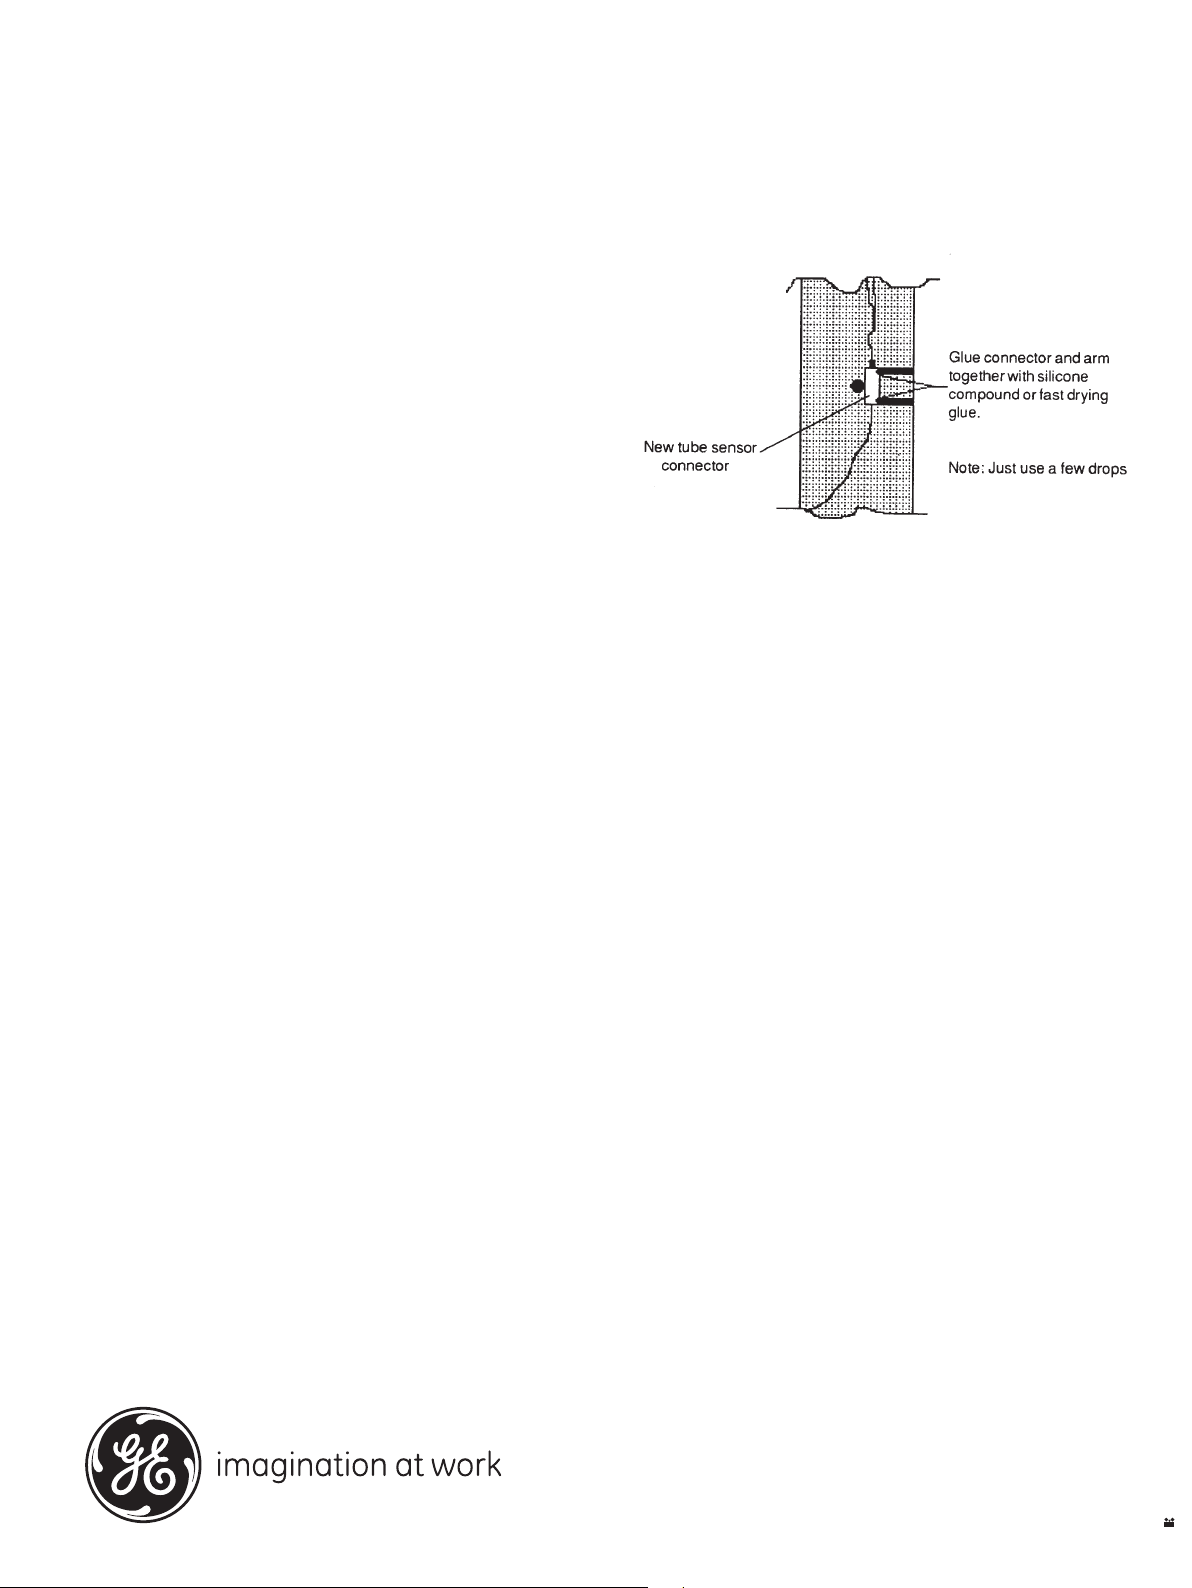
Fig 4.
Remounting
1. New types of tube sensor connector are bigger than
old ones. Therefore use a knife to cut off the edge of
the round pin which normally holds the old connector
in place (Figs 2 and 3).
2. Hook the spring (6) onto the tube sensor (5). Use a pair
of pliers to keep the snap ring (4) to the bottom of the
hole. Then, from underneath, press the tube sensor
upwards into place.
3. Remount the cover (3). Put the flat cable with its
connector (1) back into the arm. Reversing the method
used when it was dismounted, but do not fit the snap
ring yet.
4. Connect the two cables (8) to the connector (1).
5. Check that the tube sensor is not hindered in its
movement by the flat cable.
6. Secure the connector in place with a fast drying glue
or silicone compound. (Fig 4.)
Note: Use only silicone compound free from acetum.
(Dow Corning: RTV 3140 or similar.)
7. Mount the snap ring, just to ensure an extra fixing of
the connector.


