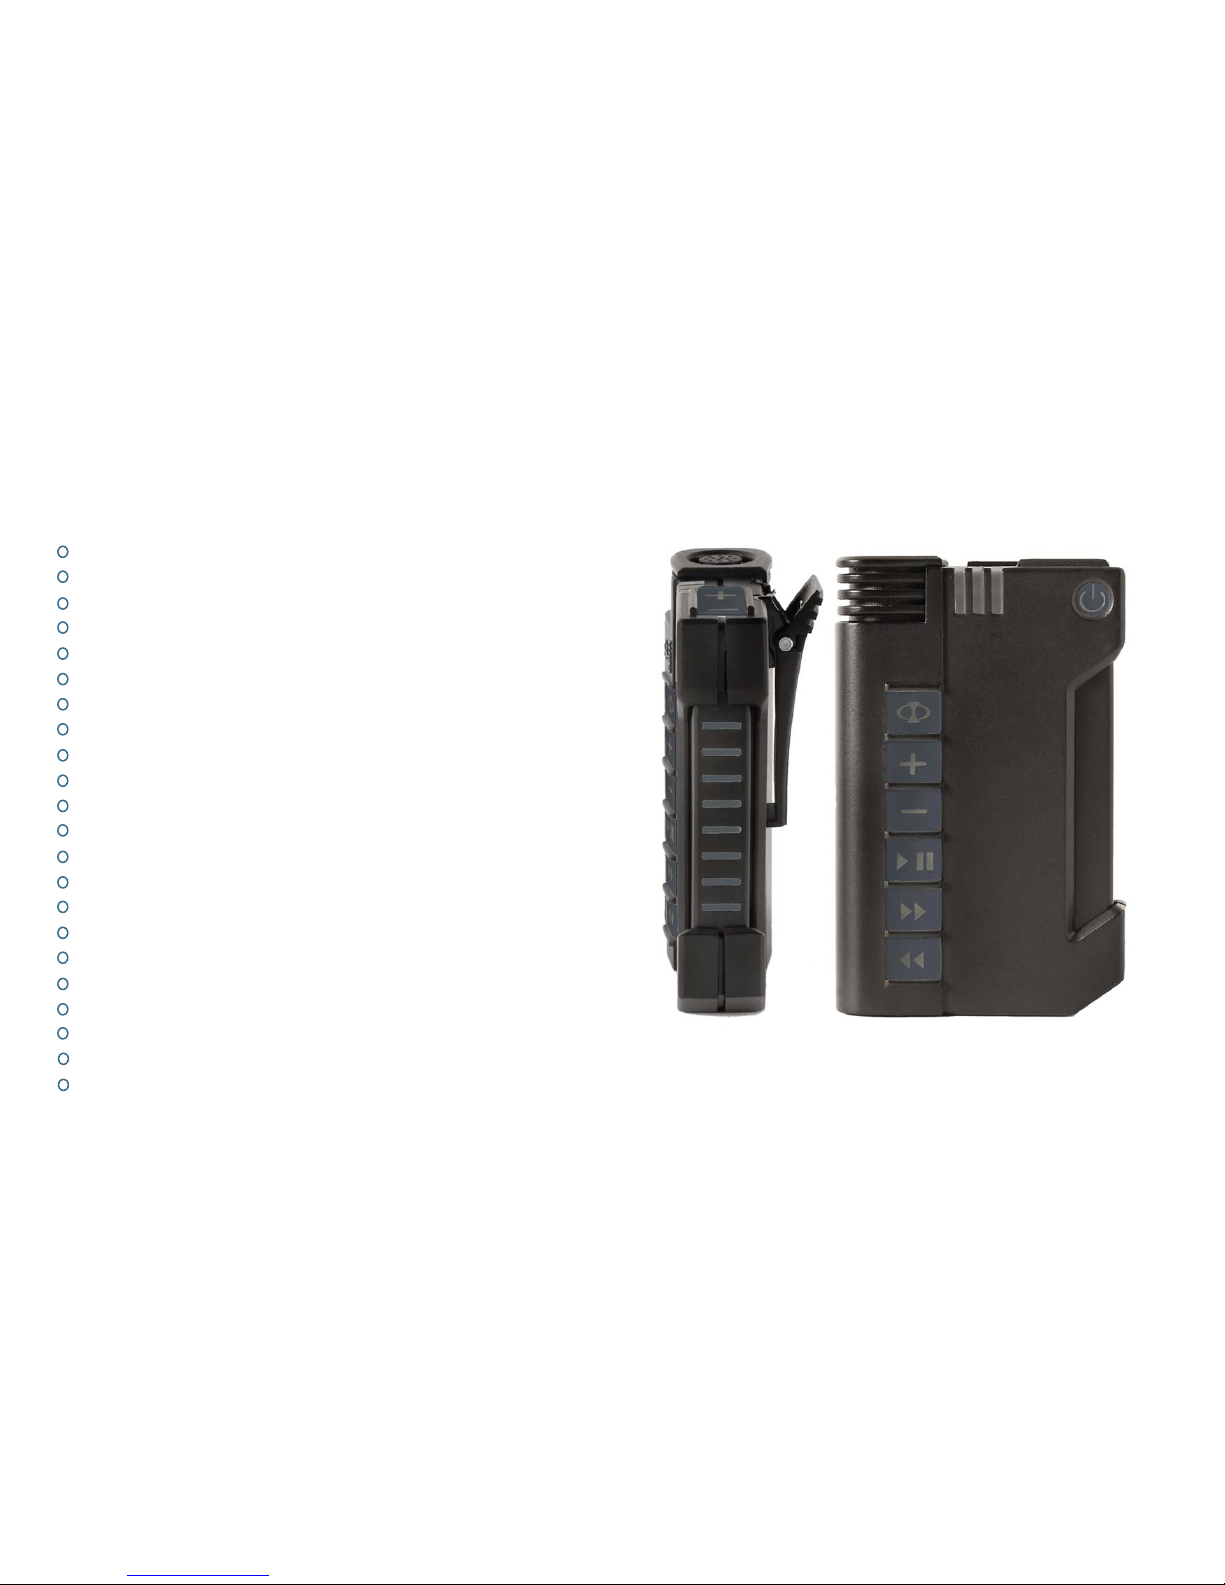
Phicom XSports 2400/1 User manual

2
2008 Phicom Pty Ltd Revision 2008-1V99
XSports 2400/1
XSports 2400/1
R
ADPC240x User Manual Release 2V
wireless communication
get connected

Phicom and the stylised Logo are trademark of Phicom Pty
Ltd. All other product or service names are property of their
respective owners.
C Phicom Pty Ltd
AUST T.M.N 1094481 2006
contents
introduction 1 1
XSports 2400 1
XSports 2401 1
features 2 3
getting started 3 5
Power control - 1 5
Volume control - 2 5
Indicators - 3 5
Main connector - 4 5
Function - 5 6
Plus - 6 6
Minus - 7 7
Play / Pause - 8 7
Forward - 9 7
Back - 10 7
Push to transmit - 11 8
at a glance 4 9
modes 5 11
modes of operation 11
standard mode 11
programming mode 11
default mode 12
programming mode 6 13
programming 13
storing a single unit 14
storing to different memory locations 14
disconnecting 15
connecting 16
clearing users 17
ptt operation 7 19
push to transmit - disconnect 19
disconnect from any call 19
connect to a preferred user 19
connect to communications equipment 19
return to MP3 mode 19
connect from MP3 mode to a user 19
virtual call waiting 20
MP3 mode 8 21
loading music 9 23
charging 10 25
battery care 11 27
specification 12 28
warranties 13 31
iii

introduction
Congratulations on your purchase of the XSports 2400/1. Read this document to
learn about the features of the XSports 2400/1, how to use its controls, and apply
it to your needs.
XSports 2400
The XSports 2400 is an advanced digital communications product, using leading
edge wireless and computer chips to provide you with enhanced audio quality.
Use your XSports 2400 to:
Communicate with up to 3 (programmable) stored users
Interface to long haul communications equipment
Experience clear sound quality
Full duplex communication
Enjoy privacy
XSports 2401
The XSports 2401 is an advanced digital communications product that allows the
user to connect with others or enjoy your own sounds.
Use your XSports 2401 to:
Communicate with up to 3 (programmable) stored users
Interface to long haul communications
Enjoy full duplex communication
Experience clear sound quality
Enjoy privacy
Listen to your sounds on the go
Load your sounds for listening on the go
1
12

Advanced Digital Signal Processing
Digital noise filtering
Noise cancellation
Low power consumption - extended operation time
Intrusion Protection rating - 67 (IP67)
MILSTD 810F
Virtual Networking
Interface to PMR Communications products
Software Upgrade capability
Audio Annunciation
Lightweight and Compact Design
Rugged construction
Removable belt clip
LED indication
Automatic reconnect
Large Push to Transmit Button
Plug and play accessories
Powered by Clarinox Blue
2 Users stored to caller memory
1 Preferred User
Critical single button control for function access
Remote PTT capability
features 2
34
*
**
If your application requires additional users, models can be software upgraded for up to 100 users
and 50 associations with the Push to Transmit button. If you feel your application has these sorts
of requirements please contact Phicom for further information and a quotation.

2
11
1
3
1 Power conrol
2 Volume control
3 Indicators
4 Connector
5 Function button
6 Plus Button
7 Minus Button
8 Play / Pause
9 Forward / Skip
10 Back / Skip
11 Push to transmit
Note - MP3, USB and MicroSD
not included in the XSports 2400 model
R
5
6
7
8
9
10
4
getting started
Power Control - 1
A single button press controls either power up or power down. On powering up
the unit will flash the red, amber and green LEDs in sequence, and then show a
solid amber LED indicating the unit is powering up. Once the unit has completely
powered up, there will be an audio tone and the Green LED will flash periodically.
Press the power control button again and the unit will turn off.
Volume Control - 2
Volume control is via the volume control button located on the top of the unit. The
volumecanbe either increasedordecreased by pressingtheplus or minussymbols.
When either symbol is pressed and held the volume will be either increased or
decreaseduntil thebutton is released.Single pressof theplus or minus will increase
or decrease the volume in a single step with each step in the volume a tone will be
heard.
Indicators - 3
There are three indicators, red, amber and green. These indicators communicate
the status of the battery charger when the unit is switched off and on charge. When
the unit is on, the indicators show status and mode of the unit.
Main Connector - 4
The main connector is the single access point to the product providing the following
functions:
Remote push to transmit in and out
Microphone input
Mono audio output (differential)
Stereo audio output (differential)
Charge input
USB 2 interface (when optioned)
Plus - 6
The plus button allows access to
special options when supported
with software. When the unit is
in programming mode this button
allows users to be stored to
memory.
3
Function - 5
The function button allows the user to enter and exit Bluetooth programming
mode.
56

Minus - 7
The minus button similar to the plus button allows acces to special features of the
unit. When the unit is in programming mode, this button allows users to remove a
caller from memory.
Play / Pause - 8
The Play / Pause button in standard mode allows the user to play or pause MP3
sounds.
Forward - 9
The Forward button in standard mode allows the user to skip to the next track or
advance through the current track playing. When given a single press the music is
advanced to the start of the next track. When pressed and held the unit is advanced
through the current or stored music until released.
Back - 10
The Back button in standard mode allows the user to skip back to the previous
track. When given a single press the music is advanced to the start of the current
track.
getting started - continued
Push to Transmit - 11
The push to transmit button allows, connect, disconnect, accept incoming call
waiting and return to MP3 mode.
78

press the power button ( )
press function ( ) - (Amber flashing)
press function ( ) for 1s - (Amber flashing)
click function twice ( ) - (Green flashing quickly)
press function ( ) - (Green flashing slowly- MP3 mode)
press ( ) (in programming mode - Green flashing)
press ( ) (while talking)
a single press on the (ptt)
two presses on the (ptt) button
press and hold the (ptt) button
double click the (ptt) button or remote PTT switch
at a glance
Using the XSports 2400 intuitive controls make it easy to talk to other XSports units,
disconnect or talk over long distances using the Phicom interface to professional
equipment. The controls of XSports 2401 allow all the functionality of the 2400 plus,
make it easy to play your sounds and audio books.
To
Do this
Turn the unit on or off
Enter programming mode - to search
Enter programming mode - searchable
Enter programming mode - delete user
Exit programming mode
To delete a caller
To store the other party unit ID
To connect to the first user
To connect to the second user
To connect to the third user (or radio)
To disconnect from any caller
4
910

After pressing the function button (5), the unit immediately enters programming mode
indicated by a flashing amber light.
Default Mode
Default mode allows the person to listen to their sounds, accept incoming calls, and call
others, and disconnect from calls, all with a the control of a single button (PTT or remote
PTT).
* The MP3 player mode is only available in the 2401 models onwards.
Modes
Modes of operation
There are two basic modes of operation. Standard mode, or default MP3* player or
programming mode. On power up the user will hear two tones indicating the unit
has powered up correctly, and the green LED will flash periodically. The unit powers
up in standard mode or default MP3 player mode for the XSports 2401 only. The
indicator lights show the current mode the unit is in.
Standard Mode
When the unit is in Standard mode the green indicator will flash periodically. This
mode allows the user MP3 functionality of the Play / Pause,Advance / Forward, and
back function keys. These keys control the MP3 player, and allow the user manage
the sounds they are listening to.
Programming Mode
To enter programming mode, press the function button. Programming mode is
indicated by a flashing amber light. In this mode the user can store other users to
memory, and be accepted by other users into their memory.
The programming of users into your memory or “telephone book” is done in concert
with others when programming XSport units IDs into memory.
5
11 12

The second unit, should at the same time as the first unit, enter programming mode
bypressing andholding the functionbutton for1s. Similarly,the amberlight willflash
on the second unit and a tone will sound in the headset when its in programming
mode.
Unit 2
p
If the user does not wish to accept the connection, they can simply disconnect by
clicking the push to transmit button twice.
Storing to different memory locations
A user may select where to store a caller ID by simply:
a) pressing once for the first memory location
b) press twice for the second memory location
c) press and hold for the remote radio or communications equipment
Step 1 - Press the function button for 1s to enter
programming mode - to be discovered.
The amber light will flash and a tone will sound in
the headset.
Step 2 - When the user has connected to the caller,
they can choose to save the caller ID to a memory
location. Pressing the plus button once will store
the caller to the first memory location.
Programming
The programming mode allows users to set up a virtual network to communicate
with peers and access long haul radio communication equipment, with a seemless
transition. It is the first truly wireless communications network giving users real
wireless access to a range of communication gateways, without the need for
infrastructure.
The important thing to remember about programming, is that two units must be
programmed at the same time. The programming method allows users to ensure
they are connected to the correct person, before allocating that person to a memory
location.
Programming mode
The programming mode allows the user to store 3 caller ID’s from other units.
Storing a single unit
Programming is performed between two units.
Unit 1 Step 1 - Enter Programming mode by pressing the
function button - to search.
The amber light will flash quickly and a tone will
sound in the headset. Once the units have been
connected, then the user can either program the
other caller ID to memory by pressing the plus key,
or disconnect from the call with a double click on
the PTT.
Step 2 - A single press of the plus button will store
the caller ID to the first memory location.
Alternatively if the other unit is not found then a
time - out tone will be heard.
6
13 14

connecting
Connecting
To connect (when not on a call) to a stored user or the remote communications
equipment do the following.
Asingle press of the ptt button to connect to the
first stored caller, the user will hear one beep
Two presses on the ptt button to connect to the
second stored caller, the user will hear two beeps
Asingle press and hold on the ptt to connect to
the communications equipment, the user will hear
a long beep
disconnecting
Disconnecting
To terminate a call with another user, double click on the Push to Transmit button or
the remote Push to Transmit button.
two clicks on the ptt
15 16
Either
Or
Or

Clearing users from memory
The units supports the removal of users from memory. To remove a user from a
memory location perform the following operation.
Clearing Users
17 18
Step 1 - Double click the function button
The gree light will flash quickly and a tone will
sound in the headset.
Step 2 - Press the minus:
i) once for the first location
ii) twice for the second location
iii) press and hold for the radio or third
location.
On removal of the ID in the memory location, a
tone will be heard in the headset.

ptt - operation
Push-to-Transmit disconnect
The Push-to-Transmit button is designed to provide quick access to a preferred
user and equipment, where the user may toggle between long haul radio equipment
or a prefered user, or disconnect from a call.
Using the ptt button on the unit or an external ptt button the user can:
disconnect from any current call
connect to a stored user
connect to remote communications equipment
return the unit to MP3 mode
connect directly from MP3 mode to a preferred user
connect directly from MP3 mode to communications equipment
accept in comming call
Disconnect from any call
A doulbe click on the push to transmit
Connect to a preferred user
A single press on the push to transmit (for the first stored user) or
two presses on the push to transmit button (for the second stored user)
Connect to communications equipment
A single press and hold
Return to MP3 mode
A double click to disconnect and return to MP3 mode.
Connect from MP3 mode to a user
A single ptt press for the first stored unit in memory
two presses on the push to transmit for the second stored unit in memory
Connect from MP3 mode to a remote radio
A single press and hold
Notification of Second Call Waiting
When a person is either listening to their sounds or on a call and someone is
attempting to connect to them, they will hear a beeping in the background. They
can stop the beeping by clicking the ptt twice, and continue talking, or disconnect
from their current call and then call the second call waiting.
To reject the call waiting - double click on the ptt - this will stop the beeping
To disconnect from the current call - double click on the ptt.
NOTE
To change callers or long haul communications equipment, the current call must be
disconnected before making another call.
7
19 20

XSports 2401
R
R
MP3 mode
To Do this
Play
Pause
Go to the next track
Go to previous track
press ( )
press ( )
press ( )
press ( )
8
21 22

loading music 9
23 24
With your XSports 2401 you can make your own background theme for what ever
you might be doing.
The XSports 2400 can be loaded with your own sounds by using your computer.
Simply connect your computer to the XSports 2401 using the USB cable.
When the XSports 2401 is connected, turn it on. The computer will recognise your
XSports 2401 as an external drive. Using the windows browser your will notice
there are two directories, one for data and one for music.
Using the windows copy and paste facilities to place your sounds into the XSports
music directory. You can create different directories for different artists and for
albums of that artist.
Once you have finished loading your songs and or data onto your XSports 2401,
you will need to close the windows browser and disconnect the external drive.
Failure to disconnect correctly may result in loss of data.

charging 10
25 26
When the unit is off and on charge the red and green indicators show the state of
the battery condition.
When the unit is charging, the red will be solid.
When the unit has fully charged, the green light will blink.
When the unit is on and connected to the charger, the indicators indicate the state /
mode of the unit.
The user may charge their XSports via the supplied charge plug pack or the USB
supplied with the XSports 2401.

battery care
With care, you can maximize the battery life (i.e. the time your battery will run before
it must be recharged) and lifespan of your XSports’s battery.
Your New XSports
Be sure to fully charge your XSports when you plug it in for the first time.
Standard Maintenance
For proper maintenance of a lithium-based battery, it’s important to keep the
electrons in it moving occasionally. Phicom does not recommend leaving your
XSports plugged in all the time for charging.
An ideal use would be a person who uses their XSports in their activity, after which
plugs it in to charge. This keeps the battery activity flowing.
Long Term Storage
Ifyoudon’tplanonusingyourXSportsformorethansixmonths,Phicomrecommends
that you charge your unit and then store.
11
27 28

N15472
Radiocommunications (low interference Poten-
tial Devices) Class License 2000 as amended
made under sections 132 and 135 of the Radio
Communications Act.
The product meets the European Union (EU) new directives on electrical and electronic equipment in
relation to its composition and the levels to which it should be recycled.
The product complies with the directive restricting the use of six hazardous substances in electrical and
electronic products and complies with the Waste Electrical and Electronic Equipment (WEEE) directive,
encouraging reuse and recycling.
Mechanical
Height 112mm
Width 25mm (max)
22mm (min)
Length 73mm
Weight 180g (typical)
200g (max)
Environmental
Charging battery 0 to +45 degress celsius
Discharging battery -20 to +60 degress celsius
Maximum humidity 100% condensing
Protection against dust 100%
Protection against immersion 15cm to 100cm (1 hour)
The unit meets MIL STD 810F
specification
Important Notes - Battery
The battery used in this product is a Lithium Ion cell. For health, safety and environmental
considerations, the following is to be observed.
The battery must NOT be - incinerated
- disposed of with household or industrial refuse
The battery should be - disposed of at an approved battery recycling centre
- returned to the manufacturer (please see the website for conditions of
return)
Electrical
Indicators
Charging - Red LED is on continuously
Fully charged - green LED flashes
Bluetooth mode - Amber LED flashes
Operation Time
Unit operation time (fully charged battery)
Unit shelf time before charge (off state) 4 months
Unit On - connected (talk time) 4 hours
Unit On - Talk time ratio 20% with 80% standby 8 hours
Audio Out Put
Audio standard out - differential 4 ohm 200mW Stereo / Mono
Audio with adapter - single ended 4 ohm / 8 ohm 100mW
12
29 30

Phicom Pty Ltd herein referred to as PHICOM reserves the right to make corrections, modifications,
enhancements, improvements, and other changes to its products and services at any time and to
discontinue any product or service without notice.
Except where mandated by Australian statutory requirements, all PHICOM’s standard warranty, testing
and other quality control techniques are used to the extent PHICOM deems necessary to support this
warranty.
PHICOM assumes no liability for applications assistance or customer support.
Customers are responsible for their products and applications using PHICOM products.
PHICOM products are not authorized for use in safety-critical applications, where a failure of the
PHICOM product could reasonably be expected to cause severe personal injury or death, unless agents
or representatives of the parties have executed an agreement specifically governing such use.
Further, Buyers must fully indemnify PHICOM and its representatives against any damages arising
out of the use of PHICOM products in such safety-critical applications. PHICOM products are neither
designed nor intended for use in military applications or environments unless the PHICOM products are
specifically designated by PHICOM as military-grade. Only products designated by PHICOM as military-
grade meet military specifications.
Buyers acknowledge and agree that any such use of PHICOM products which PHICOM has not
designated as military-grade is solely at the Buyer’s risk, and that they are solely responsible for
compliance with all legal and regulatory requirements in connection with such use.
warranties
Contact us:
Phicom Pty Ltd
83 Wood Street
Eaglehawk, Victoria 3556
Australia
Facsimile: + 61 3 5446 1215 web: http://www.phicom.com.au
13
31
This manual suits for next models
2
Table of contents