Philco PD 860 User manual

DISHWASHER
USER'S MANUAL
PD 860

Dear customer,
Thank you for buying a PHILCO brand product. So that your appliance serves you well, please read all
the instructions in this user's manual.

EN - 1
03/2011Copyright © 2011, Fast ČR, a. s.
CONTENTS
PART 1: BEFORE PUTTING INTO OPERATION................................................................................................. 2
• Important safety instructions.....................................................................................................................................................2
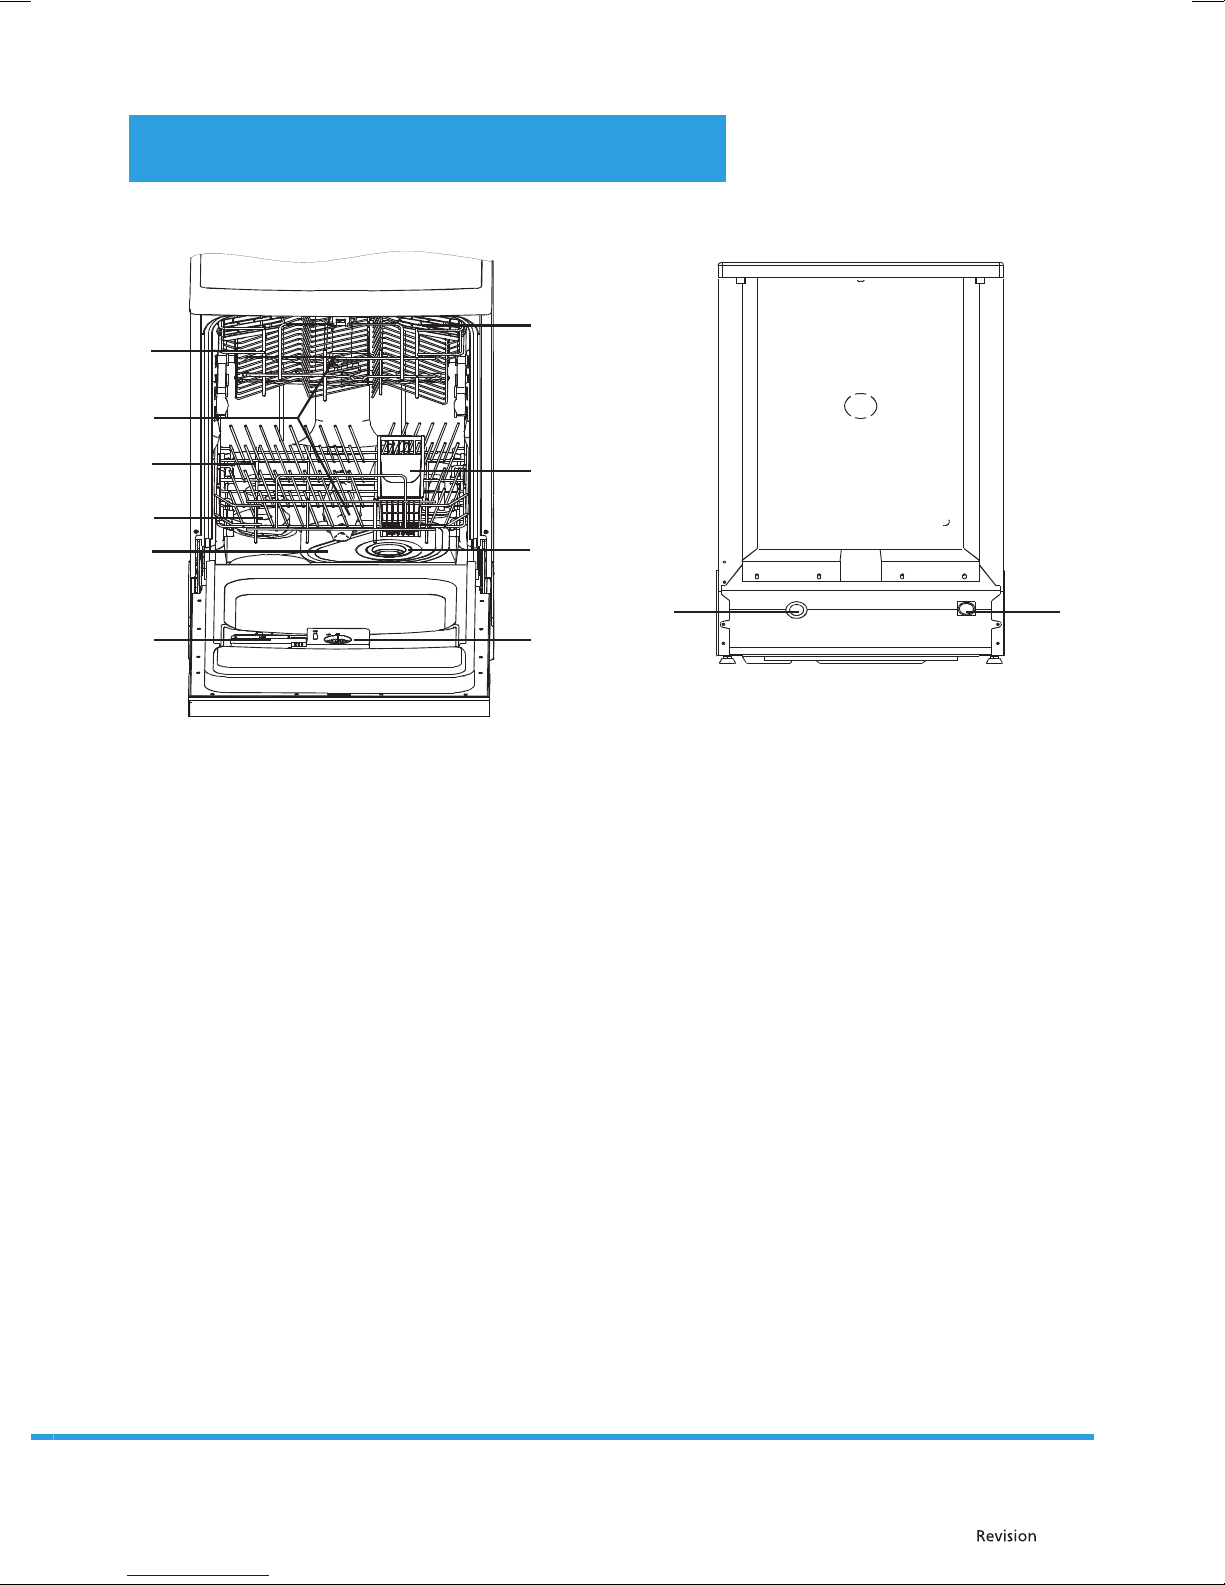
PART 2: DESCRIPTION OF THE PRODUCT....................................................................................................... 5
PART 3: INSTALLATION.................................................................................................................................... 6
• Unpacking.........................................................................................................................................................................................6
• Placement..........................................................................................................................................................................................6
• Electrical connection.....................................................................................................................................................................7
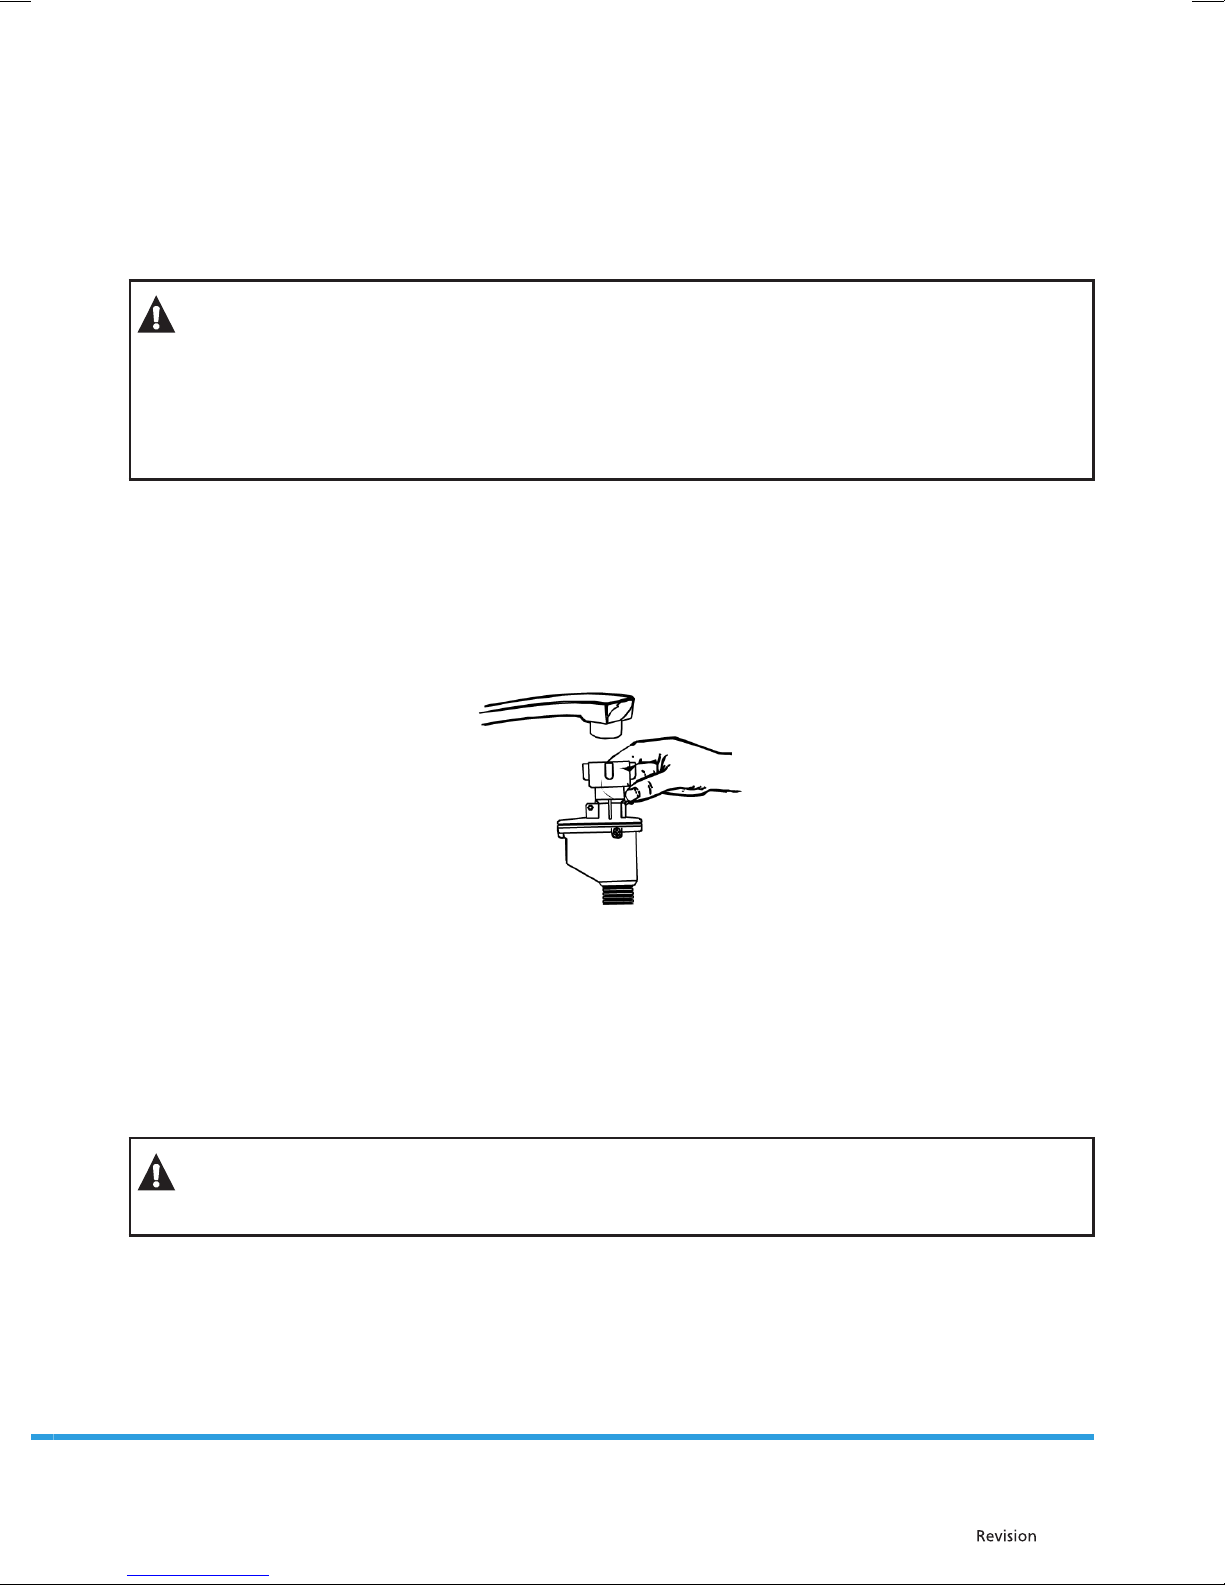
• Water supply.....................................................................................................................................................................................7
• Connecting the drain hose..........................................................................................................................................................8
PART 4: CONTROL PANEL .............................................................................................................................. 10
• Before rst use .............................................................................................................................................................................. 10
• Water softener .............................................................................................................................................................................. 10
• Adding salt into the salt container........................................................................................................................................ 12
• Adding rinsing aid....................................................................................................................................................................... 13
• Function of the detergent ........................................................................................................................................................ 15
• Dosage of the detergent........................................................................................................................................................... 16
PART 5: WASHING DISHES / CUTLERY .......................................................................................................... 18
• Filling the upper rack.................................................................................................................................................................. 19
• Filling the lower rack ..................................................................................................................................................................19
• Setting the upper rack ............................................................................................................................................................... 21
• Tilting down the tines in the lower rack..............................................................................................................................21
• Basket for cutlery ......................................................................................................................................................................... 22
• Turning on the appliance / starting a washing program .............................................................................................. 23
• Changing a program .................................................................................................................................................................. 24
PART 6: MAINTENANCE AND CLEANING...................................................................................................... 25
• Filtration system........................................................................................................................................................................... 25
• Installing the lter ....................................................................................................................................................................... 25
• Cleaning the lter........................................................................................................................................................................ 26
• Dishwasher care ........................................................................................................................................................................... 27
• Protection against frost............................................................................................................................................................. 27
PART 7: PREVENTION OF MINOR MALFUNCTIONS ..................................................................................... 29
• Error codes ..................................................................................................................................................................................... 31
PART 8: TECHNICAL SPECIFICATIONS........................................................................................................... 32

EN - 2
03/2011Copyright © 2011, Fast ČR, a. s.
PART 1: BEFORE PUTTING INTO OPERATION
Important safety instructions
• Read carefully and store for future use.
• The safety of this appliance complies with industry norms and meets legal appliance safety requirements.
However, as manufacturers, we consider it our duty to provide you with the following safety instructions.
• It is essential that you store this user's manual in a safe place so that you can use it in the future.
If you intend to sell the appliance, give it to another owner, or if you move, always make sure that the user's
manualisattachedtotheappliance,sothatthenewownercanndoutabouttheoperation of the appliance
and the relevant warnings.
• Before installation or operation of the appliance you MUST carefully read all the safety instructions and
the user's manual.
• Before putting the appliance into operation for the rst time, check that it has not been damaged during
transport.
• If the appliance is supplied in the winter months, when the temperature falls below 0°C, store the appliance
at room temperature for 24 hours before rst use.
• This dishwasher is designed for washing household dishwasher-safe dishes. Use the dishwasher only for
the purposes for which it was designed. The dishwasher is designed for a maximum of 8 sets of dishes!
• This appliance must not be used by any persons (including children) with mental disabilities, weak strength
or by inexperienced persons, unless they have been properly trained or schooled in the safe use of the
product,or unless they are properly supervised by a qualied person who is responsible for their safety.
• Children must be supervised to ensure that they do not play with the appliance.
Installation
• Check that the dishwasher has not been damaged during transport. Never connect a damaged appliance.
If the dishwasher is damaged, contact the supplier.
• It is necessary to remove all packaging from the dishwasher before it is used. Dispose of the packaging
materials in a proper manner. Do not allow children to play with the packaging material. There is a danger
of suocation!
• The electrical and plumbing installation necessary for the connection of this dishwasher may only be
performed by a person with relevant qualications.
• Maximum permitted water pressure is 1 Mpa. Minimum permitted water pressure is 0.04 Mpa.
• Connect the appliance to the water source using a new hose, do not use a used hose.
• The power cord must not be excessively or dangerously bent or pressed during the installation.
• For safety reasons, changing the technical parameters, or making any other modications to the appliance
is dangerous.
• Never use the dishwasher, if the electrical connection or the water hose are damaged, or if the control
panel, workbench or its support is damaged, when the inside of the appliance is freely accessible. Contact
a local service centre to avoid exposing yourself to possible dangers.
• You must not drill into any side of the dishwasher so that you do not damage the plumbing and electrical
components.
• Do not turn on your dishwasher until all covers are properly installed.
WARNING!
When using the dishwasher follow all the notices below.

EN - 3
03/2011Copyright © 2011, Fast ČR, a. s.
Grounding instructions
• This appliance must be grounded. In the event of a failure or malfunction the grounding will reduce the
risk of injury by electrical shock by ensuring a lower resistance to the electrical current. This appliance is
equipped with a power cord with a grounding conductor and power plug.
• You must connect the power plug into an appropriate power socket installed and grounded in accordance
with local laws and regulations.
WARNING!
• The incorrect connection of the grounding conductor may create a risk of injury by electrical
shock.
• If you have any doubts about the proper grounding of the appliance, ask a qualied electrician
or service technician for verication. Do not modify the power plug included with the
appliance, if it does not t into the power socket. Ask a qualied electrician to install a proper
power socket.
Correct use
• Before inserting dishes or kitchen utensils, check that they are suitable for washing in a dishwasher.
The manufacturer of the dishes or kitchen utensils will provide more details, or such information is
included in the attached documentation. Not adhering to this notice may lead to the damage of dishes or
kitchen utensils, or also the appliance. The warranty does not cover this kind of damage.
• Do not wash plastic items in the dishwasher unless they are marked by the manufacturer as dishwasher-
safe. For plastic items without such markings, follow the recommendations of the manufacturer.
• When using the dishwasher you should prevent the plastic items from coming into contact with the
heating element. (These instructions are intended only for dishwashers with freely accessible heating
elements.)
• Use only agents (detergents and rinsing aids, salt and polishing agents) designed to be used with
automatic dishwashers.
• Never use soap, washing or cleaning detergents designed for hand washing. Keep all these substances out
of the reach of children.
• Store all cleaning agents in a safe place. Keep children away from all washing and rinsing agents and at
a sucient distance from the open dishwasher door, because there could be remains of detergents inside.
• Do not use any solvents in the dishwasher. The could cause an explosion.
• Dishwasher detergents are very alkaline and their ingestion may be life threatening! Avoid contact with
the skin or eyes, because there is a danger of chemical burns of eyes or skin. Keep children at a sucient
distance from the dishwasher when the door is open. Follow the safety instructions of the dishwasher
detergent manufacturer.
• The water inside the dishwasher is not intended for drinking. It may contain remains of detergents.
• Place sharp items in such a way that they do not damage the door seal.
WARNING!
Knives and other utensils with sharp tines and blades must be placed inside the basket with tips
facing downwards or in a horizontal position.
• Ensure that the dishwasher door is always closed, except for the time when dishes are being inserted or
removed. This will prevent the danger of tripping over the door and subsequent injury. If the door is open,
do not allow children to come close to the dishwasher.

EN - 4
03/2011Copyright © 2011, Fast ČR, a. s.
WARNING!
Do not sit on the door or on the wire racks, do not stand on them or handle them with brute force.
Do not touch the heating elements during operation or immediately afterwards.
(These instructions are intended only for dishwashers with freely accessible heating elements.)
Do not place any heavy items on the door when it is open and do not stand on it. The appliance
could tip over.
• Open the dishwasher carefully during operation so that water does not spray out and so that you do not
get scalded by the escaping steam.
• Do not pull any dishes out of the dishwasher until the cycle is completed.
• After the completion of a washing cycle, check that the detergent compartment is empty.
• After using the dishwasher, disconnect it from the power source and turn o the water supply.
• Under no circumstances tamper with the control buttons.
Servicing, disposal
• If it is necessary to repair the appliance, contact an authorised service technician, who should use only
original spare parts.
• If the power cord is damaged it must be replaced by the manufacturer or the manufacturer's service
technician, to prevent injury to persons or damage to the appliance.
• Never attempt to repair the appliance yourself. Repairs carried out by inexperienced persons may lead to
injuries or serious damage to the appliance. Contact a local service centre. Always request original spare
parts.
• When taking an old dishwasher out of service or when disposing it, remove the dishwasher door. This
will prevent children or animals from closing themselves inside the dishwasher and prevent this life
threatening situation.

EN - 5
03/2011Copyright © 2011, Fast ČR, a. s.
PART 2: PRODUCT DESCRIPTION
1.
2.
3.
4.
5.
6.
7.
8.
9.
10.
11. 12.
View from the front View from the rear
1. Upper rack 7. Shelf for cups
2. Spraying arm 8. Cutlery basket
3. Lower rack 9. Coarse lter
4. Salt compartment 10. Rinsing aid compartment
5. Main lter 11. Drain hose connector
6. Dishwashing detergent compartment 12. Water supply hose connector

EN - 6
03/2011Copyright © 2011, Fast ČR, a. s.
PART 3: INSTALLATION
Unpacking
Remove the external packaging, remove the protective plastic lm from the surface of the appliance (if used)
and clean the external parts of the appliance with an agent designed for this purpose. Do not use steel wool or
any coarse agents, which could irreparably damage the surface of the appliance. Carefully remove all papers
and adhesive tape from the appliance, doors and other parts packed in polystyrene. Remove documents and
accessories from inside the appliance.
The packaging material is recyclable and is marked with a recycling symbol. For disposal follow the local
regulations. Packaging materials (plastic bags, polystyrene parts, etc.) must be kept out of the reach of children,
because they present a possible source of danger.
Carefully inspect the appliance. If you discover any faults, stop the installation and contact the vendor.
Placement
Place the appliance in the desired location. The dishwasher is equipped with a water supply hose and a drain
hose, which can be connected either on the right or left hand side of the dishwasher.
Levelling the appliance
After placing the dishwasher in its place it is not level, you can level it by using the levelling feet. Under no
circumstances should the dishwasher be tilted by more than 2°.
Connecting to a power source
WARNING!
For reason of personal safety:
Do not connect to an extension cord or a multi-plug socket.
Under no circumstances remove or cut away grounding from the power cord.
Power source demands
Information about the required voltage for the connection of the dishwasher to a suitable power source is
contained on the appliance's rating label. Use the required 10A fuse, the recommended delaying fuse or circuit
breaker and ensure that this appliance has its own independent electrical circuit.
Before use, check that the appliance is properly grounded.

EN - 7
03/2011Copyright © 2011, Fast ČR, a. s.
Electrical connection
Check that the voltage and frequency of the used power source correspond to the information on the
appliance's rating label. Insert the power plug only into a properly grounded power socket. If the socket to
which the appliance will be connected is not properly grounded, replace the socket rather than using adapters,
etc., which could lead to overheating or burning.
WARNING!
• The incorrect connection of the grounding conductor may create a risk of injury by electrical
shock.
• If you have any doubts about the proper grounding of the appliance, ask a qualied electrician
or service technician for verication.
• Do not modify the power plug supplied with the appliance. If the power plug does not correctly
t into your power socket, ask a qualied electrician to replace it.
Water supply
How to connect the water supply hose?
You must connect the dishwasher to a water supply using a new hose. Do not use perished, old or otherwise
damaged hoses. Water pressure must be in the range 0.04 MPa to 1 MPa. If the water pressure in your system is
lower, ask for advice from our service department.
• Pull out the hose fully from the storage area in the rear part of the dishwasher.
• Screw in the water supply hose to a tap with a 3/4" thread.
• Fully open the water supply before turning on the dishwasher.
Water supply hose
The water supply hose has double wall. The water lling system guarantees intervention by blocking the
water supply in the event that the water supply hose fails.
WARNING!
The hose connected to the water supply to the sink may break, if the sink is connected to the same
water system as the dishwasher. We recommend that you disconnect the hose and seal the opening.
How to disconnect the water supply hose?
• Shut o the water inlet.
• Reduce water pressure by pressing the reduce pressure button. This will reduce the water pressure and
prevent water from possibly squirting out into the room.
• Unscrew the water supply hose from the water tap.

EN - 8
03/2011Copyright © 2011, Fast ČR, a. s.
Cold water supply connection
Connect the water supply hose to the cold water inlet with a 3/4" thread and check that you have tightened
it properly. If the hoses are new or have not been used for a long time, ush them out with water, to be sure
that they are clean inside with all dirt removed. If you do not do this, you risk clogging up the water inlet and
damaging the appliance.
Hot water supply connection
You can also connect hot water to the dishwasher (supplied by the central system, heated by the heating
system), if the water temperature does not exceed 60 °C. This will shorten the washing cycle by 15 minutes and
the washing eciency will be slightly reduced.
The connection must be carried out in the same way as for the cold water.
WARNING!
To prevent water from staying in the hose, close the water inlet into the dishwasher.
(This does not apply to dishwashers with the aqua-stop function.)
Connecting the drain hose
Insert the drain hose into the waste water pipe with a minimum diameter of 4 cm or leave it
lying in the sink and ensure that it is not bent or dented. Use a special plastic bracket supplied
with the appliance. The hose must be at a height of 40 to 100 cm above the ground. The loose end of the hose
must not be submerged in water so that reverse water ow does not occur.
Hang the drain hose using one of the methods A, B, C.
Front part
NOTE:
The hose must be at
a height of 40 to 100
cm above the ground.
The loose end must
not be submerged in
water.
Drain hose
Sink
Ø 40 mm
MIN 400 mm
MAX 1000 mm
Hang the bracket directly next to the sink. Drain hose bracket
Draining water
• Connect the drain hose. The drain hose must be properly attached so that water does not leak. Check that
the hose is not knotted up or pinched.

EN - 9
03/2011Copyright © 2011, Fast ČR, a. s.
Extending the hose
• If you need to extend the drain hose, you must use the same type of drain hose.
• The hose must not be longer than 4 meters. Otherwise the eciency of the dishwasher would be reduced.
Connecting the drain hose
You must connect the drain hose at a height from 40 cm (minimum) to 100 cm (maximum) from the bottom
part of the appliance. Secure the drain hose using a clamp. The loose end must not be submerged in water.
Turning on the dishwasher
Before turning on the dishwasher, check the recommendation below.
• The dishwasher is levelled and properly seated.
• Is the inlet valve opened?
• Joints do not leak in the connection points.
• Cables are properly connected.
• Is the power source turned on?
• The water supply hose and the drain hose are not knotted up.
• You have removed all packaging material and all printed materials.

EN - 10
03/2011Copyright © 2011, Fast ČR, a. s.
PART 4: CONTROL PANEL
Control panel
2. 3. 4. 9.
1. 5. 6. 7. 8. 10.
1. Switch (ON/OFF): Turning on/o power to the appliance.
2. Power indicator light: It will turn on when the switch is pressed.
3. Rinsing aid warning indicator light: It will light up if rinsing aid needs to be relled.
4. Salt warning indicator light: It will light up if salt needs to be relled.
5. Delayed start indicator light: If you select the delayed start of washing, the respective indicator light will
light up.
6. Delayed start button: Press this button to select a delayed start of washing.
7. Door handle: Pull to open the door.
8. Program button: Press the button to select a desired program.
9. Program indicator: If you select a certain program, the respective indicator light will light up.
10. Start/Reset button: Press the button to start or stop the dishwasher, one of the six program indicator lights
will start to ash.
Before rst use
Before you put your dishwasher into operation:
a) set water softening;
b) pour ½ litre of water into the salt compartment and ll it up with salt;
c) ll the rinsing aid compartment;
d) ll the dishwashing detergent compartment.
Water softener
Water softening must be set manually using the water hardness dial.
The water softener is made so that it releases minerals and salts contained in water, which would have a
negative eect on the operation of the dishwasher. The higher the content of these minerals and salts, the
harder the water is.You should set the water softener according to the water hardness in your area. Information
about water hardness in your area should be provided by your water supply company.
Setting salt consumption
The dishwasher is designed to enable the adjustment of salt consumption on the basis of the hardness of the
water used. This should optimise and adapt the level of salt consumption.

EN - 11
03/2011Copyright © 2011, Fast ČR, a. s.
Adjust salt consumption according to the following steps.
• Unscrew the lid of the salt compartment.
• On the compartment there is a dial with an arrow (see illustration). If necessary turn the dial anticlockwise,
direction from the symbol "-" to "+" depending on the hardness of the water you are using.
We recommend to make these adjustments according to the following table:
Water hardness Position of the
dial
Salt
consumption
(g/cycle)
Automatic dosage
(cycles/1kg)
°dH °fH °Clarke mmol/l
0–8 0–14 0–10 0–1.4 / 0 /
8–22 14–39 10–28 1.4–3.9 - 20 50
22–45 39–80 28–56 3.9–8 Middle 40 25
45–60 80–107 56–75 8–11 + 60 16
NOTE:
1°dH=1.25°Clarke=1.78°fH=0.178 mmol/l
°DH: German measuring unit
°fH: French measuring unit
°Clark: British measuring unit
Note
"/" It is not necessary to add salt
"-" Set in the direction towards "-"
"+" Set in the direction towards "+"
"Middle" Set between "-" and "+"
You water supplier will provide you with information about the hardness of your water.
NOTE:
If your dishwasher does not have a water softening system, you can skip this chapter.
Water softener
Water hardness varies from place to place. If you use hard water in your dishwasher, then there will be particle
deposits on your dishes.
The appliance should be equipped with a special softener, which uses the salt compartment for salt specically
designed for eliminating scale and minerals from water.

EN - 12
03/2011Copyright © 2011, Fast ČR, a. s.
Adding salt into the salt container
Always use salt designed for dishwashers.
The salt compartment is located under the lower rack and you should rell it in the following manner.
NOTE
• Use only salt specically designed for use in dishwashers! Any other kind of salt, which is not
specically designed for use in dishwashers, particularly table salt, would damage the softener
system in the dishwasher. Damage caused by the use of inappropriate salt is not covered by
the manufacturer's guarantee and the manufacturer takes no responsibility for any damages
caused.
• Add the salt before starting one of the full washing cycle programs. This will prevent salt
crystals or salt water from lying at the bottom of the dishwasher, where this could lead to
corrosion.
Open
a) Slide out the lower rack and then unscrew the lid of the salt compartment - see pic. 1.
b) Before the rst wash, pour 1 litre of water into the salt compartment.
c) Place the funnel (included accessory) on the opening of the compartment and pour 1 kg of salt into it.
• It is normal for a smaller amount of water to run out of the compartment - see pic. 2.
d) After lling the compartment screw the lid back on by turning it in the clockwise direction.
e) The salt warning indicator light will turn o within 2 - 6 days after the salt compartment has been relled.
f) You should start a washing program immediately after the salt compartment has been relled (we
recommended the rinse or quick wash program). Otherwise the salt water could damage the ltration
system, pump and other important part of the dishwasher. This is not covered by the warranty.
NOTE
• Only rell the salt compartment when the salt warning indicator light on the control panel
lights up. Depending on how well the salt dissolves, the warning indicator light may stay on
even after the salt compartment has been relled.
• If there is no salt warning indicator light on the control panel (on some models), you can
estimate the amount after adding salt to the system by the number of cycles performed by the
dishwasher.
• If salt runs out anywhere, remove it by starting the rinse program or the quick wash program.

EN - 13
03/2011Copyright © 2011, Fast ČR, a. s.
Adding rinsing aid
Rinsing aid compartment
• The rinsing aid is released during the last rinse so that water drops do not remain on your dishes causing
stains. It also improves drying due to the fact that all the water ows o the dishes. Your dishwasher is
designed to only be used with a liquid rinsing aid. The rinsing aid compartment is located on the inside
wall of the door next to the dishwashing detergent compartment.
• Fill up the compartment by opening it and pouring in the rinsing aid until the indicator goes completely
dark. The capacity of the rinsing aid compartment is approximately 110 ml.
NOTE:
Use only branded dishwasher rinsing aids. Never pour other mixtures (such as liquid detergents, etc.)
into the rinsing aid compartment. Otherwise the dishwasher may be damaged.
When should the rinsing aid be relled?
If there is no rinsing aid warning indicator light on the control panel, you can estimate the amount based on
the colour of the optical indicator "C" located next to the lid. After lling the compartment with rinsing aid the
entire indicator is dark. As the rinsing aid is gradually used up the point of the indicator becomes smaller. Never
allow the amount of rinsing aid to fall below 1/4 of the compartment volume.
C (indicator of the rinsing aid)
As the rinsing aid is gradually used up the point of the indicator becomes smaller, as shown below.
Full
3/4
1/2
1/4 You should rell.
Empty

EN - 14
03/2011Copyright © 2011, Fast ČR, a. s.
1. Open the compartment by turning the lid in the direction of the arrow "open" (left) and taking it o.
2. Pour the rinsing aid into the compartment and take care not to overll it.
3. Place the lid back on and tighten it by turning it in the direction of the arrow "closed" (right).
NOTE
Wipe any spilled rinsing aid with a wiping cloth, so that excessive suds are not formed in the
following wash. Do not forget to put the lid back on before closing the dishwasher door.
Rinsing aid compartment
Setting dial
(rinse)
The rinsing aid compartment has four or six dierent settings (depending on the model). Always start with the
setting at "4". If stains form on the dishes or if there is a problem with drying the dishes, increase the released
amount of the rinsing aid by removing the lid and turning the dial to "5". If despite this step the dishes are not
without stains after drying, adjust the setting again to a higher level until the dishes are clean after drying. The
recommended setting is "4". (The value set by the manufacturer is "4".)
NOTE:
If there are water drops or scale stains on the dishes after the wash, increase the dosage. If there are
white stains or blueish layers on glasses or knife blades, lower the dosage.

EN - 15
03/2011Copyright © 2011, Fast ČR, a. s.
Function of the detergent
Dishwashing detergents with their chemical additives are essential for the removal of soils, their decomposition
and removal from the dishwasher. For this purpose the majority of commercial quality dishwashing detergents
are suitable.
Dishwashing detergents
There are 3 types of dishwashing detergents:
1. containing phosphates and chlorine;
2. containing phosphates and without chlorine;
3. without phosphates and without chlorine.
New dishwashing detergents usually do not contain phosphates and so the softening function of the
phosphates is missing. In such a case we recommended the use of a softening salt even when the water
hardness is a mere 6°dH. If you use dishwashing detergents without phosphates and have hard water, this
leads to the frequent appearance of white stains on dishes and glasses. In such a case you will therefore
achieve better results if you add more dishwashing detergent. Chlorine-free dishwashing detergents whiten
only slightly. For this reason strong and colourful stains will not be completely removed. In such a case select
a program with a higher temperature.
Concentrated dishwashing detergents
Based on their chemical composition dishwashing detergents are divided into two basic types:
• standard, alkaline dishwashing detergents with caustic additives;
• less alkaline dishwashing detergents with natural enzymes.
Using "standard" washing programs in combination with concentrated dishwashing detergents reduces
pollution and is appropriate for your dishes.These programs are specically improved with enzymes, which are
contained in concentrated dishwashing detergents, that can dissolve soils. For this reason you can achieve the
same results with concentrated dishwashing detergents using a "standard" washing program, as you would
achieve only with the use of an "intensive" program.
Dishwashing tablets
The dissolving speed of various brands of dishwashing tablets may dier. For this reason some tablets may not
dissolve during the short programs and therefore fail to perform their cleaning function. So when using tablets
use the long programs to ensure the removal of all dishwashing detergent remains.
Dishwashing detergent compartment
You must ll up the compartment before starting any washing cycle according to the instructions contained in
the dishwashing cycle table.Your dishwasher uses less dishwashing detergent and rinsing aid than an ordinary
dishwasher. Generally a single tablespoon of dishwashing detergent is sucient for a standard wash. For
more heavily soiled dishes you will need more dishwashing detergent. Always add the dishwashing detergent
immediately before starting the dishwasher, otherwise it could become damp and subsequently not dissolve
completely.

EN - 16
03/2011Copyright © 2011, Fast ČR, a. s.
Amount of used dishwashing detergent
Press to open
NOTE
• If the lid is closed, press the button. The lid will open.
• Always add the dishwashing detergent immediately before starting each washing cycle.
• Use only branded dishwashing detergents designed for dishwashers.
WARNING!
The dishwashing detergent is corrosive! Keep it out of children's reach.
Using the dishwashing detergent
Use only dishwashing detergent specically designed for use in dishwashers. Store the dishwashing detergent
in a dark and dry place.
Do not put dishwashing detergent powder into the compartment unless you intend to start the dishwasher.
Dosage of the dishwashing detergent
Fill the dishwashing detergent compartment.
The mark shows the dosage - see picture.
A. The mark "MIN" in the main wash detergent compartment corresponds to approximately 20g of
dishwashing detergent.
B. The pre-wash detergent compartment will take approximately 5g of dishwashing detergent.

EN - 17
03/2011Copyright © 2011, Fast ČR, a. s.
Follow the recommended dosages and storage indicated by the manufacturer on the packaging of the
dishwashing detergent.
Close the lid and press it down until it clicks in.
If the dishes are heavily soiled, also add dishwashing detergent into the pre-wash compartment. This dose will
be used during the pre-wash phase of the wash.
NOTE:
You can nd the information about dishwashing detergent dosages in the washing program table.
Keep in mind that the results may dier depending on the degree of soiling and hardness of the water
used.
Follow the manufacturer's recommendations on the dishwashing detergent package.

EN - 18
03/2011Copyright © 2011, Fast ČR, a. s.
PART 5: WASHING DISHES / CUTLERY
Recommendation
• Purchase dishes designated as dishwasher safe.
• Use a gentle dishwashing detergent marked as "gentle on dishes". If necessary seek out further information
from the dishwashing detergent manufacturer.
• For certain types of dishes select a lower temperature.
• To prevent possible damage, remove glassware and cutlery from the dishwasher as soon as possible after
the end of the wash.
Unsuitable are:
• cutlery with wooden, bone or mother-of-pearl handles;
• plastic parts that are not heat resistant;
• older cutlery with glued parts that are not heat resistant;
• glued cutlery or dishes;
• tin or copper dishes;
• crystal glassware;
• metal parts susceptible to corrosion;
• wooden cutting boards;
• dishes made from synthetic bres.
Partially suitable are:
• some types of glass, which may corrode after several washes;
• silver and aluminium cookware, which may become discoloured by the wash;
• glazed patterns, which may fade if washed frequently.
NOTE:
Your dishwasher will achieve the best performance if you follow these instructions for inserting dishes
into the racks.
The function and appearance of the racks and the cutlery basket may dier depending on the model
of the dishwasher.
First remove remaining or burned on foods. It is not necessary to wash dishes under running water.
Insert the dishes into the dishwasher as follows.
• Items such as cups, glasses, pots / pans, etc., should be placed bottom up.
• Curved cookware and cookware with projections should be placed at an angle to allow water to freely
ow out.
• Place dishes safely so that they cannot tip over.
• Place dishes in such a way that the spraying arms can rotate freely during the wash.
NOTE:
Do not wash very small pieces in the dishwasher because they can easily fall out of the rack.
• Hollow cookware, e.g. cups, glasses, pans, etc. should be placed bottom up so that water does not
accumulate inside them during the wash.
Table of contents
Languages:
Other Philco Dishwasher manuals

Philco
Philco PD 1046 ET User manual

Philco
Philco PD 1062 BiS User manual

Philco
Philco PD 1070 User manual

Philco
Philco PD 1142 X User manual

Philco
Philco PD 1273 BiT User manual

Philco
Philco PDI 1568 DTBIS User manual

Philco
Philco PD 1261 User manual

Philco
Philco PD 1070 User manual

Philco
Philco PDT 671 User manual

Philco
Philco 204276237 User manual

Philco
Philco PD 1466 DBIT User manual

Philco
Philco PDA 1482 BiT User manual

Philco
Philco PD 114 XE User manual

Philco
Philco PD 125 IQ User manual

Philco
Philco PDP 4 WH User manual

Philco
Philco PD 1261 BiB User manual

Philco
Philco PDA 870 User manual

Philco
Philco PDA 1281 User manual

Philco
Philco PD 1266 EA User manual

Philco
Philco PDT 67 DF User manual