Philco PHAO 1000 User manual

PHAO 1000
User's Manual
Návod k obsluze
Návod na obsluhu
Instrukcja obsługi
Használati útmutató


Copyright © 2020, Fast ČR, a. s. Revision 05/2021
1
EN
Dear customer,
thank you for buying a PHILCO brand product. So that your appliance serves you well, please read all the instructions
in this user‘s manual.
PHAO 1000
AIR FRYER
User's Manual

Copyright © 2020, Fast ČR, a. s. Revision 05/2021
2
EN
Important information for your safety is specially marked. It is essential to comply with these instructions
in order to avoid accidents and prevent damage to the appliance:
WARNING:
This warns you of dangers to your health and indicates possible injury risks.
CAUTION:
This refers to possible hazards to the appliance or other objects.
NOTE:
This highlights tips and information.
CONTENTS
PART 1: GENERAL NOTES.......................................................................................................................................................................... 3
PART 2: SPECIAL SAFETY PRECAUTIONS FOR THIS APPLIANCE..................................................................................... 4
PART 3: SCOPE OF DELIVERY.................................................................................................................................................................. 7
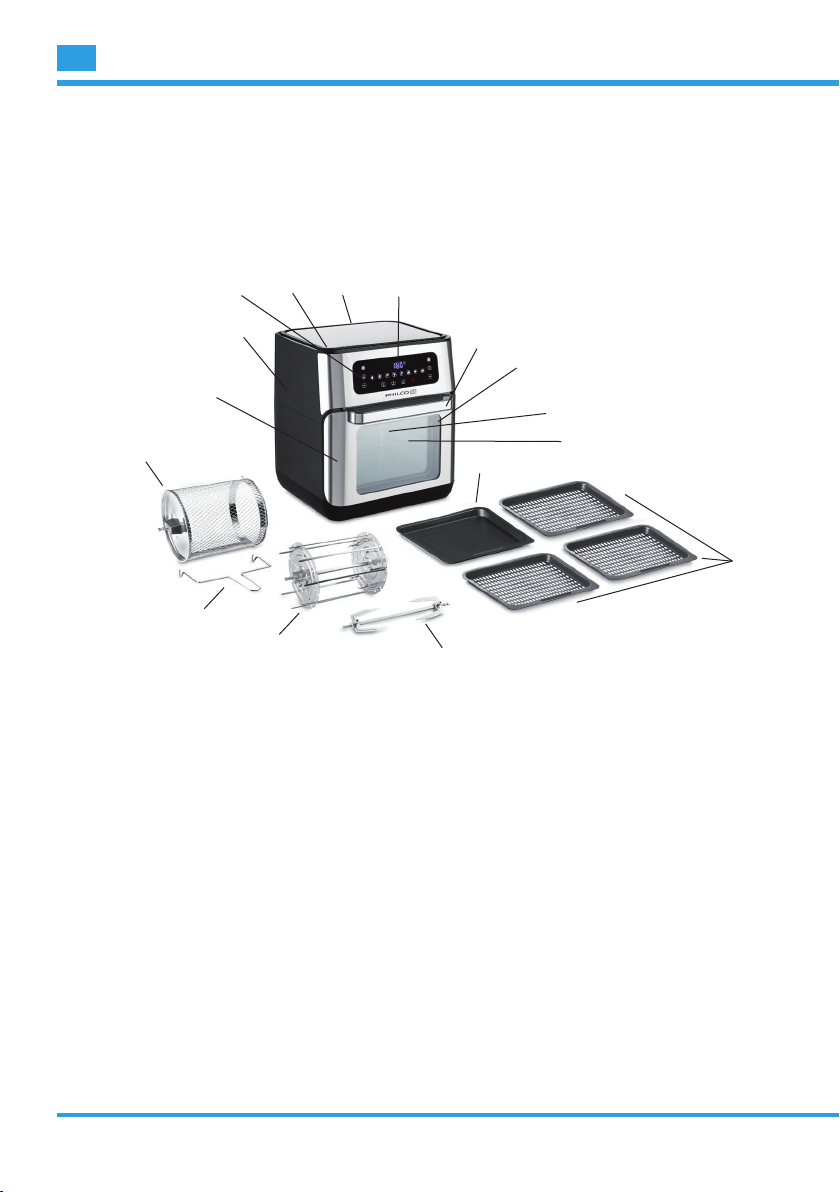
PART 4: OVERVIEW OF THE COMPONENTS.................................................................................................................................. 8
PART 5: CONTROL PANEL ......................................................................................................................................................................... 9
PART 6: NOTES FOR USE..........................................................................................................................................................................10
PART 7: FUNCTION BUTTONS .............................................................................................................................................................12
PART 8: PREPARATION...............................................................................................................................................................................14
PART 9: USING THE APPLIANCE..........................................................................................................................................................16
PART 10: CLEANING....................................................................................................................................................................................17
PART 11: TROUBLESHOOTING.............................................................................................................................................................18
PART 12: TECHNICAL DATA....................................................................................................................................................................19

Copyright © 2020, Fast ČR, a. s. Revision 05/2021
3
EN
PART 1: GENERAL NOTES
Read the operating instructions carefully before
putting the appliance into operation and keep the
instructions including the warranty, the receipt and, if
possible, the box with the internal packing. If you give
this appliance to other people, please also pass on the
operating instructions.
• The appliance is designed exclusively for private
use and for the envisaged purpose. This appliance
is not fit for commercial use.
• Donotuseitoutdoors.Keepitawayfromsourcesof
heat, direct sunlight, humidity (never dip it into any
liquid) and sharp edges. Do not use the appliance
with wet hands. If the appliance is humid or wet,
unplug it immediately.
• Whencleaningorputtingitaway,switchothe
appliance and always pull out the plug from the
socket (pull the plug itself, not the lead) if the
appliance is not being used and remove the
attached accessories.

Copyright © 2020, Fast ČR, a. s. Revision 05/2021
4
EN
• Donotoperatetheappliancewithoutsupervision.
If you leave the room you should always turn the
applianceo.Removetheplugfromthesocket.
• The appliance and the mains lead have to be
checked regularly for signs of damage. If damage
is found the appliance must not be used.
• Useonlyoriginalspareparts.
• Inordertoensureyourchildren’ssafety,pleasekeep
all packaging (plastic bags, boxes, polystyrene etc.)
out of their reach.
WARNING:
Do not allow small children to play with the plastic foil.
Thereisadangerofsuocation!
PART 2: SPECIAL SAFETY PRECAUTIONS FOR THIS
APPLIANCE
You will find the following symbol with warning
character on the appliance:

Copyright © 2020, Fast ČR, a. s. Revision 05/2021
5
EN
WARNING: Hot surface!
Danger of burns!
During operation and afterwards, the temperature of
the accessible surfaces will be very high.
• Therefore, only touch the appliance at the door
handle as well as the control panel. If necessary,
use oven gloves.
• Duringoperation,hotsteammayescapefromthe
airoutletopening.Keepasucientdistance.
• Donotcovertheairinletopeningandairoutlet
opening,inordertoensuresucientaircirculation.
• Keepsucientdistance(15cm)tohighlyammable
objectssuchasfurniture,curtains,etc.!
• Duetorisingheatandvapoursdonotplacethe
appliance under wall cupboards.
• Do not operate the appliance with an external
timer or separate remote control system.
• Donottamperwiththesafetyswitch.
• Thisappliancecanbeusedbychildrenagedfrom
8 years and above and persons with reduced
physical, sensory or mental capabilities or lack
of experience and knowledge if they have been

Copyright © 2020, Fast ČR, a. s. Revision 05/2021
6
EN
given supervision or instruction concerning use
of the appliance in a safe way and understand the
hazards involved.
• Childrenshallnotplaywiththeappliance.
• Cleaningandusermaintenanceshallnotbemade
by children unless they are older 8 years and
supervised.
• Keep the appliance and its cord out of reach of
children less than 8 years.
• Do not repair the appliance by yourself. Always
contact an authorized technician. If the supply
cord is damaged, it must be replaced by the
manufacturer, its service agent or similarly qualified
persons in order to avoid a hazard.
CAUTION:
This appliance is not intended to be immersed in water
during cleaning. Please observe the instructions that
we have included for you in the chapter“Cleaning”.

Copyright © 2020, Fast ČR, a. s. Revision 05/2021
7
EN
PART 3: SCOPE OF DELIVERY
1x Hot air fryer
1x Frying drum with lid
1x Picking tool
1x Discs with 8 toasting needles
1x Grill
3x Grid plate
1x Baking / drip tray

Copyright © 2020, Fast ČR, a. s. Revision 05/2021
8
EN
PART 4: OVERVIEW OF THE COMPONENTS
11
12 14 13
15
16
132
4
5
6
7
10
8
9
1 Air inlet opening
2 Display
3 Air outlet opening
4 Housing
5 Door
6 Door handle
7 Release
8 Guide rail
9 Mount for the rotisserie / frying basket
10 Control panel
11 Frying drum
12 Picking tool
13 Grill with fastening clips
14 Discs with needles
15 Grid baking tray
16 Baking / drip tray

Copyright © 2020, Fast ČR, a. s. Revision 05/2021
9
EN
PART 5: CONTROL PANEL
19 Buttons for program selection
20
and
buttons for the time setting (
)
21
button(Switchingtheapplianceon/o)
22
button (Add rotisserie)
23
button (Warm up food)
24
button (Turn on the lighting)
25
and
buttons for the temperature setting (
)

Copyright © 2020, Fast ČR, a. s. Revision 05/2021
10
EN
PART 6: NOTES FOR USE
Location
• Settheapplianceontoanon-slip,level,andheat-resistantsurface.
• Takecarethattheapplianceandthemainscableneverareplacedontohotsurfacesornearheat
sources (e. g. range, hob).
Connected Wattage
The total power consumption of this appliance can be up to 1500 W. With this connected load a
separate supply line protected by a 16 A household circuit breaker is recommended.
CAUTION: Overload!
• Ifyouuseextensionleads,theseshouldhaveacablecross-sectionofatleast1.5mm².
CAUTION: Overload!
• Donotuseanymultiplesockets,asthisapplianceistoopowerful.
Electric Connection
1. Before inserting the power plug into the outlet, check that the mains voltage to be used matches
that of the appliance. You can find the required information on the nameplate.
2. Connect the appliance to a properly installed earthed socket. You will hear a beep sound and all
symbolslightupbriey.The
button lights red.
Standby (Standby Mode)
NOTE: The appliance is in standby, if the
button lights red.
When faced with the following situations, the appliance will switch into standby:
• Whenthepowerplugisinserted.
• Ifnobuttonispressedforapprox.60seconds.
• Whenthetimehaselapsed.
• Whenyoupressandholdthe
button for approx. 3 seconds.
You exit the standby mode by pressing the
button. All symbols light up and the
buttonashes
red.
Switching the Appliance On / O
Turntheapplianceonandobyusingthe
button.
NOTE: Operation is only possible when the door is closed.

Copyright © 2020, Fast ČR, a. s. Revision 05/2021
11
EN
Before Initial Use
• Thereisaprotectivelayerontheheatingelement.Toremovethis,operatetheapplianceforabout
10 minutes without any contents.
• WARNING:
Allowtheappliancetocooldownbeforeyoucleanit!
- Disconnectthemainsplugfromthewallsocket.
- Wipetheinsideoftheapplianceandcleantheaccessoriesbeforeusingtheappliance.
Useful Hints for Use
• Asafetyswitchpreventstheuseoftheappliancewhenthedoorisnotclosed.Thelightingofthe
control panel goes out.
• Donotoverllthebasket.Alwaysmakesurethefoodhasenoughspaceinthebaskettogetthe
best results.
• Inordertoachievecrispyresults,youcanbastethefoodwithalittleoil.
• Allfoodscanbepreparedintheappliance,whicharealsosuitablefortheoven.
• Frozenmealsorliquidfoodssuchassoupscanbepreparedinappropriatecontainers.
• Notethatthedoughexpandsduringbakingofcakes,breadorsimilar.Nothingmustcomeinto
contact with the heating element.
• Pourwateronhomemadepotatoproductsaftercuttingatleast30minutestoreducethepotato
starch. Then dry the potato pieces with paper.
• Thecookingtimedependsonseveralfactors:Size,condition,quantityoffoodandsettemperature.
For standard values, see“Function Buttons”“Auto functions”.
• Ifyoudonotpreheatthehotairfryer,add3minutestothecookingtime.
• Frysteaks/largerquantitiesofmeatinapanpreviouslybeforeleavingtocookinthehotairfryer.
Time and temperature are dependent on the desired degree of doneness.

Copyright © 2020, Fast ČR, a. s. Revision 05/2021
12
EN
PART 7: FUNCTION BUTTONS
NOTE:
• Thebuttonsontheappliancearetouchkeys.Gentlytouchthebuttonswithangertoexecutethe
function. Whenever a button is pressed, it will be confirmed by a beep sound.
• Ifyoukeepthe
or
buttons pressed, fast mode will start.
Auto Functions
Select your desired automatic program on the control panel. The set program can be identified by the
ashingoftherespectivebutton.
Button Mode Pre-set temperature in °C Pre-set time in min.
French fries 200 15
Pizza 175 25
Bread 165 15
Meat 180 15
Fish 175 30
Drying 40 120
Poultry 190 30
Cakes 160 30
NOTE:
• These shall be considered as guide values. Depending on the size and weight, the time and
temperature may be longer and higher or shorter and lower.
• Youmay,however,changethepre-settemperatureandtimeoftheautofunctions.
• Ifyouwouldliketoselectanotherprogramafterstartingaprogram,rstpressthe
button.

Copyright © 2020, Fast ČR, a. s. Revision 05/2021
13
EN
Change of Temperature and Time
The
and
buttons are available twice each on the appliance.
• Usethe
or
buttons above and below the
symboltosetthetemperature.(Inallprograms-
exceptDrying-80°Cto200°C,Drying:40°Cto80°C)
• Usethe
or
buttons above and below the
symbol to set the cooking time. (In all programs
-exceptDrying-1to90minutes,Drying:1to24hours)
NOTE: The display shows alternately the remaining running time and the set temperature.
Turn On the Lighting
Use the
buttontoswitchthelightingintheinterioroftheapplianceonando.Afterapprox.2
minutes,thelightingswitchesoautomatically.Inaddition,thelightsgoonwhen
the door is opened.
Lighting on =
buttonashes
Lightingo=
button lights continuously
Warm Up Food
Use the
button to warm up food. The
button ashes once you have presses it. The preset
temperatureis115°Candthetime6minutes.
Add Rotisserie
Use the
buttontoswitchtherotisserieonando.Youneedthisonefortherotisserieaswellasthe
frying basket.
Rotisserie on =
buttonashes
Rotisserieo=
button lights continuously

Copyright © 2020, Fast ČR, a. s. Revision 05/2021
14
EN
PART 8: PREPARATION
Using the frying drum
1. Open the door.
2. Slide the grease drip tray onto the bottom of the hot air deep fryer.
3. Hold the frying drum by the black plastic surfaces. Open the lid of the frying drum by turning it in
the direction of
. The
symbol must be exactly above the detent. Remove the lid.
4. Fill the drum with the desired food.
5. Close the lid. Place the lid in such a way that the
symbol is above the detent. Tighten the lid in
the direction of
.
6. Lift the frying drum with the removal tool onto the guide rails. Hold the release button (7) in the
direction of the arrow and slide the drum toward the end of the rail. Unhand the release. The frying
drum must snap into place.
Using the grill with fastening clips
NOTE: Do not select a roast which is too large. The food being grilled must be far enough away from
the internal walls and the heating elements and must not touch them.
1. Open the door.
2. Slide the grease drip tray onto the bottom of the hot air deep fryer.
3. Rub edible oil on to the revolving spit and spit forks.
4. Poultry has to be dressed before grilling. To do so, tie the wings and the legs closely to the body
using kitchen yarn.
5. Place the dressed poultry or the piece of roast meat carefully on to the revolving spit. Push the spit
forks on to the revolving spit and use them to fix the roast meat in place.Tighten the fixing clips by
means of the screws.
6. Lifttheready-maderotisseriewiththeremovaltoolontotheguiderails.Holdthereleasebutton
(7) in the direction of the arrow and slide the basket toward the end of the rail. Unhand the release.
The rotisserie must snap into place.

Copyright © 2020, Fast ČR, a. s. Revision 05/2021
15
EN
Using the grill, fastening discs and needles
1. Open the door.
2. Slide the grease drip tray onto the bottom of the hot air deep fryer.
3. Stuthespitsatwill.
4. Slide the fixing discs onto the rotisserie. Pay attention to the inscription L (left) and R (right) on the
inside of the discs as well as to the recesses for the screws on the rotisserie spit. Tighten the fixing
discs with the screws.
5. Insertthestuedspitsintothexingdiscs.Refertotheadjacentgure.Placethespitwiththe
curved side in a notch of a fixing disc. Insert the end of the spit into the opposite hole of the other
fixing disc. Hook the curved side of the spit into the hole under the notch.
6. Lifttheready-maderotisseriewiththeremovaltoolontotheguiderails.Holdthereleasebutton
(7) in the direction of the arrow and slide the basket toward the end of the rail. Unhand the release.
The rotisserie must snap into place.
Using the grid plate and the drip tray
1. Open the door.
2. Slidethebakingtrayand/ortheslide-ingridsintothesliderails.

Copyright © 2020, Fast ČR, a. s. Revision 05/2021
16
EN
PART 9: USING THE APPLIANCE
1. Close the door.
2. Press the
buttontoexitstandbymode.Youwillseethepresetsetting200°Cand15minutes.
3. Select an automatic program and, if necessary, change the cooking time and the temperature with
the
or
buttons.
4. If you use the frying drum or the rotisserie, additionally press the
button to add the rotisserie.
5. Press the
button to start the cooking process.
Pause Operation
• Pressthe
button to pause the operation. The
buttonisashing.Pressthe
button again to
resume the operation. The
button is continuously lit again.
• However,theoperationwillbeinterruptedwhenyouopenthedoor.Closethedoortoresume
operation.
NOTE: The appliance will start from the spot it has been paused.
End of Operation
NOTE: When the cooking time has elapsed, the fan continues to run to cool down the appliance. OFF
ashesinthedisplay.Afterapprox.20seconds,3beepswillsoundandOFF disappears on the display.
The appliance is again in standby mode.
WARNING: Danger of burns!
• Hotsteamcanescape!
• Useovengloves!
1. Open the door.
2. If you have used the frying drum or the rotisserie spit, remove it with the removal tool. To do
this, unlock the frying drum or the rotisserie spit using the unlocking mechanism (7) and remove it.
If you have used the baking sheet or the slide-in grids, pull them out.
3. Placetheaccessoriesonlyonheat-resistantsurface!
4. Close the door.

Copyright © 2020, Fast ČR, a. s. Revision 05/2021
17
EN
PART 10: CLEANING
WARNING:
• Always turn the appliance o before cleaning it and remove the mains plug. Wait until the
appliance has cooled down.
• Donotimmersetheapplianceinwater!Doingsomayresultinanelectricshockorre.
CAUTION:
• Donotuseanywirebrushorotherabrasiveobjects.
• Donotuseanyacidicorabrasivedetergents.
Accessories
The accessories can be cleaned in a warm rinse bath.
Housing
Clean the appliance inside and outside with a slightly moist, not a wet cloth.
Storage
• Cleantheapplianceasdescribed.Lettheaccessoriesdrycompletely.
• Werecommendthatyoustoretheapplianceinitsoriginalpackagingwhenitisnottobeusedfor
a longer period.
• Alwaysstoretheapplianceatawellventilatedanddryplaceoutsidethereachofchildren.

Copyright © 2020, Fast ČR, a. s. Revision 05/2021
18
EN
PART 11: TROUBLESHOOTING
If a problem occurs, it is often only a small thing. Before you contact our service, please note the
following information:
Problem Possible Cause Remedy
The appliance is not
working.
The appliance has no power
supply.
Check the socket with another
appliance.
Plug in the mains plug correctly.
Check the main circuit breaker.
The door is not closed properly. Close the door until it audibly snaps
into place.
The appliance is defective. Contact our service or a repair
centre.
The lighting in the interior
does not light up anymore. The lighting is defect.
The food is not cooked to
the end.
The drum is too full. Reduce the amount of food. Smaller
quantities are cooked evenly.
The temperature is set too low. Set a higher temperature.
The cooking time is set too low. Set a longer period of time.
The food is not crisp.
Foods are used, which is only
suitable for a conventional
fryer.
Useoven-readyfoodorsprinkleit
with a little oil.
Smoke comes out of the
appliance.
You are preparing very fatty
foods.
Fat splashes inside the appliance
may cause the emission of fumes.
Provide adequate ventilation.
On the baking sheet / fat drip
tray are still fat residues from
previous use.
Clean the baking sheet / fat drip tray
after each use as described in the
chapter“Cleaning”.
Table of contents
Languages:
Other Philco Fryer manuals
Popular Fryer manuals by other brands

TEFAL
TEFAL FAMILY OLEOCLEAN - ANNEXE 504 manual

PowerXL
PowerXL COMBO 12-in-1 owner's manual

Angelo Po
Angelo Po 04WFR3ED Use and installation manual

BOB-HOME
BOB-HOME BISTRO VITAL DELUXE manual

Market Forge Industries
Market Forge Industries DFFG-50 owner's manual

Frymaster
Frymaster Pro H55-Series Installation and operation manual